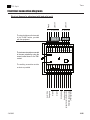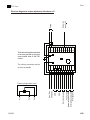
1
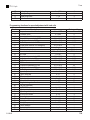
.IETNAG. T-one Tension control trough load cells or dancer roll USER’S MANUAL Re S.p.A. T-one Contents Warnings ......................................................................................................................................... 1 Intended use of the device ............................................................................................................ 2 Instrument functioning .................................................................................................................. 3 Programming.................................................................................................................................. 5 Programming functions for torque adjustment with load cells.................................................................5 Programming functions for torque adjustment with dancer roll ...............................................................6 Programming functions for speed adjustment with load cells .................................................................7 Quick start-up ................................................................................................................................ 8 Installation ...............................................................................................................................................8 Adjustment mode ....................................................................................................................................8 Calibration functions for torque adjustment with load cells - (F. 30 = 0) ...............................................8 Calibration functions for torque adjustment with dancer roll - (F. 30 = 1) ..............................................10 Calibration functions for speed adjustment with load cells - (F. 30 = 2) ................................................10 Electrical connection diagrams .................................................................................................... 12 Electrical diagram for adjustment with load cells in mV ..........................................................................12 Electrical diagram for adjustment with load cells in mA (EVO) ...............................................................13 Electrical diagram for torque adjustment with dancer roll .......................................................................14 Instrument inputs /outputs description ....................................................................................... 15 Power supply ..........................................................................................................................................15 Load cells in mV......................................................................................................................................15 Load cells in mA......................................................................................................................................15 Digital inputs ...........................................................................................................................................16 Alarms .....................................................................................................................................................16 Analog input ............................................................................................................................................16 Analog output proportional to the tension or dancer roll piston control ...................................................17 PID regulation analog output ..................................................................................................................17 Detailed description of the programming functions .................................................................. 18 Function 1 – Torque when machine is stationary ...............................................................................................18 Function 2 – Air in the dancer roll piston ............................................................................................................18 Function 3 – Password check ............................................................................................................................18 Function 4 – Accessing the calibration ...............................................................................................................18 Function 5 – Proportional parameter in AUTO ...................................................................................................18 Function 6 – Integral parameter in AUTO ..........................................................................................................18 Function 7 – Derived parameter in AUTO ..........................................................................................................19 Function 8 – Torque when machine is in emergency .........................................................................................19 Function 9 – Type of alarm.................................................................................................................................19 Function 10 – First alarm threshold ...................................................................................................................19 Function 11 – Second alarm threshold...............................................................................................................20 Function 12 – ACC time .....................................................................................................................................20 Function 13 – Proportional parameter in ACC ...................................................................................................20 Function 14 – Integral parameter in ACC ...........................................................................................................20 Function 15 – Derivative parameter in ACC .......................................................................................................20 Function 16 – DEC time .....................................................................................................................................20 Function 17 – Proportional parameter in DEC ...................................................................................................21 Function 18 – Integral parameter in DEC ..........................................................................................................21 Function 19 – Derivative parameter in DEC ......................................................................................................21 Function 30 – Type of adjustment ......................................................................................................................21 I Re S.p.A. T-one Function 31 – Type of load cells.........................................................................................................................21 Function 32 – Cell zero calibration .....................................................................................................................22 Function 33 – Decimal point ..............................................................................................................................22 Function 34 – Full scale of the tension ..............................................................................................................22 Function 35 – Weight for the gain calibration .....................................................................................................22 Function 36 – Cell gain calibration .....................................................................................................................22 Function 37 – Enabling the remote set point .....................................................................................................23 Function 38 – Calibrating the minimum value of set point .................................................................................23 Function 39 – Calibrating the maximum value of set point ................................................................................23 Function 45 – Calibrating the minimum value of dancer roll ..............................................................................23 Function 46 – Calibrating the maximum value of dancer roll .............................................................................23 Function 55 – AUTO/STOP speed .....................................................................................................................24 Function 56 – Adjustment inversion ...................................................................................................................24 Function 70 – Type of regulated output..............................................................................................................24 Function 71 – AUTO/STOP control ....................................................................................................................24 Function 72 – Alarm display ...............................................................................................................................24 Function 73 – Display filter .................................................................................................................................25 Function 74 – Analog input filter .........................................................................................................................25 Function 75 – Setting the password ...................................................................................................................25 Function 76 – Factory settings ...........................................................................................................................25 Function 77 – Display brightness .......................................................................................................................25 Function 78 – Firmware version .........................................................................................................................25 Technical specifications................................................................................................................ 26 Analog section ........................................................................................................................................26 Digital section..........................................................................................................................................26 Others characteristics .............................................................................................................................26 Mechanical dimensions................................................................................................................. 27 Guarantees ..................................................................................................................................... 28 II Re S.p.A. T-one Warnings The present manual is for device fitters and operators. It provides indications on the intended use of the device, technical specifications and instructions for installation, adjustment and use. This manual is an integral part of the device and must be kept until the device is decommissioned. It reflects the technical state of the device at the time of its sale. The plant builder may include the present manual in the documentation for plant use. Re S.p.A. reserves the right to update its production and/or manuals without updating products already sold and previous manuals. Since the device forms part of a plant, the plant builder is responsible for ensuring that all parts comply with the laws in force in the country in which it is installed. The device must be fitted and adjusted by qualified technical personnel. It may be moved manually. Information about device recovery The device bears a clear, visible and indelible indication allowing identification of the manufacturer and the separate collection symbol (symbol on side). This symbol, showing a wheelie bin with a cross through it, unequivocally indicates that the device was released after 13.08.2005 and that it must be subject to separate collection. - In European Union member states The device falls within the electrical and electronic equipment category, which must be disposed of not amongst undifferentiated urban waste, but through separate collection. Therefore, at the end of the device’s lifetime, it must be disposed of in conformity with the European standards adopted in the member state in which it was installed. WEEE (Waste Electrical and Electronic Equipment) may be intended for individual, collective or mixed collection and recovery systems at designated centres (for more information contact the relevant local authorities) or may be returned to the distributor when a new item of equipment is purchased. This eliminates or reduces potentially negative effects on the environment deriving from improper use of the equipment or parts of it. For correct waste management, the relevant authorities promote the reduction of final waste disposal by means of re-use, recycling and other forms of recovery to obtain raw materials from waste. In the event of illegal disposal of WEEE, offenders will be punished in accordance with the sanctions established by the member state in which it was installed. - In non-EU countries Si deve provvedere al recupero ed allo smaltimento finale del dispositivo in conformità alle norme vigenti nel Paese di installazione. Può essere opportuno tenere conto dell’informativa già specificata per i Paesi membri dell’Unione europea. 31/08/06 1/28 Re S.p.A. T-one Intended use of the device The T-one tension regulating system has been designed to be integrated, embedded, within an industrial plant. The instrument features a front panel to control the adjustment parameters and to program and calibrate the instrument itself. The T-one automatic regulation system allows the tension adjustment to be carried out by using: load cells with output in mV or mA; a dancer roll, as indirect tension sensor. The operator can set three different adjustment modes: tension adjustment in torque with load cells: the regulation can be carried out on unwinders or rewinders by using respectively brakes or clutches; tension adjustment in torque with dancer roll: the regulation can be carried out on unwinders or rewinders by using respectively brakes or clutches; tension adjustment in speed with load cells: the regulation can be carried out by providing the speed signal to a motor. The T-one regulator acquires from the load cells the resultant of the forces applied by the material on the measuring roller or the dancer roll position signal and, on the basis of an initial calibration (see the calibration procedure, pp. 20-23), compares it with the tension value or desired position (set point); a P.I.D. algorithm calculates the measured error. If the instrument carries out a tension adjustment in torque with load cells, the P.I.D. algorithm modifies the analog output directly so that the material tension assumes the desired value. The set point can be modified by providing a suitably calibrated analog reference (see calibration procedure, pp. 20-23). If the instrument carries out a tension adjustment in torque with dancer roll, the P.I.D. algorithm modifies the analog output directly so that the dancer roll remains stable in the same position and therefore, indirectly, that the material tension assumes the desired value. If the instrument carries out a tension adjustment in speed with load cells, the P.I.D. algorithm acts on the machine line speed. The instrument provides the speed signal corrected by the P.I.D. in output in order for the material tension to assume the desired value. The device is not suitable to work outside, in corrosive explosive or highly dusty environments. 31/08/06 2/28 Re S.p.A. T-one Instrument functioning States led Display Bar graphs display General information The front panel features a seven-segments led display with four numbers and two bar graphs displays to display all the regulation parameters. The keypad allows access to the device programming and calibration. The state led provides information on the instrument functioning state. Display Outside the programming environment, the display shows the tension, displayed in Kg, detected by the load cells or the dancer roll position expressed as a percentage of total stroke. Use the set key (see § Keypad on page 3) to display the desired tension or position value (set point). If the instrument is in “speed adjustment” mode, keep the up key pressed to display the machine line speed. In programming, use the enter key, to display the programming functions or the values of the associated parameters. Bar graphs display The front panel features two bar graphs displays: Display IN: displays the tension percentage, in respect of full-scale, detected by the load cells or the percentage of air in the dancer piston (see Function 2 page 17). Display OUT: displays the signal percentage on the regulated output. 31/08/06 3/28 Re S.p.A. T-one States led Every instrument functioning state is represented by a combination of on or blinking state leds: auto led on ⇔ regulator in AUTO state (machine running) auto led blinking ⇔ regulator in ACC state (machine in acceleration ramp) stop led on ⇔ regulator in STOP state (machine stopped) stop led blinking ⇔ regulator in DEC state (machine in deceleration ramp) stop and auto leds on ⇔ regulator in EMERG state (machine in emergency) zero led on ⇔ regulator in ZERO state (brake release) prog led on or blinking ⇔ instrument in PROGRAMMING cust led ⇔ not used Keypad The keypad functions are described below. KEY FUNCTION Pressing the auto/stop key switches the instrument from the STOP state to the AUTO state and vice versa. (For the remote management of the AUTO/STOP states see Function 38 page 22). Out of programming: − when using the load cells for the adjustment, pressing the set key switches the display from the material tension to the tension set point and vice versa; − when using the dancer roll for the adjustment, pressing the set key switches the display from the dancer roll position to the position set point and vice versa. If the display shows the tension or position set point its value can be modified by using the up and down keys. In programming (prog led blinking): keeping the set key pressed displays the material tension or the dancer roll position. Pressing the zero key switches the instrument from the STOP state to the ZERO state and vice versa. The ZERO state is only applied if the device is in the STOP state. (The ZERO state can be activated from the panel also when other remote controls are active) Keep the enter key pressed for around a second to access the programming environment. In programming, pressing the enter key switches the instrument display from the general function (prog led blinking) to the relative parameter (prog led on). Out of programming: in “speed adjustment” mode, pressing the up key displays the line speed. In programming: pressing the up key increases the function number (prog led blinking) or increases the associated parameter value (prog led on). In programming, pressing the down key decreases the function number (prog led blinking) or decreases the associated parameter value (prog led on). 31/08/06 4/28 Re S.p.A. T-one Programming The following is a summary of the device programming functions available. For a more detailed description, consult § Detailed description of programming functions on page 17. To enter the programming environment keep pressed the enter key for about one second: the display shows F. 1. To scroll the programming function menu use the up and down keys. To edit function parameters: ▪ select the desired function number; ▪ press the enter key: the display shows the value set in the function; ▪ press up and down keys and set the desired value; ▪ press enter to confirm. To exit the programming environment select function 1 and press the down key or select function 78 and press the up key. Programming functions for torque adjustment with load cells Function 1 3 4 5 6 7 8 9 10 11 12 13 14 15 16 17 18 19 30 31 32 33 34 35 31/08/06 Description Torque when machine is stationary Password check Accessing the calibration Proportional parameter in AUTO Integral parameter in AUTO Derivative parameter in AUTO Torque when machine is in emergency Type of alarm First alarm threshold Second alarm threshold ACC time Proportional parameters in ACC Integral parameter in ACC Derivative parameter in ACC DEC time Proportional parameter in DEC Integral parameter in DEC Derivative parameter in DEC Type of adjustment Type of load cells Cell zero calibration Decimal point Full scale of the tension Weight for the gain calibration Value range 0.0→100.0 0→1000 * 0.0→100.0 0.00→10.00 0.00→10.00 0.0→100.0 0→1 0→F11 F10→Full scale 0→120 0.0→100.0 0.00→10.00 0.00→10.00 0→120 0.0→100.0 0.00→10.00 0.00→10.00 0→2 0→1 * 0→3 0→9999 0→FS Factory setting 10.0 0 * 2.0 1.00 0.00 60.0 0 Full scale Full scale 0 2.5 0.80 0.05 0 2.5 0.80 0.05 0 0 * 0 50 20 5/28 Re S.p.A. 36 37 38 39 70 71 72 73 74 75 76 77 78 T-one Cell gain calibration Enabling the remote set point Calibrating the minimum value of set point Calibrating the maximum value of set point Type of regulated output AUTO/STOP control Alarm display Display filter Analog input filter Setting the password Factory settings Display brightness Firmware version * 0→1 * * 0→1 0→1 0→1 0→100 0→100 0→1000 * 1→6 * * 0 * * 0 1 0 80 30 0 * 4 * Programming functions for torque adjustment with dancer roll Function 1 2 3 4 5 6 7 8 9 10 11 12 13 14 15 16 17 18 19 30 45 46 70 71 72 73 31/08/06 Description Torque when machine is stationary Air in the dancer roll piston Password check Accessing the calibration Proportional parameter in AUTO Integral parameter in AUTO Derivative parameter in AUTO Torque when machine is in emergency Type of alarm First alarm threshold Second alarm threshold ACC time Proportional parameter in ACC Integral parameter in ACC Derivative parameter in ACC DEC time Proportional parameter in DEC Integral parameter in DEC Derivative parameter in DEC Type of adjustment Calibrating the minimum value of dancer roll Calibrating the maximum value of dancer roll Type of regulated output AUTO/STOP control Alarm display Display filter Value range 0.0→100.0 0.0→100.0 0→1000 * 0.0→100.0 0.00→10.00 0.00→10.00 0.0→100.0 0→1 0→100 0→100 0→120 0.0→100.0 0.00→10.00 0.00→10.00 0→120 0.0→100.0 0.00→10.00 0.00→10.00 0→2 * * 0→1 0→1 0→1 0→100 Factory setting 10.0 0 0 * 2.0 3.00 2.00 60.0 1 10 90 0 2.5 3.00 2.5 0 5.0 0.40 3.00 1 * * 0 1 0 80 6/28 Re S.p.A. 75 76 77 78 T-one Setting the password Factory settings Display brightness Firmware version 0→1000 * 1→6 * 0 * 4 * Programming functions for speed adjustment with load cells Function 1 3 4 5 6 7 8 9 10 11 12 13 14 15 16 17 18 19 30 31 32 33 34 35 36 55 56 70 71 72 73 74 75 76 77 78 31/08/06 Description Torque when machine is stationary Password check Accessing the calibration Proportional parameter in AUTO Integral parameter in AUTO Derivative parameter in AUTO Torque when machine is in emergency Type of alarm First alarm threshold Second alarm threshold ACC time Proportional parameter in ACC Integral parameter in ACC Derivative parameter in ACC DEC time Proportional parameter in DEC Integral parameter in DEC Derivative parameter in DEC Type of adjustment Type of load cells Cell zero calibration Decimal point Full scale of the tension Weight for the gain calibration Cell gain calibration AUTO/STOP speed Adjustment inversion Type of regulated output AUTO/STOP control Alarm display Display filter Analog input filter Setting the password Factory settings Display brightness Firmware version Value range 0.0→100.0 0→1000 * 0.0→100.0 0.00→10.00 0.00→10.00 0.0→100.0 0→1 0→F11 F10→Full Scale 0→120 0.0→100.0 0.00→10.00 0.00→10.00 0→120 0.0→100.0 0.00→10.00 0.00→10.00 0→2 0→1 * 0→3 0→9999 0→FS * 0→100 0→1 0→1 0→2 0→1 0→100 0→100 0→1000 * 1→6 * Factory setting 0 0 * 2.0 1.00 0.00 0 0 Full Scale Full Scale 0 2.5 0.80 0.05 0 2.5 0.80 0.05 2 0 * 0 50 20 * 2 0 0 2 0 80 30 0 * 4 * 7/28 Re S.p.A. T-one Quick start-up This section describes the installation and test procedures that must be carried out if you wish to set the instrument up quickly. It also includes the wiring diagrams and informations about instrument inputs and outputs . A more detailed description of how each function works is given in § Detailed description of programming functions (page 17). Installation 1. 2. 3. Fit the T-one regulator. Make the electrical connections as illustrated in § Electrical connection diagrams (pages. 11-13). Connect the instrument to a power supply. Adjustment mode 4. 5. 6. 7. Press the enter key and keep pressed for about one second, to enter the programming environment; the display shows F. 1. Use the up key to select function 4. Press the enter key: the word “CAL” flashes on the display for a few seconds; then, the calibration functions needed for the quick start-up of the instrument are given in sequence. The display shows F. 30: this functions allows to set the adjustment mode; press enter to display the function value set; using up and down keys select 0 to have the tension adjustment in torque with load cells, 1 to have the tension adjustment in torque tension with dancer roll or 2 to have the tension adjustment in speed with load cells; press enter to confirm and up to move onto the next function. Attention! The following steps depend on the adjustment mode selected. Note: During calibration the instrument can not perform the states switch, neither by frontal nor by remote. Calibration functions for torque adjustment with load cells - (F. 30 = 0) F. 31 appears on the display: use this function to set the type of load cells; press enter and the function value set is displayed; using the up or down keys set the value to 0 if you use load cells in mV as sensors of tension or 1 if you use load cells in mA; press enter to confirm and up to move onto the next function. 9. F. 32 appears on the display; make sure that the roller on which the cells are applied (measuring roller) is free of any load whatsoever; press enter and a counting will start; when the counting stops, the word “YES” flashes on the display for a few seconds if the calibration was successful, otherwise the word “BAD” flashes (in this case see the note on page 21); then function 32 is displayed again; press up to move onto the next function. 8. 31/08/06 8/28 Re S.p.A. T-one 10. F. 33 appears on the display: use this function to set the position of the decimal point in the tension displaying; press enter and the function value set is displayed; using the up or down keys set the value to 0 to have not the decimal point (0000), 1 to have one digit after the decimal point (000.0) or 2 to have two digits after the decimal points (00.00); press enter to confirm and up to move onto the next function. 11. F. 34 appears on the display: use this function to set the full scale of the cells; press enter and the function value set is displayed; using the up or down keys set the value, in kg, to the sum of the full scales of the cells, equivalent to the nominal values of the cells; press enter to confirm and up to move onto the next function. 12. F. 35 appears on the display; load a known weight on a cable following what will be the path of the material as illustrated in the diagram on page 21; press enter and the function value set is displayed; using the up or down keys set the weight (in kg) of the load applied to the cable; press enter to confirm and up to move onto the next function and perform the gain calibration. 13. F. 36 appears on the display; press enter to perform the gain: the word “YES” flashes on the display for a few seconds if the gain calibration was successful, otherwise the word “BAD” flashes (in this case see the note on page 22); then function 36 is displayed again; press up to move onto the next function. 14. F. 37 appears on the display: use this function to set the tension set point control; press enter and the function value set is displayed; using the up or down keys set the value to 0 to control the set point through the keyboard or 1 to control it by analog input; press enter to confirm; if the remote set point is enabled (F. 37 = 1), press the up key to move onto the function 38 and then onto the function 39 to perform the analog reference calibration; if the remote set point is not enabled (F. 37 = 0), press the up key to move onto the function 70. 15. F. 38 appears on the display; adjust the analog input so that it supplies the minimum voltage to the instrument (e.g. 0V); press enter: the word “YES” flashes on the display for a few seconds; then function 38 is displayed again; press up to move onto the next function. 16. F. 39 appears on the display; adjust the analog input so that it supplies the maximum voltage to the instrument (e.g. 10V); press enter: the word “YES” flashes on the display for a few seconds; then function 39 is displayed again; press up to move onto the next function. 17. F. 70 appears on the display: use this function to set the type of output to control the brake/clutch; press enter and the function value set is displayed; using the up and down keys set the value to 0 if you wish to use a 0÷10V output or 1 for a 4÷20mA output; press enter to confirm and up to move onto the next function. 18. F. 71 appears on the display: use this function to set the control of AUTO/STOP states; press enter and the function value set is displayed; using the up and down keys set the value to 0 if you wish to control the states by the instrument frontal panel or 1 if you wish to control them by the AUTO/STOP digital input; press enter to confirm and up to exit the programming environment. 31/08/06 9/28 Re S.p.A. T-one Calibration functions for torque adjustment with dancer roll - (F. 30 = 1) 8. F. 45 appears on the display; place the dancer roll so that its output (dancer roll analog input) assumes the minimum value (e.g. 0V); press enter: the word “YES” flashes on the display for a few seconds; then function 45 is displayed again; press up to move onto the next function. 9. F. 46 appears on the display; place the dancer roll so that its output (dancer roll analog input) assumes the maximum value (e.g. 10V); press enter: the word “YES” flashes on the display for a few seconds; then function 46 is displayed again; press up to move onto the next function. 10. F. 70 appears on the display: use this function to set the type of output to control the brake/clutch; press enter and the function value set is displayed; using the up and down keys set the value to 0 if you wish to use a 0÷10V output or 1 for a 4÷20mA output; press enter to confirm and up to move onto the next function. 11. F. 71 appears on the display: use this function to set the control of AUTO/STOP states; press enter and the function value set is displayed; using the up and down keys set the value to 0 if you wish to control the states by the instrument frontal panel or 1 if you wish to control them by the AUTO/STOP digital input; press enter to confirm and up to exit the programming environment. Calibration functions for speed adjustment with load cells - (F. 30 = 2) F. 31 appears on the display: use this function to set the type of load cells; press enter and the function value set is displayed; using the up or down keys set the value to 0 if you use mV load cells as sensors of tension or 1 for mA load cells; press enter to confirm and up to move onto the next function. 9. F. 32 appears on the display; make sure that the roller on which the cells are applied (measuring roller) is free of any load whatsoever; press enter and a counting will start; when the counting stops, the word “YES” flashes on the display for a few seconds if the calibration was successful, otherwise the word “BAD” flashes (in this case see the note on page 21); then function 32 is displayed again; press up to move onto the next function. 10. F. 33 appears on the display: use this function to set the position of the decimal point during the tension displaying; press enter and the function value set is displayed; using the up or down keys set the value to 0 to have not the decimal point (0000), 1 to have one digit after the decimal point (000.0) or 2 to have two digits after the decimal points (00.00); press enter to confirm and up to move onto the next function. 11. F. 34 appears on the display: use this function to set the full scale of the cells; press enter and the function value set is displayed; 8. 31/08/06 10/28 Re S.p.A. T-one using the up or down keys set the value, in kg, to the sum of the full scales of the cells, equivalent to the nominal values of the cells; press enter to confirm and up to move onto the next function. 12. F. 35 appears on the display; load a known weight on a cable following what will be the path of the material as illustrated in the diagram on page 21; press enter and the function value set is displayed; using the up or down keys set the weight (in kg) of the load applied to the cable; press enter to confirm and up to move onto the next function and perform the gain calibration. 13. F. 36 appears on the display; press enter to perform the gain: the word “YES” flashes on the display for a few seconds if the gain calibration was successful, otherwise the word “BAD” flashes (in this case see the note on page 22); then function 36 is displayed again; press up to move onto the next function. 14. F. 55 appears on the display: use this function if the function 71 is set to the states control on the basis of the machine speed (option 2); press enter and the function value set is displayed; using the up and down keys to select the speed percentage in correspondance of which you want the switch from the AUTO/STOP states and vice versa (STOP/AUTO); press enter to confirm and up to move onto the next function. 15. F. 56 appears on the display: use this function to invert the direction of adjustment; press enter and the function value set is displayed; using the up and down keys set the value to 0 if the load cells are upstream of the draft gear or 1 if they are downstream of the draft gear; press enter to confirm and up to move onto the next function. 16. F. 70 appears on the display: use this function to set the type of output to control the motor; press enter and the function value set is displayed; using the up and down keys set the value to 0 if you wish to use a 0÷10V output or 1 for a 4÷20mA output; press enter to confirm and up to move onto the next function. 17. F. 71 appears on the display: use this function to set the control of AUTO/STOP states; press enter and the function value set is displayed; using the up and down keys set the value to 0 if you wish to control the states by the instrument frontal panel, 1 if you wish to control them by the digital input or 2 if you wish to control them on the basis of the machine speed; (the speed of the switching from AUTO state to STOP state and vice versa (STOP/AUTO) is set in function 55); press enter to confirm and up to exit the programming environment. 31/08/06 11/28 Re S.p.A. T-one Electrical connection diagrams Load cell Load cell Supply Electrical diagram for adjustment with load cells in mV + - A B C D A B C D NC NC The signal cables must be inserted in the CLAMP ferrites, provided with the equipment 1 2 3 4 5 6 7 8 9 10 11 12 The instrument must be connected to the zero potential by using the screw located close to the CN1 contact 13 14 15 16 17 18 19 20 21 22 23 24 31/08/06 - + - + Selectable analog output (PID regulation) Analog input Alarm 1 Alarm 0 Auto / Stop Emergency - + Analog output (proportional to the tension) The earthing connection must be as short as possible 12/28 Re S.p.A. T-one Supply Load cell Load cell Electrical diagram for adjustment with load cells in mA (EVO) + - B E A B E A NC NC NC NC The signal cables must be inserted in the CLAMP ferrites, provided with the equipment 1 2 3 4 5 6 7 8 9 10 11 12 The instrument must be connected to the zero potential by using the screw located close to the CN1 contact 31/08/06 - + - + - + Analog input Analog output (proportional to the tension) Selectable analog output (PID regulation) Alarm 1 Alarm 0 13 14 15 16 17 18 19 20 21 22 23 24 Auto / Stop Emergency The earthing connection must be as short as possible 13/28 Re S.p.A. T-one Supply Dancer roll supply ~ 9V Electrical diagram for torque adjustment with dancer roll The instrument must be connected to the zero potential by using the screw located close to the CN1 contact The earthing connection must be as short as possible NC NC NC NC NC NC NC NC NC + - 1 2 3 4 5 6 7 8 9 10 11 12 13 14 15 16 17 18 19 20 21 22 23 24 31/08/06 - + - + - + Dancer analog input Analog output (dancer roll piston control) Selectable analog output (PID regulation) Alarm 1 Alarm 0 Auto / Stop Emergency Pin 20 Pin 19 Pin 8 Dancer roll equivalent circuit 14/28 Re S.p.A. T-one Instrument inputs /outputs description Power supply Pin 1 ( + ); Pin 2 ( - ) The instrument must be supplied with a continuous voltage of 24Vdc. Load cells in mV Carry out this connection only if F. 30 = 0 or F. 30 = 2 (adjustment with load cells) and if F. 31 = 0 (cells in mV). For the connection of load cells with 0÷20mV output, refer to § Electrical diagram for adjustment with load cells in mV, page 11. The following table sets out the correspondence between the connector contacts of the load cell in mV and the regulator pins. mV cell connector A B C D Regulator pin 3 or 8 4 or 9 5 or 10 6 or 11 Load cells in mA Carry out this connection only if F. 30 = 0 or F. 30 = 2 (adjustment with load cells) and if F. 31 = 1 (cells in mA). For the connection of load cells with 4÷20mA output, refer to § Electrical diagram for adjustment with load cells in mA (EVO), page 12. The following table sets out the correspondence between the connector contacts of the load cell in mA and the regulator pins. mA cell connector A B E 31/08/06 Regulator pin 7 or 12 4 or 9 5 or 10 15/28 Re S.p.A. T-one Digital inputs AUTO/STOP Pin 13 This input is active if F. 71 = 1. If it’s in the “HIGH” logic state (+24Vdc) the device switches to the AUTO state, otherwise it is in the STOP state. EMERGENCY Pin 14 If it’s in the “HIGH” logic state (+24Vdc) the device switches to the EMERG state, supplying the constant output voltage set in function 8. The EMERG state has priority over all the other states. Alarms Alarm 0 Pin 15; Pin 16 Relay output to warn of a first alarm threshold being exceeded. A luminous/acoustic warning or a digital input of any control device can be connected to it (e.g. PLC). Alarm 1 Pin 17; Pin18 Relay output to warn of a second alarm threshold being exceeded. A luminous/acoustic warning or a digital input of any control device can be connected to it (e.g. PLC). Analog input Pin 20 ( + ); Pin 19 ( - ) The input signal must be 0÷10, with ∆V>3V. Remote set point This input is active with remote set point function if F. 30 = 0 and F. 37 = 1. It accepts an analog reference proportional to the tension desired for the material; a potentiometer (manual setting) or a digital output of any control device can be connected to it (e.g. PLC). If you use a potentiometer (manual setting) the potentiometer supply tension is provided by Pin 8 (9V). Dancer roll This input is active with dancer roll function if F. 30 = 1. It accepts an analog signal proportional to the dancer roll position. The dancer roll position sensor output is connected to it. 31/08/06 16/28 Re S.p.A. T-one Line speed This input is active with line speed function if F. 30 = 2. It accepts an analog reference proportional to the machine line speed. A dynamo output or an analog encoder output that detects the machine MASTER motor rotation speed is connected to it. Analog output proportional to the tension or dancer roll piston control Pin 22 ( + ); Pin 21 ( - ) The output signal is the following type: 0÷10V. Proportional to the tension This output is active proportionally to the tension if F. 30 = 0 or F. 30 = 2. It provides an analog reference which can be used to display on a remote display the tension detected on the material. Dancer roll piston control This output is active with dancer roll piston control function if F. 30 = 1. It provides a command analog reference for a dancer roll; the analog input of the transducer that controls the dancer roll pneumatic piston must be connected to it. PID regulation analog output Pin 24 ( + ); Pin 23 ( - ) Type of output signal: if F. 70 = 0 0÷10V if F. 70 = 1 4÷20mA Brake control This output is active with brake control function if F. 30 = 0 or F. 30 = 1. It provides a command analog reference (speed adjustment) for a brake/clutch; the analog input of the electropneumatic transducer (pneumatic brake) or, using the Re S.p.A. FP25 command board, a magnetic powder brake, must be connected to it. Motor control This output is active with motor control function if F. 30 = 2. It provides a command analog reference (speed adjustment) for a motor. The analog input of the driver of the motor used must be connected to it. 31/08/06 17/28 Re S.p.A. T-one Detailed description of the programming functions The following is a detailed description of all the programming functions. Note that not all of the functions are active for all of the adjustment modes. Function 1 – Torque when machine is stationary Use this function to set a percentage of the use of the brake/clutch when the machine is stationary (STOP state). Press enter to access the function and the function value set is displayed. Press up and down and set the desired percentage. Press enter to confirm. Function 2 – Air in the dancer roll piston This function is active only if F. 30 = 1 (torque adjustment with dancer roll). Use this function to set an air percentage in the dancer roll piston. Press enter to access the function and the function value set is displayed. Press up and down and set the desired percentage. Press enter to confirm. Function 3 – Password check To access the other programming functions, you must enter the password, if it is set in function 75. Press enter to access the function. Press up and down and enter the password number. Press enter to confirm. If you enter an incorrect password, the word “PASS” flashes on the display for a few seconds, then function 3 is displayed again. Function 4 – Accessing the calibration Use this function to access the instrument calibration procedure (see § Quick start-up on page 7). Press enter and the word “CAL” flashes on the display for a few seconds; then the only calibration functions needed for the quick start-up of the instrument are given in sequence. Function 5 – Proportional parameter in AUTO Increasing the proportional parameter value increases the system response speed to the detriment of stability; a too high response speed can cause the onset of harmful tension oscillations. The parameter set using this function acts on the adjustment process together with the integral and derivative parameters when the machine is at operating speed (AUTO state). Press enter to access the function and the function value set is displayed. Press up and down and set the desired value. Press enter to confirm. Function 6 – Integral parameter in AUTO Reducing the integral parameter value increases the system response speed as well as its ability to recover the error when the machine has reached operating speed; reducing the integral coefficient too much may lead to harmful oscillations. 31/08/06 18/28 Re S.p.A. T-one The parameter set using this function acts on the adjustment process together with the proportional and derivative parameters when the machine is at operating speed (AUTO state). Press enter to access the function and the function value set is displayed. Press up and down and set the desired value. Press enter to confirm. Function 7 – Derived parameter in AUTO Increasing the derivative parameter value increases the system response speed and its ability to anticipate the tension variations on the material. However if the derivative parameter is increased too much it may lead to harmful oscillations. The parameter set using this function acts on the adjustment process together with the proportional and integral parameters when the machine is at operating speed (AUTO state). Press enter to access the function and the function value set is displayed. Press up and down and set the desired value. Press enter to confirm. We recommend you to set this function only when particularly elastic materials are processed or when the dancer roll is used. Function 8 – Torque when machine is in emergency Use this function to set a percentage of the use of the brake/clutch or motor when an emergency stop is triggered (EMERG state). Press enter to access the function and the function value set is displayed. Press up and down and set the desired percentage. Press enter to confirm. Function 9 – Type of alarm Use this function to set the mode with which the instrument signals having exceeded the alarm thresholds specified in function 10 and in function 11. Press enter to access the function and the function value set is displayed. Press up or down to select: − 0 if wanting the instrument to signal when the tension or the position is greater than the value set in function 10 and when the tension or the position is greater than the value set in function 11; − 1 if wanting the instrument to signal when the tension or the position is less than the value set in function 10 and when the tension or the position is less than the value set in function 11. Press enter to confirm. Function 10 – First alarm threshold Use this function to set a tension or position value for the first alarm signal. Press enter to access the function and the function value set is displayed. Press up or down and set the tension value (in Kg) or the position value at which you desire the first alarm signal. Press enter to confirm. When the tension or position exceeds this threshold, the display, out of programming, alternates the tension or position to “ALL.0”. 31/08/06 19/28 Re S.p.A. T-one Function 11 – Second alarm threshold Use this function to set a tension or position value for the second alarm signal. Press enter to access the function and the function value set is displayed. Press up or down and set the tension value (in Kg) or the position value at which you desire the second alarm signal. Press enter to confirm. When the tension or position exceeds this threshold, the display, out of programming, alternates the tension or position to “ALL.1”. Function 12 – ACC time Use this function to set a time interval, expressed in seconds, during which the machine is in acceleration. Use functions 13, 14 and 15 to set a different behaviour for the regulator during the machine start up phase. Press enter to access the function and the function value set is displayed. Press up and down and set the desired value. Press enter to confirm. Function 13 – Proportional parameter in ACC For the description of the operation, refer to function 5. The parameter set using this function acts on the adjustment process together with the integral and derivative parameters when the machine is accelerating (ACC state). Press enter to access the function and the function value set is displayed. Press up and down and set the desired value. Press enter to confirm. Function 14 – Integral parameter in ACC For the description of the operation, refer to function 6. The parameter set using this function acts on the adjustment process together with the proportional and derivative parameters when the machine is accelerating (ACC state). Press enter to access the function and the function value set is displayed. Press up and down and set the desired value. Press enter to confirm. Function 15 – Derivative parameter in ACC For the description of the operation, refer to function 7. The parameter set using this function acts on the adjustment process together with the proportional and integral parameters when the machine is accelerating (ACC state). Press enter to access the function and the function value set is displayed. Press up and down and set the desired value. Press enter to confirm. We recommend you to set this function only when particularly elastic materials are processed or when the dancer roll is used. Function 16 – DEC time Use this function to set a time interval, expressed in seconds, during which the machine is in deceleration. Use functions 17, 18 and 19 to set a different behaviour for the regulator during the machine stationary phase. Press enter to access the function and the function value set is displayed. 31/08/06 20/28 Re S.p.A. T-one Press up and down and set the desired value. Press enter to confirm. Function 17 – Proportional parameter in DEC For the description of the operation, refer to function 5. The parameter set using this function acts on the adjustment process together with the integral and derivative parameters when the machine is decelerating (DEC state). Press enter to access the function and the function value set is displayed. Press up and down and set the desired value. Press enter to confirm. Function 18 – Integral parameter in DEC For the description of the operation, refer to function 6. The parameter set using this function acts on the adjustment process together with the proportional and derivative parameters when the machine is decelerating (DEC state). Press enter to access the function and the function value set is displayed. Press up and down and set the desired value. Press enter to confirm. Function 19 – Derivative parameter in DEC For the description of the operation, refer to function 7. The parameter set using this function acts on the adjustment process together with the proportional and integral parameters when the machine is decelerating (DEC state). Press enter to access the function and the function value set is displayed. Press up and down and set the desired value. Press enter to confirm. We recommend you to set this function only when particularly elastic materials are processed or when the dancer roll is used. Function 30 – Type of adjustment Use this function to select the adjustment mode of the instrument. Press enter to access the function and the function value set is displayed. Press up or down and set the value to 0 to have the tension torque adjustment with load cells on unwinder and rewinder, 1 to have the tension torque adjustment with dancer roll on unwinder and rewinder or 2 to have the tension speed adjustment with load cells on motors for draft gears. Press enter to confirm. Function 31 – Type of load cells This function is active only if F. 30 = 0 or F. 30 = 2 (adjustment with load cells). Use this function to set the type of load cells used to read the material tension. Press enter to access the function and the function value set is displayed. Press up or down and set the value to 0 if you use mV load cells as sensors of tension or 1 if you use mA load cells. Press enter to confirm. 31/08/06 21/28 Re S.p.A. T-one Function 32 – Cell zero calibration This function is active only if F. 30 = 0 or F. 30 = 2 (adjustment with load cells). Make sure that the roller on which the cells are applied (measuring roller) is free of any load whatsoever. Press enter and a counting will start; when the counting stops, the word “YES” flashes on the display for a few seconds if the calibration was successful, otherwise the word “BAD” flashes; then function 32 is displayed again. Note: Whether the word “BAD” flashes on the display check that the load cells assembling and the connections are carried out correctly, then perform the calibration again. Function 33 – Decimal point This function is active only if F. 30 = 0 or F. 30 = 2 (adjustment with load cells). Use this function to set the decimal point position in the material tension displaying. Press enter to access the function and the function value set is displayed. Press up or down and set the value to 0 to have not the decimal point (0000), 1 to have one digit after the decimal point (000.0) or 2 to have two digits after the decimal points (00.00). Press enter to confirm. Note: It’s possible to change the decimal point position also after calibration. Function 34 – Full scale of the tension This function is active only if F. 30 = 0 or F. 30 = 2 (adjustment with load cells). Use this function to set the value (in Kg) to the sum of the full scales of the cells, equivalent to the nominal values of the cells. Press enter to access the function and the function value set is displayed. Press up or down and set the desired value. Press enter to confirm. Function 35 – Weight for the gain calibration This function is active if F. 30 = 0 or F. 30 = 2 (adjustment with load cells). Load a known weight on a cable following what will be the path of the material as illustrated in the diagram, making sure that the cable holding the weight maintains the same material infeed and outfeed angles on the measuring roller. Press enter to access the function and the function value set is displayed. Press up and down and set the value to the weight (in Kg) of the load apllied to the cable. Press enter to confirm. 1 Kg Load cells Function 36 – Cell gain calibration This function is active only if F. 30 = 0 or F. 30 = 2 (adjustment with load cells). Use this function to calibrate the gain of the load cells. 31/08/06 22/28 Re S.p.A. T-one Press enter to perform the gain. The word “YES” or “BAD” flashes on the display for a few seconds, respectively if the gain calibration was successful or not; then function 36 is displayed again. Note: Whether the word “BAD” flashes on the display check that the load cells assembling and the connections are carried out correctly, then perform the calibration again. Function 37 – Enabling the remote set point This function is active only if F. 30 = 0 (torque adjustment with dancer roll). Use this function to set the tension set point control. Press enter to access the function and the function value set is displayed. Press up or down and set the value to 0 to control the set point through the keyboard or 1 to control it by analog input. Press enter to confirm. If the remote set point is enabled, position on function 38 and then on function 39 to perform the analog reference calibration. Function 38 – Calibrating the minimum value of set point This function is active only if F. 30 = 0 (torque adjustment with load cells) and F. 37 = 1. Adjust the analog input so that it supplies the minimum voltage to the instrument (e.g. 0V). Press enter and the word “YES” flashes on the display for a few seconds; then function 38 is displayed again. Function 39 – Calibrating the maximum value of set point This function is active only if F. 30 = 0 (torque adjustment with load cells) and F. 37 = 1. Adjust the analog input so that it supplies the maximum voltage to the instrument (e.g. 10V). Press enter and the word “YES” or “BAD” flashes on the display for a few seconds, respectively if the calibration was successful or not; then function 39 is displayed again. Note: Whether the word “BAD” flashes on the display check that the connection of the analog reference is carried out correctly, and that the maximum tension value is at least 3V higher than the minimum tension, then perform the calibration again. Function 45 – Calibrating the minimum value of dancer roll This function is active only if F. 30 = 1 (torque adjustment with dancer roll). Place the dancer roll so that its output (dancer roll analog input) assumes the minimum value (e.g. 0V). Press enter and the word “YES” flashes on the display for a few seconds; then function 45 is displayed again. Function 46 – Calibrating the maximum value of dancer roll This function is active only if F. 30 = 1 (torque adjustment with dancer roll). Place the dancer roll so that its output (dancer roll analog input) assumes the maximum value (e.g. 10V). Press enter and the word “YES” or “BAD” flashes on the display for a few seconds, respectively if the calibration was successful or not; then function 46 is displayed again. 31/08/06 23/28 Re S.p.A. T-one Note: Whether the word “BAD” flashes on the display check that the connection of the dancer roll is carried out correctly, and that the maximum tension value is at least 3V higher than the minimum tension, then perform the calibration again. Function 55 – AUTO/STOP speed This function is active only if F. 30 = 2 (speed adjustment with load cells) and F. 71 = 2. Use this function to set the speed value, in percentage in respect of the maximum tension tha can be supplied to the instrument, in correspondance of which you want the switch from the AUTO/STOP states and vice versa (STOP/AUTO) Press enter to access the function and the function value set is displayed. Press up or down and set the desired value. Press enter to confirm. Function 56 – Adjustment inversion This function is active only if F. 30 = 2 (speed adjustment with load cells). Use this function to invert the direction of adjustment. Press enter to access the function and the function value set is displayed. Press up or down and set the value to 0 if the load cells are upstream of the draft gear or 1 if they are downstream of the draft gear. Press enter to confirm. Function 70 – Type of regulated output Use this function to set the type of the output to control the brake/clutch or the motor. Press enter to access the function and the function value set is displayed. Press up or down and set the value to 0 if you wish to use a 0÷10V output or 1 for a 4÷20mA output. Press enter to confirm. Function 71 – AUTO/STOP control Use this function to set the control of AUTO/STOP states. Press enter to access the function and the function value set is displayed. If F. 30 = 0 or F. 30 = 1 (torque adjustment): press up or down and set the value to 0 to control the states by the instrument frontal panel or 1 to control by the digital input. If F. 30 = 2 (speed adjustment): press up or down and set the value to 0 to control the states by the instrument frontal panel, 1 to control them by the digital input or 2 to control them on the basis of the machine speed. (The speed of the switching from AUTO/STOP states and vice versa (STOP/AUTO) is set in function 55). Press enter to confirm. Function 72 – Alarm display This function allows to display the alarms, if active, on the instrument display. Press enter to access the function and the function value set is displayed. Press up or down and set 0 if not wanting to display the alarms or 1 if wanting that the display, if there is an active alarm, alternates the display of the tension or position to “ALL.0” or “ALL.1” according to the threshold exceeded. Press enter to confirm. 31/08/06 24/28 Re S.p.A. T-one Function 73 – Display filter During adjustment the instrument instantly displays the tension values detected by the load cells or the dancer position and updates the value even if the variations are minimal. If the update speed of the display is slowed down, these changes will be made at longer intervals using an average of the values read. The greater the value of this parameter, the slower the updating speed of the display. Press enter to access the function and the function value set is displayed. Press up or down and set the desired value. Press enter to confirm. Function 74 – Analog input filter This function is active only if F. 30 = 0 or F. 30 = 2 (adjustment with load cells). Use this function to eliminate any interference on the signal read at the analog input of the instrument. Press enter to access the function and the function value set is displayed. Press up or down and set the desired value. Press enter to confirm. Function 75 – Setting the password Use this function to set the password (numeric value), required by function 3, to prevent accidental tampering by persons not authorised to program the instrument. Press enter to access the function and the function value set is displayed. Press up or down and set the desired value. Press enter to confirm. Function 76 – Factory settings Use this function to reset all the function values and return to the factory settings of torque adjustment mode with load cells. Press enter and the word “RES” flashes on the display for a few seconds. Then the instrument exit the programming environment automatically. Function 77 – Display brightness Use this function to regulate the brightness value of the display. Press enter to access the function and the function value set is displayed. Press up or down and set the desired value. Press enter to confirm. Function 78 – Firmware version The function is a read only one and shows the firmware version of the device. Press enter to access the function and the firmware version is displayed. Press enter to exit the function. 31/08/06 25/28 Re S.p.A. T-one Technical specifications Analog section Inputs 1 selectable analog input for load cells: - 0÷30mV for load cells in mV (2 cells in mV with 30mV maximum output) - 0÷40mA for load cells in mA (2 cells in mA with 20mA maximum output) 1 analog input: 0÷10V / R=10kΩ Output 1 selectable analog output (PID regulation): - 0÷10V / 10mA max - 4÷20mA Rload=330Ω max 1 analog output (proportional to the tension / dancer roll piston control): 0÷10V / 10mA max Resolution 12 bit Sampling time 30 ms Digital section Inputs 2 digital inputs: 24Vdc Outputs 2 relé outputs: 24Vdc or 24Vac / 750mA max Others characteristics Power supply and consumption 24Vdc / 300mA max Weight 400 g Operating temperature 0 ÷ 50°C Degree of protection Case: IP20 Frontal panel: IP52 31/08/06 26/28 Re S.p.A. T-one Mechanical dimensions 31/08/06 27/28 Re S.p.A. T-one Guarantees Re S.p.A. guarantees this device against all defects relative to the materials and manufacturing for a period of 12 months from the date of delivery. Should your device develop operating faults during the guarantee period, please contact the Company’s agent in your country, or, if this is not possible, contact Re S.p.A. directly. The guarantee includes spare parts and labour. It does not include shipment costs for device delivery or recall. The guarantee is invalidated by: ▪ Improper use of the device ▪ Incorrect installation ▪ Faulty electrical connections or power supply ▪ Lack of maintenance ▪ Changes or work involving non-original components or carried out by persons without Re S.p.A. authorisation ▪ Complete or partial failure to observe the instructions ▪ Exceptional events. At the end of the guarantee period, support will be provided by the support network, which will carry out repairs at the current rates. 31/08/06 28/28 Re S.p.A. Controlli Industriali Via Firenze, 3 - 20060 BUSSERO (MI) ITALY Fax (+39) 02 95 03 89 86 Technical support: Tel. (+39) 02 95 24 30.300 - E-mail: [email protected] Sales support: Tel. (+39) 02 95 24 30.200 - E-mail: [email protected] www.re-spa.com Rev. 08/06