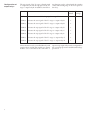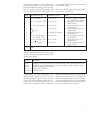
1
SPAU 130 C
Three-phase overvoltage and
undervoltage relay
User´s manual and Technical description
U >
U <
2
U n = 100V 110V
f n = 50Hz
U 12 U 23 U 31
5
60Hz
IRF
SPAU 130 C
STEP
80...265V –
~
18...80V –
U aux
U>
Un
1.2
STEP
0.8
1.6
SPCU 3C14
0.5
REGISTERS
0
0 0
t > [ s]
0
SG1
k
0.05
1
2
3
4
5
6
7
8
U > /U n
U max /U n
U < /U n
U min /U n
n (U >)
n (U < )
1
2
3
4
5
6
7
8
1.0
0.8
SGR
1
2
3
4
5
6
7
8
t / t >[ % ]
t / t <[ % ]
0
1
U<
Un
0.4
1.2
0
RESET
5.0
t < [ s]
1.0
12
Ser.No.
1315
1308
U>
RS 422
1
U<
SPCU 3C14
1MRS 750638-MUM EN
Issued 1997-02-07
Modified 2002-04-25
Version B (replaces 34 SPAU 15 EN1)
Checked MK
Approved OL
SPAU 130 C
Three-phase
overvoltage and
undervoltage relay
Data subject to change without notice
Contents
Features .......................................................................................................................... 2
Application ..................................................................................................................... 3
Function ......................................................................................................................... 3
Connections ................................................................................................................... 4
Configuration of output relays........................................................................................ 6
Start and operation indicators ......................................................................................... 7
Combined power supply and I/O module ...................................................................... 7
Technical data (modified 2002-04) ................................................................................. 8
Examples of applications............................................................................................... 10
Secondary injection testing ........................................................................................... 17
Maintenance and repair ................................................................................................ 21
Exchange and spare parts .............................................................................................. 21
Ordering numbers ........................................................................................................ 21
Dimensions and mounting ........................................................................................... 22
Order information ........................................................................................................ 22
The complete manual for the combined overvoltage and undervoltage relay SPAU 130 C
includes the following submanuals:
Three-phase overvoltage and undervoltage relay, general part
Overvoltage and undervoltage relay module SPCU 3C14
General characteristics of C-type relay modules
Features
Combined overvoltage and undervoltage protection relay
Numerical display of setting values, measured
values, recorded fault values, indications etc.
Three-phase definite time or inverse time overvoltage stage
Serial interface for bus connection module and
optical-fibre substation bus
Three-phase definite time undervoltage stage
Continuous self-supervision of relay hardware
and software for enhanced system reliability and
availability
Control input for blocking of the function of
the undervoltage stage by means of an external
control signal
Automatic blocking of the undervoltage stage
on loss of energizing voltage
Fully field-configurable output relay functions
Flexible matching of the relay to the intended
protection application
2
1MRS 750638-MUM EN
1MRS 750510-MUM EN
1MRS 750328-MUM EN
Auto-diagnostic fault indication to facilitate
repair after detection of permanent internal
relay fault
Powerful software support for parametrization
and supervision of the relay
Application
Description
of function
The three-phase voltage relay SPAU 130 C is
intended to be used for overvoltage and undervoltage protection and supervision in distribution substations. The relay can also be used for
overvoltage and undervoltage protection of generators, motors and transformers. Generally the
relay measures the three phase-to-phase voltages
of the system but it can also be programmed for
single-phase measurement.
The overvoltage stage can be given definite time
characteristic or inverse time characteristic. The
undervoltage stage features definite time characteristic alone.
The combined overvoltage and undervoltage
relay SPAU 130 C is a secondary relay that is
connected to the voltage transformers of the
protected object. The relay generally measures
the three phase-to-phase voltages of the system.
On operating the relay trips the circuit breaker
and/or provides alarm, in accordance with the
selected functions and given configuration.
The overvoltage and undervoltage relay is generally used as a three-phase relay. But by means
of a selector switch the relay can be configured
as a single phase relay.
When one of the phase-to-phase voltage or
several exceed the set start value U> of the
overvoltage stage, the overvoltage stage starts
delivering a start signal SS1. When, at definite
time mode of operation, the set operate time t>
or, at inverse time mode of operation, the calculated operate time t>, has expired, the overvoltage
stage operates delivering a trip signal TS1. In the
same way the undervoltage stage starts delivering a start signal SS2 when the measured value
goes below the start value U< and when the set
operate time t< has expired, the undervoltage
stage operates, delivering a trip signal TS2.
U12
U23
U31
The operation of the undervoltage stage can be
blocked by means of an external control signal.
The relay forms a whole including an overvoltage stage, an undervoltage stage as well as
flexible trip and alarm functions.
The overvoltage stage can be given definite time
characteristic or inverse time characteristic.
When inverse time characteristic is selected two
sets of curves named A and B are available.
The undervoltage stage has definite time characteristic. Tripping of the undervoltage stage can
be blocked by means of a control signal BS
applied to the optically isolated external control
input of the relay.
The overvoltage and undervoltage relay is provided with two output relays for tripping and
three output relays for signalling purposes. One
of the signalling relays is dedicated for the
selfsupervision system of the relay.
TRIP 1
THREE-PHASE DEFINITE TIME OR
INVERSE TIME OVERVOLTAGE
STAGE
59
THREE-PHASE DEFINITE TIME
UNDERVOLTAGE STAGE
27
EXTERNAL BLOCKING FUNCTION FOR
THE UNDERVOLTAGE STAGE
TRIP 2
SIGNAL 1
START 1
IRF
BLOCKING
SERIAL COMMUNICATION
SERIAL I/O
Fig. 1. Protection functions of the combined overvoltage and undervoltage relay SPAU 130 C. The
encircled numbers refer to the ANSI (=American National Standards Institute) number of the
concerned protection function.
3
Connections
L1
L2
L3
A
Rx
Tx
N
SPA-ZC_
n
a
+ (~)
Uaux
- (~)
BS
IRF
START1
SIGNAL1
TRIP2
TRIP1
70 71 72
77 78
80 81
68 69
65 66
SERIAL
PORT
13 14 15 16 1718 19 20 21
10 11
61 62
110V
100V
110V
100V
110V
100V
≅_
E
+ -
D
1
U3
C
B
1
1
A
1
SGR/1
U3
SGR
IRF
3U>
5
8
6
TS1
t>,k>
SS2
3U<
U1
7
SS1
SGB/5
SPAU 130 C
3 2 4
t<
TS2
I/O
U2
Fig. 2. Connection diagram for the combined overvoltage and undervoltage relay SPAU 130 C
Uaux
A,B,C,D,E
IRF
SS_
TS_
SGR
SGB/5
TRIP_
SIGNAL1
START1
U1
U2
U3
SERIAL PORT
SPA-ZC_
Rx/Tx
4
Auxiliary voltage
Output relays
Self-supervision signal
Start signal
Trip signal
Switchgroup for configuring trip and alarm signals
Switch for blocking the undervoltage stage
Trip output
Signal on relay operation
Start signal or signal on relay operation
Combined overvoltage and undervoltage relay module SPCU 3C14
Power supply and I/O module SPTU 240S1 or SPTU 48S1
I/O module SPTE 3E15
Serial communication port
Bus connection module
Optical-fibre receiver (Rx) and transmitter (Tx) of the bus connection module
Rx
61
14
62
15
65
16
66
17
68
18
69
19
80
20
81
21
77
70
78
71
10
72
11
TTL
B470701
Made in Finland
Tx
13
Fig.3. Rear view of the overvoltage and undervoltage relay SPAU 130 C
Specification of input and output terminals
Contacts
Function
13-14
13-15
16-17
16-18
19-20
19-21
10-11
61-62
Phase-to-phase voltage U12 (100 V)
Phase-to-phase voltage U12 (110 V)
Phase-to-phase voltage U23 (100 V)
Phase-to-phase voltage U23 (110 V)
Phase-to-phase voltage U31 (100 V)
Phase-to-phase voltage U31 (110 V)
External blocking signal input
Auxiliary power supply.
When DC voltage is used the positive pole is connected to terminal 61.
65-66
Trip output 1 for stages U> and U< (TRIP 1)
68-69
Trip output 2 for stages U> and U< (TRIP 2)
80-81
Signal on tripping of stages U> and U< (SIGNAL 1)
77-78
Signal on tripping of stage U<, starting of stages U> and U< (START 1)
70-71-72 Self-supervision (IRF) alarm output. Under normal conditions the contact interval
70-72 is closed. When the auxiliary voltage disappears or an internal fault is detected,
the contact interval 71-72 closes.
Protective earth terminal
The combined overvoltage and undervoltage
relay SPAU 130 C is connected to the optical
fibre communication bus by means of the bus
connection module SPA-ZC 17 or SPA-ZC 21.
The bus connection module is connected to the
D-type connector (SERIAL PORT) on the rear
panel of the relay. The opto-connectors of the
optical fibres are plugged into the counter connectors Rx and Tx of the bus connection module. The selector switches of the bus connection
module, by means of which the communication
mode is selected, are to be set in position "SPA".
5
Configuration of
output relays
The trip signals of the U> stage is firmly wired
to output relay A and the trip signal of the U<
stage to output relay B. In addition, the followSwitch
Function
SGR/1
Routes the external blocking signal to stage U<
1
SGR/2
Routes the start signal of the U< stage to output relay D
1
SGR/3
Routes the start signal of the U> stage to output relay D
1
SGR/4
Routes the trip signal of the U< stage to output relay D
1
SGR/5
Routes the trip signal of the U< stage to output relay C
1
SGR/6
Routes the trip signal of the U< stage to output relay A
1
SGR/7
Routes the trip signals of the U> stage to output relay C
1
SGR/8
Routes the trip signals of the U> stage to output relay B
1
Circuit breakers can be controlled directly with
output relay A and B. This enables two circuit
breakers to be controlled at the same time or
6
ing functions can be selected with the switches
of the SGR switchgroup on the front panel of
the relay:
Factory
default
User's
settings
separate trip output relays can be configured for
the overvoltage protection and the undervoltage
protection.
Start and
operation
indicators
U >
U <
2
U n = 100V 110V
f n = 50Hz
U 12 U 23 U 31
5
60Hz
IRF
2. The yellow LED indicators (U12, U23 and
U31) on the upper black part of the front plate
indicate, when lit, that the corresponding
voltage value is currently being displayed.
SPAU 130 C
STEP
80...265V –
~
18...80V –
U aux
U>
Un
1.2
STEP
0.8
1.6
SPCU 3C14
0.5
REGISTERS
0
0
0
t > [ s]
0
SG1
k
0.05
1
2
3
4
5
6
7
8
U > /U n
U max /U n
U < /U n
U min /U n
n (U >)
n (U < )
1
2
3
4
5
6
7
8
1.0
0.8
SGR
1
2
3
4
5
6
7
8
t / t >[ % ]
t / t <[ % ]
0
1
U<
Un
0.4
1.2
0
5.0
t < [ s]
1.0
12
Ser.No.
1315
1308
U>
RS 422
1
RESET
4. The green Uaux LED on the front panel is lit
when the power supply module operates properly.
U<
SPCU 3C14
1. The relay module is provided with two operation indicator located in the right bottom
corner of the front plate of the relay module.
One indicates operation of the overvoltage
stage and the other operation of the undervoltage stage. Yellow light indicates that the
concerned stage has started and red light that
the stage has operated (tripped).
With the SG2 software switchgroup the start
and trip indicators can be given a latching
function, which means that the LEDs remain
lit, although the signal that caused operation
returns to normal. The indicators are reset
with the RESET push-button. An unreset
indicator does not affect the operation of the
relay.
Combined power
supply and I/O
module
3. The red IRF indicator of the self-supervision
system indicates, when lit, that a permanent
internal relay fault has been detected. The
fault code appearing on the display once a
fault has been detected should be recorded
and notified when service is ordered.
The combined power supply and I/O module
(U2) is located behind the system front panel of
the protection relay and can be withdrawn after
removal of the system front panel. The power
supply and I/O module incorporates a power
unit, four output relays, the control circuits of
the output relays and the electronic circuitry of
the external control input.
The power unit is transformer connected, that
is, the primary side and the secondary circuits
are galvanically isolated. The primary side is
protected by a slow 1 A fuse F1, placed on the
PC board of the module. When the power
source operates properly, the green Uaux LED
on the front panel is lit.
5. The LED indicator below a particular setting
knob indicates, when lit, that the setting
value of the knob is currently being displayed.
6. The LED of the SG1 switchgroup indicates,
when lit, that the checksum of the switchgroup is currently being displayed.
The start and operation indicators, the function
of the SG2 software switchgroup and the functions of the LED indicators during setting are
described more detailed in the user's manual
"Combined overvoltage and undervoltage relay
module SPCU 3C14".
The power supply and I/O module is available
in two versions which have different input voltage ranges:
- type SPTU 240S1
- type SPTU 48S1
Uaux = 80...265 V ac/dc
Uaux = 18...80 V dc
The voltage range of the power supply and I/O
module inserted in the relay is marked on the
system front panel of the relay.
7
Technical data
(modified 2002-04)
Energizing inputs
Terminals
Rated voltage Un
Continuous voltage withstand
Power consuption at Un
Rated frequency fn acc. to order
Output contact ratings
Trip contacts
Terminals
Rated voltage
Carry continuously
Make and carry for 0.5 s
Make and carry for 3 s
Breaking capacity for dc, when the manoeuvre
circuit time constant L/R ≤ 40 ms,
at the control voltages
- 220 V dc
- 110 V dc
- 48 V dc
Signalling contacts
Terminals
Rated voltage
Carry continuously
Make and carry for 0.5 s
Make and carry for 3 s
Breaking capacity for dc, when the signalling
circuit time constant L/R < 40 ms,
at the control voltages
- 220 V dc
- 110 V dc
- 48 V dc
External control input (blocking)
Terminals
Control voltage
Current consumption when active
Auxiliary supply voltage
Power supply and I/O modules and voltage ranges:
- type SPTU 240 S1
- type SPTU 48 S1
Power consumption under quiescent/operating
conditions
8
100 V
110 V
13-14, 16-17, 19-20 13-15, 16-18, 19-21
100 V
110 V
2 x Un
2 x Un
<0.5 VA
50 Hz or 60 Hz
65-66, 68-69
250 V ac/dc
5A
30 A
15 A
1A
3A
5A
70-71-72, 77-78, 80-81
250 V ac/dc
5A
10 A
8A
0.15 A
0.25 A
1A
10-11
18…265 V dc or
80…265 V ac
2…20 mA
80...265 V ac/dc
18...80 V dc
~4 W/~6 W
Combined overvoltage and undervoltage relay module SPCU 3C14
- see "Technical data" in the manual for the module.
Data communication
Transmission mode
Data code
Selectable data transfer rates
Fibre optic bus connection module,
powered from the host relay
- for plastic fibre cables
- for glass fibre cables
Fibre optic bus connection module with
a built-in power supply unit
- for plastic fibre cables
- for glass fibre cables
Insulation Tests *)
Dielectric test IEC 60255-5
Impulse voltage test IEC 60255-5
Insulation resistance measurement IEC 60255-5
Electromagnetic Compatibility Tests *)
High-frequency (1 MHz) burst disturbance test
IEC 60255-22-1
- common mode
- differential mode
Electrostatic discharge test IEC 60255-22-2 and
IEC 61000-4-2
- contact discharge
- air discharge
Fast transient disturbance test IEC 60255-22-4
and IEC 61000-4-4
- power supply
- I/O ports
Environmental conditions
Specified ambient service temperature range
Long term damp heat withstand acc. to IEC 60068-2-3
Relative humidity acc. to IEC 60068-2-30
Transport and storage temperature range
Degree of protection by enclosure
for panel mounted relay
Weight of relay including flush mounting case
Fibre optic serial bus
ASCII
300, 1200, 2400,
4800 or 9600 Bd
SPA-ZC 21 BB
SPA-ZC 21 MM
SPA-ZC 17 BB
SPA-ZC 17 MM
2 kV, 50 Hz, 1 min
5 kV, 1.2/50 µs, 0.5 J
>100 MΩ, 500 Vdc
2.5 kV
1.0 kV
6 kV
8 kV
4 kV
2 kV
-10...+55°C
<95%, +40°C, 56 d/a
93...95%, +55°C, 6 cycles
-40...+70°C
IP 54
3.0 kg
*) The tests do not apply to the serial port, which is used exclusively for the bus connection module.
9
Examples of
application
-
0
Example 1.
Network overvoltage
and undervoltage
supervision
-
I
I
+
0
-
0
+
-
L1
L2
L3
I
I
+
A
0
N
+
Rx
dn
Tx
+
SPA-ZC_
da
+ (~)
Uaux
- (~)
BS
IRF
START1
SIGNAL1
TRIP2
13 14 15 16 1718 19 20 21
10 11
TRIP1
+
61 62
70 71 72
110V
100V
110V
100V
110V
100V
≅_
77 78
D
E
+ -
80 81
1
U3
68 69
SERIAL
PORT
65 66
C
B
1
+
1
A
1
SGR/1
U3
SGR
IRF
3U>
t>,k>
7
5
8
6
SS1
TS1
SS2
SGB/5
3U<
SPAU 130 C
3 2 4
U1
t<
TS2
I/O
U2
Fig. 4. Substation overvoltage and undervoltage protection with voltage relay SPAU 130 C. The
selector switch positions are shown in the table on the following page.
10
The overvoltage and undervoltage relay module
SPCU 3C14 measures the phase-to-phase
voltages.
Thus the overvoltage stage provides an alarm
signal when the overvoltage arises and trips the
circuit breaker, if the voltage continues to rise.
Many components of the power system are
sensitive to overvoltage. Inverse time characteristic of the overvoltage relay is recommended as
the liability to damage of the power system
components often is a function of the duration
of the overvoltage. At inverse time characteristic
the relay provides an alarm signal at when the set
start voltage has been exceeded. If the voltage
exceeds 1.06 times the set start voltage the relay
operates, the faster the greater the voltage is.
When the characteristic curve A is selected the
alarm level can be set low enough and still the
voltage regulator is granted time enough to
operate even during severe voltage fluctuations.
The undervoltage stage also trips the circuit
breaker. An unwanted operation of the undervoltage stage during an autoreclose cycle can be
inhibited with switch SG1/6. If switch SG1/6 = 1
the operation of the undervoltage stage is inhibited, when the voltage falls below 20% x Un.
An unwanted operation of the undervoltage
stage when the miniature circuit breaker trips
has been inhibited by routing a control voltage
from the auxiliary contact of the MCB to the
relay's control input 10-11. Switch SGB/5 on
Switch
the printed circuit board must be in position 1
as also switch SGR/1.
The selector switches of the voltage relay SPAU
130 C can be set as follows:
SG1/SPCU 3C14
SGB/SPCU 3C14
SGR
1
0 three-phase
0 not in use
2
1 U> start time = 30 s
0 not in use
3
1 U> inverse charact.
0 not in use
4
0
0 not in use
1 control signal from miniature circuit breaker (MCB)
1 start signal of stage U< to
output relay D
1 start signal of stage U> to
output relay D
0 no trip signal of stage U< to
output relay D
1 trip signal of stage U< to
output relay C
0 no trip signal of stage U< to
output relay A
1 trip signal of stage U> to
output relay C
0 no trip signal of stage U> to
output relay B
curve A
5
0
1 blocking of stage t<
6
0 not in use
7
1 U< stage blocked,
if U < 20% x Un
1 U< start time = 30 s
8
1 t< = 10...120 s
0 not in use
Σ
230
0 not in use
When the switches are set as above, the output
relays of the voltage relay SPAU 130 C provide
the following signals:
Contact
Function
65-66
68-69
80-81
77-78
70-71-72
Tripping of the circuit breaker on the high-voltage side of the transformer (U>)
Tripping of the circuit breaker on the low-voltage side of the transformer (U<)
Signal on tripping (U> and U<)
Starting (U> and U<)
Self-supervision
A prewarning of a voltage disturbance is obtained over the contact interval 77-78 and a
signal on tripping of stage U> or U< is obtained
over the contact interval 80-81. When the overvoltage stage or the undervoltage stage starts or
operates the start indicator (yellow) or operation
indicator (red) of the concerned stage is lit. If the
indicators are selfreset they are switched off
when the measured voltage returns. If the indicators are latching they have to be reset manually
with the reset push-button on the front panel or
by remote control via the serial port.
11
Example 2.
Motor undervoltage
protection
MAIN CB TRIP
A
MOTOR
FEEDER
CB TRIP
N
dn
M
+
da
+ (~)
Uaux
- (~)
BS
IRF
START1
SIGNAL1
TRIP2
TRIP1
70 71 72
77 78
80 81
68 69
65 66
13 14 15 16 1718 19 20 21
10 11
61 62
110V
100V
110V
100V
110V
100V
≅_
E
+ -
D
1
U3
C
B
1
1
SERIAL
PORT
A
1
SGR/1
U3
SGR
IRF
3U>
t>,k>
7
5
8
6
SS1
TS1
SS2
SGB/5
3U<
SPAU 130 C
3 2 4
U1
t<
TS2
I/O
U2
Fig. 5. Motor feeder undervoltage protection with relay SPAU 130 C. The selector switch positions
are shown in the table on the following page.
The undervoltage stage of the relay trips the
circuit breakers of the motor feeders connected
to the busbar. In this way the motors are prevented from restarting at the same time on
recovery of the voltage. The operate time setting
of the undervoltage stage is to be longer than the
dead time of the high-speed auto-reclose cycle of
the transmission network. This prevents motors
from tripping during short voltage interruptions.
12
An unwanted operation of the undervoltage
stage when the miniature circuit breaker (MCB)
trips has been inhibited by routing a control
voltage from the auxiliary contact of the MCB
to the control input 10-11 of the relay. Switch
SGB/5 on the printed circuit board of the voltage relay module should be in position 1 as
should also switch SGR/1.
The overvoltage stage protects the motors and
transformers connected to the busbars. The
overvoltage stage can be given inverse time
characteristic. When the characteristic curve B
is selected the start voltage can be set relatively
high without rendering to long an operate time
at severe overvoltage.
Switch
The overvoltage stage and the undervoltage
stage are both used for tripping. The trip signal
of the undervoltage stage is routed to the circuit
breakers of the motor feeders. The overvoltage
stage operates the main circuit breaker.
The selector switches of the voltage relay SPAU
130 C can be set as follows:
SG1/SPCU 3C14
SGB/SPCU 3C14
SGR
1
0 three-phase
0 not in use
2
1 U> start time = 30 s
0 not in use
3
1 U> inverse charact.
0 not in use
4
1
0 not in use
1 control signal from miniature circuit breaker (MCB)
0 no start signal of stage U<
to output relay D
0 no start signal of stage U>
to output relay D
1 trip signal of stage U< to
output relay D
0 no trip signal of stage U<
to output relay C
0 no trip signal of stage U<
to output relay A
1 trip signal of stage U> to
output relay C
0 no trip signal of stage U> to
output relay B
curve B
5
0
1 blocking of stage t<
6
7
0 U< stage blocked,
0 not in use
if U < 20% x Un
0 U< start time = 0.1 s 0 not in use
8
0 t< = 10...12 s
Σ
14
0 not in use
When the switches are set as above, the output
relays of the voltage relay SPAU 130 C provide
the following signals:
Contact
Function
65-66
68-69
80-81
77-78
70-71-72
Tripping of the main circuit breaker (U>)
Tripping of the circuit breakers of the motor feeders (U<)
Signal on tripping of the main circuit breaker (U>)
Signal on tripping of the circuit breakers of the motor feeders (U<)
Self-supervision signal
13
U3
GK
5A
1A
KK
5A
1A
BS
10 11
61 62
+ (~)
- (~)
IRF
70 71 72
Uaux
+
START1
1
D
3 2
77 78
SS1
SGR
TS1
SS2
TS2
5
TRIP2
68 69
8
1
TRIP1
65 66
1
6
A
GENERATOR
CB TRIP
B
EXCITATION
CB TRIP AND
PRIME MOVER
SHUT DOWN
C
SIGNAL1
1
7
80 81
4
U3
13 14 15 16 1718 19 20 21
SPAU 130 C
100V
110V
7 89
E
IRF
t >,k
t >>
U2
100V
110V
4 56
U3
3I>
3I>>
I/O
100V
110V
1 23
≅_
+ -
SGB
SGR/1
4
5
U1
+
BS
10 11
-
SGR/1
61 62
≅_
+ -
SGB/5
U1
3U>
3U<
L1
L2
L3
GENERATOR
AND EXCITATION
CB TRIP
SIGNAL1
TRIP2
TRIP1
PRIME MOVER
SHUT DOWN
START1
+ (~)
Uaux
- (~)
IRF
A
6
B
8
1
65 66
C
5
1
68 69
7
1
80 81
D
3 2 4
1
77 78
E
TS2
SS2
TS1
SS1
SGR
70 71 72
U3
IRF
t>,k>
t<
I/O
U2
14
5A
1A
SPAJ 131 C
Example 3.
Generator pole
short-circuit
protection
Fig. 6. Generator pole short-circuit protection with relays SPAU 130 C and SPAJ 131 C. The
selector switch positions are shown in the table on the following page.
When a pole short-circuit occurs on a generator
provided with a static excitation system the
generator voltage and the excitation rapidly
decrease so much, that the short-circuit current
falls below the set start current of the overcurrent relay.
By capturing the start signal of the overcurrent
relay with a drop-off delayed auxiliary relay,
which controls the external blocking input of
the undervoltage relay, the protection arrangement can be made to operate, even though the
overcurrent relay resets without tripping. The
undervoltage stage is normally blocked and it is
deblocked by the starting signal of the low-set
Switch
stage of the overcurrent relay. The undervoltage
stage trips the circuit breaker after the set operate time t<.
When required, the undervoltage stage can be
blocked when the miniature circuit breaker of
the energizing voltage circuit operates.
The start signal of the undervoltage stage can be
used for preventing the generator from being
connected to the network during undervoltage
or for alarming on undervoltage.
The selector switches of the voltage relay SPAU
130 C can be set as follows:
SG1/SPCU 3C14
SGB/SPCU 3C14
SGR
1
0 three-phase
0 not in use
2
1 U> start time = 30 s
0 not in use
3
1 U> inverse charact.
0 not in use
4
1
0 not in use
1 blocking signal from the
drop-off delayed relay
1 start signal of stage U<
to output relay D
0 no start signal of stage U>
to output relay D
0 no trip signal of stage U<
to output relay D
1 trip signal of stage U<
to output relay C
1 trip signal of stage U<
to output relay A
1 trip signal of stage U>
to output relay C
0 no trip signal of stage U>
to output relay B
curve B
5
0
1 blocking of stage t<
6
7
0 U< no block., when 0 not in use
U < 20% x Un
0 U< start time = 0.1 s 0 not in use
8
0 t< = 1…12 s
Σ
14
0 not in use
When the switches are set as above, the output
relays of the voltage relay SPAU 130 C provide
the following signals:
Switch
Function
65-66
Tripping of the generator circuit breaker and the excitation circuit breaker on
pole short circuit (stages U< and I>) or on overvoltage (stage U>)
Prime mover shut down on pole short circuit (stages U< and I>)
Signal on operation of the overvoltage stage or pole short circuit protection
Start signal of the undervoltage stage U<
Self-supervision signal
68-69
80-81
77-78
70-71-72
The output contacts of the relay SPAJ 131 C can
be given the following functions:
Switch
Function
65-66
68-69
80-81
77-78
70-71-72
Tri'of generator circuit breaker, stages I> and I>>
Tripping of excitation circuit breaker and shut down, stage I>>
Signal on operation of stage I> and I>>
Start signal from stage I> to the drop-off delayed auxiliary relay
Self-supervision alarm signal
15
Recorded data and
fault analysis
The registers of the overvoltage and undervoltage relay contain useful information about
the behaviour of the power network during
normal service and in a fault situation.
On starting of the overvoltage stage the maximum value of the measured voltages is recorded
in register 1 as a multiple of the rated voltage.
Any new starting of the overvoltage stage erases
the old value from the register and a new value
is recorded. On operation of the overvoltage
stage the value gathering sequence is stopped
and the highest measured value during the starting period is recorded.
Register 2 contains the maximum value of the
voltages measured after a relay reset as a multiple
of the rated voltage. The registered value is
updated any time when the value of the measured voltage exceeds the registered voltage value.
Register 2 must be erased by a command given
via the serial bus or by pressing the STEP and
RESET push-buttons simultaneously.
On starting of the undervoltage stage the minimum value of the measured voltages is recorded
in register 3 as a multiple of the rated voltage.
Any new starting of the undervoltage stage
erases the old value from the register and a new
value is recorded. On operation of the undervoltage stage the value gathering sequence is
stopped and the lowest measured value during
the starting period is recorded.
Register 4 contains the minimum value of the
voltages measured after a relay reset as a multiple
of the rated voltage. The registered value is
updated any time when the value of the measured voltage falls below the registered voltage
value. Register 4 must be erased by a command
16
given via the serial bus or by pressing the STEP
and RESET push-buttons simultaneously.
The number of startings, register 5 and 6, provides information on the occurance of
overvoltage and undervoltage in the network. It
must, however, be noted that when the start
time setting is 0.1 s, for instance, starting motors
can cause the undervoltage stage to start and the
value of register 6 to be updated. In the same
way the overvoltage stage may start on temporary overvoltages caused by, for instance, by a
voltage regulator.
Registers 7 and 8 show the duration of the latest
start situation of the stages, expressed in per cent
of the set operate time or of the calculated
operate time for the overvoltage stage. Any new
start erases the old value and a new value is
recorded. If the stage operates, the register value
will be 100.
The values of register 7 and 8 provide information about the duration of the voltage variations
and how close to operation the overvoltage and
undervoltage stages have been. Furter information is obtained about the function of the voltage regulator.
Register 2 and 4 provide information about the
limits of of fluctuation of the busbar voltage
during normal service.
Registers 1 and 3 as well as 7 and 8 facilitate the
post-fault analysis. These registers provide information about the voltage levels in a network
disturbance situation and how close to operation the overvoltage and undervoltage stages
have been.
Secondary
injection testing
Relay testing, both primary and secondary,
should always be performed in accordance with
national regulations and instructions.
The protection relay incorporates an IRF function that continuously monitors the internal
state of the relay and produces an alarm signal on
detection of a fault. According to the manufacturer’s recommendations the relay should be
submitted to secondary testing at five years’
intervals. These tests should include the entire
protection chain from the instrument transformers to the circuit breakers.
The secondary testing described in this manual
is based on the relay’s setting values during
normal operation. If necessary, the secondary
testing can be extended by testing the protection
stages throughout their setting ranges.
As switch positions and setting values have to be
altered during the test procedure the correct
positions of switches and the setting values of
the relay during normal operation conditions
have to be recorded, for instance, on the reference card accompanying the relay.
For secondary testing the relay must be disconnected from the voltage transformer circuits
and other secondary circuits by means of
disconnectable terminal blocks or a test adapter
fitted on the relay. A possible connection of the
relay to the circuit breaker trip coil must be
noted during the test.
When the auxiliary voltage is connected to the
relay, a self-testing program is carried out automatically. The self-testing program includes the
whole relay except for the matching transformers and the contacts of the output relays. The
operational condition of the relay is tested using
ordinary relay test equipment. The secondary
injection test also includes the matching transformers, the output relays and the accuracy of
the operate values.
When no relay test set is available the secondary
injection test can be carried out with the following equipment:
-
regulating transformer
isolating transformer, e.g. 220 V/220 V
voltmeter
stop watch or counter for time measurement
dc voltage source
switches and indicator lamps
supply and pilot wires
calibrated multimeter
Note the relay's rated voltage when measuring
wires are connected to the terminals of the relay,
see chapter Technical data, passage Energizing
inputs.
17
U2
1
I/O
t<
SGB/5
U1
3U<
3U>
+ SGR/1
≅_
110V
100V
U3
110V
100V
L1 N
V
SPAU 130 C
61 62
13 14 15 16 1718 19 20 21
10 11
Uaux
BS
TIMER
START
S1
TS2
SS2
TS1
U3
IRF
t>,k>
SGR
E
70 71 72
IRF
L1
SS1
1
3 2
D
4
7
1
C
5
8
1
B
65 66
TRIP1
TRIP2
68 69
80 81
77 78
L2
L3
START1 SIGNAL1
TIMER STOP
A
6
- ( ~)
+ ( ~)
S2
110V
100V
Fig. 7. Test circuit for the overvoltage and undervoltage relay SPAU 130 C.
When the test circuit has been completed and
the selector switches properly set, the auxiliary
voltage can be connected to the relay. The
18
function of the test circuit can be verified by
means of a multimeter.
Checking the matching transformers
Checking the start function
The three matching transformers of the relay are
checked one by one. Apply voltage to the relay
and compare the voltage value read from the
display of the relay with the voltage value shown
by the voltmeter. The measurements can be
performed at the rated voltage of the relay.
Apply test voltage to terminals 13-14 or 13-15
depending on the used energizing input. Close
switch S1 and increase the voltage slowly until
the overvoltage stage starts and indicator L2 is
lit. Read the start voltage value from the voltmeter.
Operate time t>
Checking the overvoltage stage U>
Definite time characteristic
Set the switches of the SGR switchgroup as
follows before starting the test:
Switch
Position
1
2
3
4
5
6
7
8
1
0
1
0
0
0
1
0
If possible, set the test voltage at 2 x the set start
voltage of the overvoltage stage. Note! The
maximum voltage withstand of 2 x Un must not
be exceeded. The timer is started by switch S1,
when it is closed and stopped by contact 65-66,
when output relay A picks up.
The operation of output relay C is indicated
with indicator L3, when it is lit.
When the relay starts the LED indicator U> in
the lower right corner of the front panel is lit
with yellow colour. When the overvoltage stage
operates the LED indicator turns red.
The following relay functions are obtained:
Inverse time characteristic
Output relay
(terminals)
Function
A (65-66)
B (68-69)
C (80-81)
Trip signal of stage U>
(Trip signal of stage U<)
Signal on operation of
stage U>
Start signal of stage U>
Self-supervision signal
D (77-78)
E (70-71-72)
When the relay has been set for inverse time
characteristic, the test is performed by measuring the operate time at two voltage values,
e.g. 1.1 x U> and 1.4 x U> and by comparing the
operate times with the operate times obtained
from the characteristic curves.
19
Checking the undervoltage stage U<
Operate time t<
Set the switches of the SGR switchgroup as
follows before starting the test:
Definite time characteristic
Switch
Position
1
2
3
4
5
6
7
8
1
1
0
0
1
0
0
0
Set the test voltage at 0.5 times the set start
voltage of the undervoltage stage. The timer is
started by switch S1, when it is closed and
stopped by contact 68-69, when output relay B
picks up.
Note!
If the test voltage setting is below 0,2 x Un,
switch SG1/6 must be set in position 0.
Checking the blocking function
The following relay functions are obtained:
Output relay
(terminals)
Function
A (65-66)
B (68-69)
C (80-81)
(Trip signal of stage U>)
Trip signal of stage U<
Signal on operation of
stage U<
Start signal of stage U<
Self-supervision signal
D (77-78)
E (70-71-72)
Further, switch SG1/1 is set in position 1, which
makes the relay a single phase relay.
Checking the start function
Set the test voltage at a value slightly above the
set start voltage U< of the undervoltage stage.
Close switch S1 and lower the voltage slowly
until the undervoltage stage starts and indicator
L2 is lit. Read the start voltage value from the
voltmeter.
20
Set switch SGB/5 of the relay module in position 1 (ON) and switch SGR/1 in position 1.
Check the blocking function by applying a
control voltage (voltage value within the same
range as the auxiliary voltage) via switch S2 to
the control input 10-11. Set the test voltage at 2
times the set start voltage of the undervoltage
stage. Lower the voltage until the undervoltage
stage starts and indicator L2 is lit but the undervoltage stage is not permitted to operate.
Checking the output relay of the self-supervision system (IRF)
The self-supervision system and the function of
the IRF LED and the output relay E can be
tested in the Trip test mode described in manual
"General characteristics of C type relay modules". The operation of output relay E is indicated by L1.
Maintenance
and repair
When used under the conditions specified in
chapter "Technical data", the relay requires
practically no maintenance. The relay includes
no parts or components that are sensitive to
abnormal physical or electrical wear under normal operating conditions.
If the environmental conditions on site differ
from those specified, as to temperature and
humidity, or if the atmosphere around the relay
contains chemically active gases or dust, the
relay should be visually inspected during the
relay secondary testing. The visual inspection
should focus on:
- Signs of mechanical damage on relay case and
terminals
- Dust accumulated inside the relay cover or
case; remove carefully with compressed air or
a soft brush
- Signs of corrosion on terminals, case or components inside the relay
Exchange and
spare parts
Overvoltage and undervoltage relay module
Combined power supply and I/O module
- Uaux = 80...265 V ac/dc
- Uaux = 18...80 V dc
Case (including I/O module)
I/O module
Bus connection module
Ordering
numbers
Combined overvoltage and undervoltage relay
SPAU 130 C
If the relay fails in operation or if the operation
values considerably differ from those stated in
the relay specifications, the relay should be given
a proper overhaul. Minor measures, such as
exchange of a faulty module, can be taken by
personnel from the customer’s instrument workshop, but major measures involving the electronics are to be taken by the manufacturer.
Please contact the manufacturer or his nearest
representative for further information about
checking, overhaul and calibration of the relay.
Note!
The protection relays contain electronic circuits
which are liable to serious damage due to electrostatic discharge. Before removing a module,
ensure that you are at the same electrostatic
potential as the equipment by touching the case.
Note!
Static protection relays are measuring instruments and should be handled with care and
protected against damp and mechanical stress,
especially during transport and storage.
SPCU 3C14
SPTU 240S1
SPTU 48S1
SPTK 3E15
SPTE 3E15
SPA-ZC 17_ or SPA-ZC 21_
RS 422 020 -AA, CA, DA, FA
Combined overvoltage and undervoltage relay including test adapter RTXP 18
SPAU 130 C
RS 422 220 -AA, CA, DA, FA
The two last letters of the ordering number designate the rated frequency fn and
the Uaux voltage range of the relay as follows:
AA:
CA:
DA:
FA:
fn = 50 Hz and Uaux = 80...265 V ac/dc
fn = 50 Hz and Uaux = 18...80 V dc
fn = 60 Hz and Uaux = 80...265 V ac/dc
fn = 60 Hz and Uaux = 18...80 V dc
21
Dimensions and
mounting
The relay case is basically designed for flushmounting. The mounting depth can be reduced
with an optional raising frame: type SPA-ZX
111 reduces the depth behind the mounting
panel by 40 mm, type SPA-ZX 112 reduces the
depth by 80 mm and type SPA-ZX 113 reduces
the depth by 120 mm. The relay can also be
mounted in a case for surface mounting, type
designation SPA-ZX 115.
142
162
129 ±1
139 ±1
34
136
30
250
216
186
a
b
Panel cut-out
Raising frame
SPA-ZX 111
SPA-ZX 112
SPA-ZX 113
a
b
176
136
96
74
114
154
Fig. 8. Dimensions of the overvoltage and undervoltage relay SPAU 130 C
The relay case is made of profile aluminium and
finished in beige.
A rubber gasket fitted on the mounting collar
provides an IP54 degree of protection between
relay case and mounting panel, when the relay is
flush mounted.
The hinged cover of the relay case is made of
clear, UV stabilized polycarbonate, and provided with a sealable finger screw. A gasket along
Order information
1. Quantity and type designation
2. Order number
3. Rated frequency
4. Auxiliary voltage
5. Accessories
6. Special requirements
22
the edge of the cover provides an IP 54 degree of
protection by enclosure between the relay case
and the front cover.
All input and output wires are connected to the
screw terminal blocks on the rear panel. Each
terminal is dimensioned for one max. 6 mm2
wire or two max. 2.5 mm2 wires. The D-type
connector connects to the serial communication bus via a bus connection module.
Example:
15 pcs voltage relay SPAU 130 C
RS 422 020-AA
fn = 50 Hz
Uaux = 110 V dc
15 bus connection modules SPA-ZC 21 MM
2 fibre optic cables SPA-ZF MM 100
14 fibre optic cables SPA-ZF MM 5
–
SPCU 3C14
Combined overvoltage and undervoltage
relay module
User´s manual and Technical description
B
U >
U <
U 12 U 23 U 31
STEP
U>
Un
IRF
1.2
STEP
0.8
1.6
0.5
t
> [ s]
SG1
k
0.05
1
2
3
4
5
6
7
8
1.0
0.8
U<
Un
0.4
1.2
0
1
RESET
5.0
t < [ s]
1.0
12
1315
U>
U<
SPCU 3C14
1MRS 750510-MUM EN
Issued 96-12-02
Modified 99-12-20
Version D (replaces 34 SPCU 7 EN1)
Checked KJ
Approved MN
Data subject to change without notice
SPCU 3C14
Combined overvoltage
and undervoltage
relay module
Contents
Features .......................................................................................................................... 2
Description of operation ................................................................................................. 3
Block diagram ................................................................................................................. 4
Front panel ..................................................................................................................... 5
Start and operation indicators ......................................................................................... 5
Settings ........................................................................................................................... 6
Selector switches (Modified 99-12) ................................................................................. 6
Measured data ................................................................................................................ 8
Recorded information ..................................................................................................... 8
Menu chart ................................................................................................................... 10
Voltage/time characteristic (Modified 99-10) ................................................................ 11
Technical data .............................................................................................................. 12
Serial communication parameters ................................................................................. 13
Event codes ............................................................................................................. 13
Data to be transferred over the serial bus (Modified 99-12) ..................................... 14
Fault codes.................................................................................................................... 17
Features
Three-phase voltage measuring relay module
which also can be programmed for use in singlephase applications
Overvoltage stage with definite time or inverse
definite minimum time characteristic
2
Automatic blocking of the undervoltage stage
on loss of energizing voltage
Digital display of measured values, set values
and recorded fault values
Two sets of voltage/time curves selectable at
inverse time operation
Serial communication capability for extensive
exchange of data with substation level equipment
Undervoltage stage with definite time characteristic
Continuous self-supervision of hardware and
software for enhanced reliability and availability
External blocking of the undervoltage stage via
built-in control input
Auto-diagnostic fault codes generated by the
module on detection of a permanent internal
fault
Description of
operation
The combined overvoltage and undervoltage
module SPCU 3C14 is a three-phase relay module, which can be programmed for single-phase
operation by means of switch SG1/1 on the
front panel. The module contains an overvoltage
stage and an undervoltage stage. The overvoltage
stage can be given either definite time or inverse
time characteristic, whereas the operation of the
undervoltage stage is based on definite time
characteristic only.
If one of the voltages measured by the module
exceeds the set start value of the U> stage, the
module delivers a start signal SS1 after the set
start time has expired. The start time of the U>
stage is selected by means of switch SG1/2, and
two alternative values are available. After the
preset operate time t>, or at inverse time characteristic, after a time depending on the level of the
overvoltage, the overvoltage stage operates delivering a trip signal TS1.
The operation characteristic of the U> stage, i.e.
definite time or inverse time characteristic, is
selected with switch SG1/3. At definite time
characteristic the setting range of the operating
time is programmed with switches SG1/4 and 5.
At inverse time characteristic two different sets
of voltage/time curves, called A and B, can be
selected by means of switch SG1/4. At inverse
time characteristic switch SG1/5 has no function.
If one of the voltages measured by the module
falls below the set start value of the U< stage, the
module delivers a start signal SS2 after the set
operate time has expired. The start time of the
U< stage is selected by means of switch SG1/7,
and two alternative values are available.
After the preset operate time t<, a trip signal TS2
is delivered by the undervoltage stage. The setting range of the operate time is selected with
switch SG1/8.
To avoid unwanted operations, for instance
during an auto-reclose sequence, starting and
tripping of the undervoltage stage can be blocked
by turning switch SG1/6 into the position 1.
The blocking function is activated if the measured signal falls to a value below 0.2 x Un. This
function is illustrated in Fig. 1.
Fig. 1. Operation of the combined overvoltage and undervoltage relay module SPCU 3C14 when
the function of the undervoltage stage is internally blocked (SG1/6 = 1).
Tripping (TS2) of the U< stage alone, may be
blocked by applying a blocking signal BTS2 on
the stage. The blockings are programmed individually for the various relay assemblies by means
of the switchgroup SGB on the relay module.
Programming instructions for the SGB switchgroup are given in the user's manual of the
concerned protection relay unit. Also see the
signal diagram of the concerned protection relay
unit.
3
Block diagram
Fig. 2. Block diagram for combined overvoltage and undervoltage relay module SPCU 3C14.
U12, U23, U31
BS1, BS2, BS3
BTS2
SG1
SG2
SGB
SS1
TS1
SS2
TS2
Y
R
Measured phase-to-phase voltages
Blocking signals
Blocking of the tripping of the U< stage
Front panel programming switchgroup
Software selector switchgroup for defining the mode of function of the
start and operation indicators
Selector switchgroup for configuration of blockings (on the PC-board)
Start signal of the U> stage
Trip signal of the U> stage
Start signal of the U< stage
Trip signal of the U< stage
Yellow indicator
Red indicator
NOTE!
All input and output signals of the relay module
are not necessarily wired to the terminals of
every protection relay unit including the overvoltage and undervoltage relay module.
4
The signals wired to the terminals are shown in
the signal diagram of the concerned protection
relay unit, see user's manual.
Front panel
B
U >
U <
U 12 U 23 U 31
Indicators for measured voltages
Simplified module symbol
Self-supervision alarm
indicator
IRF
Numerical display
STEP
Setting knob and indicator for
starting value of stage U>
U>
Un
Setting knob and indicator for
operate time t> or time multiplier k>
of stage U>
t > [ s]
1.2
STEP
0.8
1.6
Display step push-button
0.5
SG1
k
0.05
1
2
3
4
5
6
7
8
1.0
0.8
Setting knob and indicator for
starting value of stage U<
U<
Un
1.2
0.4
0
1
RESET
Selector switchgroup SG1
Indicator for switchgroups
SG1, SG2 and SG3
5.0
Setting knob and indicator for
operate time t< of stage U<
Reset push-button
t < [ s]
1.0
12
1315
U>
U<
SPCU 3C14
Operation indicators
Type designation of
the relay module
Fig. 3. Front panel of the combined overvoltage and undervoltage relay module SPCU 3C14.
Start and
operation
indicators
Each stage has its own yellow/red operation
indicator. Yellow light indicates starting of the
operation stage and red light indicates that the
stage has delivered a tripping signal.
The four LED indicators can, independently of
one another, be given self-reset or manual reset
mode of operation with switches in switchgroup
SG2. The manual reset mode means that the
indicator remains lit after being switched on,
although the stage, which controls the indicator, resets. If, for instance, the yellow start
indicator has been given self-reset mode of
operation and the red operation indicator
manual-reset mode of operation, the yellow
indicator is lit, when the stage starts and it turns
red if the stage operates. When the stage resets
after operation the red indication remains lit. If
the stage starts but does not operate the yellow
indicator is lit during the starting and reset
automatically when the stage resets. The indicators, which have been given the manual reset
mode, are reset locally by pushing the RESET
push-button on the front panel or by remote
control over the SPA bus using the command
V101 or V102. See also table (for switchgroup
SG3) on page 7 in chapter "Selector switches".
An unreset operation indicator does not affect
the protective functions of the relay module.
The relay module is constantly operative, regardless of the indicators have been reset or not.
The self-supervision alarm indicator IRF indicates that the self-supervision system has detected a permanent fault. The indicator is lit
with red light shortly after a permanent internal
fault has been detected. At the same time a
control signal is put forward to the output relay
of the self-supervision system. Additionally, in
most fault cases, a fault code indicating type of
fault appears on the display of the relay module.
The fault code is to be recorded to serve the
subsequent fault location and repair actions.
5
Settings
Selector switches
(Modified 99-12)
The setting values are shown by the three
rightmost green digits of the display. The LED
indicator below the setting knob shows, when
lit, the setting value currently being shown on
the display.
U>/Un
Start value of the U> stage as a multiple of the rated voltage of the relay energizing
input. Setting range 0.8...1.6 x Un.
t> [s]
Operate time of the U> stage, expressed in seconds, at definite time mode of k>
operation. The required setting range, 0.05...1.00 s, 0.5...10.0 s or 5...100 s, is selected
with switches SG1/4 and 5. At IDMT mode of operation the setting range of the
multiplier k> is 0.05...1.00.
U</Un
Start value of the U< stage as a multiple of the rated voltage of the relay energizing
input. Setting range 0.4...1.2 x Un.
t< [s]
Operate time of the U< stage expressed in seconds. The setting range is selected with
switch SG1/8, alternatives 1...12 s and 10...120 s.
Further, the checksum of the programming
switchgroup SG1 is indicated on the display
when the indicator under the switchgroup is
glowing. In this way a check can be made to prove
that the switches have been set and that they
work properly. An example of calculating the
checksum is given in the description "General
characteristics of C-type relay modules".
When the module has been given single-phase
operation, only U12 is measured. Additional
relay functions required in various applications
are selected by means of the selector switches of
switchgroup SG1 located on the front panel of
the relay module. The numbering of the switches,
1...8, and the switch positions, 0 and 1, are
marked on the front panel.
Switch Function
SG1/1
Selection of three-phase or single-phase operation.
Three-phase operation when SG1/1 = 0.
Single-phase operation when SG1/1 = 1.
SG1/2
Start time selection for the overvoltage stage U>.
When SG1/2 = 0, the start time is 0.1 s.
When SG1/2 = 1, the start time is 30 s.
SG1/3
SG1/4
SG1/5
6
Selection of definite time or IDMT mode of operation for the U> stage. At definite
time mode of operation switches 4 and 5 are used for selecting the setting range of the
operate time t>. At IDMT mode of operation switch 4 is used for selecting the inverse
time curve, switch 5 has no function.
SG1/3
SG1/4
SG1/5
0
0
0
0
1
1
1
1
0
0
1
1
0
0
1
1
0
1
0
1
0
1
0
1
Mode of
operation
Operate time t> or
characteristic curve
Definite time
Definite time
Definite time
Definite time
Inverse time
Inverse time
Inverse time
Inverse time
0.05...1.00 s
0.5...10.0 s
0.5...10.0 s
5...100 s
Curve A
Curve A
Curve B
Curve B
Switch Function
SG1/6
Selection of automatic blocking of starting and tripping of the undervoltage stage U<.
When SG1/6 = 0, the undervoltage stage always operates when a measured voltage falls
below the setting value.
When SG1/6 = 1, starting and tripping of the undervoltage stage are blocked if one of
the measured voltages, falls to a value below 0.2 x Un.
This feature can be used for preventing unnecessary startings and trippings during
auto-reclose sequences.
SG1/7
Start time selection for the undervoltage stage U<.
When SG1/7 = 0, the start time is 0.1 s.
When SG1/7 = 1, the start time is 30 s.
SG1/8
Selection of the setting range for the operate time t< of the undervoltage stage U<.
When SG1/8 = 0, the setting range of the operate time is 1.0...12.0 s.
When SG1/8 = 1, the setting range of the operate time is 10...120 s.
Switchgroup SG2 is a so called software switchgroup, which is located in the third submenu of
the checksum register of switchgroup SG1. The
mode of operation, i.e. self-reset or manually
reset, of the LED indicators U> and U< is
determined by the switches of switchgroup SG2.
The mode of operation can be separately set for
each indicator. The mode of operation is set by
means of the checksum, which can be calculated
from the following table. Normally the start
indications are self-reset and the operation indications manually reset.
Indicator
Start indicator U>
Operation indicator U>
Start indicator U<
Operation indicator U<
Checksum
Switchgroup SG3 is a so called software switchgroup, which is located in the fourth submenu
of switchgroup SG1. The front panel pushSG3/1
0
1
Push-button
Manually reset
Factory default
1
2
4
8
0
2
0
8
15
10
buttons STEP and RESET can be programmed
with switch SG3/1. Switches SG3/2…8 are not
in use. The default value for SG3 is 0.
Clear start/trip LED's
Erase memorized values
STEP
RESET
STEP & RESET
x
x
x
STEP
RESET
STEP & RESET
x
x
x
x
The PC-board of the relay module contains a
switchgroup SGB with eight switches. The
switches 1...3 are used for configuring the start
signals going from the module, whereas the
switches 5, 7 and 8 are used for configuring the
blocking signals applied on the undervoltage
stage in various protection relay units. Switches
4 and 6 have no function in the relay module
SPCU 3C14. Instructions for setting the switchgroup SGB are given in the user's manual of the
protection relay unit and in the signal diagram
of the relay.
7
Measured data
The measured values are presented with the
rightmost three green digits on the display. The
Indicator
Recorded
information
data being presented are indicated by LED
indicators on the front panel.
Measured data
U12
The U12 voltage measured by the module expressed as a multiple of the rated voltage
of the relay energizing input.
U23
The U23 voltage measured by the module expressed as a multiple of the rated voltage
of the relay energizing input.
U31
The U31 voltage measured by the module expressed as a multiple of the rated voltage
of the relay energizing input.
The leftmost red digit on the display indicates
the register address and the three rightmost
digits the recorded information.
Register/ Recorded information
STEP
8
1
The highest voltage value measured during the start sequence as a multiple of the
rated voltage of the relay energizing input. Any overvoltage stage start erases the old
value and starts a new recording sequence. The recording sequence is stopped on
operation of the overvoltage stage and the highest value during the start sequence is
found in the register.
2
The highest voltage value measured as a multiple of the rated voltage of the relay
energizing input. The register value is updated as soon as the measured value exceeds
the value alredy in the register. Register 2 is erased with a command via the serial port
or by pushing the STEP and RESET push-buttons simultaneously. The registered
value is also erased on loss of auxiliary supply.
3
The lowest voltage value measured during the start sequence as a multiple of the rated
voltage of the relay energizing input. Any undervoltage stage start erases the old value
and starts a new recording sequence. The recording sequence is stopped on operation
of the undervoltage stage and the lowest value during the start sequence is found in
the register.
4
The lowest voltage value measured as a multiple of the rated voltage of the relay
energizing input. The register value is updated as soon as the measured value falls
below the value already in the register. Register 4 is erased with a command via the
serial port or by pushing the STEP and RESET push-buttons simultaneously. The
registered value is also erased on loss of auxiliary supply.
5
Number of starts of the overvoltage stage, n (U>) = 0...255.
6
Number of starts of the undervoltage stage, n (U<) = 0...255.
7
Duration of the latest start event of the overvoltage stage, expressed as a percentage
of the set operate time t>, or, at IDMT mode of operation, of the calculated operate
time. A new start resets the counter which starts recounting from zero. If the stage
has tripped, the counter reading is 100.
8
Duration of the latest start event of the undervoltage stage, expressed as a percentage
of the set operate time t<. A new start resets the counter which starts recounting from
zero. If the stage has tripped, the counter reading is 100.
Register/ Recorded information
STEP
0
Display of blocking signals and other external control signals. The digit at the
extreme right indicates the state of the blocking of the undervoltage stage.
The following states are indicated:
0 = no blockings
2 = tripping of the undervoltage stage blocked
The middle digit of the register is always a zero. The leftmost green digit indicates
the state of the remote reset input, if any.
The following states are indicated:
0 = remote reset control input not energized
1 = remote reset control input energized
From this register it is possible to move on to the TEST mode, where the starting and
tripping signals of the module can be activated one by one. For further details see the
description "General characteristics of C-type relay modules".
A
The address code of the measuring relay module, required by the serial communication system.
Submenu 1: Selection of the data transfer rate.
Submenu 2: Bus traffic monitor. If the relay module is connected to a data
communication system and the communication is operating, the counter reading of
the bus traffic monitor will be 0. Otherwise the numbers 0...255 are continuously
rolling in the counter.
Submenu 3: Password required for remote setting. The password given in the setting
mode of a submenu must always be entered via the serial communication before the
settings can be altered remotely.
When the display is dark, the register can be reentered by pressing the STEP push-button.
The registers 1...8 are cleared by pressing the
push-buttons STEP and RESET simultaneously
or via the SPA bus with the command V102.
The registers are also cleared if the auxiliary
power supply to the module is interrupted. The
address code of the relay module, the data
transfer rate of the serial communication system
and the password of the module are not affected
by voltage failures. The instructions for setting
the address and the data transfer rate are given in
the manual "General characteristics of C-type
relay modules".
At the initial state when none of the stages has
started, the reading of register 1 is "000" and
that of register 3 is "– – –"
9
Menu chart
MAIN MENU
SUBMENU
STEP 0,5 s
RESET 1 s
Display off. Normal state
Voltage U12 measured
= parameter that can be set in the setting mode
Voltage U23 measured
S
T
E
P
STEP BACKWARD 0,5 s
Voltage U31 measured
B
A
C
K
W
A
R
D
Set start voltage U>
1
Remotely set
percentage p1
2
Remotely set
value U> x p1
Set operate time t> or time
multiplier k of stage U>
1
Remotely set
percentage p2
2
Remotely set
value t> x p2
Set start voltage U<
1
Remotely set
percentage p3
2
Remotely set
value U< x p3
Set operate time t< of stage U<
1
Remotely set
percentage p4
2
Remotely set
value t< x p4
2
Remotely set
checksum
.5
s
M
A
I
N
M
E
N
U
STEP FORWARD 1 s
SUBMENU
Checksum of
switchgroup SG1
1
Remotely set
checksum
3
Checksum of
switchgroup SG2
4
Checksum of
switchgroup SG3
1 Max. voltage measured during the last start of U>
2 Max. voltage measured after reset
S
T
E
P
F
O
R
W
A
R
D
3 Min. voltage measured during the last start of U<
4 Min. voltage measured after reset
5 Number of starts of overvoltage stage
6 Number of starts of undervoltage stage
1
s
7 Duration of the latest start event of stage U>
8 Duration of the latest start event of stage U<
0
Incoming
blockings
module
A Relay
address code
0
1
000
Data transfer
rate (Bd)
IRF
SS1
TS1
SS2
2 Bus communication
monitor 0 ... 255
TS2
3
Password
Fig. 4. Main menus and submenus of the combined overvoltage and undervoltage relay module
SPCU 3C14.
The procedure for entering a submenu or a setting mode and configuring the module is de-
10
scribed in detail in "General characteristics of
C type relay modules".
Voltage/time
characteristic
(Modified 99-10)
At inverse time characteristic the operate time
of the overvoltage stage will be shorter the
greater the deviation from the setting value.
The operation of the U> stage is based on inverse
time characteristic, when the selector switch
SG1/3 on the front panel is in position 1. The
relationship between time and voltage at inverse
time characteristic can be expressed as follows:
t=
k> x a
+c
p
(b x U - U> - 0.5)
U>
At an IDMT mode of operation the recording of
the tripping time of the overvoltage stage does
not start until the voltage exceeds the setting
value by 6%. The operating time accuracy stated
in the technical data applies when the voltage
exceeds the setting value by 10%. The overvoltage
stage includes two characteristics with different
inversities. The characteristic is selected with
the programming switch SG1/4. The degree of
inversity is determined by the factor p as follows:
Characteristic
p (constant)
A
B
2
3
where t = operate time [s]
k> = time multiplier
U = measured voltage [V]
U> = set start voltage [V]
a = constant 480
b = constant 32
c = constant 0.035
p = constant
t/s
1000
100
10
k>
1,0
0,7
1
0,4
0,2
0,05
0,1
0,01
1,0
1,1
1,2
1,3
1,4
1,5
U/U>
Fig. 5. Characteristic curve set A of overvoltage stage U>.
11
t/s
1000
100
10
1
k>
1,0
0,7
0,4
0,2
0,05
0,1
0,01
1,0
1,1
1,2
1,3
1,4
1,5
U/U>
Fig. 6. Characteristic curve set B of overvoltage stage U>.
Technical data
12
Overvoltage stage U>
Start voltage U>
Start time
Operate time at definite time mode of operation
Time multiplier k> at inverse time characteristic
Reset time, typically
Drop-off/pick-up ratio, typically
Operate time accuracy at definite time
mode of operation and start time accuracy
Operate time accuracy at inverse time characteristic
0.8...1.6 x Un
0.1 s or 30 s
0.05...1.00 s, 0.5...10.0 s or 5...100 s
0.05...1.00
60 ms
0.97
Operation accuracy
± 2% of set value or ± 25 ms
± 25 ms or the inaccuracy appearing
when the measured voltage varies ± 3%
± 3% of set value
Undervoltage stage U<
Start voltage U<
Start time
Operate time at definite time characteristic
Reset time, typically
Drop-off/pick-up ratio, typically
Operate time accuracy and start time accuracy
Operation accuracy
0.4...1.2 x Un
0.1 s or 30 s
1...12 s or 10...120 s
60 ms
1.03
± 2% of set value or ± 25 ms
± 3% of set value
Serial
communication
parameters
Event codes
The substation level control data communicator is able to read, over the SPA serial bus, the
event data of the module, e.g. starting and
tripping, from the over-/undervoltage relay
module SPCU 3C14. Event information called
for are printed out in the format: time (ss.sss)
and event code. The event codes of the module
are E1...E8, E50 and E51. Furthermore, the
substation level control data communicator is
able to form event codes relating to e.g. the data
communication.
The codes E1...E8 and the events represented by
these can be included in or excluded from the
event reporting by writing, over the SPA bus, a
so called event mask (V155) to the module. The
event mask is a binary number coded to a
decimal number. The event codes E1...E8 are
Code
Event
E1
E2
E3
E4
E5
E6
E7
E8
Starting of overvoltage stage U>
Starting of overvoltage stage U> reset
Tripping of overvoltage stage U>
Tripping of overvoltage stage U> reset
Starting of undervoltage stage U<
Starting of undervoltage stage U< reset
Tripping of undervoltage stage U<
Tripping of undervoltage stage U< reset
represented by the numbers 1, 2, 4...128. The
event mask is formed by multiplying above
numbers either by 0 (event not included in
reporting) or 1 (event included in reporting)
and adding up the numbers received (compare
calculation of checksum).
The event mask may have a value in the range
0...255. The default value of the over-/undervoltage relay module SPCU 3C14 is 85, which
means that all startings and trippings are included in the reporting, but not the resetting.
The codes E50...E54 and the events represented
by these cannot be excluded from the reporting.
Event codes for over-/undervoltage relay module SPCU 3C14:
Weighting
coefficient
Default
setting
1
2
4
8
16
32
64
128
1
0
1
0
1
0
1
0
Default value of event mask V155
E50
E51
E52
E53
E54
0
1
*
-
Restart of microprocessor
Overflow of event register
Temporary interruption in data communication
No response from the relay module over the data
communication bus
The module responds again over the data
communication bus
85
*
*
*
-
*
-
*
-
not included in event reporting
included in event reporting
no code number, always included in event reporting
cannot be set
NOTE!
In the SPACOM system the event codes E52...
E54 are generated by the station level control
data communicator, e.g. type SRIO 1000M.
13
Data to be
transferred over
the serial bus
(Modified 99-12)
In addition to the event code data transfer, the
input data (I data), output data (O data), setting values (S), memorized data (V data) and
some other data can be read from the relay
Data
Code
Data
direct.
Values
Measured voltage U12
Measured voltage U23
Measured voltage U31
Blocking of tripping of undervoltage stage
I1
I2
I3
I4
R
R
R
R
0...9.99 x Un
0...9.99 x Un
0...9.99 x Un
0 = no blocking
1 = tripping of stage U<
blocked
Starting of overvoltage stage U>
O1
R
Tripping of overvoltage stage U>
O2
R
Starting of undervoltage stage U<
O3
R
Tripping of undervoltage stage U<
O4
R
0 = U> stage not started
1 = U> stage started
0 = U> stage not tripped
1 = U> stage tripped
0 = U< stage not started
1 = U< stage started
0 = U< stage not tripped
1 = U< stage tripped
Activated start value for stage U>
Activated operate time t> or time
multiplier k for stage U>
Activated start value for stage U<
Activated operate time for stage U<
Activated checksum of switchgroup SG1
S1
S2
R
R
S3
S4
S5
R
R
R
0.8...1.6 x Un
0.05...100 s or
0.05...1.00
0.4...1.2 x Un
1...120 s
0...255
S11
R
0.8...1.6 x Un
S12
R
S13
R
0.05...100 s or
0.05...1.00
0.4...1.2 x Un
S14
R
1...120 s
S15
R
0...255
S21
R, W
0...999%
S22
R, W
0...999%
S23
R, W
0...999%
S24
R, W
0...999%
S25
R, W
0...255
Start value for stage U>,
set with the setting knob
Operate time or time multiplier for
stage U>, set with the setting knob
Start value for stage U<,
set with the setting knob
Operate time for stage U<,
set with the setting knob
Checksum of switchgroup SG1
(set with the switches)
Remote setting percentage of the
start value for stage U>
Remote setting percentage of
operate time or time multiplier
for stage U>
Remote setting percentage of
start value for stage U<
Remote setting percentage of
operate time for stage U<
Remotely set checksum of
switchgroup SG1
14
module over the serial communication bus.
Further, part of the data can be changed over
the SPA bus by separate commands. All data
information is available in channel 0.
Data
Code
Data
Values
direct.
Remotely set start value for stage U>
Remotely set operate time or time
multiplier for stage U>
Remotely set start value for stage U<
Remotely set operate time for stage U<
Remotely set checksum of
switchgroup SG1
S31
S32
R
R
S33
S34
S35
R
R
R
0.8...1.6 x Un
0.05...100 s or
0.05...1.00
0.4...1.2 x Un
1...120 s
0...255
V1
R
0...9.99 x Un
V2
V3
R
R
0...9.99 x Un
0...9.99 x Un
V4
V5
V6
V7
R
R
R
R
0...9.99 x Un
0...255
0...255
0...100%
V8
R
0...100%
Resetting of output relays and
operation indicators
Resetting of output relays, operation
indicators and erasing of recorded data
simultaneously
V101
W
V102
W
1 = output relays and operation
indicators reset
1 = output relays, operation
indicators reset and registers
(codes V1…V8) erased
Remote control of settings
V150
R, W
0 = setting with knobs
S11...S15 activated
1 = remote settings
S31...S35 activated
Event mask word
V155
R, W
Manual reset or self-reset mode of
operation of the LED indicators (SG2)
Programming push-buttons (SG3)
V156
R, W
V157
R, W
0...255, see section
"Event codes"
0…15, see section
"Selector switches"
0…1, see section
"Selector switches"
Opening of password for
remote settings
Changing or closing of password
for remote settings
V160
W
1...999
V161
W
0...999
Activation of self-supervision function
V165
W
1 = self-supervision output is
activated and IRF indicator
turns on in about 5 seconds,
whereafter the self-supervision system and the IRF
indicator reset
Internal fault code
V169
R
0…255
Data communication address
of the relay module
V200
W
1...254
Program version
V205
R
072_
Max. voltage measured when
stage U> started
Max. voltage measured after resetting
Min. voltage measured when
stage U< started
Min. voltage measured after resetting
Number of starts of overvoltage stage
Number of starts of undervoltage stage
Duration of the latest start
event of stage U>
Duration of the latest start
event of stage U<
15
Data
Code
Data
direct.
Values
Type designation of the relay module
F
R
SPCU 3C14
Reading of event register
L
R
Time, channel number
and event code
Re-reading of event register
B
R
Time, channel number
and event code
Reading of module status data
C
R
0 = normal state
1 = module been subject
to automatic reset
2 = overflow of event register
3 = events 1 and 2 together
Resetting of module status data
C
W
0 = resetting
Time reading or setting
T
R, W
00.000...59.999 s
R = data to be read from the module
W = data to be written to the module
The data transfer codes L, B, C and T have been
reserved for the event data transfer between the
relay module and the control data communicator.
The event register can be read by the L command only once. Should a fault occur, for example, in the data transfer, it is possible, by using the B command, to re-read the contents of
the event register once already read by means of
the L command. When required, the B command can be repeated.
The setting values S1...S5 are the alerted set
values currently used by the protection relay
module. These values are set either by remote
control or by means of the setting knobs. The
values S11...S15 are set with the setting knobs
and the selector switches. Variables S21...S25
are set as percentage values via remote control.
16
The settings S21...S25 allow reading or writing. A condition for writing is that the password V160, for remote setting has been opened.
The variables S31...S35 contain the remote setting values.
When the values of the variables S21...S24 are
to be changed, the variables can be given a percentage factor within the range 0...999. It is
possible to alter a setting value beyond the setting ranges specified in the technical data of the
relay module. However, the validity of the setting values are guaranteed only within the setting ranges specified in the technical data.
Activation of the self-supervision function
(V165) prevents the relay module from operating as long as the self-supervision output is activated and the IRF indicator is lit.
Fault codes
Once the self-supervision system has detected a
permanent relay fault, the IRF LED on the front
panel of the module is lit, and at the same time
the normally operated signal relay of the selfsupervision system drops off.
In most fault situations an auto-diagnostic fault
code is shown on the relay display. The fault
code cannot be reset. The fault code consists of
Fault code
4
30
50
195
131
67
203
139
75
253
a red digit one (1) and a green code number
that indicates the fault type. The fault code
should be recorded and stated when service is
ordered.
The fault codes of the over-/undervoltage relay
module SPCU 3C14 are explained in the following table:
Explanation
Faulty output relay path or missing output relay card
Faulty program memory (ROM)
Faulty working memory (RAM)
Too low a value in reference channel with multiplier 1
Too low a value in reference channel with multiplier 5
Too low a value in reference channel with multiplier 25
Too high a value in reference channel with multiplier 1
Too high a value in reference channel with multiplier 5
Too high a value in reference channel with multiplier 25
No interruptions from the A/D-converter
17
General characteristics of
C-type relay modules
User´s manual and Technical description
B
I >
I >>
I
Indicators for measured values
L1
I
L2 I L3
IRF
Self-supervision alarm indicator
(Internal Relay Fault)
Display, 1 + 3 digits
STEP
Setting knob 1
with indicator
I>
In
1.5
STEP
0.5
Stage 1
2.5
Step push-button (STEP)
0.5
Setting knob 2
with indicator
t > [ s]
SG1
k
0.05
1
2
3
4
5
6
7
8
1.0
13
Setting knob 3
with indicator
I >>
In
20
0
2.5
1
Programming switches SG1
Switchgroup indicator
RESET
Stage 2
0.5
Reset push-button (RESET)
t >> [ s ]
0.04
1.0
I>
I >>
Start/operation indicators
1309
Setting knob 4
with indicator
SPCJ 3C3
1MRS 750328-MUM EN
Issued 96-02-19
Version A (replaces 34 SPC 2 EN1)
Checked L-W U
Approved TK
General characteristics of
C-type relay modules
Data subject to change without notice
Contents
Push-buttons .................................................................................................................. 2
Programming switches SG1 ............................................................................................ 2
Setting knobs .................................................................................................................. 3
Display ........................................................................................................................... 3
Display main menu ................................................................................................... 3
Display submenu ....................................................................................................... 4
Setting mode ............................................................................................................. 4
Example: Operation in setting mode ......................................................................... 5
Stored information .................................................................................................... 6
Trip-test mode........................................................................................................... 7
Example: Trip-test function ...................................................................................... 8
Operation indicators ....................................................................................................... 9
Fault codes...................................................................................................................... 9
Push-buttons
The front panel of the relay module contains
two push-buttons. The STEP button is used for
stepping forward in the display and the RESET
button for resetting the red indicators. Additionally, the push-buttons are used for certain
settings, e.g. for setting the address of the relay
module and the data transfer rate for the serial
communication when the modules are used in
relay packages provided with this quality. (See
section Display).
Programming
switches SG1
Part of the settings and the selections of the
operating characteristics for the relay modules
in various applications are made with the programming switches SG1 on the front panel. The
indicator of the switchgroup glows when the
checksum of the switchgroup is shown on the
display. The checksum can be used for checking
that the switches are properly set. Fig. 2 gives an
example of calculating the checksum.
Fig. 2. Example of calculating the checksum of programming switchgroup SG1.
When the checksum calculated according to the
example is equal to the checksum indicated on
the display of the relay module, the switches are
properly set.
2
The function of the programming switches of
the individual measuring relay modules is specified in the description of the module concerned.
Setting knobs
Most of the operating values and operating
times are set by means of the setting knobs on
the front panel of the relay module. Each setting
knob has its own (LED) indicator which glows
when the concerned setting value is shown on
the display.
If a setting knob is turned while the display is
showing another measured or set value, the
value being set automatically appears on the
display. Simultaneously, the indicator for the
concerned setting starts glowing.
In addition to the settings made with the setting
knobs, most modules allow so called remote
setting. This means that the settings made by
means of the setting knobs of the module and
the checksum of the programming switchgroup
may be altered through an instruction over the
serial communication bus. Remote setting is
possible if the password in the register A is
known, and the remote settings are not activated, i.e. parameter V150=0. The circumstance
that the remote settings are activated is shown
with a flashing light of the indicator of the
setting knob, the value of which currently is
being displayed.
Display
The measured and set values as well as the data
recorded are shown on the display of the measuring relay module. The display consists of four
digits. The three digits (green) to the right
indicate the measured, set or stored value and
the digit at the extreme left (red) the number of
the register. The measured or set value displayed
is indicated by a yellow LED indicator. The
number of the register glows only when a stored
value is displayed.
When the auxiliary voltage is connected to a
measuring relay module, the module initially
tests the display by stepping through the digits
1...9 for about 15 seconds. When the test is
finished the display turns dark. The testing can
be interrupted by pressing the STEP button.
The protective functions of the module are
operative throughout the testing.
Display main menu
All the data required during normal operating
conditions are accessible from the main menu
which presents the measured values in real-time,
the normal setting knob settings as well as the
most important memorized data.
From a dark display only forward movement is
possible. When keeping the STEP button depressed, the display is continuously moving in
forward direction stopping for a while at the
dark point.
The data to be shown in the main menu are
selected to the display in a certain sequence by
means of the STEP button. When pressing the
STEP button for about one second, the display
moves forward in the display sequence. When
pressing it for about 0.5 seconds, the display
moves backwards in the display sequence.
Unless the display is switched off by stepping to
the dark point, it remains activated for about 5
minutes from the last pressing of the STEP
button and then goes out.
3
Display submenu
Less important values and values not very often
set are displayed in the submenus. The number
of submenus varies with different relay module
types. The submenus are presented in the description of the concerned module.
display moves forward when pressing the STEP
button for one second and backward when
pressing it for 0.5 seconds. The return to the
main menu has taken place when the red STEP
display turns dark.
A submenu is entered from the main menu by
pressing the RESET button for about one second. When the button thereafter is released, the
red digit (STEP) of the display starts flashing,
indicating that one is in a submenu. Going from
one submenu to another or back to the main
menu follows the same principle as when moving from the main menu display to another; the
When entering a submenu from a measured or
set value indicated by a LED indicator, the
indicator remains glowing and the address window (STEP) of the display starts flashing. A
flashing address window when no LED indicator is lit indicates that the submenu of a register
has been entered.
Fig. 3. Example of the main and submenus for the settings of the overcurrent relay module SPCJ
3C3. The settings made with the setting knobs are in the main menu and they are displayed by
pressing the STEP button. In addition to the setting knob settings the main menu contains the
measured current values as well as the registers 1…5, as well as 0 and A. The remote setting
percentage and remote setting value are located in the submenus for the settings and are activated
on the display by pressing the RESET button.
Setting mode
The registers of the main menu and the submenus
also contain parameters to be set. The settings
are made in the so called setting mode, which is
accessible from the main menu or a submenu by
pressing the RESET button, until the digit at
the extreme right starts flashing (about 10 s).
The flashing digit is set by means of the STEP
button. The flashing is moved on from digit to
digit by pressing the RESET button.
A set value is stored in the memory by pressing
the push-buttons STEP and RESET simultaneously. In practice the RESET button must be
4
pressed slightly in excess of the STEP button.
Return from the setting mode to the main menu
or submenu is possible by pressing (for about 10
s) the RESET button until the green digits on
the display stop flashing. If the module is left in
the setting mode, it will return automatically to
the start condition after about 5 minutes.
The values to be set in the setting mode are for
instance the address code of the relay module
and the data transfer rate for the serial communication. Further the percentage values for the
remote settings can be changed.
Example 1:
Function in the setting mode. Manual setting of
the address code of a relay module and the data
transfer rate for the serial communication. The
initial value for the address code is 146.
a)
Press push-button STEP until register address A
appears on the display.
g)
Set the digit by means of the STEP button.
h)
Store the set address number in the memory of
the relay module by pressing the RESET and
STEP button simultaneously. At the moment
the information enters the memory, the three
green dashes flash in the display, i.e. A—.
b)
Press the RESET button for about 10 s until the
right most digit starts flashing.
i)
Leave the setting mode by pressing the RESET
button for about 10 s, until the display stops
flashing.
c)
Press the STEP button repeatedly to set the digit
to the value desired.
d)
Press the RESET button to make the middle of
the green digits flash.
e)
Set the middle address digit by means of the
STEP button.
f)
Press the RESET button to make the left most
green digit flash.
j)
Then enter submenu 1 of register A by pressing
the RESET button for approx. one second. The
register address A is then replaced by a flashing
1. This submenu is used for setting the data
transfer rate of the serial communication.
k)
The data transfer rate for the serial communication is set and stored in the same way as the
address, see sections b...i, except that the continuously glowing register address has been replaced by a flashing 1.
l)
After storing the data transfer rate for the serial
communication you may return to the main
menu of register A by pressing the STEP button
for about 0.5 second.
5
Stored information
The parameter values measured at the moment
when a fault occurs are recorded in the registers,
in some modules also the setting values. The
recorded data, except for some setting parameters, are set to zero by pressing the pushbuttons STEP and RESET simul-taneously.
The data in normal registers are erased if the
auxiliary voltage supply to the relay is disrupted,
only the set values and the number of
autoreclosings are maintained in the registers at
a voltage failure.
The number of the registers varies with different
module types. The function of the registers are
illustrated in the descriptions of the separate
relay modules. Additionally, the system panel
contains a simplified list of the data recorded by
the various relay modules of the relay assembly.
All C-type relay modules are provided with two
general registers: register 0 and register A.
Register 0 contains, in coded form, the information about e.g. external blocking signals and
status information for the circuit breaker. The
codes are explained in the descriptions of the
relay modules.
6
Register A contains the address code of the relay
module as required by the serial communication
system. Example 1 on page 4 shows how the
address code is altered. Submenu 1 of register A
contains the data transfer rate value expressed in
kilobaud for the serial communication.
Submenu 2 of register A contains a bus traffic
monitor for the SPACOM system. If the protective relay, which contains the relay module, is
linked to a system including the control data
communicator and the data communication
system is operating, the counter reading of the
monitor will be zero. Otherwise the digits 1...255
are continuously rolling in the monitor.
Submenu 3 contains the password required for
changing the remote settings. The address code,
the data transfer rate for the serial communication and the password can be set manually or via
the serial communication bus. For manual setting see example 1.
The start value for the address code and the
password is 001 and that for the data transfer
rate 9.6 kilobaud.
Trip-test mode
The selected starting or tripping is activated by
simultaneous pressing of the push-buttons STEP
and RESET. The signal remains activated as
long as the two push-buttons are being pressed.
Register 0 also allows access to the so called
Trip-test function, which allows the output
signals of the relay module to be activated one by
one. If the auxiliary relay module of the protection assembly is in place, the auxiliary relays will
be included in the testing.
The self-supervision output is activated by pressing the STEP button once when no setting knob
indicator is flashing. The IRF output is activated in about 5 seconds after pressing of the
STEP button, and resets after that. Simultaneously, the display returns to the main menu and
performs the initial testing indicated by rolling
digits 0...9 in the display several times.
When pressing the RESET button for about 10
seconds, the three green digits to the right start
flashing to indicate that the relay module is in
test position. The indicators of the setting knobs
indicate by flashing which output signal can be
activated. The required output function is selected by pressing the RESET button for about
1 second, until the following LED indicator
starts flashing.
The signals are selected in the order illustrated in
fig. 4.
The indicators of the setting knobs refer to the
following output signals:
Setting knob 1 SS1
Starting of stage 1
Setting knob 2 TS1
Tripping of stage 1
Setting knob 3 SS2
Starting of stage 2
Setting knob 4 TS2
Tripping of stage 2
No indication IRF
Self-supervision
IRF
SS1
TS1
SS2
TS2
REGISTER 0
RESET
10 s
RESET
1s
STEP
RESET
1s
STEP+
RESET
RESET
1s
STEP+
RESET
RESET
1s
STEP+
RESET
RESET
1s
STEP+
RESET
Fig. 4. Sequence order for selecting the output signals in the Trip-test mode.
If e.g. the indicator of the setting knob 2 (second
from the top) is flashing, and the push-buttons
STEP and RESET are being pressed, the signal
TS1 (tripping of stage 1) is activated. Return to
the main menu is possible at any stage of the
Trip-test sequence scheme, by pressing the
RESET button for about 10 seconds. If the
module is left in the Trip-test mode, it will
return automatically after approx. 5 minutes.
7
Example 2:
Trip-test function. Forced activation of the outputs is made as follows:
d)
Press the RESET button for about 1 second
until the indicator of the second setting knob
starts flashing.
a)
Step forward on the display to register 0.
b)
Press the RESET button for about 10 seconds
until the three green digits to the right and the
LED indicator of the uppermost setting knob
start flashing.
c)
Press the push-buttons RESET and STEP simultaneously. Then the starting of stage 1 (e.g.
the I>-stage of the overcurrent module SPCJ
3C3) is activated and, simultaneously, the indicator of the stage starts glowing yellow.
e)
Press the push-buttons RESET and STEP simultaneously to activate tripping of stage 1 (e.g.
the I>-stage of the overcurrent module SPCJ
3C3). The indicator of the concerned stage
starts glowing red.
f)
Starting and tripping of the second stage is
activated in the same way as stage 1. The indicator of the third or fourth setting starts flashing to
indicate that the concerned stage has been activated.
g)
To activate the self-supervision output step towards the test position, where no indicator is
flashing. Press the STEP button once. In about
5 seconds the red IRF indicator starts glowing
and the IRF output is activated. Shortly thereafter the indicator goes out and the output automatically resets. At the same time the module
leaves the test position.
h)
It is possible to leave the trip test mode at any
step of the sequence scheme by pressing the
RESET button for about 10 seconds until the
three digits to the right stop flashing.
8
Operation
indicators
A measuring relay module is provided with two
separate operating stages, each of which with its
own yellow/red operation indicator on the lower
part of the front plate of the relay module.
The operation indicator starts glowing yellow
when the operating stage starts and red when a
delayed tripping operates. The functions of the
start and operation indicators are described in
detail in the different protection relay module
manuals.
Fault codes
In addition to the protective functions the relay
module is provided with a self-supervision system which continuously supervises the function
of the microprocessor, its program execution
and the electronics.
In most fault situations a fault code, indicating
the nature of the fault, appears on the display of
the module. The fault code, which consists of a
red digit (1) and a three digit green code number,
cannot be removed from the display by resetting. When a fault occurs, the fault code should
be recorded and stated when service is ordered.
When the self-supervision system has detected a
permanent fault in the relay module, the red
IRF indicator on the panel starts glowing soon
after the fault was discovered. At the same time
the module puts forward a signal to the selfsupervision contact of the relay assembly.
9
1MRS 750638-MUM EN
ABB Oy
Distribution Automation
P.O.Box 699
FI-65101 Vaasa
FINLAND
Tel. +358 (0)10 22 11
Fax.+358 (0)10 22 41094
www.abb.com/substationautomation