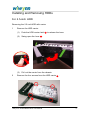
1
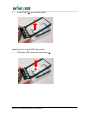
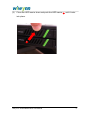
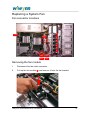
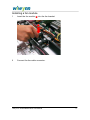
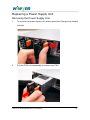
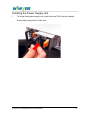
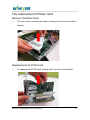
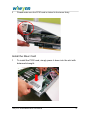
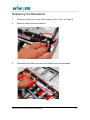
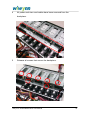
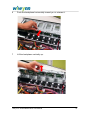
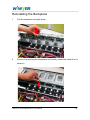
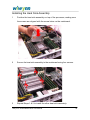
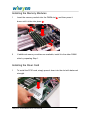
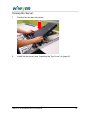
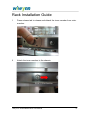
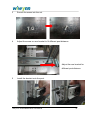
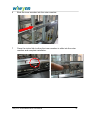
Wiwynn™ SV300
Maintenance
User Manual
Version 1.1
Published Jan 2014
Copyright © 2014 Wiwynn. All rights reserved
Content
System Upgrades ......................................................................................4
Opening the Server ...................................................................................4
Removing the Top Cover .............................................................................. 4
Installing the Top Cover ................................................................................ 5
Installing and Removing HDDs ...................................................................... 6
For 2.5-inch HDD ......................................................................................... 6
Replacing a System Fan ...........................................................................10
Fan connector locations .............................................................................. 10
Removing the fan module ........................................................................... 10
Installing a fan module ................................................................................ 11
Replacing a Power Supply Unit ...............................................................12
Removing the Power Supply Unit ............................................................... 12
Installing the Power Supply Unit................................................................. 13
The replacement of Riser Card ................................................................14
Remove the Riser Card ............................................................................... 14
Replacement of PCIE Card .......................................................................... 14
Install the Riser Card ................................................................................... 16
Replacing the Backplane .........................................................................17
Reinstalling the Backplane ......................................................................20
Replacing the Components .....................................................................22
Removing the Heat Sink Assembly .............................................................. 22
Removing the Riser Card ............................................................................ 23
Removing the Processor ............................................................................. 24
Removing the Memory Modules................................................................. 26
Reinstalling the Components ..................................................................27
Installing the Processor ............................................................................... 27
Installing the Heat Sink Assembly................................................................ 28
Installing the Memory Modules .................................................................. 29
Installing the Riser Card .............................................................................. 29
Closing the Server ....................................................................................... 30
Rack Installation Guide ...........................................................................31
Wiwynn™ SV300 Maintenance User Manual
2
Copyright
Copyright © 2013 by Wiwynn Corporation. All rights reserved. No part
of this publication may be reproduced, transmitted, transcribed, stored
in a retrieval system, or translated into any language or computer
language, in any form or by any means, electronic, mechanical,
magnetic, optical, chemical, manual or otherwise, without the prior
written permission of Wiwynn Corporation.
Disclaimer
The information in this guide is subject to change without notice.
Wiwynn Corporation makes no representations or warranties, either
expressed or implied, with respect to the contents hereof and
specifically disclaims any warranties of merchantability or fitness for
any particular purpose. Any Wiwynn Corporation software described
in this manual is sold or licensed "as is". Should the programs prove
defective following their purchase, the buyer (and not Wiwynn
Corporation, its distributor, or its dealer) assumes the entire cost of all
necessary servicing, repair, and any incidental or consequential
damages resulting from any defect in the software.
Wiwynn™ SV300 Maintenance User Manual
3
System Upgrades
Opening the Server
Removing the Top Cover
1
Loosen the one screw
2
Put your hands on the green pad
3
Lift it
3
1
on the rear of the chassis.
2
and push the cover toward the rear.
off from the chassis
1
2
Wiwynn™ SV300 Maintenance User Manual
4
3
Note: Before opening the Top Cover and replace any components, please first turn off the
system and unplug the power cord to avoid any malfunction of the system.
Installing the Top Cover
1
Slide the top cover toward the front
1
until it is closed.
1
2
Secure the one screw back to the rear of the chassis.
Wiwynn™ SV300 Maintenance User Manual
5
Installing and Removing HDDs
For 2.5-inch HDD
Removing the 2.5-inch HDD with carrier
1
Remove the HDD carrier.
(1)
Push the HDD carrier latch
(2)
Swing open the lever
2
1
to release the lever.
.
1
2
(3)
2
Pull out the carrier from the chassis.
Remove the four screws from the HDD carrier
1
.
1
Wiwynn™ SV300 Maintenance User Manual
6
3
Lift the HDD
2
up from the carrier.
2
Installing the 2.5-inch HDD with carrier
1
Place the HDD down into the carrier
1
.
1
Wiwynn™ SV300 Maintenance User Manual
7
2
Secure the HDD to the carrier with four screws
2
.
2
3
Install the HDD carrier.
(1)
Slide the HDD carrier all the way into the drive bay
1
.
1
Wiwynn™ SV300 Maintenance User Manual
8
(2)
Close the HDD carrier lever and push the HDD carrier
2
until it locks
into place.
2
Wiwynn™ SV300 Maintenance User Manual
9
Replacing a System Fan
Fan connector locations
6
Fan6
Fan5
5
4
3
2
1
Fan3
Fan4
Fan1
Fan2
Removing the fan module
1
Disconnect the fan cable connector.
2
Pull up the fan module
and remove it from the fan bracket.
1
1
Wiwynn™ SV300 Maintenance User Manual
10
Installing a fan module
1
Insert the fan module
1
into the fan bracket.
1
2
Connect the fan cable connector.
Wiwynn™ SV300 Maintenance User Manual
11
Replacing a Power Supply Unit
Removing the Power Supply Unit
1
To remove the power supply unit, please press the Orange lever toward
left side.
2
Pull the PSU out horizontally to remove the PSU.
Wiwynn™ SV300 Maintenance User Manual
12
Installing the Power Supply Unit
1
To install the power supply unit, push the new PSU into the chassis
horizontally and push it to the end.
Wiwynn™ SV300 Maintenance User Manual
13
The replacement of Riser Card
Remove the Riser Card
1
The riser card is a screw-free design. Simply pull the riser card off the
chassis.
Replacement of PCIE Card
1
To replace the PCIE card, simply pull it up from the bracket.
Wiwynn™ SV300 Maintenance User Manual
14
2
To install the PCIE card, simply press it down into the slot with balanced
strength.
Wiwynn™ SV300 Maintenance User Manual
15
3
Please make sure the PCIE card is clicked to the tenon firmly.
Install the Riser Card
1
To install the PCIE card, simply press it down into the slot with
balanced strength.
Wiwynn™ SV300 Maintenance User Manual
16
Replacing the Backplane
1
Remove the top cover (see “Removing the Top Cover” on Page 4).
2
Remove cables from the cable tie.
3
Disconnect all power and riser card cables from the backplane.
Wiwynn™ SV300 Maintenance User Manual
17
4
All power and riser card cables have been removed from the
backplane.
5
Release all screws that secure the backplane.
Wiwynn™ SV300 Maintenance User Manual
18
6
Push the backplane horizontally toward you to release it.
7
Lift the backplane vertically up.
Wiwynn™ SV300 Maintenance User Manual
19
Reinstalling the Backplane
1
Put the backplane vertically down.
2
Secure it by pushing the backplane horizontally toward the hard drive to
secure it.
Wiwynn™ SV300 Maintenance User Manual
20
3
Secure all screws that secure the backplane.
4
Connect all power and riser card cables back to the backplane.
5
Install the top cover (see “Installing the Top Cover” on Page 5).
Wiwynn™ SV300 Maintenance User Manual
21
Replacing the Components
1
Remove the top cover (see “Removing the Top Cover” on Page 4).
2
Release the fan duct and lift it from the chassis.
Removing the Heat Sink Assembly
1
Use a phillips screwdriver to loosen the four screws on the heat sink as
shown below.
Wiwynn™ SV300 Maintenance User Manual
22
2
Lift the heat sink away from the mainboard.
3
Repeat Steps 1 & 2 to remove the other heat sink assembly.
Removing the Riser Card
1
Simply pull the riser card off the chassis.
Wiwynn™ SV300 Maintenance User Manual
23
Removing the Processor
IMPORTANT : Before removing the processor from the mainboard, make sure
to create a backup file of all important data.
1
Release and pull up the load levers.
Wiwynn™ SV300 Maintenance User Manual
24
2
Flip open the processor cover.
3
Pull out the processor from the socket.
4
Repeat Steps 1 ~ 3 to remove the other processor.
Wiwynn™ SV300 Maintenance User Manual
25
Removing the Memory Modules
1
Open the locking clips
1
that secure the memory modules.
1
2
1
2
Gently pull the DIMM upward
3
Repeat Steps 1 & 2 to remove additional memory modules.
Wiwynn™ SV300 Maintenance User Manual
2
to pull it away from the chassis.
26
Reinstalling the Components
Installing the Processor
1
Align the slots on the processor with the socket and make sure that
it is properly oriented.
1
2
2
2
Press the processor into place
1
and pull the cover over it.
3
Push the load lever downward
2
until it locks into place.
4
Repeat Steps 1 ~ 2 to install the other processor.
Wiwynn™ SV300 Maintenance User Manual
27
Installing the Heat Sink Assembly
1
Position the heat sink assembly on top of the processor, making sure
the screws are aligned with the screw holes on the mainboard.
2
Secure the heat sink assembly to the mainboard using four screws.
3
Repeat Steps 1 & 2 to install the other heat sink assembly.
Wiwynn™ SV300 Maintenance User Manual
28
Installing the Memory Modules
1
Insert the memory module into the DIMM slot
down until it clicks into place
2
2
1
and then press it
.
1
2
2
If additional memory modules are available, install it in the other DIMM
slots by repeating Step 1.
Installing the Riser Card
1
To install the PCIE card, simply press it down into the slot with balanced
strength.
Wiwynn™ SV300 Maintenance User Manual
29
Closing the Server
1
Position the fan duct into place.
2
Install the top cover (see “Installing the Top Cover” on page 5).
Wiwynn™ SV300 Maintenance User Manual
30
Rack Installation Guide
1
Press release tab to release and detach the inner member from outer
member.
2
Attach the inner member to the chassis.
Slide in this direction
Wiwynn™ SV300 Maintenance User Manual
31
3
Secure the screw into the nut.
4
Adjust the screw on rear bracket to fit different post distance.
Adjust the rear bracket for
different post distance
5
Install the bracket onto the post.
Wiwynn™ SV300 Maintenance User Manual
32
6
Slide the inner member into the outer member
7
Press the circled tab to allow the inner member to slide into the outer
member and complete installation.
Wiwynn™ SV300 Maintenance User Manual
33