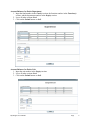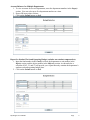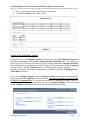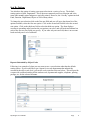
1
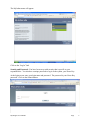
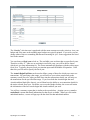
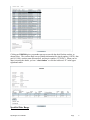
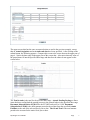
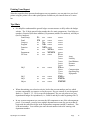
Using My Budget on the My.luther Website Where to Find Instructions on: Logging on Page 1 Account selection Page 3 Specified date range Page 7 Add’l account selections Page 8 Saving selection criteria Page 10 Sorting options Page 11 Printing reports Page 12 Tips/Hints Page 12 Trouble shooting Page 13 What is My.luther? The My.luther website is a way to access Datatel information through your Internet browser. My.luther offers you online access to your account and budget information. How do I access My.luther? http://my.luther.edu (or type my.luther.edu in the address line) Mozilla Firefox is the recommended browser to use. Users have better printing and maneuvering capabilities with Mozilla Firefox rather than Internet Explorer. My Budgets User Manual Page 1 The My.luther menu will appear: Click on the “Log In” link Security and Password: You have been set up with security that is specific to your responsibilities. You also have a unique password to log in to the system, your Norse Key. At the login screen, enter your login name and password. The password is your Norse Key password. Click on the Submit button. My Budgets User Manual Page 2 Click on the links for Faculty Menu or Employee Menu, whichever is appropriate for you.Then click on Budget Selection, and the account selection screen will appear. Account Selection Once you have logged into My.luther, the account selection screen will appear. You may use this screen to generate reports that can list information in a variety of ways depending on the selection and sort combination you select. For example, you may choose to run a report for an individual account balance, account balances for an entire department, or account balances for multiple departments. Several examples are presented in this manual, however, there are many more combinations that you can experiment with to find the reports that work best for you. If you need assistance in getting a report with a specific selection and sort, you may contact the Office for Financial Services at x1015. Individual Account Balances 1. Input the fund number in the Fund(s) section, the function number in the Function(s) section, the department number in the Dept(s) section, and the object number in the Object(s) section. 2. Click on the Submit button, use the short cut key Alt-S or just hit the enter key. My Budgets User Manual Page 3 The “Sort by” selection area is populated with the most common sort order criteria to view your budget and is the same order monthly paper budgets are typically printed. If you wish, you can change either of these to something that has more meaning for you. Some suggestions are listed later in the manual. You can choose a fiscal year to look at. The available years are those that are open fiscal years. Therefore, at May 31st when we are working in two fiscal years, you will be able to choose which year you want information for. The screen automatically populates with the earliest open fiscal year. Typically, the prior fiscal year remains open until the middle of September. Until that time you will need to specify the fiscal year. The Actuals Begin/End Date can be used to define a range of dates for which you want to see transactions. By specifying a date range, you will still see year to date actual totals on the summary screen, however, when you drill down into the transactions details you will only see the transactions for the specified date range. If you leave both the Actuals begin date and Actuals end date blank (like shown), you will then have the ability to see transaction details for the entire selected fiscal year. Each time you access the Budget website, the screen will retain the information of the last Actuals begin and Actuals end date you used. You will see a summary report that is similar to the report below. Anytime you see a number underlined, it means that detail information for that area is available. When you click on the underlined number, a screen will pop up with the detail for that underlined number. My Budgets User Manual Page 4 The following is an example of the detail for the budget. When you are done reviewing the details, you can click the “close window” button or click the red boxed “X” in the upper right hand corner. The following is an example of the detail for the actuals. Again, anything that is underlined is a hyperlink and can be clicked on to reveal more detailed information. My Budgets User Manual Page 5 Clicking on V0182106 gives you another pop up screen with the detail for that voucher, as shown below. The voucher detail screen contains information like check number (112874), date paid (9/11/08), voucher status (Reconciled), and invoice number (557295287). When you are done reviewing the details, you can “close window” or click the red boxed “X” in the upper right hand corner. Specified Date Range My Budgets User Manual Page 6 The upper screen shot has the same account selection as used in the previous example, except that an Actuals begin date and an Actuals end date have been specified. After clicking on the submit button, the following appears. Compare this screen to the screen shot on the upper part of page 6. Notice the date range in the upper part of the screen shot. Also notice that only some of the posted items fit into the specified date range and therefore the others do not appear on the screen below. The Total Actuals is the total for the specified date range. Actuals Pending Posting are those items that have not finished the posting process to the general ledger in the specified date range. Document Subtotal Before 9/1/08 shows the FY2009 totals prior to 9/1/08. Document Subtotal after 9/30/08 is the dollar amount posted to the account from the specified Actuals End Date to the end of the selected fiscal year to date. The Grand Total is the total amount posted to the account for the entire fiscal year to date. My Budgets User Manual Page 7 Account Balances for Entire Department 1. Input the fund number in the Fund(s) section, the function number in the Function(s) section, and the department number in the Dept(s) section. 2. Leave all other sections blank. 3. Click on the Submit button or Alt-S. Account Balances for Entire Unit 1. Input the unit number in the Dept(s) section. 2. Leave all other sections blank. 3. Click on the Submit button or Alt-S. My Budgets User Manual Page 8 Account Balances for Multiple Departments 1. To view accounts for several departments, enter the department numbers in the Dept(s) section. You can select up to five department numbers at a time. 2. Do not fill in any other sections. 3. Click on the Submit button or Alt-S. Report for Student Work and Operating Budget (excludes non-student compensation). 1. Input the fund number in the Fund(s) section, the department or unit number in the Dept(s) section, and the object number in the Object(s) section. As shown below a selection of 502, 51, and 52 will provide you a report that only contains the department’s student work and operating budget lines. 2. Click on the Submit button or Alt-S. My Budgets User Manual Page 9 Account Balances for All Accounts to Which You Have Security Access Note: If you have access to a large number of accounts this may time out and not work for you. 1. To view all of your accounts, leave all the sections blank 2. Click on the Submit button, Alt-S or enter. Saving Your Selection Criteria Each time you access the Budget Selection, the website clears the GL Component selection but remembers the Sort by criteria and the Actuals Begin and Actual End dates. If you typically use the same selection criteria each time you log on, check the Save GL Component Selection box immediately above the Sort by area. The website will then remember your GL Component selection criteria. The GL Component screen will automatically populate with your remembered selection. If you do not want the dates remembered, clear the Actual Begin and Actual End dates boxes. If you click on Budget summary instead of Budget selection, the webpage will automatically bring up the last GL Component selection you made, regardless of whether or not you checked the Save GL Component box. If you always use the same GL component selection, check the save GL component box and the next time you log in, use Budget Summary. This will by-pass the GL component selection screen and go directly to the budget report page. My Budgets User Manual Page 10 Sort By Options You also have the option of sorting your report selection in a variety of ways. The default sorting option is Fund, Department. This is the most commonly used sort selection and is the same order monthly paper budgets are typically printed. However, the “Sort By” options include Fund, Function, Department, Object as well as many others. To change the sort selection click on the first sort field and you will get a drop down list of the options available, select the first sort option. Click on the second sort field to select the second sort option. Click on the third sort field to select the third sort option. The form displays accounts in ascending order based on the sort options you select, and will break and subtotal on each of the first two sort fields you specify. If you enter only one sort field, there is no account break and only one level of subtotals. Reports Subtotaled by Object Codes Following is an example of when you may want to use a sort selection other than the default sorting option. If you would like to get a report for several departments that subtotal the accounts at the object code level, you can do a select similar to the one below. This will provide a report with a subtotal totaling all the student work, departmental supplies, telephone, printing, postage, etc. for the selected accounts. My Budgets User Manual Page 11 Printing Your Report When the report has been generated and appears on your monitor, you can print it to your local printer using the printer icon or other print options available on your internet browser’s menu bar. Tips/Hints It is helpful to understand the general ledger account structure to fully utilize the budget website. The 15-digit general ledger number has five main components: Fund (first two numbers), Function (next three numbers), Department (middle five numbers), and Object (last five numbers). Fund.Group Xx xxx xxxxx xxxxx Fund XX xxx xxxxx xxxxx Category xx Xxx xxxxx xxxxx Program xx XXx xxxxx xxxxx Function xx XXX xxxxx xxxxx Unit xx xxx XXXxx xxxxx Department xx xxx XXXXX xxxxx GL.class xx xxx xxxxx Xxxxx 1xxxx Asset 2xxxx Liability 3xxxx Fund Balance 4xxxx Revenue 5xxxx Expense Obj2 xx xxx xxxxx XXxxx 50xxx Compensation 51xxx Operating Exp 52xxx Equipment Obj3 xx xxx xxxxx XXXxx Obj4 xx xxx xxxxx XXXXx Object xx xxx xxxxx XXXXX When determining your selection criteria, look at the account numbers and see which account components you want to see for the report. Do you want all of your designated funds (i.e., Funds 11, 12, 13) for a specific department? Do you only want to see your departmental budget for expenditures (i.e., Fund 10 and object codes beginning with 5)? In any account component you can enter the full component or one of the subcomponent pieces. For example, you may have multiple department accounts for your area that all begin with the same three digits in the Department component (middle 5 numbers). This is the unit number. You can then just enter the unit number instead of entering each department number. My Budgets User Manual Page 12 If you have access to revenue budget accounts as well as expense budget accounts, you must enter 000 as the function component as well as the function component of the expense codes. OR you can leave the function row blank and only enter the fund and department and by default, all the accounts with the specified fund and department that you have security access to will appear. Security has been set up specifically for your needs. Individuals in the same department may have different security set up (e.g., non-compensation accounts). Thus the same selection criteria may give you different reports based on what you are authorized to view. If you do not have access to an account that you should, please contact the Office for Financial Services at x1015 to request a change in your security set up. Please keep in mind, if you are not the budget officer for those accounts, in order to add those accounts, we will need permission from the budget officer to grant you access. If you would like to keep the current pop up screen of detail open and look at a second transaction details screen, toggle back to the prior screen and drill down on another underlined area. You can maneuver between the screens and even open up additional detail screens. This is helpful when searching for a particular transaction and you do not know exactly what account it was posted to. The best way to learn to use the website is to log on and begin “playing” with it. The website is view-only so you cannot accidentally change any numbers. Try entering different sort options. You may come across one that works well for your needs. Trouble Shooting - Problems you may encounter in using My Budgets Your username and password are case-sensitive. Your password is your Norse Key password. You can change your Norse Key by following the directions on the My.luther website. If you experience problems with changing your Norse Key, please call the Technology Help Desk (x1000). If you enter an invalid account number or an account number you cannot access, you will receive the error message: Your selection of ________ is not allowed by your RSGL record. If you receive any unusual error messages as you are using My Budget, please report them to the Help Desk at extension 1000. My Budgets User Manual Page 13