1
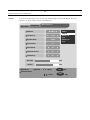
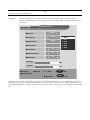
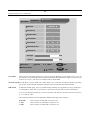
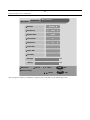
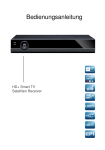
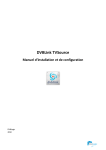
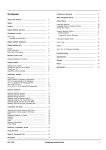
DIGITAL SET-TOP-BOX
Irdeto CA Satellite Receiver
SMP-6200
USER’S MANUAL
Digital Satellite Receiver SMP-6200
Table of Contents
1. PRE-INSTALLATION CHECKUP
3
2. SAFETY WARNINGS
4
3. CONNECTIONS
6
4. REMOTE CONTROL
8
4.1
Remote Control Unit
9
5. MENU INSTRUCTION
5.1
Main Menu
5.1.1
TV Guide
5.1.2
Radio Guide
5.1.3
Installation
5.1.3.1 Installation
5.1.3.1.1
5.1.3.1.2
5.1.3.1.3
5.1.3.1.4
Antenna Setting
Auto Searching
Manual Searching
Factory Default
10
11
11
12
12
13
17
18
24
5.1.4
Channel Management
5.1.4.1 Favorite/Lock Channel
5.1.4.2 Edit Channel
5.1.4.2.1
Move
5.1.4.2.2
Delete
5.1.4.2.3
Rename
5.1.4.3 Delete TP
24
25
25
26
26
27
27
5.1.5
System Setting
5.1.5.1 Time Setting
5.1.5.2 A/V Output
5.1.5.3 Parental Control
5.1.5.4 Timer
5.1.5.5 Power up Channel
28
28
28
29
31
31
5.1.6
System Information
5.1.6.1 CA Status
5.1.6.2 IRD Status
5.1.6.3 Load Status
5.1.6.4 Mail Message
5.1.6.5 Announcement
5.1.6.6 Upgrade software
32
32
33
33
34
34
34
6. SPECIFICATIONS
6.1
6.2
10
Compliance
Major Features
35
35
35
2
Digital Satellite Receiver SMP-6200
1. PRE-INSTALLATION CHECKUP
Please check the following items after opening the package: digital satellite receiver, remote control, battery, A/V cable,
RF cable, and user’s manual. Please keep the packing box, packing materials, and plastic bag in safe place for
repackaging in the future.
3
Digital Satellite Receiver SMP-6200
2. SAFETY WARNINGS
The normal operating temperature of the digital satellite
receiver is between 0ºC and 40ºC.
Please prevent the receiver from operating in dusty
conditions.
The receiver shall be operated in ventilated environment
away from heat sources.
Do not open or disassemble the outer chassis in order to
avoid the danger of electric shock and damaging to the
receiver. Opening the chassis will also void the warranty.
4
Digital Satellite Receiver SMP-6200
The satellite antenna that is connected to the receiver shall
be equipped with anti-shock device from lightning.
When the receiver is inoperative, please consult the
Customer Support.
5
Digital Satellite Receiver SMP-6200
3. CONNECTIONS
Please refer to Figure 1 and Figure 2 for the following instructions. Connect the LNB cable from the dish antenna to the
LNB IN connector on the back of the digital satellite receiver. Use the RCA audio/video cables to connect the Audio
Left, Audio Right, and Video Output to the corresponding connectors on TV.
Figure 1
Front Panel
POWER/ESC
To switch between standby and power-on states.
ef
To adjust the volume output of the receiver when receiving TV programs, or change parameters
within the menu.
cd
When receiving TV programs, pressing these keys switches to the next higher or lower numbered
program, or to move the scroll bar up or down on the menu.
MENU
To bring up the main menu, or exit from menu or submenu.
SELECT
To enter the next lower level submenu or to confirm the parameter value entered.
6
Digital Satellite Receiver SMP-6200
Figure 2
Rear Panel
LNB OUT
Satellite signal loop through terminal
LNB IN
Satellite signal input terminal from LNB
RS-232
RS-232 serial port
S-VIDEO
Connect to S-VIDEO Jack of the TV or VCR
VIDEO (Yellow)
Line signal output of video
AUDIO (White)
Line signal output of left audio channel
AUDIO (Red)
Line signal output of right audio channel
DIGITAL AUDIO
Connect to digital amplifier
RF OUT
PAL CH21-69
RF signal output to TV
NTSC CH3-4
RF IN
RF signal input from ANT or CATV system
AC 90-240V
50Hz/60Hz
AC power cord
POWER
Receiver power switch
7
Digital Satellite Receiver SMP-6200
4. REMOTE CONTROL
KEY
POWER
Directly goes into mail screen.
TV/AV
Switch output between TV, AV and VCR.
0~9
SIGNAL
FAVLIST
FAV+ / FAVTIMER
Remote Control
Turns power ON/OFF of the receiver.
MAIL
TV/RADIO
Figure 3
FUNCTION
Switches between TV and Radio mode.
Enters number of the required menu item or
selects a channel number to watch.
Displays the signal strength and quality
information.
Displays the favorite channel list.
Moves up/down in the favorite channel list.
Calls up Timer Recording Table.
EPG
Calls up the EPG (Electronic Program Guide).
AUD
Selects the audio input mode.
INFO
Displays the selected channel information in TV
guide screen or radio guide screen.
PRV
Returns to the previous channel.
R/L
Selects the different audio output modes.
EXIT
MENU
OK
CH+, CH-
VOL+, VOLMUTE
TELETEXT
Exits from current menu/submenu.
Presses this key one time to run menu on screen
and calls command box.
Executes the selected item in the menu screen, or
enters the desired value in any input mode.
These keys are used to switch to the next higher
or lower program, or to move the scroll bar up or
down in the menu.
These keys are used to adjust the volume output
level of the receiver, or to select the next
available parameters within the menu.
This key is used to toggle in or out of muting
mode.
Display teletext, if there is teletext information in
stream.
8
Digital Satellite Receiver SMP-6200
4.1
Remote Control Unit
Please refer to the following diagram (Figure 4) when using the remote control. The maximum distance for usage is 10
meters (30 feet) with look angle 60 degrees. Please aim the infrared transmitter in the front of the remote control to the
front panel of the receiver.
Figure 4
Remote Control Unit Range
9
Digital Satellite Receiver SMP-6200
5. MENU INSTRUCTION
5.1
Main Menu
The contents of main menu are as follows:
Main Menu
Installation
Channel Management
System Setting
System Information
Move
OK
Select
EXIT
Exit
Installation
Installation is used to search for new services or to edit existing ones. It can also be used to load the default setup of the
receiver.
Channel Management
This is used to edit the downloaded channels, to set the favorite channels and to lock channels. User can also delete the
stored TP.
System Settings
The system settings provide a convenient way of selecting different power-up channels, adjusting the time and A/V
output mode, and adjusting parental control rating.
System Information
System information provides all information regarding the receiver, including CA, loader, mail message, announcement,
and all details of the upgraded software.
10
Digital Satellite Receiver SMP-6200
5.1.1
TV Guide
This shows the list of TV program, press OK button can enter to TV guide.
You can select one of the TV programs (event name) by pressing c/d keys follow with pressing the OK key.
You can press the Info button to show the channel information.
Guide
MainTV
Menu
1. Lawyers TV
2. TV TWRAM
3. VPTV
4. Planeta TV
5. CGNTV
6. HRT
7. CMC
8. Suroyo TV
5.1.2
Radio Guide
This shows the list of Radio program, press TV/Radio key to change the options between
“TV guide” and “Radio Guide” in TV guide screen.
You can access one of the Radio programs (event name) by pressing c/d keys follow with pressing the OK key.
You can press the Info button to show the channel information.
Main
Menu
Radio
Guide
1. Radio 1
2. Radio 2
3. Radio 3
4. Radio 4
5. Radio 5
6. Radio 6
7. Radio 7
8. Radio 8
11
Digital Satellite Receiver SMP-6200
5.1.3
Installation
Installation is used to search for new services or edit existing ones. It can also be used to load the default setup of the
receiver.
To enter this menu, you have to input the PIN Code first. The default PIN Code is 0000.
Main Menu
Installation
Message Box
Channel Management
Please Input Your Password
System Setting
xx
System Information
Move
5.1.3.1 Installation
OK
Select
EXIT
Exit
This menu provides all the settings for customizing. There are two ways in searching
new services, auto search and manual search. Resetting to default setup is also set in this
menu.
Main Menu
Installation
Antenna Setting
Auto Search
Manual Search
Factory Default
Move
OK
Select
EXIT
Exit
12
Digital Satellite Receiver SMP-6200
5.1.3.1.1
Antenna Setting
You can select the Antenna and LNB settings for service searching, as well as the settings of 22KHz tone and DiSEqC
switch and dish options. There are 32 possible antenna settings. The values set in this menu are available for selection in
other Service Searching Menus. LNB type has two options to switch to, normal and universal. If normal is selected,
there will be only one Freq available. If universal is selected, there will be two frequencies provided to be selected, i.e.,
LNBF Freq low and LNB Freq High.
Main Menu
Installation
Antenna Setting
● Antenna
AMC-4 ● LNB Type
Normal ● Frequency
12120
● LNB Power
● 22KHz
AUTO ● DiSEqC
OFF ● Dish
FIXED ● Save
● Auto Search
ON
Move
OK
OK
● Save & Exit
Select
EXIT
Exit
Press c/d keys to choose between the following items, press e/f to change its value. Press OK to show all available
options.
Antenna
It shows the satellite name. User can select the satellite name by pressing e/f keys. The total
number is 32.
13
Digital Satellite Receiver SMP-6200
LNB Type
There is two options to be selected from: normal and universal. Press e/f keys to switch between
the options. If normal is selected, the figure is as above, if the universal is selected, the figure is as
following:
Main Menu
Installation
Antenna Setting
● Antenna
AMC-4 ● LNB Type
Universal
● LNB Freq Low
9750
● LNB Freq High
10600
● LNB Power
● 22KHz
AUTO ● DiSEqC
OFF ● Dish
FIXED ● Save
● Auto Search
ON
Move
OK
OK
● Save & Exit
Select
EXIT
Exit
14
Digital Satellite Receiver SMP-6200
Frequency
When the LNB Frequency is single, press OK to display the list of Frequency, then press c/d keys
to select. User can always select “user defined” to add a new Frequency.
Main Menu
Installation
Antenna Setting
● Antenna
AMC-4 ● LNB Type
Normal ● Frequency
12120
● LNB Power
ON
● 22KHz
ON
● DiSEqC
OFF ● Dish
FIXED ● Save
● Auto Search
Move
1. 5150
2. 9750
3. 10600
4. 10700
5. 10750
6. 11200
OK
OK
● Save & Exit
Select
EXIT
Exit
LNB Power
Press e/f keys to switch the LNB Power between ON and OFF.
22KHz
When LNB type is set to normal, 22KHz has two different options: ON and OFF. When LNB type is
set to universal, 22KHz will be auto selected. Press e/f keys to change between the options. Set
OFF to select dual-LNB or set ON to select two antennas connected to a 22KHz tone switch.
DiSEqC
According to the option and position of DiSEqC switch, you can select from A to D of DiSEqC and
turn it OFF.
Dish
Press e/f keys to switch between the options fixed and motor. Setting to fixed, the dish can not be
moved. Setting to motor, the dish will be movable.
Help Menu
Press c/d keys to select between the following items, presse/for input 0~9 to change its value:
press OK to show all available options.
Press Red key on remote to save the settings. The saved message will be displayed. After saving, this menu will remain
the same.
15
Digital Satellite Receiver SMP-6200
Main Menu
Installation
Antenna Setting
● Antenna
AMC-4 ● LNB Type
Normal ● Frequency
11300
Message Box
13/18V ● LNB Power
Saving data, Please wait…
AUTO ● 22KHz
● DiSEqC
OFF ● Dish
FIXED ● Save
● Auto Search
Move
OK
OK
● Save & Exit
Select
EXIT
Exit
Press Blue key on remote, the setting will be saved and meanwhile it returns to the previous menu.
Press Green key on remote, it will directly get into auto search menu.
16
Digital Satellite Receiver SMP-6200
5.1.3.1.2
Auto Searching
To enter this menu, user can press OK key from the installation screen. There are two bars on the bottom to indicate the
signal strength and quality. The bars in green color show the signal is in good condition. This menu will automatically
search for the existing channels by the frequencies.
Main Menu
Installation
Auto Search
● Satellite
AMC-4
● Frequency
12120
● Scan mode
All
● Start Scan
Move
● Antenna Setup
Select
OK
OK
EXIT
Exit
Satellite
It shows the satellite name. User can select the satellite name by pressing e/f keys. The total
number is 32. Press OK key to show all satellite lists.
Frequency
It shows the frequency of the transponder user selected. The corresponding symbol rate and
polarization that have been confirmed. Press OK to display the list of existing frequencies.
Scan Mode
It shows two scan modes in this entry by pressing e/f key. Set scan mode to all, all the channels in
the transponder you selected will be download if the signal is locked. Set scan mode to FTA, only
free-to-air channels can be downloaded.
Help Menu
Press c/d keys to select between the following items, presse/for input 0~9 to change its value:
press OK to show all available options.
Press Red key on remote to get into search menu.
Press Blue key on remote to return to antenna setting menu.
17
Digital Satellite Receiver SMP-6200
5.1.3.1.3
Manual Searching
After setting the search parameters like frequency, symbol rate etc, you can find the services in the transponder you
selected. There are two bars on the bottom to indicate the signal strength and quality. The bars in red color show the
signal is in good conditions.
Main Menu
Installation
Manual Search
AMC-4 ● Satellite
● Frequency
12120
● Symbol Rate
30000
● Polarization
V
● Scan Mode
All
● Network Search
Off
● PID Search
Off
Strength
60%
Quality
76%
● Start Scan
● Edit TP
Move
OK
OK
● Antenna Setup
Select
EXIT
Exit
You can press c/d keys to select between the following items, press e/f key or 0…9 to change its value.
18
Digital Satellite Receiver SMP-6200
Satellite
It shows the satellite name. User can select the satellite name by pressing e/f keys. The total
number is 32. Press OK key to show all satellite lists.
Main Menu
Installation
Manual Search
AMC-4
● Satellite
● Frequency
12120
● Symbol Rate
30000
● Polarization
V
AMC-1
AMC-4
2.
9750
Galaxy 16
IA 5
Galaxy 3C
IA 6
● Scan Mode
All
● Network Search
Off
● PID Search
Off
Strength
60%
Quality
76%
● Start Scan
● Edit TP
Move
OK
OK
● Antenna Setup
Select
EXIT
Exit
19
Digital Satellite Receiver SMP-6200
Frequency
It shows the frequency of the transponder user selected. Press OK to display the list of existing
frequencies. If the frequency exists in the list, the corresponding symbol rate and polarization are also
confirmed.
Main Menu
Installation
Manual Search
AMC-4 ● Satellite
● Frequency
12120
● Symbol Rate
30000
● Polarization
V
● Scan Mode
All
● Network Search
Off
● PID Search
Off
1.
1. 4000
4000
2. 3706
3. 3760
4. 3840
5. 3860
6. 3880
Strength
60%
Quality
76%
● Start Scan
● Edit TP
Move
OK
OK
● Antenna Setup
Select
EXIT
Exit
When user selects new TP stored on the bottom of the list, user can input the frequency by using digital keys from 0 to 9;
furthermore, the symbol rate and polarization also need to be input by user. User can set the polarization of the
transponder to Horizontal or Vertical. In horizontal case, the 18V and in vertical case, the 13V are output through LNB
line.
20
Digital Satellite Receiver SMP-6200
Main Menu
Installation
Manual Search
AMC-4 ● Satellite
● Frequency
● Symbol Rate
● Polarization
V
● Scan Mode
All
● Network Search
Off
● PID Search
Off
Strength
60%
Quality
76%
● Start Scan
● Edit TP
Move
OK
OK
● Antenna Setup
Select
Scan Mode
EXIT
Exit
There are two scan modes in this entry, select by pressing e/f key. If scan mode is set to ‘All’, all
the channels in the transponder that are selected will be downloaded when the signal is locked. If scan
mode is set to ‘FTA’, only free-to-air channels will be downloaded.
Network Search Press e/f key to select either ON or OFF. When ‘ON’ is selected, pressing the Red key will bring
the menu to TP search menu and all the channels in the network table will be downloaded.
PID Search
In PID search mode (ON), user is provided with the searching of a specified services by inputting it’s
a/V/PCR PID’s. When ‘ON’ is set and ‘OK’ is pressed, user will be able to search by PID menu.
User can set the PID information in services searching. The PID is in decimal value. Press the keys
0…9 to enter the value.
The meanings of these items are explained in Manual Searching menu except for:
PCR PID
V PID
A PID
This is used to set PCR PID of certain service.
This is used to set Video PID of certain service.
This is used to set Audio PID of certain service.
21
Digital Satellite Receiver SMP-6200
Main Menu
Installation
Manual Search
AMC-4 ● Satellite
● Frequency
12120
● Symbol Rate
30000
● Polarization
V
● PID Search
On
● Video PID
● Audio PID
● PCR PID
Strength
0%
Quality
0%
● Start Scan
● Edit TP
Move
OK
OK
● Antenna Setup
Select
EXIT
Exit
After setting these values, press Red key to perform service searching or press MENU key to exit.
22
Digital Satellite Receiver SMP-6200
TP Scan Menu
Main Menu
Installation
Manual Search
TV
Radio
1.
1.Lawyers TV
2. TV TWRAM
3. VPTV
4. Planeta TV
5. CGNTV
12120 V 30000 Ksps
Strength
60%
Quality
76%
Move
Start Scan
OK
Select
EXIT
Exit
Press Red key to get into TP Scan menu.
Antenna Setup Press Blue key to return to antenna setting menu.
Edit TP
Press Green key to edit the current TP parameter.
After setting these values, press Red key to perform service searching or press MENU key to exit.
23
Digital Satellite Receiver SMP-6200
5.1.3.1.4
Factory Default
When you select YES, the system setup and channel data will be changed to the default values. All the service
information manually entered by user will be lost! To exit, select NO or press MENU key.
Main Menu
Factory Default
Installation
Message Box
This will turn STB into factory default
status. Do you still want to proceed?
●YES
Left/Right
5.1.4
OK
●NO
EXIT
Save
Exit
Channel Management
This menu gives user the options to mark Favorite / Lock their TV and Radio channels. User can Rename, Delete, Move
and Edit an existing service. Besides services, all existing TP can also be deleted.
Main Menu
Channel Management
Favorite/Lock Channel
Edit Channel
Delete TP
Move
OK
Select
EXIT
Exit
24
Digital Satellite Receiver SMP-6200
5.1.4.1 Favorite/Lock Channel This menu allows users to mark favorite/lock the existing channels.
1.
2.
3.
4.
5.
6.
Press OK key to enter the favorite/lock menu
Press c/d key to select a channel.
Press Yellow key to mark favorite for channel you selected.
Press Blue key to lock the channel you selected.
Press TV/RADIO key to switch the channel list between TV and Radio.
Press Exit key to exit this menu. Upon exiting, a message box will be displayed.
Main Menu
Channel Management
Favorite/Lock Channel
1. Lawyers TV
2. TV TWRAM
3. VPTV
4. Planeta TV
5. CGNTV
6. HRT
7. CMC
8. Suroyo TV
● Favorite
EXIT
● Lock
5.1.4.2 Edit Channel
Move
Exit
This menu allows users to Move, Delete and Rename TV services.
Main Menu
Channel Management
Edit Channel
Move
Delete
Rename
Move
OK
Select
EXIT
Exit
25
Digital Satellite Receiver SMP-6200
5.1.4.2.1
1. Press c/d key to select a channel that you would like to move.
2. Press OK key to confirm. The color of this service will become grey.
3. Press the c/d key to move the highlighted channel to a new position.
4. Press the OK key to confirm. There will be a message box indicating ‘Yes’ or
‘No’ selections. Press YES to final confirm or press NO to cancel.
Move
Channel Management
Main Menu
Edit Channel
Move
1. Lawyers TV
2. TV TWRAM
3. VPTV
4. Planeta TV
5. CGNTV
6. HRT
7. CMC
8. Suroyo TV
OK
5.1.4.2.2
Move
Left/Right
EXIT
Exit
Move/Confirm
Delete
User can delete unwanted channels by:
1. Press c/d key to select a channel that you would like to delete.
2. Press OK key, a message box will appear.
3. Select ‘No’ to cancel or ‘Yes’ to confirm.
Main Menu
Channel Management
Edit Channel
Delete
1. Lawyers TV
2. TV TWRAM
3. VPTV
4. Planeta TV
5. CGNTV
6. HRT
7. CMC
8. Suroyo TV
OK
Move
OK to delete
Left/Right
EXIT
Exit
26
Digital Satellite Receiver SMP-6200
5.1.4.2.3
1. Press c/d key to move to the service.
2. Press OK key, the ‘Rename’ box will appear.
3. Press c/d or e/fkey to select the desired character.
4. Pressd key to select OK key.
5. Press OK key to confirm or MENU key to discard the changes and exit.
Rename
Channel Management
Main Menu
0
K
e
y
1
L
f
z
2
M
g
3
N
h
.
4
O
i
+
Edit Channel
1. 745 XING KONG
2. 715 Ph’x Movies
3. 721 Movies Int’l
5
6
7
8
9
A
B
C
P 4. Q
R itlS
T t.U
V
W
Subt
e Tes
j
k
l
m
n
o
p
q
- 5. $STAR
@
!
<
Movies
Int’l
6. 726 Ph’x Info
11.748
Star eWorld
7. 739 Movi
s Int’l Asi
D
X
r
E
Y
s
F
Z
t
Rename
G
a
u
H
b
v
I
c
w
J
D
X
OKPhoenix Chin
Exit es
8. 743
16. 604 Channel [V] In
OK
5.1.4.3
Move
1. Press c/d key to move to the satellite you want to select in satellite list.
2. Press c/d or fkey to select the TP you want to delete.
3. Press c/d key to move to the TP you want to select in transponder list.
4. Press OK key, a confirmation message box will appear.
5. Select YES to delete or NO to cancel.
Channel Management
Main Menu
Delete TP
Satellite
AMC-4
Move
OK to delete
Transponder
1. 12120
2. 12120
3. 12120
Galaxy 16
IA 5
Galaxy 3C
IA 6
Galaxy 11
AMC3
OK
Exit
OK to rename
Delete TP
EXIT
Left/Right
Left/Right
EXIT
Exit
27
Digital Satellite Receiver SMP-6200
5.1.5
System Setting
5.1.5.1 Time Setting
Time Zone
Set the local time zone offset of GMT from –12 to +12.
Summer Time
Set it to ON or OFF. ‘ON’ means summer time function works.
Year/Month/Day/Hour. This option is only provided to show the current time. It is not
changeable by user.
Main Menu
System Setting
Time Setting
● Time Zone
GMT
● Summer Time
OFF
● Year
2006
● Month
1
● Day
5
● Hour
03:21
Left/Right
OK
EXIT
Save
Exit
5.1.5.2 A/V Output
Main Menu
System Setting
A/V Output
● Menu Language
English ● Brightness
64
● Color
48
● TV Screen
4:3
● TV Type
AUTO ● Volume Control
OFF
● Transparent
10%
NTSC ● RF Tuner
● RF Channel
● SCART Format
Move
OK
Save
Left/Right
38
SVIDEO EXIT
Exit
28
Digital Satellite Receiver SMP-6200
Menu Language
User can select the menu language, such as English, Chinese, etc.
Brightness
User can select the brightness value.
Color
User can select the color value.
TV Screen
User can set the screen aspect ratio of TV (4:3,4:3panscan, 4:3LB, 16:9, or 16:9pillar)
TV Type
User can set the video output mode to Auto, NTSC or PAL.
Volume Control
User can set the volume control mode to ON or OFF. If ON is set, the volume is not
adjustable, if OFF is set, the volume is adjustable.
Transparent
User can adjust transparent to any status from 0% to 100%.
RF Tuner
User can select RF output mode of NTSC, PAL_DK, PAL_BG, PAL_I if RF is enabled.
RF Channel
User can select the RF output channel from 21 to 69.
SCART Format
User can set scart output format
Press OK key to save the changed settings or press EXIT to cancel.
5.1.5.3 Parental Control
To enter this menu, the current password is required. The default password is “0000”.
Main Menu
System Setting
Time Setting
Message Box
Please Input Your Password
Move
OK
Select
EXIT
Exit
29
Digital Satellite Receiver SMP-6200
User can press e/fkey to switch select parental control option among UNBLOCK, 10,13,
16, 18 and ALL_BLOCK.
Parental Control
Main Menu
System Setting
Parental Control
UNBlock ● Parental Control
● New Password
● Confirm Password
Move
OK
Save
Left/Right
EXIT
Exit
UNLOCK
If set to ‘UNBlock’, all the channels are viewable no matter the selected channel is
categorized by age 10/13/16/18. If set to ‘10/13/16/18’, only users whose age is equal to or
more than the channel’s defined can view the particular channel.
ALL_BLOCK
If set to ‘All_Block’, all the channels are not viewable until a correct pin code is keyed in by
user.
New Pin Code
To change the Pin Code, input new Pin code (four digits)
Confirm Password
Confirm the new pin code if it is same with new pin code.
After all changed settings are finished, press OK key to save.
30
Digital Satellite Receiver SMP-6200
5.1.5.4 Timer This menu provides the users to record the programs they want to view.
Timer
System Setting
Main Menu
01/05 THU 06:08 am
No.
01
02
03
04
05
06
07
DAY
WED
WED
M-F
WED
OFF
OFF
OFF
Timer Lock . On
START
: 19
: 36
: 38
: 41
: 07
: 07
: 07
08
03
03
03
06
06
06
am
am
am
am
am
am
am
● Erase All Timers
● Timer Lock
OK
08
03
03
03
06
06
06
:
:
:
:
:
:
:
END
30
38
41
44
08
08
08
am
am
am
am
am
am
am
CHANNEL
19,775 Mo
2,715 Ph’
3,721 Mov
1,749 Sta
Move
Exit
DEST
TV
TV
TV
TV
TV
TV
TV
OK
Save
EPG
EPG
The record event can be captured from the EPG event by pressing the EPG key from EPG MENU or users can input it
manually.
1.
2.
3.
4.
5.
6.
7.
Press RED key to erase all timers
Press BLUE key to lock the timer, every timer event can be run as scheduled correctly.
Press BLUE key twice to unlock the timer, if the timer lock is set to off, then all the timers will not work.
Press c/d key to move the event up/down or change the time values.
Press OK key to save the timer recording event and exit this menu.
Press EPG key to enter into EPG MENU.
Press EXIT directly to cancel the settings and exit this menu. Settings will not be saved.
5.1.5.5 Power up Channel
This is to set the selected channel to be the power up channel.
Main Menu
Power Up Channel
System Setting
OFF
2. TV TWRAM
3. VPTV
4. Planeta TV
5. CGNTV
6. HRT
7. CMC
8. Suroyo TV
OK
Move
TV/Radio Switch
Left/Right
EXIT
Exit
31
Digital Satellite Receiver SMP-6200
1.
2.
3.
4.
5.1.6
Press c/d key to select the channel you want.
Press OK key to confirm this channel to be the power up channel, a confirmation message box will appear.
Select Yes to save or No to cancel.
Press TV/RADIO key to switch the channel list between TV and Radio.
System Information
This menu provides the system information, including CA status, IRD status, Loader status, Mail Information,
Announcement and Software Upgrade.
Main Menu
System Information
CA Status
IRD Status
Loader Status
Mail Information
Announcement
Software Upgrade
Move
5.1.6.1 CA Status
OK
Select
EXIT
Exit
To view the status of CA system.
Main Menu
System Information
CA Status
CA Module:
SmartCard:
Softcell:
2.26B
Number:
No Card
Type:
0xffff
Version:
NONE
State:
0xffff
Transport Stream Information:
TS1:
EMM PID
0x1fff
Service Information:
E00 Service not scrambled
Service Handle 1:
0x0000
Globe Service State:
0x000
Component Stream State:
00
00 00
Monitoring: EMM: 00 00 00 00 00 00 00
ECM: 00 00 00 00 00 00 00 00 00 00
Nationality:
EXIT
Exit
00
00
32
Digital Satellite Receiver SMP-6200
5.1.6.2 IRD Status
To view the system status.
System Information
Main Menu
IRD
12121212
IRD:
55 .5 .55
CA Module:
Loader: 3.4
OpenTV SW:
App SW:
Driver SW:
IRD SW:
Build Date:
None
2.26B
L-17
Exit
EXIT
5.1.6.3 Load Status
-1:0:27
Smart Card
No Card
Firmware:
Softcell:
OK
None
2.0
v1.3
8.16SMD5
Jan 5 2006
IRD Status
To view the status of loader.
System Information
Main Menu
IRD Ser No.:
Manu Code:
Loader Seq:
Variant:
Key Status:
12121212
55
17
55
OK
Loader Ver:
H/W Ver:
Sig Ver:
Key SysID:
Key Ver:
Random
No:
34343434
CRC Part:
Bin2IRD Ver:
Sign Date:
Sign Time:
Dload Time:
EXIT
Exit
3.1 m
05/01/2006
13:34:55
13:35:15
Bin2IRD Ser:
Dload Date:
Image Size:
Dload Dur:
Loader Status
3.4
5
27
-1
0
30
0001
05/01/2006
1214508
00:02:43
33
Digital Satellite Receiver SMP-6200
5.1.6.4 Mail Information
Main Menu
To view the mail content sent from head-end.
1. Press e/f key to wrap the mail.
2. Press Exit key to exit this menu.
3. Press Erase key to clear all the emails.
System Information
Mail Information
Mail Message
This stream is scrambled.
Num [1/8]
Page
5.1.6.5 Announcement
Main Menu
EXIT
Date
● Erase
Exit
To view the announcement content sent from head-end.
1. Press e/f key to wrap the announcement
2. Press Exit key to exit this menu.
3. Press Erase key to clear all announcements.
System Information
Announcement
Announcement
Softcell: ver 2.26B-Demux(SW CA).
Complied
Aug 10 2005 16:49:00
Page
EXIT
Exit
● Erase
5.1.6.6 Upgrade Software
To download the new software from current satellite service. After pressing the “OK” key to download, the message
shall be displayed on the screen. If any downloading service is found, the receiver will restart to download the new
software.
Note: Don’t power off the receiver or disconnect the satellite signal during software downloading process.
34
Digital Satellite Receiver SMP-6200
6. SPECIFICATIONS
6.1 Compliance
This Digital Satellite Receiver meets the DVB-S/MPEG-2 standards for the reception of free-to-air digital
satellite broadcast. It is compatible for SCPC/MCPC, C band, and Ku band signals. The menu of this receiver
is designed such that the customer may set or change the channel frequency, symbol rate. This receiver can
provide you with rich and abundant digital satellite TV programs.
6.2 Major Features
-
MPEG-2 (MP@ML) and DVB-S compatible
Enhanced OSD (On Screen Display) screen font
Storages of up to 3,000 channel data, 2,000 TV programs, and 1,000 radio programs
EPG (Electronic Program Guide) capability
The volume is adjustable
High-resolution picture quality and high fidelity stereo output
SAP (Second Audio Program) stereo capable
Capable of setting PID code to receive specified programs
Signal strength and quality display for convenient dish installation and/or adjustment
Software download capability via RS-232 port (optional)
Embedded Irdeto conditional access with smart card reader
Standards
Tuner
Symbol Rate
Input Frequency Range
Input Signal Range
Input Signal Terminal
Video Decoder Format
Video Output Format
Video Output Aspect Ratio
Video Output Resolution
Audio Decoder Format
Audio Output Mode
Audio/Video Output Connectors
LNB Polarization Voltage
LNB 22KHz Control
DiSEqC Version
Input Voltage
Power Consumption
Dimensions
MPEG-2 DVB-S
QPSK
2 ~ 45 MSps
950 ~ 2150 MHz
-65 ~ -25 dBm
F-type
MPEG-1, MPEG-2
PAL/NTSC (Automatic switching)
4:3, 16:9 and 4:3LB
PAL (720x576), NTSC (720x480)
MPEG-1, MPEG-2
Single, Dual and Stereo
1 x RCA A/V
13/18 Volts with Short-Circuit Protection
ON / OFF, AUTO
1.2
90-240 Volts, 50/60 Hz
30 Watts
300mm (W) x 237mm (D) x 58mm (H)
35
DIGITAL SET-TOP-BOX
COPYRIGHT Home2US Communications, Inc.