1
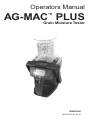
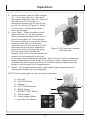
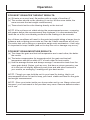
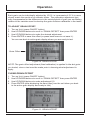
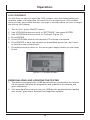
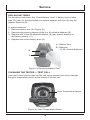
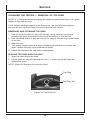
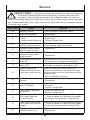
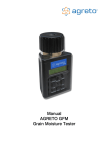
Operators Manual
AG-MAC PLUS
™
Grain Moisture Tester
DOCU-M0143 0813
Operators Manual
AG-MAC PLUS
™
Grain Moisture Tester
ENGLISH
DOCU-M0143 0813
Introduction
THANK YOU for purchasing an Agratronix grain moisture tester.
*Please treat your instrument with care. Misuse such as tossing or
dropping the unit can potentially damage the weigh scale mechanism
or other parts of this device.*
READ THIS MANUAL carefully to learn how to operate this unit correctly. Failure
to do so could result in personal injury or equipment damage.
THIS MANUAL SHOULD BE CONSIDERED a permanent part of this tester and
should remain with the unit when you sell it.
RECORD SERIAL NUMBERS in the warranty section located on page 21
accurately record all the numbers. Your dealer needs these numbers when
you need service or parts. If this manual is kept with the equipment, also file
the serial numbers in a secure place away from the unit.
WARRANTY is provided through Agratronix for customers who operate and
maintain their equipment as described in this manual. The warranty is explained
in the warranty section located on page 21.
This warranty provides you the assurance that Agratronix will back its products where defects appear within the warranty period. In some circumstances,
Agratronix provides field improvements, often without charge to the customer,
even if the product is out of warranty. Should the equipment be abused or
modified to change specifications, the warranty will become void and field
improvements may be denied.
If you do not understand any part of this manual and need assistance, contact
Agratronix Customer Service at 1-800-821-9542.
All information, illustrations and specifications in this manual are based on the
latest information available at the time of publication. The right is reserved to
make changes at any time without notice.
Please visit us at www.AgraTronix.com to view this manual along with the
complete line of Agratronix products.
i
Operation
PAGE
Operation
Components_________________________________________________
Operating Conditions _________________________________________
Operational Messages ________________________________________
Moisture Limit Guidelines ______________________________________
Operating Procedure – Preheating _______________________________
Operating Procedure – Normal Operation _________________________
Average Moisture Measurement Functions _________________________
Select a Different Grain ________________________________________
Weight Test – Test Weight Accuracy ______________________________
Select a Different Language ____________________________________
Adjust Grain Offset (bias/calibration) ______________________________
Clear Grain Offset ____________________________________________
Turn Backlight On or Off _______________________________________
Temperature and Test Weight Units _______________________________
Auto Off Setting ______________________________________________
LCD Contrast ________________________________________________
Personalizing and Updating the Tester_____________________________
1
2
2
3
4
5
8
9
10
11
12
12
13
13
14
15
15
Troubleshooting ____________________________________________ 16
Service
Check Battery Power Levels and Replace Batteries __________________
Clean the Tester – Test Cell ____________________________________
Clean the Tester – Top Ring ____________________________________
Error Codes _________________________________________________
17
17
19
20
Warranty __________________________________________________ 21
Record Serial Numbers ______________________________________ 21
Accessories ________________________________________________ 22
Manufacturer’s Contact Information ____________________________ 23
All information, illustrations and specifications in this manual are based on the
latest information available at the time of publication. The right is reserved to
make changes at any time without notice.
ii
Components
COMPONENTS
KEY
1
2
3
4
5
PART NO.
*PLAS-H0300
*PLAS-D0300
*PLAS-USBP
*06067
*06080
DESCRIPTION
GRAIN HOPPER
BATTERY DOOR
USB PORT COVER
USB CABLE
CARRYING CASE
* Indicates manufacturer’s part numbers.
3
1
2
4
5
1
Operation
OPERATING CONDITIONS
Test cell and grain MUST be free of any condensation or surface moisture.
Moisture on grain or in test cell will cause high readings. Very hot or cool grain
can pick up moisture when it warms or cools.
Because grains are irregularly shaped and may not always pack the same way
in the test cell, minor variations in readings may occur. To enhance accuracy,
always take three (3) successive readings and average the results (See page
8 for Average Moisture Measurement Functions). Empty and refill the tester
with new grain from the sample for test. This unit will automatically average the
3 most recent test results. It is important when emptying the tester to make
sure there is no grain lodged in the cell top ring. See page 16 for Troubleshooting.
The tester is most accurate when grain and tester are between 60˚F (16˚C)
and 90˚F (32˚C). The unit will, however, operate at temperatures between
33˚F (1˚C) and 120˚F (49˚C). For best results, grain temperature should not be
below 40˚F (4˚C) or above 110˚F (43˚C). If the grain temperature is 40˚F more
or less than the temperature of the unit, preheat the tester per instructions on
page 05-3. Condensation on the grain or test cell is best avoided by having the
tester and grain at similar temperatures.
The environment to which a grain sample is exposed can appreciably change
its moisture content. Exposed to the open air, grain can gain or lose 1% to 2%
indicated moisture in only a few minutes. If a sample is to be held for even a
short time before being tested it should be placed into a tightly closed, air-tight
container, such as a re-closable bag or airtight plastic container.
OPERATIONAL MESSAGES
Symbol
Definition
BATTERY LOW
Battery needs replacing
<4.0
Moisture is below the lower limit for this grain
(4% is lower limit for selected grain)
>28.0
Moisture is above the upper limit for this grain (in
this case 28.0% is the upper moisture limit for
the selected grain)
!
Error code (refer to error code section on page
20 in the manual)
2
Operation
CAUTION: Please treat your instrument with care. Misuse such as tossing or
dropping the unit can potentially damage the weigh scale mechanism or other
parts of this device. Use a soft, clean cloth to wipe out the cell, using extreme
caution no to damage the grain temperature sensor at the bottom of the test
cell. It is important when emptying the tester to make sure there is no grain
lodged in the cell top ring (see page 16 for Troubleshooting).
Display Reading - Moisture Limit Guidelines
(Specifications and design subject to change without notice)
MOISTURE RANGE
MOISTURE RANGE
GRAINS
LOW LIMIT
HIGH LIMIT
Barley 2R ____________________ 4% __________________ 26%
Barley 6R ____________________ 4% __________________ 26%
Corn ________________________ 6% __________________ 28%
Millet ________________________ 3% __________________ 22%
Oats ________________________ 5% __________________ 25%
Rapeseed (Canola) ____________ 3% __________________ 20%
Rye _________________________ 5% __________________ 26%
Safflower_____________________ 3% __________________ 20%
Sorghum (Milo) _______________ 7% __________________ 24%
Soybeans ____________________ 4% __________________ 26%
Sunflower Oil _________________ 3% __________________ 22%
Triticale ______________________ 6% __________________ 20%
Wheat: Durum ________________ 4% __________________ 21%
Wheat: Hard Red Spring ________ 5% __________________ 24%
Wheat: Hard Red Winter_________ 4% __________________ 23%
Wheat: Soft Red Winter _________ 4% __________________ 22%
NOTE: If grain temperature is 40˚F (4˚C) or below, or 110˚F (43˚C) or above,
and the grain moisture is near either the high or the low limit of the tester
(listed above), the tester may reduce its operating limits. That is, if the grain
temperature is 35F, and rye grain lower limit is 7% moisture, then the adjusted
lower limit may now be 8.5% moisture due to the cold grain temperature.
DISCLAIMER: The above moisture limits are approximate values and may
vary. Specifications and design are subject to change without notice.
Grain scales will be periodically updated with new grains and limits. New grain
scales and software can be downloaded from www.AgraTronix.com when the
unit is connected to the internet via a computer and USB cord.
3
Operation
OPERATING PROCEDURE – PREHEATING
IMPORTANT: If the temperature of the grain sample is 40˚F more or less than
the temperature of the unit, preheat the tester for best results -- as follows:
PREHEATING PROCEDURE
1. Press and release ON-OFF button (B) to turn on tester. The display (C) will
show the name of the last grain tested at the top. Secure hopper (G) to the
top of the tester (see page 5 for instructions on securing hopper).
2. When the grain to be tested has been selected using the UP/DOWN arrows
(D) fill the grain hopper (G), and pull hopper slide (H) to drop the grain into
the test cell. Allow grain to sit in the hopper as short of a time as possible
since the hopper temperature will alter the grain temperature.
3. After 30 to 60 seconds, empty test cell and immediately refill with fresh grain.
4. Take a test with this fresh grain. Now the test cell and grain should be close
enough in temperature to give a good reading.
Note: The most accurate moisture measurements are achieved when the test
cell and grain temperature are similar.
A –Test Cell
B – ON-OFF Button
C – Display
D – UP / DOWN Arrows
E – BACK Arrow
F – ENTER / TEST Button
G – Grain Hopper
H – Grain Hopper Slider
I – Level Arm with Brush I
G
A
H
C
B
E
D
F
D
Figure 1. AG-MAC PLUS Unit
4
Operation
CAUTION: Please treat your instrument with care. Misuse such as tossing or
dropping the unit can potentially damage the weigh scale mechanism, or other
parts of this device. To add the ability to measure grain test weight results in a
more complex grain testing instrument.
Use a soft, clean cloth to wipe out the cell, using extreme caution no to damage the grain temperature sensor at the bottom of the test cell. It is important
when emptying the tester to make sure there is no grain lodged in the cell top
ring (see page 16 for Troubleshooting).
SECURING THE HOPPER
1. Place the back hopper tab into the center of the base (Figure 2a).
2. Pull level arm forward (Figure 2b) and the hopper will lock into place once
the level arm is released.
Back Hopper
Tab
G
G
H
A
I
B
C
E
D
F
D
Figure 2a. Tab Placement of Hopper
Figure 2b. Pull level arm forward
OPERATING PROCEDURE – NORMAL OPERATION
1. Place Hopper on Tester – Secure empty grain hopper (G) to the top of your
tester. Press and release ON/OFF button (B) to turn on tester. The top of the
display (C) will show the name of the last selected or tested grain. If this
grain has never been tested then the values that show the last test will be
empty. At power up the display shows the results of the last grain tested.
2. Select Grain – If the desired grain is not shown at the top of the display (C)
then use the UP/DOWN arrows (D) to choose grain. Once the desired grain
is selected then press and release the ENTER (F) button to make it your
active grain. Place tester on a stable and mostly level surface. Press ENTER
to initiate test.
3. Fill Hopper – Fill hopper to the rim with grain to be tested. (ensure hopper
slider (H) is pushed in to keep grain from dropping early).
4. When prompted, Pour – Pull the hopper slider (H). This will evenly drop grain
into the test cell (A).
5
Operation
5. When prompted, remove Grain Hopper
(G) – Once test cell is full, then push
the hopper slider (H) back in to close off
the pour hole. Pull level arm (I)
towards the display and lift up on Hop
per (G) to remove it (Figure 3.). Place
it to the side in a safe place where it
won’t be dropped.
6. Level Grain – When prompted, push
grain level arm (I) in a slow steady
motion towards the back of the unit to
push excess grain out of the test cell.
For some grains you may not be able to
initially do this with in one motion,
and if so then pull the level arm (I) half
way back and push again toward the
Figure 3. Pull level arm forward.
back of the test cell to level the grain.
Lift hopper up.
Pull level arm back towards the
display. Look at the level arm brush and
ensure it is not touching the test cell
or the grain test weight will be affected. Once level arm returns (toward the
display) take hands off the tester (if it’s sitting on a flat surface) and it will
automatically start measuring. Remove hands and keep stable since test
weight is the first part of the measurement.
7. Done! – The measurement results, test weight, grain temperature and
average test results are now displayed.
NOTE: Don’t swipe grain too fast with grain level arm.
A –Test Cell
B – ON-OFF Button
C – Display
D – UP / DOWN Arrows
E – BACK Arrow
F – ENTER / TEST Button
G – Grain Hopper
H – Grain Hopper Slider
I – Level Arm with Brush
G
A
H
I
C
B
D
F
E
D
6
Operation
FOR BEST GRAIN TEST WEIGHT RESULTS:
(a) Sit tester on a semi level, flat surface with an angle of less than 5˚.
(b) This surface should not be vibrating (it can be, but the more stable, the
more accurate the test weight measurement)
(c) There should not be a fan blowing directly on the test cell
NOTE: If the unit was not stable during the measurement process, a warning
will appear before the measurements are displayed. It is recommended the
tester be on a flat, non-vibrating surface for the readings to be accurate.
Any of these conditions will result in the grain test weight taking a longer time to
measure and not being as accurate as it can be if these conditions are all met.
The entire test cell is sitting on a precision weigh scale mechanism – that’s why
it’s important to keep it stable (and not to drop the unit or damage may occur).
FOR BEST GRAIN MOISTURE RESULTS:
(a) The closer the grain and test cell temperature are to each other, the better
the results
(b) The tester compensates for temperature but the grain and test cell
temperature should be within 40˚F of each other for best results.
(c) Use the average feature and always average 3 consecutive tests from the
same grain batch. Grains, such as corn, that have a unique geometry, can
sit in the test cell slightly differently each time and add some variance in
your results, so averaging 3 readings will give best results.
NOTE: Though you can hold the unit in your hand for testing, that is not
recommended since it’s hard to keep your hand stable and level for the grain
test weight measurement.
NOTE: Store your tester inside your house when not in use. Always store and
transport your instrument in the provided carry case. Remove batteries when
not in use.
7
Operation
AVERAGE MOISTURE MEASUREMENT FUNCTIONS
There are two “average” functions in your tester.
FUNCTION 1 is AVG num – This means the “number” of Averages (AVG). That
is, you can program your tester to automatically average up to 3, 6, or 9 consecutive moisture measurements and display the result. The majority of users will not
adjust the default averaging mode of averaging every 3 consecutive moisture
measurements. We added averaging 6 or 9 readings for users who are using the
tester in unique applications.
FUNCTION 2 is Clear AVG – “Clear average” will clear the current average
moisture results. Let’s say you just took moisture measurements in one grain bin,
but you are now done with that grain bin. Next you go to another grain bin to test
another batch of grain. You can clear the previous average and start fresh with the
averages for your next grain bin.
Now Let’s discuss how to use and select each of the two AVG (Average) moisture
measurement functions.
FUNCTION 1 – AVG num (number of consecutive moisture measurements
to average)(see Figure 4.)
1. Turn on Unit (press ON/OFF button)
2. Use Up/Down buttons to scroll to “SETTINGS” then press ENTER
3. Use UP/DOWN Buttons to scroll to “AVG num”
4. Press ENTER until your desired number to average is displayed (3, 6 or 9)
5. Press back arrow to return to the grain to be tested.
AVG num
Number to
Average
Figure 4. AVG num Display in Menu
Example: You can take 3 consecutive moisture tests from the same batch of grain.
If test 1 is 15.5, test 2 is 15.3, and test 3 is 15.7, then the average moisture displayed will be 15.5 % moisture (average of the 3 consecutive tests). The current
moisture is also always displayed for each test.
8
Operation
Function 2 – Clear AVG (Clear the current averaged moisture measurement
results and start a new average for your next consecutive measurements)
1. Turn on Unit (press ON/OFF button)
2. Use UP/DOWN buttons to scroll to “Clear AVG” then press ENTER (unit
displays the “disc” save icon so you know it reset the current averages)
Clear Avg
Figure 5. CLEAR AVG
SELECT A DIFFERENT GRAIN
1. Turn on Unit (press ON/OFF button)
2. Use UP/DOWN buttons to scroll to desired grain then press ENTER (Top of
the display now shows your selected grain)
Grains
New Grain
Figure 6. GRAIN SELECTION
9
Operation
WEIGHT TEST — CHECKING TEST WEIGHT FOR ACCURACY
Weight Test — Allows user to check the calibration of the test weight function
of the tester. By following the steps indicated, the final reading will let the user
know if the test weight is off. Test weight reading errors could indicate that grain or
debris is stuck under the top ring or load cell is damaged. See page 18, Cleaning
the Tester, if weight test readings are not within tolerance.
1. Turn on Unit (press ON/OFF button)
2. Use UP/DOWN buttons to scroll to “SETTINGS” then press ENTER
3. Use UP/OWN buttons to scroll to “Weight test” (Figure 7) then press ENTER
4. Place test weight or 10 new quarters into the test cell when the screen
indicates to “PLACE WEIGHT.” Once the weight or quarters are placed
in unit, wait for reading to display. The asterisk in the upper right hand corner
indicates the tester is steady and the weight is then accurate (Figure 8).
NOTE: Tolerance is +/- 0.1 for the number of quarters — 9.9 or 10.1 is within
tolerance for 10 quarters. Please use 10 new quarters for your check if there is
not a test weight available.
Weight test
Figure 7. Weight Test
Asterisk
Indicates
Tester is
Steady
Figure 8. Weight Test Reading
for 10 Quarters
10
Number of
quarters
(+/- 0.1
tolerance)
Operation
SELECT A DIFFERENT LANGUAGE
1. Turn on Unit (press ON/OFF button)
2. Use UP/DOWN buttons to scroll to “SETTINGS” then press ENTER
3. Use UP/OWN buttons to scroll to “Language” (Figure 9) then press ENTER
4. Use UP/DOWN buttons to scroll to desired language and press enter to
select and save this language (or Press Back Arrow to abort and not select
a new language)
5. Press Back Arrow to return to the active grain display where you are ready
to test
NOTE: For English only versions, English will be the only displayed language.
Language
Figure 9. Language Selection
ADJUST GRAIN OFFSET
Let’s start with an overview of grain offset. An offset is the way you adjust your
tester to your local grain elevator’s table top tester. Some people call it a calibration, some call it an offset, and others call it a bias but all three terms mean the
same thing. Let’s say your tester measures a sample of corn at 15% moisture but
your local grain elevator tester measures it at 14.5%. What you can do is program a 0.5% moisture (enter a -0.5%) offset to your tester so it matches the grain
elevator.
NOTE: It’s not uncommon to take your load of grain to two different grain
elevators and get a different result from each of their grain elevator testers.
NOTE: An offset adjustment can NOT be made to produce moisture readings
that are below or above the moisture limit for the selected grain.
IMPORTANT: Always obtain three test results from the grain elevator for the
sample being compared. The unit will average these three results. Compare this
average with the average of three tests by your moisture tester before making an
offset adjustments.
11
Operation
Each grain can be individually adjusted by 10.0% in increments of 0.1% to more
closely match the results of an elevator tester. The calibration adjustment typically compensates for the differences in the variety/hybrid of grain you are testing
relative to the varieties used to develop the grain moisture calibration in the tester.
TO ADJUST GRAIN OFFSET:
1. Turn on Unit (press ON/OFF button)
2. Use UP/DOWN buttons to scroll to “GRAIN OFFSET” then press ENTER
3. Use UP/DOWN buttons to make the desired adjustment
4. Press ENTER to save this offset (or press back arrow to not save it ).
You are now back to active grain display where you are ready to test
Grain Offset
Figure 10. GRAIN OFFSET
NOTE: The grain offset adjustment (bias/calibration) is applied to the last grain
you tested, since a test must be made prior to knowing what adjustment to
apply.
CLEAR GRAIN OFFSET
1.
2.
3.
4.
Turn on Unit (press ON/OFF button)
Use UP/DOWN buttons to scroll to “GRAIN OFFSET” then press ENTER
Use UP/DOWN buttons to make adjustment 0.0
Press ENTER (after displaying the save [disc] icon the unit takes you back
to the active grain display and ready to test)
Figure 11. GRAIN OFFSET
12
Operation
TURN BACKLIGHT ON OR OFF
To extend battery life turn your LCD display backlight “off” if you don’t need it.
When outside in the daylight you will likely not need the backlight on.
TO TURN THE BACKLIGHT ON OR OFF:
1. Turn on Unit (press ON/OFF button)
2. Use UP/DOWN buttons to scroll to “SETTINGS” then press ENTER
3. Use UP/DOWN buttons to scroll to “Backlight”
4. Press “Enter” to toggle the backlight on or off
5. Press Back arrow when done
6. You are now back to the active grain display where you are ready to test
Backlight
Backlight On
Figure 12. Backlight
TEMPERATURE AND TEST WEIGHT UNITS
When the temperature units are changed from Fahrenheit to Celsius the test
weight units are also changed.
• If you select Fahrenheit then you will get test weight in lb/bu (pounds per
bushel)
• If you select Celsius then you will get test weight in kg/hl (Kilograms per
Hectoliter)
TO CHANGE TEMPERATURE AND TEST WEIGHT UNITS:
1. Turn on Unit (press ON/OFF button)
2. Use UP/DOWN buttons to scroll to “SETTINGS” then press ENTER
3. Use UP/DOWN buttons to scroll to “Units” (Figure 13)
4. Press “ENTER” to toggle the between F (Fahrenheit) and C (Celsius)
5. Press Back arrow when done (You are now back to the active grain display
where you are ready to test)
13
Operation
Temperature &
Test Weight Units
Unit
Figure 13. Temperature and Test Weight Units
AUTO OFF SETTINGS
Auto Off setting allows you to select the length of time you want your tester to
“automatically turn off” (auto off) after the last button press (no activity). The
default setting of 5 minutes should suffice, but if not then change it to meet your
needs. Example, if your Auto-off is set at “5 minutes” then if you turn your unit on,
and walk away, and thus don’t touch a button for 5 minutes, then your tester will
automatically turn off to conserve battery life.
TO CHANGE YOUR AUTO OFF SETTING:
1. Turn on Unit (press ON/OFF button)
2. Use UP/DOWN buttons to scroll to “SETTINGS” then press ENTER
3. Use UP/DOWN buttons to scroll to “Auto off” (Figure 14)
4. Press “ENTER” to scroll through the choices (30 seconds, 1 minute, 5 min.,
10 min., or 20 min.) and once the desired option is displayed
5. Press Back arrow to save it (You are now back to the active grain display
where you are ready to test)
Auto off
Length of
Time
Figure 14. Auto Off
14
Operation
LCD CONTRAST
You will likely not need to adjust the LCD contrast since the default setting will
meet the needs of most people. Be careful if you do adjust your LCD contrast
since you may get to either extreme (too high or too low) where you can no longer
see text on your display.
1.
2.
3.
4.
5.
6.
Turn on Unit (press ON/OFF button)
Use UP/DOWN buttons to scroll to “SETTINGS” then press ENTER
Use UP/DOWN buttons to scroll to “Contrast” (Figure 15)
Press ENTER
Press UP/DOWN buttons until desired LCD contrast is achieved
Press ENTER to save new contrast (or press Back Arrow if you don’t want
to save this new contrast level)
7. Press Back arrow to return to the active grain display where you are ready
to test
Figure 15. Contrast Screen
PERSONALIZING AND UPDATING THE TESTER
1. The tester is equipped with a USB port and when connected to the internet
via a computer will allow for diagnostics and updates to its software and
grain calibrations.
2. Visit www.AgraTronix.com to use your USB port for personalization (adding
user name), grain scale, firmware and diagnostic updates.
15
Troubleshooting
Symptom A: Unit does not power up or loses power occasionally.
Solution 1: Press ON-OFF button for shorter time. Do NOT hold button down.
Solution 2: Check batteries for 0% or higher. Replace as necessary.
Solution 3: Confirm all four batteries are properly oriented.
Symptom B: Unit is inaccurate.
Solution 1: Temperature of the grain and unit may be more than 40˚F different.
Follow preheat procedure (See page 4).
Solution 2: If grain is at an extreme temperature, let grain settle to reach room
temperature — Retest grain.
Solution 3: Grain and/or test cell may have developed surface moisture from
rapid change in temperature of the grain sample. Allow grain and tester to stabilize near room temperature.
Inspect for visible moisture on grain and inside test cell. Dry the test cell with a
soft cloth or a blow dryer if necessary. Retest grain.
Solution 4: If the tester displays BATTERY LOW, the test results may be inaccurate. Replace battery.
Solution 5: Check for lodged grain under cell top ring and use weight test under
settings menu (see page 10). Grains that are smaller in nature or carry debris are
more likely to get lodged. For cleaning instructions, see page 18.
Solution 6: Unit may need to be recalibrated by factory. Return tester to your
Agratronix dealer for repair or replacement or call Agratronix customer service at
1-800-821-9542.
Symptom C: Unit shows MOISTURE BELOW LIMIT or MOISTURE ABOVE
LIMIT.
Solution 1: Grain may be too wet or dry to test. Check moisture limit guidelines
on page 3 of Operating Instructions.
NOTE: Limits shown on page 3 are only guidelines and subject to change.
16
Service
CHECK BATTERY POWER LEVEL AND REPLACE BATTERIES
The tester is supplied with four AA alkaline batteries.
B
A – Battery Door
B – Batteries
(4 AA alkaline batteries)
NOTE: Remember to
remove batteries
when unit is not in
use after the season
to avoid corrosion.
A
Figure 16. Battery Door and Batteries
CHECK BATTERY LEVEL
1. Turn on Unit (press ON/OFF button)
2. Use UP/DOWN buttons to scroll to “SETTINGS” then press “ENTER”
3. Use UP/DOWN buttons to scroll to “Battery”
4. Press “ENTER” (Percent of battery life remaining is displayed)(Figure 17)
5. Press Back Arrow when done
6. Press Back Arrow one more time to return to active grain display where you
can take a test
Figure 17. Battery Percentage
17
Service
REPLACE BATTERIES
Per the above instruction, first “Check Battery Level”. If battery level is lower
than 15% then it’s recommended you replace batteries with four (4) new AA
Alkaline Batteries (B).
To replace batteries,
1. Remove battery door (A) (Figure 18)
2. Remove and properly dispose of the four AA alkaline batteries (B)
3. Replace with 4 new AA alkaline batteries (B) (pay special attention to
the battery polarity (+) )
4. Replace and secure battery door (A).
A – Battery Door
B – Batteries
(4 AA alkaline batteries)
B
A
Figure 18. Removing Battery Door
CLEANING THE TESTER — TEST CELL
Use a soft, clean cloth to wipe out the cell, using extreme care not to damage
the grain temperature sensor at the bottom of the test cell.
Grain Temperature Sensor
Figure 19. Grain Temperature Sensor
18
Service
CLEANING THE TESTER — REMOVAL OF TOP RING
NOTE: It is important when emptying the tester to make sure there is no grain
lodged in the cell top ring.
If test weight readings appear to be inaccurate, use the following steps to
remove the top ring and clean out excess grain and/or debris.
REMOVING AND CLEANING TOP RING
1. Use a soft, clean cloth to wipe out the cell, using extreme care not to
damage the grain temperature sensor at the bottom of the test cell.
2. Use a pointed object to pop out one of the tabs of the top ring on the inside
of the cell.
3. Remove ring.
4. Turn tester upside down and gently shake back and forth to remove any
grain / debris that may have entered the tester.
5. Check the inside of the ring before reattaching.
PLACING TOP RING BACK ON UNIT
1. Align the tabs and push down.
2. Lightly grab the ring and attempt to turn it — making sure the tabs are
locked into place.
NOTE: Listen for the tabs to lock into place.
Top Ring
Top Ring Tab
Figure 20. Top Ring Tab
19
Service
ERROR CODES — As with most test instruments there will be things you
!
do that are outside of the limits of the tester, or things that affect the
accuracy. There will also be some error codes that warn you about a
fault in your tester. Below is a list of the current error codes. Always check our web
site at www.AgraTronix.com, under the links for this tester, for the updated manual
to find all error codes.
Error Code
1-6
Cause
Solution
Memory Failure
• Call for service (1-800-821-9542)
7
Grain Not Detected
• Repeat test
8
• Grain in test cell too
soon
• Weight Scale Defective
• Clean cell and top ring
• Repeat test
• Perform “Weight Test”
9
Weight did not settle
within normal time limits
• For better accuracy, place tester on a
non-vibrating, semi level surface
10
Moisture measurement
took too long to settle
• Repeat test
11
Same as 9, except tester
stopped trying to find
stable weight
Put tester on non-vibrating, semi level surface
• Repeat test
12
Grain temperature lower
than 36F
Displayed moisture will be less accurate than
if the grain were at a higher temperature
13
Grain temperature higher Displayed moisture will be less accurate than
than 122F
if the grain temperature was below 122F
14
Large temperature
difference between the
grain and meter test cell
Meter automatically compensated for
temperature difference, for better accuracy,
grain and meter test cell should be at similar
temperatures
• See Preheating Procedure
15
Not on a sufficiently level
surface
Place tester on a semi level surface
• Repeat test
16
Grain weight greater
than 330 grams
• After swiping, make sure swiper is fully
returned
• Perform “Weight Test”
17
Grain weight less than
50 grams
• Clean cell and top ring
• Perform “Weight Test”
18
Grain weight more than
20% higher than the
nominal weight
Meter automatically compensated for weight
– Scale is based on a different test weight
• Clean top ring and perform “Weight Test”
19
Grain weight more than
20% lower than nominal
weight
Meter automatically compensated for weight
– Scale is based on a different test weight
• Clean top ring and perform “Weight Test”
20
Cup not empty in
measurement cycle
• Ensure cup is empty
• Repeat test
20
Warranty
WARRANTY
This product is guaranteed to be free from defects in materials and
workmanship for one (1) year from date of retail purchase. This warranty does
not cover the batteries or damage resulting from misuse, neglect, accident
or improper installation or maintenance. This warranty does not apply to any
product which has been repaired or altered outside an authorized factory repair
facility.
The foregoing warranty is exclusive and in lieu of all other warranties of
merchantability, fitness for purpose and any other type, whether express or
implied. Agratronix neither assumes nor authorizes anyone to assume for it any
other obligation or liability in connection with its product and will not be liable
for consequential damages.
RECORD SERIAL NUMBER
NOTE: The tester serial number is located on the bottom of the unit.
Write your model number, serial number and date of purchase in the space
provided below. Agratronix needs this information when ordering parts and when
filing warranty claims.
Model________________________________________________________
Serial No. ________________________________________________________
Date of Purchase __________________________________________________
(To be filled in by purchaser)
21
Replacement Parts
ACCESSORIES
1.
2.
3.
4.
5.
Grain Hopper – Part No. PLAS-H0300
Battery Door – Part No. PLAS-D0300
USB Port Cover – Part No. PLAS-USBP
USB Cable – Part No. 06067
Carrying Case – Part No. 06080
1
3
2
4
5
22
Manufacturer’s Contact Information
Toll-Free 1-800-821-9542
330-562-2222
FAX 330-562-7403
www.AgraTronix.com
10375 State Route 43
Streetsboro, OH 44241
USA
23