1
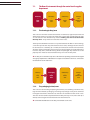
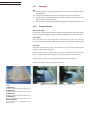
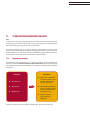
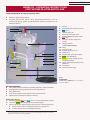
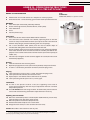
STERILIZATION GUIDELINES International Committee of the Red Cross 19, avenue de la Paix 1202 Geneva, Switzerland T +41 22 734 60 01 F +41 22 733 20 57 E‑mail: [email protected] www.icrc.org © ICRC, December 2014 Cover photos: Julie Barnet/ICRC, Reda instruments, Jeannette de Vries/ICRC STERILIZATION GUIDELINES STERILIZATION GUIDELINES 3 TABLE OF CONTENTS 1. Terms and abbreviations 5 2.Introduction 6 3.Acknowledgements 7 4. General information 8 5. Principles of contamination 5.1. Methods of reducing the bioburden 10 11 6. Classification of instruments (Spaulding Classification) 12 7. Organizing the sterilization department 7.1. The flow of instruments through the central sterile supplies department 7.1.1. The cleaning (or dirty) zone 7.1.2. The packaging (or clean) zone 7.1.3. The autoclaving (or sterile) zone 7.1.4. The storage and distribution zone 13 14 14 14 15 15 8. Water and electricity needs 16 9. The sterilization cycle 9.1.Collection 9.2. Pre‑disinfection 9.3. Cleaning, disinfection and drying 9.4. Checking to ensure instruments are and remain intact 9.5.Packaging 9.5.1. Two types of paper 9.5.2. American folding technique 9.6. Saturated steam sterilization – the autoclave 9.6.1. General information 9.6.2. The steam sterilization cycle 9.6.3. Sterilization cycle temperature 9.6.4.Safety 9.7.Control 9.7.1. Checking the sterilization cycle 9.7.1.1. Chemical indicators = TST STRIP 9.7.1.2. External indicator = Tape 9.7.1.3. Checking the package is undamaged at the end of the cycle upon unloading 17 17 18 19 19 20 20 21 21 21 22 22 22 23 23 23 24 24 4 STERILIZATION GUIDELINES 9.8. Autoclave with vacuum pump 9.8.1. Checking the airtight seal before sterilization = Bowie‑Dick test 9.8.2. Reading the graph for a vacuum‑pump autoclave 9.9.Traceability 9.10.Storage 9.10.1.Expiry 9.10.2.Checking 9.10.3.Stock management 24 24 25 26 26 27 27 27 10. Emergency sterilization 10.1. Operating with instruments sterilized using the emergency procedure 10.2. “Emergency” readiness 28 28 28 11. Sterilization procedure for linen 11.1. Organizing a laundry 11.2.Collection 11.3. Procedure for washing linen 11.3.1.Washing by hand 11.3.2.Machine washing 11.4. Packaging, sterilization and storage 29 29 30 30 30 31 31 12.References 32 ANNEX I – Instructions for folding a surgical gown 33 ANNEX II – Summary procedure for pre‑disinfecting and disinfecting instruments 34 ANNEX III – HEXANIOS® PROTOCOL (Technical File) 36 ANNEX IV – SURFANIOS® PROTOCOL (Technical File) 37 ANNEX V – Top‑loading vertical autoclave without vacuum pump (e.g. TBM 90-litre) 39 ANNEX VI – Front‑loading horizontal autoclave with vacuum pump (with or without steam generator, e.g. Matachana SC 500) 40 ANNEX VII – Operating instructions for the TBM 90-litre autoclave 41 ANNEX VIII – Operationing instructions for the 45-litre autoclave 44 ANNEX IX – Operating instructions for the 39-litre autoclave 45 STERILIZATION GUIDELINES 1. TERMS AND ABBREVIATIONS Aseptic Bioburden Biofilm CEN Check Cleaning Contamination Disinfection High‑level disinfection HIV Free from disease‑causing contaminants The number of viable micro organisms in or on an object entering a sterilization process A thin, usually resistant layer of micro organisms (e.g. bacteria) that forms on and coats various surfaces European Committee for Standardization Visual inspection and manual testing to ensure instruments are intact and perform properly Consists of removing organic and non‑organic substances through the physical‑chemical action of a detergent combined with a brushing and rinsing action The presence of a minor and unwanted constituent (contaminant) on a material or in a physical body The use of disinfectant solution to destroy or prevent the growth of organisms capable of infection The elimination of vegetative forms of bacteria and viruses by immersing pre‑disinfected and cleaned instruments in a disinfectant solution; used for semi‑critical materials that cannot tolerate steam sterilization Human Immunodeficiency Virus ICRC International Committee of the Red Cross ISO International Standardization Organization Medical device Microbicidal Packaging Pathogen Any medical equipment used on a patient for the purpose of preventing, detecting, diagnosing or treating a pathology Destroying or reducing the infectivity of microbes such as viruses and bacteria Protecting clean instruments from the risk of re‑contamination during handling and after sterilization in order to keep them sterile and protected until they are used A bacterium, virus or other micro organism that can cause disease Sterile A medical device is considered sterile and referred to as “sterile” if the possibility that it has been contaminated by viable micro organisms is equal to or less than one in a million (CEN and ISO standards). Sterilization A process that destroys all micro organisms (including bacterial spores) on the surface of an object or in a fluid TB WHO Tuberculosis World Health Organization 5 6 STERILIZATION GUIDELINES 2. INTRODUCTION All hospitals need to sterilize their equipment and supplies. Even the smallest hospital requires sterile surgical instruments for minor procedures, and sterile dressing materials. If a hospital has a full surgical unit, the sterilization of surgical instruments and linen, together with dressing materials for the wards and operating theatre, plays a key role in infection control. In medical facilities supported by the ICRC, care must therefore be taken to provide safe, sterile surgical material and safe blood for transfusion. This is all the more important when the ICRC is working in a general hospital setting where elective or semi‑elective surgery is a routine part of the workload. Processing potentially infected materials also presents a hazard to medical staff. The procedures for cleaning and disinfecting these materials should therefore include protective measures for those who handle them. Correct handling and safe processing of surgical materials are part of the standard precautions that should be taken in any medical facility, including those supported by the ICRC. In 2004 a workshop was held for experienced ICRC operating theatre (OT) nurses and experts from Médecins Sans Frontières to discuss the main problems relating to sterilization in the context of humanitarian operations. This workshop led to the drafting of the first edition of the Sterilization Guidelines. Ten years later, it was time to review the Guidelines in light of recent scientific discoveries, new sterilization procedures and technological developments. While the systems and procedures outlined in the Guidelines may be difficult to fully implement in all ICRC‑supported medical facilities, they represent good practice and set the standard to achieve in order to ensure a basic level of safety. This will sometimes involve an investment in infrastructure, equipment and training, all of which requires planning and budgeting. The Guidelines are intended for use by OT nurses working in ICRC‑supported medical facilities. While they do not cover all aspects of infection control and sterilization in detail (for more information, see the publications selected as resource material under “Reference”), they should help OT nurses in various hospitals, facing different challenges, to set up safe and simple systems for processing the entire range of surgical materials requiring sterilization. The Guidelines can be applied in situations where resources are limited and may be used to provide essential training for OT nurses and for anyone involved in sterilization. STERILIZATION GUIDELINES 3. ACKNOWLEDGEMENTS I would like to express my deepest gratitude to all the people who helped and supported me throughout the process of reviewing the Sterilization Guidelines. My special thanks go to the author of the first edition of the Guidelines, Jenny Hayward‑Karlsson, on whose excellent work the present update is based. I also take this opportunity to thank those who helped review and correct the new Guidelines, without whose professional support the undertaking would have been impossible. I am particularly indebted to Julie Barnet, who initiated the project and wrote the first draft. I am also very grateful to Mr Hervé Ney, head of the Sterilization Department at the University Hospital in Geneva, for his technical advice and support, which were of great help. A special mention goes to Catherine O’Shea, who provided continuous support and expert advice throughout the review process. To all of you, I extend my most sincere thanks. Jeannette de Vries 7 8 STERILIZATION GUIDELINES 4. GENERAL INFORMATION This document establishes guidelines for the effective use of steam sterilizers (autoclaves), the decontamination of cultures and other materials, the preparation of sterile supplies and the safe operation of autoclaves. Cleaning, disinfection and sterilization are key to preventing the spread of infections. In spite of this, many health-care facilities either lack the means to perform basic infection, prevention and control tasks or their personnel receive insufficient training. Every hospital must have the means to sterilize equipment and supplies. Even the smallest health facility will need sterile surgical instruments for minor surgical procedures and sterile dressing material. The sterilization department must be able to provide the operating theatre and wards with a sufficient quantity of sterile items for routine and emergency work. In the health facilities the ICRC supports, it has a responsibility to provide safe and sterile surgical material. As stated in ICRC Assistance Policy Doctrine 49, biosecurity is of prime importance. The main micro organisms of concern are HIV, TB, hepatitis B and C, staphylococcus and bacterial spores. Biosecurity is an important hospital function and calls for trained essential staff. The aim of sterilization is to treat medical supplies in such a way that they can be used safely without unnecessarily endangering the patient or the user. To ensure that equipment and materials are safely sterilized, it is essential for the person using them to be well trained and for the autoclave to be in perfect condition. While the systems and procedures outlined in these guidelines may be difficult to achieve in all health facilities in which the ICRC is present, they nevertheless represent best practices ensuring a basic level of safety. This should be an achievable goal in any ICRC‑supported health facility provided investment in essential infrastructure is planned and budgeted. All changes and adaptations to the 2005 edition of these guidelines are based on WHO, CEN and ISO norms relating to patient safety and control of health care‑associated infections. Their aim is to ensure good quality care and safety for ICRC patients and health staff. Health staff in charge of sterilization need to have a thorough knowledge of: zz the nature of the organisms that cause infection; zz the measures taken to limit the spread of disease; STERILIZATION GUIDELINES how disease‑causing organisms can be destroyed; how to use sterilization equipment safely and successfully; the design and operation of sterilization equipment; all types of loads and packaging systems and their behaviour when exposed to steam; zz the methods for checking the performance of sterilizers. zz zz zz zz 9 10 STERILIZATION GUIDELINES 5. PRINCIPLES OF CONTAMINATION A body penetrated by disease‑causing micro organisms is said to be “contaminated”. Instruments used during an operation are also considered to be contaminated by the patient’s micro organisms and pathogens. If these instruments are not scrupulously cleaned and sterilized before being used on another patient, pathogens can be passed from one patient to another. The population of viable organisms on materials, instruments, linen, etc., is referred to as the “bioburden”, or initial contamination. Hospital‑acquired or nosocomial infections are infections that patients acquire during their stay or treatment at a hospital or health centre. Such infections are easily transmitted during daily hospital practice: zz if the instruments used during surgery are not free of micro organisms; zz if staff do not wash their hands properly before and after treating patients; zz if the material used to treat wounds is not free of micro organisms; zz if contaminated waste is not disposed of properly (see the ICRC publication Medical Waste Management); zz if food is contaminated. Cross‑infections are infections transmitted from one patient to another through contaminated equipment, instruments and materials. Cross‑infection is one of the major causes of nosocomial diseases. It has a huge impact on the patient: zz extended stay in hospital leading to more nursing care, more operations and more rehabilitation; zz increased health complications that can ultimately result in death. For health-care providers, the extra costs can lead to a rise of up to 10 per cent in the hospital “budget”.1 It is essential for health staff to understand the mechanisms by which infection is transmitted and correct microbicidal processes so that ICRC‑supported health facilities can provide good‑quality health care to those who need it. 1 WHO, Hospital Infection Prevalence Survey, June 1987. STERILIZATION GUIDELINES 5.1. Methods of reducing the bioburden Sterilization Disinfection Cleaning Dirt and soils Microorganisms Spores Figure 1 Methods of reducing the bioburden Cleaning The process of removing dirt and soils, but not killing micro organisms and spores. Disinfection The process of destroying all pathogenic micro organisms, but not bacterial spores. Sterilization The process of destroying all forms of microbial life on inanimate surfaces, including bacterial spores. 11 12 STERILIZATION GUIDELINES 6. CLASSIFICATION OF INSTRUMENTS (SPAULDING CLASSIFICATION) In 1968, Dr E. H. Spaulding classified medical/surgical instruments as critical, semi‑critical and non‑critical based on their potential to spread infections. The classification helps to decide how to proceed with the instruments. Critical items Items that penetrate soft tissue, bone or the vascular system, or through which blood flows, such as implanted medical devices, which should be sterile when used. Semi‑critical items Objects that touch mucous membranes or non‑intact skin, such as endoscopes and respiratory therapy equipment, and which require high‑level disinfection (elimination of all micro organisms except high numbers of bacterial spores). Non‑critical items Objects that are in contact with intact skin, such as bedpans, blood pressure cuffs and bedside tables. Low‑level disinfection is required. These items are less likely to spread infections, except when contaminated with pathogens by the hands of health-care personnel. They require rigorous cleaning, washing and disinfection, and hands must be washed after handling them. Figure 2 Spaulding Classification STERILIZATION GUIDELINES 7. ORGANIZING THE STERILIZATION DEPARTMENT Before an instrument can be used, a whole range of measures must be taken to prevent it from being a danger to the patient. Sterilization is only one link in the chain of activities required to make an instrument sterile at the moment of use. Each link involves specific methods and techniques that prevent contamination of instruments, materials and living tissue. This is called the aseptic technique and is designed to prevent contamination of instruments, materials and living tissue. It includes, for example, covering the patient during the operation with sterile drapes, cleaning the operating table, and cleaning and decontaminating the patient’s skin with iodine before starting the operation. The aseptic technique must also be followed in the sterilization department. Hospitals in the developed world employ various methods of organizing the entire instrument sterilization process (collection, pre‑disinfection, cleaning, disinfection, packaging, sterilizing, distributing and storage). In the field, this task may not exist or may be carried out by a specialized department that may not even be in the same premises as the health facility. In ICRC‑supported hospitals that have a surgical department, the preferred option is to set up a central sterile supplies department. Within this department, all surfaces (walls, floors, ceilings, shelves) should be washable. All rooms should be well ventilated and lit. In a challenging environment (dust, flies, damaged infrastructure or extreme heat/cold), a balance has to be struck between adequate light and ventilation and the potential for contamination of clean material. An uninterrupted supply of water and electricity is essential. 13 14 STERILIZATION GUIDELINES 7.1. The flow of instruments through the central sterile supplies department Cleaning – Dirty zone 7.1.1. Packaging – Clean zone Autoclaving – Sterile zone Storage and distribution zone The cleaning (or dirty) zone This is the area in which reusable instruments are collected, registered, cleaned and dried. These activities can all be carried out in the same room, provided that all steps are carried out in one direction only and that nothing ever moves back towards the dirty zone – dirty and clean items must never cross. The dirty zone should be laid out in a way that facilitates this flow. In some settings, a wall will separate the dirty zone from the clean zone, although the two have to be connected via a doorway (or a wicket) to facilitate the transfer of instruments. All items must be checked to ensure they have been properly cleaned before they leave the dirty zone, and before being dried and packaged. Any items that are not properly clean must be recleaned before they can leave the dirty zone. The dirty zone should be easily accessible from the operating, obstetric and surgical emergency departments to facilitate the reception of reusable instruments. It must also be located next to the clean zone. Cleaning – Dirty zone 7.1.2. Packaging – Clean zone Autoclaving – Sterile zone Storage and distribution zone The packaging (or clean) zone This is the area for checking/inspecting instruments, reassembling instrument sets, high‑level disinfection, packaging and storage of packages ready to be sterilized. Damaged instruments should be set aside for the attention of the senior nurse. The clean zone should be separated from the dirty zone by a wall, with a door (or a wicket) connecting them to facilitate the transfer of material. It should be located between the dirty zone and the sterile zone. STERILIZATION GUIDELINES Cleaning – Dirty zone 7.1.3. Packaging – Clean zone Autoclaving – Sterile zone Storage and distribution zone The autoclaving (or sterile) zone This is the area in which the instruments ready to be sterilized by steam sterilization in an autoclave are registered. The appropriate heating source for the autoclave is defined with the technical resource person (trained hospital technician). The choice between electricity/gas/kerosene will depend on the type of autoclave, the level of the health facility and the availability of electricity/fuel; this should be discussed with the WatHab engineer and, if one is available, an ICRC biomedical engineer. It is important to ensure that there is enough space on all sides of the autoclave for safe use and maintenance. TBM 90 l autoclaves should be at least 0.60 m from other equipment and adjacent walls. A steam exit has to be provided in line with the manufacturer’s specifications (this is usually created through an exterior wall, with access to the exterior area, so that people will not be scalded by escaping steam). This access must be restricted to qualified personnel to prevent scalding. Cleaning – Dirty zone 7.1.4. Packaging – Clean zone Autoclaving – Sterile zone Storage and distribution zone The storage and distribution zone This is the area in which sterile packages are stored until distributed. It is important to have a storage place in which instruments and sterile items are protected from the risk of recontamination, i.e. dust, insects, damage to packages, humidity, light, and in which their sterile status is maintained until they are used. It should be located next to the autoclaving zone, in a separate room. 15 16 STERILIZATION GUIDELINES 8. WATER AND ELECTRICITY NEEDS The average amount of water needed in the sterilization room exclusively (not including activities in the operating theatre) is set out below.2 Pre‑disinfection, disinfection, rinsing and cleaning of instruments: zz 100 l / operation (entire instrument load for any kind of surgery) zz 30 l / delivery (all instruments for a non‑surgical delivery) zz 30 l / 5 dressings or 5 sutures Autoclave: zz 48 l / TBM 90 l autoclave cycle zz 8‑16 l / 45 l autoclave cycle High‑level disinfection: zz 35 l / procedure Cleaning / disinfection of the room and staff hand hygiene: zz 30 l / day minimum For info: zz Water supply needed in the operating department: 100 l / surgical operation Important: zz The water for the autoclave drying cycle must be cold (< 25°C if possible). zz Water hardness: should be soft to avoid limescale zz Water consumption, temperature and pressure for larger autoclaves are according to manufacturer specifications (e.g. Matachana, Getinge, Cisa). Consult with the biomedical engineer in Geneva before installing these types of autoclaves. See P. Perrin, H.E.L.P. Public health course in the management of humanitarian aid, ICRC, Geneva, 2001. 2 STERILIZATION GUIDELINES 9. THE STERILIZATION CYCLE Preventing the spread of infection: Move in one direction only. Never move backwards. Never cross clean and soiled instruments. 9.1. Collection Figure 3 Perforated baskets Why safe collection less handling of soiled instruments easy and safe transport to the sterilization room less mixing up of surgical sets easier and quicker pre‑disinfection easily available and inexpensive on local markets zz zz zz zz zz zz Aim To ensure staff safety and minimize the risk of spreading micro organisms in the environment. Medical devices should be collected and pre‑disinfected as soon as possible after use. In the operating theatre, instruments must be sent for cleaning after each operation. On the wards, they should be collected at least twice a day. This is to avoid blood and secretions drying onto the instruments. Julie Barnet/ICRC Julie Barnet/ICRC Julie Barnet/ICRC Use perforated baskets placed in closed containers. 17 18 STERILIZATION GUIDELINES 9.2. Pre‑disinfection Aim To reduce of the number of micro organisms on the surface of the equipment, thus reducing the risk of contamination and ensuring the safety of staff handling the equipment. Procedure (HEXANIOS® 0.5%) Laboratoires Anios (Microbiological properties: see Annex III) Instructions for use: concentrated solution to be diluted at 0.5% before use 1 stroke (25 ml) of the dosing pump for 5 l water 2 strokes (50 ml) of the dosing pump for 10 l water How zz Prepare a soaking bath/solution according to the volume of medical Code: XLABALAR60M Alarm clock, analog, 1 mn‑60 mn, pce Julie Barnet/ICRC instruments (5 or 10 l). zz Immerse the instruments completely in the soaking bath and leave them to soak for 15 minutes (using a timer). zz Rinse with clean water. Figure 4 Alarm clock Instruments and equipment should be pre‑disinfected and cleaned as soon as possible after use to prevent the formation of a biofilm. Throw the used solution away. Prepare a fresh bath for each load. STERILIZATION GUIDELINES 9.3. Cleaning, disinfection and drying Aim Elimination of blood, secretions and debris via the chemical action of a detergent (Hexanios®) combined with the mechanical action of brushing and rinsing. All items must be carefully cleaned before sterilization. Instruments and equipment must be thoroughly cleaned and disinfected, otherwise the sterilization process will not be effective. Procedure: HEXANIOS® 0.5% Instructions for use: concentrated solution to be diluted at 0.5% before use 1 stroke (25 ml) of the dosing pump for 5 l water 2 strokes (50 ml) of the dosing pump for 10 l water How zz Prepare a soaking bath/solution according to the volume of medical instruments (5 or 10 l). zz Immerse the instruments completely in the soaking bath, scrub them thoroughly and leave them to soak in the solution for 15 minutes. Rinse thoroughly with clear water, discard the rinsing water and dry with a clean cotton cloth. This solution can be kept for a maximum of 24 hours. Prepare a fresh bath immediately if it is visibly contaminated (dirty). 9.4. Checking to ensure instruments are and remain intact Medical instruments are expensive precision instruments. Small deposits of blood may easily develop into serious corrosion (rust). This corrosion is aggravated by the moisture and high temperatures of the sterilization process. Corrosion will result in serious damage to the instruments and may even render them useless and dangerous for the patient. This is why every instrument should be checked carefully before being packed. If it is damaged or no longer functioning, alert the senior nurse so that the instrument can be exchanged. Figure 5 Checking the instruments Julie Barnet/ICRC Jeannette de Vries/ICRC Jeannette de Vries/ICRC Apply oil if necessary, but use only specific silicone‑free instrument oil, which allows steam to penetrate during sterilization. The instrument should be rinsed to remove excess oil and dried. 19 20 STERILIZATION GUIDELINES 9.5. Packaging Aim zz Before sterilization: packaging protects the clean instruments from the risk of contamination. zz Packaging must allow the packages to be opened easily and aseptically. zz Packaging must be permeable to steam, water repellent, resistant to tears and impermeable to micro organisms. zz After sterilization: packaging must keep the instruments sterile until they are used. 9.5.1. Two types of paper Non‑woven paper Instruments are packed in wire baskets wrapped in two layers of non‑woven paper (stronger than crepe paper). Baskets should be wrapped with single sheets, twice. Crepe Paper Use crepe paper for single instruments, diathermy devices, dressing sets and compresses (in groups of 10‑20 compresses, as drums are no longer recommended). Procedure The paper used must be at least 3 or 4 times the size of the total material to be packed (in both width and length). Once the paper has been autoclaved, it cannot be re‑autoclaved. The filters in the paper are closed by the first sterilization and are therefore not re‑autoclavable. Use the American square or envelope folding technique for both layers. Code: XSTEBASK201 Basket, Sterilizing, 201x145x50 mm plus lid XSTEBASK402 Basket, Sterilizing, 380x240x90 mm plus lid XSTEBASK502 Basket, Sterilizing, 480x240x90 mm plus lid XSTEBASK302 Basket, Sterilizing, 300x200x35 mm plus lid MSTESTSHNW120 Sheet Sterilisation +/‑ 60 gr/m2, 120x120 cm non woven Jeannette de Vries/ICRC Reda instruments Jeannette de Vries/ICRC Close the package carefully using sterilization tape. Figure 6 Baskets wrapped in two layers of non‑woven paper STERILIZATION GUIDELINES 9.5.2. American folding technique 1 2 3 4 5 6 7 8 9 Figure 7 American folding technique 9.6. Saturated steam sterilization – the autoclave 9.6.1. General information The sterilization of materials using steam and pressure is a reliable method of destroying all forms of microbial life. However, the autoclave must be properly used and understood to be effective. The technique/steps recommended by the manufacturer must be followed exactly, otherwise the sterilization process will be incomplete (see Annexes V, VI, VII and VIII). zz An autoclave is basically a large pressure cooker; it operates using steam under zz zz zz zz pressure as the sterilizing agent. The high pressure heats the steam to high temperatures, thus increasing its heat content and killing power. Steam is able to penetrate objects with cooler temperatures because once the steam contacts a cooler surface, it immediately condenses to water. This creates negative pressure at the point of condensation and draws more steam to the area. Condensation continues as long as the condensing surface is cooler than the steam; once both are the same temperature, a saturated steam environment is formed. Achieving a high and even moisture content in the steam‑air environment is important for effective autoclaving. Steam also efficiently kills cells and coagulates proteins. Moist heat is thought to kill micro organisms by causing coagulation of essential proteins. The micro organism dies because of an accumulation of irreversible damage to all its metabolic functions. 21 22 STERILIZATION GUIDELINES 9.6.2. The steam sterilization cycle The steam sterilization cycle consists of various phases. Pressure Exposure Temperature Atmospheric TIME Pre-vacuum Cycle Phases 1. Start – door seals, jacket warms chamber 2. Purge – steam enters chamber, while air is purged through the chamber drain 3. Conditioning – positive pressure and negative vacuum pulses continue to heat load and purge air 4. Heat up – steam pressure builds to selected exposure temperature and pressure 5. Exposure – timing begins for selected exposure time and temperature 6. Exhaust – chamber drain opens and ejector water creates vacuum in chamber to exhaust steam 7. Drying – ejector water controls vacuum in chamber for selected dry time 8. Air in – chamber returns to atmospheric pressure 9. Cycle complete – door can be opened Exposure Time Drying Time Figure 8 The steam sterilization cycle 9.6.3. Sterilization cycle temperature All surgical instruments and linen used for major surgery Choice 1: 134°C at 2.1 bars for 18 minutes3 (134°C = 2.1 bars in relative pressure; 3.1 bars in absolute pressure; and 0.985 bars in atmospheric pressure) 9.6.4. Safety Because autoclaves use steam, heat and pressure, the risk of individual exposure and accident is high. Personnel should wear proper personal protective equipment, i.e. heat‑resistant gloves, eye protection and a lab coat, particularly when unloading the autoclave. Do not assume that the temperature and pressure have fallen when opening the chamber. Even if the pressure gauge shows “0”, open the chamber carefully; start by opening the door just a crack to allow steam to dissipate (don’t fling the door open, as steam might billow out and scald you). After opening the door, leave the items inside for five minutes before handling. This will reduce the risk of boil‑over and scalding. Regularly inspect the autoclave to make sure it is working properly. Have a trained hospital technician follow a maintenance schedule (Medical Equipment Procedures in ICRC Hospital Care Projects, R. Ayer May 2013). The ICRC follows the Swiss Ordonnance sur la prévention de la maladie de Creutzfeldt‑Jakob lors des interventions médico‑chirurgicales (Statute on the prevention of Creutzfeld‑Jakob disease during medical and surgical activities) of 20 November 2002 (OMCL, RS 818.101.21). 3 STERILIZATION GUIDELINES 9.7. 23 Control Aim For every load, it must be possible to prove that the autoclave was working properly on that date and that the sterilization cycle achieved the necessary standard. To that end, ISO and the CEN recommend recording the physical conditions (or parameters) in the sterilizer during the process. 9.7.1. Checking the sterilization cycle 9.7.1.1. Chemical indicators = TST STRIP These indicators undergo a chemical change (from yellow to dark blue) when exposed to: Time – Steam – Temperature (TST). A TST strip must be put in the big surgical wire basket to monitor time, steam and temperature inside the packages. This is not needed for small sets, like dressing, suture and delivery sets. A second strip wrapped in a double layer of crepe paper must be placed in the middle of the autoclave load, to monitor steam and temperature inside the autoclave. Code: MSTECONRS18 Control Strip, TST (T° Steam‑Time) 134° ‑ 18 min., adesive Figure 9 TST strip Tip Write the date of sterilization and the autoclave and cycle number on the TST strip. Important After sterilization is completed and before any instruments are sent to the storage room, confirm that the TST strip has changed color as shown in the above diagram; if it has not, the complete load must be considered unsterile and sent for repackaging and re‑sterilization. STERILIZATION GUIDELINES 9.7.1.2. External indicator = Tape These indicators are used only to identify packages that have been through a sterilization process. Autoclave indicator tape consists of yellow indicator stripes and pressure‑sensitive adhesive. When the steam sterilization is completed, the color of the indicator strips will turn from yellow to dark brown or black. Julie Barnet/ICRC 24 Take a piece of indicator tape and, before placing it on the package, write the date of sterilization and the initials of the person who checked and wrapped the package on it. Figure 10 External indicator = Tape 9.7.1.3. Checking the package is undamaged at the end of the cycle upon unloading The packages should not be damp or wet and the paper should be intact. Inspect each package for tears/holes. Torn packages are unsterile and must be sent for repackaging and re‑sterilization. 9.8. Autoclave with vacuum pump 9.8.1. Checking the airtight seal before sterilization = Bowie‑Dick test The Bowie‑Dick test is performed to assess air removal efficiency in steam sterilizers used in pre‑vacuum sterilization cycles. It detects air leaks and inadequate air removal and consists of folded 100% cotton surgical towels that are clean and preconditioned. It is mandatory for pre‑vacuum sterilizers and has to be carried out on a daily basis in an empty autoclave, before the first load. A commercially available Bowie‑Dick test sheet is placed in the centre of the package. The test package is placed horizontally in the front, bottom section of the sterilizer rack, near the door and over the drain, in an otherwise empty chamber. The test is run at 134°C for 3.5 minutes. The test is performed each day the vacuum‑type steam sterilizer is used, before the first load is processed. Air that is not removed from the chamber will interfere with steam contact. Smaller disposable test packages (or process challenge devices) have been devised to replace the stack of folded surgical towels for testing the efficacy of the vacuum system in a pre‑vacuum sterilizer. These devices are “designed to simulate the product to be sterilized and to constitute a defined challenge to the STERILIZATION GUIDELINES 25 sterilization process”4. They should be representative of the load and simulate the greatest challenge to the load. Sterilizer vacuum performance is acceptable if the sheet inside the test package shows a uniform color change. Entrapped air will cause a spot to appear on the test sheet, because the steam is unable to reach the chemical indicator. Julie Barnet/ICRC If the sterilizer fails the Bowie‑Dick test, do not use it until it has been inspected by the sterilizer maintenance personnel and passes the Bowie‑Dick test. Code: MSTECONRBW Bowie‑Dick Test, 134°C, Mod. PB&D134, single use Figure 11 Bowie‑Dick test The Bowie‑Dick test does not replace the TST strips. In an autoclave with a vacuum pump, the Bowie‑Dick test must be performed daily. TST strips must be used in every load as described above and recorded in the log. 9.8.2. Reading the graph for a vacuum‑pump autoclave Figure 12 Vacuum pump graph 4 World forum for hospital sterile supply 26 STERILIZATION GUIDELINES Check if the time exposure is correct. Check that the three vacuum peaks are visible. Check that the “sterilization plateau” is parallel for temperature and pressure. Once all these checks have been performed, the load can be “cleared”, meaning that it has been correctly sterilized (following the right procedure). 9.9. Traceability Each sterilizing cycle must be recorded in a log. The log should contain the following data: zz date zz contents of the load zz cycle number zz the TST zz name of the person performing the sterilization. Julie Barnet/ICRC Each autoclave must have its own log. Figure 13 Example of a traceability log 9.10. Storage The aim is to keep the packaging intact and the equipment sterile until it is used. The packages should be stored in such a way as to allow inventory to be properly managed and expiry dates to be monitored. The storage room should be clean, closed and well ventilated. It should not be a room that has many people passing through. STERILIZATION GUIDELINES Sterilized packages should be stored away from dust, humidity and sunlight. To further ensure the integrity of sterilized packages, it is recommended that they be stored in plastic storage boxes with lids (readily available on the local market). For the mobile surgical team, dust covers are included in the kits. 9.10.1. Expiry The length of time materials remain sterile depends on the quality of the entire sterilization process, the quality of the packaging and the quality of storage. If the storage conditions described above are respected, items double‑wrapped in crepe paper or non‑woven sheets can be stored for a maximum of four weeks before use. In order to avoid humidity, the instruments should not be placed in the plas‑ tic boxes or dust covers right after the sterilization process. They need to be cooled before storage, preferably on a wire rack (taking care not to tear the packaging). 9.10.2. Checking Expiry dates should be checked once a week and recorded in a logbook. 9.10.3. Stock management One important rule: first in, first out, i.e. items due to expire first should be used first. During the weekly inspection, packages should be checked to ensure that items expiring sooner are at the front and those with later expiry dates are at the back. 27 28 STERILIZATION GUIDELINES 10. EMERGENCY STERILIZATION Emergency sterilization should be employed as a last resort ONLY if surgical instruments cannot be sterilized because of an autoclave failure. It is a temporary solution. ICRC senior health staff (i.e. the operating theatre nurse, health delegate), in conjunction with any other relevant support department (logistics, WatHab), should immediately put into action a plan to correct the problem. The ICRC Health Unit in Geneva should be informed and will provide guidance on how to continue. 10.1. Operating with instruments sterilized using the emergency procedure In the event of an autoclave failure, the surgeon must be informed straight away. It is ultimately the surgeon’s decision whether or not to use instruments or material sterilized by means of the emergency procedure. If s/he decides that a life‑saving procedure must go ahead despite the risk to the patient, this should be noted in the patient’s file. 10.2. “Emergency” readiness Where autoclave capacity is limited, or to ensure readiness for an autoclave failure, a supply of disposable sterile surgical linen and compresses should be available to enable life‑saving procedures to be carried out. Semi‑elective or elective surgery should not be performed under these conditions. Remember that instruments that have undergone emergency sterilisation/ high‑level disinfection are not considered sterile. Only a limited number of instruments are concerned: Non‑autoclavable semi‑critical (thermo‑sensitive) instruments that are likely to be reused (e.g. laryngoscope). STERILIZATION GUIDELINES 11. STERILIZATION PROCEDURE FOR LINEN Aim To collect linen used in the operating theatre and from the wards for transportation to the washing area of the laundry, while ensuring staff safety and minimizing the risk of spreading micro organisms in the environment. The aim of washing linen is to remove soiling via the chemical action of soap combined with the mechanical action of brushing, followed by rinsing. Linen to be sterilized before use needs to be carefully cleaned before going into the autoclave. The procedure is the same as for the sterilization of instruments. 11.1. Organizing a laundry The process of cleaning soiled linen is a chain of activities, where the procedures must be carried out from the dirtiest to the cleanest zone, with no possibility of moving back or crossing clean with dirty linen. The clean and dirty zones should be separated. Dirty Zone Reception area Soaking area Washing area Clean Zone Drying area, which should have at least a roof in order to protect the linen from rain, dust and insects Area for folding and ironing the linen (it might be useful to have a sewing machine to mend the linen) A place for storage (with a stock) and distribution All linen must be washed as quickly as possible after delivery to the laundry. 29 30 STERILIZATION GUIDELINES 11.2. Collection In the operating theatre All used linen must be collected as soon as possible at the end of each operation by the operating theatre or auxiliary staff. In the wards All used linen must be collected at least once a day from each ward – including changing rooms – by the nursing or auxiliary staff. In practice, two “bags” must be available: zz one for wet linen or linen soiled with organic matter (e.g. blood, faeces, mucus, wound exudate), preferably a leak‑resistant container or plastic bag; zz one for dry, soiled but visibly clean linen, preferably a cloth bag. Steps 1. Check the linen, especially from the operating theatre, for sharps. 2. Place wet linen or linen soiled with organic matter – sheets, drapes, etc. – preferably in a plastic bag inside a leak‑resistant container (bin with a lid). 3. Place dry, soiled but visibly clean linen – i.e. sheets and work clothes – in a cloth bag. 4. Replace the bags when they are full. Close the plastic bags with a knot. 5. Transport the bags on trolleys to the dirty area of the laundry. 6. Do not overfill the bags so that they cannot be properly closed (fill two‑thirds full). 7. Do not mix linen soiled with organic matter and used unsoiled linen. 8. Keep the linen bin closed with the lid when it is not in use. 9. Be sure not to soil the outside of the bags and bins by handling them with soiled gloves. 10. Be sure not to leave any gloves, paper or other foreign objects in the linen bags. 11. The empty plastic bag is discarded with the waste to be incinerated. Never re‑use it. 12. The cloth bag is washed with the linen before being re‑used. After each operation, linen bins are disinfected with a surface disinfectant (Surfanios® from Laboratoires Anios) before a new plastic bag is inserted. At the end of the day, these bins are washed with soap and water and disin‑ fected with the surface disinfectant. 11.3. Procedure for washing linen Linen coming from the operating theatre and soiled linen from the wards. 1. All staff must wear heavy‑duty long rubber gloves, a waterproof apron and eye protection when handling contaminated linen. 2. Take the bags of dirty linen and empty them into the wash sink. 3. Cloth bags are washed and disinfected with the linen; plastic bags are thrown away with the waste. 4. Linen soiled with organic matter or blood should be left to soak for 30 minutes in a sink filled with enough cold water to immerse the linen completely. 5. Stir with a stick to loosen the debris. 6. Remove the linen from the sink, rinse it, and follow the procedure below. 11.3.1. Washing by hand 1. Immerse the linen completely in a sink filled with soapy water heated, if possible, to body temperature (after the detergent/washing powder has completely dissolved). STERILIZATION GUIDELINES 2. Scrub the linen with a brush. 3. Remove the linen from the tub, rinse it with copious amounts of running water until the soap is totally washed out. 4. Drain the dirty water in the sink into the waste water system. 5. Disinfect the linen in a non‑metal bucket containing a 0.1% active chlorine solution for 15 minutes. 6. Rinse copiously at least three times to wash out the chlorine solution. 7. Drain the chlorine solution in the sink into the waste water system. 8. Wear clean gloves and a clean apron to wring out the linen and put it into the clean plastic bag used for transporting the linen to the drying area. 9. Hang the linen to dry on a clothesline in an area that is protected from rain, insects and dust (or put it in the clothes dryer, if one is available). 10. Transport the dry linen to the ironing and folding area of the laundry. 11.3.2. Machine washing 1. Pre‑wash linen soiled with organic matter or blood twice at low temperature (below 25°C) for 5‑7 minutes before running the full cycle. 2. Put all linen through a full wash cycle. 3. Low temperature pre‑wash for 5 to 7 minutes. 4. Wash at 60°C for 15 minutes if possible (thermal disinfection). 5. Rinse. 6. Disinfect for 2 to 3 minutes in 0.1% chlorine solution. 7. Rinse three times with clean water. 8. Spin. 9. At the end of the wash cycle, put on clean gloves and apron to empty the machine into the bin used for this purpose. 10. Hang the linen to dry on a clothesline in an area that is protected from rain and dust. 11. Do not leave damp textiles or fabrics in the machine overnight. 12. Be careful not to overload the machine; follow the manufacturer’s recommendations. After each surgical operation, the linen bins must be disinfected with a surface disinfectant (Surfanios®) before a fresh plastic bag is inserted. At the end of the day, ALL bins must be washed with soap and water and disinfected with the surface disinfectant. 11.4. Packaging, sterilization and storage If linen is to be sterilized, pack it into two layers of crepe paper after it has been ironed and folded. The sterilization process is the same as for instruments, including the TST strip. 134°C for 18 minutes Remember that instruments and linen should never be put in the same load. The expiry date for the sterile linen is four weeks (using the storage techniques recommended for instruments, see section 9.10). Linen that does not need to be sterilized (e.g. bed sheets) can be stored ironed and folded in a clean and dry cupboard until it is sent to the wards. 31 32 STERILIZATION GUIDELINES 12. REFERENCES Swissmedic, Bonnes pratiques de retraitement des dispositifs médicaux pour les cabinets médicaux et les cabinets dentaires ainsi que de petits stérilisateurs à la vapeur d’eau saturée, version 1, April 2010. Médecins Sans Frontières, Sterilization and laundry, guidelines for MSF projects, Paris. Médecins Sans Frontières, Infection control in health care settings, guidelines for MSF projects, Paris FORGHO, 2012. ICRC, Guidelines Sterilization of Surgical Material for Hospitals Supported by ICRC, internal publication, ICRC, Geneva, June 2005. ICRC, Medical Waste Management, Geneva, 2011. PPT, La sterilisation sur les missions, Pascale Choquenet, hospital pharmacist ‑ MSF France, FORGHO Bordeaux. WHO, Prevention of hospital‑acquired infections, 2nd edition, 2008. Centers for Disease Control, Guideline for Disinfection and Sterilization in Healthcare Facilities, 2008. Hôpitaux universitaires de Genève, Sterilization Department, Mr Ney Hervé. The European Forum for Hospital Sterile Supply (EFHSS), http://www.efhss.com World Forum for Hospital Sterile Supply (WFHSS), http://www.wfhss.com G.F. Gardner, M.M. Peel, Sterilization, Disinfection and Infection Control, third edition, Harcourt, Australia, 2001. STERILIZATION GUIDELINES ANNEX I – INSTRUCTIONS FOR FOLDING A SURGICAL GOWN 1. 2. 3. 4. 5. 6. 7. 8. 9. 10. Clear the table. Lay the inside of the gown face down. Cross the 2 sleeves on the upper part of the gown (chest). Tie the 2 thick outside fasteners together loosely. Fold over the closest shoulder, so that the seam is visible all the way down the gown. Adjust the opposite shoulder, so that the seam is visible all the way down the gown. Ensure that the 2 top and 2 inside fasteners are towards the bottom of the gown. Fold the closest part of the gown, keeping 3 centimetres away from the collar. Fold the opposite part of the gown, keeping 3 centimetres away from the collar. Fold twice to obtain a square. Jeannette de Vries/ICRC Jeannette de Vries/ICRC 6 9 10 Jeannette de Vries/ICRC Jeannette de Vries/ICRC 4 Jeannette de Vries/ICRC 3 Jeannette de Vries/ICRC 2 33 34 STERILIZATION GUIDELINES ANNEX II – SUMMARY PROCEDURE FOR PRE‑DISINFECTING AND DISINFECTING INSTRUMENTS 1 Pre-disinfection + rinse 2 Cleaning and disinfection 3 Rinsing 4 Drying 5 Packaging 6 Autoclaves Central sterilization department 1. Pre‑disinfection In the operating theatre: Immerse the instruments completely in the Hexanios® soaking bath and soak for 15 minutes. Use the timer. zz Rinse with clean water. zz This solution must be changed after each use (i.e. after each operation). In the ward: Use the same procedure for instruments before bringing them to the sterilization department. Use the timer. ONE patient = ONE bath 2. Cleaning and disinfection Immerse the instruments completely in the soaking bath, brush them thoroughly and soak in the solution for 15 minutes. 3. Rinsing Rinse thoroughly with clean water. 4. Drying The instruments must be dry before packaging. Wipe them with a clean, lint‑free linen cloth. 5. Packaging Non‑woven paper: Instruments are packed in wire baskets wrapped in two layers of non‑woven paper (stronger than crepe paper). Steam indicator tape: Close each package with this tape. A TST strip has to be put in the big surgical wire basket to monitor time, steam and temperature inside the packages. This is not needed for small sets, like dressing, suture and delivery sets. A second strip wrapped in a double layer of crepe paper is placed in the middle of the autoclave load. Crepe paper: Use crepe paper for individual instruments, diathermy devices, dressing sets and compresses (in groups of 10‑20 compresses). Steam indicator tape: close each package with this tape. STERILIZATION GUIDELINES 6. Autoclave sterilization Loading: Do not put linen and instruments in the same load. Sterilize separately. Cycle: Instruments and linen: 134°C for 18 minutes 7. Traceability Complete the sterilization log: date, cycle number, load, TST, signatures and comments (wet, OK or not OK). 8. Expiry date Write the sterilization date on the steam indicator tape with a marker. Items double‑wrapped in crepe paper or non‑woven sheets can be stored for a maximum of four weeks before use. 35 36 STERILIZATION GUIDELINES ANNEX III – HEXANIOS® PROTOCOL (TECHNICAL FILE) Code: MASDCLEMIE5 Detergent/Disinfectant for instruments and equipment, 5L and pump Microbiological Properties Hexanios Active against Standards Contact time 0.25% Bacteria EN 1040, EN 13727 5 min. MSRA (EN 13727) NF T 72‑190, T 72‑300 (A.baumannii) 15 min. BMR (EN 13697) 15 min. Mycobacteria Mycobacterium tuberculosis (tb) 15 min. Yeast EN 1275 5 min. EN 13624 5 min. BDV (surrogate of HCV), herpesvirus 5 min. HIV‑1, HBV 10 min. Viruses HEXANIOS® Hexanios® is a detergent‑disinfectant used to pre‑disinfect, clean and disinfect reusable instruments (instruments and small items of medical equipment), replacing chlorine and chlorhexidine cetrimide. Concentrated solution to be diluted to 0.5% before use 25 ml = 1 stroke of dosing pump for 5 l water Staff protection Apron, gloves, mask and goggles should always be worn when using this product. or 50 ml = 2 strokes of dosing pump for 10 l water (depending on the number of instruments) Avoid contact with skin and eyes; in case of contact, rinse immediately and thoroughly with clean water and seek medical advice. PROCEDURE Step 1: Pre‑disinfection 1. Prepare a soaking bath/solution according to the volume of instruments to be pre‑disinfected: 5 or 10 l. 2. Immerse the instruments completely in the soaking bath and let them soak for 15 minutes. 3. Rinse with clean water. 4. Throw the used solution away. Do not re‑use this solution; prepare a fresh bath for each load of instruments you treat. Step 2: Cleaning and disinfection 5. Prepare a soaking bath according to the volume of instruments to be disinfected: 5 or 10 l. 6. Completely immerse the instruments in the soaking bath, brush them carefully and let them soak for 15 minutes. 7. Rinse thoroughly with clean water and dry with a clean cloth. 8. This solution can be kept for a maximum of 24 hours. In case of visible contamination (dirty solution), renew the solution immediately. STERILIZATION GUIDELINES 37 ANNEX IV – SURFANIOS® PROTOCOL (TECHNICAL FILE) Microbiological Properties Surfanios Active against Standards Contact time 0.25% Bacteria Mycobacteria Yeast Moulds 0.5% EN 1040, EN 127, EN 13727 5 min. BMR (EN 1276) 5 min. EN 13697 30 min. BMR (EN 13697) 15 min. Mycobacterium terrae (EN 14348) 60 min. 30 min. Mycobacterium terrae (EN 14563) 60 min. 30 min. EN 1275 15 min. EN 13697 30 min. EN 1275 15 min. EN 13697 30 min. Code: MASDCLEMS5 Detergent/disinfectant for surfaces, 5 l & pump 15 min. 15 min. EN 1650 120 min Viruses HIV‑1, PRV (surrogate of HBV), BDV (surrogate of HCV) and herpesvirus 5 min. Vaccinia virus 60 min. 15 min. Surfanios® is a detergent/disinfectant used for surfaces that replaces chlorine and chlorhexidine cetrimide. It is used to disinfect all surfaces: floors, walls and medical equipment (e.g. mayo table, operating table, operating lamp). SURFANIOS® It is non‑corrosive and compatible with any kind of covering/flooring. Concentrated solution to be diluted at 0.25% before use Staff protection Apron, gloves, mask and goggles should always be worn when using this product. 20 ml for 8 l of cold water (2.5 ml/litre) Avoid contact with skin and eyes; in case of contact, rinse immediately and thoroughly with clean water and ask for medical advice. 20 ml = 1 stroke of the dosing pump (5‑l can) Minimum necessary equipment 2 buckets of a different colour: zz one bucket with the diluted Surfanios® solution zz one bucket for clean cold water. 1 clean cloth or mop. Technique Work from the cleanest to the dirtiest surface and from top to bottom. Surfaces and furniture Immerse the cloth/mop in the bucket of Surfanios®, wring it out to remove excess solution and wipe the furniture. If necessary, rinse the cloth/mop in the bucket of clean water and wring it out before immersing it again in the Surfanios® solution. 38 STERILIZATION GUIDELINES Floors EXIT Immerse the cloth/mop in the bucket of Surfanios®, wring it out to remove excess solu‑ tion and wipe the floor. If necessary, rinse the cloth/mop in the bucket of clean water and wring it out before immersing it again in the Surfanios® solution. Use the Surfanios® solution on every surface in the room. Do not rinse. Leave to dry for 15 minutes without entering the room, except in an emergency. After cleaning: 1. keep the remaining Surfanios® solution for the next cleaning operation; 2. empty the water bucket; 3. rinse the bucket and mop with Surfanios® solution; 4. let them dry before using them again. At the end of each day: 1. clean and rinse all material with Surfanios®; 2. let it dry; 3. throw away the rest of the Surfanios® solution. Once every month, all surfaces should be cleaned with an ammoniated detergent5 (e.g. Ajax® (Colgate Palmolive)) to remove the fat layer that is formed by the successive application of Surfanios® Non‑ionic and anionic detergents, chelating agent, bacteriostatic and fungistatic agents, colour‑ ing and citrus fragrance. 5 STERILIZATION GUIDELINES ANNEX V – TOP‑LOADING VERTICAL AUTOCLAVE WITHOUT VACUUM PUMP (E.G. TBM 90-LITRE) Loading zz Make sure that the load is homogeneous (linen or instruments), because these items do not respond the same way to steam. It is harder for steam to penetrate linen; condensation is different, as is drying. Unloading zz Wait until the end of the sterilization cycle. zz Let the autoclave cool down and the drying finish before opening the autoclave. zz Put on heat‑resistant gloves. zz Do not crowd the packages: steam must be able to circulate freely. zz Remove the crepe paper that was placed under the lid. zz Make sure that the packages do not touch the walls of the autoclave chamber. zz Empty the autoclave baskets: place the packages on a clean, dry surface. zz Place packages in the autoclave chamber, filling the lower basket first: small packages can be placed vertically but instrument sets packaged in wire baskets should be placed horizontally. zz Check to make sure the wrappers are intact and dry. zz Do not overload the lower basket: the load should not extend beyond the top of the basket, otherwise the upper basket might rest on the load below and tear the wrappers. Crepe paper sterilization sheets are fragile. zz Load the second basket the same way. zz For each basket, place the TST strip packaged in a double layer of crepe paper in the middle of the load. zz Unwrap the TST strip and check that it has changed colour. 39 40 STERILIZATION GUIDELINES ANNEX VI – FRONT‑LOADING HORIZONTAL AUTOCLAVE WITH VACUUM PUMP (WITH OR WITHOUT STEAM GENERATOR, E.G. MATACHANA SC 500) Loading zz To minimize condensation, make sure that the load is homoge‑ neous, either linen or instruments. zz Fill the chamber two‑thirds full. zz Do not crowd the packages: steam must be able to circulate freely. zz Place the packages on the autoclave shelf: wire tray or bas‑ kets; the packages must not touch the walls of the autoclave chamber. zz Separately wrap the TST indicator strip in a double layer of crepe paper and place it in the middle of the load. Unloading zz Wait until the load has finished. zz Wait 15 minutes for the load to cool. zz Put on heat‑resistant gloves. zz Empty the autoclave: place the packages on a clean, dry sur‑ face. zz Check to make sure the wrapping is intact and dry. zz Unwrap the TST strip and check that it has changed colour. zz Remove the sterilization cycle graph or the printed ticket from the printer, check to make sure it matches the reference graph, write the date and cycle number on the paper and ar‑ chive it. STERILIZATION GUIDELINES 41 ANNEX VII – OPERATING INSTRUCTIONS FOR THE TBM 90-LITRE AUTOCLAVE STERILIZATION WITH 90‑LITRE AUTOCLAVE (TBM ®) zz Autoclave designed for hospitals zz Provided with flexible power source (electricity/gas/kerosene) and an incorporated drying system (by condensation) specially designed for use without electricity 1 7 6 13 11 18 3 8 9 15 10 1. 2. 3. 4. 5. 6. 7. 8. 9. 10. 11. 12. 13. 14. 15. 16. 17. 18. 19. 16 Air vent Graduated water tank (8 l and 16 l) Blue valve Condensation coil Removable collection tank Air filter (filled with cotton wool) Red valve Heating indicator and electric switch Heating element (1.500·3.0000/4.5000W) Timer Pressure gauge Isolation valve, not used Safety valve Weights (left: 1 bar, right: 2 bars) Green valve (bleeding) Yellow valve (for emptying at the end of sterilization) Electric overheating safety cut‑out (optional) Control box Door for kerosene/gas 2 5 AFTCH Code: XSTEAUTO90 AUTOCLAVE, COMBINED, 90 l, elec./kero., incl. kero. burner MATERIAL REQUIRED zz Clean water (low mineralization, preferably distilled, as cold as possible) zz Heating power source (electricity or kerosene/gas burner) zz Clean thick towel zz Timer (in case the timer integrated into the autoclave fails) zz Cotton wool or compresses to fill the chimney Preparations for use 1. Close the YELLOW, RED and BLUE valves (= valve perpendicular to pipe). 2. Leave the GREEN valve (purge) open (= parallel to pipe) 3. Pour water into the autoclave (water must cover the element properly6): zz 8 litres of clean water7 if heating by kerosene or gas burner; zz 16 litres of clean water if heating by electricity. 6 7 The removable lower tank can be used as a measure (when filled up to the line = 16 litres). Clean water contains no solids (e.g. filtered). 42 STERILIZATION GUIDELINES 4. Place the items to be sterilized in the basket(s), separating them so that the steam can easily circulate between them (leave enough space for a hand to slide between the packages). 5. Avoid overloading (maximum 75% of capacity). 6. Put a clean absorbent cloth (towel) over the load to absorb condensation drops falling from the inside of the lid. 7. Close the lid, tightening the diametrically opposite screws. Note: Make sure that all the nuts are on top of the screws. 8. Choose the pressure required by moving weights: 2nd notch = 2.1 bars (134°C). (134°C = 2.1 bars in relative pressure; 3.1 bars in absolute pressure; and 0.985 bars in atmospheric pressure). 9. Fill the chimney with cotton wool or compresses. Heating 10. Put on full heat: zz if using a burner, start it on full heat; zz if using electric heating, turn the red button to position 3. 11. As soon as a continuous jet of steam comes out of the GREEN valve, close this valve (= valve perpendicular to pipe). Purging 12. When the pressure reaches 1 bar on the pressure gauge (first red line), open the GREEN valve. 13. Let the pressure fall to about 0.2, then close the valve. 14. Repeat steps 12 and 13 twice more to eliminate all air pockets. 15. Let the pressure go back up to 2.1 bars (= 134°C). (134°C = 2.1 bars in relative pressure; 3.1 bars in absolute pressure; and 0.985 bars in atmospheric pressure) Sterilization 16. As soon as the pressure reaches 2 bars, the regulating valve starts to release steam. Time 18 minutes from now using the timer. 17. Reduce the heat (lower the burner flame, or position 1 or 2 on the electric heater) to keep just a light jet of steam coming out. 18. Regularly check the pressure while the load is being sterilized and adjust the heat if necessary. Expelling steam and water 19. When the sterilization process is finished (after 18 minutes): zz switch off the burner or set the switch to 0 to cut the heat; zz otherwise, the element will burn out (the timer incorporated into the autoclave acts only as reminder – it does not switch the electricity off). zz The heating indicator light goes out at position 0. 20. Open the YELLOW valve. Be careful with the jet of boiling steam and water: use a flexible tube to vent the steam and water safely away, preferably into a clean 20‑l jerry can (resistant to boiling water) in order to reuse this “distilled” clean water. 21. Close the YELLOW valve when the pressure drops to 0.1 bar. Drying 22. Fill the outer tank with cool water (16 litres). Note: The cooler the water, the more effective the drying. 23. Open the BLUE valve. The cool water flows into the coil inside the autoclave, making the steam condense onto the coil (the pressure reading falls because a vacuum is created inside). STERILIZATION GUIDELINES 24. 25. 26. 27. 28. 29. 30. 31. 32. Wait for 10 minutes (until the tank is empty). Refill the outer tank with cool water and wait for 10 minutes. Close the BLUE valve. Break the vacuum by opening the RED valve (the process takes about 2 minutes). Open the autoclave. If the towel placed over the load is wet, remove it. Wait for about 30 minutes with the lid half open for everything to cool. Drying will be completed by the heat remaining in the body of the autoclave. Remove the basket(s) and place it/them on a clean towel. Take out the sterilized equipment and close the sliding windows of the drums immediately. Checking the cycle 33. Check that the packages wrapped in paper are intact. Discard any wet packages – they will need to be re‑processed and re‑sterilized. 34. Put the lid back on the autoclave – leave it slightly open. Storage and distribution 35. Transfer the sterile packages and drums to the storage area (use a clean container for transport). Remarks The chimney (on top of the lid) must be filled with cotton wool or gauze compresses to filter the air reintroduced into the autoclave after drying. Change the cotton every 50 cycles or once a month. If you use an electric power source, this autoclave can be switched to normal (posi‑ tion 3: 4.500 W), medium (position 2: 3.000 W) or low power (position 1: 1.500 W). In the case of low power, a supplementary heating source is required (e.g. gas butane/propane burner). STERILIZATION WITH 150‑LITRE AUTOCLAVE The instructions for the 150‑l autoclave with vacuum pump are the same as for the 90‑l model, except when it comes to drying: Drying 22. Operate the BLUE valve of the vacuum pump to reach ‑0.7 / ‑0.8 bar, then release the BLUE valve. 43 44 STERILIZATION GUIDELINES ANNEX VIII – OPERATIONING INSTRUCTIONS FOR THE 45-LITRE AUTOCLAVE Code: XSTEAUTO45 Autoclave, combined, 45 l, elec./kero., incl. Kero burner, vertical MOBILE 45-LITRE AUTOCLAVE Hybrid model (electricity / oil / gas), with drying system (V45 l version ‑ two cycles) 1 User manual (see appendix V on generalities about sterilization by steam under pressure) Preparation 1. Pour water into the autoclave from the top (about 16 litres for electric heater; 8 litres for oil or gas burner). The outer tank can serve as a measure (graduation marks at 8 and 16 litres). 2. Load the device with the material to be sterilized. 3. Close the unit and tighten the nuts crosswise (tighten one nut, then the nut diametrically opposite). 4. Select the operating pressure, using the black valve. Opened valve (valve handle parallel to the pipe) = 1.1 bars (121 ° C), closed valve = 2.1 bars (134° C). 5. Close the yellow, red, green and blue valves. Leave the purple valve (purge) in the open position. Purge 6. Set up the heater: position 3 for electric heater; maximum strength for oil stove or gas burner. 7. As soon as a continuous jet of steam escapes from the purple valve, close the valve (valve handle perpendicular to the pipe). 8. When the pressure reaches 1 bar on the gauge, open the purple valve and let the pressure fall to about 0.2 bar, then close the valve. Repeat this operation at least once to eliminate all air pockets. Sterilization 9. As soon as the selected pressure is reached, the control valve starts to release steam. Start timing the sterilization process from now using the timer. Reduce the heat (turn electric heater to position 1, lower flame on burner) to maintain a slight release of steam. Water and steam evacuation 10. When the sterilization time is up, stop the heating process: for electricity, set the switch to 0 (otherwise the element will burn out); for gas, stop the flow; for oil, turn the stove off. Open the yellow valve and let pressure fall to about 0.1 bar, then close the yellow valve. NOTE: Opening the yellow valve releases a jet of boiling water and steam: use a flexible tube to drain the steam and water safely, using a suitable container. Drying equipment 11. Fill the upper external tank with cold water up to the gate (about 16 litres) 12. Open the blue valve. The steam inside condenses on the coil, which is filled with cold water, to create a vacuum (the gauge falls). Wait about 10 minutes, then close the blue valve and break the vacuum by opening the red valve. sterilization guidelines 45 ANNEX IX – Operating instructions for the 39-litre autoclave MOBILE 39-LITRE AUTOCLAVE zz Autoclave for use in health centres or in hospitals as a back‑up system. zz Direct heat source – can be electricity, gas or kerosene burner, wood or charcoal. MATERIAL Clean water (low‑mineralised, preferably distilled) Heater and fuel (gas burner, multi‑fuel burner, electric plate) Clean thick towel Timer Vaseline (if necessary) zz zz zz zz zz Preparation 1. Pour 3 litres of clean water into the bottom of the autoclave. 2. Place the items to be sterilized in the basket, separating them so that the steam can easily circulate between them (leave space to allow a hand to slide between the packages). Avoid overloading (max 75% of capacity). 3. Put a clean absorbent cloth (towel) over the load to absorb drops of condensation falling from the inside of the lid onto the load. 4. Put the lid back, making sure the marks (arrows) line up, and that the flexible metal tube attached to the lid connects with the conduit provided for this purpose in the basket. Lubricate the lid with Vaseline (to maintain quality of rubber seal). 5. Close the lid, and tighten screws crosswise (tighten one screw, then the screw diametrically opposite). Heating 6. Place the autoclave on the heating source. 7. Open the purge/pressure valve (set to vertical position) and put on full heat. 8. As soon as a continuous jet of steam comes out, close the purge valve. Purging 9. Let the pressure rise until 2.1 bar (= 134ºC), then open the purge valve. 10. Let the pressure fall to 0.2 bar, then close the valve. 11. Repeat steps 9 and 10 twice more to eliminate all air pockets. 12. Let the pressure go back up to 2.1 bar (= 134°C) again. Sterilization 13. As soon as the pressure reaches 2.1 bar, the regulating valve starts to release steam continually. The heat may be adjusted to maintain a constant temperature/pressure. 14. Time 18 minutes from now using the timer. Check that the pressure remains correct and constant during sterilization. Adjust the heat if necessary. Expelling steam and water 15. When the sterilization process is finished (after 30/40 minutes), cut the heat, open the purge valve and let the steam escape. 16. When the pressure has fallen to 0, open the lid.8 17. Remove the basket and place it on a clean towel. 18. Empty the clean water (in a clean container for later reuse). Caution: Be careful as the autoclave is still very hot. In case of difficulty opening the lid, reheat for a few minutes (without taking into account the pressure), stop the heating source, and open the lid immediately. 8 Code: XSTEAUTO39 AUTOCLAVE, UNICEF, 39 l, pressure cooker 46 STERILIZATION GUIDELINES Drying period 19. If wet, remove the cloth covering the load. 20. Put the basket back with its content inside the body of the autoclave while it is still hot. 21. Replace the lid, leaving it slightly open. This enables the accumulated heat to dry the equipment. 22. Wait 30 minutes or more (depending on the climate) for everything to cool and dry. 23. Take out the sterilized equipment and close the vents of the drums immediately. Checking the cycle 24. Check the integrity of the packages wrapped in paper. Discard any damp or wet packages (they will need reprocessing). 25. Write on the paper tape of the packs and sets: date of sterilization. 26. Replace the lid on the autoclave. Storage and distribution 27. Transfer the sterile packs and sets to the storage area (use a clean container for transport). Remarks zz Never pour cold water into or onto an autoclave while it is still warm to avoid cracking. zz This autoclave requires a powerful heating source: electric plate (minimum 1500 W) or safe gas or kerosene burner. zz Place the autoclave on a stable surface – make sure that the burner or fire is stable. zz If using a burner, use the wind screen. zz If steam is escaping from around the lid, grease the lid with Vaseline every week. zz Check regularly (at least once a month) the air exhaust tube by blowing air through. Clean with a small diameter wire. If there is any build‑up of foreign material or corrosion inside, discard and replace the tube. MISSION The International Committee of the Red Cross (ICRC) is an impartial, neutral and independent organization whose exclusively humanitarian mission is to protect the lives and dignity of victims of armed conflict and other situations of violence and to provide them with assistance. The ICRC also endeavours to prevent suffering by promoting and strengthening humanitarian law and universal humanitarian principles. Established in 1863, the ICRC is at the origin of the Geneva Conventions and the International Red Cross and Red Crescent Movement. It directs and coordinates the international activities conducted by the Movement in armed conflicts and other situations of violence. 4218/002 12.2014


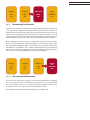


![C.Denis.pptx [Sola lettura]](http://vs1.manualzilla.com/store/data/006367953_1-950b8b322875eb390d6955b8e09ed1ac-150x150.png)