1
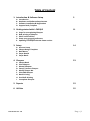
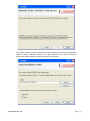
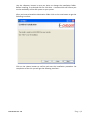
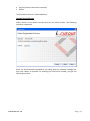
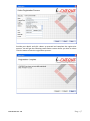
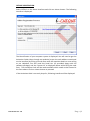
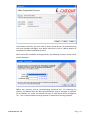
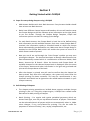
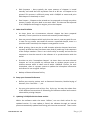
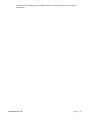
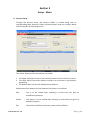
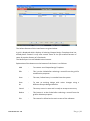
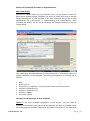
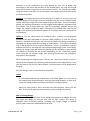
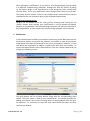
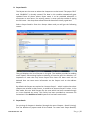
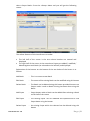
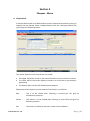
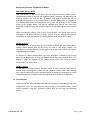
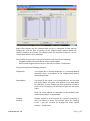
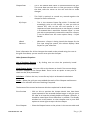
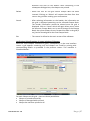
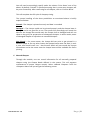
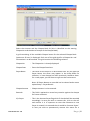
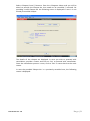
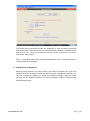
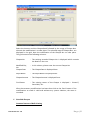
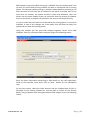
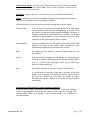
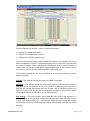
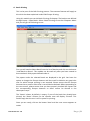
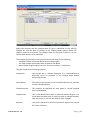
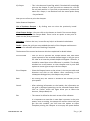
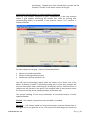
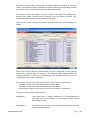
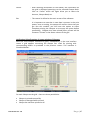
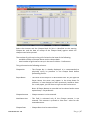
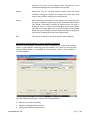
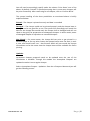
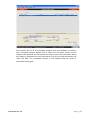
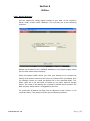
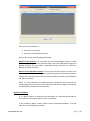
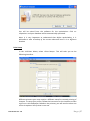
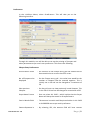
USER MANUAL Document Version: 1.0 Released on 29th September 2012 Table of Content 1. Introduction & Software Setup 2 2. Getting started with i-CHEQUE 11 3. Setup 14 4. Cheques 23 5. Reports 52 6. Utilities 55 A. B. C. D. A. B. C. D. E. A. B. C. D. E. A. B. C. D. E. F. G. H. I. Introduction Hardware and Software Requirement Software Installation & Registration Support Desk / Helpline Steps for start printing Cheques Bulk printing of Cheques Other useful utilities Setup your personal preference Updating i-CHEQUE with the latest version Account Setup Cheque Design Template Bank Name Payee Details Payee Batch Cheque Book Print Cheques Manual Cheques Cancel / Restore Cheques Modify Cheque No. Print EMI Cheques Batch Printing Excel Bulk Printing Incomplete Cheques Document Ver: 1.0 Page|1 Section 1 Introduction & Software Setup A. Introduction Congratulations on selecting i-CHEQUE that will help you in preparing and printing cheques conveniently on the standard cheque leaves provided by the banks. It is a simple to use software, which apart from printing smart looking cheques, also provides a comprehensive Cheque Book management and keeps records for all issued Cheques. This User Manual will help you in getting the best out of the software. B. Hardware and Software Requirement • • • • PC-Pentium / 1 GB RAM Minimum 1024 x 768 resolution Windows XP or higher version 150MB Hard disk space C. Software Installation & Registration i-CHEQUE operates on the .NET framework of Microsoft. If the system already has the .NET framework in place, i-CHEQUE installs directly, otherwise, the .NET framework and its components are installed followed by the installation of iCHEQUE. To install the software insert the i-CHEQUE CD in your PC. Double click on setup file. You will get the following screen:- Document Ver: 1.0 Page|2 Click <Next> button to get the following interface where you can view the default folder in which i-CHEQUE software is to be installed or you select a different destination folder where you want to install the software: Document Ver: 1.0 Page|3 Use the <Browse> button in case you desire to change the installation folder. Before installing, if so desired click on <Disk Cost ..> button which will inform you on the availability of the disk space on your system. After you have selected the destination folder click on the next button to get the following interface: Click on the <Next> button to confirm and start the installation procedure. On completion of the this you will get the following interface: - Document Ver: 1.0 Page|4 Click on <Close> button to exit the installation. Click on the software icon created on the Desktop to launch the software. The software needs to be registered with INSTA INFOTECH before one can start using the same. For i-CHEQUE registration you will get the following interface: Registration of the software can be done on the following ways: Document Ver: 1.0 Page|5 Online (internet connection required) Offline The procedure of each is explained below: ONLINE REGISTRATION Select ‘Online’ on the above interface and click on <Next> button. The following interface is displayed: Enter the Serial Number provided to you along with the software package and then click <Next> to proceed. On entering the valid serial number, you get the following interface: Document Ver: 1.0 Page|6 Provide your details and click <Next> to proceed and complete the registration process. You will get the following confirmation screen where you have to select <Finish> button to exit the registration process: Document Ver: 1.0 Page|7 OFFLINE REGISTRATION Select ‘Offline’ on the above interface and click on <Next> button. The following interface is displayed: The identification of your computer system is displayed. You will need to get the Activation Code either through our website (as per the web address mentioned on the interface) by filling up a web form with the requisite details or over calling to our Helpdesk. You will need the Serial No. (as provided along with the software package) and the ‘System ID’ as displayed above while filling the web form. The Activation Code will be made available which needs to be entered in the form above. Click on <Next> button to proceed. If the Activation Code is correctly keyed in, following interface will be displayed: Document Ver: 1.0 Page|8 In the above interface, you will need to enter the Serial No. (as provided along with then software package), User Name and Email. Click on <Next> button to complete the offline installation process. After successful installation and registration, the following currency setup screen will be displayed. Define the currency and its corresponding fractional unit. On selecting the country, the default value has been provided which may be changed, if required. As an example, for ‘India’, the default currency is ‘INR’ which can be changed to ‘Rs.’. This is required while printing amount in words while printing cheques. Document Ver: 1.0 Page|9 After successful currency setup, the following start up screen will be displayed. D. Support Desk / Helpline If you have any operational difficulty, please contact our centralized help desk as under: INSTA INFOTECH No. 313, Insta House, 15th Cross, JP Nagar, 5th Phase Bangalore - 560078, India. Helpline Number: +91-9674678287 Email: [email protected] Document Ver: 1.0 P a g e | 10 Section 2 Getting Started with i-CHEQUE A. Steps for start printing cheques using i-CHEQUE Add Account Holders with their Bank Accounts. Every Account Holder should have at least one Bank Account. Banks have different cheque layouts and based on this one will need to setup the Cheque Design so that the software prints information at the right places as per the format. Through the Cheque Design Template, simple and convenient options are there for setting up the design. For each Bank Account, the Cheque Book in hand has to be defined along with information on the available cheques. Each time a new Cheque Book is received, the information needs to recorded based on which the cheque leaves automatically gets defined for use. Make sure that a Cheque Design is attached to the Cheque Book which will enable the system to know as to which format needs to printed. Now you are all set and through the ‘Print Cheque’ module you may start printing the cheques. The Account Descriptor to identify a Bank Account has been automatically created which is a combination of Account Holder, Bank Name, Account No. & Branch. Select the Account and Cheque Book. All available cheques for the selected cheque book is displayed. Enter the name of the Payee, Amount and other information in the grid and go ahead and print on the cheque leaves of the bank. After the cheque is printed, one will need to confirm that the cheque has been printed. Only after this confirmation, the system will record that the cheque printing has been successful. This step for reconfirmation is very important and should not be ignored as this would lead to mismatch in your cheque inventory. B. Bulk Printing of Cheques The cheque printing procedure as briefed above supports multiple cheque printing in one run. Using this unique engine, i-CHEQUE has created useful derivatives for bulk printing of cheques. Batch Printing – For regular and routine periodical payments which are almost fixed type, one may set up different batches of payees. These batch can be selected wherein all payees within are automatically taken in. Make minor changes, if any, and proceed for printing. This can be useful for payments on account of salary, rent, royalty, telephone bills, etc. Document Ver: 1.0 P a g e | 11 EMI Payments – Here typically the same amount of cheques is issued monthly and could be from anywhere from 6 to 60 nos. of cheques to be printed. This process is efficiently setup with i-CHEQUE to create and print EMI cheques in absolutely no time. Excel Import – Cheques to be printed can be prepared or through any other process, transfer the print data on an excel sheet. This data can be imported in to i-CHEQUE and through its engine, prints the cheques. C. Other Useful Utilities At times there are circumstances wherein cheque has been prepared manually. There is provision to record such manually issued cheques. One may cancel cheques which imply that the same is now not good for use. In case for any reason, one needs to restore a cancelled cheque, there is a provision and if exercised, the cheque is now good for re-use. While printing, there may be an odd situation wherein cheques have been correctly printed but there has been some kind of jumble up in the sequence of the cheque numbers. There is an in-built utility to modify and correct the sequence so that the records in the software is in synchronization with the actual. Provision to print ‘incomplete cheques’. At times there are cases wherein cheques are to be printed say without date or without payee name or without amount which is taken care of within i-CHEQUE. Further, for such incomplete, there is a proper system to update the incomplete information and convert it into a regular cheque. Backup of data and Restore facility. D. Setup your Personal Preference Define your security options such as Password Protection, Double keying of Amount, Print ‘ Not Over ....’, etc. Set your print options such as Font, Size, Style, etc. You may also select from of the different conventions of formatting the different textual and numeric values while printing cheques. E. Updating i-CHEQUE with the latest version Within the software under the menu ‘Utilities’, one can check online for any updated version. If a new update is found, the software through an internal process automatically updates itself using your internet connection. There is also Document Ver: 1.0 P a g e | 12 a provision for updating the software off-line in the absence of the internet connection. Document Ver: 1.0 P a g e | 13 Section 3 Setup - Menu A. Account Setup Through the Account Setup, the Account Holder is created along with its corresponding Bank Accounts. Select <Account Setup> from the <Setup> Menu and you will get the following screen: The salient features of this interface are as under: • • • The upper half of the screen is the area where data is to be entered / viewed The lower half of the screen displays records in a list format as you keep on appending The bottom part has the self- labelled action buttons Explanation of the buttons on the bottom of the Screen is as follows: Edit : This is to be clicked after selecting a record from the grid for modification purposes Delete : This button is to be clicked after selecting a record from the grid for deletion purposes Exit : The control is shifted to the main screen of the software Document Ver: 1.0 P a g e | 14 Briefly the procedure is explained as below: Add a new Account Holder Setup an Account Holder and its Bank Account as per the self explained field / columns. After providing the details click on the <Save> button. The saved entry will be displayed in the lower half of the screen. As you keep on making more entries the display of entry will keep on increasing on the lower half of the screen. Adding additional Bank Accounts to the existing Account Holder For each Account Holder, additional Bank Accounts can be created. Type / Select the name of the existing Account Holder and then click on the link ‘Add Bank Accounts’. Proceed with providing the relevant details and click on the <Save> button. This new bank account is listed in the display grid. Modify a record On the lower half of the screen, use the mouse to select the entry you need to modify. Either double click on this entry or click on the <Edit> button. The selected entry will be displayed in the upper half of the screen which can now be modified and saved again. Delete a record On the lower half of the screen, use the mouse to select the entry you need to delete. After selecting the record click on <Delete> button, then after seeking your reconfirmation the record will be deleted. It should be noted that for those Account Holder / Bank Account – if transactional records have been created, this cannot be deleted. B. Cheque Design Template Cheque printing need to be setup as per the design of the cheque leaves that has been provided by the bank. Select <Cheque Design Template> from the <Setup> Menu and you will get the following screen: Document Ver: 1.0 P a g e | 15 The Salient features of this interface are as given below: A grid is displayed which displays all existing Cheque Design Templates that has already been created. It may also contain some of the pre-created formats of some of popular formats of a few banks. The Bottom part has self labeled action buttons Explanation of the buttons on the bottom of the Screen is as follows: Add : To create a new Cheque Design Template Edit : This is to be clicked after selecting a record from the grid for modification purposes Save : The new / edited entry is recorded into the system Save As : To save an existing design with minor changes using a different Cheque Design Identifier Cancel : The entry screen is reset and is ready to accept a new entry Delete : This button is to be clicked after selecting a record from the grid for deletion purposes Exit : The control is shifted to the main screen of the software Document Ver: 1.0 P a g e | 16 Briefly the operational procedure is explained below: Add a new Design Click on the <Add> button. On the interface form, you will need to select the Bank whose Cheque Design Template you want to create and enter a Cheque Design Identifier for it. The Identifier is for your reference and can be a short abbreviation for convenience in understanding and remembering. After providing the details, you are all set to design the Cheque template as per the screen below: The middle part enclosed between two measuring rulers, is the place where the cheque template is to be designed. The printing components in a cheque are as follows: Date Payee (Line 1) Payee (Line 2) – Optional – as many formats does have this provision Amount in words (Line 1) Amount in words (Line 2) Amount in figures A/c Payee symbol One may set up the design in three methods: Option 1: For each printable component on the cheque, you will need to measure in millimeters (mm) the top & left distances and also its printable width. After selecting the printable component (by double-clicking on it), the measured Document Ver: 1.0 P a g e | 17 distances is to be entered on the slots labeled as Top, Left & Width and accordingly it will move and set itself at the desired place. You may also drag & drop the printable component at the desired location. For altering the width, using the mouse, the same can be increased / decreased from either sides of the printable component. Option 2: To simplify the process of measuring as in Option 1, one can insert the scanned image of the Cheque into the template using the ‘Insert Cheque Image’ button. Select the image file of the cheque and click on ‘Open’. Once the image is placed, the printing components can be dragged and dropped in alignment with the cheque. The printing width can also be accordingly adjusted as per the image. The cheque image will need to be scanned (it should only have cheque image in full without any additional spaces on the sides) and then imported into the template. Option 3: For the convenience of i-CHEQUE users, a library of pre-designed templates has been uploaded on internet (web) platform. In case the format desired is available on the web, one can directly import the design template by providing the Design Code after clicking on ‘Web Import’. This option is enabled only in the presence of the internet connection. A link is provided to view the available formats on the web with the corresponding Design Codes. Accordingly, specify the Design Code and import the format into the template. It may take up to a couple of minutes for the process depending on the connectivity speed. Once imported, the cheque image with printing components pre-arranged is displayed on the template. After completing the designing part, click on the <Test Print> button to print a sample of the template for previewing and testing the format adjustments. Then, you will have to click on the <Save> button. The saved entry will be displayed on the grid. Save the design, once it is satisfactorily completed. Notes - It is recommended that you should have some blank paper cut in the size of the cheque leave should be kept in stock for the testing purpose. To start with, a few such blank formats have been provided for testing purposes. - Owing to many factors, there could be some discrepancies, which one will have to correct by adjusting the placement of the printing components. Edit an existing Design From the main grid, double click on the design that needs to be edited. One may also select the design on the grid and click on ‘Edit’ button. The design is displayed with its current settings (including the Cheque image, if inserted earlier). Make necessary modifications and ‘Save’. Document Ver: 1.0 P a g e | 18 After making the modifications, if one desires, this changed design may be saved in a different ‘Cheque Design Identifier’ through the ‘Save As’ option. By doing so, the earlier design is not disturbed and a new design has been created with minimal effort. This is very useful when minor changes takes place in the format. The earlier format remains intact for the cheque leaves received earlier and the modified format can be used to print newly received cheque leaves. Deleting an existing Design Designs can be deleted from the main grid by selecting and clicking on the ‘Delete’ button. After seeking your confirmation it will go ahead and delete. Deletion is only possible if the selected design template has not been attached to any Cheque Book. In other words only unused design template can be deleted. C. Bank Names In this module name of Banks are stored for referencing of the Bank Accounts for the Account Holders. Along with the software, the names of most of the popular Indian Banks have been pre-entered for the user’s convenience. However, in case new banks are required to be added, it needs to be done from this module. To create such Bank Names, select <Bank Names> from the <Setup> Menu and you will get the following screen: The grid displays the list of Bank Names along with the corresponding short names. This short name is used for easy identification. The module provides for adding more Banks, edit names of exiting Banks or deleting Banks from the grid. For deletion, it is important to note that only those Banks that have not been used can be deleted. Document Ver: 1.0 P a g e | 19 D. Payee Details The Payees are the ones to whom the cheques are to be issued. The payee ‘SELF’ and ‘YOURSELF’ is already created. The data in this module automatically gets updated from all places where Payee name is to be provided whenever it encounters a new name. For existing names, it saves you the trouble of typing the full name – the drop down allows selection based on initially typed text. Select <Payee Details> from the <Setup> Menu and you will get the following screen: The grid displays the list of Payees in the grid. The module provides for adding more Payees, edit existing Payees or deleting it from the grid. For deletion, it is important to note that only those Payees that have not been used can be deleted. One can store more information on the Payees such as the address details. By default the Payees are marked as ‘Account Payee’ – which implies that when cheques are printed in their favour, it would be as Account Payee. Further, in the Edit mode, one can ‘Hide’ Payees for the ones which has been created wrongly or is not required any more. This facility has been provided to overcome the limitations in the deletion of such Payees as it has been used earlier. E. Payee Batch For printing of cheques in batches (through the menu Cheque – Batch Printing), first the batches of payees need to be created. To create such Payee Batches, Document Ver: 1.0 P a g e | 20 select <Payee Batch> from the <Setup> Menu and you will get the following screen: The salient features of this interface are as under: • • The left half of the screen is the area where batches are created and displayed The right half of the screen is the area where Payees are added / modified / deleted against each Batch (as selected on the left half) and displayed. Explanation of the buttons on the bottom of the two halves of the Screen is as follows: Add Batch : This is to create a new Batch Edit Batch : The name of the existing Batch can be modified using this button Delete Batch : The Batch can be deleted using this button provided there are no Payees under it and no Batch Printing has been done using this Batch. Add Payee : Payee Names under a Batch can be added after selecting a Batch on left half of the screen Edit Payee : The existing Payee can be modified and replaced with a new Payee Name using the button Delete Payee : An existing Payee within the selected can be deleted using this button Document Ver: 1.0 P a g e | 21 Managing Batches On the left half of the screen using the buttons below it to Add a new Batch, Edit an existing Batch Name or Delete an existing Batch. In the area above the grid, you will select the Account Holder to which the Batch belongs followed by providing the Batch Name. On the Edit mode, the Batch can be blocked which would restrict it use to the extent that it will not be visible for selection in Batch printing mode. Managing Payees After selecting a Batch on the left grid, on the right grid one can Add Payees to the Batch, Edit Payee Names or Deleting existing Payees attached to it. Along with the Payee Name, amount can also be specified. Document Ver: 1.0 P a g e | 22 Section 4 Cheques - Menu A. Cheque Book A Cheque Book needs to be defined that contain cheque leaves before printing of cheques can be started. Select <Cheque Book> from the <Cheques> Menu and you will get the following screen: The salient features of this interface are as under: • • • The upper half of the screen is the area where data is to be entered / viewed The lower half of the screen displays records in a list format as you keep on appending The bottom part has the self- labelled action buttons Explanation of the buttons on the bottom of the Screen is as follows: Edit : This is to be clicked after selecting a record from the grid for modification purposes Delete : This button is to be clicked after selecting a record from the grid for deletion purposes Exit : The control is shifted to the main screen of the software Document Ver: 1.0 P a g e | 23 Briefly the procedure is explained as below: Add a new Cheque Book Add information of the Cheque Book for the relevant Account Holder and its corresponding Bank as per the self explained field / columns. By specifying the Starting Cheque No. and the No. of Leaves, the system determines all the available Cheque Nos. in the Cheque Book. A Cheque Design has to assigned to the Cheque Book which will determine the format for printing of the cheque leaves in the Cheque Book. This may be defined later, but till such time only manually issued cheques will be permitted to be recorded against this Cheque Book. After providing the details click on the <Save> button. The saved entry will be displayed in the lower half of the screen. As you keep on making more entries the display of entry will keep on increasing on the lower half of the screen. Modify a record On the lower half of the screen, use the mouse to select the entry you need to modify. Either double click on this entry or click on the <Edit> button. The selected entry will be displayed in the upper half of the screen which can now be modified and saved again. An option for ‘Block Cheque Book’ has been provided. If checked, the Cheque Book will be blocked for printing of cheques leaves from this Cheque Book. This option is useful for flagging of old cheque books which still contains cheque leaves and is not to be used. Delete a record On the lower half of the screen, use the mouse to select the entry you need to delete. After selecting the record click on <Delete> button, then after seeking your reconfirmation the record will be deleted. It should be noted that for those Cheque Books where cheques have already been issued, cannot be deleted. B. Print Cheques Once the Cheque Book has been defined and a proper Cheque Design has been assigned to it, you are now ready to start printing on the cheque leaves. Select <Print Cheques> from the <Cheques> Menu and you will get the following screen: Document Ver: 1.0 P a g e | 24 Select the Account and the Cheque Book ID (this is identified as the starting Cheque No. and the date of receipt of the Cheque Book) against which the cheques need to be printed. The Default Date for Cheques is taken in as the current date which can be modified. The number of grid rows in the grid is limited to the least of the following: - available number of cheque leaves on the cheque book - total number of grid rows as set up in the menu Utilities - Preferences This grid contains the following columns: Cheque No. : The Cheque No. is already displayed. It is recommended to physically verify its presence in the Cheque Book before proceeding further. Payee Name : The name of the Payee is to be entered here. As you type the Payee Name, the same may appear in the drop down for selection, in case cheque has been previously issued to them. For a new payee, you will have to type out the entire name. Note: All Payee Names as recorded can be viewed under menu option Setup – Payee Details. Cheque Amount Document Ver: 1.0 : Cheque amount is to be entered. As a security measure, in case you desire to enter this amount twice for avoiding errors – you can set this up through the menu option Utilities – Preferences. P a g e | 25 Cheque Date : This is the default date value as specified above the grid. The cursor does not wait here. In case you want to change the date, take the cursor on the cell and click to make changes. Remarks : This field is optional to record any remarks against the cheque for future reference. A/c Payee : This is the Account Payee flag which if checked will accordingly print on the cheque. In case you wish to remove this, click on the cell and remove it. It is important to note that whenever a new Payee is created it is assumed that it would be ‘Account Payee’. In case you wish to permanently remove this status for a Payee, it can be done from the menu option Setup – Payee Details. <Blank Column> : Whenever a Payee is being issued the cheque for the first time using the system, this column displays ‘New Payee’ for your reference. Enter information for all the cheques that needs to be printed using the rows in the grid. Once done, you are now all set to print the cheques. Other features & options: List of Previous Cheques – By clicking one can view the previously issued cheques from this account View Cheque Design – One can click on the button to check if the correct design has been mapped to the Cheque Book. There is also an option to test print to check out the print parameters. Calculator – Click on the icon, in case for any help in arithmetical calculations Totals – Below the grid you are provided the totals of the Cheques and Amount columns for reference and cross-checking if required. The bottom of the screen has buttons which are explained in details below: Print Preview : Click on this to preview the cheque details that have been super-imposed on the scanned cheque image. It will give you a fair idea as to how the printed cheque will appear. However, it should be noted that minor difference is possible. The display window has scroll buttons to view cheques one by one with options to move right to top or the last cheque. Print Cheques : Place the Cheque leaves on the printer in the correct order and Document Ver: 1.0 P a g e | 26 direction and click on this button. After confirming in the subsequent dialogue box, the cheques are printed. Delete : Select the row on the grid where cheque data has been inserted. Clicking on ‘Delete’ will remove the data from that row on the grid after seeking your confirmation. Cancel : After selecting information on the header, the information on the grid is displayed pertaining to the selected Cheque Book. The header information cannot be altered once the grid is displayed. Click on ‘Cancel’ which will again allow you to select the Account, Cheque Book, etc. In case of change in the Cheque Book, the system allows to carry forward the data in the grid (if any) to the altered grid for the new Cheque Book. Exit : The control is shifted to the main screen of the software. Verification & Confirmation of proper printing of Cheques After the ‘Print Cheque’ command is given, subsequently, in the next interface screen a grid appears containing only the cheque nos. used for printing with corresponding details as provided in the previous screen. This interface is illustrated below: For each Cheque on the grid – there are three possibilities: Cheque is printed successfully Cheque is damaged while printed Cheque has not been printed at all Document Ver: 1.0 P a g e | 27 You will need to accordingly specify under the column ‘Print Status’ one of the above. By default ‘Printed’ is selected assuming that in most cases cheques will be print successfully. After confirming for all cheques, click on ‘Confirm & Exit’. This will complete the full cycle of cheque printing. The system handling of the three possibilities as mentioned above is briefly explained below: Printed – The cheque is printed correctly and data is recorded Damaged – The cheque could not be printed properly and the cheque leave is damaged and is not good for re-use. The system will accordingly not record the data for the cheque but would mark the cheque leaf as damaged and will not show on the grid y for preparation of subsequent cheques. In other words, status of damaged cheques is equivalent to cancelled cheques. Not Printed – For some reason, the cheque did not print or got printed in a different paper or for any other reason the cheque leaves were not used, in such a case, one should mark it as ‘ Not Printed’ which will not record the cheque information and at the same time the cheque leave will be available for future printing. C. Manual Cheques Through this module, one can record information for all manually prepared cheques using the Cheque Books defined in the system. This will augment maintenance of proper cheque records. Select <Manual Cheques> from the <Cheques> Menu and you will get the following screen: Document Ver: 1.0 P a g e | 28 Select the Account and the Cheque Book ID (this is identified as the starting Cheque No. and the date of receipt of the Cheque Book). A grid containing all the available Cheque leaves for the selected Cheque Book (maximum 20 nos.) is displayed. Each row of the grid signifies a Cheque No. and information is to be entered. This grid contains the following columns: Cheque No. : The Cheque No. is already displayed. Cheque Date : Enter the Cheque Date here. Payee Name : The name of the Payee is to be entered here. As you type the Payee Name, the same may appear in the drop down for selection, in case cheque has been previously issued to them. For a new payee, you will have to type out the entire name. Note: All Payee Names as recorded can be viewed under menu option Setup – Payee Details. Cheque Amount : Cheque amount is to be entered. Remarks : This field is optional to record any remarks against the cheque for future reference. A/c Payee : This is the Account Payee flag which if checked will be recorded accordingly. In case you wish to remove this, click on the cell and remove it. It is important to note that whenever a new Payee is created it is assumed that it would be ‘Account Payee’. In case you wish to permanently remove this status for a Document Ver: 1.0 P a g e | 29 Payee, it can be done from the menu option Setup – Payee Details. <Blank Column> : Whenever a Payee is being issued the cheque for the first time using the system, this column displays ‘New Payee’ for your reference. Enter information for all the cheques that has been prepared manually using the rows in the grid. Once done, you are now all set to save the information and exit. Other features & options: List of Previous Cheques – By clicking one can view the previously issued cheques from this account Calculator – Click on the icon, in case for any help in arithmetical calculations Totals – Below the grid you are provided the totals of the Cheques and Amount columns for reference and cross-checking if required. The bottom of the screen has buttons which are explained in details below: Save : Click on this button record the manual cheque(s) information as entered in the grid. Cancel : After selecting information on the header, the information on the grid is displayed pertaining to the selected Cheque Book. The header information cannot be altered once the grid is displayed. Click on ‘Cancel’ which will again allow you to select the Account, Cheque Book, etc. In case of change in the Cheque Book, the system allows to carry forward the data in the grid (if any) to the altered grid for the new Cheque Book. Delete : Select the row on the grid where cheque data has been inserted. Clicking on ‘Delete’ will remove the data from that row on the grid after seeking your confirmation. Exit : The control is shifted to the main screen of the software. D. Cancel / Restore Cheques Through this module cheques can be cancelled which will nullify its value and would be not be good for any further use. One can cancel issued cheques as well as new unused cheques. There is also a provision that cancelled cheques could be restored making it good again for re-use. This is possible in rare cases owing to some error or voluntarily opted for by the user. Document Ver: 1.0 P a g e | 30 Select <Cheque Cancel / Restore> from the <Cheques> Menu and you will be asked to provide the Cheque No. that needs to be cancelled / restored. On providing a valid Cheque No. the following screen is displayed in case it is not already a cancelled cheque: The details of the cheque are displayed. In case you wish to proceed with cancellation, provide a reason and click on ‘Yes’ to proceed with cancellation. Once the cancellation process is over, click to ‘Exit’ to return back to the main screen. In case the provided Cheque No. is a previously cancelled one, the following screen is displayed: Document Ver: 1.0 P a g e | 31 The details of the cancelled cheque are displayed. In case you wish to proceed with restoration of the same as a new unused cheque, provide a suitable reason and click on ‘Yes’. Once the restoration process is over, click to ‘Exit’ to return back to the main screen. Note - It should be noted that restored cheques loses all its original data and it can be used as a new cheque. E. Modification in Cheque No. While printing cheques, for some reason, the order of cheque nos. as per the software and that actually printed was not the same, through this module, one can inter-change the cheque nos. within the software to align it with the actual printing. Select <Modify Cheque No.> from the <Cheques> Menu and you will get the following screen: Document Ver: 1.0 P a g e | 32 Select the Account and the Cheque Book followed by the range of Cheque Nos. wherein the modification is to take place. The selected range of Cheque Nos. are displayed in the grid. Here the modification of the Cheque No. can take place. This grid contains the following columns: Cheque No. : The existing recorded Cheque No. is displayed which contains the details in the row. Modified Chq No. Cheque Date : In this column, please enter the correct Cheque No. Payee Name : The Payee Name is displayed here. : The Cheque Date is displayed here. Cheque Amount : The Cheque Amount is displayed here. Final Status : The existing status of the Cheque is displayed – Printed / Cancelled / etc. After the necessary modifications has been done click on the ‘Save’ button. If the modifications as made is valid and without any system violation, the same is recorded. F. Print EMI Cheques Common features of Bulk Printing Document Ver: 1.0 P a g e | 33 EMI Cheques is part of the Bulk Printing in i-CHEQUE. Once the cheque data is set up from any of the Bulk Printing module, this data is transferred into a printing queue. This concept enables printing in multiple cheque books by selecting it one after the other till such time the all cheques in the queue is printed. Even if one exits from the module, the queue remains in place and whenever, next one enters into the same module, either he continues with the printing of cheques that is in the queue or empties the queue for the next set of cheque printing. It is to be noted that once data is transferred to the printing queue, it cannot be modified. In case of any changes are to be made, once will have to empty the queue and re-create the printing queue. Using this module you can print EMI cheques together. Select <Print EMI Cheques> from the <Cheques> Menu and you will get the following screen: Enter the basic information pertaining to EMI details on the self explanatory fields on the interface. Once done, click on ‘Next ‘ button for the subsequent step. On the next screen, select the Bank Account and the Cheque Book ID (this is identified as the starting Cheque No. and the date of receipt of the Cheque Book). The grid appears with auto generation of EMI cheque as per the following screen: Document Ver: 1.0 P a g e | 34 The number of grid rows in the grid is limited to the least of the following: - available number of cheque leaves on the cheque book - the total number of EMI cheques to be printed - total number of grid rows as set up in the menu Utilities - Preferences The grid contains the following columns: Cheque No. : The Cheque No. is already displayed. It is recommended to physically verify its presence in the Cheque Book before proceeding further. Payee Name : The name of the Payee is displayed here. Cheque Amount : The EMI amount as specified is displayed here. Cheque Date : The Cheque Date in each grid row is automatically computed as per the EMI frequency and displayed. Say for monthly cheques, the dates increment by one month for each row. Remarks : This field is optional to record any remarks against the cheque for future reference. Now you are all set to print the cheques. Other features & options List of Previous Cheques – By clicking one can view the previously issued cheques from this account Document Ver: 1.0 P a g e | 35 View Cheque Design – One can click on the button to check if the correct design has been mapped to the Cheque Book. There is also an option to test print to check out the print parameters. Calculator – Click on the icon, in case for any help in arithmetical calculations Totals – Below the grid you are provided the totals of the Cheques and Amount columns for reference and cross-checking if required. The bottom of the screen has buttons which are explained in details below: Print Preview : Click on this to preview the cheque details that have been super-imposed on the scanned cheque image. It will give you a fair idea as to how the printed cheque will appear. However, it should be noted that minor difference is possible. The display window has scroll buttons to view cheques one by one with options to move right to top or the last cheque. Print Cheques : Place the Cheque leaves on the printer in the correct order and direction and click on this button. After confirming in the subsequent dialogue box, the cheques are printed. Back : On clicking this, the control is shifted to the summary of the print queue. Cancel : After selecting information on the header, the information on the grid is displayed pertaining to the selected Cheque Book. Click on ‘Cancel’ which will again allow you to select the Account, Cheque Book, etc. Exit : The control is shifted to the main screen of the software. It is important to note that in case data is present in the print queue, even on exiting, the queue still remains. Next time you get into this module, you will have the option to either complete printing the cheques or to empty the queue before proceeding. Verification & Confirmation of proper printing of Cheques After the ‘Print Cheque’ command is given, subsequently, in the next interface screen a grid appears containing the cheque nos. used for printing with corresponding details as provided in the previous screen. This interface is illustrated below: Document Ver: 1.0 P a g e | 36 For each Cheque on the grid – there are three possibilities: Cheque is printed successfully Cheque is damaged while printed Cheque has not been printed at all You will need to accordingly specify under the column ‘Print Status’ one of the above. By default ‘Printed’ is selected assuming that in most cases cheques will be print successfully. After confirming for all cheques, click on ‘Confirm & Exit’. If cheques are still present in the queue, you are again back to the previous screen for continue printing of the pending cheques in the same way. The system handling of the three possibilities as mentioned above is briefly explained below: Printed – The cheque is printed correctly and data is recorded Damaged – The cheque could not be printed properly and the cheque leave is damaged and is not good for re-use. The system will accordingly not record the data for the cheque but would mark the cheque leaf as damaged and will not show on the grid y for preparation of subsequent cheques. In other words, status of damaged cheques is equivalent to cancelled cheques. Not Printed – For some reason, the cheque did not print or got printed in a different paper or for any other reason the cheque leaves were not used, in such a case, one should mark it as ‘ Not Printed’ which will not record the cheque information and at the same time the cheque leave will be available for future printing. Document Ver: 1.0 P a g e | 37 G. Batch Printing This is also part of the Bulk Printing process. The common features will apply to this which has been explained under EMI Cheque Printing. Using this module you can do Batch Printing of cheques. The batches are defined through Setup – Payee Batch. Select <Batch Printing> from the <Cheques> Menu and you will get the following screen: First you will need to Select Batch from the list of batches and click on the button ‘Load Batch to Queue’. This module can be used only after you have created at least one batch with payees defined under it. The payees under the selected batch are displayed in the grid. You have the option to change the Cheque Amount and also mark for deletion any particular row for which cheque printing is not required. Please ensure that all Cheque Amounts has a positive value that is not marked as deleted. Before proceeding to the next screen, please ensure that you have properly checked the Payees and the corresponding Cheque Amounts as these cannot be altered in the subsequent steps. The ‘Status’ column by default is empty. If part of the batch has already been printed, the ‘Status’ column for the relevant rows will display ‘Printed’. This would imply that the rest is still in queue for printing. Once you are ready, click on the button ‘Next’ and the next screen appears as under: Document Ver: 1.0 P a g e | 38 Select the Account and the Cheque Book ID (this is identified as the starting Cheque No. and the date of receipt of the Cheque Book) against which the cheques need to be printed. The Default Date for Cheques is taken in as the current date which can be modified. The number of grid rows in the grid is limited to the least of the following: - available number of cheque leaves on the cheque book - the total number of cheques to be printed for the Batch - total number of grid rows as set up in the menu Utilities - Preferences The grid contains the following columns: Cheque No. : The Cheque No. is already displayed. It is recommended to physically verify its presence in the Cheque Book before proceeding further. Payee Name : The name of the Payees as carried forward from the previous screen is displayed here. Cheque Amount : The amounts as specified for each payee is carried forward here and displayed. Cheque Date : This is the default date value as specified above the grid. The cursor does not wait here. In case you want to change the date, take the cursor on the cell and click to make changes. Remarks : This field is optional to record any remarks against the cheque for future reference. Document Ver: 1.0 P a g e | 39 A/c Payee : This is the Account Payee flag which if checked will accordingly print on the cheque. In case you wish to remove this, click on the cell and remove it. If you wish to permanently remove this status for a Payee, it can be done from the menu option Setup – Payee Details. Now you are all set to print the cheques. Other features & options: List of Previous Cheques – By clicking one can view the previously issued cheques from this account View Cheque Design – One can click on the button to check if the correct design has been mapped to the Cheque Book. There is also an option to test print to check out the print parameters. Calculator – Click on the icon, in case for any help in arithmetical calculations Totals – Below the grid you are provided the totals of the Cheques and Amount columns for reference and cross-checking if required. The bottom of the screen has buttons which are explained in details below: Print Preview : Click on this to preview the cheque details that have been super-imposed on the scanned cheque image. It will give you a fair idea as to how the printed cheque will appear. However, it should be noted that minor difference is possible. The display window has scroll buttons to view cheques one by one with options to move right to top or the last cheque. Print Cheques : Place the Cheque leaves on the printer in the correct order and direction and click on this button. After confirming in the subsequent dialogue box, the cheques are printed. Back : On clicking this, the control is shifted to the summary of the print queue. Cancel : After selecting information on the header, the information on the grid is displayed pertaining to the selected Cheque Book. Click on ‘Cancel’ which will again allow you to select the Account, Cheque Book, etc. Exit : The control is shifted to the main screen of the software. It is important to note that in case data is present in the print queue, even on exiting, the queue still remains. Next time you get into this module, you will have the option to either complete printing the cheques or to empty the queue before Document Ver: 1.0 P a g e | 40 proceeding. Cheques that have already been printed will be shown as ‘Printed’ in the Status column of the grid. Verification & Confirmation of proper printing of Cheques After the ‘Print Cheque’ command is given, subsequently, in the next interface screen a grid appears containing the cheque nos. used for printing with corresponding details as provided in the previous screen. This interface is illustrated below: For each Cheque on the grid – there are three possibilities: Cheque is printed successfully Cheque is damaged while printed Cheque has not been printed at all You will need to accordingly specify under the column ‘Print Status’ one of the above. By default ‘Printed’ is selected assuming that in most cases cheques will be print successfully. After confirming for all cheques, click on ‘Confirm & Exit’. If cheques are still present in the queue, you are again back to the previous screen for continue printing of the pending cheques in the same way. The system handling of the three possibilities as mentioned above is briefly explained below: Printed – The cheque is printed correctly and data is recorded Damaged – The cheque could not be printed properly and the cheque leave is damaged and is not good for re-use. The system will accordingly not record the Document Ver: 1.0 P a g e | 41 data for the cheque but would mark the cheque leaf as damaged and will not show on the grid y for preparation of subsequent cheques. In other words, status of damaged cheques is equivalent to cancelled cheques. Not Printed – For some reason, the cheque did not print or got printed in a different paper or for any other reason the cheque leaves were not used, in such a case, one should mark it as ‘ Not Printed’ which will not record the cheque information and at the same time the cheque leave will be available for future printing. H. Excel Bulk Printing This is also part of the Bulk Printing process. The common features will apply to this which has been explained under EMI Cheque Printing. Using this module you can import data from an Excel sheet for bulk printing of cheques. Select <Excel Bulk Printing> from the <Cheques> Menu and you will get the following screen: Give a unique name for the List to be imported for reference in the field labeled ‘List Description’. You will need to browse and select the Excel file from the cheque printing data would be imported and click on the button ‘Click on Excel file’. The number of records for import in a single print queue is limited to 100. The data in the Excel sheet must be provided in a structured format which can be downloaded by clicking on ‘Get Excel file structure’. After the import of data successfully, the payees with the corresponding amounts are displayed in the grid. You have the option to change the Cheque Document Ver: 1.0 P a g e | 42 Amount but ensure that it has a positive value. Before proceeding to the next screen, you should properly checked the Payees and the corresponding Cheque Amounts as these cannot be altered in the subsequent steps. The ‘Status’ column by default is empty. If part of the data has already been printed, the ‘Status’ column for the relevant rows will display ‘Printed’. This would imply that the rest is still in queue for printing. Once you are ready, click on the button ‘Next’ and the next screen appears as under: Select the Account and the Cheque Book ID (this is identified as the starting Cheque No. and the date of receipt of the Cheque Book) against which the cheques need to be printed. The Default Date for Cheques is taken in as the current date which can be modified. The number of grid rows in the grid is limited to the least of the following: - available number of cheque leaves on the cheque book - the total number of cheques to be printed for the Batch - total number of grid rows as set up in the menu Utilities - Preferences The grid contains the following columns: Cheque No. : The Cheque No. is already displayed. It is recommended to physically verify its presence in the Cheque Book before proceeding further. Payee Name : The name of the Payees as carried forward from the previous screen is displayed here. Document Ver: 1.0 P a g e | 43 Cheque Amount : The amounts as specified for each payee is carried forward here and displayed. Cheque Date : This is the default date value as specified above the grid. The cursor does not wait here. In case you want to change the date, take the cursor on the cell and click to make changes. Remarks : This field is optional to record any remarks against the cheque for future reference. A/c Payee : This is the Account Payee flag which if checked will accordingly print on the cheque. In case you wish to remove this, click on the cell and remove it. If you wish to permanently remove this status for a Payee, it can be done from the menu option Setup – Payee Details. Now you are all set to print the cheques. Other features & options: List of Previous Cheques – By clicking one can view the previously issued cheques from this account View Cheque Design – One can click on the button to check if the correct design has been mapped to the Cheque Book. There is also an option to test print to check out the print parameters. Calculator – Click on the icon, in case for any help in arithmetical calculations Totals – Below the grid you are provided the totals of the Cheques and Amount columns for reference and cross-checking if required. The bottom of the screen has buttons which are explained in details below: Print Preview : Click on this to preview the cheque details that have been super-imposed on the scanned cheque image. It will give you a fair idea as to how the printed cheque will appear. However, it should be noted that minor difference is possible. The display window has scroll buttons to view cheques one by one with options to move right to top or the last cheque. Print Cheques : Place the Cheque leaves on the printer in the correct order and direction and click on this button. After confirming in the subsequent dialogue box, the cheques are printed. Back : On clicking this, the control is shifted to the summary of the print queue. Document Ver: 1.0 P a g e | 44 Cancel : After selecting information on the header, the information on the grid is displayed pertaining to the selected Cheque Book. Click on ‘Cancel’ which will again allow you to select the Account, Cheque Book, etc. Exit : The control is shifted to the main screen of the software. It is important to note that in case data is present in the print queue, even on exiting, the queue still remains. Next time you get into this module, you will have the option to either complete printing the cheques or to empty the queue before proceeding. Cheques that have already been printed will be shown as ‘Printed’ in the Status column of the grid. Verification & Confirmation of proper printing of Cheques After the ‘Print Cheque’ command is given, subsequently, in the next interface screen a grid appears containing the cheque nos. used for printing with corresponding details as provided in the previous screen. This interface is illustrated below: For each Cheque on the grid – there are three possibilities: Cheque is printed successfully Cheque is damaged while printed Cheque has not been printed at all Document Ver: 1.0 P a g e | 45 You will need to accordingly specify under the column ‘Print Status’ one of the above. By default ‘Printed’ is selected assuming that in most cases cheques will be print successfully. After confirming for all cheques, click on ‘Confirm & Exit’. If cheques are still present in the queue, you are again back to the previous screen for continue printing of the pending cheques in the same way. The system handling of the three possibilities as mentioned above is briefly explained below: Printed – The cheque is printed correctly and data is recorded Damaged – The cheque could not be printed properly and the cheque leave is damaged and is not good for re-use. The system will accordingly not record the data for the cheque but would mark the cheque leaf as damaged and will not show on the grid for preparation of subsequent cheques. In other words, status of damaged cheques is equivalent to cancelled cheques. Not Printed – For some reason, the cheque did not print or got printed in a different paper or for any other reason the cheque leaves were not used, in such a case, one should mark it as ‘ Not Printed’ which will not record the cheque information and at the same time the cheque leave will be available for future printing. I. Incomplete Cheque Preparation This module is activated only after opting for ‘Incomplete Cheques’ through Utilities – Preferences – Advanced. Select <Incomplete Cheques - Preparation> from the <Cheques> Menu and you will get the following screen: Document Ver: 1.0 P a g e | 46 Select the Account and the Cheque Book ID (this is identified as the starting Cheque No. and the date of receipt of the Cheque Book) against which the cheques need to be printed. The number of grid rows in the grid is limited to the least of the following: - available number of cheque leaves on the cheque book - total number of grid rows as set up in the menu Utilities - Preferences This grid contains the following columns: Cheque No. : The Cheque No. is already displayed. It is recommended to physically verify its presence in the Cheque Book before proceeding further. Payee Name : The name of the Payee is to be entered here. As you type the Payee Name, the same may appear in the drop down for selection, in case cheque has been previously issued to them. For a new payee, you will have to type out the entire name. Note: All Payee Names as recorded can be viewed under menu option Setup – Payee Details. Cheque Amount : Cheque amount is to be entered. Not Above Amt : This field is activated only of the Cheque amount is not entered. This amount is printed as ‘Not Over’ value for this entered amount. Cheque Date : Cheque Date is to be entered here. Document Ver: 1.0 P a g e | 47 Remarks : This field is optional to record any remarks against the cheque for future reference. A/c Payee : This is the Account Payee flag which if checked will accordingly print on the cheque. In case you wish to remove this, click on the cell and remove it. It is important to note that whenever a new Payee is created it is assumed that it would be ‘Account Payee’. In case you wish to permanently remove this status for a Payee, it can be done from the menu option Setup – Payee Details. <Blank Column> : Whenever a Payee is being issued the cheque for the first time using the system, this column displays ‘New Payee’ for your reference. For printing an incomplete cheque, one needs to provide data is at least one of the field – Payee Name, Amount (or Not Over Amount) and Cheque Date. Further out these data field data should be missing on at least one of them to make it an incomplete cheque. Enter information for all the incomplete cheques that needs to be printed using the rows in the grid. Once done, you are now all set to print the cheques. Other features & options: List of Previous Cheques – By clicking one can view the previously issued cheques from this account View Cheque Design – One can click on the button to check if the correct design has been mapped to the Cheque Book. There is also an option to test print to check out the print parameters. Calculator – Click on the icon, in case for any help in arithmetical calculations Totals – Below the grid you are provided the totals of the Cheques and Amount columns for reference and cross-checking if required. The bottom of the screen has buttons which are explained in details below: Print Preview : Click on this to preview the cheque details that have been super-imposed on the scanned cheque image. It will give you a fair idea as to how the printed cheque will appear. However, it should be noted that minor difference is possible. The display window has scroll buttons to view cheques one by one with options to move right to top or the last cheque. Print Cheques : Place the Cheque leaves on the printer in the correct order and Document Ver: 1.0 P a g e | 48 direction and click on this button. After confirming in the subsequent dialogue box, the cheques are printed. Delete : Select the row on the grid where cheque data has been inserted. Clicking on ‘Delete’ will remove the data from that row on the grid after seeking your confirmation. Cancel : After selecting information on the header, the information on the grid is displayed pertaining to the selected Cheque Book. The header information cannot be altered once the grid is displayed. Click on ‘Cancel’ which will again allow you to select the Account, Cheque Book, etc. In case of change in the Cheque Book, the system allows to carry forward the data in the grid (if any) to the altered grid for the new Cheque Book. Exit : The control is shifted to the main screen of the software. Verification & Confirmation of proper printing of Cheques After the ‘Print Cheque’ command is given, subsequently, in the next interface screen a grid appears containing only the cheque nos. used for printing with corresponding details as provided in the previous screen. This interface is illustrated below: For each Cheque on the grid – there are three possibilities: Cheque is printed successfully Cheque is damaged while printed Cheque has not been printed at all Document Ver: 1.0 P a g e | 49 You will need to accordingly specify under the column ‘Print Status’ one of the above. By default ‘Printed’ is selected assuming that in most cases cheques will be print successfully. After confirming for all cheques, click on ‘Confirm & Exit’. The system handling of the three possibilities as mentioned above is briefly explained below: Printed – The cheque is printed correctly and data is recorded Damaged – The cheque could not be printed properly and the cheque leave is damaged and is not good for re-use. The system will accordingly not record the data for the cheque but would mark the cheque leaf as damaged and will not show on the grid y for preparation of subsequent cheques. In other words, status of damaged cheques is equivalent to cancelled cheques. Not Printed – For some reason, the cheque did not print or got printed in a different paper or for any other reason the cheque leaves were not used, in such a case, one should mark it as ‘ Not Printed’ which will not record the cheque information and at the same time the cheque leave will be available for future printing. Updation Incomplete cheques prepared needs to be updated once the rest of the information is available. Through this module the ‘Incomplete Cheques’ are updated to make it into a regular cheque. Select <Incomplete Cheques - Updation> from the <Cheques> Menu and you will get the following screen: Document Ver: 1.0 P a g e | 50 This contains the list of all incomplete cheques that need updation to make it into a complete cheque. Double click or select row and press <enter> on the cheque to be updated. On the bottom part of the screen the information about the cheque is populated. You are required to fill up the missing information and ‘Save’ the data. The incomplete cheque is now updated and the record is removed from the grid. Document Ver: 1.0 P a g e | 51 Section 5 Reports Brief Synopsis i-CHEQUE has an in-built comprehensive system for printing various General and Query reports. It generates reports for both on-screen viewing as well as printing hard copies serving multiple purposes such as record keeping, auditing, filtered queries, etc. The report interface is simple to use with convenient self-explanatory labels for understanding. Most of the reports have the facility for setting filters across Accounts Details, Cheques, Dates, etc. The reports as generated and printed from the software are summarized as under: Cheque Issue Register This provides a list of all cheques issued and recorded in the system. One can print details of all cheques or only the summary for each Account Holder. Further, set date range and also set multiple filters such as Account Holder / Bank, Payee, etc. Report is sorted either on the Cheque Preparation Date or the Cheque Date. Payee Cheque Issue Register This a unique report wherein it provides all Cheque issues sorted and grouped on Payee Name. Through this report one can view payments to each Payee across all Account Holders. One can print details of all cheques or only the summary for each Payee. Further set date range and also set multiple filters such as Payee, Account Holder / Bank, etc. Report is sorted either on Cheque Date with each Payee Name. Cheque Book Summary i-CHEQUE keeps track of each Cheque Book in terms of issued, cancelled and unused cheques. Summary of all Cheque Books or only of the current ones can be viewed and keep track of the cheque leaf inventory that is on hand. Cheque Book Details This is a log report for each Cheque Book very similar to the way one records in the attached sheets provided by the bank. One can print detail for a particular Cheque Book or multiple Cheque Books as desired. Document Ver: 1.0 P a g e | 52 List of Cancelled Cheques Through this report one can get a list of all cheques that has been cancelled or has been damaged while printing. Bulk Cheque Printing One can get a list of cheques printed through modules separately for EMI Cheques, Batch Printing and Excel Import. Report can be for all or selective Account Holders and can viewed in both detailed and summary modes. Listing Report These are simple listing reports for the following: - Account Details: This provides a list of Account Holders and the corresponding Bank Accounts. - Payee Details: This provides a list of Payee Names. - Payee Batch: This provides a list of all Batches with corresponding Payee Names. Query Report This a powerful reporting tool which primarily has two query options. Firstly, provide a Cheque No. for query on it. Secondly, it has an open ended filtering system – wherein a report can be generated with filter options on Account Holders / Bank Accounts, Printed / Manual Cheques, Payee Name, Cheque Date / Entry Date, etc. Exception Report This reporting option contains the following: Modification of Cheques Nos.: This lists out those cheques that has been modified through the menu Cheques – Modify Cheque No. List of Not-Printed / Damaged Cheques: This lists all cheques that could not be printed or was damaged after the print command was given through the cheque printing options. Cheques released for Re-use: This lists out all cheques that has been restored after was cancelled earlier Document Ver: 1.0 P a g e | 53 Incomplete / Updated Cheques – Issue Register This module prints all cheques entered through the Incomplete Cheque module. It has options to print either the incomplete cheques or updated cheques or both together. Document Ver: 1.0 P a g e | 54 Section 6 Utilities Tasks - Backup & Restore Use this module for taking regular backup of your data. In the <Utilities> Menu, under <Tasks> select <Backup>. This will take you to the following interface: Backup can be taken for the i-CHEQUE database or the Cheque images. Select the one that needs to be backup up. Select the Output folder where you want your backup to be created and specify some textual note which will serve as a reference for the backup. Click on <Backup> button to create the backup file in the specified folder. This folder could be in the hard disk of system or any other external storage device. The name of the backup file is placed by default which contains the data and time stamp which is changeable by the user. For restoration of backed up data, click on <Restore> under <Tasks> in the <Utilities> Menu. This restore will take you to following interface: Document Ver: 1.0 P a g e | 55 Here you have two options: • • Restore from Archive Restore from Specified Location Each of the above is briefly explained below: Restore from Archive: This will show you the chronological history of data backup taken along with the reference notes that was submitted through the Backup module. You can select a specified backup and click on <Restore> Button to restore the data. Restore from Specified Location: You can also use this option to restore the data only if you know the file location and filename where the same has been stored. Once you browse the file and select <Restore> button your database file will be restored. Note: It is very important to understand that restoration will overwrite the existing data and as such the current database will be lost. Before restoration, it is advisable to backup the current data. Optimize Database It is a good practice to optimize your database for improved performance. This removes redundant spaces from the database. In the <Utilities> Menu, under <Tasks> select <Optimize Database>. This will take you to the following interface: Document Ver: 1.0 P a g e | 56 You will be exited from the software for the optimization. Click on <Optimize> and your database will be automatically optimized. Note: It is very important to understand that before optimization, it is advisable to take a backup of the current data and store it in a different location. Print Setup In the <Utilities> Menu, select <Print Setup>. This will take you to the following interface: Different printers types may require a different setup for smooth printing of cheques. To setup your printer, follow the instruction on the interface to take a print on a A4 sized paper. Based on the printout, you will need to select one of the six options. Your printer is now set. Document Ver: 1.0 P a g e | 57 Preferences In the <Utilities> Menu, select <Preference>. This will take you to the following interface: Through this module, one will be able to set up the printing of cheques and other parameters as per one’s own preference. This covers the following: Cheque Entry Preferences: Enter Amount Twice : On selection in the Cheque entry grid the amount has to be entered twice to a cross-check for errors No. of Cheques to be displayed : On the Cheque entry grid – the value here would be the number of cheques that be entered together. This is initially set to 20 and can be changed to a maximum of 50. View previous Cheques : On the grid, one can view previously issued cheques. This is also set to 20 and can be changed to a maximum of 50. Payee Name Format : One can select ALL CAPS – which implies that the Payee Name will always be stored in all capital letters. Case in Words fields : The amount in words could be printed either in ALL CAPS or IN PROPER case as per one’s preference Comma Separater in : By selecting YES, the amount field will have comma Document Ver: 1.0 P a g e | 58 Amount separaters. Precede *** in Amount ; By selecting YES, the amount will be preceded by ***. Example 3455.00 will be displayed as ***3455.00. For Amount not having decimal, the figure should be terminated as ‘/-‘ : For amounts with nil paisa, one can opt to print either as 3455.00 or 3455/-. Font, Font Size & Style : One can select the Font, Size and Style of printing on cheques as per one’s preference and liking. Password : As an option, one can set the password. Every time you start the software, you will get access only after providing the correct password credentials. This password may also be removed as and when required. Advanced Options This contains the following optional features: Printing – ‘NOT OVER Rs. ….’ on cheques. If opted for, the Not Over amount will be rounded off to the following Rupee. Exmaple – Cheque Amount: 2344.45 Not Over Amount: 2345.00. Printing of Incomplete Cheques – Only on selection of this feature, the software will permit printing of Incomplete Cheques (implies cheques without date or payee name or amount). This gets activated in Cheque menu. If this is opted for, then the other feature ‘NOT OVER Rs .…’ is automatically selected. Update Now From time to time software updates will be released on i-CHEQUE based on changes, user feedbacks and bug corrections, if any. The software can be updated both online (internet connection required) and offline. For updating the software, click on <Update Now> under the <Utilities> Menu. This is an internet based automated system for updating the software wherein the latest version is checked for and if any new update is found, the software is instantly updated. In the absence of the internet connection, you will need to download the update file from the website www.icheque.instainfotech.com. Please follow necessary instructions from the website for off-line updation. Document Ver: 1.0 P a g e | 59 Visit us at: www.instainfotech.com Developed by: INSTA INFOTECH No. 313, Insta House 15th Cross, JP Nagar 5th Phase, Bangalore - 560078 Helpline Number: +91-9674678287 Email: [email protected]