1
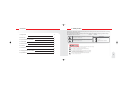
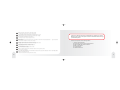
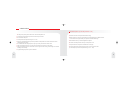
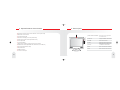
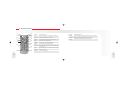
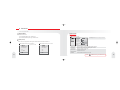
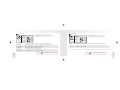
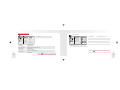
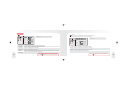
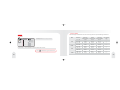
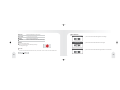
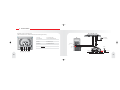
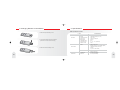
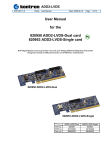
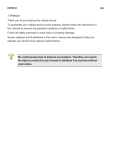
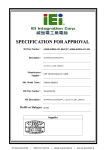
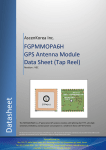
INSTRUCTION MANUAL
17” DIGITAL TFT LCD COLOR MONITOR
CM-1710D/TM-1710D (Option)
Thank you for choosing this product.
Please read this instruction manual carefully before
operating this product.
1. Safety Rules
Contents
1. Safety Rules
3
2. Before Use
8
Please read the “Safety Rules” carefully before using this product. Following of the safety rules prevents users from any damage
related with the misuse of this product.
It is very important that users follow these safety rules. We state “Caution” and “Warning” to clarify any potential for damage
associated with misuse of the product.
Warning
3. Special Features of the product
10
4. Terms of part
11
5. Remote Control
12
6. Functions
14
7. Connections
26
8. Changing Remote Control Battery
28
9. Specifications
29
Caution
May cause bodily harm or even death if users ignore
warnings in the safety rules.
About signs
“Precautions”
“Do not”
May cause bodily harm or even death if users ignore
cautions in the safety rules.
“Follow directions carefully”
Warning
Place the product where it doesn’t prevent the driver from driving.
--- The driver’s view of sight should not be blocked.
Do not watch or operate the product while driving.
--- This may cause a major accident.
Do not place the product near the passenger-side airbag.
--- Airbags may not operate properly or may cause personal damage
and accident when accidentally opening.
Do not get product wet and operate with wet hands.
--- This may cause electric shock.
3
Do not use in bathtub. Do not pull the plug with wet hands.
---This may cause electric shock.
Do not use unapproved power voltage.
---This may cause fire or electric shock.
Caution
Do not use unapproved Cigarette Lighter Adapter.
--- This may cause fire ,electric shock and/or malfunction.
Do not put the product in a place where sudden temperature increase occurs such as the vehicle’s dashboard.
Do not damage or bend electric cord. Do not place heavy objects on electric cord.
---This may cause fire from electric sparks.
Do not use damaged electric cord.
Do not place the product where high temperature and/or the direct ray of the sun occurs.
--- This may cause fire, electric shock and/or malfunction.
--- This may cause fire and/or electric shock.
Do not put the product in an unstable place where the product may be exposed to shock and/or impact.
Do not put pins or needles into the product or electric cord of product.
--- The product may fall and be damaged.
--- If this happens, stop the product operation immediately. Continuous use may cause fire, electric shock and/or malfunction.
Do not place any containers with water or any small metal objects on top of the product or nearby it.
--- Unplug the product when water or metal comes in contact with the product. Continuous use may cause fire,
electric shock and/or malfunction.
Stop using the product immediately when you drop it or damage
the outside shell.
--- Continuous use may cause fire, electric shock and/or malfunction.
Do not place electric cord near a heating product.
--- The cord surface may melt and cause fire and/or electric shock.
Do not press or drop LCD panel.
--- You should not give any shock on LCD panel because it may cause damage.
Always clean the cigarette lighter socket before using product.
--- Bad connection may cause fire.
Be careful when thunder and lighting occurs.
Clean electric socket area often.
--- There is a danger of electric shock.
--- Dust in the area may cause fire.
Do not use non-specified double socket and extended car battery cord.
Keep electric cord properly positioned.
--- This may cause excess heat and/or fire.
--- An improperly positioned electric cord may cause fire or electric shock when metal material is in contact with the power source.
Do not attempt to open, disassemble or repair the product by any person except an authorized service dealer.
4
--- This may cause electric shock and/or malfunction. You should request an authorized service dealer for any inspection and
repair of the product.
5
Unplug the product and remove cords when moving.
--- It may damage cords and cause fire and/or electric shock.
The car engine should be running when you use the product in a car.
---Without the engine running, you may have excessive discharge of the car battery.
Do not pull the cord line when you unplug it.
---Damaged cords may cause fire and/or electric shock.
If you find any strange occurrences or malfunction in the product or any foreign
substance gets into the product, please contact the authorized retailer where you
purchased the product.
Hold the plug when you unplug the product. Put a battery in the remote control properly with +, - signs as directed
in this manual.
--- Improper use of batteries may cause fire and/or damage.
Unplug the product when you don't use it for a long period of time.
---Insulation may cause electric shock, electric leak and/or fire.
Unplug the product when you clean or care for it.
---Not unplugging product may cause electric shock.
Do not watch Monitor for a long period of time.
---This may damage your eyesight.
= Do not use the product in the following locations.
---This may cause malfunction.
= In direct rays of the sun and near heating products
= High in humidity and with bad ventilation
= Dusty or oily locations
= Low temperatures
= Unstable environment
When you transport the product, remove all cords and do not give any shock.
---This may cause a malfunction.
Do not place volatile materials such as insecticides on the product. The product should not come in contact with rubber
or vinyl for a long period of time.
---The surface of the product may change and paint may peel off.
6
7
2. Before Use
Precautions (when you use the product in a car)
=To safely use the product, please read the user’s manual carefully before use.
=Connect all lines as directed in the product connection map in the manual.
=Do not touch the LCD panel.
=Use the product at the temperature range of 0OC ~ 50OC .
=Screen may be a little dark when the product is operated in low temperature areas. Screen will be shown normal
luminosity after a few minutes.
=The driver should not use the product while he/she is driving.
=Quality of pictures on screen may vary depending on the radio field strength in different locations.
You should use video equipment where you experience weak radio field strength.
=Follow traffic laws when you use the Navigation Route System.
=Be cautious of humidity and shock when you use the product in a car.
=Do not disassemble and modify the product in any way. This may cause fire and/or electric shock.
=When you install the product in a car, do not set a volume level too loud for others to hear outside.
=When you install the product in a car and watch TV, the car engine should be running as there might occur excessive
discharge of the car battery.
=The product should not be placed on the dashboard or near engine
=Cover the product when exposed to direct rays of the sun for a long period of time.
(You should keep the product at a temperature range of -20℃ ~ 60℃.)
=Any liquid leaking into product may cause malfunction.
8
9
3. Special Features of the Product
4. Terms of part
= Applied high resolution and low reflection DIGITAL TFT LCD (1280 x 1024)
= All electronic control functions
①
= Convenient Graphic OSD
= All functions are displayed on screen (OSD function)
= System auto recognition function(PAL/ NTSC/ AUTO)
= PC auto adjustment
= 7 Languages display
(Italian, Korean, Japanese, English, German, French, Spanish)
= MODE selection function(DSUB ANALOG, DVI DIGITAL, AV, S-VIDEO,TV)
= One-touch Dimmer(Remote control)
= 4W speaker built-in
= STAND BY Function
MENU
SELECT
②
③
④
⑤
⑥
⑦
① REMOTE SENSOR WINDOW
Sensor for receiving signal from
the remote control.
② S/BY LED
Displays STAND BY and ON/OFF
③ POWER
Power ON/OFF button
④ MENU
Selects menu and changes function
⑤ SELECT
DSUB ANALOG / DVI DIGITAL / AV
/ S-VIDEO/TV selection button.
⑥ ▼▲
Button to select Menu and Mode
⑦ ◀▶
Button to Control level of sound
= Low Power consumption
10
11
5. Remote Control
①
③
TV/AV
POWER
②
④
⑥
⑤
CH
RECALL
SLEEP
⑧
MENU
⑦
VOL
AUTO
PIC
CH
PICTURE
SETUP
⑩
SOUND
⑫
⑪
1
2
3
4
5
6
7
8
9
⑬
0
A.MEMO.
⑭
12
Power ON/OFF Key
⑫ SOUND
Sound selection button
② TV/AV
Select TV, external video, s-video, DVI, D-sub analog
⑬ 0~9KEY
Changes CHANNEL by selecting numbers directly (only TM-1710D)
③ RECALL
Displays present status and volume level
⑭ A.MEMO.
Quick channel scan and channel store (only TM-1710D)
④ SLEEP
Reserves time for sleep in 10 minute increments (0 ~120 min.)
⑮ CH.SET
Changes the memorized channel (only TM-1710D)
⑤ MENU
Selects menu and changes function
⑥ ◀▶VOL
Controls Volume and changes MENU level
⑦ ▼▲CH
Selects channel and moves to MENU
⑧ AUTO PIC
Selects DYNAMIC, NORMAL, MILD, USER for PICTURE
⑨ MUTE
For muting sound
Returns to the previous sound level when you push again
⑩ SETUP
Setup selection button
⑪ PICTURE
Picture selection button
VOL
MUTE
⑨
① POWER
CH.SET
⑮
13
6. Functions
※(
), it means a remote control button.
3 MENU (MENU)
1 POWER (POWER)
AV/ S-VIDEO
=POWER ON/OFF KEY
① Push POWER(POWER) button. POWER is on.
PICTURE(PICTURE)
② Push POWER (POWER) button again. POWER is OFF.
2 SELECT(TV/AV)
=It is function to change external video signals to DSUB ANALOG/ DVI/ VIDEO/ S-VIDEO/ TV
DSUB ANALOG/ DVI DIGITAL/ AV/ S-VIDEO/ TV
55
CONTRAST
40
SHARPNESS
14
※ With VOL ▶, go to SUB MENU. After adjusting in SUB MENU,
press MENU to exit.
COLOR TINT
COLOR TONE
DSUB ANALOG/ DVI DIGITAL/ AV1/ AV2/ TV
SYSTEM
※ Adjust it with CH ▲▼
60
AUTO
NTSC
PAL
DSUB ANALOG
DSUB ANALOG
① BRIGHTNESS
Adjust the brightness of video without affecting RGB’s brightness.
DVI DIGITAL
DVI DIGITAL
② CONTRAST
Adjust the contrast of video without affecting RGB’s contrast.
AV1
③ SHARPNESS
Adjust the sharpness of video image.
④ COLOR TINT
Change the richness of color.
⑤ COLOR TONE
Change the tone of color.
⑥ SYSTEM
Change broadcast system NTSC, PAL, AUTO
AV
S-VIDEO
14
BRIGHTNESS
AV2
※Press
MENU
MENU button to go to the Main menu.
15
SETUP(SETUP)
SOUND(SOUND)
▶ ENGLISH
LANGUAGE
OSD TIME
10
TRANSLUCENT
14
※ With VOL ▶, go to SUB MENU. After adjusting in SUB MENU,
press MENU to exit.
MUTE
OSD H POS.
OSD V POS.
FACTORY RESET
VOLUME
10
TREBLE
50
BASS
50
OFF
① LANGUAGE
Change language English, France, German , Spanish , Italian, Japanese, Korean.
① MUTE
Mute the sound temporarily. Mute is released when you change channel and adjust volume.
② OSD TIME
The number of seconds that the OSD will remain visible before disappearing.
② VOLUME
Adjust the sound volume.
③ TRANSLUCENT
Change the opaqueness of the background of the OSD.
③ TREBLE
Emphasize high frequency audio.
④ OSD H POS.
Move the OSD Window to the horizontal direction.
④ BASS
Emphasize low frequency audio.
⑤ OSD V POS.
Move the OSD Window to the vertical direction.
⑥ FACTORY RESET
A factory default reset will clear all of OSD information.
※Press
16
※ With VOL ▶, go to SUB MENU. After adjusting in SUB MENU,
press MENU to exit.
OFF
MENU
MENU button to go to the Main menu.
※Press
MENU
MENU button to go to the Main menu.
17
TV Mode (only TM-1710D)
CH
PICTURE(PICTURE)
TV
※ With VOL ▶, go to SUB MENU. After adjusting in SUB MENU,
press MENU to exit.
TYPE
CHANNEL
① BRIGHTNESS
Adjust the brightness of video.
② CONTRAST
Adjust the contrast of video.
③ SHARPNESS
Adjust the sharpness of video.
COLOR TINT
④ COLOR TINT
Change the richness of color.
COLOR TONE
⑤ COLOR TONE
Change the tone of color.
BRIGHTNESS
CONTRAST
ADD/DELETG
ADD
SHARPNESS
FINE TUNE
+0
AUTO SEARCH
TV REGION
14
OFF
GERMANY / B/G
① SYSTEM
TV signal selection.
② CHANNEL
Channel selection.
③ ADD/DELETION
Deleting/Adding the selected channel.
④ FINE TUNE
Channel fine tuning.
⑤ AUTO SEARCH
Automatic channel scan.
⑥ TV REGION
NTSC: USA, JAPAN, KOREA
※ With VOL ▶, go to SUB MENU. After adjusting in SUB MENU,
press MENU to exit.
※Press
MENU
MENU button to go to the Main menu.
PAL: EUROPE
※Press
18
MENU
MENU button to go to the Main menu .
19
PC (ANALOG)
COLOR
PICTURE
BRIGHTNESS
75
※ With VOL ▶, go to SUB MENU. After adjusting in SUB MENU,
press MENU to exit.
The tone of color can be changed from red-dish white to bluish white.
The individual color components are also user customizable.
CONTRAST
H POSITION
USER
50
※ With VOL ▶, go to SUB MENU. After adjusting in SUB MENU,
press MENU to exit.
V POSITION
PHASE
PIXEL FREQ.
RED
14
GREEN
100
BLUE
20
① BRIGHTNESS
Adjust the brightness of video without affecting RGB s brightness.
② CONTRAST
Adjust the contrast of video without affecting RGB s contrast.
① 9300K Change color temperature : Red 45 Green 43 Blue 50
③ H POSITION
Adjust the horizontal position of the image.
②7300K Change color temperature : Red 50 Green 47 Blue 47
④ V POSITION
Adjust the vertical position of the image.
③6500K Change color temperature : Red 50 Green 47 Blue 47
⑤ PHASE
Remove the noises. When phase value is wrong, the image has vertical lines especially in 1 dot on and off.
④USER User customizable. (RED, GREEN, BLUE)
⑥ PIXEL FREQ.
Adjust the sampling frequency of DSUB analog signal.
※Press
MENU
MENU button to go to the Main menu.
※Press
MENU
MENU button to go to the Main menu.
21
DISPLAY MODES
PC (DVI)
For the display modes listed below, the screen image has been optimized during manufacture.
PICTURE
BRIGHTNESS
75
※ With VOL ▶, go to SUB MENU. After adjusting in SUB MENU,
press MENU to exit.
Mode
CONTRAST
H POSITION
VGA
Resolution
Horizontal
Frequency(KHz)
Vertical
Frequency(Hz)
Pixel Clock
Frequency(MHz)
Sync Polarity
(H/V)
720 x 400
31.469
70.087
28.322
-/+
640 x 480
31.469
59.940
25.175
-/-
640 x 480
37.500
75.000
31.500
-/-
800 x 600
37.880
60.300
40.000
+/+
800 x 600
46.875
75.000
49.500
+/+
1024 x 768
48.363
60.004
65.000
-/-
1024 x 768
60.023
75.029
78.750
+/+
1280 x 1024
63.981
60.02
108.000
+/+
1280 x 1024
79.976
75.025
135.000
+/+
V POSITION
PHASE
PIXEL FREQ.
SVGA
① BRIGHTNESS
Adjust the brightness of video without affecting RGB s brightness.
XGA
※Press
MENU
MENU button to go to the Main menu.
SXGA
22
23
4 RECALL
Displays present status and volume level.
5 AUTO PIC
TV channel scan and memory.
6 SLEEP
Sleep timer(0/10/20/30/60/90/120)
7 TV/CATV
Select TV, external video, s-video, DVI, D-sub analog.
10 OSD MESSAGE
OUT OF RANGE
NO SIGNAL
8 MUTE
① The screen shows this when signal is out of range.
② The screen shows this when there is no signal.
It is a function of Mute control.
When you push MUTE button, OSD display this image.
This image can be toggle.
9 CH.SET
CHECK CABLE
③ The screen shows this when the signal cable is not connected.
ex) when the memorized board PR2 moves PR4, press CH.SET button, number 4 and then MENU button.
PR ___
24
PR 4
25
7. Connections
Backside , monitor stand detached
(without monitor stand / distance between each mounting hole 75mm)
CM-1710D/TM-1710D
① ANT IN
Ant in for TM-1710D
② PC-AUDIO IN
Audio input DSUB ANALOG,
DVI DIGITAL mode
③ DVI IN
DVI DIGITAL input
④ DSUB IN
DSUB ANALOG input
⑤ MULTI CONNECTOR
DC12V, AV, S-VIDEO, AUDIO input
⑥ DC IN 12V
DC 12V Input
PC
AC/DC SMPS
12V, 5A (option)
PC-AUDIO
① ② ③ ④ ⑤⑥
DVI
~
Option
D-SUB
(Not Supplied)
REMOTE OUT
RED (DC INPUT)
S-VIDEO
YELLOW (VIDEO 2)
YELLOW (VIDEO 1)
AUDIO IN 1 (L/R)
AUDIO OUTPUT (L/R)
S-AUDIO/AUDIO IN 2(L/R)
26
27
8. Changing Remote Control Battery
9. Specifications
CM-1710D/TM-1710D
1. Slide and open the battery cover.
SPECIFICATION
ITEM
LCD PANEL
SIZE
43.18cm (17.0 INCH)
MAKER
SAMSUNG(LTM170EU-L11 & L21)
NUMBER OF PIXELS
1280 X 1024
0.264(H) X 0.264(V)mm
PIXEL PITCH
2. Insert new batteries and ensure that the
polarities are correct when inserting.
BRIGHTNESS
300cd/㎡
CONTRAST RATIO
500 : 1
VIEW ANGLE CR≥5
75˚ / 75˚ / 75˚ / 60˚(L/R/U/D)
DISPLAY COLOR
16.2M
VIDEO
DIGITAL SIGNAL (DVI)
ANALOG R.G.B 0.7Vp-p, TTL SEPARATE (DSUB)
INPUT SIGNAL
COMPOSITE VIDEO (VHS, SVHS)
3. Slide and close the battery cover.
S-VIDEO
TV (NTSC or PAL, OPTION)
FREQUENCY
28
AUDIO
STEREO
390mVrms L/R INPUT
HORIZONTAL
VERTICAL
30~80KHz(AUTOMATIC)
56~75 Hz(AUTOMATIC)
29
MEMO
SPECIFICATION
ITEM
POWER, MENU, SELECT, ▼▲, ◀▶
S/BY LED, REMOTE SENSOR WINDOW
USER CONTROLS
OSD DISPLAY LANGUAGES
POWER SUPPLY
VOLTAGE
CONSUMPTION
7 LANGUAGES
DC 12V
36WATT
SOUND SIGNAL
DIMENSION ( W X H X D )
OPERATING TEMPERATURE
STORAGE TEMPERATURE
WEIGHT
2WATT STEREO
422(W) X 371(H) X 38.5(D)mm
0 oC~ + 50 oC
o
o
-20 C~ + 60 C
4.8Kg
ACCESSORIES
REMOTE CONTROL (WITH BATTERY) --------------------1
MONITOR CABLE ------------------------------------------------1
CHANGE CABLE ( OPTION)
VESA STAND ( OPTION)
AC/DC POWER ADAPTER (OPTION)
OPTION
30
TV TUNER (NTSC USA/JAPAN/KOREA, PAL 3MULTI/4MULTI)
Printed in KOREA