1
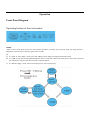
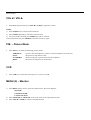
15" High Resolution Professional CRT Monitor USER MANUAL PLEASE READ THIS INSTRUCTION CAREFULLY! Contents 1. INTRODUCTION 2. FEATURES 3. CONNECTION 3.1 Connection Diagram 3.2 Rear panel diagram 3.3 Operation 3.4 Confirm Alarm 4. ATTENTION 5. SPECIFICATIONS Introduction Thank you for selecting our product. This manual relates to the following model: 15” HIGH RESOLUTION PROFESSIONAL COLOR MONITOR WITH QUAD BUILT-IN The specifications and information contained in this manual are provided for informational use only, and are subjected to change at any time without notice. Features 1. Real time display, recording & playback in single image mode 2. The latest difital real time display, recording & playback in quad mode 3. Auto full screen sequence or qutomatic switching display, 4 monitored images 4. Four channel alarm inputs for alarm detectors or emergecy buttons 5. One channel alarm output used for activation VCR or lighting 6. Video loss automatic detect & alarm 7. OSD is flexible and easy to operate 8. Selectable date/time display, and camera IP address/ID code & title display. Clock has more than 10 years operating time even when switched off or power off. 9. On the spot of watch with intercon in quad mode 10. I2C channel control circuit, high reliability 11.Blue background noise control & black electric level expansion circuits improve the contrast 12.Power supply: 110→250V AC, 50Hz / 60Hz Connection Connection Diagram Rear Panel Diagram PAL/NTSC switch(MANUAL CONTROL)---- CH1-CH4 1) Video input terminals: accepts video input from cameras or other standard video equipment. 2) MTR OUT: loop-through quad output for external monitor 3) Impedance selection switch 4) VCR input and output terminals 5) S-VHS input and output terminals 6) Alarm terminals 7) AV2 input and output terminals 8) Audio input and output terminals Operation Front Panel Diagram Operating buttons at front of monitor: MODE When in AV1 mode, press the key, the four pricture automatic cyc disply; press this key again, the image become 2 PIP(picture in picture); press this key again, become 1 PIP, 图 A) In “quad” or “auto disply” mode, press CH1-CH4 key, then disply the single pricture(CH1-CH4). B) In “2 PIP” mode, first press ENTER/TALK, then select a CH (CH1-CH4) as the main picture. Press other CH as the left sub-picture, and press the other CH as the right sub-picture. C) In “PIP auto disply” mode, select one CH and press it as the main picture. ENTER/TALK When in single picture mode, press the key, “TALK ” in the picture, you can talk in this side and other side can listen.Unloosen this key, you can listen or monitor sound.(need connect loudspeaker) In other situation, work in other key. FREEZE DISPLY MODE Press “freeze” key first QUAD Enter freeze fuction Auto disply 2 PIP Not support freeze fuction Enter freeze fuction 1 PIP Single picture Freeze the main picture Freeze the main picture Then press the “1”, “2”, “3” or “4” key to freeze Then press the “1”, “2”, “3” or “4” key to freeze ---------------Then press the “1”, “2”, “3” or “4” key to freeze ------------------------------------- Note: press the channel key again, unloosen freeze Press “freeze” key, unloosen all freezed channel. Then exit the fuction. When the channel was freezed, press “freeze” key and unloosen all freezed channels, and exit the fuction. Zoom A) zoom random position: firstly, press “zoom” key, enter zoom fuction, there is a shadow in the screen, press CH1, CH2,CH3,CH4 to up, down, left and right. Then press “enter/ talk” key, the picture in the shadow will zoom. Press “enter/ talk” key again, cancel the zoomed picture. B) Zoom fixed position: the monitor has fuction to zoom 1/4 top left corner, top right corner, under righ corner, under left corner. SETUP/VCR A) In AV1, “quad” “1 PIP” “2PIP” or “single picture auto disply” mode, press this key, enter fuction of seting menu. B) In AV1 ,the fixed single picture mode, press the key, “PLAYBACK” in the screen. If input VCR, then watch playback. Press CH1/CH2/CH3/CH4, return the single picture, or press MODE key to return quad picture. CH14-CH4 In quad picture or single picture mode, press CH1-CH4 key, enter single pricture relevant channel. SELECT Menu settings VOL◄ / VOL► When not using the menu, press VOL◄ or VOL► to adjust the volume. SLEEP 1) Press SLEEP key to activate timed switch-off. 2) Press SLEEP repeatedly to select the switch-off time. 3) To cancel timed switch-off press SLEEP until “00” is selected. After timed switch-off, press SELECT to turn the monitor on again P.M. – Picture Mode Press P.M. key to select the following picture modes: PERSONAL: Use the values for brightness, contrast, color and sharpness set by the user. SOFT: The picture is silky but less clear. STANDARD: The best setting for a picture under normal conditions. RICH: The picture is sharp but may be distorted. VCR Press VCR key to select the video input: AV-1, AV-2 or S-VHS MENU (2) – Monitor 1) Press MENU (2) key once to enter the monitor menu. The screen displays: PICTURE COLOR SYSTEM LANGUAGE ENG 2) Press SELECT▼ or SELECT▲ to move the curser to the required menu item. 3) Press VOL◄ or VOL► to enter the selected submenu. MIC The position of tone arm. Confirm Alarm When the camera signal is lost: The display will switch to the lost picture,“ V LOSS” will be displayed on screen The buzzer alarm will sound (optional) An alarm output will occur The buzzer alarm will stop when ENTER/TALK key is pressed or after the alarm timeout period. If no key is pressed the system will automatically confirm after the alarm timeout period(30 seconds). Specifications Model Picture Tube Resolution Scanning System Scanning Frequency Power Supply Power Color Temp. Video In/Out 15” Monitor 15" high resolution color tube 750 lines (Y/C) AV2, S-VHS: PAL / NTSC system (automatic identification) Quad: PAL / NTSC standard system (manual control) Horizontal: 15.75KHz (NTSC) / 15.625KHz (PAL) Vertical: 60Hz (NTSC) / 50Hz (PAL) 110~240V AC, 50Hz / 60Hz Max: 65W+35W 93000K AV1(quad) CVBS Input: 1V p-p, 75Ω, BNC MTR(CVBS) Output: 1V p-p, 75Ω/330Ω, BNC VCR input: 1V p-p, 75Ω, BNC VCR onput: 1V p-p, 75Ω, BNC AV2(single image) CVBS Input: 1V p-p, 75Ω/150Ω, BNC CVBS Output: 1V p-p, 75Ω S-VHS In / Out: mini DIN 4 pin plug ×2, loop-through output Y: 1V p-p, 75Ω/330Ω C (PAL): 0.3V p-p, 75Ω/330Ω Audio In/Out C (NTSC): 0.288V p-p, 75Ω/330Ω AV1(quad) VCR IN: 390mVrms; high impedance,RCA VCR OUT: high impedance, AV2(single image) VCR IN:390mVrms; high impedance,RCA Audio System Ambient Temperature Dimensions (D×W×H) Loudspeaker VCR OUT: loop through with “Audio in”, RCA Built-in loudspeaker, 8Ω / 3W, maximum RMS power of 1W Operating temperature: 0~40°C, relative humidity 40~90% Storage temperature: -25~55°C, relative humidity 20~90% D380×W362×H350mm Input/Output:6 pin DIN plug Built in loudspeaker:8Ω/0.5W Power output:+12V D, max 250Ma Dimension:W70×D90×H50 1 1 Attention 1) To avoid any damage caused by humidity or electrostatic discharge, never expose the monitor to rain or extreme humidity. Never put drinks, potted plants or other objects on top of the monitor that may spill liquid into the monitor. 2) The circuit board inside the monitor contains hazardous high voltage. To avoid electric shock never allow any unqualified personnel to open the back cover of the monitor. 3) Keep the monitor well ventilated. Avoid exposure to direct sunlight and protect the monitor from any heat source. 4) When the monitor is not to be used for an extended period of time unplug the power connector. 5) In the unlikely event of malfunction, such as abnormal sound, smell or smoke, switch off the power immediately and unplug the power connector. 6) When cleaning the cabinet and the screen avoid of using solvent or chemicals that contain benzene or petroleum. For safety, unplug the power connector before cleaning. 7) Do not locate the monitor near any magnetic objects. Never move the monitor while it is switched on, so that it is not affected by magnetic fields. If the display has been affected by magnetism, switch off the main power for least 30 minutes. This step can enable the automatic demagnetizing circuit to work. 1 2