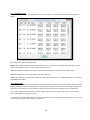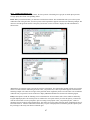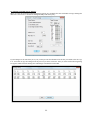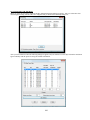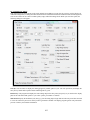
1
USER'S MANUAL
MineSimU Module
of
ICAMPS Software
Revision 06/12/2014
Version 13, 14, 15, 16, 17, 18,19,20
English
Ohio Automation
62971 Siverly Creek Rd
McArthur, Ohio 45651
(740)596-1023
Copyright (c)
1987-2009 by Ohio Automation
All Rights Reserved
TABLE OF CONTENTS
Overview..................................................................1
Out of Seam Dilution......................................................3
Helpful Hints.............................................................4
ACAD Command Abbreviations in MineSimU ..................................5
Section 1: Create/Edit ICAMPS Grids.......................................6
1.1 Grid Creation..............................................6
1.2 Compositing Seam Grid with Roof and/or Floor Grids .......10
Section 2: Pull-Down Menu Bar............................................12
Section 3: Setup.........................................................14
3.1 Configure MineSimU........................................14
3.1.1 Simulation Defaults................................15
3.1.2 Boundary/Text Size.................................16
3.1.3 Calendar And Grid Files............................17
3.1.4 Difficulty Code Table..............................19
3.1.5 Height Sensitive Mining Table......................20
3.2 Printer Setup.............................................21
3.3 Mine Grid Module..........................................22
3.3.1 Create Grid File...................................22
3.3.2 Edit a Grid File...................................31
3.3.3 Convert a Grid File................................32
3.4 Displace Grid..............................................33
3.5 Graphical Point Change....................................33
3.6 Grid Scale Refinement.....................................35
3.7 Combine R-S-F Grids.......................................36
3.8 Pre-Mine R-S Grids........................................39
3.9 Define a Seam.............................................41
3.10 Display a Seam............................................42
3.11 Switch to a Seam..........................................43
3.12 Areas in Seam Bounds......................................44
3.13 Convert ICAMPS Files......................................45
3.13.1 Penn State to DXF Conversion......................45
3.13.2 Btree to ASCII Conversion.........................46
3.13.3 ASCII to Btree Conversion.........................47
3.13.4 Convert All ACAD2007..............................48
3.13.5 Convert Calendar Files............................49
3.14 Create/Edit Cost Files...................................50
Section 4: Layout Commands...............................................53
4.1 Mining Areas By 4 Points..................................54
4.2 Mining Areas By 2 Points..................................54
4.3 Define New Areas..........................................55
4.4 Attach Attribute Block....................................59
4.5 Undefine Mining Area......................................60
4.6 Erase Mining Areas........................................60
4.7 Stretch Mining Area.......................................60
4.8 Find Mining Areas.........................................60
4.9 Mining Area Utilities.....................................61
4.9.1 Fix Areas in Map/File..............................61
4.9.2 Copy Areas.........................................62
4.9.3 Add a Map..........................................62
4.9.4 Attribute Block Change.............................64
4.9.5 Reverse Mining Direction...........................65
4.9.6 Compare Graphics & Db..............................65
4.9.7 List Mining Area...................................66
4.9.8 Draw Pillars.......................................66
4.9.9 Write Mining Areas File............................67
Section 5: Simulate Commands.............................................68
5.1 Edit Mine Calendar........................................68
5.2 Edit Mining Area File.....................................73
5.2.1 Change.............................................74
5.2.2 Undefine...........................................74
5.2.3 Integrate..........................................75
5.2.4 Divide.............................................75
5.2.5 Retreat............................................75
5.2.6 F-Edit.............................................76
5.2.7 Print..............................................76
5.2.8 Draw Subdivisions...................................76
5.3 Edit Machine Sequence File................................76
Edit Mach. Seq. File W/Draw.............................76
5.3.1 Miner Unit Specifications..........................77
5.3.2 Areas Assigned to the Miner Unit...................79
5.4 Edit Exceptions File......................................80
5.4.1 Shifts Exceptions..................................80
5.4.2 Rate Exceptions....................................82
5.5 Area Finish Unit ShutDown.................................83
5.6 Edit Offset Days by Area Type.............................84
5.7 View Defined Mining Areas.................................85
5.8 View Quality/Reserves.....................................85
5.8.1 Quality Grid.......................................86
5.8.2 Quality Information Type...........................87
5.8.3 View Grid .........................................89
Section 6: Output Commands...............................................92
6.1 Calculate Timing..........................................93
6.2 Schedule to Target Tonnage................................95
6.3 Schedule to Monthly Target Tonnage........................99
6.4 Longwall Move CM Shut Down................................100
6.5 Quick View Timing.........................................101
6.6 Detailed View Timing......................................103
6.7 Generate Reports..........................................106
6.8 Timing Utilities..........................................108
6.8.1 Change Out Machines................................109
6.8.2 List Miner Unit delays.............................111
6.8.3 Timing Info for Areas..............................112
6.9 Royalty Tonnage Report....................................115
6.9.1 Separate Properties Royalty Report..................115
6.9.2 Combined Properties Royalty Report..................118
6.10 Royalty Quality Report....................................118
6.11 Asmined Report............................................120
6.12 Overlay File..............................................122
6.12.1 Read Overlay File...................................122
6.12 2 Write Overlay File..................................122
6.13 Export to R-W Format......................................123
6.14 Report Manager............................................124
6.15 Export to Excel Format....................................126
6.16 Export to Spreadsheet.....................................126
6.16.1 Export SE (Area File)..............................126
6.16.2 Export O2 (Timing File)............................128
6.16.3 Export Combined File...............................128
6.16.4 Export Machine Data................................130
6.17 Calculate Daily Timing....................................131
6.18 View Daily Timing.........................................132
6.19 List Daily Unit Delays....................................133
6.20 Generate Daily Reports....................................133
6.21 Export to EXCEL Format....................................133
6.22 Export to Spreadsheet.....................................133
6.23 Annotate Utilities........................................134
6.23.1 Construction Grid..................................134
6.23.2 Title Block........................................134
6.23.3 North Arrow........................................134
6.23.4 Fan................................................134
6.23.5 Regulator..........................................134
6.23.6 Scale Block........................................134
6.23.7 Box................................................134
6.23.8 Post Z Values......................................134
INDEX....................................................................136
OVERVIEW
MineSimU runs inside AutoCAD which allows for a smooth transition between the ICAMPS modules and other AutoCAD
based applications. The user interface consists of dialog boxes and pull down menus for the most frequently used functions
and command line prompts where they are most appropriate.
Before starting to layout the mine, you must specify essential drawing defaults such as text sizes and coloring patterns and
the names of the calendar and grid files. Optional data includes specifications for height sensitive mining and mining
difficulty.
The preferred method for defining the mine layout is to work from existing as-mined and projections AutoCAD maps. The
layout can also be digitized from a hardcopy map of the mine. Mining areas are four sided closed polygons which
correspond to the outside ribs. An area can also be divided into subareas to allow more flexibility in scheduling.
In addition to a mine layout, you must specify the percent extraction, the direction of mining and a gridded seam model for
each mining area. If you define the production rate as advance per cut and cuts per shift, the program also needs the average
entry width for room and pillar mining areas.
The percent extraction can be calculated from a detailed layout of each pillar and entry, but that level of precision is rarely
needed. Most users use the percent extraction based on the nominal pillar and entry sizes. This method assumes that the
entry and crosscut widths and centerline spacings are the same for the entire length of a mining area. Note that the
cumulative entry and pillar dimensions must account for the full width and length of the area. Although not required for
calculating production reports and timing maps, the system can also draw detailed pillar and centerline layouts.
In most applications one gridded seam model applies to the entire mine, but alternative grids can be specified for areas with
special problems. For example, continuous miners and longwalls may have different amounts of out-of-seam dilution or
the lack of information in the more remote areas of the mine may not justify a grid with a fine pattern.
The default dimensions for pillars and entries appear for each room and pillar area. The dimensions you specified for the
preceding area will become the default values.
You must create a work day calendar and specify the mining machine production rates and limits. The mining rate can
adjust automatically for varying seam height and difficult mining conditions. Scheduling requires you to assign mining
areas to machines and to indicate any precedence requirements such as completing gate development before mining a
longwall. The system also allows for exceptions to the standard specifications.
The following figure is a diagram of the Start Up pull down menu which appears whenever ICAMPS is executed. All the
ICAMPS modules, e.g. MineVent and MineWater can be accessed from this menu. To run this software, double click the
ICAMPS shortcut/icon.
1
MineSimU keeps all the user entered data in temporary <WORK> files. When you load an existing AutoCAD drawing or
start a new drawing file, MineSimU deletes any existing <WORK> files. It then copies any existing MineSimU data files
into <WORK> files. The advantage of this approach is that if you decide to quit the drawing without saving, your old
drawing files and MineSimU data base files will be intact. When you save or end a drawing, MineSimU copies the
following <WORK> files into <DWGNAME> files:
1. WORK.SE* --> <DWGNAME>.SE* Area Definition data base
2. WORK.SIM --> <DWGNAME>.SIM Simulation Default file
3. WORK.RE* --> <DWGNAME>.RE* Inter-Relationship data base
4. WORK.CR* --> <DWGNAME>.CR* CREW data base
5. WORK.EX* --> <DWGNAME>.EX* Shift Exceptions data base
6. WORK.PR* --> <DWGNAME>.PR* Mining Rate Exceptions data base
Where <DWGNAME> is the name of the current drawing.
CAUTION: Whenever you load an existing AutoCAD drawing or start a new drawing, MineSimU deletes all the above
mentioned <WORK> files and recopies them from the <DWGNAME> files.
2
Out of Seam Dilution
The MineSimU module of ICAMPS has three ways to account for potential out of seam dilution. A description of each
method follows:
1. Out of seam dilution from roof (floor).
If the immediate roof tends to fall in where it is too thin to support itself and the roof thickness varies across the seam, the
ideal way would be to create a grid of the immediate roof thickness. This approach requires sufficient drill hole structure
data to model the roof. MineSimU allows you to specify a roof thickness that would be self supporting. This value is
labeled "thickness before it falls" or "Min Roof Thick" in the seam grid defaults. If the roof thickness is less than or equal
to the Min Roof Thickness then the roof falls.
If a weak immediate roof is fairly uniform in thickness across a seam, the simplest approach is to use a default value for the
immediate roof thickness. The default roof thickness is labeled "roof thickness" in the seam grid defaults. If the "thickness
before it falls" value is greater than the default roof thickness, MineSimU will treat the roof as an out of seam dilution
everywhere.
In either of the above cases, the weight of the out of seam dilution is calculated from the roof thickness and the default rock
density. The roof rock becomes part of the raw coal weight.
If the out of seam dilution is expected to come from the floor rather than the roof and is expected to be the same amount
everywhere, the above scheme for default roof thickness could be applied to the floor. If dilution from the floor is expected
to vary considerably across the mine, the floor material should be included in the grid as explained under method 3 below.
2. Out of seam dilution due to minimum mining height.
Out of seam dilution may also come from the need to take rock in low coal to allow for sufficient clearance for the miner
unit. You must specify a minimum mining height for each machine. If the coal seam thickness plus the thickness of any
roof that falls is less than the minimum mining height for the machine, the mined height is set equal to the minimum mining
height and the additional rock is added to the weight of the raw coal.
If the coal is washed, MineSimU assumes that all of this out of seam dilution is removed and the weight and quality of
clean coal is not effected but the yield percentage (clean coal divided by raw coal) will decrease.
If the coal is not washed, the weight of the out of seam dilution is added to the weight of the in-seam ash, so the raw coal
ash content increases. In these calculations the out of seam material is considered 100 percent ash.
Even if the out of seam dilution will be carbonaceous material with significant heat content, the above methods are
probably sufficient for estimating the quality of washed coal. Other techniques should be used to evaluate the effect of
carbonaceous out of seam dilution on raw coal quality.
3. Out of seam dilution incorporated in the grid.
The best approach may be to create grids from composites of the expected mined height. This method requires chemical
analyzes of each horizon that will be mined. The compositing routine in MineSurf/QuickSurf can create composites for
each drill hole that account for out of seam dilution. The compositing rule can account for roof rock that will fall and also
for the minimum mining height. Because continuous miners and longwalls have different mining heights, separate grids
may be required for continuous miner and longwall areas.
The coal quality estimates for short term longwall mining can be improved by merging channel sample data with drill hole
information. Only the essential data needs to be added to the grid. For example, the mining height or ash content estimates
may be significantly affected by the channel sample information but the effect on other quality parameters can be ignored.
Any or all of the above techniques could be applied in a given situation. For example roof may fall uniformly and the
method 1 would apply, but additional of out of seam material may be removed due to low coal, so a combination of both
methods 1 and 2 would be required.
3
Helpful Hints
To speed up filling the edit boxes, use the double click procedure to clear out the old data and the tab key to go to the next
edit box. You can also use the TAB key to move to the next edit box.
As a general rule, the number of key strokes will be minimized if all areas of the same type are defined as a group.
If you need to add many areas to the drawing, use the separate options Draw Mining Areas by 4 Points or Draw Mining
Areas by 2 Points to draw the areas. Then use the Define New Area option to define them.
If two areas will meet at an odd angle (not 90 degrees), use the 4 or 2 point methods to draw a portion of each area. Then
use the Stretch Areas option to extend them until their polylines overlap. Finally use the AutoCAD polyline edit
command to create the two areas with the correct intersection points as corners. Use the AutoCAD polyline edit command
only on undefined areas.
Common Errors
If the numbers or letters do not appear on the timing map, most likely the text style and size have been changed. The style
must be standard and the height must be set to zero. Type the AutoCAD style command to change them.
The AutoCAD alert message, "Area Definition file not found", will appear the first time you start to define areas on a new
drawing. Click OK; the file will be created automatically as soon as you define the first area.
4
AutoCAD Command Abbreviations in MineSimU
a
aa
ap
av
b
c
ch
cf
cr
cy
d
DD
dd
ds
er
ex
f
h
i
l
la
lf
li
lo
ls
lt
m
m1
o
p
pe
r
rg
rt
CR
s
sc
t
tx
vd
vr
vs
za
zd
ze
zp
zw
draw arc by three points
edit attributes one at a time
edit attributes one at a time
edit attributes one at a time
break
draw circle by two points or key-in diameter or radius
change
chamfer
color
copy
dimension
edit definition block
edit definition block
distance between two points
erase
extend
draw fillet
draw cross-hatch
insert block
draw line
change layer settings
freeze layer
line information
layer off
layer set
thaw layer
move
move to another layer
offset
draw polyline
polyline edit
redraw
regenerate
rotate
change current layer color
save
scale
trim
insert text
delete view
restore view
ave view
zoom all
zoom dynamic
zoom extents
zoom previous
zoom windows
5
Section 1. Create/Edit ICAMPS Grids
The following procedure includes instructions for creating a gridded seam model with the MineSurf /QuickSurf module
and for importing ASCII gridded parameter files in the Easting, Northing, Z-parameter (ENZ) format from any modelling
system.
1.1 Grid Creation
1.1.1 Outline of Procedure
The sequence of steps to create an ICAMPS grid is as follows. If you are not using the MineSurf module, ignore steps 1,2
and 3.
1. Go to MineSurf and import the ASCII data for the Z parameter into QuickSurf.
2. Create a grid for the Z parameter in QuickSurf
3. Export the grid nodes data into an ENZ file.
4. Go to MineSimU and create a new ICAMPS grid.
5. Import the ENZ file into the ICAMPS grid file.
6. You repeat the above procedure for each additional Z parameter except you add the other Z parameters to the ICAMPS
grid file you created in Step 4. An ICAMPS grid file can contain up to 14 different Z parameters.
1.1.2 Procedure details
Step 0. Starting up in MineSurf.
Select the QuickSurf option and designate a window that will extend well beyond your mine layout. The window will
default to the limits determined from the extreme X and Y values in your control points unless you specify a larger
window. The window can be set using the Drawing Limits under Settings pull down. Zoom to the extents.
Step 1. Importing ASCII data into QuickSurf.
Creating an ICAMPS grid requires an ASCII file of control points. The file must contain only control point data. Delete
other header information such as the seam name. The data importing options are under the QuickSurf pulldown. After you
select Import ASCII Data, you have two options, Read ASCII Points and Read ASCII Table for importing ASCII data into
QuickSurf.
If you have only one or two Z-parameters to grid, the Read ASCII Points option is satisfactory. Each record of the ASCII
data file must have the X,Y position of the control point and numeric values for each (Z) parameter. Missing or
non-numeric Z values are not allowed. If your file has records with missing values, delete those records from the file or
delete the entire column of data fields for the corresponding Z parameter. If you do not want to delete any data, use the
Read ASCII Table option which is described below.
After you choose Read ASCII Points, pick the file name using the browse feature. Next choose the Configuration option
and then choose Configure ASCII Load. Indicate the fields where the X, Y and Z parameter are located, e.g., second, third
and fourth. The fields must be in the same relative position in each record. For example, if the X value is in the first field, it
must be in the first field in every record. When you choose the Grid option, you are prompted for the surface name. Take
the <.> default.
The Read ASCII Table option is preferred if you have many parameters to grid and/or some records have missing
parameter values. The X, Y and Z values must be in a separate fields delimited with one or more non-numeric character
such as a comma. When you create the ASCII data file, replace any missing parameter values with a delineated space. For
the Read ASCII Table option you do not specify the field number for the X,Y and Z parameters.
6
Instead, you must include a header record to identify the parameters in each field. The parameter names must be listed in
the order in which their corresponding values appear in a data record. The header record must begin with a # sign. See page
71 of the QuickSurf manual for an example. Caution: Use X and Y as the first two variables in the header record or the
other variable names will default to S1, S2 etc.
The Read ASCII Table option loads each Z parameter value into a surface which has the same name as the parameter name
you specified in the header record. When you choose the Grid option, you are prompted for these surface names instead of
using the Configure ASCII Data option to specifying the column numbers. For either importing option, you can verify that
you have imported the correct data by using the track Z option. One option is to display the control points using the Points
option or check a grid; see section 3 below.
Step 2. Create a Z-Parameter grid
Choose the Configuration option and then choose Configure Grid. See page 200 of the Quicksurf Manual for an example.
Set the grid configuration as follows:
Turn the Auto Cell Size off and type the cell sizes. They do not have to be square. Set the Cell Count to Auto and the Min:
Number of Cells to a number less than the expected cell count. The system ignores the upper limit (Max:) on the cell count.
If your ICAMPS grid file will contain several Z parameters, the grids for the individual Z parameters must be registered to
the same point. That is, each grid will have the registration point as a grid node. Click register grids and specify the
registration point. An easy to remember number should be used because you may need to register the grids for several Z
parameters. The Cell Factor can be ignored, but the Undefined grid value: MUST be -99.
If your data varies greatly over short distances, some of the gridding models can give unreasonable answers if the
derivative functions are used. In such cases, pick the Standard method, set the Derivatives to None and the Weighting: to
2. These settings correspond to the inverse distance squared method for calculating the grid node values. We recommend
turning on Honor local extrema.
Choose the Grid option. Accept the <.> surface if you are using the Read ASCII Points option, otherwise enter the
parameter surface name, then choose Draw and Dots. The grid nodes will appear. To check if the grid node values are
reasonable, use the Track Z option under Elevation utilities which is under the main Utilities option. After you enter the
surface name, <.> if you are using the default or the parameters surface name, the Z values at the current cursor position
will appear in the upper left corner of the header line. Check the Z value for any questionable area of the grid.
Step 3. Export the grid
An ENZ file contains the Easting, Northing and a Z value for each grid node. We always recommend using the .ENZ
extension for the file name so you can easily identify these files. The above procedure is repeated to grid each Z parameter.
Step 4. Import the .ENZ files into ICAMPS.
After you have created your .ENZ files, type "ICAMPS" at the AutoCAD command line and select the MineSimU option
under the Start-up menu. The choose the MineGrid Module option from the Setup pull down menu.
To create a new grid file, select the Create New Grid option under the MineGrid module. Name the new grid; include the
path. We recommend placing all grids in one sub-directory. If the mine has more than one seam, you may find it convenient
to create a sub-directory for each seam.
Click the Retrieve Grid Extents and browse the .ENZ files for the parameter. After the grid extents appear in the dialog
box, use the list box in the upper right corner to select the parameter that will be placed in the ICAMPS grid such as Seam
Height. Click the OK to bring up the following dialog box. The parameter you selected in the previous dialog box will be
highlighted.
7
If you need to add another parameter highlight it in the list and select the Add/Change button. Then the following dialog
box will appear.
8
The parameter you are adding to the grid will appear at the top of the dialog box. The Z-File button will be highlighted. The
Type of file must read ENZ. Use the browse feature to load the correct file and click OK. You will return to the previous
dialog box and you can select other Z parameters to add to the ICAMPS grid. You must then click "Save" to actually add
the parameter(s) to the ICAMPS grid.
If you are adding a parameter to an existing grid, choose the Edit Grid instead of Create Grid option. Since the grid
already exists, you do not go through the retrieve extents procedure, but follow the steps outlined above to add the new
parameter to the grid.
************************************************************************************************
Helpful hints for checking grid files and Gridding with MineSurf
1.1.3 Checking if the grid matches the mine plan
The seam thickness grid must cover the entire mine plan. Use the View Quality feature under the Simulate pull down to
check if the grid covers the area of your mine plan. After you identify the grid, click the "View" button, "Select" a window
around the mine plan and "Show" the grid as "Pfaces".
1.1.4 Saving Configurations
When you initially start up MineSurf /QuickSurf, the standard grid configuration is saved in a file named QS.QCF. To
avoid having to use the Grid Configuration option for each Z-parameter, the desired configuration can be saved. Use the
Save Configuration option under Configuration menu. When you choose the Save Configuration option, you will be asked
for a drawing name where the configuration will be saved. If you need several configurations, such as different registration
points for each seam, you can specify a drawing name for each configuration. If one configuration will fit all your
applications, save that configuration in QS.QCF.
1.1.5 Grid Window
The Grid option always creates the grid within the limits specified under "Window". The window automatically defaults to
the minimum and maximum X and Y values in the control points, i.e., the points in the file you load with the Read ASCII
Points under the Import Data option. These limits may not yield a grid that covers the mine plan. To insure a large enough
window, select "Window" under the "Surface Options". The defaults will show, followed by the prompt "Define Window".
The grid will fill the entire default window only if the distance from the grid registration point to the window extents is an
integer multiple of the grid spacing. For example, if the window is (0,0; 1000,1000), the grid spacing is 100 x 100 and the
grid registration point is (10,10), the furthest set of grid nodes would be have x = 910 and y = 910. Enlarge the window to
insure a large enough grid.
9
1.2 Compositing Seam Grid with Roof and/or Floor Grids
The existing MineSimU module in ICAMPS reports total tonnages that includes the weight of out-of-seam dilution and
adjusts the percent recovery to reflect this waste material. Currently, the system assumes the out-of-seam tonnage is
removed in the cleaning process and the clean coal quality is based on the in-seam coal analysis which the user adjusts for
any carry over of out-of-seam material into the clean product. If the product is not cleaned, all the out-of-seam material is
considered ash and the ash percentage is adjusted accordingly. In some cases, the out-of-seam material may have some heat
value or all the dilution may not be removed in cleaning.
By controlling roof or floor dilution, one may be able to mine a product that matches contract specifications while
improving preparation plant yields. The Grid and Quality section now provides a precise method for accurately
estimating the effect of out-of- seam dilution. You can easily control the amount of roof and/or floor material going into the
product and quickly compute the composite values of the resulting quality parameters. This information is particularly
useful for evaluating alternative mining practices.
1.2.1 Creating Roof and Floor Grids
This new grid compositing feature called "Combine R-S-F Grids" is in the MineGrid module under the Setup pull down
menu. Combine R-S-F Grids requires grids of the roof and floor in addition to the usual seam grid. These grids must be
registered to the seam grid, that is, each must have the same extents and grid interval as the seam grid and the grid nodes
must start from the same reference point. The roof and floor grids must include thickness, density, % recovery and quality
information, either as gridded values or defaults. Note: Since the roof and floor will be the out of seam dilution in the
composited grid, their grids have no need for out of seam density parameter values. Where information is not known for a
Z-parameter at a grid node, that grid node value must be -99. The corresponding default value will be used in the
compositing function.
You may have already created seam grids, but not the roof and/or floor grids. Your geological modeling software must use
the same grid interval as the seam grid to generate Z-parameter grid files for the roof or floor. Since, all three grids must be
have the same extents, the easiest way to create roof and/or floor grids which are compatible with the seam grid is to use the
seam grid as a base. Copy the seam grid to a new .grd file and edit this file; delete unwanted parameters and use the Add
function to import the desired Z-parameter files. You can repeat the process for the other grid. If you do not have quality
information for both the roof and floor, and you want to assume all the out of seam dilution will come from the source for
which you have information, use the same grid for the roof and floor.
The combined grid quality parameter values are composited into weighted average values at each grid node and stored in a
.grd file under the name you specify. You must specify the minimum mining height based on machine specifications or
mining practices. If the seam height for a grid node is equal to or greater than the minimum mining height, the original
seam height, grid node parameters are assigned to the corresponding node in the combined grid. Wherever the seam height
is less than the minimum mining height, material from the roof and/or floor is added to bring the total height to the
minimum and the quality parameters are adjusted accordingly. The thickness of the out of seam dilution in the combined
grid thickness is the difference between the minimum mining height and the original seam height. The proportions of roof
and/or floor added to the seam is under your control. The alternatives for specifying the source of the out of seam dilution
are given below.
You have the option to include the original seam height and density as parameters in the combined grid, but this
information should not be used to compute average values of these parameters. The value of seam parameters which are not
affected by the out of seam dilution, such as difficulty code, are transferred directly from the original seam grid to the
combined grid. To prevent additional out of seam dilution from affecting the composite quality parameters in the timing
calculations, the Min Roof Thickness parameter is set to zero in the composite grid, and the Minimum Mining Height in
the machine specification should be equal to or less than the Minimum Mining Height that is used to calculate the
composite grid parameters.
10
1.2.2 All from the roof ignoring roof grid thickness values
Frequently, estimates of out of seam quality parameters are based on a thin sample of the entire layer. Consequently the
thickness value in the roof or floor grid is much less than the actual thickness. If you assume the roof material is fairly
homogeneous and the dilution will come from the roof, select Roof as the Controlling grid. To over ride the thickness
value in the Roof grid, click the option Ignore Thickness for Calculations button ON and type 100 in the Percent OSD
of Roof Taken box.
When the combined grid node thickness includes roof, the combined grid quality parameters are based on the roof and
seam grid information. Each parameter value at a grid node is weighted by the product of the thickness, the density and
percent recovery values at the corresponding node in each grid. You should enter default Z-parameter values to replace any
grid node parameters that are missing from the roof grid. If you do not specify defaults for missing parameter values in the
roof grid, the original seam grid node parameter value is assigned as the corresponding grid node parameter value in the
combined grid. But, if a grid node parameter value is missing from the original seam grid, -99 is assigned to the
corresponding grid node parameter in the combined grid.
1.2.3 All from the floor ignoring floor grid node thickness values
In this case all out of seam dilution comes from the floor. The procedure is the same as above except assign Floor as the
Controlling Grid and type 0 in the Percent OSD of Roof Taken box. The grid node parameter values will come only
from the original seam and floor grids.
1.2.4 From roof & floor ignore thickness values in Controlling grid
In this option out of seam dilution can come from both the roof and floor. You must assign the Roof or Floor as the
Controlling Grid and enter the percentage of the out of seam that comes from the Controlling Grid in the Percent OSD
of Roof Taken box. The amount of Controlling Grid in the combined grid thickness is the difference between the
minimum mining height and the original seam height multiplied by the Percent OSD of Roof Taken value. All the
remaining out of seam dilution thickness comes from the Non-Controlling Grid.
When the combined grid node thickness includes roof and floor, the combined grid quality parameters are weighted
average values based on the roof, seam and floor grid information. Each quality parameter value at a combined grid node is
weighted by the product of the thickness, density and percent recovery values at the corresponding node. The default
parameter values are used wherever a grid node parameter value is missing from the roof or floor grid. If you do not specify
defaults for missing parameter values in the roof and floor grids, the original seam grid node parameter value is assigned as
the corresponding grid node parameter value in the combined grid. But, if a parameter value is missing from the original
seam grid, -99 is assigned as the corresponding grid node parameter value in the combined grid.
1.2.5 From roof & floor, roof thickness limited to grid node values In this option you must assign the Roof or Floor as
the Controlling Grid and click OFF the Ignore Thickness for Calculations option. The Controlling grid contribution to
the out of seam thickness in the combined grid thickness is the lesser of the difference between the minimum mining height
and the original seam height multiplied by the Percent from (Controlling Grid) value or the Controlling Grid's
thickness at the grid node. All the remaining out of seam dilution thickness comes from the Non-Controlling Grid without
regard to the thickness value in the Non-Controlling Grid.
When the combined grid node thickness includes roof or floor material, the combined grid quality parameters values are
based on the roof, seam and floor grid information. Each parameter value at a grid node is weighted by the product of the
thickness, density and percent recovery values at the corresponding node. The default parameter values are used wherever
a grid node parameter value is missing from the roof or floor grid. But, if a parameter value is missing from the original
seam grid, -99 is assigned as the corresponding grid node parameter value in the combined grid.
11
2. PULLDOWN MENUS
MineSimU has a pull-down menu bar as shown below. The first three headings on the left and the last two on the right give
you direct access to commonly used AutoCAD commands. The contents of the first three pull-down commands follow.
2.1 Tools Menu
The Tools menu is mainly used for on-the-go osnapping. For example, if the osnaps are OFF and you want to quickly snap
to an intersection you can just go to Tools-->INTersec and then snap to the intersection then osnaps are turned back off so
that it is a quick one time use of osnaps. If you want to make osnaps "permanent" then select OSNAP first and then the
desired snap mode.
The other useful features of the Tools menu is the Cancel command, Undo, Redo, and Redraw. A word of caution is that
you should be very careful using Undo and Redo in MineSimU drawings. If you erase an area with the MineSimU Erase
Mining Area command and then do an undo you will end up with an area that is in the drawing but not in the area definition
file which can cause major issues. So it is highly advised that you do not use the Undo and Redo unless you know that you
are working on parts of the map that have no affect on MineSimU entities such as areas and attribute blocks.
12
2.2 Edit Menu
The Edit menu has several useful AutoCAD commands. As noted earlier you should be careful with the Erase command as
well as the copy command when working with MineSimU entities. The rest of the commands here can be used with relative
safety. Of course you do not want to delete any of the MineSimU layers such as MATTRIBS, MNUMS or MAREAS.
Also you should never Explode any MineSimU entities namely attribute blocks unless you know what you are doing and
have a good reason to do so.
2.3 Display Menu
The Display menu has the most commonly used Zooming and Panning features of AutoCAD. As well as a menu option
called Drawing Aids which is essentially the AutoCAD Drafting options dialog box where you can change grids, snap
modes, polar tracking and more. One useful option on this menu is called Modify Layer and can be used to access the
AutoCAD layer manager where you can turn on and off layers, freeze them, set the current layer, set layer colors and other
options depending on your version of AutoCAD.
13
Setup
When you choose the Setup option, the following pull down menu appears, The first step is to define the drawing and
scheduling parameters. The inputs include the gridded seam model which may need to be created. The MineGrid module
allows you to create and edit grids without leaving your AutoCAD session. The Multi-Seam options are required only if
you are mining two or more seams with the same set of equipment and the machines move back and forth among the seams
or an opening created in one seam could cause roof or floor stability problems in the other seam(s).
----------------------------------------------------------CONFIGURATION-------------------------------------------------------------3.1 Configure MineSimU
This option sets up the defaults for the AutoCAD drawing and mine design and simulated mining. The dialog box for this
option is given below:
14
3.1.1 Simulation Defaults
The dialog box for this option is given below:
The "Simulation Defaults" dialog box allows you to view/change the current simulation defaults. When you pick "OK", all
the parameters are saved into an ASCII file called WORK.SIM. All the other MineSimU programs access this file to get
the current simulation defaults. Any changes made here would affect the subsequent mining area definitions, but will not
affect any mining areas which were defined previously. The "B of L&M" and "Code" are inserted in "Define New Areas"
under the Layout pull down menu and can be edited there or in the "Edit Mining Area File" under the Simulate pull down
menu. They are used in budget calculations. A brief description of each parameter and suggested default values follow.
B of L&M: This variable points to the a list of materials and labor for this area type. The contents of this file are user
defined. <default is -99> i.e. not specified.
Code: This variable points to a file of the entry and pillar dimensions. The file of dimensions is created when you select the
"Calc % Extraction" option in "Define New Areas" under the Layout pull down menu. < default is -99> i.e. not specified.
Entry Width: Average entry width <default is 20 feet>
Shift/Day: Shifts per day <default is 3.0 shifts per day>
Mining Rate: Portion of normal production rate <default is 1.0>
Quality Grid: Quality grid [An integer between 1 and 20]. <default is 1>
15
% Extraction for R/P Areas: Percent extraction for the Room/Pillar areas. This usually depends upon the pillar design
and ranges from 35.0 to 55.0 percent. When you define a room and pillar area, the default will be used unless you specify a
different value.
File Editor Name: This is the editor which is used for the Full-Screen editing of different MineSimU files. You can enter
the name of any ASCII file editor here. The default is <\APPLIED\MISCDIR\Q.EXE>. If you are unsure type in
notepad.exe
Hatch Pattern: You can select the desired AutoCAD hatch pattern from the pop-down list. The defaults are <SQUARE>
hatching for Room and Pillar areas and <DOTS> for longwall areas.
Color: You can select the desired AutoCAD color from the pop-down list. The defaults are < YELLOW> for
developments and <GREEN> for bleeders and <RED> for longwalls.
Hatch Scale: You can key in any non-zero hatch pattern scale factor. The defaults are <200.0> for Room and Pillar areas
and <2000.0> for longwall areas.
Seam Height measured in: The seam height in the grid file will in feet or inches. You must indicate the seam height units.
Factory Defaults: Pick this button to reset all the values to their original default values.
3.1.2 Boundary/Text Size
The "Boundary/Text Size" option allows you to view/change the current drawing limits, point symbol size, point symbol
type and the text annotation size. The dialog box for this option follows:
16
Drawing Limits: This option allows you to set the current drawing limits. You can either key in the new values or pick the
lower left and upper right corners by selecting the "Select Point" button. Any changes in this area updates the LIMMIN and
LIMMAX AutoCAD system variables. These limits will also be assigned as the default boundary for the seam on which
the mine is being drawn.
Point Symbol Size: This edit box contains the current point symbol size. Changing this symbol size updates the PDSIZE
AutoCAD system variable.
Point Symbol Type: This edit box contains the current point symbol type. The valid values in this field are 0, 1, 2, 3, 4,
32, 33, 34, 35, 36, 64, 65, 66, 67, 68, 96, 97, 98, 99 and 100. Changing a symbol type updates the PDMODE AutoCAD
system variable.
Text Annotation Size: This edit box contains the current text annotation size which controls the size of the attribute block
that appears when you add a mining area. The text annotation size also controls the size of the numbers which appear at the
vertices of the mining area when you define a mining area. Changing the size updates the DIMASZ, DIMTXT and
TEXTSIZE AutoCAD system variables.
3.1.3 Calendar and Grid Files
The "Calendar and Grid Files" dialog box, shown below, allows you to assign/change the current calendar and grid file
paths and file names. Use the Define New Calendar button to assign a new calendar file.
When you pick "OK", all the parameters are saved into an ASCII file named FILES.DEF. All the other MineSimU modules
access this file to get the current calendar and grid file paths and names.
17
3.1.3.1 Calendar File Options:
Filename: Every calendar file referenced in your mine plan must be identified by a number from 1 to 20. The edit box
shows the calendar file associated with the highlighted calendar number in the Calendar Select List. A "Not_yet_defined"
means that no calendar is assigned to that number. You can type the file name, but the complete path must be specified with
the extension of .XH. The preferred method is to use the Browse Calendars button to bring up the list of existing calendars
in your current directory. Use the Define New Calendar button to assign a new calendar. You must define a separate
calendar file for each machine if you want to use the "Schedule to Target Tonnage" or "LongWall Move CM Shutdown"
option under the Output pull down menu.
Undefine Calendar: Pick this button to undefine the highlighted calendar. Undefine removes the calendar from the list but
does not erase the file.
Starting and Ending Year: You should set the range to maximum time span of your application. These limits need to be
set only once. Do not change the range after creating a Julian calendar because the start and end year in your Julian
calendar file would not match the years in the configuration files. The maximum time span is 50 years, if you select a time
span of more than 50 years you will get an error when you try to create or edit the actual calendar.
3.1.3.2 Grid File Options:
Grid File:Every grid referenced in your mine plan must be identified by a number from 1 to 20. The edit box shows the
grid name associated with the highlighted grid number in the Grid Selection List. A "Not_yet_defined" means that no grid
name is assigned to that particular grid number. To view the grid names associated with the grid numbers, scroll through
the Grid Selection List Box. You can change the name of a grid or add to the list of grids. Type the grid file name in the
Grid file edit box or click the Browse Grids button to display the available grid files and select from the list. The browse
function brings up the standard AutoCAD directory list dialog box. If you type the file name in the edit box, you must
specify the complete path and the grid file name must have the extension ".GRD". The program does not check for the
existence of the file.
Undefine Grid: Pick this button to undefine the highlighted grid. Undefine removes the grid from the list but does not
erase the file.
Quality Calculations: Quality calculations can be done at three levels of precision. The complex method requires slightly
more time but is recommended for most applications. Click the down arrow to display the options as shown below. The
selected method will be used in all subsequent quality and timing calculations.
Approximate: The approximate method is the fastest because it uses a monte carlo sampling method to estimate
the parameter values but is least accurate.
Detailed: The detailed method computes a weighted average value for each quality parameter based on the
proportion of each grid block in the area mined for each time period.
Complex: The complex method is similar to the detailed method, but the weighting function considers only that
portion of the seam height that is actually removed and the out of seam parameters are weighted by the out of seam
density of each grid block.
Use Custom File: Certain grid parameters can be assigned custom names which are stored in a file. Toggle this option on
to use the custom names. If you change the custom names in the MineGrid Module, the file of custom names is updated, but
you must return to Calendar and Grid Files option for the new names to appear in your mine plan output.
18
Edit Quality Scales: This option allows you to enhance the display of grids by assigning a color to a specific range of each
grid parameter. Details of the color assignment procedure are given in the View Quality/Reserves option under the
Simulate pull down menu.
3.1.4 Difficulty Code Table
The "Difficulty Code Table" option allows you to create, view and change a table of multipliers that correspond to the
difficulty codes that are found in the geological grid. Each mining machine type can have its own table of multipliers. A
typical table and the available machine types are shown in the following figure.
Your grid must contain difficulty codes; use zero (0) for a grid block with normal conditions ,i.e. the mining rate is 100
percent. The mining rate for an area is the weighted average of the mining rates for the individual grid blocks intersected.
For the above example, if in one time period 50 percent of the mined area intersects with grid blocks containing a 0, 30
percent intersects with grid blocks containing a code of 1 and 20 percent intersects with grid blocks containing a code of 2,
the mining rate for that period would be (0.5 x 1.00 + 0.3 x 0.95 + 0.2 x 0.90) or 0.965. Select the machine type from the
pull down list box in the upper right corner and use the following functions to create a new table or modify an existing
table.
Add: This button is used to add new records to the table. Type the new data in the edit boxes at the bottom of the table and
click the Add button. The new record always appears at the end of the current list.
Change: This button is used to change an existing row. To use this button, first highlight the row you want to change. The
contents of that row will appear in the edit boxes below the list box. Make any changes and then click the Change button.
The highlighted row will reflect the changes.
Delete: This button is used to delete an existing row. To use this button, highlight the row and click the Delete button.
Print: This button is used to print the current contents of this file. By default, the output goes to the LPT1 printer port. To
print to a file, change the printer file name to the desired file name, and then click the Print button.
OK: When you pick "OK", all the values are saved into the ASCII file called CODE.DIF.
19
3.1.5 Height Sensitive Mining Table
This option brings up the dialog box shown below and provides a table of factors to adjust the mining rate in proportion to
the seam height. Each mining machine type can have its own table of factors. The mining capacity is assumed to vary
linearly between the points specified in the table. For the example in the following dialog box, when the continuous miner
unit works in an area with a seam thickness of 63.0 inches, it will mine at 85.0 percent of its normal production capacity.
The pick boxes within the dialog box allow you to create, change and print the table as described below:
Add: This button is used to add a record to a new or an existing table. New records are always added at the end of the
current list. Type the new data in the edit boxes at the bottom of the table and click the Add button.
Change: To change an existing row, highlight the row you want to change. The contents of that row will show up in the
edit boxes below the list box. Make any changes and then click the Change button. That row will now reflect the changes.
Delete: To delete an existing row, highlight the row and then click the Delete button.
Print: Use this button to print the current contents of the print file. By default, the output goes to the LPT1 printer port. To
print to a file, change the printer file name to the desired file name, and then click the Print button.
OK: Saves all the values into an ASCII file called CODE.SNS.
20
3.2 Printer Setup
This option brings up the following dialog box for selecting the type of printer and the printer port.
Scroll through the list of printers and ports and select the desired options. Clicking OK saves your selection. If your printer
is on the network rather than a separate printer for your own computer, you may need to change your Windows setup to
redirect the port to the network printer.
By default the output goes to the LPT1 printer port. Since most printers are USB the best option is to use a network printer
and re-direct LPT1 to the network printer.
One way to do this is:
1. Go to Windows Accessories and select Command Prompt.
2. At the command prompt type in: net use lpt1 \\server\printername
3. Ask your Network Administrator for the server and printer name.
CAUTION: If you try to print to LPT1 and there is no printer attached to the port or LPT1 is not re-directed to a valid
network printer then the computer may freeze. In this case it is best to print to a file and open it in Notepad, Microsoft Word
or any other word processor or text editor to print it from there. This also has the advantage of letting you change the fonts
and other text formatting.
21
----------------------------------------------------------------MINEGRID---------------------------------------------------------------3.3 MineGrid Module
MineGrid is a system to combine up to 14 gridded seam data files from your geological modeling system into a master
binary file which is required by MineSimU. The input to MineGrid consists of gridded seam data files, one for each
parameter. The input file can be QSB files created with MineSurf/QuickSurf or ASCII files e.g., VAL files from CPS and
ENZ from any source. Most geological modeling systems will output an ENZ file, i.e.,an ASCII file where each record
contains the Easting, Northing and one parameter value at a grid node. The fields must be delimited with a space or a
comma.
This output of MineGrid goes into an indexed binary file called a grid. It is stored in the default directory and has a default
file type of ".GRD". Each record consists of the easting and northing of a grid node followed by fourteen (14) parameter
fields.
Note: Each grid file contains all the quality information from one seam or ore body. Where no data is available for the
parameter at a grid node, the corresponding field contains a -99. If you have no data for a parameter, the entire column of
values for that parameter will be filled with -99's.
When you run MineSimU, you must assign a grid number (1,2,.. up to 20) to each grid that will be used to schedule the
mine and calculate production quantities and quality. Any one mine plan can use up to twenty grids. In general each seam
will have its own grid but the different types of mining areas, i.e. developments, bleeders and longwalls may need separate
grids to reflect out of seam dilution and mineable height accurately.
The following dialog box appears when you select this option.
3.3.1 Create a Grid File...
When you select this option, the standard AutoCAD directory list box of grids appears as shown in the following example.
Normally you will be creating a file under a new name, but you can also replace an existing .GRD file with entirely new
information. The file name should indicate the source of the data, such as CLAR6CM, which would be a grid for the
Clarion 6 seam for continuous miners. If you specify a new grid file, you must specify the complete path and the file name
must have the extension ".GRD."
If you select an existing grid to replace, the following AutoCAD warning will appear. Click YES to replace the entire file.
22
After you enter the desired grid file name, the following dialog box will appear. The box has buttons for two options, one to
specify the grid extents and interval and the other to customize the list of parameters (Z's) in the file. Most applications in
coal mining can use the default set of quality parameters but other types of mining will need different information.
23
3.3.1.1 Retrieve Extents:
If you know the extents, fill in the edit boxes. You can also retrieve the extents from a QSB or ENZ parameter grid file.
CPS (*.VAL) files do not contain coordinate information and you must type the extents and grid intervals in the edit
boxes.. To retrieve the grid extents from the input file, pick the file TYPE from the drop down list and click the Retrieve
Extents button. The following types of parameter grid files appear in the drop down list:
After you click Retrieve Extents, an AutoCAD directory file list box will appear as shown in the following example.
24
Select the appropriate input file from the list. The Model for Grid Extents dialog box will now reappear, as shown below,
with the extracted extents shown but grayed out. The dialog box also contains the number of grid blocks in the X and Y
directions.
25
3.3.1.2 Customize ZNames
To customize the quality parameters names, units or headings click the Customize ZNames button. The following dialog
box will appear:
The parameter descriptions that initially appear in the edit boxes are the standard defaults for coal mining. You can specify
parameter names, units and column heading abbreviations that are relevant to your application for the parameters which are
not grayed out. The other parameters are used in the timing calculations and their units must not change. You are allowed to
customize the names of these variables. The dialog box has the following options to modify the parameter information.
3.3.1.2.1 Manually Edit Parameter Information
Type the new name, units or column headings in the edit boxes.
3.3.1.2.2 Reset to Defaults
Click the Reset to Defaults button to restore the standard default parameter information.
3.3.1.2.3 Load Grid Z-Names
When you click this button, an AutoCAD directory list box appears as shown in the following example. The parameter
information from the selected file will be loaded into the new grid file.
26
OK: Click the OK button to save the extents and parameter modifications. A dialog box containing the list of acceptable
parameters and the dates when each parameter grid was created or last updated will appear as shown in the following
example.
27
3.3.1.3 Add/Change
This option allows you to add parameter grid data to a grid file or modify existing parameter values in the a grid file. To add
new parameter grid values to the grid file, highlight the parameter you want to add and click the Add/Change button. The
current date will be inserted into the Date column and the following dialog box will appear. The parameter you highlighted
in the previous step will appear in the top line. You now must indicate the source of the parameter grid values.
3.3.1.3.1 Parameter Value Source
When you are adding a new grid or replacing the values for a parameter, the data must be imported from your geological
modeling system.
Current Grid:
This option is only used to modify the parameter values in the current grid file, not for adding a new parameter to
the current grid.
Z File:
Click this button to import a parameter grid file from your geological modeling system. After you click the Z File
radio button, the New Z file information box will be enabled. To load the parameter grid data, select the Type of
file from the pull down list and use the browse function to select the file.
28
After you select the parameter grid file, the selected file name, including the path will appear opposite Z File:.
Click the OK button to add the parameter values to the grid file.
If you want to adjust the parameters before they are loaded into the grid file, use the Modify Parameter Values option
below before clicking the OK button.
3.3.1.3.2 Modify Parameter Values
This option allows you to adjust the parameter grid values as they are loaded into the grid file. The value of the modifier is
grayed out until you click the corresponding function button. The system does not allows you to Multiply or Add
simultaneously but either can be used with the fill missing values function. The Erase function cannot be combined with
another function for the same parameter, i.e. you must click both OK buttons and let the system complete the erasing before
you can insert a new set of Z-values or use the Fill function to replace the -99's with a default value.
Multiply a Parameter:
When you click the check box, the grayed out multiplier edit box will be enabled. The multiplier can be any
positive number.
Add to a Parameter:
When you click the check box, the grayed out add edit box will be enabled. The value can be positive or negative,
but the resulting parameter value can never be less than zero.
Fill Missing Values:
When you click the check box, the grayed out filler value edit box will be enabled. The value can be any positive
number.
Erase Parameter from the Existing Grid:
Click this option to erase the parameter specified above from an existing grid. Erase means the parameter values
will be set to -99. The Erase function will always be grayed out when in the Create Grid option.
OK: When you click the OK button, the parameter grid values and any modifications will be loaded into the grid
file and you are returned to the dialog box of parameters and dates. Highlight another parameter and click the
Add/Change button to add another set of parameter grid values into your grid file.
3.3.1.4 View Info
This option allows you to look at the data in the grid, one parameter at a time. To view parameter values, highlight the
parameter name and click the View Info button. The following dialog box will appear. The coordinates of the grid nodes
appear on the left and the values of the selected parameter are on the right.
29
You can scroll through the list or use the Search for a Point option. To bring up the value for a specific grid node, type its
coordinates in the edit boxes at the bottom and click the Search the List bar.
3.3.1.5 Edit Default Parameter values
Click this button to change the default values for the parameters. The following dialog box will appear. The default values
are used in MineSimU if the grid file does not contain a grid value for the corresponding parameter. The standard defaults
appear in the edit boxes unless you have changed them.
30
You have the following options for modifying the parameter information.
Manually Edit Parameter Information:
Type the new parameter default values in the edit boxes.
Reset Parameter Default Values:
Click the Reset Parameters Default Values button to restore the standard parameter default values.
OK:
Click the OK button to save your changes. The parameters and dates dialog box will reappear.
3.3.1.6 Customize Parameter (Z) Names
Use this option if you need to modify the quality parameters names or units. This option is exactly the same as Option
3.2.1.2 Customize ZNames. See that option above for the details of this procedure.
3.3.2 Edit a Grid File...
This option is exactly the same as Option 3.2.1 Create a Grid File except you do not need to specify the extents of the
drawing. When you select this option, the standard AutoCAD directory list box of grid files appears as shown in the
following example.
Select the desired file or type the file name. If you type the name, specify the complete path and include the extension
".GRD." This option allows you to modify an existing grid file. Values from a new parameter grid file can replace the
existing parameter grid data or existing parameter values in the grid file can be changed. After you click the OK button, a
dialog box containing the list of acceptable parameters and the dates, when each parameter grid was created or last updated,
will appear as shown in the previous section.
3.3.2.1 Add/Change
This option is exactly the same as the Create Grid option above, except you can now modify the existing parameter grid
values as well as add new parameter grid values to the grid file. You can also use the Erase Parameter from the Existing
Grid function. See Option 3.2.1.3 Add/Change above for details of the procedure.
31
3.3.2.2 Change Default Parameter values
See Option 3.2.1.4 Change Default Parameter Values above for details of the procedure.
3.3.2.3 Customize Parameter (Z) Names
See Option 3.2.1.5 Customize Parameter (Z) Names above for details of the procedure.
3.3.3 Convert a Grid File..
The ICAMPS grid files are stored in binary format and the values cannot be viewed in standard editors. This option allows
you to convert a binary grid file into an ASCII file which can be viewed and edited.
CAUTION: Manually editing grid files is not recommended because the exact format must be maintained. You can
convert the grid to an ASCII file modify it and then convert it back to binary and use it. But do so at your own risk, if the
grid becomes corrupted you may get errors or other unexpected results.
When you click the Convert a Grid File button, the following dialog box appears.
Conversion Format:
This option allows you to convert from binary to ASCII or from ASCII to binary. Click the desired conversion
format button and indicate the files to use.
Files to Manipulate:
Source: To select the source file, click the Browse Existing Files button to bring up the AutoCAD
directory list box. Pick the desired file.
Saved To:
To select the destination file, click the Browse Current Files button to bring up the AutoCAD directory
list box. You can pick an existing file from the list or type the name, including the path of the new file.
Convert: After you name the source and converted file, click the Convert button to perform the conversion.
32
3.4 Displace Grid
This option allows you to move a grid to a new location and to assign a new file name to the displaced grid. This function
is useful where grids have been created in one coordinate system such as State Plane and the mine maps have been drawn
in another coordinate system. Another use is in situations where you don’t have the actual grid for a property , but want to
evaluate some plans with a grid which should be similar to the correct grid. When you select this option, the following
dialog box appears.
Source Grid: Use the Browse option to select the name of an existing grid.
New Grid: Use the Browse option to select the name of the new grid. To displace a grid without a name change, enter the
Source Grid name in New Grid.
Displacement Values for Coordinates: Enter the distance to move the grid to the East and North.
Save: When you click this button, the displacement values are added to the Easting and Nothing coordinates
of the original grid.
CAUTION: If the New Grid file name is the Source Grid file name, all the original coordinate values are updated. Any
new grid you select will be overwritten if it already exist.
3.5 Graphical Point Change
This option allows you to change any of the parameter values for any grid node in an existing grid. You specify the change
and graphically select the node or nodes to change from a display of the grid nodes. When you select this option the
following dialog box appears.
33
You must first specify the grid that will be modified. The changes you make will be permanent; if you want to retain the
original grid values, save the grid under a new name before making any changes. Click the Currently Define Grids bar to
select from the list of grids which you defined in option 3.1.3 Calendar and Grid File. Otherwise, click the Browse for Any
Existing Grid button to use any other grids that you may have created.
After you select a grid, the file name will appear as shown in the dialog box example and the Window Region and Point
Color buttons will be highlighted. Use the Point Color option to specify the color of the unmodified grid nodes and then
select Window Region to draw a rectangle around the region of where you want to make parameter changes. For example,
have the mine layout displayed and window around the longwall panels where you have new quality information. Make
sure that the window includes grid nodes outside the mining panels of interest. Only nodes within the window can be
modified in this session. After you select the window, the grid nodes will appear in the color you selected.
Press Enter to return to the dialog box. The options for modifying parameter values will now be highlighted as shown
above.
You can change up to four grid quality parameters at one time. Click the arrow to list the available parameters and select
the desired one. Enter the appropriate response, for example, to the defined ash value to 10.5, Click Ash from the list, type
1 as the Multiplier, enter 10.5 in the Add box and select Defined from the pull down list on the right. You can repeat this
process for up to four different parameters. Use the Point Color option to specify the color of nodes that have been
modified.
34
You can select individual nodes or a group of nodes to change. Use the Select Closed Polygon button to select all the nodes
within an existing closed polygon or click the Draw Closed Polygon to draw a multi-sided closed polygon around the
desired nodes as shown in the following example. The points within the polygon will be highlighted and the following
command line prompt will appear.
Change the highlighted points in the Grid <Yes/No> <Yes>
A Yes permanently changes the parameter values as you specified.
3.6 Grid Scale Refinement
This option allows you to change the grid interval of an existing grid. Since the changes will be permanent and the grid
interval must be the same within a grid, you must designate the name for the grid with the refined grid interval. The refined
gird can have the same extents as the existing grid, or be a selected region from the existing grid. When you select this
option, the following dialog box appears.
35
You must first select the grid file to modify and provide a file name of the refined grid as shown in the example above.
After you enter the file names the other options will be highlighted. You can select the entire grid or click the New Region
button to window the desired region. Be sure to draw a window that is well outside of the region of interest.
After you select the region, you must select the degree of refinement. The current grid block size is given. You indicate the
number of divisions within each grid block by selecting from the pull down lists on the right. The number of divisions can
be different in the X and y directions. After you select the number of divisions, the size of refined grid blocks is displayed.
Click Save to save the refined grid. The refined grid is created by linearly interpolating between the original grid node
values. While the grid is generated, the new grid nodes will appear on the drawing and the command line will have the
following messages:
Please Wait while the New Grid is Created...
Setting Up the New Matrix...
Filling in the New Matrix...
Vertical Linear Interpolation...
Horizontal Linear Interpolation...
Creating a Date File...
Creating a Custom Name File...
The New Grid Creation is Complete.
Press <RETURN> to continue
3.7 Combine R-S-F Grids
This option allows you to create composite grids of the roof, seam and floor material. The purpose is a grid which
accurately reflects the quality of the final product which includes some material from the roof and/or floor where the seam
height is less than the minimum mining height. The inputs are ICAMPS grids of the roof, seam and/or the floor. You must
also specify defaults for the roof and floor quality parameters and the minimum mining height. The quality parameters in
the combined grid are weighted according to the thickness, density and percent recovery from the ICAMPS input grids.
The seam and out of seam densities are a weighted averages of the thicknesses of the material required to meet the
minimum mining height and their densities.
To prevent additional out of seam dilution from affecting the composite quality parameters in the timing calculations, the
Min Roof Thickness parameter is set to zero in the composite grid, and the Minimum Mining Height in the machine
specification should be equal to or less than the Minimum Mining Height that is used to calculate the composite grid
parameters. The original seam height and density can be included as parameters in the composited grid file. When you
select this option, the following dialog box appears.
Controlling Grid:
Frequently roof and floor quality estimates will be based on small samples taken from the immediate roof or floor, but you
want to consider them as representative of the entire roof or floor. Where the seam height is less than the mining height, the
compositing function must use out of seam material to achieve the minimum mining height.
The controlling grid will be the primary source of the out of seam dilution. If the controlling grid thickness is insufficient to
meet the minimum mining height requirement, the remainder comes from the other source. For example, if the roof is
controlling, but the total of the seam and roof thickness is less than the minimum mining height, all the balance must come
from the floor. The non-controlling source is always considered to have unlimited thickness.
Ignore Thickness for Calculation:
If you do not want the thicknesses in the controlling grid to limit the amount taken from that source, click the Ignore
Thickness for Calculation button ON to allow the system to use more than the grid thickness. Otherwise click the button
Off.
36
Specify Grids:
You must specify the grids for the seam, controlling grid and the non-controlling grid in that order. Include the path as well
as the name. The Seam grid always is specified first; Controlling and Non-Controlling grid will be specified as Roof or
Floor depending upon which grid you selected as controlling. Use the browse function to select the grid files.
You may have already created seam grids, but not the roof and/or floor grids. All three grids must be have the same extents
and grid intervals. The easiest way to create out of seam grids which are compatible with the seam grid is to use the seam
grid as a base. Use your geological modeling software to create the required Z-parameter files for the roof or floor. Copy
the seam grid to a new .grd file and edit this file; delete unwanted parameters and use the Add function to import the desired
Z-parameter files. You can repeat the process for the other grid. If you do not have quality information for both the roof and
floor, and you want to assume all the out of seam dilution will come from the source for which you have information, use
the same grid for the roof and floor.
Set Controlling Defaults: &
Set Non-Controlling Defaults:
The composited grid will have defined grid values only for grid nodes where the seam grid has information. Frequently the
available information for the roof or floor is more limited than for the seam. To insure that the composited grid will have
values wherever the seam has data, you must provide defaults for missing roof or floor grid node parameter values. When
you select each of these options, the default editing box appears as shown below.
37
Special Options:
These options are required. They allow you to create grids for different mining heights and to vary the amount of material
taken from the roof and floor.
Minimum Mining Height:
The minimum mining height is always specified in feet and should be equal to or greater than the minimum mining
height in the machine specifications.
Percent OSD of (Controlling Grid) Taken:
This feature allows you to limit the percentage of the out of seam dilution which will come from the Controlling
grid. If the seam height is less than the minimum mining height, the contribution from the Controlling Grid is the
lesser of the difference between the minimum mining height and the original seam height multiplied by the
Percent from (Controlling Grid) value or the Controlling Grid's thickness at the grid node. The balance comes
from the Non-Controlling grid. To use this feature you must click the Ignore Thickness for Calculation button
OFF.
Save Original Values:
This option allows you to save the original seam height and seam density as two of the user definable quality parameters as
shown in the following example.
38
The available user definable parameters are shown below.
3.8 Pre-Mine R-S Grids
This option is intended for two situations. The first is where the immediate roof tends to fall unless the seam is thick enough
to leave sufficient roof coal to support the roof. In the second case some of the roof is intentionally mined and the
remaining roof would not be self supporting. For both cases you must provide grids for the seam and roof and the
maximum mining height of the machine. For case 1, you specify the minimum thickness of coal to hold the immediate roof
and in case 2, the minimum self supporting thickness of roof. Both cases assume the machine will mine to its maximum
height. At grid nodes where the roof would come with the coal, the system creates composite grid values from the seam and
roof grids. At all other grid nodes the values come from the seam grid. The system creates a composite for only one case at
one time.
Seam/Roof Grids: You must browse for the path and name of the ICAMPS master seam and roof grid files. The grids
must have the same extents and grid intervals. If a parameter is not in the seam grid, that parameter is omitted from the
composite grid. You can provide default values for parameters that may be missing from the roof grid.
New Grid: The option creates a new grid. You must provide the path and name of this grid.
39
Premining Variables:
Max. Mining Height: Enter the maximum mining height that would normally be specified. (feet or metres)
Seam Ht.-Max Ht>=X: X is the minimum thickness of roof coal that will hold the immediate roof. (feet or metres)
Seam Ht.+ Roof -Max Ht. >= X: X is the minimum remaining roof thickness that can be held. (feet or metres)
Create: Click this button to create the composite grid.
40
---------------------------------------------------------------MULTISEAM-------------------------------------------------------------************************************************************************************************
The multiple seam feature allows you to maintain the mining sequence while shifting equipment between seams. All the
mine layouts are drawn on the same layer, but you specify an offset to allow viewing them without being overlapped. To
draw the layouts you specify one seam as the origin or seam 0 from which the layouts for the other seams are offset. The
first option allows you to specify the boundaries of the origin seam and the offsets. The subsequent menus let you
superimpose layouts and to switch to a specific seam-layout drawing combination for editing. The Seam Utilities Option
provides functions to list and highlight any or all areas in a seam drawing and the capability to import mining areas from
other drawings. These features can be a significant time saver. For example, you may have used MineSimU to layout each
seam's mine plan in a separate drawing, but you need to combine the drawings for scheduling or you may want to copy part
of a mine layout from one seam's mine plan into the layout for another seam. The number of seams is unlimited.
************************************************************************************************
3.9 Define a Seam
After you select this option, the following dialog box will appear.
When you begin a new mine layout, the system automatically assigns the drawing extents you enter in Option 3.1.2,
Boundary and Text Size as the boundaries for seam 0 which is considered the origin. All other seam layouts will be
shifted or offset relative to the origin. The origin is always seam zero and has an offset of zero.
You can change the default boundary values in this option. To edit the boundary of the layout for the origin, highlight the
top line in the edit list. Type the coordinates of the lower left and upper right corners of the boundary in the edit boxes or
41
click the Select Pts. button and use the cursor to indicate the lower left and upper right corners. The boundary can be
changed as needed. You must click the Change button to save the origin boundaries. The "Move Areas on Map to Match
Seam Displacement Changes" function causes all the areas defined as being part of a seam layout to move with the seam
boundary when the seam displacement is changed and normally should be enabled. The following options are available.
Add: To add other seams to the layout, highlight the last seam in the list. Each seam should be offset far enough to avoid
drawing a mining layout on top of the layout for another seam. After you highlight the line, type the seam name and the
offset distance in the edit boxes below the list. In general, an offset is specified in the X direction but not the Y direction,
but either or both can be used. If you specify a positive X or Y offset, the layout will be drawn at the specified distance to
the right or above the origin seam. Click the Add button to insert the new seam in the list.
Delete: To delete the boundary information for a seam, highlight the corresponding line in the list and click the Delete
button.
Change: To change the information for a seam, highlight the corresponding line in the list. The original values will appear
in the edit boxes below the list. Edit the data as required and then click the Change button.
Print: This button is used to print the current contents of this file. For the details of this function, see the Print command
under Option 4.1 Edit Mine Calendar.
Show: This button allows you to view the seam information for the highlighted seam.
3.10 Display a Seam
When you select this option, the following dialog box appears.
42
This option lets you see the seam mine layouts on top of the layout for another seam. You designate the mine layout you are
editing as the Main seam and superimpose the other seam layout on it. If needed, select different line types and colors to
help distinguish between the layouts. If you have difficulty distinguishing the different line types, use a larger AutoCAD
Line Scale.
On/Off: Highlights the seam layout which you want to superimpose on the Main seam. While the seam is highlighted, the
line type and color edit boxes are in bold and can be changed. Use the On/Off button to toggle the display on or off.
Main: While editing a seam layout you may want to adjust the layout relative to features in another seam layout. Usually
you will want to designate the seam layout you are editing as the underlying or Main seam. To designate a seam as the main
seam, highlight the corresponding line in the list of seams and click the Main button.
Info: To check the coordinates and other information about a seam layout, highlight the corresponding line in the list of
seams and click the Info button. The information will appear in a dialog box as shown in the following example.
3.11 Switch to a Seam
Use this option to view a seam layout in the main part of the screen. When you select this option the following dialog box
will appear. Click on the arrow key to display the list of available seams layouts. Highlight the desired line and click OK to
bring that seam layout to the center of the screen.
43
3.12 Areas in Seam Bounds
When you select this option, the following dialog box appears.
The list box portion contains all the mining areas in the mine layout drawing for that seam. This option includes the
following functions:
Show: To view a specific area, highlight the corresponding line in the list and select the Show button. The area will be
highlighted and the direction of mining arrow will appear.
Show All: Click this button to highlight all the mining areas in the list. The directions of mining will also be indicated.
Print: Click this button to print the contents of the file. For details of this function, see the Print command under Option 4.1
Edit Mine Calendar.
Switch: Click this button to exercise the Switch to a Seam from within this option. The list will be updated to display the
areas in the seam you selected.
44
----------------------------------------------------------------MINECONV--------------------------------------------------------------************************************************************************************************
This option is only available in MineSimU for AutoCAD versions earlier than 2007. The options here are used to convert
the earlier binary files into the new ASCII format. The ASCII files can be easily viewed in any text editor. The first
conversion option Convert ICAMPS Files should not need to be used. If you are considering using this option please call
Ohio Automation at 740-596-1023.
************************************************************************************************
3.13 Convert ICAMPS Files
When you select this option, the following dialog list box appears.
The conversion options are PENN STATE TO DXF, BTREE TO ASCII, AND ASCII TO BTREE. Penn State to DXF is
only used for MineVent and is rarely used. BTREE TO ASCII can still be used by older versions of AutoCAD. ASCII TO
BTREE really should no longer be used as all the new files are already ASCII.
3.13.1 Penn State to DXF Conversion
Unlike the MineVent module of ICAMPS, the non-graphical versions of the PennVent programs do not require the to-scale
drawing of node locations. Prior to running this option you must create a file of node locations by using the Digitize Nodes
Option in the MineVent module. For each network the existing files of branch and fan data are converted to the DXF
format and merged with the corresponding node file for the network.
When you select this option the following dialog box will appear.
Type the name of the corresponding file, including the complete path if known or use the Browse function to locate the file.
45
The following files must be converted to build a MineVent model.
Penn State Input File:
This is the file from your existing Penn Vent application. This file must have the extension .PEN.
Node Input File:
A file of node locations created with the Digitize Nodes option of MineVent. This file must have the extension .NOD.
Fan Input File:
A file of fan characteristics from your existing Penn Vent application. The file must have the extension .FAN.
The above files are merged and exported in a DXF format which will be converted into a to-scale AutoCAD drawing of
your ventilation network.
DXF Output File:
Enter the name of the output file which will be used as the input to the MineVent module. This file must have the
extension .DXF
You must also enter default values for the drawing limits and the text and symbol size.
Map Corners:
Enter the drawing limits, lower left and upper right corners, for the AutoCAD drawing of your ventilation network.
Annotation Text & Pt. Symbol:
Enter the default values for your Scale factor, Text and Symbol sizes. Click the ReCalc button to have the text and
symbol sizes reported in drawing units.
3.13.2 Btree to ASCII Conversion:
This option allows you to convert btree files into the ASCII format which can be viewed and modified in an editor and is
compatible with other software applications such as spreadsheets.
When you choose this option, the following dialog box appears. The radio buttons are labeled with the file extensions for
each type of file. The file types that correspond to the extensions are listed below:
46
Extension
File Type
CR
Machine Specifications
RE
Mining Sequence
o2
Timing Calc. Output
Extension File Type
CL
Calendar (old format no longer used)
EX
Exception
SE
Area Definition
When you pick a radio button, files with the corresponding extensions appear in the browse list. The extensions for the
ASCII files are not restricted. Select the input and output file names from the AutoCAD browse list. The complete path is
required. Btree files must have the specified extension. Click OK to start the conversion process.
3.13.3 ASCII to Btree Conversion:
This option allows you to convert ASCII files into btree files which are compatible with the ICAMPS software. This option
is only useful for AutoCAD 2006 and earlier. Even so the current versions of MineSimU for AutoCAD 2004 and higher
use the new ASCII file format. There may be some users that are still using the binary file format. Normally you will have
edited the ASCII file in a full screen editor and will use this option to load the edited file back into ICAMPS.
When you choose this option, the following dialog box appears. The radio buttons for the btree files are labeled with the
file extensions for each type of file. The file types that correspond to the extensions are listed under Option 3.11.2 above.
When you pick a radio button, files with the corresponding extensions appear in the browse list. The extensions for the
ASCII files are not restricted. Select the input and output file names from the AutoCAD browse list or type the name of the
new file. The complete path is required. Btree files must have the specified extension. Click OK to start the
conversion process.
47
3.13.4 Convert All ACAD2007:
When you select this option the following dialog box appears.
This option is used to convert all the binary btree files used in MineSimU for AutoCAD 2000 to 2006 to the ASCII format
that is used in MineSimU for AutoCAD 2007 and above. Under the Files to Convert you browse for the name of the
drawing associated with the files. The Output Files will be automatically set to the same name. It is recommended to keep
the names the same, but if you have good reason and know what you are doing you can change them. The program will not
overwrite any existing files but it will open them and change the date on them. All the new files will have new extensions.
48
3.13.5 Convert Calendar Files:
When you select this option the following dialog box appears.
This option is used to convert all the binary calendar files used in MineSimU for AutoCAD 2000 to 2006 to the ASCII
format that is used in MineSimU for AutoCAD 2007 and above. Under the Files to Convert you browse for the name of the
calendar you want to convert. The Output Files will be automatically set to the same name. It is recommended to keep the
names the same, but if you have good reason and know what you are doing you can change them. The program will not
overwrite any existing files but it will open them and change the date on them. All the new files will have new extensions.
49
---------------------------------------------------------------------COST-------------------------------------------------------------------This option allows you to create and edit files containing cost information including the account codes and a bill of labor
and materials which you can attach to mining areas under B of L&M. when creating the area definitions. Each file is
assigned to a number, and the assigned number is stored in the area definition file. The names and details are user options.
These are ASCII files which can be read into a spreadsheet application and used to prepare budgets and cost comparisons.
CAUTION: The B of L&M file has been created as an ASCII file for the convenience of the user. In order to allow you
maximum flexibility in creating your field definitions, the Semi-colon (;) has been reserved as the field delimiter. You can
use any other ASCII character in your item descriptions. Do not use Semi-colons in your descriptions.
3.14 Create/Edit Cost Files
When you select this option, the following dialog box appears.
The number for the file appears under the B of L&M header and is permanently assigned. This is the number you will
assign to a mining area in its B of L&M. field. The B of L&M file numbers do not need to be sequential so you can delete
a B of L&M file without affecting the file number of any other file.
Cost files: The list contains the user configurable files which include account codes and labor and material requirements.
You can select the New button to add a add a new file, Import to add an existing file from another directory, Edit to modify
an existing file and Delete to remove a cost file from the current directory. If you want to use the same cost files for several
projects, create a separate directory for all the cost files and copy them into your current directory
New: This option brings up the following dialog box. Enter the name of the new file; the extension must be .cos. After you
click the Save button a dialog box for entering cost data appears as shown below.
50
Import: This option allows you to import a cost file from another directory. When you select Import, a dialog box similar
to the above appears. Browse for the existing cost file to add to the list of cost files.
Edit: Highlight the desired file and press Edit to bring up the following dialog box for entering cost data. Highlight a line
item to edit its contents or use the Add option to enter additional line items.
51
The system allows up to four levels of accounting categories. Type the name of each cost center in Name and the account
number in Value. Then enter the cost item information the edit boxes below the list box. You can have up to one hundred
items in the list. Use item Name and Usage Rate that you want in your spreadsheet. You can use any description you
choose but do not use a “;” in your descriptions. Quantity must be a numeric value that depends on the function you will
use in your spreadsheet calculations. Recovery % refers to the amount of the item that can be re-used after an area is mined.
Op/NonOp refers to whether an item is a operating expense or a non-operating expense. ItemAccount is the account
number, if any, that you want to assign to this line item. OtherCost can be the actual unit cost for this item.
Add: Click this button to add the item information to the list.
Change: To modify information for an item, highlight the item in the list. Its information will appear in the edit boxes.
Type in the changes and click the Change button.
Delete: Highlight an item and click this button to delete it from the list.
OK: After you click this button, the information you entered is added to the file. The number of items in the file appears on
a separate line after the lines containing the Names and Values.
.
52
Layout Commands
When you choose the Layout option, the following pull down menu appears. The mine layout can be drawn by any one of
three methods, but in each case the mining areas must be four-sided closed polylines. If you are adding only a few new
mining areas to a drawing, the recommended method is to use Option 4.3, Define New Areas, which allows you to draw a
mining area, define it as a bleeder, development or longwall and enter the mining direction and extraction rate in one step.
If you are starting a new drawing or are adding many new areas to an existing drawing, the task goes faster if you use
Options 4.1 and/or 4.2 (Mining Area by 4 Points or Mining Area by 2 Points) to layout the mine and then use Option 4.3
to define the area. The third method is to draw the mine layout using standard AutoCAD pline commands and transform the
mining areas to the MineSimU format by using Option 4.4, Attach Attribute Block. Then use Option 4.3 to define the areas.
The mine layout appears on the screen as an AutoCAD drawing and the information for the mining areas is stored in the
Area Definition data base files called WORK.SEX (Pardon the name it was necessary for consistency). If for some reason
any of these files are corrupted, you can use the Mining Areas Utilities-->Fix Areas in Map/File to compare the AutoCAD
graphics and Area Definition data base files and bring them into agreement.
53
---------------------------------------------------------UNDEFINED - AREAS---------------------------------------------------------***********************************************************************************************
You can perform the following AutoCAD operations on a mining area before it is defined as a longwall, bleeder or
development.
************************************************************************************************
1. Erase a mining area using the AutoCAD ERASE command but you must erase both the polyline and the
corresponding attribute block.
2. Move an area using the AutoCAD MOVE command but you must move both the polyline and the corresponding
attribute box.
3. Modify an area's size or shape with the AutoCAD PEDIT command.
4. Change the size of an area with the AutoCAD SCALE command.
5. Use the AutoCAD copy command to copy any polyline representing a mining area before the attribute block has been
attached.
CAUTION: Never copy an attribute block with the AutoCAD COPY command.
************************************************************************************************
The next two options are now included in the Define New Areas option but can still be used separately. Time saving
suggestion: to add many new mining areas to your layout, first use Option 4.1 or 4.2 to draw the areas and then use Option
4.3 to define them.
************************************************************************************************
4.1 Mining Areas By 4 Points
Use this option to pick the four points which will be the corners of a mining area. In ICAMPS terminology a "Mining Area"
is a four-sided closed polygon on layer "MAREAS".
The command line will prompt you to pick the four points which determine the area and then ask you to select a starting
point and a point to indicate the alignment direction for the area label. Normally you want the label near the center of the
area. MineSimU then creates an attribute block and places it and the label N000 at the location you selected. The prompts
appear in the following sequence:
Pick Point 1 of Area / <R> to END:
Pick point 2 of Area:
Pick point 3 of Area:
Pick point 4 of Area:
Pick point to start label:
Pick alignment point:
The size of the attribute block depends on the values entered for the "Text Size For Text Annotation" in the Simulation
Defaults option.
4.2 Mining Areas by Two Points
This option allows you to define a mining area by selecting the beginning and ending points of the starting side and
specifying the area width. You will get the following prompts:
Pick center of starting side/<R> to end:
Pick center of ending side:
Azimuth/Perpendicular/Pick Orientation:
54
The third prompt allows you to specify the orientation of the ending sides in three ways:
1. By typing the letter "A" and entering the azimuth in degrees.
2. By typing "P" which indicates that the end lines are perpendicular to the center line.
3. By picking two points to designate the orientation of the end lines.
If you select azimuth, you must enter the azimuth in degrees and minutes. After you specify the orientation of the ends
lines, the following prompts ask for the perpendicular width of the area left or right of the first side.
Enter Perpendicular Area Width Left of first Side:
Enter perpendicular Area Width Right of First Side
You can either type in the value or pick two points to indicate the width. Think of left or right relative to the first side as
facing in the direction from the start point to the end point you selected. You can also think of the first side as a line inside
the area and specify distances both left and right from that line.
You then specify the starting point and alignment of the label in response to the following prompts.
Pick point to start label:
Pick Alignment point:
MineSimU will then create an attribute block and place it and the label N000 at the location you selected. Normally you
want the label near the center of the area. The size of the attribute block depends on the values entered for the "Text Size
For Text Annotation" in the Simulation Defaults option.
4.3 Define New Areas
This option combines the options to draw and define mining areas. Subdividing of mining areas and specifying the bleeder
and development retreat areas are handled under Option 5.2 Edit Mining Areas. When you select this option, the following
dialog box appears.
55
The program allows up to 999 areas of each type. All the defaults in this routine are read from the WORK.SIM file which
was created with Option 3.1 Simulation Defaults. If the WORK.SIM file is not found, the following defaults are used:
Type:
Entry width:
Shifts/day:
Quality grid:
-99
20.0
2.0
1
Code:
Percent extraction:
Mining rate:
Seam
-99
40.0
1.0
0
The upper portion of the dialog box is a list box of all the mining areas that have been defined in this session. These areas
and their parameters are not permanently saved in the area definition file until you select the "OK" button. You must look
in the area definition file( Simulate-->Edit Mining Area File) for information about previously defined areas.
Drawing and defining a mining area can be done in the same step. First you enter specifications for the area and then draw
the mining area or select a drawn but not defined mining area. Most of the correct information appears by default if you are
defining the same type of areas.
Area Num. and Type: By default the Area Number edit box is grayed out and assigned automatically. However, you can
control the number by picking the Manual Numbering button and typing the desired value. To change the Area Type, select
the drop down list in the second edit box and click the area type. A error message appears if you specify a duplicate area
type-number combination.
Entry Width: The average entry width is required only for room and pillar areas for which the production rate is specified
in advance per cut and cuts per shift.
% Extraction: The percent extraction defaults to the previous value except for longwalls which are always assigned a
percent extraction of 100 percent. If the percent extraction needs to be changed, type in the new value if known, otherwise,
pick the Calc % Extract button. A list of entry and pillar configurations and their percent extraction and overall widths will
appear as show in the following example. If the required configuration is available, click on the desired line and the
corresponding entry width and percent extraction will appear in the edit box.
Otherwise you have the option to have the program compute the percent extraction. Pick the New button and an array of
pillar layout icons will appear as shown below. Click on the desired icon. The icons in the first two rows of the first column
apply to any number of entries; the others apply only to the shown configurations. If no icon meets your requirement you
must hand calculate the percent extraction.
56
Using the standard rectangle pattern as an example, the following prompts will appear on the command line.
Enter the Name of the configuration <NONAME>:
The name should suggest the particular pillar and entry configuration that corresponds to the calculated data ,e.g.
G3E80100 for a 3 entry gate on 80 by 100 centers. The next prompt is
Calculation Adjust. Is Normal/Miner Borer/RoadHeader <N?M?R> <N>:
If you choose M or R, the program will calculate the width of an equivalent rectangular opening. Then
Number of entries:
Specify entry spacings individually <Yes/No> <N>:
Assume that N was selected.
Center to Center distance of Abutment entries:
Specify entry widths individually <Yes/No> <N>:
Assume that N was selected.
Entry Width:
Center to Center distance of Abutment Pillar Crosscuts:
Crosscut Width:
57
The program then makes the calculations based on your input data and reports the results and asks if you want to save the
data.
Average entry width:
Total width of Area:
Percent extraction:
Keep configuration <Yes/No> <Y>:
If you reply with Y the new information is added to the end of the list.
OK: Highlight the % extraction configuration you want to use and click the OK button to insert the corresponding data into
the % Extract. and Entry Width edit boxes.
Name: You must enter a unique name for the mining area. The name is limited to ten characters preferably without spaces.
Seam & Grid: If you are designing a one seam mine, that seam is always the "origin" seam and the edit box for Seam
always contains a zero. If you are simultaneously mining in two or more seams, enter the seam number that corresponds to
the current mine layout. Grid defaults to the value you specified for QualityGrid in the Simulation Defaults option in
Configure MineSimU under the Setup pull down menu. In some cases you will want to use a different grid for longwall
areas and room and pillar areas or for different parts of the same mine plan. Be sure that the correct grid number is in the
edit box.
Draw or Pick: After you enter the information for the area, select either the Draw by Four Points or Draw by Two Points
method from the drop down menu below the Draw button and click the Draw button. See Options 3.1 or 3.2 above for the
drawing procedures. If the area was previously drawn, click the Pick button; the following command line prompts will
appear. If you specify a duplicate area type-number combination or area name, your Draw or Pick command will not be
accepted and an error message will appear.
Pick attribute block of area to be defined/<R> to end:
Is Correct area highlighted (Yes,No)/<Yes>:
In either case you must pick the direction of mining in response to the following prompt.
Pick direction of mining/<R> to end:
After you pick the direction, the area will appear on the drawing with the designation N000 and the defined mining area
will be added to the list but not saved in the area file. After you click the SAVE button, the area is saved in the Area
Definition file and the mining area type and number will appear in the drawing.
Change: Defined mining areas in the list can be edited or deleted. First highlight the desired line by clicking on any point
in the line. The area's parameters will appear in the edit boxes. After you correct the data, click the Change button.
Delete: The Delete button will erase the highlighted line from the list.
While you are drawing and defining areas, you may need to look at the drawing or list the mining areas that have been
defined. The dialog box buttons View Drawing and List Defined Areas can be used at any time during the process of
creating or editing mining areas. Since the simulation program uses the Area Definition file to compute the schedule, the
AutoCAD Graphics and Area Definition file must be consistent. If a problem occurs, you can compare the information for
a specific mining area by using Option 4.9.6 "Compare Graphics & Db" or check all the areas by using Option 4.9.1 "Fix
Areas in Map/File".
58
The following information is kept for every mining area:
Parameter
1. Name
2. Type
3. Code
4. Entry width
5. Percent extraction
6. Base line orientation
7. Shifts per day
8. Mining rate
9. Quality grid
10. No. of sub-areas
Storage
GDB &
GDB &
GDB &
GDB &
GDB &
SEDB
SEDB
SEDB
SEDB
GDB &
Location
SEDB
SEDB
SEDB
SEDB
SEDB
SEDB
Type
10 characters
double
double
double
double
5 characters
double
double
integer
integer
4.4 Attach Attribute Block
This option lets you attach a mining area attribute block to a polyline which you created with the standard AutoCAD
commands. You are prompted to pick the polyline which you want to define as a mining area. The polyline must meet the
following conditions:
1. Four-sided polygon.
2. Closed polyline.
3. On the layer called MAREAS.
4. Not already defined as a mining area.
5. Must be a convex figure.
If the polyline meets the above conditions, you will be prompted to pick the starting and alignment points for the attribute
block.
59
-------------------------------------------------------------DEFINED - AREAS---------------------------------------------------------4.5 Undefine Mining Area
This option allows you to undefine an area. Normally this option is used to change a development to a bleeder or
vice-versa. When you select this option, the following prompt appears:
Pick Attribute block of area to be Undefined/<R> to end:
The selected area will be highlighted. After you verify that the correct area is highlighted, the area will revert to the
undefined state, i.e., the label will be N000.
4.6 Erase Mining Area
This option allows you to delete any mining area, either undefined or defined as longwalls, bleeders or developments. The
following prompt appears:
Pick Attribute block of area to be erased/<R> to end:
You will be asked to verify that the correct area is highlighted. If the area was undefined, the attribute block and the
corresponding polyline will be erased and the area removed from the list of undefined mining areas. The corner points will
remain until the next AutoCAD redraw command.
If you attempt to delete a defined area, the following prompt appears.
WARNING: Do you want to erase this area (Yes/No) <No>:
If you answer Y, the area will be removed from the area definition file and from the drawing.
4.7 Stretch Mining Area(s)
This option allows you to change the shape and size of previously defined mining areas without changing any other
information such as the area name or mining method or direction. This option will move a side of an area in any direction
but the usual application is to shorten areas that have been partially mined prior to replanning the mine or to lengthen or
shorten one or more longwall panels and the associated gates for different mining scenarios.
CAUTION: Do not use the AutoCAD Undo with Stretch Mining Areas.
CAUTION: Only the sides of whole mine areas can be modified; one end of a sub-area cannot be repositioned.
When you select this option, the command line will ask you to window the area(s) to change. The window is always four
sided. The window must cut opposite sides of a mining area and enclose the side to be moved. Areas inside the window
will also move but their size and shape will not change. Entire sub-areas will move correctly if they are inside the window.
After you create the window, the following command line prompt appears.
Move by (Point/Distance/Quit) <Q>
In either case you are asked to pick a base point from which to stretch or shorten the area(s). If you selected Point, the next
prompt asks for the new location of the base point. The Distance option asks you to indicate the direction in which to move
and to enter the move distance.
4.8 Find Mining Areas
This option helps you locate a mining area on the screen. The program will ask for the mining area name, e.g. Main-4, ID
number, e.g. D4, or handle, e.g. R068. Once a valid area handle is entered, the mining area will be highlighted on the
screen, and a small green arrow will appear in the middle of the mining area. The arrow will disappear when the drawing is
redrawn or regenerated. Mining areas can be listed using Option 4.9.7, List Mining Areas.
60
4.9 Mining Area Utilities
This option provides a menu of utilities to modify and/or correct mine layouts and the area files after the areas have been
defined. It also has functions to create, export and import files and to draw detailed projections of room and pillar areas. A
description of each option follows.
4.9.1 Fix Areas in Map/File
This option corrects discrepancies between the current drawing file and the file of defined areas. The following dialog box
will appear.
The listed parameters are in both files and you must select which file will have the correct values for each parameter. If
some areas are not in both files, and you want them added to the other file, click the Create All Missing Areas button. When
the drawing and area file do not agree, the program warns you with an AutoCAD Alert message box. Click the OK button
to except the correction.
61
4.9.2 Copy Areas
This option allows you to copy one or a group of areas that have already been defined without having to draw and define
them individually. When you select this option, the command line prompts you for the corners of a four sided window
around the attribute blocks of the areas to be copied. After you create the window, the next prompt is
Displace by (Point/Distance/Quit) <Q>:
If you select Point, the following prompts appear:
Pick base point:
and
Pick new point:
If you select Distance, the prompts are:
Pick base of direction
Pick direction of displacement
Enter length of displacement (0 to Quit) <0.0000>:
After you respond to the prompts, the areas will then be copied to the new location.
The program assumes that each copied area will be of the same type and have the same mining parameters as the original
area. The area identifier defaults to the next available identifier number, but you can type the number for each area as it is
copied. As each copied area appears highlighted on the screen, you are prompted for the new name and number as shown in
the following example for a copied development area.
Enter number of area <S to Skip>: <6>
Enter name of area D6: <no name>:
After you enter the name, the area will show as a defined area and the next copied area will be highlighted.
4.9.3 Add a Map
This option allows you to import mine plans from another drawing. The mining areas in the imported drawing can be edited
to include only certain mining areas or restricted to mining areas within specific coordinates. When you select this option,
the dialog box shown below will appear.
62
The list box will contain all the mining areas in the imported file. The edit boxes on the left and below the list box contain
the coordinates of the upper left corner of the seam layout into which the areas will be imported. The edit boxes on the
lower right are for the reference coordinates where the imported areas will be inserted. They will be grayed out until a file
is loaded. You select the current map and the imported map from the drop down list boxes below the edit boxes. Select OK
to save your parameters.
The buttons on the right provide the following options; the Delete and Filter functions allow you to eliminate specified
areas from the imported mine plan.
Load: This button brings up a standard AutoCAD directory list dialog box of mining area files. The imported file must
have the extension ".SEX". Select the desired mining area file, press OK and the corresponding mining areas will appear in
the list box as shown in the example above.
Delete: This button allows you to delete mining areas from the imported file. To delete an area, highlight the area in the list
and click the Delete button.
Filter: The Filter button brings up the following dialog box. You can filter areas out of the imported file by area type and
identifier number or seam. To eliminate areas, toggle the button for the area types "On" (X) and enter the range of identifier
numbers and/or seams to omit. All the areas outside the range will be eliminated.
To remove a group of areas within the list of areas or seams, you must use a two step process. For example, to omit all the
areas on seam 2 from a file that has areas in four seams (0,1,2,3,4), first eliminate all the areas less than zero and greater
than 2. Click the OK button to load the remaining areas (seam 0 and 1 areas) into the current drawing. Then re-import the
area file and omit all the seams less than 3 and greater than 9999. Click OK again and areas from seam 3 and 4 will be
added to the map.
63
Print: Click this button to print the contents of the file. For details of this function, see the Print command under Option 5.1
Edit Mine Calendar.
4.9.4 Attribute block change
This option allows you to choose between displaying the area identification number or the area name for any or all defined
mining areas and to change the size of the characters in the display. When you choose this option, the following dialog box
appears. You must use the Region to Change option in connection with either changing the text size or the attribute to
display.
64
Size Change Value: This option lets you to set the text size as a multiple of the current size or to specify the size in
drawing units. After you select the text size, you must specify which mining areas to change with the Region to Change
option. You can also specify the attribute to display in the same operation in which you select the text size.
Large Text in Attribute Block: Since you frequently will want to change the text size but not the attribute to display, this
option defaults to Change Nothing. This option allows you to change the attribute to display with or without changing the
text size.
Region to Change: You must specify the attribute boxes which will be affected by the above selections. If you choose the
Within a region option, the command line will ask you to draw a four sided polygon around the attribute boxes to change
after you select the Change button.
4.9.5 Reverse Mining Direction
This option allows you to reverse the direction of mining for one or more mining areas. When you select this option, the
following command line prompts appears.
Surround Attribute Blocks with a polygon (4 points):
Pick First Corner
After you pick a corner, the prompts ask for the second, third and fourth corners.
If the polygon includes at least one attribute block, the next prompt is
Updating Complete
and returns to the Command prompt. If the polygon is empty, the prompts again ask you to pick the corners of the polygon.
4.9.6 Compare Graphics & Db
This option allows you to verify that the AutoCAD graphics data for each mining area agrees with the parameters stored for
the corresponding area in the area definition data base. You select the areas to be checked in response to the following
prompt.
Pick attribute block of the area to be checked/<R> to end:
After you select an area to be checked, it is highlighted on the screen and the results of the comparison are displayed. A
typical example is given below:
Area:
3
DEVELOPMENT
Parameter
Area Definition File
Graphics Status
Name
MAIN-3
MAIN-3
OK
Percent extraction
34.9000
34.9000
OK
Entry width
20.0000
20.0000
OK
Type
-99
-99
OK
Code
-99
-99
OK
Flag
20
20
OK
Shifts/day
3.0000
3.0000
OK
Mining rate
1.0000
1.0000
OK
Number of splits
0
Orientation
2 - 3
Point 1
( -47986. 7,
-7267.7) ( -50543.4,
-8929.0) OK
Point 2
( -47848.8,
-7534.1) ( -47848.8,
-7534.1)
OK
Point 3
( -50543.4,
-8929.0) ( -47986.7,
-7267.7)
OK
Point 4
( -50681.3,
-8662.6) ( -50681.3,
-8662.6)
OK
65
4.9.7 List Mining Areas
This option generates a list of the mining areas in the drawing. When you select this option the following dialog box
appears
Descriptions of the column headings follow:
Handle: This column contains a unique hexadecimal ID for every mining area. The mining area handle can be used in
Option 4.8, Find Mining Area, to locate a mining area on the screen.
Num: This column contains the area number. For an undefined mining area, this column will contain N000.
Sub: If the mining area is sub-divided, this column will contain Yes.
Name: If the mining area is defined, this column will contain the name of the area. All undefined mining areas will have
NONAME in this column.
4.9.8 Draw Pillars
When you select this option the following menu of pillar design icons will appear. Use the Draw Pillars option if you need
to draw detailed pillar layouts including center lines, pillars, and the outer ribs for numerous common pillar configurations.
They can be viewed on the screen or plotted on a drawing. The percent extraction will appear in the command line.
If you want to calculate percent extraction without displaying he pillar layout on the screen, use the "Calc % Extract"
feature within Option 4.3 Define New Areas.
After choosing one of the pillar designs you will be prompted to pick the start point and then the end point. This will form
a reference belt centerline for the location of the pillars.
66
4.9.9 Write Mining Area File
This option allows you to create a new file designated as <DWGNAME>.MA where <DWGNAME> is the name of the
drawing file you are currently working on. The file will contain information about the mining areas similar to what is list in
List Mining Areas.
67
Simulate
After you select the Simulate option, the pull down menu shown below appears. The options above the divider are for
setting up the simulated mining process. A mine calendar, defined mining areas and machine sequence file are essential.
Option 2, Edit Mining Area File allows you to change mining parameters, subdivide and/or retreat mine specified areas.
The exceptions file give you flexibility to change shift schedules and mining rates. The options below the divider are aids
for setting-up the mine plan and schedule.
5.1 Edit Mine Calendar
You must create the mine calendars you specified in the Configure MimeSimU option. When you select this option, the
following list box appears.
The calendar files you specified are in the list. Select a file from the list and click the OK button. A dialog box containing
a monthly Julian or wall calendar will appear as shown below.
68
The system schedules by working days, but if machines are on different work day calendars, e.g. some machines work five
days a week and others only four, work day 10 might be Julian day 12 for one machine and Julian day 17 for another. The
scheduling algorithm must know such differences for precedences to be followed correctly, especially for shorter term
scheduling. To enable the scheduling algorithm to correlate working days to Julian dates, you must specify the
non-working days for every month of each year within your planning period.
Non-working days are indicated in the calendar display by clicking the small square in the upper left hand corner of each
days block. The calendar also shows the number of shifts per day in the left most edit box of the days block which can be
edited in place. The right most edit box in the days block is for the hours, which is only used if you choose to do so in the
scheduling. For building a new calendar or extensive editing of an existing calendar use the Advanced option which has an
automatic feature to check off all the regularly scheduled non-working days and edit the shifts per working day as well as
most holidays. Vacation days must be checked off manually for each month of every year in the calendar. Such
non-working days are scheduled according to company or national practices.
<-- and --> buttons: Use these buttons to move to the next or the previous month.
Off Day Type: Some users want to indicate the type of non-working days on the Gantt chart. Four types are allowed,
Normal, Vacation, Holiday and Other. If Vacation, Holiday or Other is selected, a V, H or O appears in the non-working
day display.
Total Days and Total Shifts: The number of scheduled working and non-working days and the total shifts for the
displayed month.
69
Advanced: When you select this option, the following dialog box appears.
This option lets you specify all the standard non-working days of the week for the Update Interval you specify. The Ignore
option allows you to edit an existing calendar without changing the previous settings for that day of the week. Otherwise,
click the OFF or Work button to indicate a non-work or work day. You must also indicate the shifts per day for every
working day. The shifts in the calendar default to the Shifts/Day you specified in the Simulation Defaults, but they can be
automatically be reset to the value you enter in the Shifts edit box. If you do not want the shifts/day to change, enter -1.0 in
the shifts edit box. Optionally, you can enter the hours per day if you plan to use the scheduling feature that adjust the
mining rate based on hours (rate=rate*hours/default hours). After you set the requirements for all days of the week, click
the Update button. The specified non-working days will be appear in the calendar with a check mark in the small square
and the specified shifts updated for every working day.
If you want to mark off the standard holidays for the update interval then check the appropriate box. The rules that we use
for marking off holidays may not match your standards for example, what if Christmas falls on a Sunday, do they get
Friday off or Monday or Saturday? Here are the rules that we use:
New Years Day, Jan. 1st. If New years falls on Sunday take Monday off.
Memorial Day, Last Monday in May
Independence Day, July 4th. If July 4 falls on Sunday take Monday off
Labor Day, 1st Monday in September
ThanksGiving Day, 4th Thursday in November
Black Friday day after ThanksGiving
Christmas Day, December 25th. If Christmas falls on Sunday take Monday off.
Christmas Eve, December 24th. If Christmas Eve falls on Sunday take Saturday off.
Martin Luther King Jr. Day, 3rd Monday in January.
70
President's Day, 3rd Monday in February
Columbus Day, 2nd Monday in October
Veterans Day November 11th. If Veterans Day falls on Sunday take Monday off .
Update Interval: Enter the Start and End Dates for the automatic updating of the calendar.
Auto: This option brings up the following dialog box. The dialog box allows you to enter the Consecutive Days to work
followed by the Consecutive Days off, the Number of Crews, the Hours per Shift, and the dates the crews would be active.
It then modifies the calendar from earliest start date to latest end date and puts in the calculated number of shifts based on
the crews and marks the days on and off based on the pattern (i.e.) 4 days on and 3 days off would keep repeating this
pattern from start date to end date.
This option is used to set the calendar to a sequence of days to work followed by a sequence of days to take off and adjust
the shifts based on whether one or more crew is available as well as take into account the hours per shift. A simplified
explanation of what the program calculates is Number of Shifts = [( Hours per Shift)/8.0] * crews available. So if there is
only one crew working and the date is within that crews range then the days to work would be marked and shifts for that
day would be 1 if the Hours per Shift was set to 8. The program does not care what a day of week it is, i.e. it does not take
Sundays off, it just repeats the pattern of marking the consecutive work days and then the number of days off.
Work Days: Click this button to display the working days for each month of every year in your calendar. An example list
follows. The total number of working days for each year also appears in the table.
71
Done: Click this button to exit this option.
Print: This button allows you to print the current contents of this file. The following dialog box will appear. You can attach
an identifying header to file; up to four lines and 80 characters per line are allowed. You must also select the print mode. By
default the output goes to the LPT1 printer port. To print to a file, select the Print to file option and enter the desired file
name.
72
Since most printers are USB the best option is to use a network printer and re-direct LPT1 to the network printer.
One way to do this is:
1. Go to Windows Accessories and select Command Prompt.
2. At the command prompt type in: net use lpt1 \\server\printername
3. Ask your Network Administrator for the server and printer name.
CAUTION: If you try to print to LPT1 and there is no printer attached to the port or LPT1 is not re-directed to a valid
network printer then the computer may freeze. In this case it is best to print to a file and open it in Notepad, Microsoft Word
or any other word processor or text editor to print it from there. This also has the advantage of letting you change the fonts
and other text formatting.
Set-up: This button brings up another dialog box, as shown below, for selecting the printer type and port. Since most
printers are Hp Compatibles this is the only option right now. We may print directly to all Windows printers in the future
but at this point it is about the same as printing to a file and opening it in Notepad or any other word processor. You should
normally hit Set as default and quit to exit out of this dialog box.
Save: Click this button to save the calendar file. A command line message will say that the file has been created.
5.2 Edit Mining Area File
This option brings up the following dialog box which allows you to change mining parameters such as shifts, mining rate,
base line orientation, entry width, percent extraction and seam and grid numbers, create retreat mining areas and subdivide
both on advance and retreat areas. An area can also be undefined within this option.
General: All the defined mining areas appear in the list box. To edit an area you must highlight the line corresponding to the
area of interest. An area that is being mined on advance can be highlighted by using the Pick button or by positioning the
cursor on the corresponding line in the list box. Retreat mining areas can only be selected from the list box. After you
highlight the line, the changeable parameters will appear in the edit boxes below the list and only the buttons for the
available editing options will be in bold. Edit options are described below.
73
Very important: Any changes made in the list box are permanently saved in the area definition file only after you click the
OK button. Before the OK button is activated, the list can be restored to its original condition by clicking the Cancel button,
but all your changes will be lost.
Pick: This option applies only to areas that are mined on advance. After you click on Pick, the dialog box disappears.
Position the cursor anywhere within the area or subarea to be edited and click the left mouse button. The selected mining
area will be highlighted in the list box.
5.2.1 Change:
To change parameter values, click on the corresponding edit box, type in the correct values and then click the Change
button to insert the new values in the list.
5.2.2 Undefine:
Note: Undefine handles advance and retreat areas slightly differently. To undefine an area, highlight the line corresponding
to the area and click the Undefine button. The selected area and all associated sub-areas will disappear from the list but the
area remains on the mining area file. If you undefined the wrong advance area, you can restore it by clicking the Cancel
button but all your changes will be lost. If you permanently undefine an area, you must return to Option 4.3 Define New
Areas in the Layout pulldown menu to redefine the area.
If you undefine an advance area that has a corresponding retreat area, the retreat area will also be undefined, that is,
removed from the list. If you undefine a retreat area, the corresponding advance area remains in the list. A retreat area can
be restored by using the Retreat option.
74
5.2.3 Integrate:
The button for this option is normally grayed out and appears in bold only if a subdivided area has been highlighted in the
list. The base line orientation for the whole area will correspond to the baseline orientation for the subdivision you
highlighted. After you highlight any subdivision for the corresponding area, click the Integrate button. All the area's
subdivisions will disappear and a new line for the whole area will be inserted in the list.
5.2.4 Divide:
Only a whole area can be subdivided. Highlight the area to subdivide and click the Divide button. If you have selected an
area that is already subdivided, the Divide button will be grayed out. After you click Divide, the dialog box disappears and
the selected area will have two sides highlighted with the numbers 1 and 2 at the ends where the subdividing must begin.
Either side 1 or 2 can be the basis of the subdivisions. Respond to the command line prompt with a 1 or 2. The side can be
divided by typing distances in the command line or by picking points with the cursor. Press [Enter] to return to the dialog
box.
5.2.5 Retreat:
This option allows you to create a retreat area and to indicate whether to mine by subareas or the whole area. The direction
of retreat mining will always be opposite the baseline orientation of the corresponding advance area. If you want to specify
retreat subareas which differ from the advance retreat subareas, you must first create a whole retreat area, subdivide it and
then specify mining by subareas.
To define a retreat area, highlight the line for the corresponding advance mining area. If the advance area is subdivided,
highlight a subdivision which has the desired baseline line orientation and click the Retreat button. The following retreat
dialog box will appear inside the preceding dialog box.
At this point you have the option to mine the retreat as a whole area or by the same subareas as the advance. If the area is
subdivided for the advance mining, and you want the retreat mining to use the same subdivisions on retreat, click the
Subareas button. Otherwise, click the Single button. Choosing the Single button will create a retreat area and indicate
mining as a whole. You can use the Divide option to subdivide the whole retreat area and then specify mining by a different
set of subareas than the advance.
You must always specify a retreat percent extraction in the edit box. The percentage is of the total area, not the percent of
remaining pillars. Click the OK button for the above dialog box to add the retreat area(s) to the list.
A retreat area can be subdivided after it is created as a whole area. Highlight the line corresponding to the retreat area and
click the Divide button.
75
5.2.6 F-Edit:
This button is used for Full-Screen editing of the file. Before running this option always save your changes by clicking the
"OK" button. The full screen editor is a quick way to update a file but you must maintain the same record format. Tabs are
not allowed.
5.2.7 Print:
This button is used to print the current contents of this file. For details see the Print command under Option 5.1 Edit Mine
Calendar.
5.2.8 Draw Subdivisions:
This check box allows you to draw the subdivisions on the screen rather than just showing them. By drawing the
subdivisions the current outline of the mine will remain visible while the Draw Subdivisions box is checked. While using
this option you should leave the box checked for the entire editing process because by un checking it and turning it off you
may see results that are inaccurate.
5.3 Edit Machine Sequence File & Edit Mach. Seq. File W/Draw
When you select either option, the “Edit inter-relationship file" dialog box shown below appears.
This file contains the miner unit information and all the areas assigned to each miner unit. The dialog box has two sections,
The options on the left allow you to add, change or modify mining machine information and the methods. The options on
the right allow you to add mining areas to a machine’s sequence of areas to mine and to add other information such as
precedences and time delays between mining areas. The difference is in the process for creating the sequence of mining
areas. The With Draw option displays the mine map with all previously assigned mining areas highlighted in the color you
specified for the machine and as you continually assign areas to the sequence using the Super option it puts an X through
76
the areas that are already assigned as well as the ones you pick. The other option is less graphical and interactive and does
not draw anything on the mine map. The With Draw option is preferred for most situations, but, if you only want to look at
the machine information or the mining area sequences, the other option is quicker because you do not have to wait for a
redraw of the mine map.
5.3.1 Miner Unit Specifications:
You must define each mining machine before entering its specifications or building its mining area sequence. Click the
Add button to enter information for a new machine.
Unit: The unit number and of type of machine is specified with the Add option and can be changed only with the F-EDIT
option. The other machine specifications, machine name, calendar file or mining method are entered with the Add option
and modified with the Change option.
Add: This button brings up the new Miner Unit Configuration sub-dialog box shown below.
Miner Unit: Enter the miner unit ID (4 digit max).
Type: Click the machine type pull-down arrow to display the following list of available machine types. Select the
machine type from the pull-down list.
Text: You can enter a name for the machine in the box
77
Calendar: Choose the desired calendar from the pull down list. All machine can use to the same calendar if
desired.
Color: The areas in the machine's mining areas sequence will appear in the color you select from the from the
pull-down list.
Mining Method: Click the desired method for measuring production. (Raw tons/shift, Clean tons/shift or
advance/cut and Cuts/shift).
Change: When you click this button, the above dialog box will appear with the machine number and type grayed out. You
may change the machine name, calendar, color assignment and mining method. Click the OK button to save your changes.
Delete: This button deletes the current miner unit from the list.
F-Edit: This button is used for Full-Screen editing of the file. Before running this option always save your changes by
clicking the "OK" button. The full screen editor is a quick way to update many records in a file but you must be careful to
maintain the same record format. Tabs are not allowed.
Print: This button is used to print the current contents of this file. For details see the Print command under Option 5.1 Edit
Mine Calendar.
The contents of the all the other edit boxes can be changed by clicking on the corresponding box. The following
information is required for each miner unit.
Tons/shift: Units are short tons in the imperial system and metric tonnes in the meter system.
or
.
Advance/cut-Cuts/shift: Units are in feet for the imperial system and metres for the metric system
If the machine is a continuous miner, longwall or super-section the following machine limits can be edited:
Maximum Mining Height: The machine's maximum mining height in feet.
Minimum Mining Height: The machine's minimum mining height in feet.
and the Borer dia. will be grayed out.
For miner borers you can edit the following:
Borer dia.: The fixed diameter of the cutter heads. The max. and min. mining height will be grayed out.
Machine start time: The day, month and year the machine will be ready to start work. The date must be within the range
of the mining calendar.
First: This button shows the first miner unit in the list.
Last: This button shows the last miner unit in the list.
Previous: This button shows the previous miner unit in the list.
Next: This button shows the next miner unit in the list.
78
5.3.2 Areas assigned to the miner unit
The pick buttons and edit boxes under this option have the following meanings:
Num: A number assigned to the area according to its numerical sequence in the list.
Area: Area is the identifier of the area to be mined. For example D101 would refer to Development 101, B20-3 refers to
Bleeder 20 (Sub Area 3). L23 refers to Longwall 23.
P-Area: P_Area_1, P_Area_2 and P_Area_3 represent precedence areas 1, 2 and 3 respectively. They are the identifiers
of the areas which must be mined before the specified area can be mined. Up to three precedence areas can be indicated.
You do not need to put in precedence areas for areas that are above the one in the list, they will be mined in the sequence
they are entered.
OD: Offset days, such as, time allowed for moving equipment from the previous area to the next area.
DMR: This refers to a different production rate. The rate can be different for each area assigned to a miner unit.
Note: If production is being measured in Advance/Cut, Cuts/Shift, both values must be entered.
There are two methods for building the list of areas to be mined by the machine. One uses the first button on the left labeled
PICK and the other uses the button labeled SUPER. Both options are described below but the SUPER option is highly
recommended.
The Pick option is used in conjunction with the ADD button as follows:
Add: Highlight the row where you want the area to be inserted. If you want to insert an area at the end of the list, highlight
the first blank line at the bottom of the list. You can type the area type abbreviation, including the R if the area is being
mined on retreat, and identifier number in the edit box but following graphical procedure is recommended for inserting
areas.
PICK: Each of the buttons labeled PICK allow you to select an area from the mine plan map. To add a new area to the
machine's sequence of areas to mine, highlight the list where you want the area to be inserted and click the first PICK
button on the left; the display will change to the mine map and the following command line prompt appears:
Pick a point inside AREA to ADD
Pick any point inside the desired area: the area identification will appear in the first edit box on the left. If you
pick an area that has already been assigned to a machine, the following command line message appears:
Area XX already assigned to a machine
where XX is the area identifier. If you actually want to assign this area to the machine, you must first delete it
from the other machine’s area assignments or use the Move to Buffer and Paste From Buffer options.
If the area will be mined on both advance and retreat, the following command line message appears
Use the Advance/Retreat/Cancel (A/R/C) <A>:
Type A or R as needed. If you choose R, the retreat designation will appear in the edit box. For example, if you
Selected development area 4, DR4 will appear in the edit box. In either case you must click the ADD button to
add the area to the list.
Each mined area can have up to three precedence areas. To set precedences, repeat the picking process before
clicking the ADD button. Click on the PICK button below the P-Areas 1,2 or 3 and click inside the desired
area. Repeat the process for each precedence area. After the edit boxes have the required information, click the
ADD button and the information will appear in the row indicated by the highlighted bar.
79
Super: This option allows you to build the machine's mining areas sequence without leaving the mine map display. In the
W/Draw option, when you pick an area, it is highlighted in the color you selected for the machine and remains highlighted
while you pick additional areas. Also the areas are marked with an X as you add them to the list so that you can tell which
areas you have already assigned. The procedure is as follows:
Highlight the row where you want the next area to be inserted. If you want to insert an area at the end of the list, highlight
the first blank line at the bottom of the list. Click the SUPER button. In the W/Draw option, the mine map will appear with
all the mining areas colored and the areas that have been assigned to a machine will be marked with an X. All previously
assigned areas are highlighted in the color corresponding to the machine. Click anywhere inside the mining areas in the
desired mining sequence. A message will state that the corresponding area has been added to the mining area sequence.
The corresponding area identifier, whole, subdivided or retreat, will appear in the mining sequence without clicking the
Add button. To exit the picking process, click the right mouse button.
The main advantage of using the Super option is that you can add several areas to the machine without leaving the drawing
and it saves many mouse clicks of clicking Pick and Add.
Note: The Super option does not apply to picking precedence areas. Use the Change option to add precedences.
Change: Highlight the row you want to change. The contents of that row will appear in the edit boxes. Make changes by
typing or using the Pick feature and then click the Change button. The new data will appear in the list.
Delete: Highlight the row to be deleted and click the Delete button.
Move to Buffer & Paste from Buffer: Used together, these two options provide a convenient method to re-assign
previously assigned areas to another machine or to re-organize the sequence of areas for a machine. Highlight areas in
the assigned mining areas list in the sequence the way you want them to appear for the same or another machine. Click the
Move to Buffer button after highlighting each area. This process creates a file with the areas in the desired order and
includes all the information from each line. After the areas are selected, highlight the line where you want the contents of
the buffer file to be inserted and click the Paste from Buffer button. To assign the selected areas to another machine, change
to the other machine, highlight the insertion line and then click the Paste from Buffer button.
OK: Always click the OK button to save your changes.
Note: A mining unit will not be retained in the file unless at least one mining area has been assigned to the unit.
5.4 Edit Exceptions File
Selecting Edit Exceptions file brings up two sub-options, Edit Shifts Exceptions and Edit Mining Rate Exceptions.
Exceptions can be added for any mining unit that appears in the machine sequence file. Shift exceptions take precedence
over shifts that are specified in the area definition file and the calendar. Production rate exceptions take precedence over the
production rates under DMR in the mining area sequence file and the production rates specified for the machine.
5.4.1 Shifts Exceptions
The shifts exceptions allow you to over ride the shifts per day specification in the area definition file and the calendar . You
can specify the number of shifts for any month within the span of the mining unit’s calendar and any mining unit in the
machine sequence file. These shifts are prorated over the working days for the month in the calendar
When you select this option, the following dialog box appears. In the example, -1 means the machine will work at the
shifts per day specified for the mining area or the shifts specified in the calendar during that particular month. Zero
shifts/month is an allowable exception and is used to shut down a machine for the month.
80
The dialog box has options to create a completely new shifts exception file or to add, delete or change records in an existing
file as described below.
Add: This button is used to add new records to the table. New records are always added at the end of the current list. There
are several ways to add a new record. If the new record will be similar to an existing record use the change process given
below and then click the Add button. The other alternative is to start with a blank row of edit boxes and enter all the new
data. Use the arrow key to display the list of mining units and click on your choice. Even though it always adds information
at the end of the list the data will be sorted by unit and date after you click OK and will show up next time you run Shift
Exceptions.
Delete: This button is used to delete an entire row. To use this option, first highlight the row you want to delete and then
click the Delete button.
Change: This button is used to change an existing row. To use this button, first highlight the row you want to change as
shown in the dialog box. The contents of that row will show up in the edit boxes. Make any changes and then click the
Change button. That row should now reflect the changes you made.
Auto: This button is used to add or subtract shift exceptions to existing shift exceptions for the desired machine over a
certain time span. When this button is clicked the following dialog box appears.
81
F-Edit: This button is used for Full-Screen editing of the file. Before running this option always save your changes by
clicking the "OK" button. The full screen editor is a quick way to update a file but you must maintain the same record
format. Tabs are not allowed.
Print: This button is used to print the current contents of this file. For details see the Print command under Option 4.1 Edit
Mine Calendar.
5.4.2 Rate Exceptions
An example of the "Mining rate exception Table" dialog box appears below. Mining rate exceptions allow you to change
the production rate for any month of any year for each unit in the Machine Sequence file. The rate exception takes
precedence over the DMR for an area and the production rate specified for the mining unit. The new rate applies only to the
month specified in the exceptions file.
One of the mining rates for a machine must be non-zero. If you want to stop the miner unit for a whole month, use a zero
shifts/month exception instead. In the example, miner unit 0001 CM will mine at 500 raw tons per shift during February
and March 2009, then change to 750 tons per shift in April and 1000 tons per shift in May 2009.
Add: This button is used to add new records to the table. Records are always added at the end of the current list. There are
two ways to add a new record. If the new record will be similar to an existing record, use the change process given below
and then click the Add button. The other alternative is to start with a blank row of edit boxes and enter all the new data. Use
the arrow key to display the list of mining units and click on your choice.
Change: This button is used to change an existing row. To use this button, first highlight the row you want to change. The
contents of that row will show up in the edit boxes at the bottom of the list box. Make any changes and then click the
Change button. That row should now reflect the changes you made.
Delete: This button is used to delete an existing row. To use this button, first highlight the row you want to delete and then
click Delete.
82
F-Edit: This button is used for Full-Screen editing of the file. Before running this option always save your changes by
clicking the "OK" button. The full screen editor is a quick way to update a file but you must maintain the same record
format. Tabs are not allowed.
Print: This button is used to print the current contents of this file. For details see the Print command under Option 4.1 Edit
Mine Calendar.
Auto: This button is used to set the mining rate exceptions for the specified unit over a time span to reduce typing and
editing several mining rate exceptions.
5.5 Area Finish Unit ShutDown
This option allows you to create a list of when to shut-down any Machine when a particular area finishes. Normally this
would be used for Longwall Moves and CM Shut-downs. After selecting this option the following dialog box appears:
Area: Edit box allows you to type in or use the Pick Area Button this is the area that when it finishes the Unit specified will
be shutdown for the amount of days specified.
Unit: This is the Unit/Machine that you want to shut down.
Wait Days Before: This is the number of days to wait before applying the shutdown days. Could be negative but use
negative numbers at your own risk.
Shut Down Days: This is the number of days to shut down the Machines calendar. Note: Calendars will not be
permanently modified.
Day Type: This is the type of days you want to wait and shut down. If you select Workdays it will skip over days in the
calendar that are marked as OFF (or non-workdays). If you select ALLDays then it will just shutdown for the wait days and
shut down days whether it was a workday or not.
Add: After making your selections from the edit and list boxes below you click this button to add it to the list of Areas and
Units to shutdown. Note: You cannot have duplicate Area and Unit combos.
Delete: This deletes the selected Area and Unit combo from the list
83
Change: This changes the selected Area and Unit combo list to the parameters entered below. Note: You cannot have
duplicate Area and Unit combos.
Pick Area: This button allows you to pick inside an area and will put the area found in the area edit box. You should then
make sure all other parameters are correct and click Add.
Print: This button allows you to print the list to a re-directed printer on LPT1 or to print it to a file.
This option creates and edits the .LWX file.
***** NOTE: **** For this option to have any effect you must check the Use Area Finish Unit Shut Down Table
checkbox in Calculate Timing.
5.6 Edit Offset Days by Area Type
This option brings up a table that can be filled in to use a certain number of offset days based on the type of precedence area
or type of the area that was just finished. When the timing runs it reads from the file created by this option to determine
the offset days. Normally, you would not have offset days in the Machine Sequence File when using this option.
In the above example if a Bleeder is to be mined and has a Development as a precedence it would wait 12 offset days. If a
Longwall is to be mined and has a Bleeder as a precedence it would wait 15 days. If a Bleeder just finished mining and the
next area to be mined is a Longwall then it would wait 22 days. If a Development just finished mining and the next area is
a Bleeder it would wait 10 days.
84
5.7 View Defined Mining Areas
This option is useful for checking if your mine plan is correct. All the new and previously defined mining areas appear on
the screen. Each area in the area definition file appears in the color you selected in option 3.1. The small triangles in each
area or sub-area indicate the direction of mining. An example of the defined area appears in the following figure. This
option uses the command line to prompt you whether to show or draw the area definition file. If you pick SHOW, the
graphics are displayed on the existing screen, but entities are not added to the drawing. A REDRAW will clear the screen.
If you pick DRAW, then the area definition file is actually drawn on the "MVIEWALL" layer. And you must delete that
layer to clear the screen.
5.8 View Quality/Reserves
This option takes you to the quality estimation module of ICAMPS. There are several uses. One option is to draw quality
grids on the screen to get a feel for the overall quality of the deposit. Another is to estimate the quality of the material in a
mining area or to make reserve calculations for a property. When you select this option, the following dialog box will
appear. The lower portion of the dialog box is grayed out unless you select the View Grid option under Quality Information
Type.
85
5.8.1 Quality Grid
You can view information for any grid which has been defined in the Setup options. Select the grid using the Quality GRID
pull down list. Only grids which you assigned in the Grid File Options can be selected. After you select a grid, you have the
following options for interrogating the grid.
INFO: When you choose this option, the default values for raw coal, clean coal and rock density, percent recovery, roof
thickness and minimum roof thickness before it falls are displayed as shown below. These values are used in the
production calculations when the corresponding grid values are absent. The boundaries of the grid, the grid increments,
number of grid blocks and the list of Z-values in the grid are also given.
86
5.8.2 Quality Information Type
If you select the Point, Area or Entity buttons, the lower portion of the dialog box is grayed out. Each option provides
average quality data for the corresponding feature.
Point: When you click this button, you must also click the Select button. The command line asks you to select a point
within the extent of the grid. After you select a point, a table of parameters appears as shown in the following example. The
values are from the grid node nearest to the point you selected. Use the scroll bar to display the other information as
shown below.
Area: When you select this option you must also click the Select button. The command line prompt will ask you to pick the
corners of a four sided area within the grid extent. After you pick the area, a table of parameters appears as shown in the
following example. The values are averages of the grid node values weighted by the area of each node's zone of influence
within the area you specified. Use the scroll bar to display additional information as shown in the following figures.
Entity: This option is useful for obtaining reserve information for selected entities such as leases which are defined by
irregular shaped polylines. The results process is similar to the Area option. When you select this option, you must also
click the Select button. You are prompted to pick an existing closed polyline. After you pick the polyline, a table of
parameters appears as shown in the example below. The values are averages of the grid node values weighted by the area of
each node's zone of influence within the selected entity. If a part of the polyline lies outside the grid, this option reports
the percentage of the entity area that lies within the grid.
87
The tonnage and quality estimates are based on the portion of the entity that lies within the grid.
Because the Multi-seam option allows you to draw mine layouts for each seam offset from the origin seam, there can be
some question about where the object you select is actually located. The following rules apply:
1. If the object lies within the boundary of a seam layout, the coordinates are taken as having the same offset as the seam
mine layout.
2. If the object lies between seam boundaries or overlaps a seam boundary, the program defaults to the current seam and
displays that information as shown in the following example. You can take the default, or select the correct seam by
scrolling through the list of seams.
88
View grid: This option lets you view or draw a color coded quality grid on the screen. Only one parameter can be
displayed in one grid view. Scroll through the Z Parameters to select the parameter of interest. A message will appear if you
request a parameter for which there is no data in the .GRD file.
When you select this option, the lower portion of the dialog box becomes highlighted. Those options allow you to specify
the viewing features. You must also indicate your viewing preferences. The defaults are a good choice for most
applications. Although you may want to select Quick Scale instead of entering the scales manually.
5.8.3 View Grid
Use this option to specify the grid viewing features.
View Preference: If you select Show the grid display will not remain on the screen after a Redraw. To enable the Post Z
Value w/Color option below, you must select Draw.
Grid Display: The grid can be displayed with a dot at each grid node or as lines which represent the zone of influence of
each grid node.
Color Assignment: The grid parameters will be displayed in colors which correspond to specific ranges of the quality
selected parameter after the grid has been drawn or showed. Click the Show button if you want to see the color
assignments. Otherwise, click the Skip button.
Post Z Value w/Color: This option allows you to display a color coded grid with all, one or all of the grid parameter values
for a grid node shown inside each grid block. If you select None, the grid blocks will be empty but the color will correspond
to the color scale assignment you choose.
If you select One and you chose the Lines option for the grid display, the values of the Z-parameter you selected above will
be centered inside the grid block as shown in the following example.
89
If you select All and you chose the Lines option for the grid display, all the available Z-parameter values will be centered
inside the grid blocks as shown in the following example.
Value w/Color Display option is useful if you want to see the previous grid node parameter values while you are using
the Graphical Point Change option under the Setup pull-down menu.
Color Scale Information: This option allows you to control the color scheme of the grid display.
Scale to Use: This option gives you two methods for assigning colors to ranges of parameter values; user Defined scale or
Quick Scale, an automatically assigned scale based on the number of colors you select.
Defined Scale: This option uses a scale in which you have specified a color for a range of the displayed grid parameter
values. You must use the Edit Defined Quality Scales option below to specify your scales. Any parameter value that falls
outside the ranges you specify will not be shown in the grid display.
Quick Scale: This allows you to specify the starting color and number of colors in the grid parameter display, but you
cannot control the range of the parameter values that correspond to a color.
Edit Defined Quality Scales: This option allows you to control both the colors and the range of grid parameter values that
correspond to a color in the grid display. The following dialog appears when you select this option.
90
You must specify the colors and grid value ranges for each parameter you want to display. To create a new scale, or edit an
existing scale, select the parameter from the Quality Parameter pull down list box. To create a new scale, highlight the top
line in the scale list box table; to edit an existing scale, highlight the line to be changed. Enter the Start and End of the
parameter range in the edit boxes below the list box and select a color from the color pull down list. Click the Add button to
add a new line to the table or the Change button to replace the modified line. To delete a line from the table, highlight the
line and click Delete button.
Note: Be sure that the table covers the entire range of the parameter values because the grid display will include only the
ranges in the table.
Save: Click the Save button to save the scales.
Grid Layer Control: If you want the grid (and the posted Z-values) to disappear when you leave this option, toggle the
Delete Grid Layer on button before proceeding.
Select: After you indicate your preferences, click the Select button. You will be prompted for the lower left and upper right
corners of the grid display. This is the area within which the grid will be drawn.
Done: You must click this button to terminate each quality information type option.
91
Output Commands
The output is organized in six sections; all but Annotate use results from the timing calculations. Timing is done by day or
month and reported by day, week or month. The Output menu defaults to the Monthly timing options as shown below. To
schedule by day, select the Switch to Daily Menu option in the Switch Menu section.
92
------------------------------------------------------------Monthly---TIMING----------------------------------------------------------6.1 Calculate Timing
This option simultaneously calculates the dates for the production timing map and the quality parameters for the
corresponding section of each mining area. The output goes into files for generating the timing maps and reports. Your
input consists of specifying the conditions to use during simulated mining and the duration of the schedule. No design data
is requested. The following dialog box appears when you select this option.
Toggle the square at the end of each option to turn it on (X) or off (blank). If you ask the program to check for precedences,
an area will not be scheduled until all its precedence areas have been completed.
Longwalls Only: Frequently the main mine planning concern is to develop a schedule in which the Longwall production
for each year meets a user specified target. By turning this option On to schedule only the longwall units without any delays
for development work.. The scheduler ignores all precedence relationships for longwall development and does not
schedule the continuous miners. The resulting longwall schedule becomes the basis for adjusting the schedule for the
development work (CM’s). If you want the system to develop a schedule that meets the longwall production target by
automatically adjusting the longwall working shifts in the calendar or modifying the mining rate, use Option 6.2, Schedule
to Target, which is described below.
Check Precedences: Check this option if you want the precedences in the Machine Sequences file to be met.
Check Shifts Exceptions & Check Rate Exceptions: The schedule will take into account shift and mining rate
exceptions if you turn these options ON.
Use Difficulty Code & Use Height Sensitive Mining: These two options only modify the production rate. The program
computes the average mining height and difficulty code value for the area mined in each period and calculates the
corresponding mining rates using the parameters you specify in Configure MineSimU option. (See Difficulty Code Table
and Height Sensitive Mining Table). The effective mining rate is the product of these two rate and the mining rate in the
area file.
93
Calculate Raw Quality: This option allows you to make an estimate of the raw quality if you only have data for cleaned
coal in your grids. The system uses the recovery factor to calculate the amount of rock that would be in the raw product and
uses this information to estimate the percent ash and BTU content in the raw product.
Use Offset Minus Wait Days: Turn this option ON if you want to reduce the offset days by the number of days the mining
of an area was delayed while waiting for a precedence to be met.
Use Offset Days by Area Type: Turn this option ON if you want to use the Offset Days by Area Type table specified
under the Simulate menu.
Use Variable Length Shifts: Turn this option ON if you want the calculation to consider the hours specified in the
calendar. It will use Rate=Rate*(Hours/DefaultHours).
Do Not Truncate End of Mining Date: If this option is checked the calculation will not truncate the working days and
adjust the offset days. It subtracts 1 if the workday fraction is greater than 1/2 a day.
Use Area Finish Unit ShutDown Table: If this option is checked the program will use the Area Finish Unit Shutdown
table created under the Simulate Menu. It will internally shut down the CM and or LW Calendars when the area finishes
without saving the calendars. The program runs the Timing twice once to get all the shutdown dates and again to apply
them. For this reason each Machine must have a separate calendar.
Generate debug information: The Debug option is normally turned OFF. However if the Calculate Timing operation
does not perform as expected, debug may help you or Ohio Automation technical support personnel diagnosis a problem.
With Debug turned on, the details of the timing calculations are saved to an ASCII file called DEBUG.TMP. You can view
the contents of this file with any editor.
Quality Calculation: The system will use the method for making quality calculations you selected in the Option 3.1.3
Configure Calendars and Grids.
Timing Period: You have two choices for the duration of the simulated mining. The simulated mining can be done over
the entire mine calendar or up to the month and year you specify.
After you click OK a mining progress display appears as shown in the following example. For each machine, the status,
area being mined and the date is shown. The status possibilities include available, done, mining or waiting for the start day
for the machine, for offset days to elapse or waiting for a precedence to be met. Available means that the machine has
completed its previous task, but has not begun mining the next area. If the machine is waiting for a precedence area to
complete, the number of the precedence area is also displayed
94
6.2 Schedule to Target Tonnage:
This option automatically adjusts each machines calendar and/or mining rate to insure that longwall tonnage for each year
in the planning period is within the tolerance you specify. After the longwall production targets are met, the calendars for
development machines are modified to allow time for shut downs to release crews per your specifications for longwall
moves. The development machine calendar and/or mining rates are also adjusted to insure that development work will
avoid any longwall start up delays. The timing reports include total production from both the longwall and development
machines. If the total is not within your requirements, you will need to adjust the longwall target tonnages and rerun the
procedure. When you choose this option, the following dialog box appears.
Timing Options: See 6.1 Calculate Timing for explanations of the details of these options
Plan Options: You can specify that the automatic scheduler will modify only the machine calendars or mining rates or
both in order to meet the target tonnage, avoid longwall startup delays and allow time for shutdowns to assist with longwall
moves.
Modify Shifts: In this option the shifts are adjusted by adding shifts to regular non-working days such as Saturdays or
Sundays until a schedule to the target tonnage with no longwall delays is obtained or no additional shifts can be added. The
Shifts Exceptions file is ignored.
Modify Rates: This option modifies the mining rate multiplier for each month as needed until a schedule that meets the
target tonnage without longwall delays is obtained or the maximum mining rates have been reached. Your Mining Rate
Exceptions file is ignored.
Modify Both: When you chose Modify Both option the program first adjusts the calendars and then modifies the mining
rates as needed until a schedule that meets the target tonnage without longwall delays is obtained or no solution can be
found. Both the Shifts Exceptions and Rate Exceptions will be ignored.
95
Since each machine may require adjustments to its calendar, you must first create a separate calendar for each machine and
assign a different calendar to each machine. If your existing plan has the same calendar assigned to more than one machine,
copy that calendar to as many files as needed so that each calendar number can be assigned to a different calendar file in the
Calendar and Girds assignment function under the Setup pull down menu.
Target Tonnage: You must specify a longwall target tonnage for each year of the planning period. The assignments
appear in the list box as shown in the above example. To change a target value, highlight the year in the list.
Start Year: You must specify the first year for the plan, e.g. if you want to develop a plan beginning in March of 2009, The
start year would be 2009 regardless of how your fiscal years are numbered.
Number of Years: Specify the number of years in the plan you are scheduling.
Fiscal Month: The planning will begin in the month and year you specified and each year will include a full twelve
months.
After you click OK the following dialog box appears. For each longwall machine you must specify which development
machines will be shut down, and number of working days (# of days) before (Negative) or after (positive) the end of the
current longwall panel and the number of working days to shutdown (Period). You can shut down as many machine as
you want, but you must specify the information for each machine.
The scheduler firsts adjusts the longwall schedule to meet the specified longwall tonnage for each year and then modifies
the development machine calendars according to the shutdown information you specified. It then checks the longwall
precedences to insure that development work will not delay the longwalls. If necessary, the system will schedule more
development shifts or increase the mining rates for the development machines as you specified in the previous dialog box.
While the system is calculating the schedule, the following dialog box appears. Mining progress is reported for each year in
your planning period, first for the longwall units and then for the development work to match the longwall schedule.
In the display the longwall tonnage is combined with the development tonnage for each year, but the tonnage is not updated
if a required schedule changes for a later year cause a tonnage change in an earlier year. The yearly tonnages are updated
after the timing is completed for the full planning horizon.
As the scheduler works, the machine type in process is reported in the lower left corner of the dialog box and the buttons
are greyed out. If the scheduler cannot find a solution within the original specifications, the system may ask for more
information.
96
The system tries to reschedule the development work as needed to avoid longwall start-up delays. Sometimes the
development work cannot be rescheduled to avoid longwall delays. In such cases, if the Start Dates you specified for the
longwalls areas are later than the current time, the following dialog box will appear.
If your answer is Yes, the system will try to find a solution by adjusting the development schedule for the time period
before the longwall’s Start Date, but not before the current date.
The scheduler tries to eliminate all delays that affect the longwall delays. For example, a development machine is delaying
the start of a longwall, but that machine is also waiting because of a precedence relationship with another development
machine. If the scheduler cannot eliminate such a delay, the following dialog box will appear. You will have the option to
accept the delay and let the system continue scheduling or to stop the scheduling process. Such unresolvable delays will
often happen at the beginning of a planning period, where a machine cannot begin working until another machine
completes its first assigned area.
97
Sometimes a schedule that meets your production target may be very difficult if not impossible to solve. Normally the
solution is found within about ten iterations. To avoid having very difficult problems run indefinitely, the following dialog
box appears when a solution has not been found within 30 iterations.
Respond Yes to try another 30 iterations. If a solution is not found in the next 30 iterations, the dialog box reappears.
Trying more iterations does not guarantee that a solution will be found. It is possible to specify targets that cannot be met
with your machine specifications. To correct such situations, click the NO button and modify your input, such as change
the machine sequences, the target tonnage or the shutdown specifications and rerun the scheduler.
If the solution requires increasing the mining rate for a longwall machine, the mining rate adjustment for that longwall
machine will be the same for an entire year. If a development machine requires a mining rate adjustment, individual
months will be adjusted as needed to meet all your specifications and stored in the equivalent of the rate exception file.
When a schedule that meets the tonnage and delay requirements, the buttons are highlighted and you have the following
options.
Done: Caution! When you select this option the calendar and rate modifications are deleted if you have not selected Save
Calendars. Be sure you have saved any information you want before clicking Done .
Save Calendar: This option saves the calendars as modified by the scheduler. The files replace the previous contents of
the calendar files which you have assigned to machines. You can look at these calendars using the Edit Calendars option
under the Simulate pulldown menu.
Show Rates: This option displays the mining rate assigned to each machine for every month of the scheduling period as
shown in the following example.
If you want to save the list of mining rates, use the Print option to create a hard copy of the mining rates. This information
is not stored in a permanent file.
98
6.3 Schedule to Monthly Target Tonnage
When you select this option the following dialog box appears. It is essentially the same as Schedule to Target Tonnage the
difference is that it tries to calculate the tonnage monthly rather than yearly.
If your tonnages are the same from year to year you can just enter the information for the first year and the select the Copy
P. Y. Ton. button to copy the tonnages from the previous year to the current one. Once you select OK the following dialog
box appears which shows the mining rates and tonnages calculated for each month.
99
6.4 Longwall Move CM Shut Down
When you select this option the standard Calculate Timing Information dialog box appears. After you select OK it first
runs through the timing with the CM's off or longwalls only as shown in the following dialog box.
After you select Done here then the following dialog box appears and you continue to set the days and run the calculation
again eventually with the option of saving the calendar information.
100
This option allows you to shut down the CM's for a certain amount of time after the LW finishes a mining area.
Under the LW heading is the LW unit that finished an area. Under the CM heading is the CM unit that you want to shut
down. Under the date heading is the date that the LW finished an area.
Under the DaysAfter LW Finished is the days to wait (+) after the LW finished or input a (-) value to indicate that you want
to shut down the CM's x number of days before the LW is finished.
Note: Essentially the DaysAfter LW Finished indicates when you want to start the shut down.
Under the Days To ShutDown heading is the number of days that you want to shut the CM down.
The toggle option is used to indicate whether or not you want to shut down that particular CM. A value of 1 means to shut
the CM down and a value of -1 means to ignore it or do not shut it down.
To set all the values to certain numbers you can use the Default wait Days and Default shut down days and click the Set
Defaults button. This can save considerable time entering data.
6.5 Quick View Timing
This option allows you to specify the time span and timing block intervals but no options to control size, orientation or
solid filling of the timing blocks. The following dialog box will appear.
101
The following options are available:
View by: You can choose to display the mining progress by month, quarter or year. The "All" option lets you display the
first years by month and/or quarter and the remaining time by years.
Pause Every: The program will display the entire timing map for the time period you specify or you can have the display
pause at the end each month, quarter or year. After a pause, press Enter to continue.
Time Period: Specify the month and year for the timing map to begin and end. The time period does not need to cover the
entire time period over which you have generated a schedule. The display program also ignores time periods that precede
or follow your schedule information.
View All Options: The All option allows you specify the number of years to display the timing by month and/or quarters.
The remaining years are displayed by years.
Label Option: Each block in the timing map can be labeled to indicate the date of mining or the unit which is doing the
mining. The Normal display has the month and year as shown the following figure. The month can also be identified with
an alphabetic abbreviation of the name such as Jan. or Feb. None suppresses all indications of time or mining unit.
Delete Timing: Toggle the square at the end of this option to turn it on (X) or off (blank). The timing will be erased if you
exit this edit box by choosing either OK or Cancel.
102
6.6 Detailed View Timing
This option allows the same options as the quick method, but in addition you can elect the system to size the labels to fit
within the timing blocks, to change the label orientation and to solid fill or hatch and/or border the labels and timing blocks.
You can also choose to use colors to indicate quality ranges within the timing blocks. When you select this option, the
following dialog box will appear.
View by: You can choose to display the mining progress by month, quarter or year. The "All" option lets you display the
first years by month and/or quarter and the remaining time by years.
Pause Every: The program will display the entire timing map for the time period you specify or you can have the display
pause at the end each month, quarter or year. After a pause, press Enter to continue.
Time Period: Specify the month and year (mm/yyyy) for the timing map to begin and end. The time period does not need
to cover the entire time period over which you have generated a schedule. The display program ignores time periods that
precede or follow your schedule information.
103
View All Options: The All option allows you specify the number of years to display the timing by month and/or quarters.
The remaining years are displayed by years.
Label Option: Unit displays the number of the machine which is doing the mining. Start/End displays the starting and
ending dates (mm/yy) for the timing block. The Normal display has the month and year. None suppresses all indications of
time or unit labels.
Color: Assigns a color for the labels and timing block borders that will contrast with the colors selected in the Configure
Colors function below.
Color and Text Options:
Color By: This command gives you the option to use color in the timing map to indicate quality, time period, mining unit
or the type of mining area.
Quality: If you choose this option, you must select which quality parameter to display from the drop down list under the
Quality heading and assign ranges of the parameter's values to colors in the Configure Colors option below. The color
indicates the average value of the quality parameter for the corresponding time period.
Time: This option lets you use color to indicate the month quarter or year. The colors repeat after twelve periods. If you
select ALL in the View By option, the system defaults to coloring by year.
Unit: The option uses color to indicate the mining unit.
Area: This option uses color to indicate the type of mining area, Development, Bleeder or Longwall.
Fill: This option provides several solid fill, crosshatching and wire framing options depending upon the Color By: option
you have chosen.
Solid: If you choose Quality, Time, or Unit and only Solid, the timing blocks are solid filled according to the colors you
select in the Configure Colors option below. If you also select Border, each timing block is wire framed in a contracting
color. If Solid is used with the by Area option the colors from Simulation Defaults are used.
Hatch By Area: The timing blocks are hatched in the pattern you assigned to the area types in Simulation Defaults and the
color assigned in Configure Colors. If you also select the Border option, the timing blocks are wire framed in the color.
You assign the hatch pattern in the Configure MineSimU option under the Setup pulldown menu and the color in the
Configure Color option below.
None: This option does not solid fill or hatch the timing blocks.
Label Size: These options allow you to control the text size, orientation and border of the timing map labels.
Auto Sizing: This option calculates the size of the label to insure it will fit within the timing block regardless of the
orientation of the label. You specify the text size in the edit box designated Size.
Box Label Click this button if you want a wire frame and wire frame the label. The frame will be in the same color as the
label text and sized according to the Box Size you specify.
MAX Label : Click this box to control the maximum size of the label to the size you assign in the edit box opposite MAX
Size:
Label Auto Align: This option provides four options for controlling the label sizes.
Align Along Adv.: Click this option to align the long axis of the timing block labels in the direction of mining.
104
Align Normal Adv.: Click this option to align the long axis of the timing block labels perpendicular to the direction of
mining.
Align for Largest: Click this option to align the timing block labels to allow the largest label size that will fit within the
timing block.
LW Along Dev Normal : Click this option to align the long axis of the timing block labels perpendicular to the direction
of mining for developments and to align the long axis of the timing block labels in the direction of mining for Longwalls..
Dev Along LW Normal : Click this option to align the long axis of the timing block labels perpendicular to the direction
of mining for Longwalls and to align the long axis of the timing block labels in the direction of mining for Developments.
None: This option aligns the timing block labels horizontally.
Quality: Use this option to select the quality parameter to display. The parameter that appears in the window will be
displayed in the timing map.
Time: Select the time period that will correspond to the timing blocks. The options are Month, Quarter, and Year.
Fiscal Start Month: This option allows you to color the timing map by fiscal years instead of the calendar year. Select the
first month of your fiscal year from the pull down menu of months.
Year Index: The fiscal year appears in the timing blocks representing years. You can specify whether the year in the block
corresponds to the beginning or ending calendar year for your fiscal year.
Configure Colors: This option allows you to assign colors to ranges of the quality parameter values, units or time periods
depending on which Color By radio button is selected, the dialog box changes. When you select Color By: Quality and a
Quality parameter, you can define the range of parameter values that correspond to a color as shown in the following
example.
When you select Color By: Time and a Time period, you can define the color assignments for the each time period. For
Month or Quarter the color pattern repeats each year in the schedule. When you select Color By: Unit you can define color
assignments for the machines.
Delete Timing Layer on [OK] or [Cancel]: Toggle the square at the end of this option to “on” to turn the timing off
when you exit this edit box by choosing either OK or Cancel.
105
--------------------------------------------------------------------Report-------------------------------------------------------------------6.7 Generate Reports
All reports are generated from the Calculate Timing output file data. This option brings up the following dialog box.
The dialog box has three main sections, Report format, Quality information and Time period. The report type options and
the number of formats are listed below:
Report Type
Summary
Sections
Monthly
Machine
Lotus
Formats
1
1
4
4
1
Report format:
When the Timing Reports dialog box appears, one of the report types will appear in the upper left list box with all five
report types listed below in the list box. You can select another the report type by moving the cursor to highlight the type
and clicking the left mouse button. The chosen report type will appear in the list box.
106
The five report types are as follows:
Summary Report: An annual summary by machine. Contains list of areas mined and production data by area including
tonnages and average quality parameters by area.
Section Report: An annual summary by machine. Contains a list of areas mined, starting and completion dates and
tonnage information.
.
Monthly Report: Available in three formats as follows:
Monthly Complete Report - A monthly summary of all production listed by machine and the mined areas. Includes
production and quality data by area and monthly totals and averages accumulated for all the mining units. The
monthly data is summarized for each year by type of mining.
Monthly Summary Report - Monthly totals and average quality parameters by type of mining.
Quarterly Summary Report - Quarterly totals and average quality parameters by type of mining.
Yearly Summary Report - Yearly totals and average quality parameters by type of mining.
Machine Report: Available in three formats as follows:
Machine Complete Report - Monthly production data by machine and total and yearly accumulations.
Machine Monthly Report - Monthly total production data and yearly summary by machine.
Machine Quarterly Report - Quarterly total production data and yearly summary by machine.
Machine Yearly Report - Yearly total production data by machine.
Lotus Report: An ASCII file in spreadsheet format that gives a detailed breakdown of production, productivity measures
and seam characteristics for each machine.
In addition to the report options in the menu, you can create an ASCII file from the Calculate Timing output and design
your own reports with a spreadsheet or the Report Writer option.
Quality information: The default quality parameters appear in the Quality information boxes. Each of them can be set to
one of ten parameters. Click on the parameter you want to change, and the list of parameter options will appear as shown in
the Reports dialog box above. The default parameter for coal applications appear in the list, but Sulfur, ash, Moisture, Btu,
Z1 and Z2 will have the names you assigned when creating the grid. Where the Quality information is grayed-out, quality
parameters do not appear in the report or the list of parameters is fixed as in the Lotus Report.
Custom Names for Z1 and Z2: This option allows you to change the names of parameters Z1 and Z2 that will appear in
the reports. A maximum of eight characters is allowed.
Time period: In addition to selecting the type of report, you must specify the time span covered by the report.
Start Month and End Month: The start and end dates must be within the time period used for the timing calculations.
First Month of Fiscal Year: This option allows you to accumulate production and compute average quality values by
fiscal years instead of the calendar year. Select the first month of your fiscal year from the pull down menu .
Page Length: The program needs to know the page length in order to place headers on each new page. The page length
defaults to 58 but can be changed to fit other printers.
View: This option lets you preview the report. The contents of the report are displayed with the default editor you specified
in Option 3.1.1 Simulation Defaults.
107
OK:. When you click OK the following dialog box appears . You can attach an identifying header to the report; up to four
lines and 80 characters per line are allowed. You must also select the print mode. By default the output goes to the LPT1
printer port. Make sure LPT1 is redirected to a network printer (See Print option under Edit Mine Calendar). To print to a
file, select the Print to file option and enter the desired file name.
6.8 Timing Utilities...
This option has sub-options to display the miner unit delays and provides detailed scheduling information for specific
areas. The following sub-menu appears when you select this option.
108
6.8.1 Change Out Machines
This option creates a report of scheduled machine change out for each mining unit based on actual and projected hours of
operation, tonnage produced or both. The following dialog box appears when you select this option.
To obtain an accurate schedule, you must input the accumulated actual hours worked and production up to the schedule
start date. The hours per shift is required and you must also specify the cumulative hours and/or tonnage to trigger a
machine change out. All the machines in the .o20 file appear in the list box on the upper left. Highlight a machine and enter
the machine's settings.
Update Machine Settings:
To modify the machine settings, click the Update button. The mining units settings include the normal hours in a
work shift and the cumulative hours the machine(s) has worked and tonnage it has produced up to the schedule start
time given in the Machine Sequence file. If you do not use one of these measures to trigger a change out, let the set
value default to zero. It will have no effect on the change out schedule. You also have the option to change the name
of the machine as part of the settings, but the name will not be changed in the timing output file. After you make
changes to a machine's settings, you must click the Change button to save the information for the machine. Repeat
the process for each mining unit.
Trigger Values:
Each type of machine can have unique target hours and/or tonnages to trigger a change out. Click the arrow in the
machine type list box to display the list of available machine types. The machine types are abbreviated in the list box
as shown below.
109
CM Continuous Miner
SS Super-Section
RH Road Header
LW LongWall
MB Miner Borer
Highlight the machine type and enter the trigger values in the list boxes. If you do not want a measure to trigger a
change out, assign a large trigger number such as 99999 for cumulative hours.
The following options apply only to retreat mining.
Precedence (SS Only):
This option applies to selecting the newer machine to do the retreat mining. Usually one machine will have more
cumulative hours and tonnage. But, one machine could have more cumulative hours and the other could have more
cumulative hours. Click the radio button for the measure that should take precedence in these situations.
Change Out Options (SS Only):
The system assumes that the better machine, i.e., the machine with less hours and tonnage is used to retreat mine.
But, if that machine is scheduled for a change out while retreat mining an area, either the replacement machine or
the older idle machine can complete mining in that area. Click the radio button to indicate your preference.
Print: The change out report can be sent to the printer or to a file. Enter the path and name for your output file. See the Print
option under Edit Calendar File above for printing details. A sample of the change out results follows. The upper portion
contains the hours and/or tons that will trigger a change out for each type of machine. The M*, where * is a number,
represent four additional machine types that are available but which have yet to be defined. Default trigger values are
assigned to such machines.
The lower part is a list of scheduled change outs. The first column contains an H or T to indicate which parameter triggered
the change out. The next fields indicate the type of machine and the mining unit number using the machine. The number
after the machine type abbreviation indicate the number of change outs, i.e., a 2 means that machine replaced the original
machine, a 3 means it replaced the second machine used under that unit number, etc. The Tonnage, Hours, Date and Area
information indicate the accumulated tonnage and hours on the machine and the date and the area being mined when the
machine was replaced. The last machine listed for a mining unit was still in service at the end of the schedule period. The
information in these rows indicate the projected tonnage and hours on the machine at the end of the scheduling period and
when and where it was working.
110
Testmine 1997-1998
Machine Type: CM
Trigger Tonnage: 1500000.00
Trigger Hours: 4000.00
Machine Type: LW
Trigger Tonnage: 1500000.00
Trigger Hours: 5000.00
Machine Type: SS
Trigger Tonnage: 1500000.00
Trigger Hours: 3000.00
Machine Type: MB
Trigger Tonnage: 1000000.00
Trigger Hours: 3000.00
Machine Type: RH
Trigger Tonnage: 1000000.00
Trigger Hours: 3000.00
Machine Type: M1
Trigger Tonnage: 1000000.00
Trigger Hours: 3000.00
Machine Type: M2
Trigger Tonnage: 1000000.00
Trigger Hours: 3000.00
Machine Type: M3
Trigger Tonnage: 1000000.00
Trigger Hours: 3000.00
Machine Type: M4
Trigger Tonnage: 1000000.00
Trigger Hours: 3000.00
Precedence: Tonnage
Retreat: Use old machine to complete retreat mining
-----------------------------------------------------------------------------Unit ID
Unit NAME
Tonnage Hour
Date Area ID Area Name
-----------------------------------------------------------------------------H 0001 CM1
0001
0.25M 4000
1/98 0000042 GATE4
0001 CM2
0001
0.02M
2/98 0200031 BL3
T 0003 LW1
0003
1.50M 2810
0003 LW2
0003
0.18M
H 0004 CM1
0004
0.25M 4000
1/98 0200032 GATE3
0004 CM2
0004
0.03M
3/98 0100031 BL3
367
368
521
8/98 0000033 LW-3
9/98 0000033 LW-3
6.8.2 List Miner Unit Delays
If the check precedences option is enabled, the mining sequence in the inter-relationship file may delay the start of critical
units such as longwalls. While Calculate Timing is running, it stores the list of any such delays including the following
information: the mining unit/area that is waiting, the duration of the wait, the time the wait began and the mining area that
caused the delay. When you choose this option, the delay information is displayed in a list box as shown in the following
example.
111
To eliminate delays you must modify the mining sequences in the Machine Sequence file or increase the mining rate and/or
the number of shifts per month for the mining unit that caused the delay.
Print: This button is used to print the current contents of this file. For details see the Print command under Option 4.1 Edit
Mine Calendar.
6.8.3 Timing Info for an Area
When you select this option, the command line prompts you to pick the attribute box of the area of interest. After you
acknowledge that the correct area is highlighted, the following dialog box of output options appears.
Toggle your selections ON (X) and click the Done button to view the information. All selections will be displayed in one
continuous dialog list box.
Advance Calculations: This option provides a list of the monthly and cumulative advances through the selected area as
shown in the following example.
112
Tonnage Calculations: This option provides a list of the monthly and cumulative production through the selected area as
shown in the following example.
Z-Parameter Present: This option provides a list of the quality information (Z-Parameters) that was available for the
selected area as shown in the following example.
Unit and Dates: This option provides the number and type of the miner unit(s), the starting and ending dates and days
worked to mine the selected area as shown in the following example.
113
Rates and Shifts: This option provides production rates and the shifts per day to mine the selected area as shown in the
following example.
Technical: This option provides information about the selected area as shown in the following example.
114
----------------------------------------------------------------ROYALTY----------------------------------------------------------------6.9 Royalty Tonnage Report
This option allocates each area's monthly production by property and generates a report by month or year. The process
merges the Calculate Timing output and a file of the properties or leases. Each property may have 1 or more parcels
attached to it. Each parcel must be defined with a closed polyline. The parcels outlines can be any size or shape. If a parcel
is completely surrounds another parcel, such as a donut with a hole, the record for that property must include both the outer
and inner boundaries (polylines) of the outer parcel. The system will not allow parcels to overlap. If two parties own
separate parcels and share ownership of another parcel, that parcel must be defined as a separate property.
If surface ownership differs from the mineral ownership, you can also use this option to determine when the surface will be
undermined. You will need to create a separate file of the surface ownership properties lines and rerun the royalty tonnage
report. You would ignore the tonnage information but use the date information.
When you select this option you have the following options:
6.9.1 Separate Properties Royalty Report
When you select this option the following dialog box appears. This option creates a property royalty report that
summarizes each property separately. So if you want to see a report with all the properties added together then you should
use Combined Properties Royalty Report.
115
Load: Click this button to browse the list of property files. After you select a property file, a list of properties will appear in
the list box. Each line in the list box is a record in the property file and corresponds to a property owner or lease. A property
must have one or more parcels. In order to calculate the tonnage mined from each parcel, the parcels must be defined by
closed polylines.
Create: Use this option to create a new property file. Browse to the desired drive and directory and type the new file name.
After you specify a file name, the path and file name with the extension .PR will appear above the list box. To insert
property records into the new file first type the property name (owner or lease) in the edit box below the list box,(up to 80
characters). Then click the Add button. To attach parcels to this property, load an AutoCAD drawing of the parcel
boundaries into your mine drawing.
Add: After you click the Add button, the command line prompt is:
Select Objects:
Click on each polyline you want to add to the property. Production will be reported by property not by parcel. If you want
production by parcel, each parcel can be defined as a separate property. The properties will be identified by a number
which is assigned sequentially as the properties are added to the file. N0TE: No royalty calculations will be made for open
polylines. When you have selected the polylines, click <Enter> twice to return to the dialog box.
Change: Lets you change the property descriptions. Type the new name in the edit box and then click Change.
New Line: Use this option to change the parcel assignments to a property. When you click the New Line button the Select
Objects command line prompts reappears. You must re-select all the parcels for a property.
Delete: Allows you to delete an entire property. Highlight the line you want to delete and click the Delete button.
Show & Draw: Both display the selected properties on the screen, but they will disappear on a redraw after Show. Draw
creates the polyline on layer MPROP01.
Save: Click this button to save your choices.
Report: Generates the tonnage report by property. This option uses the output file from Calculate Timing, therefore you
must run that option before the royalty report can be generated. When you select this option, the following dialog box
appears.
116
Report format: Four reporting options are available as follows.
Complete: In this report, tonnage and date information are broken down by mining area and date. This information is too
detailed for most applications but could be used to adjust schedules to avoid expiration of lease prepayment credits.
Monthly summary: This report contains total projected production by property for each month.
Yearly summary: This report contains total projected production by property for each year.
Yearly Brief summary: This report contains the total projected production that will come from the list of properties.
Time period: After you select the report type, you must specify the beginning and ending month and year for the report.
The defaults correspond to the limits of the timing data file.
OK: This button allows you to print the current contents of this file. The following dialog box will appear. You can attach
an identifying header to the file; up to four lines and 80 characters per line are allowed. You must also select the print mode.
By default the output goes to the LPT1 printer port. To print to a file, select the Print to file option and enter the desired file
name.
117
An example for the month of Dec. 1995 from a Complete Royalty report for one property is given below. Each line
contains the total tonnage and area for a mined area that intersected the property and the percentage of the tons and mined
area that was within the property. The month and year summary lines contains the total tons, total area and percentage that
came from the property.
Timing: 1/1995 through 1/1999
ROYALTY CALCULATIONS
AREA-TYPE/ NAME
SUBAREA
DATE
12/1995
12/1995
12/1995
12/1995
12/1995
25.618%
1995
6 DE (WH) O28
10 DE (WH) L91
13 DE (WH) A02
11 DE (WH) M06
SUMMARY ......................
SUMMARY .......................
AREA
RAW TONNAGE
PROPERTY
CLEAN TONNAGE
AREA
PROPERTY
AREA SQ. FT.
AREA
PROPERTY
PERCENT
18396.00
21355.38
19550.54
21342.90
219509.41
18396.00
21355.38
14708.50
1774.59
56234.46
13797.00
16016.53
14662.90
16007.17
164632.06
13797.00
16016.53
11031.37
1330.94
42175.85
49625.74
50497.26
42602.92
46196.09
552501.33
49625.74
50497.26
32051.55
3841.04
136015.60
100.000%
100.000%
75.233%
8.315%
2881592.91
1313155.79
2161194.68
984866.84
7208593.99
3395352.92
45.570%
6.9.2 Combined Properties Royalty Report.
This option is the same as Separate Properties Royalty Report except it allows you to get results on combined properties
and property files into a report that more or less considers all properties as one big property and everything is added
together. You can get the same results from the Separate Properties Royalty report function but you would have to go
through the whole report and manually add the totals.
6.10 Royalty Quality Report
This option allocates each area's monthly production by property and generates a monthly report that includes quality as
well as tonnages. The process merges the Calculate Timing output and a file of the properties. The property file must be
created with Option 6.6 Royalty Tonnage Report. When you select this option the following dialog box appears.
After you select the property file from the list box, the list of tracts (polygons) in the file will appear. You can do a report
for any number of tracts. To select more than one you can hold down the Ctrl key while left clicking.
Select All: To create a report for all tracts, click the Select All button. Otherwise, click on the individual tracts in the list.
The report will include only those tracts you highlighted.
Clear List:
If you want to change your selection, click the Clear List button.
118
Done: The Done button exits the program.
Print: Click the Print button to bring up the following dialog box for specifying report parameters. When you click Print
the following dialog box appears.
At the present time only the monthly report is available. The monthly data can be summarized by month, quarter or year.
You can also select up to four quality parameters and the time period for each report. The start and end dates must be
within the time period corresponding to the scheduled timing. The column headings are fixed for all parameters except Z1
and Z2, which are user definable. After configuring your report, click the OK button to bring up the following dialog box
for configuring the report format.
The report can be in portrait or landscape orientation with up to four lines of header and three print modes. The output can
also be sent to a text file for on screen viewing and editing. When you choose the Print to a text file option, the grayed out
file name and browse boxes will be highlighted. Normally the printer setup will have been specified previously but you can
click the Setup button to change the type of printer or port.
119
6.11 As mined Report...
The As-Mined royalty tonnage report option calculates the tonnage mined each month within a specified lease or actual
production for a specific machine. When you select this option, the following dialog box appears.
120
The As mined Report requires the following inputs:
1. Grid file (*.grd)
2. Lease or property file with each tract drawn as a closed polyline. A parcel may be wholly inside another tract but the
polygons for adjacent tracts must not overlap.
3. Outline of the area mined for the time period, normally a month, with the perimeter of the mined area drawn as a closed
polyline.
4. Outline of pillars drawn as drawn as closed polylines on the layer Pillar. Be sure that no pillar outline overlaps any other
pillar outline.
The grid file used to calculate as-mined production would normally be the same file as used for mining projections. A
separate grid can also be created based on measurements taken after the area was mined.
The property or lease drawing file can be on any layer you choose. Normally you would keep it on a separate layer.
The as-mined drawing has two parts, the perimeter of the mined area which can be on any layer you choose, but the pillars
must be on the layer Pillar.
To create an As-Mined Report, load the drawing files and select this option. The procedure works very similarly to the
Royalty Tonnage Report option. Enter the month and year and choose the report type-- by machine or lease. Enter the unit
or lease name and the grid number in the corresponding edit boxes. After you click "OK, the tract(s) and mined
perimeter()s are picked in response to the following command line prompts.
Pick Property polyline (s)
Select objects <R> to Quit:
After you select the tract or lease polylines, the following command line appears:
Pick Area(s) Mined
Select objects <R> to Quit:
After you select the area polyline(s), the report appears on the screen as shown in the following example. Choose the Print
option to obtain a hardcopy. Since the mined areas correspond to only one period, the reports apply only to that period. For
the time being, a cumulative as-mined royalty tonnage report must be created by loading the royalty tonnage reports into a
spreadsheet routine.
121
6.12 Overlay File
When you select this option, you have two options as shown in the following menu. Essentially, these two options let you
store and retrieve polyline information in external files.
6.12.1 Read Overlay File
This option is used to read the overlay files created by Option 6.12.2 or by an external program.
6.12.2 Write Overlay File: The program will prompt you for the overlay file name and for a short description (28
characters). If the file you select already exists, you will have the option to over write the file. Next the program prompts
you to pick the polylines to store in the overlay file. You can include up to eight overlays and an unlimited number of
polylines in each overlay file. The program will automatically differentiate between an open and closed poly line.
122
---------------------------------------------------------REPORT WRITER------------------------------------------------------------6.13 Export to R-W Format
When you select this option, the following dialog box appears. The Export to R-W Format option converts ICAMPS output
files with the extensions SE*, o2 and CR* into a format which can be modified and printed with the Report Writer routine.
The converted files are automatically assigned file names with the extension .rse. .ro2, and .rcr. You can also change the
output from English to Metric units or Metric to English units.
Export Current SE and o2 Files: Customized reports are created from the current area definition (SE*), machine
parameters and mining sequence (CR*) and Timing Data (o2) files which are stored as Work files with the corresponding
extensions.
Click the Browse Files... to select an existing output file name or enter a new name. If file name has already been assigned,
the following AutoCAD message appears. You can click yes to overwrite the file or use a different file name for the output.
After you select the output file name, the corresponding file names will appear in the export list with the extension. If you
want the output in the alternative units system, click the Convert Output Units button. Finally, click the OK button to
convert the files to the Report Writer format.
123
6.14 Report Manager.
When you select this option the following dialog box appears.
Report Writer Defaults: This option allows you to specify where Report Writer is located and to setup the defaults for
running Report Writer procedure.
Reports Currently Using: This option allows you to select the files for your customized report. However, you must first
designate the directory where Report Writer is located. See option Directory for Report Writer below for the directory
selection procedure. If you have previously saved defaults in the current session, the list of reports defaults to the last set.
To change the reports, click the Use Other Files button to browse the list of existing files. After you select the files, the
program scans the files for the earliest and latest months and places the dates and file names in the dialog box. The starting
and ending dates can be edited to any period within the default limits.
Directory for Report Writer: RW DIR contains the directory where Report Writer software is located. This option will
normally be run only once unless you change the location of the Report Writer program.
Change Directory: When you click this button, the following dialog box appears. Type the directory name in the edit box
and click OK.
124
Save Defaults and Use Report Files: Click this button to save the defaults and to use the specified report files in Report
Writer.
Exit: Click this button to leave the Report Manager option.
Copy: Click this box to copy the report data into another file. An AutoCAD directory list box appears. Select a file or enter
the name of the new file name.
Delete: This option allows you to select a group of files to delete. When you click this button, an AutoCAD directory list
dialog box appears. Select the files to delete.
125
------------------------------------------------------------SPREADSHEET-------------------------------------------------------------The spreadsheet options export ICAMPS files into ASCII files which are compatible with spreadsheet programs. You can
use this data to generate customized reports or to do financial analysis with the spreadsheet software. The mining area
definitions (SE) file contains information about area sizes, direction of mining and production rates. The Timing (O2) file
contains information about the mining equipment, length of advance, start and completion dates and production tonnage
and quality information.
6.15 Export to Excel Format
This option exports the contents of the O2 and SE files as a comma delimited ASCII file compatible with Excel and other
spreadsheets. When you choose this option, the following dialog box appears. You must specify the exported file name
with the extension .E97 and the dates for the report. Some of the parameters you will want in your customized report must
be computed from the exported data e.g. %Recovery is Clean tonnage/ Total Tonnage.
6.16 Export to Spreadsheet
This option converts information from mine scheduling system the area definition file into a comma delimited ASCII file.
When you select this option, the following sub-menu appears.
6.16.1 Export SE (Area File)
This option converts data you select from the area definition file into an ASCII file with user specified delimiters. When
you select this option, the following dialog box appears.
126
Included Information: Since you will probably need all the data items in the list, they are pre-selected. Click the check
box to toggle off those items which you don't need in the spreadsheet file. SE1, SE2 and SE3 are user defined variables in
the area definition file.
Spreadsheet Setup: The spreadsheet setup requires the file name, the type of delimited needed in the ASCII file, whether
to put the field names on the top line of the file.
Field Separators: Click the scroll bar to display the delimiter options as shown below and select the desired option.
Field Names as First Line: The field names are useful when viewing the ASCII file. Click the check box to turn on this
option. The field names selected in the list of data items will be loaded into the ASCII file and appear above the data if you
view the file in an editor.
File: Click the edit box and type the file name, including the path or click the browse button which brings up an AutoCAD
directory list box. Select the desired file name from the box or type in the new name. If you select an existing file name you
will be warned and ask if you want to overwrite it.
127
6.16.2 Export O2 (Timing File)
This option converts information from the timing information (O2) file into an ASCII file with user specified delimiters.
When you select this option, the following dialog box appears.
Included Information: Since you will probably need all the data items in the list, they are pre-selected. Click the check
box to toggle off those items which you don't need in the spreadsheet file. O2_1, O2_2 and O2_3 are user defined variables
in the timing Information file.
Spreadsheet Setup: The spreadsheet setup requires the file name, the type of delimiters needed in the ASCII file, whether
to put the field names on the top line of the file. See option 6.13.1 above for the details of this procedure.
6.16.3 Export Combined File
This option converts the information from the (SE) and (o2) files which are required to generate the daily scheduling files.
The output goes into a comma delimited ASCII file which you specify. When you select this option, the following dialog
box appears. See the above option for specifying the ASCII file.
128
129
6.16.4 Export Machine Data
This option allows you to export data to a comma delimited ASCII file which has the data specified by Year then by Unit
with months across the top and the fields vertical. This file should be imported into a spreadsheet such as MS Excel.
Usually you would want to uncheck the box next to Redundant Years and Units so that each year and unit is only listed
once.
130
-----------------------------------------------------------Switch to Daily Menu----------------------------------------------------------When you select thus option, the output menu changes and displays the Daily Timing menu as shown below.
6.17 Calculate Daily Timing
When you select this option, the following dialog box appears. The procedure for daily timing is the same as for Monthly
timing except shift exceptions are not implemented and you must specify the number of days to schedule. Currently the
system allows a maximum of 100 days into the future. See Option 6.1 Calculate Timing above for details .
131
6.18 View Daily Timing
When you select this option, the following dialog box appears.
The following options are available:
View by: You can choose to display the mining progress by day, week or month.
Pause Every: The program will immediately display the entire timing map for the time period you specify or you can have
the display pause at the end each day, week or month
Time Period: Specify the month and year for the timing map to begin and end. The time period does not need to cover the
entire time period over which you have generated a schedule. The display program also ignores time periods that precede
or follow your schedule information.
Label Boxing: This option allows you to enclose each label in a rectangle. This feature is useful if you want to fill in the
timing blocks with a solid color.
Label Options: Each block in the timing map can be labeled to indicate the date of mining or the unit which is doing the
mining. Suppress omits the label from the timing blocks. The other options are to show the Unit Number which mined the
block or to indicate the time when the block was scheduled to be mined. If you chose to display the timing by week or
month, Start & End displays the first and last calendar day worked in each block. Normal displays week number for
weekly timing and the month and year for monthly blocks.
132
Delete Timing: Toggle the square at the end of this option to turn it on (X) or off (blank). The timing will be erased if you
exit this dialog box by choosing either OK or Cancel.
6.19 List Daily Unit Delays
This option gives a list of machines which where delayed due to precedence requirements. See List Miner Unit Delays
above for details
6.20 Generate Daily Reports
This option provides monthly summaries of the daily scheduling. The format is generated for monthly scheduling except
that the detailed reports contain a line for each day a machine worked in an area. See Generate Reports above for details.
6.21 Export to EXCEL Format
This option exports the complete contents of the SE (Area File) and oD (Daily Timing File) in a format which is compatible
with EXCEL and other spreadsheet programs. When you select this option, the following dialog box appears.
The file translation assigns a work week number to every work day record in the timing data file. You can specify any
weekday as the beginning of the week, such as, a work week begins on Monday and ends on Sunday. The specified starting
date is the calendar date that corresponds to the first day of the week when production is to begin. For example, if the your
company considers Monday to be the first day of the week, and the scheduled mining is to begin on Wednesday January 13,
1999, enter January 11, 1999 for the starting date. The weeks are numbered sequentially starting from 1. Some weeks may
have no activity due to vacation shutdowns or holidays. The weekly report requires the combined file and ACCESS, Visual
Basic and EXCEL modules of Office 97 to print the report.
6.22 Export to Spreadsheet
This option is almost identical to Export to Spreadsheet in the Monthly Timing section except the timing data is in the oD
file instead of the o2 file. The sub-menu options are given below.
133
---------------------------------------------------------------ANNOTATE---------------------------------------------------------------6.23 Annotate Utilities:
After you select the Annotate option, the following pull down menu appears.
6.23.1 Construction Grid
This option allows you to create a scaled grid on your drawing. The main purpose of the grid is to provide a frame of
reference on the hardcopy of the mine map. You set the grid limits through the following commands:
Enter/Pick Lowest Easting(Y),Northing(X) Grid Starting Point < >
Enter/Pick highest Easting(Y),Northing(X) Grid Ending Point:
After you set the limits, you are prompted for the horizontal and vertical grid spacing. The default values correspond to the
previously defined grid. If you answer yes to the final prompt,
Label Grid with North and East <yes,no>:
each grid line will be labeled.
6.23.2 Title Block
6.23.4 Fan
6.23.6 Scale Block
6.23.3 North Arrow
6.23.5 Regulator
6.23.7 Box
The above options are for adding icons to the drawing. Each option has command line prompts for locating and sizing the
icon.
6.23.8 Post Z Values
This option can be used in conjunction with option 4.8 "View Quality" to post quality parameters on the screen. After you
select this option, the following prompts will appear. To prepare the grid "dots" pattern, see the grid display options with
parameter values under options 5.6 and 5.7 for viewing quality.
The command and suggested responses are shown below:
Enter digits of precision (0-4):2
(right of decimal point)
Select Objects:w
Select Objects: <Return>
134
Text position:@0,0
Text angle <0>: 0
Align (Left/Center/Middle/Right) <L>:c
If you have drawn a grid with one of the View Quality option, you probably will want to enter a "W" at the "Select
Objects" prompt. The W option allows you to window around the grid to select the objects.
The z-value corresponding to each object will be posted. Caution: If the drawing within the window contains other objects
in addition to the dots, the z-value at those object locations will also be posted. The text position and angle can be typed in
as shown above or indicated with the mouse.
135
A
Abbreviations · 8
Add a Map · 65
advance · 4, 59, 76, 77, 78, 81, 82, 128
Advance/cut · 81
Annotate · 94, 136
area · 4, 7, 10, 12, 15, 18, 19, 20, 21, 22, 23, 47, 53, 55, 56, 57, 58, 59, 61, 62, 63, 64, 65, 66, 67, 68, 69, 76, 77, 78, 80, 82, 83, 85, 86,
87, 89, 93, 95, 96, 99, 103, 106, 109, 112, 113, 114, 115, 116, 117, 119, 120, 123, 125, 128, 129, 135
Area
Assign Code · 18
Assign Grid · 18, 61, 76
Assign Machine · 79, 82, 83
Assign Seam · 61, 76
Bill of Labor and Materials (B of L&M) · 18, 53
Code · 18, 59
Copy · 65
Delete/Erase · 63
Draw · 57
Name · 61
Number & Type · 59
Quality · 89
Retreat Mine · 78
Stretch/Shorten · 63
Sub-Divide/Integrate · 78
Undefine · 77
As Mined Report · 122, 123
Assign Areas to Machines · 79, 82
Assign Calendars to Machines · 81
Attribute Block Attach · 56, 62
Attribute Block Change · 67
Attribute Block Size · 20, 67
B
Base Line Orientation · See Direction of Mining
Boundary/Drawing · 20
Boundary/Grid · 27, 88, 91
Boundary/Seam · 44
Boundary/Text Size · 19
Budgeting · 18, 53, 58
C
Calendar · 20, 21, 37, 45, 47, 50, 52, 67, 71, 79, 81, 85, 86, 98, 100, 110, 112, 114
Assign to Machine · 81
Define · 20
Edit · 71, 72, 73, 74
Workdays · 74
Change Dates · See Starting Date
Change Grid Interval · 38
Change Grid Parameter Values · 36, 37, 38, 92
136
Change Outs · 111
Triggers · 111
code · 13, 22, 95
Compare Graphics & Db · 61, 68
compositing · 6, 13, 39
Configure MineSimU · 17, 61, 95, 106
convert · 35, 48, 49, 50, 51, 52, 125
Convert Files · 35, 48, 51
Copy Areas · 65
CPS · 25, 27
D
Daily Timing · 133, 134, 135
Dates Timing · 95, 96
Define a Seam · 44
Define New Areas · 18, 56, 57, 58, 69, 77
Delays, Miner Unit · 113
delete · 8, 9, 13, 16, 22, 23, 40, 45, 53, 55, 63, 66, 82, 84, 85, 87, 93, 118, 127
Delete/Erase Mining Area · 15, 63
Different Mining Rate · 82
Difficulty Code · 22, 95
Dilution · 4, 6, 13, 14, 25, 39, 40, 41
Direction of Mining · 4, 47, 61, 68, 87, 106, 107, 128
Display · 87
Edit · 76
Pick · 61
Reverse · 68
Displace a Grid · 36
Displacement of Seams · 44, 45
Display a Seam · 45
Display menu · 16
Divide · See Area:Sub-Divide/Integrate
DMR · 82, 83, 85
Draw Pillars · 69
DXF · 48, 49
E
Edit a Grid · 34
Edit Exceptions · 83, 85
Edit Machine Sequence File · 79
Edit Machine Specifications · 80
Edit menu · 16
Edit Mine Calendar · 71
Edit Mining Area · 18, 59, 71, 76
Ending Year
Calendar · 21
Reports · 109
Scheduling · 96
Timing Map · 104, 105
Entity Quality · 89
entry width · 4, 18, 59, 61, 76
Erase Mining Area · 63
Excel Output · 128
137
Exceptions File · 71, 83
Export Output to Spreadsheets · 109, 128, 129, 130, 132
Extraction · 4, 19, 56, 59, 61, 62, 68, 69, 76, 78
F
F-Edit · 79, 81, 85, 86
File Conversion · 35, 48
ASCII to Btree · 50
Btree to ASCII · 49
Calendars for AutoCAD 2007 and above · 52
Grid · 35
Penn State to DXF · 48
To AutoCAD 2007 and above · 51
File Editor Name · 19
Fix Areas · 56, 61, 64
Floor · 6, 13, 14, 17, 39, 40, 41
G
Generate Reports · 108, 135
grid · 4, 6, 9, 10, 12, 13, 14, 18, 19, 20, 21, 22, 25, 26, 27, 28, 29, 30, 31, 32, 33, 34, 35, 36, 37, 38, 39, 40, 41, 42, 43, 59, 61, 62, 76,
88, 89, 90, 91, 92, 93, 109, 123, 136, 137
Assign Grid to Area · 61
Change Interval · 38
composite · 6, 39
Convert to ASCII · 35
Create · 9, 10, 11, 25
Customize Parameter Names · 34
Default Grid · 18
Default Parameter Values · 29, 33, 35, 88
Displace · 36
Display · 91
Edit · 13, 34
Graphical Editing · 36, 38, 39
Quality Reserve Info (Area, Entity, Point) · 87
view · 87, 91
H
Height Sensitive · 23, 95
Hints · 7
I
Imperial Units · 81
Integrate Mining Sub-Areas · 78
L
List Miner Unit Delays · 113
138
List Mining Areas · 63, 69, 70, 77
Lotus Report · 109
M
Machine Change Outs · 111
Machine Report · 109
Machine Type · 22, 23, 80, 98, 111, 112
Main Seam · 44, 45, 46
Maximum Mining Height · 81
MineGrid Module · 10, 21, 25
Miner Borer · 60, 112
Miner Unit · 6, 23, 79, 80, 81, 82, 85, 110, 115
Rate Exceptions · 83, 85
Shift Exceptions · 83
Specifications · 80
miner unit delays · 110
Minimum Mining Height · 13, 39, 41, 81
Minimum Roof · 88
Mining Height · 6, 13, 14, 39, 41, 42, 43, 81, 95
Mining Method · 63, 80, 81
Mining Rate · 59, 62, 68, 85
Mining Sequence/Create · 44, 82, 83, 113, 125
Mining Sequence/Modify · 83
Modify Grid Parameter Default Values · 35
Modify Grid Parameter Values · 34
Monthly Report · 109
Multiseam · 44, 45
MultiSeam · 46
N
Node · 15
O
Offset Days · 82
Origin Seam · 44, 45, 90
Out of Seam Dilution · 6, 13
Overlays · 124
Overview · 4
P
Page Length · 109
Parcels (Royalty) · 117, 118, 123
Percent Extraction · See Extraction
Percent Recovery · 13, 14, 39, 88
Pick (Mining Areas) · 82
Point Quality · 89
Post Quality Parameters · 91, 92, 136
Post Z-Values · 136
Precedence Areas · 4, 82, 83, 85, 86, 95, 96, 99, 112, 135
139
Print · 22, 23, 45, 47, 67, 75, 79, 81, 85, 86, 100, 110, 112, 114, 119, 121, 123
LPT1 · 24
Print Mode · 75, 110, 119
Printer
port and networking · 24, 76
set-up · 76
Printer Setup · 121
Production Rate · 4, 18, 59, 82, 85, 95
Property · 36, 87, 117, 118, 119, 120, 123
Q
QSB · 25, 27
Quality grid · 59, 62
Quality Grid · 87, 88, 91
Quality Information · 13, 25, 37, 40, 93, 115, 128
R
Rate Exceptions · 83, 85, 95, 97
Read Overlay File · 124
Report Manager · 126
Report Writer · 125
Reserves · 22
Retreat Mining · 76, 78, 112, 113
Roof · 6, 13, 14, 17, 39, 40, 41, 42, 43, 88
Royalty Calculations · 117
Royalty Report · 117
As Mined · 122
Quality · 120
Tonnage · 118
S
Schedule · 25, 61, 71, 94, 95, 97, 98, 99, 100, 104, 105, 107, 111, 112, 133, 134
Seam · 4, 6, 9, 10, 12, 13, 14, 17, 19, 20, 21, 23, 25, 39, 40, 41, 42, 44, 45, 46, 47, 61, 66, 90, 109
Seam Displacement · 45
Seam Height · 10, 19
Section Report · 109
Shift Exceptions · 5, 84
Shorten Mining Area · 63
Simulation Defaults · 18, 57, 58, 59, 61, 73, 106, 109
Spreadsheets · 49, 128
Starting Date · 135
Calendar · 20
Machine · 81
Report · 109
Reports · 135
Schedule · 96
Timing Map · 104, 105
Starting Year
Calendar · 21
Reports · 109
Scheduling · 96
140
Timing Map · 104, 105
Stretch Mining Areas · 63
sub-area · 87
sub-areas · 62, 63, 77
Summary Report · 109
Super (Pick) · 79, 83, 112
Surface Ownership · 117
Switch to a Seam · 46
T
Target Tonnage · 97
Timing Utilities · 110
Area · 114
Change Out Machine · 111
Miner Unit Delays · 113
Tools menu · 15
U
Undefine (Mining Areas) · 63, 77
Units, Miner · See Machine Type
V
View Defined Mining Areas · 87
View grid · 91
View Grid · 87, 91
View Quality · 12, 22, 87, 136, 137
View Timing · 103, 105
W
Weekly Timing · 134
Working Day Calendar · 74
Write Overlay File · 124
Z
Znames · 29, 34
141