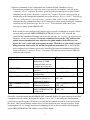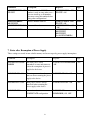
1
AEROTHERM RCS2
USER MANUAL & SETTINGS INSTRUCTIONS
Congratulations on your new RCS2!
AeroTherm and iSocket have partnered to bring you the most advanced switch on the
market! The RCS2 is the highest amp rated switch available and is a great addition to
any of our heaters.
Key Features
•
•
•
•
Text “on”/ “off” – the unit will send a text response confirming it was received
Check hangar (or switch location) temperature via text
Notification of power outage/restore
Set specific run times with a simple text and receive confirmation
Be sure to check out the iSocket app on your iOS or Android device for the one touch
control of your RCS2 from your smartphone.
Search- Isocket (select model GSM-707US in setup)
Your RCS2 is activated and ready to use
Safety Instructions
This appliance complies with the accepted technological standards with regard to safety. Nevertheless,
as manufacturers we consider it our obligation to make you aware of the following safety information.
To ensure years of trouble-free enjoyment, and to maintain your guarantee, please note the following.
•
•
•
•
•
•
•
•
•
Never carry out repairs yourself! There are no serviceable parts in the device.
The operating voltage of the appliance and the main voltage, as well as the type of current must
match (see the rating plate on the underside of the appliance).
Only plug into correctly installed earthed mains socket.
The device is not intended for direct plug-in equipment, which are not equipped with a plug.
External equipment that connects to the device must have a cord with appropriate plug.
Do not use the external equipment with a faulty plug!
Do not connect to appliances which cannot be left unattended (e.g. certain heaters)
Do not exceed power load limit and other electrical parameters specified in the technical
characteristics. Check the power of the connected device!
This product is not designed for safe disconnection of the controlled equipment from the power
network; the device is not equipped with a residual-current device (RCD). Make sure that your
home electrical network meets safety standards.
The product is designed for indoor use in dry area. Do not use it in a wet or chemically
aggressive environment! For example, do not use it in the bathroom. It is also not designed for
industrial operation in aggressive environments.
1
The next section is only if SIM replacement is necessary.
1. Quick Start
To start work with the AeroTherm RCS2 is very simple. You need a SIM- card from a GSM-operator.
If you have not purchased a SIM-card, then do so at the nearest mobile operators office. You can also
use prepaid cards.
NOTE: You must disable PIN-code authorization for the SIM-card! The AeroTherm RCS2 will not
work unless you do this. You can only disable PIN authorization by using your mobile phone. Do not
use SIM-cards that contain messages! Remove all messages from the SIM-card. If you use a prepaid card
you might need to activate it first with your cell phone network provider.
Quick Start is comprised of three simple steps:
1. Turn off PIN authorization for SIM card
Insert the SIM-card into your mobile phone and
disable PIN usage using the phone menu. You can
find more information in the manual for your phone
or ask assistance from the shop where you purchase
the mobile subscription.
2. Insert the SIM-card into the special slot and
push until fixed (you will hear a click).
SIM-card orientation is shown on the front
side of device.
Do not insert or eject the SIM-card on a
running device! Switch off the device
before you insert or eject SIM-card
3. Connect the AeroTherm RCS2 to a wall
socket.
All indicators blink three times simultaneously
(except GSM indicator). If everything is
functioning the POWER indicator will be green.
GSM indicator blinks once a second during
network search and every 3 seconds when the
network has been found.
If you have forgotten to disable PIN
authorization the GSM indicator will
start blinking rapidly. Make sure that
PIN authorization was turned off!
The device might reject some old sim cards. Please
make sure you are using a modern sim card which
complies with specification.
If the SIM-card is not inserted correctly
or is damaged the indicator POWER
and OUT will signal this by specific
blinks.
The device is now ready to work! You can carry out a simple test. Connect your device to the
AeroTherm RCS2, e.g. a desk lamp (don’t forget to turn on the lamp switch). Send the message ON to
the SIM-card number and the lamp will switch on. Send the message OFF and the lamp will turn off.
2
1. Managing the AeroTherm RCS2 Device
You can manage the device with SMS-commands, by phone call or manually. SMS management offers
best performance.
1.1 Managing by SMS
Commands are sent in the form of SMS messages to the SIM-card number of the AeroTherm RCS2.
Messages have the following syntax:
COMMAND
(for example, STATUS).
If a password was configured, then you must use following syntax:
passwordCOMMAND
(for example, 1234STATUS),
Where 12345 is a password set by the command PASSWORD=12345
There are three types of commands:
Configuration commands (marked “30min” in the tables)
•
Allow parameters and functions to configure the AeroTherm RCS2 device. The configuration can only be
performed within 30 minutes after device has been powered on or after the last configuration command has
been received. If you try and configure device after 30 minutes, then you will get the message “command –
Time for configuration is expired (30min)” (only if ERROR = ON To remind the user of this limit we have
marked configuration commands as “30min” in the column “type” in the tables. Settings are stored in nonvolatile memory and are not lost when power is off.
Information configuration commands (marked “Inf” in the tables)
• These commands have a question mark at the end (COMMAND?). These are information commands. In
response you will receive the current value of the parameter, which has the same name as the command. These
commands do not activate the configuration, but only inform you of the value. These commands are available at
any time. You can set up the facility to reset the configuration interval (see section 5.3)
Control and Management commands (marked “Ctrl” in the tables)
•
Used to control the AeroTherm RCS2 device and can be used at any time.
Each command has a default value. This is the value that was installed at the factory. Commands are not
case sensitive. You will get a response after sending the command. This can be disabled if desired.
Should a configuration command have different values these will all be seen in response to the
information command associated with this configuration command. The values will be comma-separated
and the current active value will be indicated in parentheses. For example, you send the information
command “Command?” In response you will get the reply “COMMAND=OFF, (ON). This means the
current active value is “ON”, and “OFF” is another value acceptable for this command. This syntax is
made for possible values. They will be given in the response. The first value in the response is the
factory default value
If you make a mistake in the command and send an incorrect command, you will receive a message
“command –Error!” (Only if ERROR=ON). If a command longer than 30 characters was sent, it will be
deleted without any response notifications.
3
Note: Configuration commands are only accepted during the first 30 minutes after powering on.
This is for security reasons. If you want to reconfigure the device you must disconnect it from the
main outlet and turn it on again. You can also set up the facility to reset the configuration level.
The list of simple commands for management and configuration is shown in the following table. The
real response may differ from those indicated in the table, depending on the command.
Command
ON
OFF
ON123
OFF123
RESTART
STATUS
RUNTIME
Description
Turn on the main power socket
Turn off the main power socket.
Turn on the main power socket for 123
minutes. Maximum value is 720 minutes
Turn off the main power socket for 123
minutes. Maximum value is 720 minutes.
Response
Power socket ON
Power socket OFF
Power ON for 123 min
Type
CTRL
CTRL
CTRL
Power OFF for 123 min
CTRL
Restart (return to the same status after a
certain period of time) main socket. Time for
restart set by RESTARTTIME.
Request for main power and micro relay
status, temperature, GSM signal, date and
sensor’s status, etc.
Power socket restarted.
CTRL
Power socket ON
Signal: Good (-67 dBm)
Temp:25C
ALARMF: Disabled
ALARM status: No
activity
Time: y/m/d, h:m:s
CTRL
Informs how long main relay has been turned
on (since last restart or power on).
Power socket in ON from:
y/m/d, h:m:s
CTRL
If you turn on the main socket manually
before the correct date was installed on the
device the start up time of the device will not
be recorded directly.
4
2. Security Settings
Block access to AeroTherm RCS2 management for unauthorized users! If there are no security
settings, then anyone who knows the phone number of the SIM-card will be able to manage the
device – which is not advisable! The device uses two methods of protection against unauthorized
access:
•
•
Only allowing access to authorized phone numbers.
Authentication by password
Both methods can be used separately or together. In the first method the device ignores SMScommands and calls from numbers that are not listed. The list can contain up to 10 numbers. The second
method involves use of individual 5 character password. This password must be typed before the SMScommands without any space or special characters as shown here”
passwordCOMMAND
( for example, 12abcSTATUS)
Where 12abc is a password set by the command PASSWORD-12abc (more details below)
2.1 Security Numbers List Settings
The security list allows you to configure up to 10 numbers and up to 15 digits for one phone
number. Below is a list of commands that explain how to activate the security list and how to add
a number. By default, the security list is disabled and does not contain any numbers.
Command
Description
Response
Type
SECNUMBER+605-555-5555 - 30min
SECNUMBER+605-555-5555 Add new number to
security list.
OK
Delete specific number
SECNUMBER-605-555-5555- 30min
SECNUMBER-605-555-5555
from security list.
OK
Delete all number from
SECNUMBER-ALL- OK
30min
SECNUMBER-ALL
the list
Request for security list
SECNUMBER? 605-555-5555 Inf
SECNUMBER?
numbers
605-555-5555
Activate security list
SECLIST= ON- OK
30min
SECLIST=ON
Disable security List
SECLIST=OFF
30 min
SECLIST=OFF
Information about
SECLIST=OFF, (ON)
Inf
SECLIST?
security list activation
5
Telephone numbers must be added in the international formal (with country code) without spaces or
hyphens. Here is a general example of how to add and remove number 1(212)555-5555
SECNUMBER+12125555555 –example of adding a number
SECNUMBER-12125555555 – example of removing a number
Here 1 is the United States Country code, 212 is the area code for New York and 5555555 is a 7-digit
local number.
If you add a number to the list when the list is not activated the protection will be disabled. Do not forget
after adding number to activate security list by command SECLIST=ON. If you deleted all the numbers
by command SECNUMBER-ALL, the protection will be disabled automatically (SECLIST=OFF became
active)
Make sure that Caller ID is active for the listed number. All numbers that the system does not recognize
are considered to be unauthorized numbers.
We suggest that you always use security list protection, even if you use password protection.
2.2 Renewal of the Configuration Interval
If you’re away from the device but need to reconfigure it and the configuration time has expired then
you can resume the configuration. You will get another 30 minute window for configuration.
However taking into account that this timeout is an additional level of security the opportunity to
reset this limit should be protected by password and configured in advance. If you have not done this
in advance then you will not be able to do it remotely.
3. Command Confirmation
It is important to confirm that the command was executed successfully. For this purpose we have
implemented notifications of each executed command. If you wish to receive execution
confirmations the setting “hide my number” should not be activated on the phone from which
you are sending messages or making calls to AeroTherm RCS2.
3.1 Confirmation of SMS-commands
If you activate this notification you will be informed about each command execution. It is the
default setting but you can disable these notifications to save the cost of SIM-card messages.
Command
SMSCONFIRM=ON
Description
Response messages to SMScommands will be sent
SMSCONFIRM=OFF Do not send response messages
to SMS-Command
Information about
SMSCONFIRM?
SMSCONFIRM configuration
6
Response
SMSCONFIRM=ON -OK
Type
30min
SMSCONFIRM=OFF -OK
30min
SMSCONFIRM=ON, (OFF)
Inf
3.2 Incorrect commands, Later Configuration and Commands From Unauthorized Users.
If an incorrect command was sent to the device (typo mistake, for example), you will get the
“command – Error!” response. If you have password protection but forgot to specify it before
command you will get the “Invalid access password!” response. If you are trying to assign an
invalid value to the configuration command you get the message “Incorrect value!” You will get
“Time for configuration is expired (30 min)!” response when you try to send a configuration
command after the configuration time is up. If an unexpected error occurred during the command
execution you will get the message “Execute error!” You can disable all the above error
messages by setting options ERROR=OFF
If the security list was configured and someone tries to execute a command no response will be
received until you install SMSCONFIRMUNAUTH=ON. If you set “ON” value for this
parameter then unauthorized number will receive the message “Access deny!” in response to an
attempt to execute any command. We do not recommend you to set the “ON” value for this
option, because unauthorized users who know the phone number of the SIM-card can
deplete the card’s credit with such response messages. Therefore, we also strongly suggest
using protection with security list and not just password protection! This is due to the fact
that a command typed without a password is considered an incorrect command and the illegal
sender will receive “command – Error!” in response. This Activity can also deplete SIM-card
credits by such responses.
Command
ERROR=ON
Description
Activates sending
information of a SMS
command which was not
executed due to any error.
Disables the error message
ERROR=OFF
responses
Information about Error
ERROR?
Configuration
SMSCONFIRMUNAUTH=ON Send reports (errors, not
permitted, time out) to
unauthorized numbers
Don’t send reports to
SMSCONFIRMUNAUTH=
unauthorized numbers
OFF
Information about
SMSCONFIRMUNAUTH?
SMSCONFIRMUNAUTH
configuration
Response
ERROR=ON - OK
Type
30min
Error=OFF -OK
30min
Error =(ON),OFF
Inf
SMSCONFIRMUNAUTH= 30min
ON – OK
SMSCONFIRMUNAUTH= 30min
OFF – OK
SMSCONFIRMUNAUTH= Inf
(OFF), ON
Generally, it should be noted that the ERROR=OFF command disables all reports about errors and later
configuration for all senders. By default this option is set to “ON” so that during the familiarization
period you can get all responses about errors and will not be confused when there is no response from
the device. Once you are familiar with the device you can disable the error message responses. In the
beginning however, we strongly recommend configuring the list of allowed numbers and keeping the
option SMSCONFIRMUNAUTH, which is set to OFF by default.
7
Command
Description
ALERTNUMBER+605- Set the number for SMS. This
number is used in some other cases –
555-5555
You can install up to 10 numbers.
You must set up this number before
doing other configurations!
Remove number from list
ALERTNUMBER 605-555-5555
ALERTNUMBER-ALL Remove all numbers
ALERTNUMBER?
Information about numbers
Response
Type
ALERTNUMBER + 605555-5555 - OK
30min
ALERTNUMBER – 605555-5555 –OK
ALERTNUMBER – ALL
– OK
ALERTNUMBERs :
605-555-5555
605-555-5555
No ALERTNUMBERs!
30min
30min
Inf
7. Status after Resumption of Power Supply
These settings are stored in non-volatile memory and are not upset by power supply interruptions.
Command
Description
Response
POWERSTATE=REM
EMBER
The main power socket
remembers its state and returns to
it after the resumption of power is
supplied to the device.
POWERSTATE=REMEMBER Conf
- OK
POWERSTATE =ON
The main power socket always
turns on when resuming the power
supply to the device
POWERSTATE=ON – OK
Conf
POWERSTATE =OFF
Main power socket is always
turned off when resuming the
power supply to the device
POWERSTATE=OFF –OK
Conf
POWERSTATE?
Information about
POWERSTATE configuration
POWERSTATE=
(REMEMBER), ON, OFF
Inf
8
Type
Power Notifier
Power Notifier – a feature of this device which will notify you in the event of a power failure and/or
the restoration of the power supply.
To receive such alerts you need to configure the number for alerts using the command
ALERTNUMBER. Once this number has been configured you will receive messages whenever
power is interrupted and/or restored. This number is also used for other notifications. You can only
disable this feature by removing the number for notifications.
Note! This feature might be unstable if you use more than one ALERTNUMBER. On the 707 Model
the unit might sometimes remain turned on after you have disconnected it from the power source.
This is because of the built-in battery. If this happens please remove the SIM card from the unit and
wait several minutes. It will switch off after a maximum of 6 minutes.
8. Original Factory Settings
Each new device has pre-configured factory settings. These are the so-called default values. These
settings are described in the table below. The device can be returned back to these default values at
any time. The reset button is positioned on the front panel next to the logo. To reset the device, press
this button with a suitable thin object, hold it for 5 seconds and then release. When you release the
button all indicators (except GSM) should start blinking for the next 10 seconds.
Please press the button again with these 10 seconds to confirm reset to factory defaults. Then
wait until the device reboots. Your device is now returned to the original factory configuration.
Note! All you personal settings will be erased during this reset procedure.
Default Factory Settings
SMSCONFIRMUNAUTH=OFF
THERMOSTAT=HEATING
TEMPOFF=10 (or 50 for the “US” models)
THERMALERT=OFF
TRISEALERT=OFF
TFALLALERT=OFF
TEMPCAL=5
MICRORELAYTIME=0
SENSORTYPE=NO
ALERT=SMS
MICLEVEL=15
POWERSTATE=REMEMBER
SALDOUMS = NO
Main socket is switched off
Alarm function is deactivated
Scheduler is empty
Thermostat is not activated
RESTARTIME= 10
RING=NOACTION
SECLIST=OFF
PASSWORD=NO
RENEWINTERVALPW=NO
SMSCONFIRM=ON
RINGCONFIRM=ON
RINGCONFIRMTYPE=SMS
ERROR=ON
9
9. LED Indicators
Below we list possible LED modes.
Indicators
POWER green, GSM blue, MICROPHONE yellow (optional), OUT red
SIM socket
Push-push type, plug-in SIM car 3V
GSM
850/900/1800/1900mhZ, integrated strip antenna
Temperature Control
(Optional)
Built-in thermometer and thermostat, temperature measurement provided by SMS, turn on/off
equipment by thermostat’s settings
PWR (green)
Lights constantly
Blinks 4 times per second then lights 2 seconds
Input power to device is OK
SIM card problems (Missed, incorrectly placed, PIN
protection is enabled)
Alarm function is enabled; sensors are not in active
status
Blinks every second
GSM (blue)
Blinks every second
Blinks every 3 seconds
Not logged to GSM network yet, searching (the same
blinking if PIN protection is still activated)
Logged to GSM network
ON (red)
No light
Lights constantly
Blinks 4 times per second
Main power socket is turned off
Main Power socket is turned on
An error or possibly a problem with SIM card
Security
Management and Main
Features
Password, phone number list, limited configuration interval
SMS control and configuration, call control, manual switching
Turn on/off or restart of 120VAC/240VAC appliances by main relay
Turn on/off of appliances up to 24VDC by micro relay (optional)
Temperature measurement, provided by SMS (optional)
Alarm Notifier – alarm notification over external sensors actuation (optional)
Scheduling start, stop, status info, Alarm function on/off (optional)
Power Notifier
Online 24/7 – gets the device back online even after a break in the GSM- network.
10
10.Troubleshooting
Please read the safety instructions carefully as well as the warranty terms. You may not repair the
device yourself. Here are descriptions of the possible problems and their rectification. Some of the
described situations may not be malfunctions. If you are unable to eliminate any problem yourself
during the warranty service period you can take the device to the store from which you bought it.
Postal warranty service is provided by the manufacturer or authorized service centers. Some advice
can be given by e-mail. When contacting make sure to specify the device model and firmware
version (you can check this by sending the SMS-commands FIRMWARE and HARDWARE to
device).
Possible Malfunction
No lights on indicators after AeroTherm
RCS2 switched into a wall outlet
The device is plugged into a wall outlet,
the POWER indicator is on but the device
does not accept any commands
The device attached to the main socket
will not turn on although the main socket
itself is working
Command was sent but no response and
nothing happens
Possible solutions
Make sure that the wall outlet is functioned and that power is available
Make sure that all indicators are correctly lit, the SIM-card is inserted correctly,
PIN-code authorization is removed on the SIM-card and the GSM network is
available
Check whether the connected device functions and whether its own switch is
turned ON
The AeroTherm RCS2 could have lost contact with the GSM-network or there
is no electricity in the home network. If you’re away from the device and cannot
verify the existence of electricity in the home network or the GSM-signal you
can carry out a simple test. Try to call to the device’s number. If this works you
will hear a ringing tone instead of a “subscriber not available” signal (only if
RING=NOACTION). If you are sure that the device is online you need to look
for other possible problems.
One possibility is that the phone number from which you are sending messages
is unauthorized and therefore you will not receive any messages and no action
will be carried out
A mistake in writing the command could have occurred and error suppression
could have been set (ERROR=OFF). In this case you would not know if you
had made a mistake in the command. Check your outgoing messages to see
what command was sent and check that it was written correctly, according to
the manual.
The OUT indicator reports an error
(blinking 4 times per second)
The phone from which device was
controlled has been lost, but the number
Read about other potential problems below.
If the OUT indicator blinks 4 times per second, even only occasionally (e.g. at
the start of the device), it is likely that there is some problem with the SIM card.
Check that the SIM card in the device doesn’t contain any data (such as stored
phone numbers and messages). If the SIM card has data on it then clean it using
your cell-phone. Also try using another SIM card. Make sure you are using a
modern SIM card.
If the OUT indicator is blinking constantly and the blue GSM indicator is
always off there is probably a problem with the power of the GSM module.
Contact the service department
The device must be reset to the factory defaults and set again with another
phone.
11
was recorded in the list of allowed
numbers so you can no longer control the
device.
The device is behaving strangely – e.g. no
response to commands
The device doesn’t send power failure/
power restore alerts
Try to reset to factory default and configure the device again. You can also
check that the SIM card in the device doesn’t contain any data (such as store
phone numbers and messages). If the SIM card has data on it then clean it using
your cell-phone
First please check that your model supports the Power Notifier feature. Second,
make sure that the number for alerts is installed. Lithium-ion batteries are
subject to a natural aging process. When the capacity falls below a critical value
you will not be able to receive the power failure alerts. If this happens during
the warranty period you have the right to get a replacement battery for the
product. If you use the device outside the specified temperature range this can
also be the reason for not receiving power failure alerts.
12