1
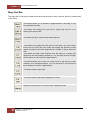
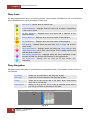
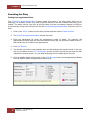
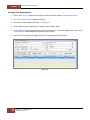
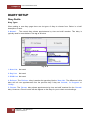
Chapter 6 THE APPOINTMENT BOOK THE APPOINTMENT BOOK CONTENTS GETTING ROUND THE DIARY ....................................................... 3 Overview .............................................................................................. 3 Diary Holding Tank.............................................................................. 3 Diary Tool Bar ...................................................................................... 4 Diary Icons ........................................................................................... 5 Diary Navigation .................................................................................. 5 Appointment States ............................................................................ 6 Searching the Diary............................................................................. 7 Finding Free Appointment Slots ................................................................. 7 Finding Client Appointments ...................................................................... 8 DIARY SETUP ................................................................................. 9 Diary Profile ......................................................................................... 9 Diary Types ................................................................................................... 9 Creating a New Diary Page ........................................................................ 10 Default and Minimum Appointment Length ............................................. 10 Zoom Level Setup ...................................................................................... 11 Customising Staff Order ............................................................................ 12 Time Division Display ................................................................................ 13 Setting Up Multi-Book ................................................................................ 14 Setting Up Rooms ...................................................................................... 15 Diary Reasons ................................................................................... 16 Creating a New Diary Reason ................................................................... 16 Setting the Duration of Diary Reasons ..................................................... 16 Assigning Colours to Diary Reasons ....................................................... 17 Business Hours ................................................................................. 18 Holidays ............................................................................................. 18 Setting Up a New Holiday .......................................................................... 18 Editing the date of the Holiday.................................................................. 18 1 HAIRLINKSQL User Manual v4.5 Updated 01/05/2012 Chapter 10 THE APPOINTMENT BOOK Notes on Creating Holidays ...................................................................... 18 Diary Forms ....................................................................................... 19 Customising a Client Form........................................................................ 19 Printing a Client Form ................................................................................ 19 AJUSTING STAFF ROSTERS ...................................................... 20 Adding Staff on a Non-Rostered Day ............................................... 20 Altering Staff Hours on a Single Day ............................................... 20 Diary Locks ........................................................................................ 21 Adding a New Lock .................................................................................... 21 Removing a Lock ....................................................................................... 21 APPOINTMENTS ........................................................................... 22 Booking an Appointment .................................................................. 22 How to Change Appointment Details ............................................... 24 How to Confirm and Unconfirm an Appointment ............................ 24 Appointment Conflicts List ............................................................... 25 Minimal Entry New Client Form ........................................................ 26 STANDING APPOINTMENTS ....................................................... 27 Examples of Using Standing Appointments ................................... 27 How to Access Standing Appointments .......................................... 27 Setting up Standing Appointments .................................................. 28 The Standing Appointment Details Window.................................... 28 Creating a New Standing Appointment ........................................... 30 Editing & Checking Existing Standing Appointments .................... 32 Error Handling ................................................................................... 33 MESSAGING SYSTEM.................................................................. 34 How to Add a New Message ............................................................. 35 How to Mark a Note as Done, Read or Cancelled ........................... 36 ARRIVALS ..................................................................................... 37 2 HAIRLINKSQL User Manual v4.5 Updated 01/05/2012 Chapter 6 THE APPOINTMENT BOOK GETTING ROUND THE DIARY Overview Fig. 6 - 1 The Diary is used to create, view and edit appointments for clients. In HairlinkSQL you can configure more than one diary into various types and formats including a list view. Diary Holding Tank The holding tank is a temporary holding bay for any appointments that you wish to change to another day or diary. If you drag an appointment into the holding tank you can then search through other days or diaries to find a suitable time slot. When a time slot is found simply drag the appointment from the holding tank onto the diary using your mouse. Fig. 6 - 2 3 HAIRLINKSQL User Manual v4.5 Updated 01/05/2012 Chapter 10 THE APPOINTMENT BOOK Diary Tool Bar The diary has its own diary toolbar which allow fast access to diary functions. Below is a description of this menu. This button allows you to search for appointments in the diary or find free appointment slots. This button will change the view from a single Day view to a vie showing the entire week. This button will print various diary related reports. This button will change the zoom level on the diary. Up to five zoom levels can be set by the user which will change the number of staff shown across the top of the page and the number of hours down the side. This button will add a staff member onto the diary for a single day which they are not already rostered on. You can also choose a single staff member to view only their appointments. This button allows you to lock out certain times of the day for a staff member, or for all staff members. You can use this for such things as lunch breaks or a doctor‟s appointment. This button starts a cash sale. This button starts a bill that is assigned to a client. Opens the actions menu of specific diary related functions 4 HAIRLINKSQL User Manual v4.5 Updated 01/05/2012 Chapter 6 THE APPOINTMENT BOOK Diary Icons On diary appointments and in the billing window, icons provide information to the user about the client. Read below for a brief description of each icon. New Client - Shows when a client is new. Current Balance - Displays when the client has a balance outstanding in the current month. 30 Day Balance - Displays when the client has a balance in the previous month. 60 Day Balance - Displays when the client has a 60 day balance. 90 Day Balance - Displays when the client has a 90 day balance. Bad Debtor - Displays when the client has ‘Stop Charge’ set on their client record. Very Bad Debtor - Displays when the client has ‘Stop Charge’ and ‘Stop Statements’ set on their client record. This is usually when a bad debt has been written off. Not Seeing Requested - Displays when the client requested a staff member and did not get that staff member for the appointment. See Requested - Displays when the client got the staff member they requested. Diary Navigation Navigation around the diary is controlled by the navigation tool bar. This toolbar consists of three or four buttons. Prev Day: Allows you to scroll back in the diary day by day. Next Day: Allows you to scroll forward in the diary day by day. Today: Takes you to the current day in the diary. Note: Only shows when not on current day. Date button: When you click on the ‘Date’ button a calendar opens where you can go to future or past days in the diary Fig. 6 - 3 5 HAIRLINKSQL User Manual v4.5 Updated 01/05/2012 Chapter 10 THE APPOINTMENT BOOK Appointment States Each appointment on the diary will be colour coded to display the stage the appointment and billing process are up to. This makes it easy for the user to glance at the diary screen and instantly see the status of an appointment. Due (White) – The client has not arrived or confirmed their appointment and no bill has been started. Confirmed (Purple) – The client has been contacted by phone, email or sms and they have confirmed their appointment. Replied (Orange) - The client has been sent a SMS which they have replied to with a message that is not ‘Y’ or ‘Yes’. To view the reply, right click on the appointment and go to ‘Email/SMS’ then ‘Look at Reply’. Arrived (Yellow) - The client has arrived in the salon and is waiting to be seen. In Progress (Red) - A bill has been started for this appointment and it is either still open or it has been saved and exited and marked as „not ready‟ for reception. Ready (Green) – Items have finished being added to the bill. The bill has been marked as „Ready‟ so reception can edit the bill and take payment. Finished (Blue) - The client has been processed and the bill has been finished with a payment receipted. 6 HAIRLINKSQL User Manual v4.5 Updated 01/05/2012 Chapter 6 THE APPOINTMENT BOOK Searching the Diary Finding Free Appointment Slots The ‘Find Free Appointment Slot’ function helps find space in the diary where there are no bookings. For example, a client may need to get their haircut in the next 2 weeks before they go on holiday. The salon may be very busy at this time with very few free spaces. Instead of having to scour the diary to find a free slot they can use the ‘Find Free Appointment Slot’ function to do it for them. 1. Click on the ‘Ctrl-F’ button from the diary tool bar and then select ‘Find Free Slot’. 2. The ‘Find Free Appointment Slot’ window will open. 3. Enter the parameters for which the appointment needs to satisfy. For example, the appointment must be within the next three weeks on any day, the client only wants to see AT and half an hour is needed for the appointment. 4. Click ‘F3: Search’. 5. The function will find the next available time slot that matches the search criteria. If the time slot is not suitable click on ‘F3: Find Again’ and the function will find the next time slot that matches the search criteria. You can keep searching until a suitable space is found. 6. Once a suitable space is found click on the ‘F12: Accept’ button and an appointment details form will open to make the appointment at that time. Fig. 6 - 4 7 HAIRLINKSQL User Manual v4.5 Updated 01/05/2012 Chapter 10 THE APPOINTMENT BOOK Finding Client Appointments 1. Click on the ‘Ctrl-F’ button from the diary tool bar and then select ‘Find Appointment’. 2. The ‘Find Appointment’ window will open. 3. Enter your search criteria and click ‘F12: Search’. 4. All the appointments matching your search criteria will be listed. 5. If you have found the appointment you were looking for select the appointment and click ‘F12: Accept’, otherwise search again with new criteria. 6. You will now be taken to the appointment you have selected on the diary. Fig. 6 - 5 8 HAIRLINKSQL User Manual v4.5 Updated 01/05/2012 Chapter 6 THE APPOINTMENT BOOK DIARY SETUP Diary Profile Diary Types When adding a new diary page there are six types of diary to choose from. Below is a brief description of each. 0: Normal: The normal diary shows appointments by time and staff member. This diary is typically used for consultations. See Fig. 6 - 6 below. Fig. 6 - 6 1: Num List: Not used. 2: Day List: Not used. 3: DOW List: Not used. 4: Rollover: The ‘Rollover’ diary is another list type diary like the ‘Num List’. The difference is this diary will roll over appointments from the previous day if they are ‘Arrived’, ‘In Progress’ or ‘Ready’. 5: Rooms: The ‘Rooms’ diary shows appointments by time and staff member like the ‘Normal’ diary. However a „Room‟ button will also appear on the diary for you to check room bookings. 9 HAIRLINKSQL User Manual v4.5 Updated 01/05/2012 Chapter 10 THE APPOINTMENT BOOK Creating a New Diary Page 1. Login with the highest access rights you have. 2. Go to the 'Options' menu and then select 'Pick Lists Setup' 3. Expand the 'Diary' option and double click on ‘Diary Profile’. 4. A list of diary pages that have already been created will be displayed. 5. Double click on a line where the ‘Dry_Name’ column is blank to open a diary profile window. 6. Enter the ‘Name’ of the diary you are creating. 7. Select the ‘Type’ of diary you want to create (See Diary Types , page 9) 8. Set ‘Status’ to ‘Active’ 9. Click ‘F12: Accept’ to save and exit the diary. Default and Minimum Appointment Length When you make an appointment in the diary you can set a default appointment duration if the appointment duration is automatically entered by the reason. For example, if no reason was selected the system would automatically enter 15 minutes for the duration of the appointment; the user could then change this if they needed. You can also set the minimum amount of time a user can set for an appointment. For example, you may have a policy of 15 minute consultations; you can set the minimum appointment length to 15 minutes so you don‟t get double booked accidently. 1. Login with the highest access rights you have. 2. Go to the 'Options' menu and then select 'Pick Lists Setup' 3. Expand the 'Diary' option and double click on ‘Diary Profile’. 4. A list of diary pages that have already been created will be displayed. 5. Double click on the Diary you wish to edit. 6. If you wish to set the minimum appointment duration change the ‘Min Apt’ field to suit. To change the default appointment length change the ‘Def Apt’ field to suit. 7. Click ‘F12: Accept’ to save and exit. 10 HAIRLINKSQL User Manual v4.5 Updated 01/05/2012 Chapter 6 THE APPOINTMENT BOOK Zoom Level Setup The zoom level set up configures the number of hours and staff members that are displayed on the diary. There are five different zoom levels that can be configured. When the zoom button is pressed on the diary it will move to the next zoom level that has been configured. 1. Login with the highest access rights you have. 2. Go to the 'Options' menu and then select 'Pick Lists Setup' 3. Expand the 'Diary' option and double click on ‘Diary Profile’. 4. A list of diary pages that have already been created will be displayed. 5. Double click on the Diary you wish to edit. 6. The zoom levels are displayed on the right hand side in the table. 7. Edit the zoom levels and click ‘F12: Accept’ to save and exit. Fig. 6 - 7 11 HAIRLINKSQL User Manual v4.5 Updated 01/05/2012 Chapter 10 THE APPOINTMENT BOOK Customising Staff Order You can order the staff members across the top of the diary in four methods. Numerically by staff number, alphabetically by the staff member‟s last name, alphabetically by staff ID or a user defined custom order. To edit the staff order, follow the steps below: 1. Login with the highest access rights you have. 2. Go to the 'Options' menu and then select 'Pick Lists Setup' 3. Expand the 'Diary' option and double click on ‘Diary Profile’. 4. A list of diary pages that have already been created will be displayed. 5. Double click on the ‘Diary’ you wish to edit. 6. Change ‘Stf Order’ to the method you wish to order staff. 7. If you selected custom click on the ‘Order’ button. 8. Add staff members to the diary by clicking on the ‘+’ button and searching for the staff member. 9. You can easily change the staff order by editing the order #. 10. Click the ‘Tick’ button to save and then the ‘Exit’ button to exit the ‘Custom Order’ screen. 11. Click ‘F12: Accept’ to save and exit. 12 HAIRLINKSQL User Manual v4.5 Updated 01/05/2012 Chapter 6 THE APPOINTMENT BOOK Time Division Display The ‘Normal’ diary is displayed in units of time. The lines that are drawn on the screen to display time can be broken down into multiples of 5, 10, 15, 20 or 30 minutes. Please see below for examples. Fig. 6 - 8 Fig. 6 - 9 Fig. 6 - 8 shows the diary with the time division display set to 10 minutes. Fig. 6 - 9 shows the same diary with time division display set to 15 minutes. 1. Login with the highest access rights you have. 2. Go to the 'Options' menu and then select 'Pick Lists Setup' 3. Expand the 'Diary' option and double click on ‘Diary Profile’. 4. A list of diary pages that have already been created will be displayed. 5. Double click on the ‘Diary’ you wish to edit. 6. Change ‘Time Division Display’ to the division you want. 7. Click ‘F12: Accept’ to save and exit. 13 HAIRLINKSQL User Manual v4.5 Updated 01/05/2012 Chapter 10 THE APPOINTMENT BOOK Setting Up Multi-Book Multi-book allows more than one appointment to be made for the same staff member in the same appointment block. For example, a client may be bringing both their children in for a haircut. They may be able to see both children at the same time in the same 30 minute appointment block. With multi-book turned on, both children could be booked in with an appointment. When they look at the diary they will be able to see both appointments. (see Fig. 6 - 10) 1. Login with the highest access rights you have. 2. Go to the 'Options' menu and then select 'Pick Lists Setup' 3. Expand the 'Diary' option and double click on ‘Diary Profile’. 4. A list of diary pages that have already been created will be displayed. 5. Double click on the ‘Diary’ you wish to edit. 6. Change ‘Num Apt / Time Slot’ to the number of appointments you wish to be able to book at the same time for a staff member. 7. Click ‘F12: Accept’ to save and exit. 8. Open the staff record of the staff member you wish to enable multi-book for. 9. Go to ‘8: Stf’ | ‘F11 Roster(Click for Details)’. 10. For the rosters / days you wish to enable multi-book, place a tick in the ‘Multi-Book’ column. 11. Click the ‘Tick’ to save and close the staff record. Fig. 6 - 10 14 HAIRLINKSQL User Manual v4.5 Updated 01/05/2012 Chapter 6 THE APPOINTMENT BOOK Setting Up Rooms Some clinics may book appointments by the room or machine. This is different to the normal diary whereby you book by the staff member. If you are booking by room / machine you need to ensure that the room or machine is not double booked by two staff members. Using the rooms diary will ensure this does not happen. 1. Login with the highest access rights you have. 2. Go to the 'Options' menu and then select 'Pick Lists Setup' 3. Expand the 'Diary' option and double click on ‘Diary Profile’. 4. A list of diary pages that have already been created will be displayed. 5. Double click on the ‘Diary’ you wish to edit. 6. Change the ‘Type’ to ‘Rooms’. 7. If a room must be selected for each appointment made, set ‘Room is Required’ to ‘Yes’. If a room is only required sometimes set ‘Room is Required’ to ‘No’. 8. To add your new room types click on the ‘Rooms’ button and then on the ‘+’ at the bottom of the new window. 9. Enter the details of the room you are creating. a. b. c. d. Name: The room name, eg „Massage Room‟ ID: A short ID for the room, eg „M1‟ Status: Enables or disables the room to be used. Room#: The room number, Eg the Massage room is room number „1‟. 10. Click ‘F12: Accept’ to save and exit. 11. Save and exit the Room List window. 12. Click ‘F12: Accept’ to save and exit. 15 HAIRLINKSQL User Manual v4.5 Updated 01/05/2012 Chapter 10 THE APPOINTMENT BOOK Diary Reasons Creating a New Diary Reason Diary Reasons are used when making an appointment to show what the appointment is about. The diary reason can be linked to a SERVICE so it is automatically billed when the bill is started. To create a new diary reason, follow the steps below. 1. Login with the highest access rights you have. 2. Go to the 'Options' menu and then select 'Pick Lists Setup' 3. Expand the 'Diary' option and double click on ‘Diary Reasons’. 4. A list of diary reasons that have already been created will be displayed. 5. Click on the blue ‘+’ button at the bottom of the page to create a new reason and select ‘OK’ to the insert new record prompt. 6. Enter a ‘Name’ for the appointment reason and change ‘Status’ to ‘Active’. 7. If you wish to link it to a service click on the ‘Add New Product’ button and choose the service you want. 8. Click ‘F12: Accept’ to save and exit. Setting the Duration of Diary Reasons To make entering appointments a faster and more streamlined process you can assign default durations to appointment reasons. This will ensure staff members do not waste time entering the duration details and remembering how long an appointment will take. 1. Login with the highest access rights you have. 2. Go to the 'Options' menu and then select 'Pick Lists Setup' 3. Expand the 'Diary' option and double click on ‘Diary Reasons’. 4. A list of diary reasons that have already been created will be displayed. 5. Double click on the reason you wish to edit. 6. Change the ‘Duration’ to suit (see). 7. Click ‘F12: Accept’ to save and exit. 16 HAIRLINKSQL User Manual v4.5 Updated 01/05/2012 Chapter 6 THE APPOINTMENT BOOK Assigning Colours to Diary Reasons To assist staff members in quickly gauging what type of appointments reasons are in the diary, colours can be assigned to reasons. It is recommended that only the important reasons are coloured coded to avoid confusion. Follow the steps below to assign colours to appointment reasons. 1. Login with the highest access rights you have 2. Go to the 'Options' menu and then select 'Pick Lists Setup' 3. Expand the 'Diary' option and double click on ‘Diary Reasons’. 4. A list of diary reasons that have already been created will be displayed. 5. Double click on the reason you wish to edit. 6. Click on ‘Colour’ (see Fig. 6 - 11) and select a colour from the palette then click ‘OK’. 7. Click ‘F12: Accept’ to save and exit. Fig. 6 - 11 17 HAIRLINKSQL User Manual v4.5 Updated 01/05/2012 Chapter 10 THE APPOINTMENT BOOK Business Hours Staff members and appointments can only be added to the diary between the scheduled shop hours. Follow the instructions below to change the shop hours. 1. Log in with your user ID and password. 2. Click on ‘Options’, then select ‘Pick Lists Setup’. 3. From the pick lists double click on ‘Diary’ then double click on ‘Business Hours’. 4. This will open the „Business Hours’ form. From here you can edit any of the shop hours which are in 24 hour format. Holidays Setting Up a New Holiday 1. Login with the highest rights you have. 2. Go to the 'Options' menu and then select 'Pick Lists Setup' 3. Expand the 'Diary' option and double click on ‘Holidays’. 4. A list of holidays that have already been created will be displayed. 5. Click the '+' symbol to add a new holiday. 6. Enter the ‘Name’ and ‘Date’ of the holiday and set the 'Status' to ‘Active’. 7. Click the 'Tick' button in the bottom right hand corner of the window, then click 'Ok' to save the changes. Editing the date of the Holiday If the holiday is already entered but is for a previous year just click on the date and select the correct date from the calendar. Notes on Creating Holidays If there are any appointments already booked on the selected date, the system will not allow you to activate the holiday, but will display a warning informing you of the number of appointments found on that day. You will need to move all appointments from that day to another day before you can activate the holiday. Once you have activated the holiday, close the application and restart. You will no longer be able to make appointments on that day. If you look at the day in the diary, you will notice the text of the date has changed to a dark red, and the name of the holiday is listed in brackets immediately after the date. To allow an appointment to be created on a holiday, you will have to mark the holiday as 'Inactive'. Simply follow the instructions listed above to get back to the Holiday List. 18 HAIRLINKSQL User Manual v4.5 Updated 01/05/2012 Chapter 6 THE APPOINTMENT BOOK Diary Forms HairlinkSQL has a number of forms that can be printed directly from the right click menu of an appointment. All the forms are completely configurable by the user. The forms that are available are: New client form Address confirm form Consent form Custom consent form Customising a Client Form 1. Go to the ‘Options’ menu then choose ‘Setup’. 2. Log in with your user ID and password. 3. Click on the ‘Diary’ button then the ‘2: Form’ tab. 4. Select the form you wish to edit. 5. Using the word processor tools edit the form. 6. Select the computer disk in the top left hand corner to save the form. Printing a Client Form 1. Right click on a client‟s appointment and choose ‘Print Forms / History’. 2. From the pop-up box choose which form you wish to print. 19 HAIRLINKSQL User Manual v4.5 Updated 01/05/2012 Chapter 10 THE APPOINTMENT BOOK AJUSTING STAFF ROSTERS Adding Staff on a Non-Rostered Day The diary automatically adds staff members to the diary using a staff members roster on their staff record. Occasionally, a staff member may come into work on a non rostered day and therefore will not have a column on the diary. You can use the ‘Add Staff’ to add the staff member onto a single day. To do this follow the steps below. 1. Go to ‘F7: Staff’ | ‘Add Staff’. 2. Search for the staff member you wish to add and click ‘F12: Accept’. 3. The staff member will be added to the diary. Blue manual locks will appear in place of the normal ‘Not Working’ times. If the staff member‟s roster is updated to be working for this day, the manual locks will override the roster. Fig. 6 - 12 Altering Staff Hours on a Single Day The background processor will periodically check the staff roster on the staff record and allocate the diaries based on that. If you move the grey ‘Not Working’ times on the diary, when the background allocates the roster it will change the ‘Not Working’ times back to whatever is in the roster. To alter the hours when a staff member works overtime or starts late you need to change the grey ‘Not Working’ times to blue manual locks. 1. Find the day in the diary you wish to extend the staff members hours for. 2. Right click on a staff members ‘Not Working’ time and select ‘Change to Manual’. 3. The ‘Not Working’ Times should turn blue. Using your mouse drag the „Not Working‟ times to the hours you wish. NOTE: When they diary allocates the staff rosters the ‘Not Working’ times in blue will not be moved. 20 HAIRLINKSQL User Manual v4.5 Updated 01/05/2012 Chapter 6 THE APPOINTMENT BOOK Diary Locks The lock function allows you to lock out time slots so appointments cannot be made at those times. This is handy for entering lunch breaks, training time and meetings. Your clinic can assign colours to locks so identification can be made easier. Adding a New Lock 1. Click the ‘F8: Lock’ button at the bottom of the diary or right click on the diary on the time you want to lock from and select ‘Lock’. 2. Enter the required details and press ‘F12: Accept’. 3. A lock will appear on the diary for the times requested. Removing a Lock 1. Double click on the lock you wish to remove. 2. The lock screen will open with all the lock details automatically entered, but on the ‘Unlock’ tab. 3. Click ‘F12: Accept’ to remove the lock. Fig. 6 - 13 21 HAIRLINKSQL User Manual v4.5 Updated 01/05/2012 Chapter 10 THE APPOINTMENT BOOK APPOINTMENTS Booking an Appointment 1. Click the ‘Diary’ button to open the diary. 2. Select which diary you wish to make the appointment in, Eg. „Main‟. Fig. 6 - 14 3. With your mouse, double left click on the time and the staff column you wish to make the appointment for. Eg. 10:00am with Joanne Bloggs. Fig. 6 - 15 4. Search for the client you wish to make an appointment for or click on the ‘New’ button to add a new client. 5. When you have selected the correct client the appointment details window will open. Fill in the details as required, then click ‘F12: Finish’ to complete the appointment. 22 Client: Clicking on the client button will allow you to change the client that the appointment is for. Appt For: Clicking on the Appt For button will allow you to change the person that the appointment is for, but this will leave the bill in the Clients name. Reasons: This will show a drop down list of all the different reasons for an appointment. These reasons can then be linked to a till category and a service will be automatically entered onto the bill when the bill is created. Details: This is a free typing field were you can enter in any other details you wish to record about the appointment. Staff: This is the staff member who you are booking the appointment for. This is automatically selected when you HAIRLINKSQL User Manual v4.5 Updated 01/05/2012 Chapter 6 THE APPOINTMENT BOOK double click on a staff member‟s appointment column. Req / Prf Staff: Requested or Preferred Staff member. This can be selected if the client requested a particular staff member Start & End Times: These are defaulted to the time that you have selected when creating the appointment in the diary. The times are automatically updated when you select an appointment reason. For example, a haircut may take 30 minutes, so selecting this as a reason may change the duration of the appointment to 30 minutes. Appointment time/length can be manually changed from the drop down list of times as well. Duration: This is the duration for the appointment. The duration will be automatically calculated from the start and end times. You can also manually change the duration using the drop down list and when you do, it will change the end time of the appointment. Client Details: This displays the current details on the client file. You may click the ‘F2:Change’ button if any of these details are not correct to update them. Client Account details: This displays the current balance of the client‟s account, with a breakdown of where they may be overdue. Reminders: Displays reminders that are due. Fig. 6 - 16 23 HAIRLINKSQL User Manual v4.5 Updated 01/05/2012 Chapter 10 THE APPOINTMENT BOOK How to Change Appointment Details Appointments can only be changed if they are still in the Due state, white colour. If an appointment is confirmed or arrived you will need to unconfirm or unarrive the appointment before proceeding with the changes. Using the “drag and drop” facility it is easy to make changes to appointments. Change Details To change any appointment details double click on a Due appointment to open up the appointment details form. You can change any details relating to the appointment from here. Change assigned staff member The appointment can also be moved between staff members. To do this click on the appointment and drag it to another staff member while holding down the mouse button. Change appointment time To change the time of the appointment click and drag the appointment to a new time while still holding down the mouse button. Changing appointment duration Changing the appointment duration can be done by moving the cursor over the bottom edge of the appointment. The cursor will change to a double headed arrow. You can now make the appointment duration longer or shorter while still holding down the left mouse button. Transferring appointments To transfer an appointment from one day to another, click on the appointment and drag it to the holding tank, then navigate to the day the appointment is to be transferred, and drag the appointment from the holding tank to the selected time slot. How to Confirm and Unconfirm an Appointment Confirming an appointment means the client has been contacted and the appointment has been confirmed by the client. Confirming an Appointment: Right-click on the appointment and select ‘Confirm’. The appointment will change to a purple colour to indicate it is confirmed. Uncomfiming an Appointment: Right-click on the appointment and selecting ‘Unconfirm’. Appointments can also be confirmed via SMS. For more details on confirming appointments using this method, refer to the section on “Sending Appointment Confirmations” later in this chapter. 24 HAIRLINKSQL User Manual v4.5 Updated 01/05/2012 Chapter 6 THE APPOINTMENT BOOK Appointment Conflicts List If an appointment is added that is unable to fit in the required space, you can be prompted to place it in the Waiting List Diary. While it is in the Waiting List you can then check the diary for a space to fit it into. If you select the appointment and press Enter on your keyboard you can use the plus and minus buttons to change the duration to fit it into a free space better. Note: Appointments must be moved from the Waiting List Diary before any other diary functions can be used. This option can be enabled or disables from Options | Setup | Diary | Diary Options | Use Conflicts Diary. Fig. 6 - 18 25 HAIRLINKSQL User Manual v4.5 Updated 01/05/2012 Chapter 10 THE APPOINTMENT BOOK Minimal Entry New Client Form The minimal client entry form is used for entering new clients from the Diary and can be enabled from Options | Setup | Diary | Diary Options | Minimal Entry for new clients. The form has fewer fields and ensures that before the new client can be saved, provided staff have entered a name and one form of contact. You can also make it compulsory for staff to add the referral method. This can be enabled from Options->Setup | Client->Options | Use Referral | Referral is Compulsory. Referral types can be set up from Options | Setup | Client | Referrals and are customisable by the user. TIP: The minimal client entry form can also be configured to check if the new client may be a duplicate. You can enable this from Options | Setup | Diary | Diary Options | Check if New Cln already in Database. Fig. 6 - 19 26 HAIRLINKSQL User Manual v4.5 Updated 01/05/2012 Chapter 6 THE APPOINTMENT BOOK STANDING APPOINTMENTS Standing appointments are appointments that are repeated at regular intervals. For example, a client may have a massage every two weeks. Instead of entering every appointment individually or copying appointments and dragging them from the holding tank, HairlinkSQL can automatically enter these for you. Examples of Using Standing Appointments Standing appointments can be used for many different types of appointments and has been designed to save time by removing the need to copy an appointment to the holding tank and drag each appointment to a different day in the diary. Some examples of how standing appointments may be used are listed below: A client may have a haircut on the first Monday of every month. By using standing appointments with an indefinite time span the appointment will be made automatically and reduce the chance of another staff member accidently booking a different appointment into that time slot. Standing appointments can also be used for staff scheduling. For example, you may have a staff meeting on the first Monday of every month. Please note; such appointments may skew information in some reports such as Staff Productivity report, No Show report, and other diary reports. TIP: As standing appointments are automatically scheduled in advance they are best utilised in conjunction with the appointment confirmation feature by SMS, Email or phone. By sending an appointment confirmation message clients will not forget they had appointments booked in advance. How to Access Standing Appointments There are several ways of accessing the standing appointments window: From Client screen, click the ‘Actions’ button then ‘Standing Appointment’ menu option. From Diary screen, right click an existing appointment then click the ‘Standing Appointment’ menu option. 27 HAIRLINKSQL User Manual v4.5 Updated 01/05/2012 Chapter 10 THE APPOINTMENT BOOK Setting up Standing Appointments Before using standing appointments you must set up how far ahead you would like HairlinkSQL to generate the scheduled appointments. To do this, in HairlinkSQL go to Options | Setup | Log In | Diary | enter the number of weeks to allocate ahead in „Weeks to Allocate Standing Apts (1-60)’. NOTE: The number of weeks to allocate standing appointments should NOT exceed the number of weeks to pre-allocate diary. Fig. 6 - 20 The Standing Appointment Details Window The left hand side of the form is the same as the normal appointment details screen. The right hand side of the screen contains details for the standing appointment. Fig. 6 - 21 28 HAIRLINKSQL User Manual v4.5 Updated 01/05/2012 Chapter 6 THE APPOINTMENT BOOK Repeat Pattern Frequency Daily: An appointment will be generated every day. Weekly: An appointment will be generated each week. Day of Month: An appointment will be generated each month following the start on date. 1st Weekday of Month: An appointment will be generated on the first week of the month 2nd Weekday of Month: An appointment will be generated on the second week of the month. 3rd Weekday of Month: An appointment will be generated on the third week of the month. 4th Weekday of Month: An appointment will be generated on the fourth week of the month Yearly: An appointment will be generated each year following the start on date. Recur Every: Based on the frequency, appointments will be generated at the interval set in the ‘Recur Every’ field. For example, if ‘Frequency’ was set to ‘Week’ and ‘Recur Every’ was set to “2”, appointments would only be generated every second week. Repeat Range Start On The date on which appointments will start being allocated. End On The date on which appointments will no longer be allocated. You are able to choose from three selections: Never Ends: Appointments will continually be generated. After Count: Appointments will be entered until the number entered in the ‘End After’ field is reached. By Date: Appointments will be generated until the ‘End By’ date is reached. Other Items Status 29 HAIRLINKSQL User Manual v4.5 Updated 01/05/2012 While the standing appointment still needs to be allocated this needs to be set to ‘Active’ otherwise to stop allocation set to ‘Inactive’. Chapter 10 THE APPOINTMENT BOOK Creating a New Standing Appointment 1. Search for and open a client record. 2. Click on the ‘Actions’ button and select ‘Standing Appointments’. 3. The Standing Appointments window will open. This window will list all the current standing appointments. If there are no current standing appointments it will be blank. 4. Click on the blue ‘+’ button at the bottom of the window and the appointment details window will open. 5. Enter the details for the appointment. The left hand side of the form is the same as the normal appointment details screen. The right hand side of the screen contains details for the standing appointment. 6. Click on the ‘Next’ button and the appointments will be generated. The system will check for existing future appointments as well. 7. HairlinkSQL will now produce a list of all the future appointments. Check the appointment details and then click on the ‘F12: Finish’ button. Fig. 6 - 22 8. A warning prompt will appear. Read it and click ‘Yes’ to continue. 9. If the allocation was not successful you will be asked if you would like to correct the errors now. 10. Click ‘Yes’ to correct the errors. 11. A list of all the appointments in error will be displayed. To correct an appointment double click on the appointment in error. This will change the diary to the appointment date. 12. At this stage you may need to move appointments or alter the roster. To cancel an appointment move it to the ‘Deleted’ diary. 13. Next drag the appointment onto the diary to the position you want it. 30 HAIRLINKSQL User Manual v4.5 Updated 01/05/2012 Chapter 6 THE APPOINTMENT BOOK Fig. 6 - 23 14. Once all the appointments in error have been cleared close the error window. 31 HAIRLINKSQL User Manual v4.5 Updated 01/05/2012 Chapter 10 THE APPOINTMENT BOOK Editing & Checking Existing Standing Appointments Once the standing appointments have been created and added to the diary they function in the same manner as any other appointment. You can double click on it to change the appointment details or use the mouse to stretch or drag it. To edit all the remaining standing appointments open the client record and select standing appointments from the actions tab. Double click on the standing appointments schedule you wish to edit and the appointment details screen will open. Make any changes as necessary. Fig. 6 - 24 Any changes made to the schedule will affect appointments already made, this may result in the deletion of existing appointments and creation of new ones. Examples: To Stop a Standing Appointment Schedule – Changing the ‘End By Date’, any appointments after the new date will be removed. To Change the Day of Week – In the Standing Appointment details screen change the day of the week, the appointments will be moved to the newly selected day. Similarly changing the Start Time will move the appointments to the new start time. 32 HAIRLINKSQL User Manual v4.5 Updated 01/05/2012 Chapter 6 THE APPOINTMENT BOOK Error Handling Errors may occur when generating appointments, these are presented in a separate page, ‘Appointments in Error’. Errors may be accessed from the Dairy screen by expanding the ‘Holding Tank’, right click on the holding tank > left click on ‘Expand Form’ > when the Holding Tank is displayed, left click on the ‘In Error’ tab. The table below describes errors that may be presented after creating or amending standing appointment schedules. Error Details Explanation Not Open on Day Business closed Outside Work Hours Business hours do not extend as far as the requested appointment time Time Slot Not Available Appointment slot is already booked Room Not Available Selected room already booked - when using the rooms/resources type diary Conflict with Lock The appointment slot has been locked (manual lock) Conflict with Appointment Another appointment already exists in the requested time slot Number of Slots Exceeded No available appointment slots – when using multi booking Holiday Day marked as a holiday – business closed Staff Not Working Staff not available in diary Apt exists for the client An appointment is already made on that day In case of errors, you may do one of the following: Cancel the appointment by moving to the ‘Deleted’ diary page Move the appointment to an available appointment slot In cases where the staff is not on the appointment diary you may add the staff column manually using the ‘Staff’ button in the Diary screen In case where the appointment falls outside the normal staff hours, you may choose to make a one off change to the staff roster. First change the roster to a manual roster by right clicking on one of the ‘Not Working’ blocks in the staff column, click on ‘Change To Manual’, now stretch the not working blocks to accommodate for the appointment. Move the appointment to the appropriate slot. 33 HAIRLINKSQL User Manual v4.5 Updated 01/05/2012 Chapter 10 THE APPOINTMENT BOOK MESSAGING SYSTEM The messaging system (To-Do List) allows you to attach messages to a staff member‟s column in the diary. When they have a message that has not been completed a thumbtack will appear in the top left hand corner of their column. A read thumbtack signifies at least one note has not been read, a yellow thumbtack signifies all notes have been read. Once all notes have been marked as done the thumbtack will disappear. Fig. 6 - 25 Each note in the To Do list is coloured for easy identification. The note that you currently have selected will have a red border. White: Signifies the note has not been read. Pink: Signifies that the note has been cancelled. Blue: Signifies that the note has been completed / actioned. Yellow: Yellow signifies the note has been read but not yet completed or actioned. Fig. 6 - 26 34 HAIRLINKSQL User Manual v4.5 Updated 01/05/2012 Chapter 6 THE APPOINTMENT BOOK How to Add a New Message 1. Click on the staff member‟s name or photo at the top of the diary. 2. The To Do list will open. Click on the ‘+’ button at the bottom of the To-Do List page. 3. Fill in the form as required for the new To Do List Item. FROM: The staff members that is creating the message o o o Date: The date that the note is created for. Status: This is the status of the note New: This is for a new note Read: The note has been read but not yet completed. Done: The note has been completed Cancelled: The note has been cancelled Time: The time the note is due for completion. 4. Click ‘OK’ to save the note. Fig. 6 - 27 TIP: If you are leaving a note for a staff member to call a client, add the client contact details quickly by using the „Include Details‟ button. You can search for a client and the name, client # and phone numbers will be added to the note automatically. 35 HAIRLINKSQL User Manual v4.5 Updated 01/05/2012 Chapter 10 THE APPOINTMENT BOOK How to Mark a Note as Done, Read or Cancelled 1. Click on the staff member‟s name or photo. 2. Select the note you wish to edit so a red border surrounds it. 3. Change the ‘Status’ field to suit. o New: This is for a new note o Read: The note has been read but not yet completed. o Done: The note has been completed o Cancelled: The note has been cancelled Note: Until a message is marked as ‘Done’ or ‘Cancelled’, it will keep rolling over to the next day. 36 HAIRLINKSQL User Manual v4.5 Updated 01/05/2012 Chapter 6 THE APPOINTMENT BOOK ARRIVALS In the arrivals diary, the ‘Arrivals Due’ list shows what appointments have not arrived yet while the ‘Waiting (Arrived)’ list shows what appointments are currently in progress and what clients have arrived and are waiting in the clinic. When you select an appointment all the appointment details are shown in the bottom section of the window, including a timer to show how long a client has been waiting. Fig. 6 - 28 The ‘Arrivals’ diary can be used for each diary that you have set up. Change the diary by clicking on the tab at the top of the screen. If you wish to view all diaries click on the ‘All’ tab. By default the ‘Arrivals’ diary will not show ‘Ready’ appointments (see Appointment States on page 6). Tick the ‘Show Ready Appointments’ check box if you would like these to display in the ‘Arrivals’ diary as well. TIP: Click on the ‘F7: Staff’ button to only show appointments for a particular staff member. 37 HAIRLINKSQL User Manual v4.5 Updated 01/05/2012