1
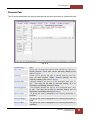
Client Management Chapter 2 CLIENT MANAGEMENT CONTENTS OVERVIEW ........................................................................................ 3 Personal Tab...................................................................................... 3 More Tab ............................................................................................ 6 Marketing Tab .................................................................................... 8 Financial Tab ..................................................................................... 9 Info Tab ............................................................................................ 11 Account Tab ............................................................................................ 11 Sales Tab ................................................................................................. 12 Bns Points Tab ....................................................................................... 12 Incen Disc Tab ........................................................................................ 13 History Tab ...................................................................................... 15 8: Bills Tab .............................................................................................. 15 9: Transactions Tab ................................................................................ 16 8: Quotes Tab.......................................................................................... 16 Document Manager ......................................................................... 17 Contacts ........................................................................................... 18 SEARCH FUNCTION....................................................................... 19 How to Perform a Basic Client Search........................................... 19 Using Advanced Search options.................................................... 20 How to Enter a New Client .............................................................. 22 HOW TO CHANGE CLIENT DETAILS ........................................... 23 STREET, SUBURB & CITY MANAGEMENT .................................. 24 Adding a New Street ....................................................................... 24 Editing an Existing Street ............................................................... 24 Adding a New Suburb & City .......................................................... 25 Editing an Existing Suburb and City .............................................. 25 Address Formats When Printing .................................................... 26 HAIRLINKSQL User Manual v4.5 Updated 01/05/2012 1 Chapter 2 Client Management REFERRAL MANAGEMENT........................................................... 27 How to Create Referral Types ........................................................ 27 How to Set how a Client was Referred........................................... 27 MAILING LIST MANAGEMENT ...................................................... 28 Adding a New Mailing List Group .................................................. 28 CLIENT GROUPS AND FLAGS ...................................................... 29 Manual Client Group Flags ............................................................. 29 Setting up a New Manual Client Group Flag ........................................ 30 Assigning a Manual Client Group Flags to Clients .............................. 30 Automatic Client Groups ................................................................ 31 Setting up a New Manual Client Group Flag ........................................ 32 SETTING UP CLIENT CATEGORIES ............................................. 32 SETTING UP CLIENT PROFILES ................................................... 33 ADDING CLIENT NOTES ................................................................ 33 2 HAIRLINKSQL User Manual v4.5 Updated 01/05/2012 Client Management Chapter 2 OVERVIEW The client module is primarily used to hold client details, preferences and other attributes. It is also a centralised reference point for purchases, reminders and history notes. The following chapter describes the functions of each of the client module tabs. Personal Tab The personal tab is where client personal details are maintained and where account information can be viewed. Fig. 2 - 1 Title The title used to address the client. E.g. Mr, Ms etc.. Gnd The client gender. If Female is selected a pink border will appear around the client record while a blue border will appear for males. Last Name The clients family name First Name The client first name. Known As An alias or other name that may be used to identify the client (e.g. her first name may be Anne but she is known as Annie). This is then available in the marketing module as a mail merge variable. Co Name The name of the company. This is used if the client is a company and not an individual. DOB Client Date of Birth. (The year does not need to be included) HAIRLINKSQL User Manual v4.5 Updated 01/05/2012 3 Chapter 2 Client Management Status The status field should be set to 'Active' as long as the client still actively deals with the business. When this is set to ‘Inactive’ you will no longer be able to see the client record in normal searches. You would normally set a client to ‘Inactive’ in cases where the client has ceased dealing with your business. Contact Numbers These are the contact numbers for the client. The numbers do not have to be in any particular format but it is advisable to enter them in such a way that they can easily be read, with the corresponding area codes. Provision is made for up to four phone numbers; work, home, fax and cell phone. Work Client‟s work phone number. Home Client‟s home phone number. Fax Client‟s Facsimile number. Celluar Client‟s mobile number. Email This is the client‟s preferred e-mail address. This is displayed in a purple colour, which signifies that you can automatically send an e-mail just by double-clicking on the address. Web The client‟s web address. This can be used in a similar manner to the e-mail option. Double-clicking it activates your preferred web browser (e.g. internet explorer) and goes straight to the client‟s website. Address Details This section is subdivided into two tabs allowing you to enter the postal and delivery address. Postal: This is the address for all posted mail for the client or company. Delivery: This is the address where all parcels or packages will be delivered for the client or company. NOTE: The delivery address is used on shipping labels when specified. 4 St Num Enter only the street number of location or, if the client uses post office boxes then enter the post office box details in the format “PO Box NNN”. Street Refers to the street name. You can either type it in, or select it from the drop-down list provided. This option is disabled when a PO box is used in the street number field. Suburb Refers to the suburb name. You can either type it in, or select it from the drop-down list provided. Suburbs are linked to Cities so when you select the suburb it will automatically choose the City. City Refers to the city name. The city is automatically entered when the suburb is chosen. Post Code Refers to the Post code for that addresses area. Distance This is how far a client is located from the business. Enter the figure in kilometres. This piece of information is particularly useful when billing for a job that was performed at the client HAIRLINKSQL User Manual v4.5 Updated 01/05/2012 Client Management Chapter 2 site. HairlinkSQL will automatically calculate how much the client would be charged for mileage based on the distance provided. Care Of The care of field refers to the postal location of the customer if the customer‟s postal address is the same as their business postal address or within a company department, for example, To: John Smith Care of Marketing Department Account Balance The account balance gives users a quick overview of the status of the client account. These figures are dynamically updated by bills made to the client and show balances for the current, 30, 60, and 90 day periods. To the right of the ‘Total’ field is the ellipsis button. Clicking this button will open the ‘Account Reconciliation’ screen view a more detailed view of the client account. You can switch between months using the ‘Previous Month’ and ‘Next Month’ buttons. The Account Balance also shows a total for unfinished bills. The ellipsis button next to these will show you the transactions that make up these totals Due Reminders This section displays a list of reminders that are due for that client. Intelligent Notes The ‘Ctrl+N’ notes button is used to create notes that are related to the client. These notes can be manipulated to pop up at predetermined stages or screens in HairlinkSQL. The notes can be used to remind a staff member to do something or provide them with more information. The notes can also be set up to print out on a client‟s histories, receipts, statements etc. HAIRLINKSQL User Manual v4.5 Updated 01/05/2012 5 Chapter 2 Client Management More Tab The ‘More’ tab contains further fields for recording client information and assigning clients to groups and categories with the system. Fig. 2 - 2 6 User Code An abbreviation or short code used to identify the client. It is normally created by the system but it can be modified to suit your preference. Pref Staff The staff member the client prefers to see. You can manually select this or it will be automatically populated when the client see‟s the same staff member consecutively and there is a service on the bill. Batch Code This option is used during statement printing. It is a code that is used to group certain clients together when printing statements. For example, you may want to send out a newsletter to all VIP clients with their statements. By marking VIP clients with a “VIP” batch code, all these statements will print out together – making it easier to slip a newsletter into the envelope for these clients. Recall This is an indicator that states whether the client would like to receive recall reminder prompts at billing. This is normally set to ‘Yes’, but can be set to ‘No’ if the client does not want to be issued with recall reminders. Group You can set up groups such as VIP, Makeup or Newsletter and assign to a client which are then used to identify a type of client with a coloured flag in the diary, bills and searches. See HAIRLINKSQL User Manual v4.5 Updated 01/05/2012 Client Management Chapter 2 Manual Client groups section later on in this chapter. Family Not Applicable Category 1/2/3/4 The client categories group the clients for reporting purposes. A client can only belong to one group in each category. Syndicate Not Applicable Referral The referral fields relate to how the client found out about your business. You can select from different referral types that are created by users. This information is particularly handy for allocating advertising budgets. Referral The existing client on the HairlinkSQL database that referred the new client to the business Referral Type This relates to how the client was referred to the business. For example, if they were referred to your business from a friend, newspaper, TV etc… Referral Date This relates to the date the referral was made which is updated automatically when the referral details are entered. Belongs To If you are running HairlinkSQL in multi-branch or company mode, this setting states which branch / company they belong to To PDA Not Applicable Web Access This option refers to whether the client can access their client information on the web. Please contact CFL for more information on integrating HairlinkSQL with your website. HAIRLINKSQL User Manual v4.5 Updated 01/05/2012 7 Chapter 2 Client Management Marketing Tab The Marketing Tab is useful for setting up any marketing information that is relevant to the client. Information in the Marketing tab is useful for customer relations, for example, to identify a client as a VIP. Fig. 2 - 3 8 Send By Mail Click in the check boxes to identify the information the client would like to receive through the post. Contact By Phone Click in the check boxes to identify the information for which the client would like telephone contact. Send By Email Click on the check boxes to identify the information the client would like to receive via email. Send SMS Click on the check boxes to identify the information the client would like to receive via SMS. Mailing List 1/2/3/4 This is used for sending mail outs to clients. You can use the mailing list to group common clients together. You can customise the name of each entry in the Mailing Lists to your preference. At the bottom of the column, is a list of the mailing lists that this client is subscribed to. HAIRLINKSQL User Manual v4.5 Updated 01/05/2012 Client Management Chapter 2 Financial Tab The Financial tab displays the financial settings and discounts that relate to a particular client. Fig. 2 - 4 Commercial N/A Acc. Fee Allows you to select the account fees that will be used on a client‟s account. These fees can be manually edited by the user in ‘Setup’. Interest Allows you to specify the type of interest that the client will incur on their account. Again, interest settings can be manually edited by the user in ‘Setup’. Exempt GST Indicates whether the client is to be exempted from GST or not. You may not be able to edit this setting, as it is dependent on settings selected in Setup. Exempt @Tax2 This indicates whether the client is to be exempted from Tax2 or not. You may not be able to edit this setting, as it is dependent on settings selected in „Setup’. Disc on Svc The group the client is assigned to for receiving discounts on services Disc on Retail The group the client is assigned to for receiving discounts on retail Disc on Mat The group the client is assigned to for receiving discounts on materials HAIRLINKSQL User Manual v4.5 Updated 01/05/2012 9 Chapter 2 10 Client Management Def Pmnt You can choose a default payment method that will be automatically selected when finishing a bill for this client. Stop Mailers Normally set to ‘No’ but set this to ‘Yes’ if you want a client to stop being sent mailers from the ‘Bulk Mailers’ module. Stop Cheque Normally set to ‘No’ but set it to ‘Yes’ if you want to stop a client from using cheques as a method of payment. A prompt will appear to warn you when you try to select ‘Cheque’ and it will ask you to choose another payment method. Stop Charge Normally set to ‘No’ but change to ‘Yes’ if you want to stop a client from charging a bill to their account. Stop Statement Normally set to ‘No’ but set it to ‘Yes’ if you will not be sending statements to this client. Reason Why Enter a reason why you have selected ‘Yes’ to any of the stoppages above. This is for your own reference. Personalised Discount Schedule In the personalised discount schedule you are able to give one-off discounts to a client on a number of services and retail products which are only active for a specified date range. For example you could give one client a 10% discount on “After Wax Cream” which is valid until the end of the month. HAIRLINKSQL User Manual v4.5 Updated 01/05/2012 Client Management Chapter 2 Info Tab The info tab shows you accounting information for sales, bonus points and incentive discounts for a client. This tab shows both up-to-date as well as historical information. You can view a client‟s account status, sales analysis and bonus points as well as incentive discounts just by clicking on the appropriate button. Fig. 2 - 5 Account Tab The Account tab displays the amounts owed to your business by a client. The amounts are aged into monthly figures so you can easily determine how much a client is in arrears. Fig. 2 - 6 HAIRLINKSQL User Manual v4.5 Updated 01/05/2012 11 Chapter 2 Client Management Sales Tab This displays the sales history for clients for each month since the first sale. The figures are then broken down into sales for services and other sales (i.e. Sales of products that are not services). To complement these figures actual profits made on service sales, other sales and totals for both are displayed. Fig. 2 - 7 Bns Points Tab This shows the number of bonus points that a client has accrued through having services performed or by purchasing products. It details each transaction where bonus points were used or gained. Fig. 2 - 8 12 HAIRLINKSQL User Manual v4.5 Updated 01/05/2012 Client Management Chapter 2 Incen Disc Tab This displays the incentive discounts that a client received as a result of paying on time. You can specify a “pay-by” date and set up a discount in ‘Setup’ that becomes effective if a client pays their account by that date. Fig. 2 - 9 The bottom of the Info tab displays information about the client visits to the business and the last payment on their account. It also stores any cheque and direct debit details. Fig. 2 - 10 First Visit This is the date of a client‟s very first visit or the very first time a client dealt with the business. Last Visit The last time a client visited the business. Last Staff The last staff member that dealt with the client. # Visits The total number of visits a client has made. Since This displays the start date for the number of visits recorded. Visit Freq Last Paid Displays the amount that was last paid on a client‟s account. On Date The date on which the amount displayed above was paid. Bill Num The invoice number that details the last payment. Direct Debit and Cheque Details This section displays a client‟s direct debit and cheque details. Each client can have up to three different cheque accounts and one direct debit account stored on the system. HAIRLINKSQL User Manual v4.5 Updated 01/05/2012 13 Chapter 2 Client Management To enter new cheque details click on the ellipsis button. This will open a new window prompting you to enter the details. Fig. 2 - 11 14 HAIRLINKSQL User Manual v4.5 Updated 01/05/2012 Client Management Chapter 2 History Tab The history tab is split into three more tabs that displays purchase history for a client. 8: Bills Tab The ‘8: Bill’ tab is split into two sections. The top section displays a summary of all bills while the bottom section lists all the items that are on the bill selected in the top section. Double-clicking on a bill in the top section will open up the bill for viewing. Fig. 2 - 12 HAIRLINKSQL User Manual v4.5 Updated 01/05/2012 15 Chapter 2 Client Management 9: Transactions Tab The ‘9:Transactions’ tab allows you to search for specific transactions using the filters provided. You are able to search for transactions in a certain date range, by a particular staff member, for transactions that used a certain product, category of products or class of products. Fig. 2 - 13 8: Quotes Tab The ‘8: Quotes’ tab is split into two sections. The top section displays a summary of all quotes and estimates while the bottom section lists all the items that are on the quote or estimate selected in the top section. Double-clicking on a quote or estimate in the top section will open up the quote or estimate for viewing. Fig. 2 - 14 16 HAIRLINKSQL User Manual v4.5 Updated 01/05/2012 Client Management Chapter 2 Document Manager The document manager is used for recording any communication that you have with your client - for example any important emails, faxes or phone conversations. Fig. 2 - 15 The document manager is split into seven different sections or document types. In each tab you can record a different piece of communication the business had with the client. All communication is saved so you can look back to see what contact you have had with a client. The communication types are listed below. o o o o o o o A: All N: Note P: Phone L: Letter E: Email C: SMS Z: Other HAIRLINKSQL User Manual v4.5 Updated 01/05/2012 17 Chapter 2 Client Management Contacts The „Contacts‟ tab on the client record is where you can record additional contacts. This is especially useful for farms or studs where there are multiple contacts in the business. Each contact needs to be assigned a position which can be assigned in ‘Pick List Setup’. Fig. 2 - 16 18 HAIRLINKSQL User Manual v4.5 Updated 01/05/2012 Client Management Chapter 2 SEARCH FUNCTION The client search function is used in many areas of the program, for example when making appointments, making bills or simply looking up client details. Regardless of what you are doing, when searching for a client the same search options and dialogue boxes are used. How to Perform a Basic Client Search 1. Click on the ‘Client’ button. 2. This will display the ‘Client Search Window’. 3. Enter the first few letters of the last name, first name or company name of the client you are searching for. 4. Click ‘F12: Search’ to begin the search. 5. The search results are now displayed. To navigate through the list use the keyboard cursor keys (the up and down arrows) or use the scroll bar at the right hand side of the window. 6. To make a selection double-click on a line in the results window, or, using the keyboard, press the ‘F12’ key on the line you wish to select. Fig. 2 - 17 HAIRLINKSQL User Manual v4.5 Updated 01/05/2012 19 Chapter 2 Client Management Using Advanced Search options If you cannot find the client you need, or if there are too many results to search through, you can narrow your search by using the advanced search function. 1. Click on the ‘Client’ button. 2. This will display the ‘Client Search Window’. 3. Click on the ‘F8: Advanced’ button. 4. The ‘Advanced Search Form’ will now open. 5. This form provides more options for you to search by, such as the client number, user code, status and phone number. 6. Select the client and choose ‘F12: Accept’ to open the client record. Advanced Search Fields Overview 20 Number The client number as assigned by HairlinkSQL. Last Name The clients Last name. First Name The clients first name. Company The company name. User Code Alternative user defined search code. Clnt Status Defines whether client is active or inactive. DOB (dd/mm) Clients date of birth excluding year Amt Owing Searches for clients with an amount owing on their last statement between the specified values. Notes Allows users to search for keywords or phrases in the intelligent notes attached to clients records. Phone Searches all phones numbers. E.g. Home, work, fax and cellular. Email Address Searches by email address. Street No/Box Find clients with a particular street or PO box number. Street Find all clients having the selected street in the address. Suburb Find all clients having the selected suburb in the address. City Find all clients having the selected city in the address. Belongs To Find clients belonging to a particular branch. Syndicates Only Find only syndicate clients. Group Man Searches for clients in the selected manual group Group Sales Searches for clients in the selected sales group Contains The ‘Contains’ fields provide a word within a word search on selected fields. For example, if ‘Contains’ is checked and you do a first name search for Anne, the system will find HAIRLINKSQL User Manual v4.5 Updated 01/05/2012 Client Management Chapter 2 „Anne‟, ‘Joanne’ and ‘Joe and Anne’. If ‘Contains’ was unchecked it would only find ‘Anne’. TIP: You may set up your preferred method of search under Options | Setup | Client | 1: Options tab | Search Dialog | then select ‘Simple’ or ‘Advanced’ from the drop down list. Fig. 2 - 18 HAIRLINKSQL User Manual v4.5 Updated 01/05/2012 21 Chapter 2 Client Management How to Enter a New Client 1. Click on the ‘Client’ button. 2. The ‘Client Search’ window will open. 3. Click on the ‘F7: New’ button to enter a new client. Fig. 2 - 19 4. The ‘Client Profile’ window will open. Select the client profile you wish to use. Fig. 2 - 20 TIP: Client Profiles enter some default information when creating new clients. Each profile can enter different information which is configured by users. This makes client entry faster and also helps stop mistakes being made. 5. A ‘New Client Record’ will open. Enter the new client details onto the form. 6. Click on the tick button to save. 22 HAIRLINKSQL User Manual v4.5 Updated 01/05/2012 Client Management Chapter 2 HOW TO CHANGE CLIENT DETAILS 1. Click on the ‘Client’ button. 2. Search for the client whose details you wish to edit. 3. Open the client record. 4. Edit the details you wish to change or add. 5. If you are unable to edit the details click on the ‘Edit’ button on the bottom of the client window. 6. Once the client details have been modified save the changes by clicking on the tick in the bottom right hand corner. Fig. 2 - 19 HAIRLINKSQL User Manual v4.5 Updated 01/05/2012 23 Chapter 2 Client Management STREET, SUBURB & CITY MANAGEMENT Adding a New Street Street names in HairlinkSQL are stored in a database. As a new street is added it gets added to the existing list. To add a new street to the list follow the steps below. 1. Create a new client or open an existing client record. 2. Start typing the new street name into the street field. 3. A prompt will appear. ‘Street name not found add ‘new street’ to the database’. 4. Select ‘Yes’ to add a new street. 5. The ‘Adding a New Street’ window will open. 6. Check the street name is correct and click ‘F12: Save’ to add the new street. Editing an Existing Street If there is a street in the system that has been spelt incorrectly or is no longer active, you can edit it through ‘Pick List Setup’. NOTE: Every client that is currently linked to this street will change to the new name as well 1. Go to the ‘Options’ then ‘Pick Lists Setup’. 2. Select ‘Client’ and double click ‘Street’. 3. The Street Pick List will open. Double click on the street you wish to edit. 4. The Street Details window will open. 5. Edit the name of the street. 6. If the Street is not currently linked to any client records you will be able to mark it as inactive as well. NOTE: If you wish to mark it as inactive and clients are still linked to that street you will need to find those clients and change their street address first. 7. Click ‘F12: Save’ to save the street. 24 HAIRLINKSQL User Manual v4.5 Updated 01/05/2012 Client Management Chapter 2 Adding a New Suburb & City Suburbs and Cities in HairlinkSQL are stored in a database and linked together. As a new suburb you are also prompted for a city and they are added to the existing list. To add a new suburb and city to the list follow the steps below. 1. Create a new client or open an existing client record. 2. Start typing the new suburb name into the suburb field. 3. A prompt will appear. ‘Suburb name not found add ‘new suburb’ to the database’. 4. Select ‘Yes’ to add a new suburb and city. 5. The ‘Adding New Record window will open. 6. Check the suburb name is correct and the city that it is in. 7. Click ‘F12: Save’ to add the new suburb and city combination. Editing an Existing Suburb and City If there is a suburb and city in the system that has been spelt incorrectly or is no longer active, you can edit it through ‘Pick List Setup’. NOTE: Every client that is currently linked to this suburb and city will change to the new name as well. 1. Go to the ‘Options’ then ‘Pick Lists Setup’. 2. Select ‘Client’ and double click ‘Suburb & City’. 3. The Street Pick List will open. Double click on the street you wish to edit. 4. The Suburb and City window will open. 5. Edit the name of the suburb and / or city. 6. If the Suburb and City is not currently linked to any client records you will be able to mark it as inactive as well. NOTE: If you wish to mark it as inactive and clients are still linked to that suburb and city you will need to find those clients and change their address first. 7. Click ‘F12: Save’ to save the suburb and city. HAIRLINKSQL User Manual v4.5 Updated 01/05/2012 25 Chapter 2 Client Management Address Formats When Printing HairlinkSQL allows you to choose from a number of address formats that will be automatically used when printing address labels, statements, tax invoices or tax reciepts. To change these settings go to Options | Setup | Client | Address Formats. Address Format 0: (C/O line irrelevant) In this format the address on the statement will be displayed in one of two ways depending on the presence of the “Company Name” field. If the company name is present, it will be displayed; otherwise the “Client Name” will be used for the address. Company Name Present Company Name Address Company Name Blank Client Name Address Address Format 1: (C/O line irrelevant) In this format the address on the statement will be displayed in one of three ways depending on the presence of the “Company Name” and the “Client Name” fields. If both these fields are present, then both will be displayed. If the “Company Name” field is blank, then the “Client Name” would be displayed and vice-versa. Company Name Company Name Blank and Client Name Present Company Name Client Name Attn Client Name Address Address Client Name Blank Company Name Address Address Format 2: (C/O line relevant) Case 1: C/O field present (NOT Blank) The address format on the statement will be displayed in one of two ways depending on the presence of the “Client Name” field. If the client name is present, it will be displayed and if the client name is blank, then the “Company Name” will be used instead. Client Name Present Client NAme C/O Address Client Name Blank Company Name C/O Address Case 2: C/O field blank In a situation where address Format 2 is used and the C/o field is blank, then the address on the statement will be displayed in one of three ways depending on the presence of the “Client Name” and “Company Name” fields. If both the client and company name fields are present, then both will be displayed on the statement. If the client name field is blank, then the company name will be displayed and vice-versa. Client Name Present Company Name Attn Client Name Address 26 HAIRLINKSQL User Manual v4.5 Updated 01/05/2012 Client Name Blank Company Name Address Company Name Blank Client Name Address Client Management Chapter 2 REFERRAL MANAGEMENT How to Create Referral Types The referral list, by default, is populated with two types of referrals. They are ‘None’ and ‘REWARD CLIENT’. Follow the steps below to enter your own referral types. 1. Go to the ‘Options’ menu then click on ‘Setup’. 1. When setup has loaded click on the ‘Client’ button and go to the ‘5: Referrals’ tab. 2. On the right hand side of the page is a list of referral names. You can now add to this list or edit the types already entered. 3. If you have selected ‘Reward Client’; the existing client who referred the new client can receive bonus points on the new client first visit. The existing client can receive a flat rate or they can receive points depending on how much the new client spends. Fig. 2 - 20 How to Set how a Client was Referred 1. Open a client record and click on the ‘More’ tab. 2. Click on the ellipsis button next to the referral field to add in referral details. 3. The referral window will open. Select how the client was referred to your business from the ‘Referral Type’ Pick List. 4. If the referral was from another client, you can select the referring client in the ‘Referred By’ field. 5. Click ‘F12: OK’ to save and exit. HAIRLINKSQL User Manual v4.5 Updated 01/05/2012 27 Chapter 2 Client Management MAILING LIST MANAGEMENT Adding a New Mailing List Group 1. Go to ‘Options’ and then ‘Setup’. 2. Once setup has loaded up click on the client button. 3. Select the ‘3: Lists’ tab. 4. Enter your Mailing List by typing in one of the available fields. Fig. 2 - 21 28 HAIRLINKSQL User Manual v4.5 Updated 01/05/2012 Client Management Chapter 2 CLIENT GROUPS AND FLAGS HairlinkSQL allows users to assign clients to groups which are identified by coloured flags or coins on diary appointments, client search windows, the billing screen, as well as the client record. There are two types of groups. The Manual Client Groups will be in the shape of a flag with varying colours. These flags are assigned individually by the user on the client record. The Automatic Client Group will be in the shape of a coin with varying colours. These flags are assigned automatically by HairlinkSQL based on criteria set by the user for all clients. Manual Client Group Flags You can assign flags of different colours to client groups. These flags will appear on diary appointments, client search windows, on the billing screen, as well as the client record. This allows you to quickly determine what group the client belongs to. For example you could have green flags for breeders, silver flags for staff members and blue flags for bonus points members. The flag will also appear when performing client searches making it easy to tell which “Joe Bloggs” is the Gold Member. Fig. 2 - 22 HAIRLINKSQL User Manual v4.5 Updated 01/05/2012 29 Chapter 2 Client Management Setting up a New Manual Client Group Flag 1. Go to ‘Options’ and then select ‘Picklist Setup’. 2. Click on ‘Client’ and then ‘Group (Manual)’. 3. The ‘Client Groups (Manual)’ window will open. 4. To add a new group enter a new group name in one of the ‘Name’ fields that is blank field and select a colour from the ‘Colour’ menu. Assigning a Manual Client Group Flags to Clients 1. Search for and open a client record. 2. Click on the ‘More’ tab. 3. Select a new group from the ‘Group’ menu list. TIP: You can also set the group to be assigned to client profiles under Options | Pick Lists | Client | Profiles. This way new clients will automatically have the correct group selected when created. NOTE: You can select up to 16 manual client groups. Fig. 2 - 23 30 HAIRLINKSQL User Manual v4.5 Updated 01/05/2012 Client Management Chapter 2 Automatic Client Groups Clients can be automatically “graded” and applied to special client groups based on their sales figures. For example, you could create a client group called “Silver Client” that would contain all clients that have spent between $500 and $2000 in a predefined period. Using these groups allows you to quickly know who your biggest spenders are. You can also choose to calculate only from profit and/or for services only if you wish to exclude retail sales. Selecting the number of visits can solve the problem of large single purchases. A client might spend over $500 on a single treatment but that doesn‟t necessarily mean they should belong in the Bronze Client group as they may not intend to come back regularly at all. Setting the visits to 5 means they need to have come in at least 5 times in the chosen period and also spent an amount that is in one of the ranges specified. Fig. 2 - 24 HAIRLINKSQL User Manual v4.5 Updated 01/05/2012 31 Chapter 2 Client Management Setting up a New Manual Client Group Flag 1. Go to ‘Options’ and then select ‘Picklist Setup’. 2. Click on ‘Client’ and then ‘Group (Automatic)’. 3. The ‘Client Groups (Automatic)’ window will open. 4. To add a new group enter a new group name in one of the ‘Name’ fields that is blank field and select a colour from the ‘Colour’ menu. 5. Select the criteria that you would like clients to be assigned to this group by. 6. HairlinkSQL will now checks your client‟s spending overnight and updates them to the correct groups. NOTE: Ensure that your HairlinkSQL Background Processor is left running overnight otherwise this will be performed when it is first started in the morning. NOTE: You can force recalculation by clicking on the client‟s group icon on their client record, this will take any sales from today into effect. SETTING UP CLIENT CATEGORIES Categories group clients, products or suppliers together for reporting purposes. Common categories for clients could include makeup, beauty or hair. You can then generate a report for a particular category to see their sales figures or profitability. See below for instructions on creating a new category. 1. Click on the ‘Options’ menu and select ‘Picklists Setup’. 2. Expand the client, product or supplier menu depending on what type of category you are setting up. 3. Double-click on category 1 or 2. If you are creating a product category you have an extra three categories to choose from. 4. If you are creating a new category click on the red plus button at the bottom of the form. (If you are editing a category name just click on the name with the mouse and type in the new name.) 5. A blank line will be added at the bottom of the grid. Type in the name of the category and click on the red plus button to save. 6. When creating a new client, product or supplier record or when editing an existing record you should now be to assign that record to a category. 32 HAIRLINKSQL User Manual v4.5 Updated 01/05/2012 Client Management Chapter 2 SETTING UP CLIENT PROFILES When a new client or product is added to your database, a profile is requested. Examples include Adult, Member, etc. The profile acts like a template and is there so that users in your business do not have to make decisions on a number of client configurations when setting up new client or product records. These settings include what mailing list they will be automatically subscribed to, the report category that they will be assigned to, the discount levels that they will be given or the batch group they will go to for statements. You can create new client profiles with pre-set criteria and train your staff to select the correct ones when adding new clients. This „standardisation‟ within your organisation will benefit the business as data entry will be faster and more accurate as a number of options will not have to be selected each time a new record is added to the database. 1. Click on the ‘Options’ menu and select ‘Picklists Setup’. 2. Expand the client or product or menu depending on what type of profile you are setting up. 3. Double-click on profile. And the client profile form will open. 4. To edit an existing profile double-click on the profile name. To create a new profile click on the red plus button at the bottom of the screen. 5. The client or product profile form will open. Select the options you wish to use in the profile. Depending on the profile selected a number of different options will be available. 6. Once you have set the fields for the profile click on the ‘Accept’ button to save and exit. ADDING CLIENT NOTES The notes system is used to display pop-up or printed notes at various user defined stages in HairlinkSQL. For example, you can automate the system to display a note when a bill is made for a particular client. These notes may be prompts to advise staff of important information they need to know about a client while billing or making an appointment. Notes can be added for clients, products, staff members and suppliers. The process for adding these reminders however is the same throughout the program. Please refer to the Notes Chapter for more information. HAIRLINKSQL User Manual v4.5 Updated 01/05/2012 33