1
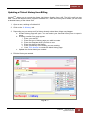
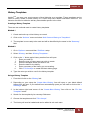
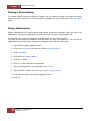
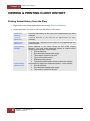
CLIENT VISIT HISTORY Chapter 19 CLIENT VISIT HISTORY CONTENTS OVERVIEW ........................................................................................ 2 UPDATING A CLIENT HISTORY ...................................................... 2 Updating a Client History from the Diary............................................ 2 Updating a Clinical History from Billing ............................................. 3 Updating Client History from the Update History Menu .................... 4 History Templates ................................................................................ 5 Creating a History Template......................................................................... 5 Using a History Template ............................................................................. 5 Deleting a Clinical History ................................................................... 6 History Abbreviations .......................................................................... 6 Copy Previous History ......................................................................... 7 Copy Last History ......................................................................................... 7 Copy Any History .......................................................................................... 7 VIEWING & PRINTING CLIENT HISTORY ....................................... 8 Printing Animal History From the Diary.............................................. 8 History Slide Show ............................................................................... 9 Features of the History Slide Show ............................................................. 9 Accessing the History Slide Show .............................................................. 9 Printing From the History Slide Show ......................................................... 9 History Browser ................................................................................. 11 Features of the History Browser .................................................................11 Accessing the History Browser ..................................................................12 Printing From the History Browser .............................................................12 Emailing From the History Browser ...........................................................13 Print History Menu ............................................................................. 14 HAIRLINKSQL User Manual v4.5 Updated 01/05/2012 1 Chapter 19 CLIENT VISIT HISTORY OVERVIEW The Clinical History is used to manage client‟s visit details. Information such as notes, and products used can be recorded in the animal visit history. A new visit history page is used for each individual visit. There are several methods of recording, updating and looking up visit histories, in the following sections we will discuss the most efficient and most frequently used methods. UPDATING A CLIENT HISTORY Updating a Client History from the Diary If a history has not already been started, you can begin a new client history directly from the Diary. 1. Right click on the client‟s appointment and select ‘History’. 2. If a bill has already been started for this appointment you will be taken straight to the clinical history form. If a bill has not been created for the appointment you will be prompted with a message to create a new bill, click ‘Yes’ to this question. 3. If there are any open bills for this client, you will be asked to start a new bill or add to an existing bill. a. Select ‘Yes’ to use an existing bill b. Select ‘No’ to start a new bill. 4. Depending on your setup and if a history already exists three things may happen. a. A blank history page will open. You can select your favourite history form to open in setup. b. A history creation form may appear. i. Enter your staff ID. ii. Enter the type of history page you wish to create. iii. Enter the template which you wish to use. iv. Enter the date for the history. v. Enter a summary of the history you are creating. vi. Click ‘F12: Accept’ to create the blank history page. c. An existing history will open. 5. Update the client history as needed. 2 HAIRLINKSQL User Manual v4.5 Updated 01/05/2012 CLIENT VISIT HISTORY Chapter 19 Updating a Clinical History from Billing SQL Hairlink allows you to record the clients visit history directly from a bill. The bill is split into two tabs. The bill tab lists bill items, payment methods etc.., while the history tab is where you can write a detailed history of the clients visit. 1. Open a new, existing or finished bill. 2. Click on the ‘2: History’ tab. 3. Depending on your setup and if a history already exists three things may happen. a. A blank history page will open. You can select your favourite history form to open in setup. b. A history creation form may appear. i. Enter your staff ID. ii. Enter the type of history page you wish to create. iii. Enter the template which you wish to use. iv. Enter the date for the history. v. Enter a summary of the history you are creating. vi. Click ‘F12: Accept’ to create the blank history page. c. Update the clinical history as needed. 4. Edit the History as needed. Fig. 19 - 1 HAIRLINKSQL User Manual v4.5 Updated 01/05/2012 3 Chapter 19 CLIENT VISIT HISTORY Updating Client History from the Update History Menu The update history menu is used as a quick method for finding and updating previous day‟s histories. The update history menu will list each of the last seven days and have a client search function. By clicking on one of the days you will then be taken to a history screen that will list all the bills for that day. You can then choose the bill you want to update history for and be taken directly to the history that is attached to that bill and client. If you search by client you can then find the bill you want to update history for and be taken directly to the history form too. 1. Click on the ‘Bill’ button on the main toolbar. 2. Click on the ‘Update History’ button. 3. The ‘Update History’ menu will open. 4. Select the day which the bill you want to add clinical history to was created. If you do not know the day or it is older than 7 days click on the ‘Find Client’ button to search by client and bill. 5. A new form will open that will display all the bills that were made for that day. 6. Double Click on the bill you wish to update the history for. 5. Depending on your setup and if a history already exists three things may happen. d. A blank history page will open. You can select your favourite history form to open in setup. e. A history creation form may appear. i. Enter your staff ID. ii. Enter the type of history page you wish to create. iii. Enter the template which you wish to use. iv. Enter the date for the history. v. Enter a summary of the history you are creating. vi. Click ‘F12: Accept’ to create the blank history page. f. An existing history will open. 6. Update the clinical history as needed. 4 HAIRLINKSQL User Manual v4.5 Updated 01/05/2012 CLIENT VISIT HISTORY Chapter 19 History Templates SQL Hairlink can save your most common clinical histories as a template. These templates can be used to quickly create a clinical history for a client with some default information filled out. The histories can then be edited to add any extra details specific to the client. Creating a History Template There are two methods used to create history templates. Method 1 1. Create and write up a client history as normal. 2. Click on the 'Actions' menu and select 'Add Current History to Templates'. 3. The template is now ready to be used and will be identified by the name in the 'Summary' field. Method 2 1. Go to ‘Options’ menu and then ‘Picklists’ setup. 2. Select ‘History’ and then ‘History Templates’. 3. Click on the '+' button and a history creation form will open. i. Enter your staff ID. ii. Enter the type of history page you wish to create. iii. Enter the template which you wish to use. iv. Enter the date for the history. v. Enter a summary of the history you are creating. vi. Click ‘F12: Accept’ to create the blank history page. 4. Type the notes you wish to use for the history template. Using a History Template 1. From the bill click on the 'History' tab. 2. Depending on your setup the ‘Create New History’ form will open or your blank default history form will open. If your default form automatically opens you will need to click on the '+ Add Page' button. 3. In the bottom right hand corner of the 'Create New History' form click on the 'F9: Use Template' button. 4. Search for the template by its summary field name. 5. Choose the template and click 'F12: Accept'. 6. The history will now be loaded and can be edited to suit each case. HAIRLINKSQL User Manual v4.5 Updated 01/05/2012 5 Chapter 19 CLIENT VISIT HISTORY Deleting a Clinical History If a clinical history has been added by mistake you can delete the page. Just open the clinical history you wish to delete so it is being viewed for updating on screen and click on the ‘Del Page’ button. History Abbreviations History abbreviations are used to quickly enter words, sentences or phrases. When you type in an abbreviation and press the spacebar it will enter the word, sentence or paragraph in full. For example you could use this feature for an abbreviation of the words “leg wax”. Just type „lw‟ then press the spacebar, and the words “leg wax” will replace „lw‟. You can use an abbreviation for a word, phrase, sentence or paragraph up to 256 characters long. 1. Login with the highest rights you have. 2. Click on the ‘Options’ menu and then select ‘Picklists Setup’. 3. Click on ‘History’. 4. Double click on ‘History Abbrs’. 5. Click the '+' button. 6. Click 'Ok' to the insert new record prompt. 7. Type in the abbreviation you would like to use - eg 'lb'. 8. Type the word or pharse out in full. eg 'leg wax' or 'leg wax full'. 9. Click the tick symbol in the bottom right-hand corner. 10. Click 'Ok'. 6 HAIRLINKSQL User Manual v4.5 Updated 01/05/2012 CLIENT VISIT HISTORY Chapter 19 Copy Previous History In a number of situations clinical notes may be repetitive, such as revisits with similar appointments. HairlinkSQL enables users to quickly enter similar client notes with the 'F11: Copy Last' and 'F10: Copy any' functions. These buttons are found on the history creation form. Depending on your set up the history creation form will open the first time you create a history or by clicking on the ‘Add Page’ button. Copy Last History Selecting this option will simply copy all text from the previous history to the current new page. You may then edit the contents as required. Copy Any History Selecting this option will simply bring up the History browser so that you may select the history that you wish to copy over. The history browser has a button at the bottom of the form when called from here, called 'Copy'. Simply select the history you wish to use and select 'Copy'. HAIRLINKSQL User Manual v4.5 Updated 01/05/2012 7 Chapter 19 CLIENT VISIT HISTORY VIEWING & PRINTING CLIENT HISTORY Printing Animal History From the Diary 1. Right click on the clients appointment and choose ‘Print Form/History’. 2. Select the history you wish to print from the bottom of the menu. 8 Print Last History: Prints the last history for the client on the appointment you have selected. Print All Histories: Prints all histories for the client on the appointment you have selected. Print Last 3 Histories: Prints the last 3 histories for the client on the appointment you have selected. Print History (HTML): Prints histories in the same format as the HTML History Browser. You have more advanced options to choose which history to print as well. These include; Print all histories Print histories between date range The number of histories to print Types of histories to print. Exclude product prices Include histories linked to items of particular classes Print History (Advanced): Prints histories with more advanced options. These include; Print all histories Print histories between date range The number of histories to print HAIRLINKSQL User Manual v4.5 Updated 01/05/2012 CLIENT VISIT HISTORY Chapter 19 History Slide Show Features of the History Slide Show The history browser is divided into four parts which are separated by black lines. The black line is adjustable. By dragging the line with the mouse each section can be made bigger or smaller depending on the user‟s preference. Top Left: Displays the details of the history that the user has selected from the list in the bottom screen. Top Right: Displays the bill items that are attached to the history selected. Middle Right: Displays any scripts that are on the bill. Bottom: Lists a summary of all histories for the animal selected. Fig. 19 - 2 Accessing the History Slide Show From the Diary: Right click an appointment, click on ‘History’ and select „History Slideshow‟. From the Billing Screen: Change to the ‘History’ tab, click on ‘Prev History’ and select your preferred browser. From the History Page of the Billing Screen: Press ‘F8’ on the keyboard. From an Client Record: Click ‘Actions’ and select your preferred browser. Also while in the Client Record press ‘F8’ on the keyboard. Printing From the History Slide Show HAIRLINKSQL User Manual v4.5 Updated 01/05/2012 9 Chapter 19 CLIENT VISIT HISTORY The history slide show allows you a number of options to print the clinical histories. To print clinical histories from the history slide show click on the button at the bottom of the window and choose one of the options outlined below. 10 4 History (Current Bill): Prints the clinical history you currently have selected in the history slide show. 5 History (Last Bill): Prints the clinical history from the most recent bill. 6 History (All Bills): Prints all the clinical histoies. 7 History (Last 3 Bills): Prints the clinical histories from the last three bills. Animal History (Advanced): Prints histories with more advanced options. These include; Print current (selected) history Print last history Print all histories Print histories between date range The number of histories to print HAIRLINKSQL User Manual v4.5 Updated 01/05/2012 CLIENT VISIT HISTORY Chapter 19 History Browser The history browser will list all clinical histories in chronological order in one list. The browser is spilt into 3 sections; the left hand side has the display options for viewing and selecting the histories to show, the middle section will show the written clinical history while on the right hand side you will see the bill items and scripts that are attached to the history. Fig. 19 - 3 Features of the History Browser Flexible Date Selection: Select the start and ending dates to view histories for. Note: An intelligent note will display if histories are being hidden because of the date selection. Filter Options: Allows you to selectively view relative entries in a bill. You may select any combination of Retail, Drug, Service, Fee and Materials. Search: You can easily look for a keyword in your list of current histories, enter a keyword in the ‘Find Text’ box then click the ‘Find’ button. To find the next instance of the keyword click ‘Find’ repeatedly, HairlinkSQL will step you through all matching words until it reaches the last one. HAIRLINKSQL User Manual v4.5 Updated 01/05/2012 11 Chapter 19 CLIENT VISIT HISTORY Accessing the History Browser From the Diary: Right click an appointment, click on ‘History’ and select your preferred browser. From the Billing Screen: Change to the ‘History’ tab, click on ‘Prev History’ and select your preferred browser. From the History Page of the Billing Screen: Press ‘Shift+F8’ on the keyboard. From an Client Record: Click ‘Actions’ and select your preferred browser. Also while in the Client Record press ‘Shift+F8’ on the keyboard. Printing From the History Browser Through the HTML browser, advanced print options are made available. The printed report is formatted as seen on the screen, all images and letters are printed in line with the remaining history content. Several print options are available making it flexible and easy to use. The screen below shows the available print options including ability to include or hide prices and exclude certain type of histories. Fig. 19 - 4 12 HAIRLINKSQL User Manual v4.5 Updated 01/05/2012 CLIENT VISIT HISTORY Chapter 19 Emailing From the History Browser 1. Open the client record and select ‘History Browser’ from the Actions menu in the bottom right. 2. Click the ‘Email’ button in the sidebar. This will open the email options window. 3. Select the options to narrow what is sent including showing/hiding prices and date ranges etc. 4. If you tick ‘Remember My Settings’ this will save the current settings as the new default for future emails. 5. Select ‘F12: OK’ once you have selected your settings. 6. The HTML editor will open to allow formatting of the email. 7. Click ‘Send Now’ to send the history. Fig. 19 - 5 HAIRLINKSQL User Manual v4.5 Updated 01/05/2012 13 Chapter 19 CLIENT VISIT HISTORY Print History Menu The history menu provides quick and easy access to animal clinical history, no matter how your system is configured this menu system will always behave in the same manner. From this menu you may view and print client visit history. 1. Click on the ‘Bill’ button and then on the ‘F2: Print Hist’ button. 2. A client search window will appear, search and select the client record. 3. The history toolbar will now open, a. Click on the ‘Print 3’ button to print the last 3 histories b. Click on the ‘Print All’ button to print all histories. 4. Depending on your system configuration; a. The clinical history will automatically print out. b. The clinical history will open and preview on screen. You can click on the print icon at the top of the page to print the history and then click the ‘Close’ button to close the preview. Fig. 19 - 6 14 HAIRLINKSQL User Manual v4.5 Updated 01/05/2012