1
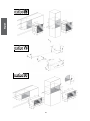
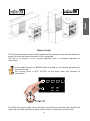
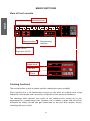
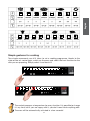
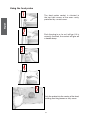
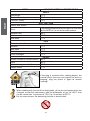
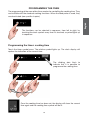
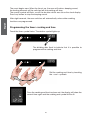
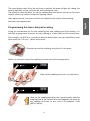
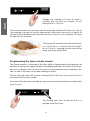
BO920TS
90cm Multifunction oven
Multi-language user manual
Italiano
INDEX
Installation and Connection
Demo mode
Regulating the clock
Switching on the oven
25
27
28
29
English
OVEN PRESENTATION
30
30
31
32
32
33
37
38
Deutsch
View of front console
Cooking functions
Simple gestures for cooking
Regulating the cooking temperature
Residual heat
The food probe
Special functions: turbo heat and turbo clean
Oven light control
Français
Main Functions
Safety
Over lock function
43
23
Nederlands
39
40
41
42
43
Português
Programming the timer: cooking time
Programming the timer: cooking end time
Programming the timer: delayed cooking
Programming the timer: minute counter
Programming the timer: cancelling the programme
Español
Programming the oven
Português
24
Nederlands
Español
Deutsch
Français
English
Italiano
Dear Customer, your new oven is managed by an electronic card which constantly
monitors its operation in order to improve its all-round performance.
Italiano
OVEN PRESENTATION
Dear Customer, this oven is a sophisticated electrical appliance, classified as a durable
item. It must be installed by qualified personnel who operate in compliance with the
very highest standards both for connection to the electricity supply and installation
into the kitchen unit.
Nederlands
Español
25
Português
series
Français
Installation and Connection
Deutsch
Just a few buttons, lots of functions and no difficult combination or sequence of
buttons. Simply concentrate on following the recipe and the oven is ready with two
movements!!!
English
The state-of-the-art, reliable and precise touch control system.
The elegant, orderly and discreet interface, more user-friendly than ever before!
Português
Nederlands
Español
Deutsch
Français
English
Italiano
series
series
series
26
series
Italiano
series
Français
English
Nederlands
In this mode the oven is NEVER really activated, as the heating elements are
not switched on!!
The control panel is NOT ACTIVE so the oven does not respond to
commands!
Español
This is the name of the mode usually implemented by the oven every time the electricity
supply fails and also when the oven is first connected.
The aim is to display all the control potentials with a recorded sequence of
commands.
Deutsch
Demo mode
To disable the demo mode, touch the light symbol for five seconds: the controls will
enter into standard operational mode and the oven is ready to be switched on.
27
Português
5 sec.!!
The oven signals the connection to the electricity main with a double beep.
To regulate the system time, press the TIMER FUNCTIONS button for 5 sec.
Every control used is confirmed by a beep.
Italiano
Español
Deutsch
Français
English
Regulating the clock
Português
Nederlands
Regulate the clock using the + and – buttons:
the dividing dots flash while the time is being set and
stop flashing when the time has been acquired.
28
Italiano
Français
The oven is switched on using the ON/OFF symbol shown
in the figure.
The control activates all the symbols, illuminating the
background.
English
Switching on the oven
29
Português
Nederlands
Español
Deutsch
The control will wait eight seconds after switch-on for a cooking function to be
chosen. Otherwise it interprets the switch-on as accidental and automatically
switches off the oven for safety reasons.
Italiano
MAIN FUNCTIONS
Français
English
View of front console
Cooking
functions
)XQ]LRQL
Oven
Oven
Special
functions
)XQ]LRQL
3URJUDPPD
Programming
the
oven
]LRQHGHO
Español
Deutsch
2Q2IIIRUQR
On/Off
lock On/Off
2Q2IIEORFFR
7HPSHUD
Temperature
Oven
lock
%ORFFR
Clock
2UROR
Português
Nederlands
Cooking functions
The control makes a total of twelve specific cooking functions available!
Every function has a set temperature chosen on the basis of cooking tests using
frequently used recipes and can easily be adjusted to suit personal preference.
The following table contains the results of the cooking tests carried out in our
laboratories by a professional chef. However, this is merely a guide and the values
indicated are simply to help you get started and try our your own recipes, always
achieving the best results!
30
Italiano
English
Français
The control proposes a temperature for every function. It is possible to change
it t any time, but if you are happy with it, you don’t need to do anything else.
The oven will be automatically activated in a few seconds!
31
Português
Nederlands
Español
Two simple movements are all it takes to set a cooking programme, thanks to the
state-of-the-art control logic: switch on the oven and select the best function for the
dish you are preparing. Simply select it and touch it!
Deutsch
Simple gestures for cooking
Italiano
Temperature Regulation
The control makes use of a temperature probe with a level of precision of ±5°C offering
maximum reliability of the cooking times required.
It isn’t necessary to confirm the change, as the control is automatically activated after
just a few seconds.
Deutsch
Français
English
To change the temperature simply use the plus and minus symbols. The range of
regulation varies from +50°C to +250°C.
During the heating process, the degrees centigrade symbol (°C) symbol flashes,
indicating that the heat is being regulating to reach the temperature required.
When the correct temperature is reached, you will hear a beep.
Português
Nederlands
Español
Residual heat
While cooking food, the structure of the oven stores heat. This heat is kept isolated
from the rest of the kitchen thanks to an excellent insulation system and certain
construction details.
The heat is gradually dispersed can be used as a further cooking resource if managed
appropriately: the control indicates the interior temperature, after the oven has been
switched off, until it reaches 50°C.
use this feature to keep food warm or to gently complete the
process.
32
cooking
(available on certain models)
Italiano
Food probe (or probe thermometer)
33
Deutsch
Español
Bacteria multiply very quickly above a temperature of 4.4° up to 60°C. Mince is
particularly at risk from this point of view.
To prevent bacteria from multiplying, it is necessary to take the following measures:
s $ONOTDEFROSTFOODATROOMTEMPERATUREALWAYSINTHEFRIDGEORINTHEOVENUSING
the specific function. In the latter case, cook the food immediately afterwards.
s 3TUFFCHICKENJUSTBEFOREEATINGIT.EVERBUYPREPACKEDREADYSTUFFEDCHICKENAND
only buy ready-cooked stuffed chicken when you intend to eat it within 2 hours.
s -ARINATEFOODINTHEFRIDGENOTATROOMTEMPERATURE
s 5SEAFOODPROBETOCHECKTHETEMPERATUREOFMEATlSHANDPOULTRYIFTHEYAREMORE
than 5 cm thick, to ensure that the minimum cooking temperatures are reached.
The greatest hazards are posed by poorly cooked chicken, particularly at risk from
Salmonella.
s !VOID INTERRUPTING THE COOKING PROCESS IE PARTIALLY COOKING FOOD STORING IT AND
completing the cooking process later. This sequence encourages the growth of
bacteria due to the “warm” temperatures reached inside the food.
s2OASTMEATANDPOULTRYINTHEOVENATTEMPERATURESOFATLEASTª#
Nederlands
Certain types of bacteria make food go off, while others, such as Salmonella,
Campylobacter jejuni, Listeria monocytogenes, Escherichia coli and Staphylococcus
aureus can be seriously harmful to human health.
Português
The temperature reached by food during cooking is closely linked to problems relating
to health and hygiene. Bacteria can be contained in every kind of meat, poultry and
fish, as well as raw eggs.
Français
English
The food probe is a thermometer which, when inserted into the food, makes it possible
to check the internal temperature and use it to establish the end of cooking.
For example, meat may look like it is cooked on the outside, but still be pink on the
inside!
Italiano
Using the food probe
The food probe socket is situated in
the top front corner of the oven cavity,
protected by a metal cover.
Push the plug in as far as it will go. If it is
correctly inserted, the control will give off
a double beep.
Português
Nederlands
Español
Deutsch
Français
English
Push the probe into the centre of the food,
avoiding touching bones or fatty areas.
34
Italiano
English
Remember that the probe will not work if it is connected when the oven is
already switched on!
Deutsch
Français
Switch on the oven!
After 5 sec. the temperature
display switches to indicate the
temperature of the food probe,
i.e., the temperature which must
be reached inside the food.
You can change the minimum internal temperature value to suit requirements
within an interval of +30°C to +99°C , but we recommend that you consult the
table below, taken from THE NATIONAL FOOD SAFETY DATABASE (USA)
35
Nederlands
Português
Español
Select the best cooking function for your recipe.
Italiano
FOOD
Português
Nederlands
Español
Deutsch
Français
English
Hamburger
Beef, veal, lamb, pork
Chicken, turkey
MINIMUM INTERNAL TEMPERATURE
Mince
71°C
74°C
74°C
Beef, veal, lamb
Roasts and steaks:
The cooking temperature for rare meat is not indicated
by the NFSD as it is unsafe for health reasons
Rare
Medium-rare
Medium
Well done
Chops, roasts, ribs:
Medium
Well done
Fresh ham
Fresh sausages
Whole chicken or chicken pieces
Duck
Whole turkey (not stuffed)
Turkey breast
63°C
71°C
77°C
Pork
71°C
77°C
71°C
71°C
Poultry
82°C
82°C
82°C
77°C
If the plug is removed after cooking begins, the
control blocks the oven and signals the error by
beeping: plug the probe in again to resume
cooking!
When cooking with the aid of the food probe, all the pre-set temperatures are
changed, to maintain consistency with the philosophy of use, to 165°C: they
can be varied from a minimum of 120°C to a maximum of 250°C.
For the same reason, the defrosting function is deactivated.
36
Italiano
Français
When the cooking time is up, remember to disconnect
the food probe and remove it from the oven.
CAUTION: the probe is very hot after cooking.
If the probe is left connected to the oven but not inside
the food, an error may be generated (ERR3) on the
timer display. The error will disappear when the probe is
disconnected from the oven.
English
The end of cooking, established by reaching the internal temperature set for the food
probe. All the oven programming functions (timer functions) are stopped, apart from
the beeper (minute counter).
When the food probe senses the temperature for which it has been set, the oven is
automatically deactivated and you will hear a beep!
SPECIAL FUNCTIONS
Boost (quick preheat)
Clean (quick cleaning)
Correct operation is combined with the use of the lateral panels and catalytic fan cover:
the oven is treated with special enamel with a micro-porous structure, which breaks
down the fat projected thanks to a catalytic oxidisation process which transforms
residues into gaseous products.
The turbo clean function is only activated when no cooking function has been selected,
so: switch on the oven and touch the symbol as shown in the figure for five seconds.
37
Português
It is possible to disconnect the turbo heat function or change cooking function at
any time.
Nederlands
Español
Deutsch
This special function can be activated after selecting a cooking function and is used to
reduce the time required to reach the set cooking temperature.
This period of time is known as preheating, and is required in practically all recipes.
Italiano
English
Français
Deutsch
5
sec.!!
The cleaning process takes place at a temperature of 250°C and lasts one
hour. Do not use it for cooking food!!
The oven light is activated and can be switched off and on again at any time.
All the self-cleaning panels will perform effectively for thirty cleaning processes, after
this limit the panels must be replaced.
The panels should be cleaned exclusively with tap water and replacements can be
ordered from your specialised dealer.
Oven light control
Português
Nederlands
Español
The light control is active on all the cooking functions and is independent, meaning
that it can be switched on or off to suit your requirements, when you want!
The oven light is usually kept on throughout the heating time and then for three minutes
after reaching the temperature set. From then on, the oven light switches off to save
power.
To check the cooking, it may be necessary to switch on the internal light. All you
have to do is touch the light symbol: the light will stay on for three minutes and then
switch off automatically. Naturally you can switch it off immediately by touching the
light symbol again.
Some models are equipped with a door control. This feature uses sensor technology
to detect the position of the door to control the oven light: the opening of the door is
indicated by a beep and the light comes on. It switches off when the door is closed
again.
38
English
The programming of the oven offers three modes for controlling the cooking time. They
are available with the standard cooking functions. When the food probe is used, they
are deactivated (see specific chapter).
Italiano
PROGRAMMING THE OVEN
Français
The functions can be selected in sequence, from left to right, by
touching the clock symbol: every time it is touched, a symbol lights up
in sequence.
Programming the timer: cooking time
Once the cooking time has been set, the display will show the current
time again and the cooking time symbol will be lit.
39
Português
Nederlands
Español
The dividing dots flash to
indicate that it is possible to
programme the cooking time
Deutsch
Touch the timer symbol once. The relative symbol lights up. The clock display will
replace the indication of the current time:
Italiano
The count begins now. When the time is up, the oven will make a beeping sound,
the heating elements will be switched off and cooking will stop.
The special symbol will flash, as will the duration which was set on the clock display.
Press any button to stop the beeping sound.
English
After eight seconds, the oven switches off automatically unless other cooking
functions are programmed.
Programming the timer: cooking end time
The dividing dots flash to indicate that it is possible to
programme the cooking end time.
Deutsch
Français
Touch the timer symbol twice. The relative symbol lights up.
Português
Nederlands
Español
Set the cooking end time by touching
the + and – symbols.
Once the cooking end time has been set, the display will show the
current time again and the cooking end symbol will be lit.
40
Italiano
The count begins now. When the set time is reached, the oven will give off a beep, the
heating elements will be switched off and cooking will stop.
The special symbol will flash, as will the cooking end time which was set on the clock
display: press any button to stop the beeping sound.
Programming the timer: delayed cooking
English
After eight seconds, the oven switches off automatically unless other cooking
functions are programmed.
For example, it is 8.30 a.m. and you’re about to leave home, but you would like a roast
to be ready for 1.00 p.m.. Here’s what to do:
Français
Using the combination of the two cooking time and cooking end time modes, it is
possible to programme the oven to start cooking at a later time than the current time.
Now set the cooking end time: the control usually adds the
cooking time to the current time and proposes the result as
the cooking end time. In our case it will propose 10:30
(8:30+2 hours).
41
Español
Nederlands
Now set the cooking time, let’s say two hours.
Português
Switch on the oven, select the cooking function and set the temperature.
Deutsch
Prepare the roast for cooking and place it in the oven.
Italiano
English
Change the cooking end time to make it
coincide with the time you require. In our
example this is 1.00 p.m.
Deutsch
Français
The oven now enters into stand-by and the oven light switches off. When it is time to
start cooking, the light will not be automatically switched on because it is logical to
assume that the delayed start coincides with your absence, so it is pointless to leave
the light on for no reason.
The control will automatically activate the oven
at 11:00 (1:00 p.m. –2 hours) and will switch it
off at 1.00 p.m., meaning that the roast will be
ready when you arrive home!
Programming the timer: minute counter
Español
The minute counter is a function of the timer which is independent of the operation of
the oven, meaning that it does not block the cooking and does not switch off the oven,
but acts as a beeper. You can set it at any time, as a reminder to check cooking on the
hob, as well as the oven, or for other cooking activities.
This can also be used with the oven switched off. In this case all you have to do is
touch the timer function symbol.
Nederlands
If you use it with the oven switched on, you must touch the time function symbol three
times in a row.
Português
The dividing dots flash to indicate that it is
possible to set the value.
42
Italiano
Programming the timer: cancelling the programme
To cancel a programme, it is necessary to take the value assigned previously to zero
or switch off the oven.
Français
The count begins now. When the time indicated is up, the oven will make a beeping
sound and the special symbol will flash. Press any button to interrupt the beeping
sound.
English
Set the minutes using the + and - symbols.
3 sec.!!
Lock activated:
red padlock closed symbol on the display Every action
linked to cooking is disabled.
43
Español
Nederlands
Touch the on/off symbol for at least three seconds to activate
or deactivate, alternately, the oven lock.
Português
The control males a lock available on the console to prevent the oven from being
switched on or the cooking settings from being interfered with.
It can be activated and deactivated at any time using the on/off button.
Deutsch
SAFETY: OVEN SWITCH-ON LOCK
Italiano
Português
Nederlands
Español
Deutsch
Français
English
Lock deactivated:
white padlock open symbol on the display
44
cod. 2.002.05.0 - 3°ed
IMPORTANT: If your appliance appears not to be
operating correctly, then you should disconnect it from
your mains supply and then contact the Customer Care
Department.
DO NOT ATTEMPT TO REPAIR THE APPLIANCE YOURSELF.
Please note that if an engineer is asked to attend whilst the product is
under guarantee and finds that the problem is not the result of an
appliance fault, then you may be liable for the cost of the call out charge.
The appliance must be accessible for the engineer to perform any
necessary repair. If your appliance is installed in such a way that
an engineer is concerned that damage will be caused to the
appliance or your kitchen, then they will not complete a repair.
This includes situations where appliances have been tiled in,
sealed in with sealant, have wooden obstructions placed in front
of the appliance, like plinths. Or any installation other than the
one specified by the manufacturer has been completed.
IMPORTANT: The manufacturer operates a policy of continuous
improvement and reserves the right to adjust and modify its
products without prior notification.
United Kingdom
Baumatic Ltd.,
Baumatic Buildings,
6 Bennet Road,
Reading, Berkshire
RG2 0QX
United Kingdom
Czech Republic
Baumatic CR spol s.r.o.
Lípovà 665
460 01 Liberec 4
Czech Republic
+420 483 577 200
www.baumatic.cz
Sales Telephone
(0118) 933 6900
Sales Fax
(0118) 931 0035
Customer Care Telephone
(0118) 933 6911
Customer Care Fax
(0118) 986 9124
Spares Telephone
(01235) 437244
Advice Line Telephone
(0118) 933 6933
Slovakia
Baumatic Slovakia, s.r.o.
Panenská 34
811 03 Bratislava - Staré Mesto
Slovakia
+421 255 640 618
www.baumatic.sk
Germany
Baumatic Gmbh
Bachstr.10-12
D-32 257 Bünde
Deutschland
E-mail:
[email protected]
[email protected]
[email protected]
[email protected]
+49 (0) 5223 99408 0
www.baumatic.de
Website:
www.baumatic.co.uk
Italy
Baumatic Italia S.R.L.
Via Galvani N.3
35011 Campodarsego (PD)
Facebook:
www.facebook.com/baumatic.uk
+3904 9920 2297
www.baumatic.it
Republic of Ireland
Service Telephone
1-890 812 724
Holland
Baumatic Benelux B.V.
Dukdalfweg 15d
1332 BH ALMERE
Nederland
Spares Telephone
091 756 771
+31(0)36 549 1553
www.baumatic.nl
1
40