1
Vinyl Windows and Doors
Part Number: V784840
©Pella Corporation 2007
Manufactured by Pella Corporation
INSTALLATION INSTRUCTION - INSTRUCCIONES DE INSTALACION
FOR DOUBLE-HUNG VENT REPLACEMENT WINDOW
Lea las instrucciones en español en el reverso.
Installation Instructions for Typical Wood Frame Construction.
These instructions were developed and tested for use with typical wood frame wall construction in
a wall system designed to manage water. These instructions are not to be used with any other
construction method. Installation instructions for use with other construction methods may be
obtained from Pella® Corporation or a local Pella retailer. Building designs, construction methods,
building materials, and site conditions unique to your project may require an installation method
different from these instructions and additional care. Determining the appropriate installation method
is the responsibility of you, your architect, or construction professional.
Handling and Storage:
Provide full support under the framework while storing, moving and installing this product. DO
NOT lift the product by the head member only. Remove the plastic shipping material prior to storing
or installing the product. DO NOT store in direct sunlight. Allow sufficient spacing between products
for ventilation.
YOU WILL NEED TO SUPPLY:
TOOLS REQUIRED:
s#EDAROR)MPERVIOUSSHIMSSPACERSTO
sXSHEETMETALSCREWSFORHEADEXPANDER
s'REAT3TUFF™ Window and Door Insulating Foam
Sealant by the Dow Chemical Company or equivalent
LOWPRESSUREPOLYURETHANEWINDOWANDDOORFOAM
$/./4USEHIGHPRESSUREORLATEXFOAMS
s(IGHQUALITYEXTERIORGRADEPOLYURETHANEOR
SILICONESEALANTTUBEPERWINDOW
s,OOSElLLlBERGLASSINSULATION
&OR(IGH0ERFORMANCE)NSTALLATIONSONLY
sXmATHEADCORROSIONRESISTANTWOODSCREWS
sXPINEFORINTERIORFRAMESTOPS
s4APEMEASURE
s,EVEL
s(AMMER
s5TILITYKNIFE
s0UTTYKNIFE
s0RYBAR
s3CREWDRIVER&LAT0HILLIPS
s3IDECUTTERS
s$RILLWITHvDRILLBIT
s3EALANTGUN
SEALANT
SEALANT
Installation will require two or
more persons for safety reasons.
REMEMBER TO USE APPROPRIATE
PERSONAL PROTECTIVE EQUIPMENT.
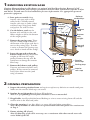
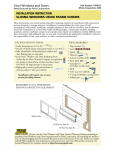
*OUF
&YJTUJOHXBMM
DPOTUSVDUJPO
SJPS
&YJTUJOH
XJOEPX
GSBNF
$IFDLSBJM
%SZXBMM
*OTVMBUJPO
'SBNJOH
Always read the Vinyl Window and Door Limited Warranty before purchasing or
installing Vinyl Windows and Doors manufactured by Pella Corporation. By installing this product,
you are acknowledging that this Limited Warranty is part of the terms of the sale. Failure to comply
with all Pella installation and maintenance instructions may void your Pella product warranty. See
Limited Warranty for complete details at http://warranty.pella.com.
1 REMOVING EXISTING SASH
Caution: Many windows in older homes are painted with lead-based paint. Removal of old
windows may disturb this paint. Proper precautions must be taken to minimize exposure to dust
and debris. Consult state or local authorities for more information. Use appropriate personal
protective equipment.
A. Score paint or varnish along
interior sash stops with a sharp
utility knife. Carefully remove
INTERIORSASHSTOPSATJAMBSSIDES
ANDHEADTOPUSINGPUTTYKNIFE
and prybar. Set aside to reuse.
B. Cut the balance cords on the
bottom sash and lift out the sash.
Allow weights to fall to the bottom
of the weight pocket.
C. Remove the parting stops. There
may be a small wedge of wood at
the bottom of the upper sash that is
NEXTTOTHEPARTINGSTOPS4OMAKE
it easier to remove the parting stop,
use a chisel to knock off the wedge.
D. Lower the top sash and cut the
balance cords allowing the balance
weights to fall into the weight
pocket. Remove the top sash. Be
CAREFULNOTTODAMAGETHEEXTERIOR
blind stop.
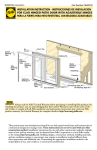
#BMBODF
DPSEQVMMFZT
*OUFSJPS
TBTITUPQ
#PUUPN
CBMBODF
DPSET
1BSUJOH
TUPQ
5PQ
CBMBODF
DPSE
5PQTBTI
#PUUPN
TBTI
XFJHIU
&YUFSJPS
CMJOE
TUPQ
5PQTBTI
XFJHIU
#PUUPN
TBTI
&YUFSJPS
CMJOETUPQ
1BSUJOHTUPQ
E. Remove the balance cord pulleys.
Unscrew and remove balance cord
pulleys. If they cannot be removed
easily, drive them into the jamb
using a hammer.
*OUFSJPS
TBTITUPQ
*/5&3*03
2 OPENING PREPARATION
A. Inspect the existing window frame and repair or replace any defective or rotted wood parts.
-AKESURETHEEXTERIORBLINDSTOPSARESOUND
B. Insulate the weight pocket with loose fill insulation.
Note: Use of expanding/aerosol foam insulation is not recommended.
C. If applicable,INSTALLPRElNISHEDMETALmASHINGORTRIMTOCOVEREXISTINGFRAMESILLANDTHE
EXTERIORTRIMATTHEHEADANDJAMBS
D. Clean the openingOFANYDIRTDEBRISOREXCESSOLDPAINTBEFOREPROCEEDING
Note: Many windows in older homes are painted with lead-based paint. See caution note
in Step 1.
E. Ensure existing sill is level.
Note: If shimming of the sill is necessary, use a continuous shim that extends across the
entire width of the sill.
F. Verify that the installation jamb screws will fasten into solid wood. If not, insert
solid filler at screw locations.
Note: Raise the lower sash to access the lower
&95&3*03
installation holes. There will be four or six
installation holes in each jamb, depending on
w
the window frame size.
&YUFSJPS
CMJOETUPQ
High Performance Installations: Using a
DRILLBITPREDRILLDEEPANDINSERT
XmATHEADEXTERIORGRADEWOODSCREWSIN
ALLTHEEXTERIORBLINDSTOPS3CREWSSHOULDBE
PLACEDFROMEACHENDANDNOTMORETHAN
ONCENTER
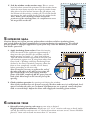
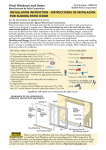
3 PREPARE THE WINDOW FOR INSTALLATION
A. Remove packing materials from the window.
Note: Check product for any cracks or
penetrations in the frame. DO NOT install
damaged windows.
Î
4JMMBEBQUFS
4JMMBDDFTTPSZ
HSPPWF
B. Install the sill adapter in the sill
accessory groove.
Note: Use a rubber mallet to drive
the sill adapter into the sill accessory
groove. The vertical leg of the sill
adapter may be cut to accommodate
different sill angles.
4 SEALING AND FASTENING THE WINDOW
A. Test fit the window in the opening. With the window closed and locked, set the bottom
of the window into the opening, then tilt the top into position.
B. Ensure the window is resting against the interior surface of the blind stops and the sill
adapter meets the original sill.
Note: The height of the window frame can be
increased by as much as 3/8" by applying the
head expander (included) to the window
frame. If more than 3/8" height adjustment
is required, install a continuous shim at
{
the sill.
DO NOT use the head expander in High
Performance installations.
C. Apply the head expander (if required). For installation
USINGTHEHEADEXPANDERGOTO).34!,,!4)/.
).3425#4)/.3(%!$%80!.$%2LATERINTHISBOOKLET
i
D. Drill two 1/4 weep holesINTHESILLADAPTER,OCATETHEHOLESvFROMEACH
end. The bottom of the weep hole must be at the bottom of the vertical leg of
the sill adapter.
i
E. Apply a 1/4 to 3/8 continuous bead of sealant to the
INTERIORFACEOFTHEEXISTINGBLINDSTOPSATTHEHEADANDBOTH
jambs. Also apply a bead of sealant across the sill, connecting
with the sealant at the jambs.
*OUF
SJPS
{
F. Place a bead of sealantWHERETHEEXISTINGSTOOLMEETSTHE
EXISTINGFRAMESILLANDJAMBS
*OUF
SJPS
'Insert the replacement windowFROMTHEINTERIOR
in the opening by setting the bottom of the window
in first, then tilting the top into place. Make sure the
window rests against the interior surface of the blind
STOPSANDTHESILLADAPTERWILLCONTACTTHEEXISTINGSILL
{
(Place a shim near the top of one jamb, in line with the
TOPPREDRILLEDHOLEINTHEWINDOWFRAME0ARTIALLYINSERT
AXPANHEADSCREWPROVIDED2EPEATPROCESSFOR
other jamb.
*OUF
SJPS
{
4IJN
TDSFX
I. Continue placing shims at each pre-drilled installation
screw holes in jambs as needed to plumb and square the
window. Check window for squareness by making sure
diagonal measurement from corner to corner is within
INBOTHDIRECTIONS
J Pre-drill 1/16" diameter holes in the shims.)NSERTA
XPANHEADWOODSCREWPROVIDEDINTOEACHPREDRILLED
hole in the frame. Finish inserting the top screw in each
jamb. Minor adjustments may be made at the checkrail
using the jamb adjustment screws located in the lower sash
channel, just above the checkrail.
Note: Ensure the jamb adjustment screws are flush
or just below flush with the sash track so they do not
interfere with the travel of the balances.
*OUFSJPS
{
&YUFSJPS
K. Seal the window to the exterior stops. Place a corner
bead of sealant around the perimeter of the window frame
where the new frame contacts the original window frame.
Also place a bead of sealant between the sill adapter and
THEBOTTOMOFTHEEXISTINGWINDOWSILL4HISBEADSHOULD
connect to the jamb sealant beads. Tool the sealant beads.
Note: When corner beading sealant around the
perimeter of the window frame, be careful not to cover
the weep holes at the sill.
{
5 INTERIOR SEAL
Caution: Ensure use of low pressure polyurethane window and door insulating foams
and strictly follow the foam manufacturer’s recommendations for application. Use of high
pressure foams or improper application of the foam may cause the window frame to bow
and hinder operation.
A. Apply insulating foam sealant. From the interior,
INSERTTHENOZZLEOFTHEAPPLICATORAPPROXIMATELY
deep into the space between the window and the
ROUGHOPENINGANDAPPLYADEEPBEADOFFOAM
4HISWILLALLOWROOMFOREXPANSIONOFTHEFOAMAND
will minimize squeeze out. If using foam other than
'REAT3TUFF™ Window and Door Insulating Foam
Sealant by the Dow Chemical Company, allow the
FOAMTOCURECOMPLETELYUSUALLYTOHOURS
BEFOREPROCEEDINGTOTHENEXTSTEP
Note: It may be necessary to squeeze the end of
the tube with pliers to be able to insert into the
space between the new and existing window
frame. DO NOT completely fill the space from the
back of the blind stops to the interior face of the
opening.
*OUFSJPS
x
B. Check window operation by opening and closing the window.
Note: If the window does not operate correctly, check to make sure it is still plumb, level,
square and that the sides are not bowed. If adjustments are required, remove the foam
with a serrated knife. Adjust the shims and reapply the insulating foam sealant.
6 INTERIOR TRIM
A. Reinstall existing interior sash stops or new trim as desired.
High Performance Installations:)NSTALLNEWXINTERIORSASHSTOPSATHEADJAMBS
ANDSILL0REDRILLFORANDINSERTXmATHEADCORROSIONRESISTANTSCREWS3CREWSSHOULDBE
PLACEDFROMEACHENDANDNOTMORETHANONCENTER
INSTALLATION INSTRUCTIONS (HEAD EXPANDER)
Note: To determine if the Head Expander is required refer to Step 4B.
A. Make a pencil markFROMTHETOPOFTHE
window on the room side edge of each jamb.
*OUFSJPSGSBNFFEHF
B. Install the head expander on the top of the
window frame.3LIDETHEEXPANDERDOWNONTO
the head as far as it will go.
)FBEFYQBOEFS
5PQXJOEPXGSBNF
C. Test fit the window into the opening.
3LIDETHEHEADEXPANDERUPUNTILTHETOP
OFTHEHEADEXPANDERISWITHINOF
THETOPOFTHEEXISTINGOPENING%NSURE
the pencil marks are not visible. If the
PENCILMARKISVISIBLETHEEXPANDERIS
EXTENDEDTOOFAR
Note: If the expander extends past
the pencil mark it may be necessary
to shim the original sill or to order a
larger window.
4JEF7JFX
)FBEFYQBOEFS
1FODJMNBSL
*OUFSJPSGSBNFFEHF
D. Drill two 1/16" pilot holesTHROUGHTHEROOMSIDELEGOFHEADEXPANDERINTOTHEFRAME4HESE
HOLESARETOBEFROMEACHENDOFTHEHEADEXPANDER)NSERTAXPANHEADSHEETMETAL
SCREWNOTPROVIDEDINTOEACHHOLE
E. Proceed to Step 4D.
CLEANING INSTRUCTIONS
2EMOVELABELSANDCLEANTHEGLASSUSINGASOFTCLEANGRITFREECLOTHANDMILDSOAPORDETERGENT"ESURE
to remove all liquid by wiping dry or use a clean squeegee. The vinyl frame may be cleaned as described
ABOVE&ORSTUBBORNDIRTAhNONABRASIVEvCLEANERSUCHAS"ON!MI® or Soft scrub® may be used. Do
NOTUSESOLVENTSSUCHASMINERALSPIRITSTOLUENEXYLENENAPHTHAORMURIATICACIDASTHEYCANDULLTHE
lNISHSOFTENTHEVINYLANDORCAUSEFAILUREOFTHEINSULATEDUNITSEAL+EEPDOORTRACKSCLEAROFDIRTAND
debris. Keep weep holes open and clear of obstructions.
IMPORTANT NOTICE
Because all construction must anticipate some water infiltration, it is important that the wall system be
designed and constructed to properly manage moisture. Pella Corporation is not responsible for claims
or damages caused by anticipated and unanticipated water infiltration; deficiencies in building design,
construction and maintenance; failure to install Pella products in accordance with Pella’s installation
instructions; or the use of Pella products in wall systems which do not allow for proper management
of moisture within the wall systems. The determination of the suitability of all building components,
including the use of Pella products, as well as the design and installation of allow for proper
management of moisture within the wall systems. The determination of the suitability of all building
COMPONENTSINCLUDINGTHEUSEOF0ELLAPRODUCTSASWELLASTHEDESIGNANDINSTALLATIONOFmASHINGAND
sealing systems are the responsibility of the Buyer or User, the architect, contractor, installer, or other
construction professional and are not the responsibility of Pella.
Pella products should not be used in barrier wall systems which do not allow for proper management of
MOISTUREWITHINTHEWALLSYSTEMSSUCHASBARRIER%XTERIOR)NSULATIONAND&INISH3YSTEMS%)&3ALSO
KNOWNASSYNTHETICSTUCCOOROTHERNONWATERMANAGEDSYSTEMS%XCEPTINTHESTATESOF#ALIFORNIA
.EW-EXICO!RIZONA.EVADA5TAHAND#OLORADOPella makes no warranty of any kind on and
assumes no responsibility for Pella windows and doors installed in barrier wall systems. In the
states listed above, the installation of Pella Products in barrier wall or similar systems must be in
accordance with Pella’s installation instructions.
Product modifications that are not approved by Pella Corporation will void the Limited Warranty.