1
DreamTheme Reloaded Blue Theme v.1.2 for PrestaShop
Dear Customer,
Thank you for buying DreamTheme Reloaded Blue theme for PrestaShop. Please, take time to read this
User’s Manual and also read the Terms of Use attached to the theme archive documentation.
Table of Contents
Installation………………………………………………..……………………………………………..…..…..3
Configuration……………………………………………………………………………..………………….....5
Working with modules…………………………………………………………………………………..….7
Upgrading from old versions……………………….……………………………………………….….11
Translating the theme in not included languages…………………………………………....11
Frequently asked questions…………………………………………………………………………....12
Additional information……………………………………………………………………………….……15
Installation
1. Important! Back up your files and database first.
2. Open your PrestaShop Back Office (admin) and search for “Theme Installator” module.
( Note: Install the module if it’s not installed ) and Click “Configure”.
3. At the first section “Import from your computer” select the theme archive that you have downloaded
and click “Next”.
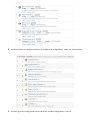
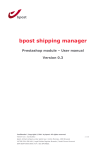
4. Follow the process by Clicking “Next”, “Next” and then “Finish”.
( Note: See the picture on the next page )
5. That’s it you are done with the installation. You now need to configure your new theme, see on the next page.
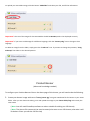
Configuration
1. Select the new installed theme by going to “Preferences” - > “Themes” tab. If not selected Click on the
check box of the installed theme.
2. Important!
If needed to change image sizes go to “Preferences” - > “Images” tab, and make sure to
edit width and height of images to the following values:
Large_dm:
Category_dm:
Home_dm:
Medium_dm:
300 px, 300 px
545 px, 200 px
135 px, 135 px
135 px, 135 px
3. Important! In the following field “Images” in the same tab, check option to “Use PNG only if the base
image is in PNG format”. And Click “Save”.
4. Important! Scroll down to the “Regenerate thumbnails” fields on the same page and Click the
“Regenerate thumbnails” button and wait to finish. This may take some time depending on how many
products and images you have.
5. Go back to “Preferences” - > “Themes” tab. Under the “Appearance” field, select your logo and upload
it and Click “Save”.
Note: Use transparent PNG format image for your logo.
6. That’s it you are done. Checkout working with modules section on the next page.
Working with the modules
Dreamtheme Horizontal Menu ( navigation bar )
In general, the usage with this module is the same as the Top Horizontal Menu, native module included in
PrestaShop.
To change or configure the links in the Horizontal Menu, go to your PrestaShop Back Office’s Modules section and
search for “Dreamtheme Horizontal Menu”. Click “Configure”. Now you can configure the links as you like using the
interface.
You can remove, add or translate links from here.
If you want to change the module settings to the default links, press “Reset” option on the module, in the modules
list.
DreamSlider Module
In general, the usage with this module is the same as the HomeSlider, native module included in PrestaShop.
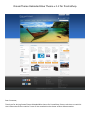
With this module, you can change front page big banner slider images. To do so, go to your PrestaShop Back Office’s
Modules section and search for “Dreamslider”. Click “Configure”. Now you can configure the links as you like using
the interface.
To upload your new Slider Image, Click the button “Add Slider” and select your file, and fill the information.
Important! The size of the images for the DreamSlider should be 957x423 pixels to be displayed correctly.
Important! If you want to add Image for a different language, Click the “Country Flag” icon to change to that
language.
To delete an image from the slider, simply press the “Trash Can” icon. If you want to change the positions, “Drag
and Drop” the sliders to the desired position.
Product Banner
( Advanced knowledge needed )
To configure your Product Banners like on the demo page of this theme, you will need to do the following.
1. Create your banner image with name “home_banner.jpg” using our PSD theme file for banner in your assets
folder. After you are done with editing, save and upload the image in your theme folder/img with exactly the
same name.
( Note: You will need PhotoShop software or other suitable for editing our PSD theme)
( Note: The picture file name and size must be exactly the same as our PSD theme; otherwise it will
be broken unless you edit the CSS for that)
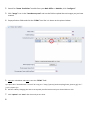
2. Search for “Home Text Editor” module from your Back Office -> Modules, click “configure”.
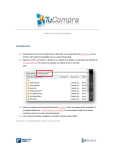
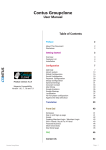
3. Click “Image” icon in the “Introductory text” and use the field to upload the two images you just have
created.
4. Empty all other fields and click the “HTML” icon like it is shown on the picture below:
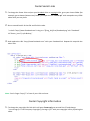
5.
Copy the code below and Paste it into the “HTML” field.
<p><span class="home-banner"><a href="#"><img src=""http://yoururl/yourtheme/img/home_banner.jpg" alt=""
/></a></span></p>
6.
Edit the code by changing the URL to correspond your file location and your desired links on click.
7.
Click “Update” and “Save” after that and you are done.
8.
Footer Social Links
1. To change the footer links and put your Facebook links or copyright info, go to your theme folder (for
example, go to themes/dtheme-blue/ folder) and open the file “footer.tpl” with notepad or any HTML
editor that you may have.
2. Go to around line 43 of that file and find this code:
“<a href="http://www.facebook.com"><img src="{$img_dir}/icon/facebook.png" alt="Facebook"
id="footer_icons"/></a> ”
3. And replace the URL “http://www.facebook.com” with your Facebook link.
Repeat this step with the
other links.
Note: Don’t forget “http://” in front of your URL and save.
Footer Copyright information
1. To change the copyright info link while still open footer.tpl go to around line 97 and change
“<p><strong>{l s='Your Company Copyright'}</strong></p>” with your copyright info by replacing the
name.
Important! Remember to enable “force compile” function once in the Back Office in order to see the
changes in the footer, and if needed clear your browser and PrestaShop cache.
Upgrading from old versions
If you are upgrading this theme from 1.4.x series versions of PrestaShop, we strongly recommend making
a clean install of PrestaShop and importing your data in it. If that is not possible you should do the
following.
1. Backup your theme changes to a different location.
2. Delete the folder “themes/dtheme-blue”
3. Delete the modules “Blocktopmenu”, “Slideric”, “Homefeatured2”
4. After that, start the install process explained in this User’s Manual.
Translating the theme in not included languages
You can translate this theme to any language you want. To do so you need to do the following:
1.
Import your language file in PrestaShop, or use PrestaShop Translation option.
Note: Find detailed steps about that in PrestaShop’s documentation.
2.
Translate the Navigation Links by edit the links in the “Dreamtheme Horizontal Menu”
Note: See working with modules.
3.
Translate via the PrestaShop Translation option the module “Home Featured”.
4.
If you need for back office use, translate the module “DreamSlider” in PrestaShop Translation page and
that’s it.
Frequently asked questions
Q. I can’t install the theme via theme installer from PrestaShop, what to do?
A. This is due to wrong permission’s from your hosting or PrestaShop installation or PHP file upload limit
settings. You can manage the appropriate permission’s or use alternate method below or you can install
the theme manually (not recommended).
Method 1
1.
To install the theme via alternative method, simply upload your theme archive via FTP to
PrestaShop installation folder in “modules\themeinstallator\import”.
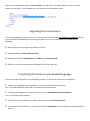
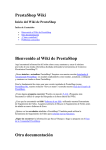
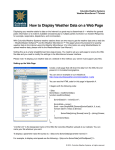
2.
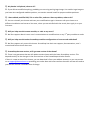
After that start the Theme installer again, and choose the last option “Install from FTP” you should
see your theme archive as an option there. See the picture below.
3.
From there just continue as shown in the normal installation.
Method 2 ( Manual Installation )
1.
Copy the modules folders from downloaded theme archive and upload them to your module
directory on your server where the PrestaShop installation is.
2.
Copy “Dtheme-blue” theme folder from the themes folder in the archive and upload it to your
PrestaShop theme folder.
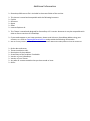
3.
After that disable the following modules in your PrestaShop. Check the picture on the next page.
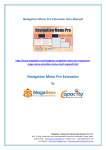
4.
You also will have to configure positions of modules and configurations. Check the picture below:
5.
And then go to the configuration steps and do the needed configurations. That’s it.
Q. My header is displaced, what to do?
A. If you did not modified anything, probably you are using too big Logo image. Use smaller Logo image or
you have miss configured modules position, see section manual install for proper modules positions.
Q. I have edited, modified CSS, TPL or other files, and now I have a problem, what to do?
A. You can reinstall your theme and start your modifications again. However edit your theme on a
different installation and not on a live store, when you are satisfied with the result, then apply it on your
live store.
Q. Will you help me with custom module, or code on my store?
A. No! Our support doesn’t cover user’s customizations or modifications or any 3rd party modules or code.
Q. Will you help me with native PrestaShop modules configuration or how to work with them?
A. No! Our support only covers this theme. PrestaShop has their own support, documentation, user’s
manual and forums check them out.
Q. PrestaShop has new version, will I get new version of the theme?
A. There is no guarantee that we will update certain theme with the latest PrestaShop version. This
depends mainly on the changes in the new versions of the PrestaShop and other factors.
If there is a new version of the theme, you can download it from your addons account, or you can contact
us at [email protected] providing your order date and name used on the order and we will send to
you the new version if available free of charge.
Additional Information
Photoshop PSD source file is included in the assets folder of the archive.
This theme is tested and compatible with the following browsers.
FireFox
GChrome
Opera
Safari
Internet Explorer 8+
This Theme is tested and designed for PrestaShop 1.5.2 version. However it may be compatible with
older or future versions of PrestaShop.
If you need support or you have questions, please send ticket on PrestaShop addons using your
account, or e-mail at [email protected] and provide the following information:
Due to security reasons, tickets on our e-mail without order date and number/name will not be answered.
Order date and name:
Theme installation URL:
Description of the problem:
Screenshots of the problem if available:
Version of your PrestaShop:
Version of your Theme:
Any edits or custom modules that you have made or have:
Other: