1
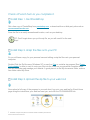
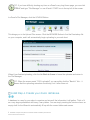
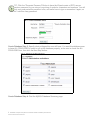
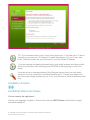
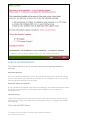
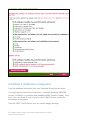
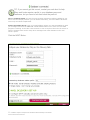
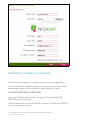
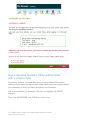
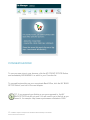
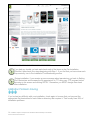
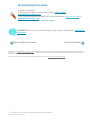
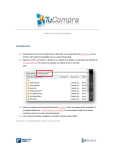
PrestaShop
Installation
What's in this Chapter?
Installing a web-based program is not like auto-installing a program on your
Windows computer.You don't just pop in a DVD and click "Install." You need the
skills or patience to create a database, set file security permissions, and to work
with files with long path names, many of which are confusingly similar (such as
includes/configure.php and admin/includes/configure.php).
Thankfully, there are many people who can install your store for you. Because
nobody can know everything about a technology, in the tech world, even the most
advanced programmer has someone they can ask for help. So don't be shy about
asking for help. See Appendix A for some recommendations.
PrestaShop is a copyright of Bruno Leveque. This Installation Guide is an excerpt from SHOWME™ Guides' PrestaShop
User Manual ©2008 Pithy Productions, Inc. www.osCommerceManuals.com. THIS PRESTASHOP INSTALLATION GUIDE
MAY BE REDISTRIBUTED IF THIS ENTIRE COPYRIGHT STATEMENT REMAINS INTACT.
Like this free guide? You'll love the full PrestaShop User Manual. Get it from www.osCommerceManuals.com.
1
Installation Chapter excerpted from ShowMe Guides PrestaShop User Manual
www.oscommercemanuals.com
Pre-Installation Checklist
Before you begin, fill out the Pre-Installation Checklist completely. This will allow you to have all the
information you will need during installation and configuration in one place. This will save you
many, many hours of back-and-forth figuring out little, “just-one-more thing ” things.
FTP (File Transfer Protocol) program to
batch upload files, create directories and
set file permissions. FileZilla is a free, open
source FTP program.
Do your web host's servers support
PrestaShop? Call and ask them before
starting... it's a good way to test their
support before you buy.
Site management/HTML editor program
like Dreamweaver to synchronize [create a
mirror copy website on your PC] and
perform quick Searches [CTRL-F] to locate
the code you wish to edit)
Does your web host use the easy-to-use
control panel cPanel, Vdeck, or Plesk?
Other control panels are not as easy.
A graphics program such as Paint Shop
Pro, PhotoShop or any free graphics
program downloaded from the web, for
resizing your photos.
Do you have your domain name
registered?
What payment processor will you use?
What is their URL, Username, account
number, and password?
What is the exact www address?
Did you register it at least 24-72 hours
ago? Type the address in your browser to
be sure it is live.
Have you notified your web host about your
new domain name so they can “point” your
files to it? If you use cPanel, Vdeck or
Plesk you can add the domain name
yourself just by clicking Domain Manager.
2
Installation Chapter excerpted from ShowMe Guides PrestaShop User Manual
www.oscommercemanuals.com
What shipping company will you use? What
is their URL, Username, account number,
and password?
Are you required to charge tax? On what
products, what rate, and in what regions?
Get help from your attorney.
Check off each item as you complete it.
Install Step 1. Get PrestaShop
Get a free copy of PrestaShop from prestashop.com, or download from a third-party site such as
oscommercemanuals.com.
Save the file to an easily-remembered location, such as your desktop.
TIP: Don't forget where you put the zip file, as you will need it for the next
step!
Install Step 2. Unzip the files onto your PC
So you will have a copy for your personal use and editing, unzip the files onto your personal
computer.
Double-Click the Zip file name (Windows XP) or use free 7zip or a similar zip program (See Power
Tools chapter for how to use) to unzip your files into the folder on your personal computer where
you will administer and manage your website. A good place is in the My documents folder, make a
new folder called My Store.
Install Step 3. Upload the zip file to your web host
Now upload a full copy of the program to your web host. Log onto your web host's cPanel Home
page using the instructions your web host sent you, and click the FILE MANAGER link:
3
Installation Chapter excerpted from ShowMe Guides PrestaShop User Manual
www.oscommercemanuals.com
TIP: If you have difficulty locating any item on cPanel's very long Home page, you can click
CTRL-F and type "File Manager" or use cPanel's "FIND" box in the top left of the screen.
In cPanel's File Manager, click the UPLOAD Button:
This brings you to the Upload Files screen. Click the BROWSE Button to find the Prestashop file
on your computer, and it will automatically begin uploading to your web host:
When it has finished uploading, click the link Back to /home to leave the uploader and return to
the File Manager.
TIP: When the screen reads "100% uploaded" you can safely click the "Back to" link... it
seems that the uploading animation should stop, but it often does not.
Install Step 4. Create your store's database
A database is a way for your shop to organize and store all the information it will gather. Think of it
as a very large spreadsheet with many, many tables. You are simply creating the structure here; an
empty shell for the Wizard to automatically fill up with the correct tables and names.
4
Installation Chapter excerpted from ShowMe Guides PrestaShop User Manual
www.oscommercemanuals.com
Use cPanel's Database Wizard to:
•
•
•
Create an empty database
Create a database user, and
Assign a user and permissions to the database.
In your web host's cPanel Home page, scroll down to the "DATABASES” section and click the
MySQL Database Wizard:
This easy Wizard will help you create the database.
Create Database Step 1: Make up a name for your database. Don't worry, the Wizard will tell you
if you have used an incorrect character, or if the name you chose is too long or short. Then click
the Next Step button:
TIP: The database name is not going to be exactly this name - the Wizard will assign an
account prefix based on your web host's setup. For example, the database in this example
will actually be myprestashop_mydatabase. You will notice this on the last summary
screen.
Create Database Step 2: Create a username, any name seven characters or less, and a
password, then click the Next Step button:
5
Installation Chapter excerpted from ShowMe Guides PrestaShop User Manual
www.oscommercemanuals.com
TIP: Click the "Generate Password" Button to have the Wizard create a VERY secure,
random password for you using a long string of symbols, characters and numbers. You will
only copy and paste this password once, and never have to type or remember it again, so
let it use this crazy password.
Create Database Step 3: Specify what privileges this user will have. You want this database user
to have ALL PRIVILEGES in order to set up the database properly, so be sure to check the ALL
PRIVILEGES box, then click the Next Step button:
Create Database Step 4: Print the MySQL Database Summary page:
6
Installation Chapter excerpted from ShowMe Guides PrestaShop User Manual
www.oscommercemanuals.com
Notice the extra pieces of vital database information circled above - you did not enter this, it
is your web host’s SERVERNAME. You will need all four circled pieces of information for
the next step!
By default the server name is commonly named localhost, so if you do not see the circled
message in your cPanel MySQL Database Wizard, try using localhost for the server name,
then contact your web host for more help.
Leave this window open so you can copy and paste the information directly into the
Installation Wizard, being careful to not copy any spaces before or after. Open a new
browser window by clicking CTRL-N.
After Database Setup:
Once you have created your empty database, you will receive an information screen with four
important pieces of information: the exact database name, server location, and your username and
password. SAVE AND PRINT THIS DATABASE INFORMATION and keep it in a safe place – you
will need it for the next step.
Install Step 5. Start the Install Wizard
Using your web browser, go to the following address:
http://www.yourdomainname.com/install/
Please refer to your Pre-Installation Checklist for each item on the following
Installation screens.
7
Installation Chapter excerpted from ShowMe Guides PrestaShop User Manual
www.oscommercemanuals.com
TIP: If your domain name is new, it may not be active yet – it can take up to 72 hours.
Instead, you can use your “IP Address” to install the program. If it's not in your web
host's "Welcome email, ask your web host for your site’s exact IP address.
If you are copying and pasting information into your install screens, and have trouble,
check to be sure you are not pasting extra SPACES at the beginning or end of the
words.
If you see an error message instead of the Welcome screen, then your web host's
server is not set up correctly for installing PrestaShop 6.3. Contact your web host to
see if they can change anything for you. If not, you will need to install at a different web
host.
Installation Screens
Install Start Welcome Screen
You've come to the right place!
Choose your language - English or French, then click the NEXT Button at the bottom to begin
automatic installation.
8
Installation Chapter excerpted from ShowMe Guides PrestaShop User Manual
www.oscommercemanuals.com
System and Permissions
The Wizard checks to see if your web server has everything needed to
proceed.
Required Settings:
Every item should be displayed in green. If any Required Extensions or Required Settings
are not, then contact your web host to see if they can be changed for you. If not, you will
need to stop here and find a new web host.
Required "Write permissions"
If you uploaded and unzipped using cPanel's File Manager, all the Write Permissions should
be correct. If you did not, turn to the Power Tools chapter for help in setting the
permissions now.
Optional set-up
Leave these settings the way they are unless you are an advanced user. If there are any
problems here, consult your web host or a tech support person - no beginner can modify
these settings.
Then click the NEXT Button.
9
Installation Chapter excerpted from ShowMe Guides PrestaShop User Manual
www.oscommercemanuals.com
Install Step 2. Database Configuration
Copy the database information from your Database Wizard results above.
You might get this step wrong a few times – especially database SERVER
(usually "localhost" or a number) and database NAME (usually a name). Don’t
worry, you can’t break it! Just hit your browser’s BACK button, switch the
information and try again.
Click the VERIFY NOW Button until you see the happy message:
10
Installation Chapter excerpted from ShowMe Guides PrestaShop User Manual
www.oscommercemanuals.com
TIP: If you cannot get this correct, contact your web host for help.
Many web hosts require a prefix to your database name and
username, but you have to ask them what the prefix is!
FULL or SIMPLE MODE: To have the most common payment modules installed for you,
and to see the sample products (you can delete them later), use FULL MODE. Advanced
users only can select Simple Mode.
EMAIL DELIVERY SETUP: Type your email address where you want PrestaShop to send
you messages and click the SEND ME A TEST EMAIL Button to see if the server's SMTP
program is working. It can take a few minutes or even a couple of hours for the server to
send it, because there can be many other messages from other domains in the mail
server's queue.
Click the NEXT Button.
11
Installation Chapter excerpted from ShowMe Guides PrestaShop User Manual
www.oscommercemanuals.com
Install Step 3. Shop Configuration
Shop name: Fill in the name of your store to be displayed in your store.
Shop logo: Click the BROWSE Button to find your store's logo on your computer.
Recommended size is 230x75 pixels, but it can accept many sizes.
First name: The name you will use when logging in or if you forget your password.
Last name: The last name you will use when logging in or if you forget your password.
Shop password: The password you want to use when logging into your shop's Back
Office administration panel.
Receive notifications by e-mail: If you do not check this box, you will not receive email
notices when you receive orders, etc.
When you are finished, click the NEXT Button.
12
Installation Chapter excerpted from ShowMe Guides PrestaShop User Manual
www.oscommercemanuals.com
Install Step 4. Installation is complete!
Print a copy of this page as a backup in case you forget your password.
For security reasons, PrestaShop will not let you log onto your Back Office
administration panel until you delete the "Install" directory or folder.
TO DELETE THE INSTALL DIRECTORY
Open your cPanel browser window, or log onto cPanel and click FILE
MANAGER as you did above.
Click the folders until you find the INSTALL directory, then click the DELETE
Icon (X button in the top row):
13
Installation Chapter excerpted from ShowMe Guides PrestaShop User Manual
www.oscommercemanuals.com
Step 5. Rename the Back Office Admin folder
with a unique name
For security reasons, you must also give your store's Back Office Admin
folder a unique name. Having a unique folder name helps discourage hackers
from attempting to find your Admin and steal your information.
Still in your cPanel's File Manager, click until you highlight the ADMIN
directory.
Then click the RENAME Icon (A B Button in top row):
14
Installation Chapter excerpted from ShowMe Guides PrestaShop User Manual
www.oscommercemanuals.com
CONGRATULATIONS!
To see your new store in your browser, click the MY FRONT OFFICE Button,
and immediately BOOKMARK it or add it to your Favorites list.
To see and begin setting up your new private Back Office, click the MY BACK
OFFICE Button, and turn to the next chapter.
TIP: If you renamed your Admin as you are supposed to, the MY
BACK OFFICE link will not work! You will need to go to the link as you
named it, for example: http://www.mystorename.com/admin12345.
15
Installation Chapter excerpted from ShowMe Guides PrestaShop User Manual
www.oscommercemanuals.com
If you had any trouble, go back and check each of the items on the Pre-Installation
Checklist, then check your steps beginning with Step 1. If you find that you have done each
step correctly, turn to the Installation Troubleshooting section.
During installation, if you receive an error message about permissions, go back to Setting
File Permissions and increase the file permissions to 777 using your FTP program before
returning to this screen and clicking RETRY. Remember you MUST change them back
after installation.
Istallation Problem-Solving
If you’ve had any difficulty with your installation, check again to be sure that you have set the
appropriate file permissions for each folder or directory that requires it. That usually fixes 99% of
installation problems.
16
Installation Chapter excerpted from ShowMe Guides PrestaShop User Manual
www.oscommercemanuals.com
Technical Help Procedure:
1. Read your Manual.
2. Ask your email group for more help, such as [email protected]
3. Go to the technical forums and FAQ for a similar problem (www.getcre.com) or
oscommerceuniversity.com)
4. When all else fails, pay for technical support.
TALK BACK! Did you want more information on anything in this chapter? Click here to
let us know!
Return to Table of Contents
Go to Next Chapter
PrestaShop is a copyright of Bruno Leveque. This Installation Guide is an excerpt from SHOWME™ Guides' PrestaShop User Manual ©2008 Pithy
Productions, Inc. www.osCommerceManuals.com. THIS PRESTASHOP INSTALLATION GUIDE MAY BE REDISTRIBUTED IF THIS ENTIRE
COPYRIGHT STATEMENT REMAINS INTACT.
Like this free guide? You'll love the full PrestaShop User Manual. Get it from www.osCommerceManuals.com.
17
Installation Chapter excerpted from ShowMe Guides PrestaShop User Manual
www.oscommercemanuals.com