1
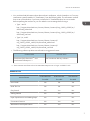
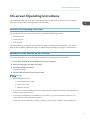
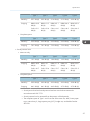
Read This First
Manuals Provided with This Machine
Safety Information for This Machine
Other Information for This Machine
Appendix
For information not in this manual, refer to
the HTML/PDF files on the supplied
CD-ROM.
Read this manual carefully before you use this machine and keep
it handy for future reference. For safe and correct use, be sure to
read the Safety Information in this manual before using the
machine.
TABLE OF CONTENTS
How to Read the Manuals................................................................................................................................. 3
Symbols Used in the Manuals.......................................................................................................................3
Disclaimer........................................................................................................................................................3
Notes............................................................................................................................................................... 4
Machine Types............................................................................................................................................... 4
1. Manuals Provided with This Machine
Manuals for This Machine................................................................................................................................. 5
Manuals List.................................................................................................................................................... 7
On-screen Operating Instructions..................................................................................................................... 9
Formats of the Operating Instructions........................................................................................................... 9
Reading the HTML Manuals on the CD-ROM.............................................................................................9
Installing and Opening the HTML Manuals.............................................................................................. 10
Reading the PDF Manuals on the CD-ROM..............................................................................................10
2. Safety Information for This Machine
Safety Information............................................................................................................................................ 13
Safety During Operation.............................................................................................................................13
Safety Precautions to Be Followed............................................................................................................. 13
Safety Labels of This Machine.........................................................................................................................22
Positions of WARNING and CAUTION labels.........................................................................................22
Power Switch Symbols.................................................................................................................................25
3. Other Information for This Machine
Laws and Regulations...................................................................................................................................... 27
Duplication and Printing Prohibited............................................................................................................ 27
Laser Safety.................................................................................................................................................. 27
Notes to USA Users of FCC Requirements................................................................................................ 28
Important Safety Instructions for Facsimile Unit......................................................................................... 30
Notes to Canadian Users of Facsimile Unit............................................................................................... 31
Other Information.............................................................................................................................................32
ENERGY STAR Program..............................................................................................................................32
Energy Saving Functions............................................................................................................................. 32
Notes to users in the state of California (Notes to Users in USA)............................................................ 34
4. Appendix
Specifications....................................................................................................................................................35
1
Trademarks....................................................................................................................................................... 39
2
How to Read the Manuals
Symbols Used in the Manuals
This manual uses the following symbols:
Indicates points to pay attention to when using the machine, and explanations of likely causes of paper
misfeeds, damage to originals, or loss of data. Be sure to read these explanations.
Indicates supplementary explanations of the machine's functions, and instructions on resolving user
errors.
This symbol is located at the end of sections. It indicates where you can find further relevant information.
[]
Indicates the names of keys on the machine's display or control panels.
Indicates instructions stored in a file on a provided CD-ROM.
(mainly Europe and Asia), (mainly Europe), or (mainly Asia)
(mainly North America)
Differences in the functions of Region A and Region B models are indicated by two symbols. Read the
information indicated by the symbol that corresponds to the region of the model you are using. For
details about which symbol corresponds to the model you are using, see "Model-Specific Information",
Getting Started .
Disclaimer
Contents of this manual are subject to change without prior notice.
To the maximum extent permitted by applicable laws, in no event will the manufacturer be liable for any
damages whatsoever arising out of failures of this machine, losses of the registered data, or the use or
non-use of this product and operation manuals provided with it.
Make sure that you always copy or have backups of the data registered in this machine. Documents or
data might be erased due to your operational errors or malfunctions of the machine.
In no event will the manufacturer be responsible for any documents created by you using this machine or
any results from the data executed by you.
3
Notes
The manufacturer shall not be responsible for any damage or expense that might result from the use of
parts other than genuine parts from the manufacturer with your office products.
For good output quality, the manufacturer recommends that you use genuine toner from the
manufacturer.
Some illustrations in this manual might be slightly different from the machine.
Colors on color keys or the color circle may differ slightly from the colors of actual copies.
The color samples in this manual may differ slightly from the colors of actual copies.
Machine Types
Check the type of your machine before reading the manuals.
Type 1: MP C3003SP/MP C3003SPG
Type 2: MP C3503SP/MP C3503SPG
Type 3: MP C4503SP/MP C4503SPG
Type 4: MP C5503SP/MP C5503SPG
Type 5: MP C6003SP/MP C6003SPG
Certain types might not be available in some countries. For details, please contact your local dealer.
Certain options might not be available in some countries. For details, please contact your local dealer.
Depending on which country you are in, certain units may be optional. For details, please contact your
local dealer.
4
1. Manuals Provided with This Machine
This chapter explains manuals for this machine.
Manuals for This Machine
Read this manual carefully before you use this machine.
Refer to the manuals that are relevant to what you want to do with the machine.
• Media differ according to manual.
• Adobe® Acrobat® Reader®/Adobe Reader must be installed in order to view the manuals as PDF
files.
• A Web browser must be installed in order to view the html manuals.
User Guide
Regarding the basic usage of this machine, frequently used functions, troubleshooting when an
error message appears, etc., summaries are provided below for each user manual.
Read This First
Before using the machine, be sure to read the section of this manual entitled Safety Information. It
also describes how to install the included CD-ROM, each regulation, and environmental
conformance.
Easy Search
You can search for a description by what you want to do. Also, this machine's distinctive functions
are explained.
Getting Started
Describes preparations for using the machine, operating instructions, and character input methods.
Paper Specifications and Adding Paper
Describes how to load originals and sheets and about their specifications.
Convenient Functions
Describes how to register frequently used settings, customize the Home Screen, and display a Web
page on the control panel. It also describes how to manage a job.
Maintenance and Specifications
Describes how to replace supplies and how to install and clean this machine. It also describes the
specifications of the main unit and options.
Troubleshooting
Provides a guide for resolving common usage-related problems.
5
1. Manuals Provided with This Machine
Copy/ Document Server
Explains Copier and Document Server functions and operations. Also refer to this manual for
explanations on how to specify the settings for originals.
Fax
Explains Facsimile functions and operations.
Print
Describes how to print using the printer driver. It also describes the functions available for printing.
Scan
Describes how to scan paper data using this machine and how to send the scanned data to a
computer and store the data.
Connecting the Machine/ System Settings
Explains how to connect the machine to a network, and configure and operate the machine in a
network environment. Also explains how to change User Tools settings and how to register
information in the Address Book.
PostScript 3
Explains how to set up and use PostScript® 3TM.
Extended Feature Settings
Describes how to configure the extended features using the control panel or Web Image Monitor.
Security Guide
This manual is for administrators of the machine. It explains security functions that you can use to
prevent unauthorized use of the machine, data tampering, or information leakage. For enhanced
security, we recommend that you first make the following settings:
• Install the Device Certificate.
• Enable SSL (Secure Sockets Layer) Encryption.
• Change the user name and password of the administrator.
For details, see "Before Using This Machine", Security Guide.
Be sure to read this manual when setting the enhanced security functions, or user and administrator
authentication.
Driver Installation Guide
Describes how to install and configure each driver. This manual is included in the drivers CD.
• Manuals provided are specific to machine types.
• Driver Installation Guide and HTML manuals are available in English, German, French, Italian,
Spanish, Dutch, and Russian.
6
Manuals for This Machine
• You can download information about the machine's certification, which is based on an IT security
certification system (hereafter CC Certification), from the following URLs. This information is about
how to set up the machine. If you have purchased a CC Certified machine, be sure to read it
before operating the machine so you can make the correct settings before using it.
• Type 1 and 2
http://support-download.com/services/device/ccmanual/mp_c3003_c3503/en/
download_admin.html
http://support-download.com/services/device/ccmanual/mp_c3003_c3503/en/
download_user.html
• Type 3, 4, and 5
http://support-download.com/services/device/ccmanual/
mp_c4503_c5503_c6003/en/download_admin.html
http://support-download.com/services/device/ccmanual/
mp_c4503_c5503_c6003/en/download_user.html
• The following software products are referred to using general names:
Product name
ScanRouter EX Professional *1 and
ScanRouterEX Enterprise *1
General name
the ScanRouter delivery software
*1 The ScanRouter EX Professional and ScanRouterEX Enterprise are no longer available for sale.
Manuals List
Printed Manuals
Provided
HTML Manuals
Provided
PDF Manuals
Provided
User Guide
Yes
No
Yes
Read This First
Yes
No
No
Easy Search
No
Yes
No
Getting Started
No
Yes
No
Paper Specifications and Adding Paper
No
Yes
No
Convenient Functions
No
Yes
No
Maintenance and Specifications
No
Yes
No
Manual Name
7
1. Manuals Provided with This Machine
Printed Manuals
Provided
HTML Manuals
Provided
PDF Manuals
Provided
Troubleshooting
No
Yes
No
Copy/ Document Server
No
Yes
No
Fax
No
Yes
No
Print
No
Yes
No
Scan
No
Yes
No
Connecting the Machine/ System
Settings
No
Yes
No
PostScript 3
No
Yes
No
Extended Feature Settings
No
Yes
No
Security Guide
No
No
Yes
Driver Installation Guide
No
No
Yes
Manual Name
• Driver Installation Guide and HTML manuals are available in English, German, French, Italian,
Spanish, Dutch, and Russian.
8
On-screen Operating Instructions
On-screen Operating Instructions
This chapter describes the on-screen operating instructions of this machine. The on-screen operating
instructions are included in the supplied manual CD-ROM.
Formats of the Operating Instructions
The operating instructions of this machine are provided in the following formats:
• Printed manuals
• HTML manuals
• PDF manuals
For details about the contents of each manual, see page 5 "Manuals for This Machine". The various
manuals are available in different formats. For details about availability, see page 7 "Manuals List".
Reading the HTML Manuals on the CD-ROM
This section describes how to read the HTML manuals on the supplied manual CD-ROM.
1. Insert the CD-ROM in the CD-ROM drive of your computer.
2. Select a language, and then click [OK].
3. Click [Read HTML manuals].
The browser opens.
4. Click the title of manual you want to read.
• Recommended browsers:
• Internet Explorer 6 or later
• Firefox 3.5 or later
• Safari 4.0 or later
• If you want to read the HTML manuals on a Macintosh, insert the CD-ROM in the CD-ROM drive,
and then open "Manuals.htm".
• If JavaScript is disabled or unavailable in your browser, you will not be able to search or use
certain buttons in the HTML documentation.
• HTML manuals are available in English, German, French, Italian, Spanish, Dutch, and Russian.
9
1. Manuals Provided with This Machine
Installing and Opening the HTML Manuals
This section describes how to install and open the HTML manuals on your computer.
For your convenience, we recommend you install these manuals on your computer.
1. Insert the CD-ROM in the CD-ROM drive of your computer.
2. Select a language, and then click [OK].
3. Click [Install manuals].
4. Install the HTML manuals by following the on-screen instructions.
5. When the installation is complete, click [Finish].
6. Click [Exit].
7. Open the HTML manuals that you installed.
To open the manuals from an icon, double-click the icon on the desktop. To open the manuals from
the [Start] menu, point to [All Programs], and then click [Product Name].
8. Click the title of the manual you want to read.
• You need administrator permissions to install the manuals. Log in as an Administrators group
member.
• The system requirements for installing the manuals are as follows:
• Operating system: Windows XP/Vista/7/8, Windows Server 2003/2003 R2/2008/2008
R2/2012
• Minimum display resolution: 800 × 600 pixels
• If you cannot install a manual, copy the "MANUAL_HTML" folder to your computer's hard drive,
and then run "setup.exe".
• To delete an installed manual, on the [Start] menu, point to [All Programs], click [Product Name],
and then uninstall the data.
• Depending on the settings made during installation, menu folder names may differ.
• HTML manuals are available in English, German, French, Italian, Spanish, Dutch, and Russian.
Reading the PDF Manuals on the CD-ROM
This section describes how to read the PDF manuals on the supplied manual CD-ROM.
File path
The manuals are included in the following folder on the CD-ROM:
MANUAL_PDF\(language)
10
On-screen Operating Instructions
1. Insert the CD-ROM in the CD-ROM drive of your computer.
2. Select a language, and then click [OK].
3. Click [Read PDF manuals].
• To view the PDF manuals, you need to have Adobe Acrobat Reader/Adobe Reader installed on
your computer.
• If you want to read the PDF manuals on a Macintosh, insert the CD-ROM in the CD-ROM drive,
and then open "Manuals.htm".
• Driver Installation Guide is available in English, German, French, Italian, Spanish, Dutch, and
Russian.
11
1. Manuals Provided with This Machine
12
2. Safety Information for This Machine
This chapter describes the safety precautions.
Safety Information
Safety During Operation
In this manual, the following important symbols are used:
Indicates a potentially hazardous situation which, if instructions are not followed, could result in death
or serious injury.
Indicates a potentially hazardous situation which, if instructions are not followed, may result in minor
or moderate injury or damage to property.
Safety Precautions to Be Followed
This section explains safety precautions that should always be followed when using this machine.
Environments where the machine can be used
This section explains safety precautions about environments where the machine can be used.
• Do not use flammable sprays or solvents in the vicinity of this machine. Doing so could result in
fire or electric shock.
• Do not place vases, plant pots, cups, toiletries, medicines, small metal objects, or containers
holding water or any other liquids, on or close to this machine. Fire or electric shock could result
from spillage or if such objects or substances fall inside this machine.
• Keep the machine away from humidity and dust. Otherwise a fire or an electric shock might
occur.
13
2. Safety Information for This Machine
• Do not place the machine on an unstable or tilted surface. If it topples over, an injury might
occur.
• Do not place heavy objects on the machine. Doing so can cause the machine to topple over,
possibly resulting in injury.
• Make sure the room where you are using the machine is well ventilated and spacious. Good
ventilation is especially important when the machine is used heavily.
• Do not obstruct the machine's vents. Doing so risks fire caused by overheated internal
components.
Handling power cords and power cord plugs
This section explains safety precautions about handling power cords and power cord plugs.
• Do not use any power sources other than those that match the specifications shown. Doing so
could result in fire or electric shock.
• Do not use any frequencies other than those that match the specifications shown. Doing so could
result in fire or electric shock.
• Do not use multi-socket adaptors. Doing so could result in fire or electric shock.
• Do not use extension cords. Doing so could result in fire or electric shock.
14
Safety Information
• Do not use power cords that are damaged, broken, or modified. Also, do not use power cords
that have been trapped under heavy objects, pulled hard, or bent severely. Doing so could
result in fire or electric shock.
• Touching the prongs of the power cable's plug with anything metallic constitutes a fire and
electric shock hazard.
• The supplied power cord is for use with this machine only. Do not use it with other appliances.
Doing so could result in fire or electric shock.
• It is dangerous to handle the power cord plug with wet hands. Doing so could result in electric
shock.
• If the power cord is damaged and its inner wires are exposed or broken, contact your service
representative for a replacement. Use of damaged power cords could result in fire or electric
shock.
• Be sure to disconnect the plug from the wall outlet at least once a year and check for the
following:
• There are burn marks on the plug.
• The prongs on the plug are deformed.
• If any of the above conditions exist, do not use the plug and consult your dealer or service
representative. Use of the plug could result in fire or electric shock.
15
2. Safety Information for This Machine
• Be sure to disconnect the power cord from the wall outlet at least once a year and check for the
following:
• The power cord's inner wires are exposed, broken, etc.
• The power cord's coating has a crack or dent.
• When bending the power cord, the power turns off and on.
• Part of the power cord becomes hot.
• The power cord is damaged.
• If any of the above conditions exist, do not use the power cord and consult your dealer or
service representative. Use of the power cord could result in fire or electric shock.
• Be sure to push the plug of the power cord fully into the wall outlet. Partially inserted plugs
create an unstable connection that can result in unsafe buildup of heat.
• If this machine is not going to be used for several days or longer at a time, disconnect its power
cord from the wall outlet.
• When disconnecting the power cord from the wall outlet, always pull the plug, not the cord.
Pulling the cord can damage the power cord. Use of damaged power cords could result in fire
or electric shock.
• Be sure to disconnect the plug from the wall outlet and clean the prongs and the area around
the prongs at least once a year. Allowing dust to build up on the plug constitutes a fire hazard.
• When performing maintenance on the machine, always disconnect the power cord from the
wall outlet.
Handling the main machine
This section explains safety precautions about handling the main machine.
16
Safety Information
• Be sure to locate the machine as close as possible to a wall outlet. This will allow easy
disconnection of the power cord in the event of an emergency.
• If the machine emits smoke or odours, or if it behaves unusually, you must turn off its power
immediately. After turning off the power, be sure to disconnect the power cord plug from the
wall outlet. Then contact your service representative and report the problem. Do not use the
machine. Doing so could result in fire or electric shock.
• If metal objects, or water or other fluids fall inside this machine, you must turn off its power
immediately. After turning off the power, be sure to disconnect the power cord plug from the
wall outlet. Then contact your service representative and report the problem. Do not use the
machine. Doing so could result in fire or electric shock.
• Do not touch this machine if a lightning strike occurs in the immediate vicinity. Doing so could
result in electric shock.
• The following explains the warning messages on the plastic bag used in this product's
packaging.
• Keep the polythene materials (bags, etc.) supplied with this machine away from babies
and small children at all times. Suffocation can result if polythene materials are brought into
contact with the mouth or nose.
• Unplug the power cord from the wall outlet before you move the machine. While moving the
machine, take care that the power cord is not damaged under the machine. Failing to take these
precautions could result in fire or electric shock.
• If you have to move the machine when the optional paper tray unit is attached, do not push on
the main unit's top section. Doing so can cause the optional paper tray unit to detach, possibly
resulting in injury.
17
2. Safety Information for This Machine
• After you move the machine, use the caster fixture to fix it in place. Otherwise the machine might
move or come down to cause an injury.
• If the lower paper tray is installed, do not pull out more than one tray at a time when you are
changing or replenishing paper or resolving paper jams. Pressing down forcefully on the
machine's upper surfaces can result in malfunctions and/or user injury.
• Contact your service representative if you need to lift the machine (such as when relocating it to
another floor). Do not attempt to lift the machine without the assistance of your service
representative. The machine will be damaged if it topples or is dropped, resulting in
malfunction and risk of injury to users.
• Do not look into the lamp. It can damage your eyes.
• Do not hold the control panel while moving the machine. Doing so may damage the control
panel, cause a malfunction, or result in injury.
• Keep your hands away from the hinges and exposure glass when lowering the ADF. Not doing
so result in an injury if your hands or fingers are pinched.
Handling the machine's interior
This section explains safety precautions about handling the machine's interior.
• Do not remove any covers or screws other than those explicitly mentioned in this manual. Inside
this machine are high voltage components that are an electric shock hazard and laser
components that could cause blindness. Contact your sales or service representative if any of the
machine's internal components require maintenance, adjustment, or repair.
• Do not attempt to disassemble or modify this machine. Doing so risks burns and electric shock.
Note again that exposure to the laser components inside this machine risks blindness.
18
Safety Information
• Some of this machine's internal components get very hot. For this reason, take care when
removing misfed paper. Not doing so could result in burns.
• The inside of the machine could be very hot. Do not touch the parts with a label indicating the
"hot surface". Otherwise, an injury might occur.
• When removing jammed paper, make sure not to trap or injure your fingers.
• When loading paper, take care not to trap or injure your fingers.
• Keep your hands clear of the booklet finisher tray when removing misfed paper, pulling out or
pushing in the finisher's staple unit. You can trap and injure your fingers if you do not.
• During operation, rollers for transporting the paper and originals revolve. A safety device has
been installed so that the machine can be operated safely. But take care not to touch the
machine during operation. Otherwise, an injury might occur.
• If the machine's interior is not cleaned regularly, dust will accumulate. Fire and breakdown can
result from heavy accumulation of dust inside this machine. Contact your sales or service
representative for details about and charges for cleaning the machine's interior.
Handling the machine's supplies
This section explains safety precautions about handling the machine's supplies.
• Do not incinerate toner (new or used) or toner containers. Doing so risks burns. Toner will ignite
on contact with naked flame.
19
2. Safety Information for This Machine
• Do not store toner (new or used) or toner containers anywhere near naked flames. Doing so
risks fire and burns. Toner will ignite on contact with naked flame.
• Do not use a vacuum cleaner to remove spilled toner (including used toner). Absorbed toner
may cause a fire or explosion due to electrical contact flickering inside the vacuum cleaner.
However, it is possible to use a vacuum cleaner that is explosion-proof and dust ignition-proof. If
toner is spilled on the floor, remove the spilled toner slowly using a wet cloth, so that the toner is
not scattered.
• The following explains the warning messages on the plastic bag used in this product's
packaging.
• Keep the polythene materials (bags, etc.) supplied with this machine away from babies
and small children at all times. Suffocation can result if polythene materials are brought into
contact with the mouth or nose.
• Do not crush or squeeze toner containers. Doing so can cause toner spillage, possibly resulting
in dirtying of skin, clothing, and floor, and accidental ingestion.
• Store toner (new or used), toner containers, and components that have been in contact with
toner out of reach of children.
• If toner or used toner is inhaled, gargle with plenty of water and move into a fresh air
environment. Consult a doctor if necessary.
• If toner or used toner gets into your eyes, flush immediately with large amounts of water. Consult
a doctor if necessary.
• If toner or used toner is swallowed, dilute by drinking a large amount of water. Consult a doctor
if necessary.
20
Safety Information
• When replacing a toner or waste toner container or consumables with toner, make sure that the
toner does not splatter. Put the waste consumables in a bag after they are removed. For
consumables with a lid, make sure that the lid is shut.
• When removing jammed paper or replacing toner, avoid getting toner (new or used) on your
clothing. If toner comes into contact with your clothing, wash the stained area with cold water.
Hot water will set the toner into the fabric and make removing the stain impossible.
• When removing jammed paper or replacing toner, avoid getting toner (new or used) on your
skin. If toner comes into contact with your skin, wash the affected area thoroughly with soap and
water.
• Do not attempt to print on stapled sheets, aluminum foil, carbon paper, or any kind of
conductive paper. Doing so risks fire.
• Keep SD cards or USB flash memory devices out of reach of children. If a child accidentally
swallows an SD card or USB flash memory device, consult a doctor immediately.
21
2. Safety Information for This Machine
Safety Labels of This Machine
This section explains the machine's safety information labels.
Positions of WARNING and CAUTION labels
This machine has labels for WARNING and CAUTION at the positions shown below. For safety,
please follow the instructions and handle the machine as indicated.
Main unit
1
CUZ001
1.
Do not touch the parts a label indicates. The inside of the machine could be very hot. Caution should be
taken when removing misfed paper.
22
Safety Labels of This Machine
Paper trays
1
2
3
CUZ002
1.
The inside of the machine could be very hot. Do not touch the parts which a label is put on. Otherwise,
an injury might occur.
2.
The inside of the machine could be very hot. Do not touch the parts which a label is put on. Otherwise,
an injury might occur.
3.
The inside of the machine could be very hot. Do not touch the parts which a label is put on. Otherwise,
an injury might occur.
23
2. Safety Information for This Machine
Finisher SR3140 or Booklet Finisher SR3150
3
1
2
CUZ007
1.
During operation, rollers for transporting the paper revolve. Take care not to touch rollers during
operation. Otherwise, an injury might occur.
2.
Keep your hands clear of the booklet finisher tray when pulling out or pushing in the finisher's staple unit,
or removing paper jam. You might trap your fingers if you do not. Take care not to touch the booklet
finisher tray during operation. Otherwise, an injury might occur.
3.
Keep your hands clear of the booklet finisher tray when pulling out or pushing in the finisher's staple unit,
or removing paper jam. You might trap your fingers if you do not.
24
Safety Labels of This Machine
Finisher SR3160 or Booklet Finisher SR3170
3
1
2
4
CUZ004
1.
During operation, rollers for transporting the paper revolve. Take care not to touch rollers during
operation. Otherwise, an injury might occur.
2.
Keep your hands clear of the booklet finisher tray when pulling out or pushing in the finisher's staple unit,
or removing paper jam. You might trap your fingers if you do not. Take care not to touch the booklet
finisher tray during operation. Otherwise, an injury might occur.
3.
During operation, rollers for transporting the paper revolve. Take care not to touch rollers during
operation. Otherwise, an injury might occur.
4.
Keep your hands clear of the booklet finisher tray when pulling out or pushing in the finisher's staple unit,
or removing paper jam. You might trap your fingers if you do not.
Power Switch Symbols
The meanings of the symbols for the switches on this machine are as follows:
•
: POWER ON
•
: STANDBY
25
2. Safety Information for This Machine
26
3. Other Information for This Machine
This chapter describes laws and regulations related to this machine.
Laws and Regulations
Duplication and Printing Prohibited
Do not copy or print any item for which reproduction is prohibited by law.
Copying or printing the following items is generally prohibited by local law:
bank notes, revenue stamps, bonds, stock certificates, bank drafts, checks, passports, driver's licenses.
The preceding list is meant as a guide only and is not inclusive. We assume no responsibility for its
completeness or accuracy. If you have any questions concerning the legality of copying or printing
certain items, consult with your legal advisor.
This machine is equipped with a function that prevents making counterfeit bank bills. Due to this function
the original images similar to bank bills may not be copied properly.
Laser Safety
Laser Safety for Type 1 and 2
CDRH Regulations
This equipment complies with requirements of 21 CFR Subchapter J for class I laser product. This
equipment contains four AlGaInP laser diodes, 655–663 nanometer wavelength for each emitter. The
beam divergence angle is 21 degrees (minimum) and 29 degrees (maximum) in the vertical direction,
and 7 degrees (minimum) and 11 degrees (maximum) in the horizontal direction, and laser beams are
generated in Continuous Wave (CW) mode. The maximum output power of the light source is 10
milliwatt.
Caution:
Use of controls or adjustments or performance of procedures other than those specified in the manuals
might result in hazardous radiation exposure.
Laser Safety for Type 3, 4, and 5
CDRH Regulations
This equipment complies with requirements of 21 CFR Subchapter J for class I laser product. This
equipment contains four 4ch-Laser Diode Arrays (4ch-LDA). Laser diodes are AlGaInP, 657–663
27
3. Other Information for This Machine
nanometer wavelength for each emitter. The beam divergence angle is 16 degrees (minimum) and 23
degrees (maximum) in the vertical direction, and 7 degrees (minimum) and 12 degrees (maximum) in
the horizontal direction, and laser beams are generated in Continuous Wave (CW) mode. Each 4chLDA has four light sources and the maximum output power of the light source is 17 milliwatt.
Caution:
Use of controls or adjustments or performance of procedures other than those specified in the manuals
might result in hazardous radiation exposure.
Notes to USA Users of FCC Requirements
Part 15 of the FCC Rules
Declaration of Conformity
This device complies with Part 15 of the FCC Rules.
Operation is subject to the following two conditions:
(1) This device may not cause harmful interference, and
(2) this device must accept any interference received, including interference that may cause
undesired operation.
Responsible party: Ricoh Americas Corporation
Address: 5 Dedrick Place, West Caldwell, NJ 07006
Telephone number: 973-882-2000
Product Name: Multi Function Peripheral
Model Number:
• Type 1: MP C3003SP/MP C3003SPG
• Type 2: MP C3503SP/MP C3503SPG
• Type 3: MP C4503SP/MP C4503SPG
• Type 4: MP C5503SP/MP C5503SPG
• Type 5: MP C6003SP/MP C6003SPG
Note:
This equipment has been tested and found to comply with the limits for a Class B digital device,
pursuant to Part 15 of the FCC Rules. These limits are designed to provide reasonable protection
against harmful interference in a residential installation. This equipment generates, uses and can
radiate radio frequency energy and, if not installed and used in accordance with the instructions,
may cause harmful interference to radio communications. However, there is no guarantee that
interference will not occur in a particular installation. If this equipment does cause harmful
interference to radio or television reception, which can be determined by turning the equipment off
28
Laws and Regulations
and on, the user is encouraged to try to correct the interference by one or more of the following
measures:
• Reorient or relocate the receiving antenna.
• Increase the separation between the equipment and receiver.
• Connect the equipment into an outlet on a circuit different from that to which the receiver is
connected.
• Consult the dealer or an experienced radio /TV technician for help.
Caution:
Changes or modifications not expressly approved by the party responsible for compliance could
void the user's authority to operate the equipment.
Installing the Ferrite Core
A network interface cable and a telephone line cable with a ferrite core must be used for RF
interference suppression.
Part 68 of the FCC Rules regarding Facsimile Unit
1. This equipment complies with Part 68 of the FCC rules and requirements adopted by the ACTA. On
the cover of this equipment is a label that contains, among other information, a product identifier in
the format US:AAAEQ##TXXXXX. If requested, this number must be provided to the telephone
company.
2. This equipment uses the RJ11C USOC jack.
3. A plug and jack used to connect this equipment to the premises wiring and telephone network must
comply with the applicable FCC Part 68 rules and requirements adopted by the ACTA. A
compliant telephone cord and modular plug is provided with this product. It is designed to be
connected to a compatible modular jack that is also compliant. See installation instructions for
detail.
4. The REN is used to determine the number of devices that may be connected to a telephone line.
Excessive RENs on a telephone line may result in the devices not ringing in response to an incoming
call. In most but not all areas, the sum of RENs should not exceed five (5.0). To be certain of the
number of devices that may be connected to a line, as determined by the total RENs, contact the
local telephone company. The REN for this product is part of the product identifier that has the
format US:AAAEQ##TXXXXX. The digits represented by ## are the REN without a decimal point
(e.g., 03 is a REN of 0.3).
5. If this equipment causes harm to the telephone network, the telephone company will notify you in
advance that temporary discontinuance of service may be required. But if advance notice is not
practical, the telephone company will notify the customer as soon as possible. Also, you will be
advised of your right to file a complaint with the FCC if you believe it is necessary.
6. The telephone company may make changes in its facilities, equipment, operations or procedures
that could affect the operation of the equipment. If this happens the telephone company will
29
3. Other Information for This Machine
provide advance notice in order for you to make necessary modifications to maintain uninterrupted
service.
7. If trouble is experienced with this equipment, for repair or warranty information, please contact
Ricoh Americas Corporation Customer Support Department at 1-800-FASTFIX. If this device is
causing problems with your telephone network, the telephone company may request that you
disconnect the equipment until the problem is resolved.
8. In the event of operation problems (document jam, copy jam, communication error indication), see
the manual provided with this machine for instruction on resolving the problem.
9. Connection to party line service is subject to state tariffs. Contact the state public utility commission,
public service commission or corporation commission for information.
10. If your home has specially wired alarm equipment connected to the telephone line, ensure the
installation of this equipment does not disable your alarm equipment. If you have questions about
what will disable alarm equipment, consult your telephone company or a qualified installer.
WHEN PROGRAMMING EMERGENCY NUMBERS AND/OR MAKING TEST CALLS TO
EMERGENCY NUMBERS:
1. Remain on the line and briefly explain to the dispatcher the reason for the call before hanging
up.
2. Perform such activities in the off-peak hours, such as early morning hours or late evenings.
The Telephone Consumer Protection Act of 1991 makes it unlawful for any person to use a computer or
other electronic device, including FAX machines, to send any message unless such message clearly
contains in a margin at the top or bottom of each transmitted page or on the first page of the
transmission, the date and time it is sent and an identification of the business or other entity, or other
individual sending the message and the telephone number of the sending machine or such business,
other entity, or individual. (The telephone number provided may not be a 900 number or any other
number for which charges exceed local or long-distance transmission charges.)
In order to program this information into your FAX machine, you should complete the following steps:
Follow the FAX HEADER programming procedure in the Programming chapter of the operating
instructions to enter the business identification and telephone number of the terminal or business. This
information is transmitted with your document by the FAX HEADER feature. In addition to the information,
be sure to program the date and time into your machine.
Important Safety Instructions for Facsimile Unit
When using your telephone equipment, basic safety precautions should always be followed to reduce
the risk of fire, electric shock and injury to persons, including the following:
• Do not use this product near water, for example, near a bath tub, wash bowl, kitchen sink or
laundry tub, in a wet basement or near a swimming pool.
• Avoid using a telephone during an electrical storm. There may be a remote risk of electric shock
from lightning.
30
Laws and Regulations
• Do not use a telephone in the vicinity of a gas leak to report the leak.
• Use only the power cord and batteries indicated in this manual. Do not dispose of batteries in a
fire. They may explode. Check with local codes for possible special disposal instructions.
Save these instructions.
IMPORTANTES MESURES DE SÉCURITÉ de l'unité Fax
Certaines mesures de sécurité doivent être prises pendant l'utilisation de material téléphonique afin de
réduire les risques d'incendie, de choc électrique et de blessures. En voici quelques-unes:
• Ne pas utiliser l'appareil près de l'eau, p.ex., près d'une baignoire, d'un lavabo, d'un évier de
cuisine, d'un bac à laver, dans un sous-sol humide ou près d'une piscine.
• Éviter d'utiliser le téléphone (sauf s'il s'agit d'un appareil sans fil) pendant un orage électrique. Ceci
peut présenter un risque de choc électrique causé par la foudre.
• Ne pas utiliser l'appareil téléphonique pour signaler une fuite de gaz s'il est situé près de la fuite.
• Utiliser seulement le cordon d'alimentation et le type de piles indiqués dans ce manual. Ne pas
jeter les piles dans le feu: elles peuvent exploser. Se conformer aux règlements pertinents quant à
l'élimination des piles.
Conserver ces instructions.
Notes to Canadian Users of Facsimile Unit
This product meets the applicable Industry Canada technical specifications.
The Ringer Equivalence Number is an indication of the maximum number of devices allowed to be
connected to a telephone interface. The termination on an interface may consist of any combination of
devices subject only to the requirement that the sum of the RENs of all the devices does not exceed five.
Remarques à l'attention des utilisateurs canadiens de l'unité Fax
Le présent matériel est conforme aux spécifications techniques applicables d'Industrie Canada.
L'indice d'équivalence de la sonnerie (IES) sert à indiquer le nombre maximal de terminaux qui peuvent
être raccordés à une interface téléphonique. La terminaison d'une interface peut consister en une
combinaison quelconque de dispositifs, à la seule condition que la somme d'indices d'équivalence de la
sonnerie de tous les dispositifs n'excède pas 5.
31
3. Other Information for This Machine
Other Information
ENERGY STAR Program
ENERGY STAR® Program Requirements for Imaging Equipment
This company is a participant in the ENERGY STAR® Program.
This machine is compliant with the regulations specified by the
ENERGY STAR® Program.
The ENERGY STAR® Program Requirements for Imaging Equipment encourage energy conservation
by promoting energy efficient computers and other office equipment.
The program backs the development and dissemination of products that feature energy saving
functions.
It is an open program in which manufacturers participate voluntarily.
Targeted products are computers, monitors, printers, facsimiles, copiers, scanners, and multi-function
devices. Energy Star standards and logos are internationally uniform.
• For details about the "default delay time", see page 32 "Energy Saving Functions".
Energy Saving Functions
To reduce its power consumption, this machine has the following functions:
Low Power mode for Type 3, 4, and 5
• If this machine remains idle for a specified period, it automatically reduces its electrical
consumption.
• The default period the machine waits before entering Low Power mode is 1 minute. This
default time can be changed.
32
Other Information
Sleep mode
• If this machine remains idle for a specified period or when the [Energy Saver] key is pressed, it
enters Sleep mode to further reduce its electrical consumption.
• The default delay time the machine waits before entering Sleep mode is 1 minute. This default
time can be changed.
• The machine can print jobs from computers and receive faxes while in Sleep mode.
Specification for Type 1 and 2
Type 1
Type 2
Reduced electrical consumption in Sleep 0.49 W
mode *1
0.49 W
Time of switch into Sleep mode
1 minute
1 minute
Time of switch out from Sleep mode *1
5.6 seconds
5.6 seconds
*1 The time it takes to switch out from energy saving functions and electrical consumption may differ
depending on the conditions and environment of the machine.
Specification for Type 3, 4, and 5
Type 3
Type 4
Type 5
Reduced electrical
consumption in Low Power
mode *1
67 W
67 W
67 W
Time of switch into Low Power
mode
1 minute
1 minute
1 minute
Time of switch out from Low
Power mode *1
4.9 seconds
6.4 seconds *2
6.4 seconds *2
Reduced electrical
consumption in Sleep mode *1
0.55 W
0.55 W
0.56 W
Time of switch into Sleep mode 1 minute
1 minute
1 minute
Time of switch out from Sleep
mode *1
6.4 seconds *2
6.4 seconds *2
5.3 seconds
*1 The time it takes to switch out from energy saving functions and electrical consumption may differ
depending on the conditions and environment of the machine.
*2 The time it takes to switch from energy saving functions may differ depending on the functions you use
and options you install.
33
3. Other Information for This Machine
• Specifications can vary depending on which options are installed on the machine.
• For details about how to change the default interval, see "Timer Settings", Connecting the
Machine/ System Settings .
• The machine enters sleep mode directly in the following situations:
• Low Power Mode Timer and Sleep Mode Timer are set to the same time
• Sleep Mode Timer is set to a shorter time than Low Power Mode Timer
• Depending on which embedded software application is installed on it, the machine might take
longer than indicated to enter Sleep mode.
Notes to users in the state of California (Notes to Users in USA)
Perchlorate Material - special handling may apply. See: www.dtsc.ca.gov/hazardouswaste/
perchlorate
34
4. Appendix
This appendix describes trademarks and specifications for the machine.
Specifications
For specifications not described in this manual, see "Specifications", Maintenance and Specifications
.
Warm-up time
• Type 1: 19 seconds
• Type 2: 19 seconds
• Type 3: 20 seconds
• Type 4: 16 seconds
• Type 5: 16 seconds *1
(23°C (73.4°F), rated voltage)
*1 The warm-up time may differ depending on the functions you use and options you install.
First copy/print time
• Type 1
• Full color: 7.1 seconds
• B&W: 4.6 seconds
• Type 2
• Full color: 7.1 seconds
• B&W: 4.6 seconds
• Type 3
• Full color: 5.7 seconds
• B&W: 4.0 seconds
• Type 4
• Full color: 4.5 seconds
• B&W: 3.1 seconds
• Type 5
• Full color: 4.5 seconds
• B&W: 3.1 seconds
(A4 , 81/2 × 11 , delivered face down, feeding from tray 1, on the exposure glass)
Power consumption
• Main unit only
35
4. Appendix
Type 1
Type 2
Type 3
Type 4
Type 5
Ready
78 W
78 W
107 W
107 W
107 W
During
printing
515 W
515 W
758 W
959 W
959 W
Maximum
1,584 W or
less
1,584 W or
less
1,584 W or
less
1,584 W or
less
1,584 W or
less
The power level when the main switch is turned off and the power cord is plugged into an
outlet: 1 W or less
• Complete system
Maximum
Type 1
Type 2
Type 3
Type 4
Type 5
1,584 W or
less
1,584 W or
less
1,584 W or
less
1,584 W or
less
1,584 W or
less
• The complete system of Type 1 and 2 consists of the main unit, ARDF, lower paper trays,
internal tray 2, large capacity tray (LCT), bridge unit, Booklet Finisher SR3150, fax unit,
two extra G3 interface unit, and wireless LAN board.
• The complete system of Type 3, 4, and 5 consists of the main unit, one-pass duplex
scanning ADF, lower paper trays, internal tray 2, large capacity tray (LCT), bridge unit,
Booklet Finisher SR3170, fax unit, two extra G3 interface unit, and wireless LAN board.
Power consumption when using the facsimile function
• Immediate Transmission:
approx. 115 W
• Memory Transmission:
approx. 100 W
• Memory Reception:
approx. 100 W
• Reception:
approx. 585 W
Noise emission
• Sound power level:
• Main unit only
36
Specifications
Type 1
Type 2
Type 3
Type 4
Type 5
Stand-by
32.1 dB (A)
32.2 dB (A)
31.4 dB (A)
31.5 dB (A)
32.2 dB (A)
Copying
B&W: 60.8
dB (A)
B&W: 61.3
dB (A)
B&W: 63.1
dB (A)
B&W: 64.6
dB (A)
B&W: 65.4
dB (A)
Color: 62.1
dB (A)
Color: 62.6
dB (A)
Color: 64.1
dB (A)
Color: 66.3
dB (A)
Color: 66.3
dB (A)
Type 1
Type 2
Type 3
Type 4
Type 5
Stand-by
35.0 dB (A)
35.0 dB (A)
35.0 dB (A)
35.0 dB (A)
35.0 dB (A)
Copying
70.1 dB (A)
70.1 dB (A)
72.2 dB (A)
73.3 dB (A)
73.3 dB (A)
Type 1
Type 2
Type 3
Type 4
Type 5
Stand-by
19.1 dB (A)
19.4 dB (A)
18.6 dB (A)
19.3 dB (A)
19.3 dB (A)
Copying
B&W: 48.8
dB (A)
B&W: 50
dB (A)
B&W: 51.8
dB (A)
B&W: 53
dB (A)
B&W: 52.6
dB (A)
Color: 49.7
dB (A)
Color: 50.4
dB (A)
Color: 52.7
dB (A)
Color: 54.1
dB (A)
Color: 53.5
dB (A)
Type 1
Type 2
Type 3
Type 4
Type 5
Stand-by
29.0 dB (A)
29.0 dB (A)
29.0 dB (A)
29.0 dB (A)
29.0 dB (A)
Copying
64.1 dB (A)
64.1 dB (A)
66.2 dB (A)
67.3 dB (A)
67.3 dB (A)
• Complete system
• Sound pressure level:
• Main unit only
• Complete system
• Sound power level and sound pressure level are actual values measured in
accordance with ISO 7779.
• Sound pressure level is measured from the position of the bystander.
• The complete system of Type 1 and 2 consists of the main unit, ARDF, lower paper
trays, internal tray 2, large capacity tray (LCT), bridge unit, and Booklet Finisher
SR3150.
37
4. Appendix
• The complete system of Type 3 and 4 consists of the main unit, ARDF, lower paper
trays, internal tray 2, large capacity tray (LCT), bridge unit, and Booklet Finisher
SR3170.
• The complete system of Type 5 consists of the main unit, one-pass duplex scanning
ADF, lower paper trays, internal tray 2, large capacity tray (LCT), bridge unit, and
Booklet Finisher SR3170.
38
Trademarks
Trademarks
Adobe, Acrobat, PostScript, PostScript 3, and Reader are either registered trademarks or trademarks of
Adobe Systems Incorporated in the United States and/or other countries.
Firefox is a registered trademark of the Mozilla Foundation.
Macintosh and Safari are trademarks of Apple Inc., registered in the United States and other countries.
Microsoft, Windows, Windows Server, Windows Vista, and Internet Explorer are either registered
trademarks or trademarks of Microsoft Corporation in the United States and/or other countries.
The SD is a trademark of SD-3C, LLC.
The proper name of Internet Explorer 6 is Microsoft® Internet Explorer® 6.
The proper names of the Windows operating systems are as follows:
• The product names of Windows XP are as follows:
Microsoft® Windows® XP Professional
Microsoft® Windows® XP Home Edition
Microsoft® Windows® XP Media Center Edition
Microsoft® Windows® XP Tablet PC Edition
• The product names of Windows Vista are as follows:
Microsoft® Windows Vista® Ultimate
Microsoft® Windows Vista® Business
Microsoft® Windows Vista® Home Premium
Microsoft® Windows Vista® Home Basic
Microsoft® Windows Vista® Enterprise
• The product names of Windows 7 are as follows:
Microsoft® Windows® 7 Home Premium
Microsoft® Windows® 7 Professional
Microsoft® Windows® 7 Ultimate
Microsoft® Windows® 7 Enterprise
• The product names of Windows 8 are as follows:
Microsoft® Windows® 8
Microsoft® Windows® 8 Pro
Microsoft® Windows® 8 Enterprise
• The product names of Windows Server 2003 are as follows:
Microsoft® Windows Server® 2003 Standard Edition
Microsoft® Windows Server® 2003 Enterprise Edition
39
4. Appendix
• The product names of Windows Server 2003 R2 are as follows:
Microsoft® Windows Server® 2003 R2 Standard Edition
Microsoft® Windows Server® 2003 R2 Enterprise Edition
• The product names of Windows Server 2008 are as follows:
Microsoft® Windows Server® 2008 Standard
Microsoft® Windows Server® 2008 Enterprise
• The product names of Windows Server 2008 R2 are as follows:
Microsoft® Windows Server® 2008 R2 Standard
Microsoft® Windows Server® 2008 R2 Enterprise
• The product names of Windows Server 2012 are as follows:
Microsoft® Windows Server® 2012 Foundation
Microsoft® Windows Server® 2012 Essentials
Microsoft® Windows Server® 2012 Standard
Other product names used herein are for identification purposes only and might be trademarks of their
respective companies. We disclaim any and all rights to those marks.
40
EN US
D146-7513
© 2013
EN US
D146-7513