1
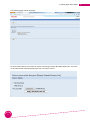
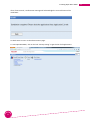
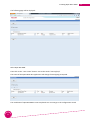
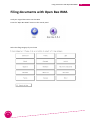
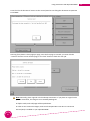
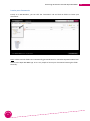
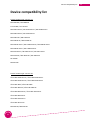
Version 3 – August 2014 Open Bee R.M.A – Administrator Guide Contents Legal notices OPEN BEE provides this publication "As Is" without warranty of any kind, either express or implied, including but not limited to the implied warranties of merchantability or fitness for a particular purpose. Some states or jurisdictions do not allow disclaimer of express or implied warranties in certain transactions; therefore, this statement may not apply to you. OPEN BEE reserves the right to revise this publication and to make changes from time to time in the content hereof without obligation of OPEN BEE to notify any person of such revision or changes. Copyright © 2001-2014 Open Bee ™. All rights reserved. OPEN BEE is a registered trademark of OPEN BEE, in France and/or other countries. All other company names or product names referenced herein may be the trademarks of their respective holders. Trademarks and credits Adobe, Acrobat and PostScript are trademarks or registered trademarks of Adobe Systems Incorporated in the United States and/or other countries. Microsoft, Windows, Windows Media, Windows Server, Windows NT, Windows XP, Windows Vista, Win32, Outlook, ActiveX, Active Directory are either registered trademarks or brands, or trademarks or service marks of Microsoft Corporation in the United States and/or other countries. All other company names or product names referenced herein may be the trademarks of their respective holders. Open Bee ™ PAE des Longeray 74370 Metz-Tessy, France Tél. : +33 (0)4 50 640 551 2 2 Contents Contents Contents........................................................................................................................................................... 3 Welcome .......................................................................................................................................................... 4 Solution description ......................................................................................................................................... 5 Installing Open Bee™ RMA ............................................................................................................................... 6 System requirements .......................................................................................................................................... 6 Step by step installation using web browser ...................................................................................................... 6 Configuration wizard of Open Bee™ RMA application .................................................................................... 13 General settings: ............................................................................................................................................ 15 Connection settings to Open Bee DMS: ............................................................................................................ 16 Date format: ..................................................................................................................................................... 16 Administrator password: .................................................................................................................................. 17 Filing documents with Open Bee RMA ........................................................................................................... 18 Retrieving documents filed with Open Bee RMA ............................................................................................ 21 Log in to Open Bee Portal as a registered user ................................................................................................. 21 Locate your documents ..................................................................................................................................... 22 Searching your documents................................................................................................................................ 23 Device compatibility list ................................................................................................................................. 24 3 3 Welcome Welcome The Open Bee™ RMA Guide gathers recommendations, advice and suggestions on how to use the Open Bee Ricoh MFP Agent in combination with Open Bee™ Portal. In order to make the best out of it, please acquaint yourself with the concepts and procedures described hereunder. When installing and setting up an Open Bee system, you must be familiar with the Ricoh scanning devices that you will use with Open Bee software components, and the basic installation and configuration workflow. This guide is intended for administrators responsible for the initial installation, configuration, and licensing of Open Bee DMS Solutions. Please visit our Open Bee™ website should you have any question or should you need any additional information: http://www.myopenbee.com This guide have been written and published under the control of Open Bee™. 4 4 Solution description Solution description Open Bee™ RMA (Ricoh MFP Agent) is a software solution which allows you to index and file scanned paper documents, directly from your Ricoh MFP touch’s screen to your Open Bee Portal DMS Server. Portal DMS To file scanned paper documents to Open Bee Portal DMS server, you simply need to follow the next steps: 1. 2. 3. 4. 5. 6. Walk up to your Ricoh MFP device Select Open Bee app from the touch screen Select a “filing category” corresponding to your document type * Enter few metadata when prompted Modify scanning resolution and color (optional) Click on “File” to route the document to Open Bee Portal * Open Bee™ RMA displays existing filing wizards which have been set in Open Bee Portal “filing categories”. Please read the appropriate section of the Open Bee Portal user manual. 5 5 Installing Open Bee™ RMA Installing Open Bee™ RMA System requirements Ricoh MFP compatible with SDK Type-J version 10 and 11 (only WVGA and uWVGA) LAN network and/or internet connexion Open Bee Portal DMS Server v5.6 or superior Step by step installation using web browser Please, open a Web browser and type the following URL:: http://IP-adress:port-number/ IP-address: IP address of your Ricoh MFP Port-number: the port number is not required, just enter http://IP-adress/, ( Should you use a simulator, enter http://IP-adress:8081/ Validate.The following page will be displayed: 6 6 Installing Open Bee™ RMA To successfully install Open Bee RMA, you need an administrator account. The default administrator account is: Login: admin Password: by default no password is required but if you use a simulator, you must set : ricoh To get the authentication form, you must click on the “login” button, in the top right of the over page. To access the authentication form , please click on the 'login' link in the top right corner of the page The following page will be displayed: Enter the login and password and confirm by clicking on the “login” button. 7 7 Installing Open Bee™ RMA Once authenticated, the following page will be displayed: In order to complete the installation of Open Bee RMA, click on the “ install” link. 8 8 Installing Open Bee™ RMA The following page will be displayed: Click the browse button and select the zip file containing the Open Bee RMA application. The name of the selected file will be displayed next to the “browse” button. 9 9 Installing Open Bee™ RMA Click on the “Display Extended Feature List” button. Select the parameters as shown below. The installation must be made on the MFP’s HDD. To start the installation, click the “down arrow” button next to the word “Install”. Confirm your choice by clicking OK. 10 10 Installing Open Bee™ RMA After a few seconds, a confirmation message will acknowledge the successful state of the installation: Go back twice to return to the administration page. To start Open Bee RMA, click on the link “startup setting” to get the list of all applications: 11 11 Installing Open Bee™ RMA The following page will be displayed: Select Open Bee RMA Then click on the “ two arrows” button next to the words “start up/stop” The status of the Open Bee R.M.A application will change from Stopping to Suspend. The installation of Open Bee RMA is now completed. You can now go to the configuration wizard 12 12 Configuration wizard of Open Bee™ RMA application Configuration wizard of Open Bee™ RMA application On the MFP, click on to access to the application. Then Press the “Open Bee R.M.A” button : When the application is running on the MFP for the first time, you must complete two steps to perform the configuration. The first step is related to the authentication mode. You can choose between two modes: 1. Allow access without authentication: this mode allows you to use one single account for all your users, and one will not have to log in each time one use the application. 2. Require user authentication: One need to enter login and password every time one pause (or stop) the application and restart it, you can also change the URL. At any time, you can change those settings (please refer to next section). 13 13 Configuration wizard of Open Bee™ RMA application If you have selected “Allow access without authentication”, the following screen will be displayed If you have selected “Require user authentication”, the following screen will be displayed: Click on each button tocomplete the fields using the screen keyboard. 14 URL or IP address: The host on which the Open Bee Portal run Port: This field allows you to enter the port number, do not select SSL if you do not use https. Login: A valid Open Bee Portal login (by default ‘admin’) Password: A valid Open Bee Portal password (by default ‘admin’) 14 General settings: General settings: At the bottom left of the home screen of your application, click on the “General settings” button if you want to customise your settings: You must enter the administrator password of the application, By default the password is: 123456 15 15 General settings: Once logged in as an administrator, the following screen appears: Connection settings to Open Bee DMS: This menu allows you to display the configuration wizard of Open Bee RMA described in the previous section Date format: This menu allows you to choose your the date format. To save your settings, please click the OK button. 16 16 General settings: Administrator password: You can change the administrator password using this menu. 17 17 Filing documents with Open Bee RMA Filing documents with Open Bee RMA Load your original documents into the MFP. Press the “Open Bee R.MA” button on the control panel. Select the filing category of your choice 18 18 Filing documents with Open Bee RMA Input required metadata (every required metadata have a star *) Select document resolution, color and scan source (the duplex mode is only available from feeder). 19 19 Filing documents with Open Bee RMA Press the ‘File the document’ button on the control panel to start filing the document to Open Bee Portal DMS Scanning from platen is done page per page, once the first page is scanned, you must click the “continue” button to scan another page, or the “End” button to finish the scan job. Note: Generally, place originals in the landscape orientation. If you place an original in the portrait orientation, the image is sent rotated by 90 degrees. In duplex mode, each odd page will be upside down. In order to auto rotate the images, make sure that Open Bee™ Scan O.C.R. Conversion Service (OCS) is enabled on your Open Bee DMS. 20 20 Retrieving documents filed with Open Bee RMA Retrieving documents filed with Open Bee RMA Open Bee™ Portal offers a quick and simple access to all your documents that have been previously filed from your Ricoh MFP touch’s screen thanks to Open Bee RMA. In order to retrieve your documents, please follow the next steps: Log in to Open Bee Portal as a registered user In order to connect to the Open BeeTM Portal server, please run your web browser and the address that your network administrator gave you: For instance: http://ricohdms.myopenbee.com The following window pops up, asking you for your username and password: Please login with the username and password provided by your administrator and click . You are now logged in to Open Bee™ Portal. The displayed folders are those you have access to, whether it is as a reader only, or with advanced permissions. Note: The username and password are case sensitive. Please make sure that the Caps Lock key is not enabled before typing your information. In case of prolonged inactivity when logged in, the message « session has expired » will be displayed; you will then have to type your login and password from the login screen. 21 21 Retrieving documents filed with Open Bee RMA Locate your documents Exactly as in MS Windows, you can click the “Document” tab and click on folders to locate your documents. Note: Folders and sub-folders are automatically generated based on metadata inputted at MFP level thanks to the Open Bee RMA app. So it is very simple to locate your documents browsing the folder hierarchy. 22 22 Retrieving documents filed with Open Bee RMA Searching your documents This functionality allows you to search your documents. From any page, you have access to the two different search modules: The simple search and the advanced search. In order to retrieve a document previously filed thanks to Open Bee RMA, enter one or several keywords / series of characters within the frame and click « search » to run the search. In this case, you can retrieve documents depending on the words contained within: - Document title Metadata associated to the documents that have been prompted thanks to Open Bee RMA Once the search has been run, a page is popping up, displaying all the documents matching your search criteria. There are also many multiple ways to retrieve a document. Please read the appropriate section of the Open Bee Portal user manual for more information on this subject. 23 23 Device compatibility list Device compatibility list Device list SDK Type-J version 11 MP C6502SP / MP C8002SP Pro C5100S / Pro C5110S MP C4503 Series / MP C5503 Series / MP C6003 Series MP C3003 Series / MP C3503 Series MP C2003 SP / MP C2503 SP MP C2003Z SP / MP C2503Z SP MP C4503Z Series / MP C5503Z Series / MP C6003Z Series MP C3003Z Series / MP C3503Z Series MP 2553 Series / MP 3053 Series / MP 3353 Series MP 2553Z SP / MP 3053Z SP / MP 3353Z SP SP 4510SF MP 401 SPF Device list SDK Type-J version 10 Aficio MP C3002 Series / Aficio MP C3502 Series Aficio MP C4502 Series / Aficio MP C5502 Series Aficio MP 4002 / Aficio MP 5002 Aficio MP 4002 SP / Aficio MP 5002 SP Aficio MP 6002 Series / Aficio MP 7502 Series Aficio MP 9002 Series Aficio MP C305 Series Aficio MP 301 Series MP 2001 SP/ MP 2501 SP 24 24