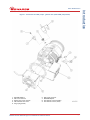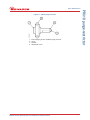
1
B811-00-880 Issue B Instruction Manual nEXT Pump Accessories This page has been intentionally left blank. B811-00-880 Issue B gea/0086/06/10 Section Page 1 Introduction ....................................................................................... 1 1.1 1.2 Scope and definitions ................................................................................................... 1 Installation and operation safety ...................................................................................... 2 2 BX bakeout band .................................................................................. 5 2.1 2.2 2.3 2.3.1 2.3.2 2.3.3 2.3.4 2.4 Description ................................................................................................................ 5 Technical data ........................................................................................................... 5 Installation ................................................................................................................ 6 Unpack and inspect ...................................................................................................... 6 Fit the BX bakeout band to the pump ................................................................................ 6 Electrical connection to a TIC relay box ............................................................................. 6 Electrical connection to an independent electrical supply ....................................................... 6 Operation ................................................................................................................. 7 3 ACX nEXT Air Coolers ............................................................................. 9 3.1 3.2 3.3 3.3.1 3.3.2 3.3.3 3.3.4 3.4 3.4.1 3.5 Description ................................................................................................................ 9 Technical data ........................................................................................................... 9 Installation ................................................................................................................ 9 Unpack and inspect ...................................................................................................... 9 Side (or Radial) mounting .............................................................................................. 9 Axial mounting ..........................................................................................................11 Combined radial and axial mounting ................................................................................ 11 Electrical connection ...................................................................................................13 Power supply requirements ...........................................................................................13 Operation ................................................................................................................ 14 4 TAV vent-valve .................................................................................. 15 4.1 4.2 4.3 4.3.1 4.3.2 4.3.3 4.4 Description ............................................................................................................... 15 Technical data ..........................................................................................................16 Installation ............................................................................................................... 17 Unpack and inspect .....................................................................................................17 Fit the TAV vent-valve to the pump ................................................................................. 17 Electrical connection ...................................................................................................18 Operation ................................................................................................................ 19 5 Inlet-screens ..................................................................................... 21 5.1 5.2 5.3 5.3.1 5.3.2 Description ............................................................................................................... 21 Technical data ..........................................................................................................21 Installation ............................................................................................................... 21 Unpack and inspect .....................................................................................................21 Fit or remove the inlet-screen ........................................................................................ 22 6 PRX10 purge-restrictor ......................................................................... 25 6.1 6.2 6.3 6.3.1 6.3.2 6.4 6.4.1 6.4.2 Description ............................................................................................................... 25 Technical data ..........................................................................................................25 Installation ............................................................................................................... 25 Unpack and inspect .....................................................................................................25 Fit the purge-restrictor ................................................................................................25 Operation ................................................................................................................ 26 General ................................................................................................................... 26 Calibration of the PRX10 purge-restrictor for different purge gases ........................................... 26 © Edwards Limited 2010. All rights reserved. Edwards and the Edwards logo are trademarks of Edwards Limited. Page i Contents Contents B811-00-880 Issue B Contents 7 Vent-port adaptor .............................................................................. 29 7.1 7.2 7.3 7.3.1 7.3.2 Description ............................................................................................................... 29 Technical data ..........................................................................................................30 Installation ............................................................................................................... 30 Unpack and inspect .....................................................................................................30 Connect the vent-port adaptor ....................................................................................... 30 8 VRX vent-restrictor ............................................................................. 31 8.1 8.2 8.3 8.3.1 8.3.2 8.3.3 Description ............................................................................................................... 31 Technical data ..........................................................................................................31 Installation ............................................................................................................... 31 Unpack and inspect .....................................................................................................31 VRX vent-restrictor selection ......................................................................................... 31 Fit the vent-restrictor .................................................................................................. 31 9 WCX water-cooler .............................................................................. 33 9.1 9.2 9.3 9.3.1 9.3.2 9.4 Description ............................................................................................................... 33 Technical data ..........................................................................................................33 Installation ............................................................................................................... 33 Unpack and inspect .....................................................................................................33 Fit the water-cooler to the pump .................................................................................... 33 Operation ................................................................................................................ 34 10 nEXT Interface Cable ........................................................................... 35 10.1 10.2 10.3 10.3.1 10.3.2 10.4 Description ............................................................................................................... 35 Technical data ..........................................................................................................35 Installation ............................................................................................................... 35 Unpack and inspect .....................................................................................................35 Fit the interface cable to the pump ................................................................................. 35 Operation ................................................................................................................ 36 11 Maintenance ..................................................................................... 37 For return of equipment, complete the HS Forms at the end of this manual. Illustrations Figure 1 2 3 4 5 6 7 8 9 10 11 12 13 14 15 16 Page ii Page Accessories for nEXT pumps - general view (nEXT 240D pump shown) .......................................... 3 Accessories for nEXT pumps -general view continued (nEXT240D DN100CF shown) .......................... 4 ACX nEXT air cooler installation, alternative mounting positions ............................................... 10 ACX nEXT radial and axial air cooler installation ..................................................................12 nEXT connector plug and socket ..................................................................................... 14 TAV vent-valve dimensions (mm) .................................................................................... 16 Fitting the TAV vent-valve ............................................................................................17 TAV vent-valve connections ...........................................................................................19 Integral mesh centring ring inlet-screen ............................................................................ 22 Mesh inlet-screen .......................................................................................................23 PRX10 purge-restrictor .................................................................................................27 Vent-port adaptor ......................................................................................................29 Extended vent-port adaptor .......................................................................................... 29 VRX vent-restrictor .....................................................................................................32 WCX water-cooling .....................................................................................................34 nEXT interface cable ...................................................................................................36 © Edwards Limited 2010. All rights reserved. Edwards and the Edwards logo are trademarks of Edwards Limited. B811-00-880 Issue B Table 1 2 3 4 5 6 7 8 9 10 11 12 Page BX bakeout band technical data ....................................................................................... 5 ACX nEXT Air Cooler technical data .................................................................................. 9 ACX nEXT air cooler power requirements ........................................................................... 13 TAV vent-valve technical data ........................................................................................ 16 Inlet-screens technical data .......................................................................................... 21 PRX10 purge-restrictor technical data .............................................................................. 25 Nitrogen flow rate through the PRX10 purge-restrictor ..........................................................26 Vent-port adaptor technical data .................................................................................... 30 Extended vent-port adaptor technical data ........................................................................ 30 Vent-restrictor technical data ........................................................................................ 31 WCX water-cooler technical data .................................................................................... 33 nEXT interface cable technical data ................................................................................. 35 Associated publications Publication title Vacuum pump and vacuum system safety © Edwards Limited 2010. All rights reserved. Edwards and the Edwards logo are trademarks of Edwards Limited. Publication number P400-40-100 Page iii Contents Tables B811-00-880 Issue B This page has been intentionally left blank. Page iv © Edwards Limited 2010. All rights reserved. Edwards and the Edwards logo are trademarks of Edwards Limited. B811-00-880 Issue B Introduction 1.1 Scope and definitions This manual provides installation, operation and maintenance instructions for the Edwards range of accessories for the nEXT pump range. The accessories are shown in Figure 1 and 2. The Item Numbers for the accessories are listed in the appropriate sections. You must use the accessories as specified in this manual. Read this manual before you install accessories onto your nEXT pump. Important safety information is highlighted as WARNING and CAUTION instructions; you must obey these instructions. The use of WARNINGS and CAUTIONS is defined below. WARNING Warnings are given where failure to observe the instruction could result in injury or death to people. CAUTION Cautions are given where failure to observe the instruction could result in damage to the equipment, associated equipment and process. Throughout this manual, page, figure and table numbers are sequential. The units used throughout this manual conform to the SI international system of units of measurement. When flow rates are specified, the abbreviation 'sccm' is used to mean 'standard cm3 min-1: this is a flow of 1 cm3 min-1 at an ambient temperature of 0 °C and a pressure of 1013 mbar (1.013 x 10⁵ Pa). In accordance with the recommendations of EN61010, the following warning labels may appear on the pump or its accessories: Warning - refer to accompanying documentation. Warning - risk of electric shock. Warning - hot surfaces. © Edwards Limited 2010. All rights reserved. Edwards and the Edwards logo are trademarks of Edwards Limited. Page 1 Introduction 1 B811-00-880 Issue B Introduction 1.2 Installation and operation safety WARNING You must use the procedures described in this manual to install your accessory, and you must obey all safety instructions and take note of all appropriate precautions. If you do not, you can damage the accessory or other equipment and can cause injury to people. WARNING The user of the nEXT pump system is responsible for the safe operation and monitoring of the system. WARNING Before you install the accessory, ensure that you switch off the pump and isolate the controller/podule as described below. Before you install your accessory, you must: Switch off the nEXT pump and wait until the pump has stopped rotating. Isolate the pump controller from the electrical supply. Page 2 © Edwards Limited 2010. All rights reserved. Edwards and the Edwards logo are trademarks of Edwards Limited. B811-00-880 Issue B Introduction Figure 1 - Accessories for nEXT pumps - general view (nEXT 240D pump shown) 1. 2. 3. 4. 5. DN10NW Adaptor VRX vent-restrictor Manual vent-valve (fitted) TAV Solenoid vent-valve Purge plug (fitted) 6. 7. 8. 9. PRX purge-restrictor DN10NW Adaptor ACX nEXT air cooler (Radial) ACX nEXT ait cooler (Axial) © Edwards Limited 2010. All rights reserved. Edwards and the Edwards logo are trademarks of Edwards Limited. Page 3 B811-00-880 Issue B Introduction Figure 2 - Accessories for nEXT pumps -general view continued (nEXT240D DN100CF shown) 1. BX 250 Bake out band (DN100CF envelope shown) 2. BX 250 Bake out band position 3. WCX Water cooling accessory Page 4 © Edwards Limited 2010. All rights reserved. Edwards and the Edwards logo are trademarks of Edwards Limited. B811-00-880 Issue B BX bakeout band 2.1 Description You can fit an Edwards BX bakeout band to a nEXT pump to increase the rate of degassing of the pump body, to achieve faster pump down and lower ultimate pressure. You should only fit a BX bakeout band to CF flanged pumps intended for use at ultra high vacuum. BX bakeout bands are available for use with electrical supplies of 110 or 240V a.c., from a rear panel socket on a TIC relay box, or from any suitable electrical supply. 2.2 Technical data Table 1 - BX bakeout band technical data Electrical supply 110 to 120 V a.c., 50/60 Hz or 200 to 240 V a.c., 50/60 Hz Cable length 3m Termination 3-pin IEC reverse configuration plug Typical operating temperature 80 °C (measured on the pump envelope above the bakeout band) Pollution degree EN61010 Part 1, Category 2 Equipment type Fixed equipment for indoor use only BX250 BX300 BX450 Approximate mass (kg) 0.55 0.65 0.70 Minimum diameter (mm) 119 140 140 Width of band (mm) 30 20 40 Input power (W) 60 80 80 110 to 120 V 1.0 A 1.0 A 1.0 A 200 to 240 V 0.5 A 0.5 A 0.5 A Fuse rating Item Numbers Model To fit pump BX250 110 V nEXT240 B580-52-041 BX300 110 V nEXT300 B580-52-048 BX450 110V nEXT400 B580-52-043 BX250 240 V nEXT240 B580-52-061 BX300 240 V nEXT300 B580-52-068 BX450 240 V nEXT400 B580-52-063 © Edwards Limited 2010. All rights reserved. Edwards and the Edwards logo are trademarks of Edwards Limited. Item Number Page 5 BX bakeout band 2 B811-00-880 Issue B BX bakeout band 2.3 Installation 2.3.1 Unpack and inspect Remove all packing materials and protective covers and check the BX bakeout band. If the BX bakeout band is damaged, notify your supplier and the carrier in writing within three days; state the Item Number of the BX bakeout band together with your order number and your supplier's invoice number. Retain all packing materials for inspection. Do not use the BX bakeout band if it is damaged. 2.3.2 Fit the BX bakeout band to the pump WARNING Before you install the accessory, ensure that the pump is switched off and isolated as described below. Refer to Figure 2. 1. Switch off the pump, isolate the pump controller from the electrical supply, and wait until the pump has stopped rotating. 2. Fit the BX bakeout band over the pump body below the inlet flange at the position shown by Figure 2. 3. Tighten the clamping screw. 2.3.3 Electrical connection to a TIC relay box Refer to the TIC relay box instruction manual for information on how to fit the correct fuse, and how to connect the bakeout band to the TIC relay box. 2.3.4 Electrical connection to an independent electrical supply If necessary, you can connect the BX bakeout band directly to an appropriate electrical supply. Always ensure that the electrical supply to the bakeout band is interlocked so that it is automatically switched off whenever the nEXT pump operates below normal speed. Check that the rating of the fuse fitted within your electrical supply corresponds to the fuse rating on the BX bakeout band. Page 6 © Edwards Limited 2010. All rights reserved. Edwards and the Edwards logo are trademarks of Edwards Limited. B811-00-880 Issue B Operation WARNING Do not operate the BX bakeout band when it is not installed on a pump. Without the cooling effect of the pump-body, the temperature of the band can rise to 300 °C with the danger of insulation breakdown and fire. WARNING Do not touch the BX bakeout band when it is switched on, as it can get very hot during operation. CAUTION When using the bakeout heater accessory, water cooling should always be used. If using the heater accessory in combination with baking heaters on the vacuum system, the pump inlet flange temperature should not exceed 80°C. Generally this is ensured by allowing the mating flange on the system to reach a maximum of 120°C. When you use the bakeout band, ensure that there is adequate cooling for the pump and adequate ventilation for the bakeout band. If you have connected the bakeout band to a TIC relay box, refer to the TIC instruction manual for instructions on how to use the TIC to control the operation of the bakeout band. © Edwards Limited 2010. All rights reserved. Edwards and the Edwards logo are trademarks of Edwards Limited. Page 7 BX bakeout band 2.4 B811-00-880 Issue B This page has been intentionally left blank. Page 8 © Edwards Limited 2010. All rights reserved. Edwards and the Edwards logo are trademarks of Edwards Limited. B811-00-880 Issue B ACX nEXT Air Coolers 3.1 Description The ACX nEXT air cooler is an enclosed 24 V d.c. motor electric fan and a fixing bracket assembly which can be easily fitted to the nEXT range of pumps via bolt holes in the base of the pump. The ACX nEXT air coolers are available for both radial and axial mounting. It is possible to use both variants simultaneously if so desired and space allows. TICs can provide power for one fan only. 3.2 Technical data Table 2 - ACX nEXT Air Cooler technical data Electrical supply 20 to 28 V d.c. Cable cores Red (+20 - 28 V) Black (0 Volts return) Yellow and Green (screen) Pollution degree EN61010 Part 1 Category 2 Power consumption 2.7 Watts Noise emissions 39 dBA (per fan) 3.3 Installation 3.3.1 Unpack and inspect Remove all packing and materials and protective covers and check the ACX air cooler. If the ACX air cooler is damaged, notify your supplier and the carrier in writing within three days; state the Item Number of the ACX air cooler together with your order number and your supplier's invoice number. Retain all packing materials for inspection. Do not use the ACX air cooler if it is damaged. 3.3.2 Side (or Radial) mounting WARNING Before you install the accessory, ensure that you switch off and isolate the pump. Refer to Figure 3 and 4. 1. Switch off pump; wait until the pump has stopped rotating. Isolate the pump drive from the electrical supply. 2. Remove the rubber mounting feet from the base of the pump. 3. Using 4 off M8 x 12 mm button head screws supplied. Fit the ACX radial air cooler mounting bracket to the base of the pump as shown on Figure 4. Ensure the fixing screws are secure. To ensure the radial air cooler works most effectively it is recommended that the fan should be placed directly opposite the pump drive, as shown in Figure 4. This ensures adequate cooling of the nEXT drive. Alternative mounting positions are available as shown in Figure 3. © Edwards Limited 2010. All rights reserved. Edwards and the Edwards logo are trademarks of Edwards Limited. Page 9 ACX nEXT Air Coolers 3 B811-00-880 Issue B ACX nEXT Air Coolers Figure 3 - ACX nEXT air cooler installation, alternative mounting positions 1. ACX nEXT Air cooler (recommended) 2. Pump outlet port 3. Alternative mounting position Page 10 © Edwards Limited 2010. All rights reserved. Edwards and the Edwards logo are trademarks of Edwards Limited. B811-00-880 Issue B Axial mounting WARNING Before you install the accessory, ensure that you switch off and isolate the pump. WARNING The axial air cooler does not have an internal guard and MUST NOT operate unless attached to the pump. Refer to Figure 4. 1. Switch off pump; wait until the pump has stopped rotating. Isolate the pump drive from the electrical supply. 2. Remove the rubber mounting feet from the base of the pump. 3. Using the M8 x 12 mm button head screws supplied, fit the ACX axial air cooler to the base of the pump as shown in Figure 1. Ensure the fixing screws are secure. 3.3.4 Combined radial and axial mounting Refer to Figure 4. Maximum pump cooling can be obtained with the simultaneous use of radial and axial cooling fans. The fan arrangements can be fitted as shown in Figure 1. 1. Switch off pump; wait until the pump has stopped rotating. Isolate the pump drive from the electrical supply. 2. Remove the rubber mounting feet from the base of the pump. 3. Using the M8 x 12 mm button head screws supplied, fit the radial and axial air coolers to the base of the pump as shown in Figure 1. © Edwards Limited 2010. All rights reserved. Edwards and the Edwards logo are trademarks of Edwards Limited. Page 11 ACX nEXT Air Coolers 3.3.3 B811-00-880 Issue B ACX nEXT Air Coolers Figure 4 - ACX nEXT radial and axial air cooler installation 1. Axial air-cooler 2. Radial air-cooler Page 12 © Edwards Limited 2010. All rights reserved. Edwards and the Edwards logo are trademarks of Edwards Limited. B811-00-880 Issue B Electrical connection CAUTION Ensure that the electrical supply is correct. If it is not, you can damage the ACX air cooler. CAUTION Ensure that the power supply to the cooling accessory can be isolated in a fault condition if required. The ACX air cooler requires a 24 V d.c. electrical supply. You can connect the ACX air cooler to a TIC (Turbo Instrument Controller), a suitable electrical supply or via the nEXT drive electronics. With the air cooler powered via the nEXT drive electronics, the turbo pump will operate satisfactorily with any of the supply voltages specified in the pump product manual. Note: Note:For combined use of both the axial and radial ACX air coolers, a TIC can be used to supply power to one air cooler only. A separate 24 V power supply is required to power the second air cooler. It is recommended that you fit a separate earth (ground) conductor to the earth of the air cooler; use an un-insulated braid or a separate insulated green/yellow connector and use the M5 x 10 screw and shake-proof washer supplied (attached to the fan cowling) to secure the earth conductor to the air-cooler. 3.4.1 Power supply requirements Table 3 - ACX nEXT air cooler power requirements Part number Description Operation B58053170 ACX nEXT RADIAL KIT 24 V WIRED Powered via the nEXT drive electronics. See section 4.2 B58053175 ACX nEXT RADIAL KIT 24 V STD Powered via the TIC or any suitable electrical power supply B58053180 ACX nEXT AXIAL KIT 24 V WIRED Powered via the nEXT drive electronics. See section 4.2. B58053185 ACX nEXT AXIAL KIT 24 V STD Powered via the TIC or any suitable electrical power supply 3.4.1.1 Connector socket The nEXT turbo pump drive has a 3-way connector socket on the side of the pump as circled in Figure 5. When you receive the pump, this connector may be concealed by a black protective cover. If you intend to use the connector, this cover should be removed by levering with a small screwdriver. A mating plug for this connector is supplied with the pump and the following fan assemblies are available which has a mating plug pre-wired: B58053170 ACX nEXT RADIAL KIT 24 V WIRED B58053180 ACX nEXT AXIAL KIT 24 V WIRED © Edwards Limited 2010. All rights reserved. Edwards and the Edwards logo are trademarks of Edwards Limited. Page 13 ACX nEXT Air Coolers 3.4 B811-00-880 Issue B ACX nEXT Air Coolers Figure 5 - nEXT connector plug and socket 1. 24 V d.c. Out 2. Chassis 3. 24 V d.c. Rtn 3.5 Operation WARNING There is no guard on the outlet of the axial air cooler. Therefore, you must not operate the air cooler unless it is installed on the pump. When operating the ACX air cooler, do not obstruct the fan inlet and ensure there is an adequate supply of cooling air. During operation, if the temperature of any surface of the pump is higher than 60 ºC the pump is too hot and you must increase the cooling. Page 14 © Edwards Limited 2010. All rights reserved. Edwards and the Edwards logo are trademarks of Edwards Limited. B811-00-880 Issue B TAV vent-valve 4.1 Description To maintain cleanliness of your vacuum system, we recommend that you vent the pump or vacuum system whenever you switch the pump off. The TAV vent-valves are 24 V d.c. electrical-solenoid operated valves which you can use to vent your vacuum system with atmospheric air or dry nitrogen when you switch the nEXT pump off. The TAV vent-valve is normally open when the solenoid is de-energised. In the case of a power failure, the vacuum system and pump will vent and the pump will slowly come to a halt. Refer to Figure 8. The TAV vent-valve is supplied with a sintered bronze inlet filter (1), a riffled hose connector (7) and 3 metres of cable. You can connect your dry nitrogen supply to the hose connector. An NW10 adaptor (Figure 8, item 3) is also supplied to convert the 1/8 inch BSP outlet connector (Figure 6, item 2) of the TAV vent-valve for direct connection to your vacuum system. The TAV vent-valve can be powered by the nEXT drive electronics, controlled from a TIC controller, or from any suitable electrical supply. CAUTION Correct venting is essential to prevent suck-back of hydrocarbon vapour present in the backing line - especially when using oil-sealed rotary vane pumps. To prevent suck-back when stopping the nEXT pump, always begin the venting sequence before the nEXT pump has slowed to 50% of normal rotational speed. Always introduce venting gas to the venting port or to the high vacuum inlet. Never vent to the backing line. © Edwards Limited 2010. All rights reserved. Edwards and the Edwards logo are trademarks of Edwards Limited. Page 15 TAV vent-valve 4 B811-00-880 Issue B TAV vent-valve 4.2 Technical data Table 4 - TAV vent-valve technical data Maxiumum inlet pressure Orifice diameter Helium leak rate (valve closed) TAV5 TAV6 1 bar gauge, 2 x 10⁵ Pa 1 bar gauge, 2 x 10⁵ Pa 0.5 mm 1.0 mm < 1 x 10 -8 mbar l s -1 < 1 x 10⁻⁶ mbar l s-1 < 1 x 10⁻⁶ Pa l s-1 < 1 x 10⁻⁴ Pa l s-1 Valve inlet-filter Sintered bronze Sintered bronze Hose connector Riffled nozzle for 4 mm bore tube Riffled nozzle for 4 mm bore tube See Figure 6 See Figure 6 Dimensions Mass Item Numbers 0.08 kg 0.08 kg B580-66-010 B580-66-020 Configuration Normally open Pollution degree EN61010 Part 1, Category 2 Equipment type Fixed equipment for indoor use only Nominal electrical supply voltage 24 V d.c. Electrical supply voltage range 15 to 24 V d.c. Pull-in voltage 14 V d.c. Drop-out voltage 10 V d.c. Power consumption Cable type and length Cable cores Valve electrical connector type 1.8 W 2-core screened, unterminated, 3 m long Red (positive), black (negative) 2 pole and earth (ground), miniature DIN Vale inlet-connection M5 female Valve outlet-connection 1/8 inch BSP Figure 6 - TAV vent-valve dimensions (mm) 1. M5 female thread 2. 1/8 inch BSP male thread Page 16 © Edwards Limited 2010. All rights reserved. Edwards and the Edwards logo are trademarks of Edwards Limited. B811-00-880 Issue B Installation 4.3.1 Unpack and inspect Remove all packing materials and protective covers and check the TAV vent-valve. If the TAV vent-valve is damaged, notify your supplier and the carrier in writing within three days; state the Item Number of the TAV vent-valve together with your order number and your supplier's invoice number. Retain all packing materials for inspection. Do not use the TAV vent-valve if it is damaged. 4.3.2 Fit the TAV vent-valve to the pump WARNING Before you install the accessory, ensure that you switch off the pump and disconnect the power supply as described below. CAUTION When fitting the TAV vent-valve, apply torque to the steel body only. On no account should torque be applied to the solenoid body, failure to do so could damage the valve which may cause it to leak. Figure 7 - Fitting the TAV vent-valve © Edwards Limited 2010. All rights reserved. Edwards and the Edwards logo are trademarks of Edwards Limited. Page 17 TAV vent-valve 4.3 B811-00-880 Issue B TAV vent-valve Refer to Figure 1. 1. Switch off the pump, isolate the pump controller from the electrical supply, and wait until the pump has stopped running. 2. If your nEXT pump has a manual vent-valve, unscrew and remove it, then continue at step 4. 3. If your nEXT pump does not have a manual vent-valve, fit the vent-valve adaptor to a suitable NW10 flange on your pump or vacuum system. 4. Check that the TAV vent O-ring (Figure 8, item 4) is fitted and screw the TAV vent-valve into the vent-valve adaptor or into the 1/8 inch BSP hole vacated by the manual vent-valve. 5. Connect your dry nitrogen or other inert gas supply pipeline to the M5 inlet (Figure 8, item 2) or use the riffled hose connector (Figure 8, item 7) supplied. 6. If you vent the pump with air, fir the sintered bronze inlet-filter (Figure 8, item 1) to protect your system against the entry of dust. 4.3.3 Electrical connection CAUTION Ensure that the electrical supply is correct. If it is not, you can damage the TAV vent-valve. The TAV vent-valve requires a 24 V d.c. electrical supply. The nEXT pump includes drive electronics which provide facilities for regulated pulsed venting (see pump manual for details). This ensures that your vacuum system can be vented to atmosphere as rapidly as possible without damage to the pump. Alternatively, you can connect the TAV vent-valve to a TIC (see TIC instruction manual for details) or your own electrical supply. Page 18 © Edwards Limited 2010. All rights reserved. Edwards and the Edwards logo are trademarks of Edwards Limited. B811-00-880 Issue B Operation CAUTION If you manually vent the pump when it is at full rotational speed and the rate of pressure rise is too high, the pump life may be reduced. When using the manual vent-valve supplied, we recommend that you either limit the vent or only open the vent-valve after the nEXT pump speed has fallen to 50% of full rotational speed. Do not vent the backing line as this may lead to contamination. If you vent into your vacuum system and use an oil sealed rotary backing pump, select a point upstream of the nEXT pump, to prevent oil back-streaming from the backing line. Operation of the TAV vent-valve depends on how you have conneted it: If you have connected the TAV vent-valve to the drive electronics of the nEXT pump; refer to the nEXT pump instruction manual. If you have connected the TAV vent-valve to a TIC: refer to the TIC instruction manual for operating instructions. If you have connected the TAV vent-valve to your own electrical supply, switch on the electrical supply to operate the vent-valve. Figure 8 - TAV vent-valve connections 1. 2. 3. 4. Air filter Inlet-port Vent-valve adaptor O-ring 5. Alternative electrical supply connector position 6. Electrical supply connector 7. Hose connector © Edwards Limited 2010. All rights reserved. Edwards and the Edwards logo are trademarks of Edwards Limited. Page 19 TAV vent-valve 4.4 B811-00-880 Issue B This page has been intentionally left blank. Page 20 © Edwards Limited 2010. All rights reserved. Edwards and the Edwards logo are trademarks of Edwards Limited. B811-00-880 Issue B Inlet-screens 5.1 Description Inlet-screens are supplied with all new nEXT pumps. If you have a nEXT pump without an inlet-screen, we recommend that you fit an inlet-screen for additional safety. The only exception to this is the main port in the END faces of split flow pumps. Plastic covers must be retained on these variants until ready to install to minimise the risk of injury from impeller blades. The inlet-screen prevents the entry of debris into the pump and also prevents people from coming into contact with the blades if the pump is switched on when it is disconnected from your vacuum system. 5.2 Note: Technical data Refer to the pump instruction manual for details of performance reductions when an inlet-screen is fitted. Table 5 - Inlet-screens technical data Pump inlet flange size Pump model Item number ISO100 coarse inlet-screen nEXT240 / 300 B810-00-808 ISO100 fine inlet-screen nEXT240 / 300 B810-00-809 nEXT400 B800-00-825 ISO160 coarse inlet-screen ISO160 fine inlet-screen nEXT400 B800-00-826 CF100 coarse inlet-screen nEXT240 / 300 B800-00-821 CF100 fine inlet-screen nEXT240 / 300 B800-00-822 CF160 coarse inlet-screen nEXT400 B800-00-823 CF160 fine inlet-screen nEXT400 B800-00-824 5.3 Installation 5.3.1 Unpack and inspect Remove all packing materials and protective covers and check the inlet-screen. If the inlet-screen is damaged, notify your supplier and the carrier in writing within three days; state the Item Number of the inlet-screen together with your order number and your supplier's invoice number. Retain all packing materials for inspection. Do not use the inlet-screen if it is damaged. © Edwards Limited 2010. All rights reserved. Edwards and the Edwards logo are trademarks of Edwards Limited. Page 21 Inlet-screens 5 B811-00-880 Issue B Inlet-screens 5.3.2 Fit or remove the inlet-screen WARNING Before you install the accessory, ensure that you switch off the pump and disconnect the power supply as described below. WARNING If you remove the inlet-screen, there will be a risk of injury from exposed sharp edges in the pump. CAUTION Do not remove the inlet-screen unless you can be sure that debris cannot fall into the pump. Debris which falls into the pump can seriously damage it. 1. Switch off the pump, isolate the pump controller from the electrical supply, and wait until the pump has stopped rotating. 2. Use the following appropriate procedure according to the type of inlet-screen. 5.3.2.1 Integral mesh centring ring inlet-screen Refer to Figure 9. Locate the inlet-screen between the nEXT pump flange and the mating flange on your vacuum system chamber. Figure 9 - Integral mesh centring ring inlet-screen Page 22 © Edwards Limited 2010. All rights reserved. Edwards and the Edwards logo are trademarks of Edwards Limited. B811-00-880 Issue B Inlet-screens 5.3.2.2 Mesh inlet-screen Refer to Figure 10. Insert the mesh inlet-screen into the pump inlet as shown in Figure 10. Figure 10 - Mesh inlet-screen © Edwards Limited 2010. All rights reserved. Edwards and the Edwards logo are trademarks of Edwards Limited. Page 23 B811-00-880 Issue B This page has been intentionally left blank. Page 24 © Edwards Limited 2010. All rights reserved. Edwards and the Edwards logo are trademarks of Edwards Limited. B811-00-880 Issue B PRX10 purge-restrictor 6.1 Description The PRX10 purge-restrictor (shown in Figure 11) sets the purge gas flow rate. The nEXT pump range has a purge port facility to allow you to purge the motor and bearing cavity with dry nitrogen or other inert gas. Note: You will need a vent port adaptor (see Section 7) to fit the PRX10 purge-restrictor. 6.2 Technical data Table 6 - PRX10 purge-restrictor technical data Nominal nitrogen flow rate* 255 sccm, 0.42 mbar l s-1, 42 Pa l s-1 Flange size NW10 Item Number * B580-65-001 At a supply pressure of 0 bar gauge (1 x 10⁵ Pa) 6.3 Installation 6.3.1 Unpack and inspect Remove all packing materials and protective covers and check the PRX10 purge-restrictor. If the PRX10 purge-restrictor is damaged, notify your supplier and the carrier in writing within three days; state the Item Number of the PRX10 purge-restrictor together with your order number and your supplier's invoice number. Retain all packing materials for inspection. Do not use the PRX10 purge-restrictor if it is damaged. 6.3.2 Fit the purge-restrictor WARNING Before you install the accessory, ensure that you switch off the pump and disconnect the power supply as described below. CAUTION Do not exert any sideways force on the purge- restrictor when you clamp it into place. If you do, you can damage the seal between the O-ring (Figure 11, item 2) and the body of the purge-restrictor. If the seal is damaged, gas may leak through the seal and you will not be able to properly control gas flow into the pump. Note: If you will use a purge gas other than nitrogen, you must calibrate the purge-restrictor (refer to Section 6.4.2) before you connect your purge gas supply. 1. Switch off the pump, isolate the pump controller from the electrical supply, and wait for the pump to stop rotating. 2. Remove the blank and clamp from the purge-port on the pump. © Edwards Limited 2010. All rights reserved. Edwards and the Edwards logo are trademarks of Edwards Limited. Page 25 PRX10 purge-restrictor 6 B811-00-880 Issue B PRX10 purge-restrictor 3. Attach your purge gas supply pipeline (which must be terminated with an NW10 flange) to the purge-port with the PRX10 purge-restrictor in place of the normal NW10 centring-ring. 4. Carefully secure the connection with the NW10 clamp. 6.4 Operation 6.4.1 General The PRX10 purge-restrictor, as supplied, is adjusted to restrict the flow rate of dry nitrogen at a supply pressure of 0 bar gauge (1 x 10⁵ Pa) to 25 sccm (0.42 mbar l s-1, 42 Pa l s-1). You can increase the supply pressure to increase the flow rate; see Table 7. For most applications, you can use a nitrogen flow rate of 25 sccm (0.42 mbar l s-1, 42 Pa l s-1) to 30 sccm (0.5 mbar l s-1, 50 Pa l s-1). To do this, your nitrogen supply pressure must be 0.1 to 0.2 bar gauge (1.1 x 10⁵ to 1.2 x 10⁵ Pa). Do not exceed the maximum purge gas supply pressure given in the instruction manual supplied with your pump. 6.4.2 Calibration of the PRX10 purge-restrictor for different purge gases The purge gas flow rate at a particular supply pressure will change if you use a different purge gas. If you want to use a different purge gas, use the procedure below to adjust the flow rate. 1. Fit the PRX10 purge-restrictor to the pump as described in Section 6.3.2. Fit a calibrated mass flow meter between your purge gas supply and the PRX10 purge-restrictor. 2. Switch on the backing pump to evacuate the nEXT pump and then turn on your purge gas supply. 3. Monitor the indicated purge gas flow rate while you adjust the purge gas supply pressure. If you can achieve the required flow rate, you do not need to adjust the purge-restrictor; in this case, continue at Step 5 below. 4. Refer to Figure 11. If you cannot achieve the required flow rate, undo the locknut (3) on the purge-restrictor and use a small screwdriver to turn the adjustment screw (4) clockwise to decrease the flow rate, or anticlockwise to increase the flow rate. Tighten the locknut. 5. Turn off your purge gas supply, remove the mass flow meter and connect your purge gas supply to the purgerestrictor. Table 7 - Nitrogen flow rate through the PRX10 purge-restrictor Nitrogen supply pressure Nitrogen flow rate bar gauge bar absolute Pa sccm mbar l s-1 Pa l s-1 0.0 1.0 1.0 x 10⁵ 25 0.42 42 0.5 1.5 1.5 x 10⁵ 38 0.63 63 2.0 2.0 x 10⁵ 50 0.83 83 2.5 x 10⁵ 63 1 100 5 75 1.25 125 3.5 x 10⁵ 88 1.5 150 4.0 x 10⁵ 100 1.7 170 1.0 1.5 2.0 2.3 3.0 Page 26 2.5 3.0 3.5 4.0 3.0 x 10 © Edwards Limited 2010. All rights reserved. Edwards and the Edwards logo are trademarks of Edwards Limited. B811-00-880 Issue B PRX10 purge-restrictor Figure 11 - PRX10 purge-restrictor 1. 2. 3. 4. Filtered purge gas inlet to PRX10 purge-restrictor O-ring Locknut Adjustment screw © Edwards Limited 2010. All rights reserved. Edwards and the Edwards logo are trademarks of Edwards Limited. Page 27 B811-00-880 Issue B This page has been intentionally left blank. Page 28 © Edwards Limited 2010. All rights reserved. Edwards and the Edwards logo are trademarks of Edwards Limited. B811-00-880 Issue B Vent-port adaptor 7.1 Description The 1/8 inch BSP(P) male to NW10 vent-port adaptor can be used to convert the 1/8 inch BSP(P) female vent-port on all nEXT pumps to an NW10 flange. An alternative vent-valve to the TAV 5/6 or a vent pipeline may then be fitted to this flange. See Figure 12. Figure 12 - Vent-port adaptor 1. 2. 3. 4. NW10 flange O-ring 1/8 inch BSP male thread Removable flow-restrictor The vent-port adaptor is supplied with a removable flow restrictor and an O-ring to seal the adaptor to the pump. It is suited for all nEXT pump types. Also available is an extended vent-port adaptor which is intended for use with the split-flow turbo pumps where the backing port is too close to the vent-port to allow the standard vent-port adaptor to be used. The extended ventport adaptor is supplied with an O-ring to seal to the pump, NW10 centering ring and NW10/16 clamping ring. Refer to Figure 13. Figure 13 - Extended vent-port adaptor 1. 2. 3. 4. NW10 flange O-ring 1/8 inch BSP male thread M5 internal thread CAUTION The extended vent-port adaptor is not supplied with a removable flow restrictor. Venting a turbo pump from atmosphere, through the extended vent-port adaptor, would cause damage to the turbo pump. To vent a turbo pump when using the extended vent-port adaptor, you must either control the flow-rate to the adaptor or incorporate a 0.8 mm orifice in the pipeline used to connect to the extended vent-port adaptor. © Edwards Limited 2010. All rights reserved. Edwards and the Edwards logo are trademarks of Edwards Limited. Page 29 Vent-port adaptor 7 B811-00-880 Issue B Vent-port adaptor The extended vent-port adaptor is best suited to the following pump types. nEXT240 nEXT300 nEXT400 7.2 Technical data Table 8 - Vent-port adaptor technical data Internal diameter 0.8 mm Flange size NW10 Item number B580-66-011 Table 9 - Extended vent-port adaptor technical data Internal diameter M5 thread Flange size NW10 Item Number B580-66-028 7.3 Installation 7.3.1 Unpack and inspect Remove all packing materials and protective covers and check the vent-port adaptor. If the vent-port adaptor is damaged, notify your supplier and the carrier in writing within three days; state the Item Number of the vent-port adaptor together with your order number and your supplier's invoice number. Retain all packing materials for inspection. Do not use the vent-port adaptor if it is damaged. 7.3.2 Connect the vent-port adaptor WARNING Before you install the accessory, ensure that you switch off the pump and disconnect the power supply as described below. 1. Switch off the pump, isolate the pump controller from the electrical supply, and wait for the pump to stop rotating. 2. Unscrew and remove the manual vent-valve from the nEXT pump. 3. Refer to Figure 12 and 13. Check that the vent-port adaptor has an O-ring (2) fitted and screw the adaptor into the 1/8 inch BSP vent-port. Tighten the adaptor so that it seals firmly against the face of the vent-port. 4. Connect your vent pipeline to the NW10 flange (1) of the adaptor with suitable fittings. Page 30 © Edwards Limited 2010. All rights reserved. Edwards and the Edwards logo are trademarks of Edwards Limited. B811-00-880 Issue B VRX vent-restrictor 8.1 Description Note: A VRX vent-restrictor can be fitted in any nEXT vent port or purge port. Fit a VRX vent-restrictor to your nEXT pump if you will vent the pump when the pump speed is above 50% of full rotational speed. The vent-restrictor restricts the flow-rate of the vent gas into the nEXT pump. You can fit the VRX vent-restrictor directly to the inlet of a vent-port adaptor, together with a TAV vent-valve (if required). Note that you must fit the vent-restrictor before you fit the TAV vent-valve or vent-port adaptor. 8.2 Technical data Table 10 - Vent-restrictor technical data VRX Orifice diameter Item Number VRX10 0.1 mm B580-66-021 VRX20 0.2 mm B580-66-022 VRX30 0.3 mm B580-66-023 VRX50 0.5 mm B580-66-024 VRX70 0.7 mm B580-66-025 8.3 Installation 8.3.1 Unpack and inspect Remove all packing materials and protective covers and check the vent-restrictor. The VRX identification number (Figure 14, item 5) is located on the restrictor base; for example, if you have a VRX20 vent-restrictor, ‘20’ will be shown on the base of the restrictor. If the vent-restrictor is damaged, notify your supplier and the carrier in writing within three days; state the Item Number of the vent-restrictor together with your order number and your supplier's invoice number. Retain all packing materials for inspection. Do not use the vent-restrictor if it is damaged. 8.3.2 VRX vent-restrictor selection Make sure that you have the correct vent-restrictor for your pump and vacuum system. Refer to your nEXT pump instruction manual for selection details. You must not exceed the maximum allowable rate of pressure rise specified in the nEXT pump instruction manual. 8.3.3 Fit the vent-restrictor WARNING Before you install the accessory, ensure that you switch off the pump and disconnect the power supply as described below. Use the following procedure to fit the vent-restrictor to a nEXT pump: © Edwards Limited 2010. All rights reserved. Edwards and the Edwards logo are trademarks of Edwards Limited. Page 31 VRX vent-restrictor 8 B811-00-880 Issue B VRX vent-restrictor 1. Switch off the pump, isolate the pump controller from the electrical supply, and wait until the pump has stopped rotating. 2. Remove the vent-valve or plug from the nEXT pump, or disconnect the vacuum connections from the purge port as appropriate. 3. Refer to Figure 14. If a vent-restrictor is already fitted, fit a suitable M3 screw into the M3 taped hole (2) in the restrictor, and then pull the screw to remove the old vent-restrictor. 4. Fit a suitable M3 screw to the new restrictor and push the new restrictor fully into the vent-port or purge port of the nEXT port. 5. Remove the M3 screw and refit the vent-valve or plug, or reconnect the vacuum connections to the purge port. Figure 14 - VRX vent-restrictor 1. O-ring 2. M3 tapped hole 3. Sealing washer Page 32 4. Orifice diameter 5. VRX identification number © Edwards Limited 2010. All rights reserved. Edwards and the Edwards logo are trademarks of Edwards Limited. B811-00-880 Issue B WCX water-cooler 9.1 Description A WCX water-cooler can be fitted to all nEXT pumps, to provide water cooling during pump operation. Refer to the pump instruction manual to determine the operating conditions under which you must use water cooling. 9.2 Technical data Table 11 - WCX water-cooler technical data Item number B80000815 To fit pump models All nEXT pumps Water connection dimensions Push-fit connectors suitable for 10 mm OD plasic pipe 9.3 Installation 9.3.1 Unpack and inspect Remove all packing materials and protective covers and check the WCX water-cooler. If the water-cooler is damaged, notify your supplier and the carrier in writing within three days; state the Item Number of the water-cooler together with your order number and your supplier's invoice number. Retain all packing materials for inspection. Do not use the water-cooler if it is damaged. 9.3.2 Fit the water-cooler to the pump WARNING Before you install the accessory, ensure that you switch off the pump and disconnect the power supply as described below. 1. Switch off the pump. Isolate the pump controller from the electrical supply, and wait until the pump has stopped rotating. 2. Refer to Figure 2 & 15. Fit the water-cooler to the pump as described below. 9.3.2.1 WCX water-cooler 1. If necessary, remove the old water -cooler from the pump, and retain the fixing screws. 2. Use the screws removed in step 1, or use the two supplied, to secure the new water-cooler to the pump in position as shown in Figure 2. 3. Push the 10 mm OD plastic tube (not supplied) into the push fit connectors ensuring that they are securely inserted. 4. Briefly turn on the cooling water supply and check for leaks. Seal any leaks found. © Edwards Limited 2010. All rights reserved. Edwards and the Edwards logo are trademarks of Edwards Limited. Page 33 WCX water-cooler 9 B811-00-880 Issue B WCX water-cooler 9.4 Operation CAUTION Ensure that the cooling-water flow is correct for the pump operating conditions. Insufficient or excess coolingwater flow can damage the pump. Refer to your nEXT pump instruction manual for: The operating conditions under which you must use water-cooling. The necessary cooling-water supply flow rates and temperatures. Figure 15 - WCX water-cooling Page 34 Item number Product description Quantity 1 Water-cooling block 1 2 M6 x 16 socket cap screw 2 3 Push fit connector 10 OD pipe 1/4 BSP 2 4 Plastic tube 10 OD ref only © Edwards Limited 2010. All rights reserved. Edwards and the Edwards logo are trademarks of Edwards Limited. B811-00-880 Issue B nEXT Interface Cable 10.1 Description The nEXT interface cable allows you to connect the serial link of an nEXT Pump to a PC. Serial commands can then be used to control and monitor the nEXT Pump. Refer to the pump instruction manual for information on the serial protocol utilisation, including a full serial command set and details of the required message structure. 10.2 Technical data Table 12 - nEXT interface cable technical data Item number B800-00-808 To fit pump models All nEXT pumps Pump connection 15 way female D-type socket (dual-entry back shell) Supply connection 15 way male D-type plug (single-entry back shell) PC connection 9 way female D-type socket (single-entry back shell) 10.3 Installation 10.3.1 Unpack and inspect Remove all packing materials and check the interface cable. If the interface cable is damaged, notify your supplier and the carrier in writing within three days; state the Item Number of the interface cable together with your order number and your supplier's invoice number. Retain all packing materials for inspection. Do not use the interface cable if it is damaged. 10.3.2 Fit the interface cable to the pump WARNING Before you install the accessory, ensure that you switch off the pump and disconnect the power supply as described below. 1. Switch off the pump. Isolate the pump controller from the electrical supply and wait until the pump has stopped rotating. 2. Disconnect the nEXT pump logic interface cable from the TIC Turbo Instrument Controller or TIC Turbo Controller or from your own systems, depending upon your connection method. 3. Refer to Figure 16 for the interface cable connection diagram. 4. Connect the 15 way female D-type socket (pump connection) of the interface cable to the nEXT pump logic interface cable. 5. Connect the 15 way male D-type plug (supply connection) of the interface cable either to the back of the TIC (refer to the TIC instruction manual for further information) or to the pump connection of your own system, depending upon your connection method. 6. Connect the 9 way female D-type socket (PC connection) of the interface cable either to the serial port of your PC or to a suitable USB to RS232 converter, depending upon your PC serial port availability. © Edwards Limited 2010. All rights reserved. Edwards and the Edwards logo are trademarks of Edwards Limited. Page 35 nEXT Interface Cable 10 B811-00-880 Issue B nEXT Interface Cable 10.4 Operation WARNING Ensure that the interface cable is correctly and securely fitted before turning on the power supply and starting the pump, as described in Section 10.3.2. Refer to your nEXT pump instruction manual for information detailing pump operation and serial protocol utilisation. Figure 16 - nEXT interface cable 1. Pump connection 2. Supply connection 3. PC connection Page 36 © Edwards Limited 2010. All rights reserved. Edwards and the Edwards logo are trademarks of Edwards Limited. B811-00-880 Issue B Maintenance Edwards nEXT accessories require little user maintenance and contain no user serviceable parts. To maintain the accessories in normal use, do the appropriate checks below when you maintain the pump. Check that all mechanical fixings are secure. Check that any electrical connections are secure. Check that any electrical supply cables are undamaged. © Edwards Limited 2010. All rights reserved. Edwards and the Edwards logo are trademarks of Edwards Limited. Page 37 Maintenance 11 B811-00-880 Issue B This page has been intentionally left blank. Page 38 © Edwards Limited 2010. All rights reserved. Edwards and the Edwards logo are trademarks of Edwards Limited.