1
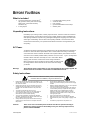
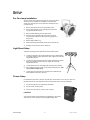
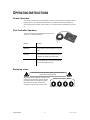
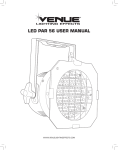
CH-PAR56PACK
PAR-56 System
USER MANUAL
Chauvet, 3000 N 29th Ct, Hollywood, FL 33020 U.S.A
(800) 762-1084 – (954) 929-1115
FAX (954) 929-5560
www.chauvetlighting.com
Table of Contents
BEFORE YOU BEGIN .................................................................................................................... 3
WHAT IS INCLUDED ........................................................................................................................ 3
UNPACKING INSTRUCTIONS ............................................................................................................ 3
AC POWER ................................................................................................................................... 3
SAFETY INSTRUCTIONS .................................................................................................................. 3
INTRODUCTION ............................................................................................................................. 4
FEATURES ..................................................................................................................................... 4
PRODUCT OVERVIEW ..................................................................................................................... 4
SETUP............................................................................................................................................. 5
PAR CAN LAMP INSTALLATION ........................................................................................................ 5
LIGHT STAND SETUP...................................................................................................................... 5
CHASER SETUP ............................................................................................................................. 5
Linking .............................................................................................................................................. 5
OPERATING INSTRUCTIONS ....................................................................................................... 6
CHASER OPERATION...................................................................................................................... 6
FOOT CONTROLLER OPERATION .................................................................................................... 6
REPLACING A FUSE ........................................................................................................................ 6
APPENDIX ...................................................................................................................................... 7
MAINTENANCE ............................................................................................................................... 7
RETURNS PROCEDURE .................................................................................................................. 7
CLAIMS ......................................................................................................................................... 7
TECHNICAL SPECIFICATIONS .......................................................................................................... 8
Par-56 System
2
11/1/2004 1:35:00 PM
BEFORE YOU BEGIN
What is included
¾
¾
th
¾
¾
¾
¾
¾
(4) Chrome Par56 Cans, complete with 4
clip, gel frame, socket, power cord with plug,
safety screen, clutch brake and lamp
retention O ring
4 color gel pack
Light Stand with mounting screws
4-channel chaser
Foot controller
(4) Par56 300w Medium Flood Lamps
Warranty Card
Unpacking Instructions
Immediately upon receiving a fixture, carefully unpack the carton, check the contents to ensure that
all parts are present, and have been received in good condition. Notify the shipper immediately and
retain packing material for inspection if any parts appear damaged from shipping or the carton itself
shows signs of mishandling. Save the carton and all packing materials. In the event that a fixture
must be returned to the factory, it is important that the fixture be returned in the original factory box
and packing.
AC Power
To determine the power requirements for a particular fixture, see the label affixed to the back plate of
the fixture or refer to the fixture’s specifications chart. A fixture’s listed current rating is its average
current draw under normal conditions. All fixtures must be powered directly off a switched circuit and
cannot be run off a rheostat (variable resistor) or dimmer circuit, even if the
Figure 1 - AC Voltage Switch
rheostat or dimmer channel is used solely for a 0% to 100% switch. Before
applying power to a fixture, check that the source voltage matches the
fixture’s requirement. Check the fixture or device carefully to make sure that
if a voltage selection switch exists that it is set to the correct line voltage
you will use.
Warning!
Verify that the power select switch on your unit matches the line voltage applied. All
fixtures must be connected to circuits with a suitable Earth Ground.
Safety Instructions
Please read these instructions carefully, which includes important
information about the installation, usage and maintenance?
•
•
•
•
•
•
•
Please keep this User Guide for future consultation. If you
sell the unit to another user, be sure that they also receive
this instruction booklet.
Always make sure that you are connecting to the proper
voltage and that the line voltage you are connecting to is
not higher than that stated on decal or rear panel of the
fixture.
This product is intended for indoor use only!
To prevent risk of fire or shock, do not expose fixture to
rain or moisture. Make sure there are no flammable
materials close to the unit while operating.
The unit must be installed in a location with adequate
ventilation, at least 50cm from adjacent surfaces. Be sure
that no ventilation slots are blocked.
Always disconnect from power source before servicing or
replacing lamp or fuse and be sure to replace with same
lamp source.
Caution!
Par-56 System
•
•
•
•
•
•
Secure fixture to fastening device using a safety chain.
Never carry the fixture solely by its head. Use its carrying
handles.
Maximum ambient temperature is Ta: 40°. Do not operate
fixture at temperatures higher than this.
In the event of serious operating problem, stop using the
unit immediately. Never try to repair the unit by yourself.
Repairs carried out by unskilled people can lead to
damage or malfunction. Please contact the nearest
authorized technical assistance center. Always use the
same type spare parts.
Don’t connect the device to a dimmer pack.
Make sure power cord is never crimped or damaged.
Never disconnect power cord by pulling or tugging on the
cord.
Avoid direct eye exposure to lamp while it is on.
There are no user serviceable parts inside the unit. Do not open the housing or
attempt any repairs yourself. In the unlikely event your unit may require service,
please contact CHAUVET.
3
11/1/2004 1:35:00 PM
INTRODUCTION
Features
• Complete light system for all occasions
• 4 par cans with 300w lamps and color gels
• 4-channel chaser
- Sound-activated with sensitivity knob
- 16 preset patterns
- 1,200 total watts
- Linkable via CH-DIN20 cable
- Foot controller
• Includes tripod light stand and mounting screws
• Available in 115V or 230V
• 1 year limited warranty
Product Overview
Tripod Light Stand
Par56 Cans
Lightweight tripod light stand
includes mounting screws and T
bar for hanging fixtures. Load
capacity of 45 lbs.
Chrome Par56 Cans,
complete with 4th clip, gel
frame, socket, power
cord with plug, safety
screen, clutch brake and
lamp retention O ring
Gel Pack
Actual color provided
(chrome)
4 colored gels
LED Indicator
Linkable
This 4-channel chaser
can be linked to other 4channel chasers for
unison synchronized
operation using CHDIN20 cables.
Foot Controller
Simple blackout and Full
On overrides.
4 LED channel activity
indicators
4 Receptacles
4 Fuses
Fuse protection
Audio Sensitivity
Knob
Power Switch
On/Off switch
Par-56 System
4
11/1/2004 1:35:00 PM
SETUP
Par Can Lamp Installation
The par can box will include both lamp and can. The lamp is placed
inside the can but not fastened nor installed in the socket. Use
caution when removing par cans out of the box and take care as to
not drop the lamp.
1)
Remove lamp from inside can to expose lamp socket.
2)
Remove lamp retention ring by squeezing both ends of the
ring together and then pull out.
3)
Remove bubble wrapping from the lamp socket.
4)
Hold lamp socket and glass side of lamp then proceed to
insert the lamp inside the can while connecting lamp pins to
lamp socket.
5)
Replace lamp retention ring.
6)
Slide combined (gel-frame/safety-screen) and secure with clip.
7)
If desired, mount gel frame with or without gel.
Light Stand Setup
This stand was designed to be operated on a flat and level surface.
1)
Loosen leg extension knob and pull outwards on legs to widest position
for optimum stability. Tighten leg extension knob. Tighten set screw with
supplied Allen wrench.
2)
Loosen lower pole extension knob and pull pole upwards to fully extend
lower pole. Tighten pole extension knob. Tighten set screw with
supplied Allen wrench.
3)
Loosen lighting bar knob. Snap lighting bar into upper pole extension.
4)
Using supplied mounting screws, secure parcan(s) to lighting bar. Take
care to balance weight evenly.
5)
Loosen upper pole extension knob and raise pole to desired height.
Stand extends a maximum of nine feet.
Chaser Setup
It is advisable to purchase a C clamp for use with the 4 channel chaser. In this way, the chaser can
be placed near the top of the stand where all cans will be within reach of the AC receptacles.
1)
Connect each parcan to an individual AC receptacle.
2)
Connect chaser to mains power.
3)
Connect Foot controller to ¼” phone input on chaser.
L IN K IN G
The 4-channel chasers in the Par56 Pack and Par38 Pack can be daisy
chain linked for unison operation using a CH-DIN20 linking cable.
Par-56 System
5
11/1/2004 1:35:00 PM
OPERATING INSTRUCTIONS
Chaser Operation
The 4 channel chaser includes 16 preset pattern chases. The chases advance automatically and are
triggered by music. An audio sensitivity dial allows you to adjust the sound level received by the
internal microphone for optimum sound activation. The chaser will function immediately once turned
on.
Foot Controller Operation
The Foot controller provides the following functions on the
chaser; all on, chasing and blackout.
BUTTON
FUNCTION
BLACKOUT
Blackout will bring all light intensity to 0 or the off
position.
FULL ON
Full On will bring all channel output levels to full
or maximum. No visible chase will be seen.
In normal operation the chaser will automatically
run the chases triggered by music.
Replacing a fuse
Disconnect the power cord before replacing a fuse and always
replace with the same type fuse.
With a Philips head screwdriver, unscrew the fuse
holder until it can be entirely removed. Remove
the damaged fuse from its holder and replace
FUSES: F10A 125V 5 X20mm
1
2
3
4
with exact same type fuse. Insert the fuse
holder back in its place and reconnect power.
Par-56 System
6
11/1/2004 1:35:00 PM
APPENDIX
Maintenance
To maintain optimum performance and minimize wear fixtures should be cleaned frequently. Usage
and environment are contributing factors in determining frequency. As a general rule, fixtures should
be cleaned at least twice a month.
Unplug fixture from power. Use a vacuum or air compressor and a soft brush to remove dust
collected on external vents and internal components.
Returns Procedure
Returned merchandise must be sent prepaid and in the original packing, call tags will not be issued.
Package must be clearly labeled with a Return Merchandise Authorization Number (RA #). Products
returned without an RA # will be refused. Call CHAUVET and request RA # prior to shipping the
fixture. Be prepared to provide the model number, serial number and a brief description of the cause
for the return. Be sure to properly pack fixture, any shipping damage resulting from inadequate
packaging is the customer’s responsibility. CHAUVET reserves the right to use its own discretion to
repair or replace product(s). As a suggestion, proper UPS packing or double-boxing is always a safe
method to use.
Claims
Damage incurred in shipping is the responsibility of the shipper; therefore the damage must be
reported to the carrier upon receipt of merchandise. It is the customer's responsibility to notify and
submit claims with the shipper in the event that a fixture is damaged due to shipping. Any other claim
for items such as missing component/part, damage not related to shipping, and concealed damage,
must be made within seven (7) days of receiving merchandise.
Par-56 System
7
11/1/2004 1:35:00 PM
Technical Specifications
4-CHANNEL CHASER
Length.................................................................................................................... 168.27 mm (6.625 in)
Height .......................................................................................................................... 215.9 mm (8.5 in)
Width ......................................................................................................................... 57.15 mm (2.25 in)
Weight ................................................................................................................................ 2 Kg (4.4 lbs)
Switch-selectable power settings ..................................................................115V 60 Hz or 230V 60 Hz
European version ................................................................................................................... 240V 50Hz
AC input..............................................................................................................3-prong IEC 60320 C14
AC output (115V)......................................................................................................................7A per Ch
AC output (230V & 240V) .........................................................................................................5A per Ch
Total output capacity ...................................................................................................... 1200 watts max
Fuse: Main (115V) ................................................................................20mm Glass 7A 125V Fast Blow
Fuse: Main (230V) ................................................................................20mm Glass 5A 250V Fast Blow
PAR CAN
Par Can ................................................................................................. (4) x Short par56 can (polished)
Lamp: Par56 300w Medium Flood .................................................................. (4) x CH-300PAR56/MFL
LIGHTING STAND (Light Duty)
Load capacity ............................................................................................................... 20.41 Kg (45 lbs)
Extension.............................................................................................................................. 2.74 m (9 ft)
Inclusions................................................................................................... 4 mounting screws and T bar
CONTROL & PROGRAMMING
Foot Controller............................................................................................................................. ¼” Plug
Linkable chaser using.................................................................................................... CH-DIN20 cable
ORDERING INFORMATION
Par-56 System.............................................................................................................. CH-PAR56PACK
Par-56 System
8
11/1/2004 1:35:00 PM