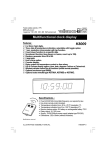
1
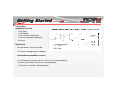
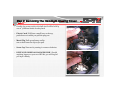
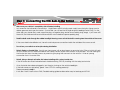
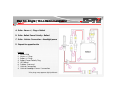
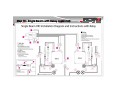
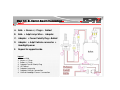
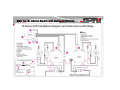
Getting Started
Kit Includes:
Single Beam/Hi-Lo Kits
1. 2x HID Bulbs
2. 2x HID Ballasts
3. 2x Sets of Mounting Brackets
4. 2x Sets of 3M double sided tape
5. 8x Screws
Bi-Xenon Kits
Same as above, but also includes
2x Bi-Xenon headlight power adapters
Optional Recommended Accessories
2x ECM Warning Canceller (for Non-Canbus units) (Sold separately)
1x Battery Power Relay connection (Sold separately)
1x Bi-Xenon Control Wire (Sold Separately)
Getting Started
Kit Includes
As a safety precaution, make sure that the car has had time to cool down before starting the
installation process.
Put the vehicle into “park” and make sure it is securely in gear.
Make sure to have the ignition turned off and the keys removed.
Leave the protective plastic covering on the HID bulb until you are about to install the HID bulbs into
the vehicle headlight housing.
It is recommended to use safety glasses and gloves during installation, if the oils on human skin or
dirt come in contact with the bulb glass, it will greatly reduce the bulbs lifespan.
You may be required to drill or cut a 25mm hole into the back of the resin or rubber headlight cap.
Before installation, carefully examine each component for any possible cracks, loose wiring, bent
frames, or anything else that may appear less than new. Faulty wiring can be dangerous!
We always recommend installing one bulb at a time, with the battery-side first.
Step 1: Removing The Headlight Housing Cover
Open the hood and examine the headlight assembly for your vehicle, you may need to remove the
headlight assemblies on both sides. If your engine bay has enough space for you to do the installation, the
headlights will not have to be removed.
Sealed Cover
Pre-Drilled Cover
o Remove the cover by physically tugging on
each end until it comes loose.
o You will need to drill or cut a 25mm hole in
the cover to allow for HID connections
o Unplug the headlight power cord from the
light bulb
o Unplug the headlight power cord from the
light bulb.
o Remove the cover by physically tugging on
each end until it comes loose.
Step 2: Removing The Headlight Housing Cover
Usually, the power cords or the bulb itself will be held by
one of 3 different kinds of safety latch
Plastic Catch: Will have a small lever at the top,
push down on it while you pull the plug out.
Metal Clip: Pull up and away, and be
sure to hold onto the clip as you pull.
Screw Cap: Unscrew by turning it counter-clockwise.
KEEP YOUR ORIGINAL HALOGEN BULB: Should
anything happen to your new HID kit, you will be glad
you kept it handy.
Step 3: Connecting the HID Bulb to the Ballast
Make sure your vehicle is completely shut off before installing
Let’s examine the bulb and its connections. Single Beam and Hi-Lo bulb cords usually have the bulb, 4 plugs, and a
rubber grommet serving as the center. On one side, you will see the HID bulb and the Headlight Power Plug. On the
other side, you should see 3 cords, a positive plug, a negative plug, and a Power Polarity plug (large). If you have a BiXenon kit, the third cord will be a small connection wire instead of a power polarity plug.
Feed the bulb cords through the rubber headlight housing cover so that the bulb is coming from the outside of the cover.
If the cover had to be drilled or cut, have the vehicle power connection fed to the outside of the cover as well.
Do not turn your vehicle on at anytime during installation.
Note A: Relays vs Control Wire: Your kit may have come with a relay harness or a control wire. Either of which will work
for your vehicle, but it is recommended to use a relay harness for pre-2004 vehicles when possible. You can distinguish
the control wire from the relay harness by examining the plug that connects to the vehicle. If it has a 3-prong
connection then it is control wire.
Note B: Always attempt activation first before installing with a relay/control wire.
If the HID bulbs do not activate after basic troubleshooting, THEN try installing with the relay/control wire.
Once the bulbs have been plugged in, test them by turning on the vehicle headlights.
If the bulb comes on right away, great! Your OPT7 kit is working perfectly!
Please proceed to step 4
If not, don’t fret! Check out our FAQ/ Troubleshooting guide for alternative ways to hookup your HID kit!
Step 3a: Single / Hi-Lo Beam Installation
A. Bulb > Xenon +/- Plugs > Ballast
B. Bulb > Ballast Power Polarity > Ballast
C. Bulb > Vehicle Connection > Headlight power
D. Repeat for opposite side
Legend
1. Xenon Bulb
2. Xenon +/- Plugs
3. Ballast +/- Plugs
4. Ballast Power Polarity Plug
5. HID Ballast
6. Rubber Grommet
7. Vehicle Connection
8. Vehicle Headlight Power Connection
*Hi-Lo plugs may appear slightly different
Step 3b: Single Beam with Relay (optional)
Step 3c: Hi-Lo Beam with Relay (optional)
Step 3d: Bi-Xenon Beam Installation
A. Bulb > Xenon +/- Plugs > Ballast
B.
Bulb > Adpt Jump Wire > Adapter
C. Adapter > Power Polarity Plug > Ballast
D. Adapter > Adpt Vehicle connector >
Headlight power
E.
Repeat for opposite side
Legend
1. Xenon Bulb
2. Xenon +/- Plugs
3. Ballast +/- Plugs
4. Adapter Power Polarity Plug
5. HID Ballast
6. Adapter Jumpwire
7. Adapter Vehicle Connection
8. Vehicle Headlight Power Connection
Step 3e: Bi-Xenon Beam with Relay (optional)
Step 3e: Bi-Xenon Beam with Control Wire (alt)
*Only use this diagram if
your kit included a
Control Wire
Step 4-5: Mounting the HID kit
Step 4: Installing the HID bulb
Remove the plastic wrapping and dust shield
from the HID bulb, DO NOT ALLOW ANY DUST OR
OIL TO GET ONTO THE SURFACE OF THE HID BULB.
Carefully, place the bulb into the headlight
housing and twist it into place like the OEM bulb
you removed earlier. If you have a Hi-Lo bulb,
ensure that the high beam is sitting on top of the
HID xenon bulb.
Secure the bulb retainer back into place..
Step 5: Almost done!
While not necessary to function, it is highly
recommended to mount the ballasts somewhere in
the vehicle engine bay. Keep the ballast and cords as
far away as possible from any other heat sources such
as the battery, radiator, or the engine itself. Do not
cover the ballast with a rag, towel, or anything else
that might cause excessive heat.
• 3M Double-Sided tape: Be sure to clean the area
you plan to place the ballast thoroughly to ensure a
strong hold.
Done! Enjoy your new OPT7 HID Lighting Kit!
Place the cover back over the headlight
housing opening.
Double check one more time by activating your
headlight low beams and high beams to ensure
nothing came loose during bulb installation.
If at any point your kit fails to perform as
advertised, please see our FAQ below. Most
problems can be solved with just a few minor
adjustments!
For more information, please visit our online
manual at HIDextra.com/support. You can also
find our video installation guides on our OPT7
Youtube channel. To contact, please message
us via the sales platform you purchased from.
FAQ and Troubleshooting
Initial installation problems:
1. Bulb(s) Won’t Fit
Check for correct bulb size/fitment. Double-check your bulb size with the Sylvania Lamp Replacement Guide
available at Sylvania.com. Also, check the bulb itself to see if you received the correct bulb size.
Special bulb adapter: See if it is possible to reuse the adapter from the stock halogen bulb. If not, contact us
to see if we have a bulb adapter for your specific vehicle.
Bulb Customization: The base of the bulb needs to be modified. Compare the base of the stock halogen bulb
to the HID bulb; shape the HID bulb’s base to match that of the stock halogen bulb via grinding, sanding, etc.
2. One or both sides fail to light up immediately after installation
Fuses: The headlight fuse may be blown. Common occurrence if your kit was installed incorrectly. Check
your vehicle fuse box and replace with a 15 amp fuse if needed.
Power Polarity Switch: The power polarity plug needs to be flipped. Locate the power connection to the
ballast, unplug it, flip it over, plug it back in, and try again. Then, secure with electrical tape. Make sure the
vehicle is off before you unplug or plug anything.
Relay/ Control Wire: Your vehicle may be having trouble with the different electrical output of the HID system
and therefore may require the use of a relay/control wire. If your kit included a relay/control wire, please
follow the instructions for proper installation. You still may need to flip the polarity or change the fuses even
with the relay/control wire.
Part Failure: If only one side is failing, simply swap the bulb or the ballast from the non-working side to the
working side to see if the problem follows. If the problem follows the ballast or the bulb, then you may need a
replacement ballast or bulb. Please contact us for any replacements.
FAQ and Troubleshooting
3. One or both sides flicker, flash, or work intermittently
DRL Conflict: Turn off the daytime running lights and/or auto-light on feature to prevent those features from
affecting the operation of your HID lights.
Relay/Control Wire: Your vehicle may be having trouble with the different electrical output of the HID system
and therefore may require the use of a relay/control wire. Contact us if you think you may need a
complimentary relay. If your kit included a relay/control wire, please follow the instructions for proper
installation. You still may still need to flip the polarity or change the fuses even with the relay/control wire.
Parts Failure: There may be malfunctioning parts. If only one side is failing, simply swap the bulb or the ballast
from the non-working side to the working side to see if the problem follows. If the problem follows the ballast
or the bulb, then you may need a replacement ballast or bulb. Please contact us for any replacements.
4. Low or High beam does not activate (For Hi/Lo, Bi-Xenon Kits)
Power Polarity Switch: The power polarity plug needs to be flipped. Locate the power connection to the
ballast, unplug it, flip it over, plug it back in, and try again. Then, secure with electrical tape.
Diode flip / Jumpwire adjustment (Bi-Xenon Kits): On your Headlight Power Adapter, locate the Power Diode
by unraveling the only component hanging off to the side of the adapter. The jumpwire is the small wire with
the white connections Once revealed, try one or all of the following recommended configurations
a) Setting 1: (default): diode in default position, Jumpwire attached
b) Setting 2: diode in default position, Jumpwire removed
c) Setting 3: diode flipped 180 degrees, Jumpwire attached
d) Setting 4: diode flipped 180 degrees, Jumpwire removed
Parts Failure: If this is a kit with a relay and all polarity settings have been attempted but either the low or high
beams do not activate, then you may need a replacement part, please contact us.
FAQ and Troubleshooting
5. Low and High Beams Are Switched (For Hi/Lo, Bi-Xenon Kits)
The polarity setting must be changed until the low and high beams activate.
If this is a Bi-Xenon kit, it is possible that the bulbs were installed upside down, such that the high beams are projected
further downwards compared to low beams.
If all polarity settings are attempted, then there may be crossed wiring somewhere in the kit.
6. “Light Out” Indicator Turns On
ECM Warning Capacitors: A pair of ECM warning capacitors may add the resistance needed to correct your vehicle’s
CAN-bus warning system.
7. Car Fuses Keep Popping
Correct Fuse: Check if 15 amp fuses are being used, since 10 amp fuses are more easily blown. Never use a 20 or higher
amp fuse.
Parts Failure: If the fuses are already 15 amps, it is possible that the ballast is causing feedback which is blowing the fuse.
Contact us for a replacement.
WARNING TIPM, Dodge, Chrysler, Jeep owners!
Several American makes use a Totally Integrated Power Module
(TIPM), a device that regulates and controls almost all of the electrical components
in the vehicle. When any HID kit is installed into these TIPM vehicles, it’s VERY important that they are installed perfectly
with a power relay harness. Without a relay harness, you risk serious damage to the TIPM or at the very least, a poor
functioning product. If your kit did not come with a power relay, please purchase one from our eBay store or contact us
to obtain one.
ALL HID KITS ARE INSTALLED AT THE YOUR OWN RISK! OPT7 and its partners are are not responsible for any damage
caused by improper installation or faulty hardware.