1
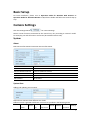
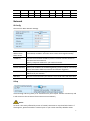
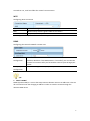
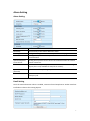
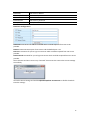
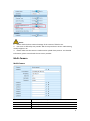
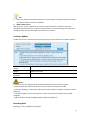
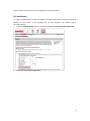
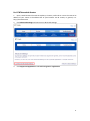
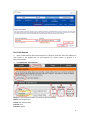
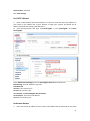
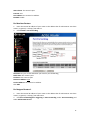
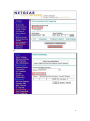
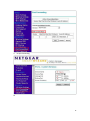
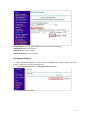
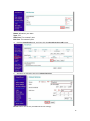
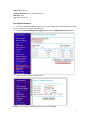
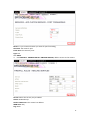
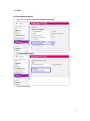
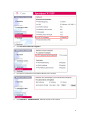
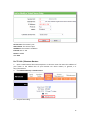
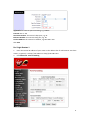
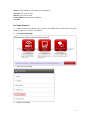
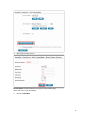
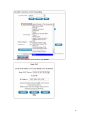
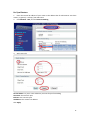
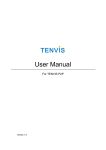
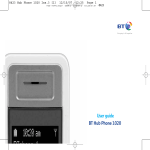
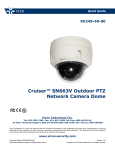
TENVIS Technology Co., LTD
User Manual
For MJPEG Cameras
Version: US 2.0
Catalogue
Basic Setup ................................................................................................................................ 4
Camera Settings ......................................................................................................................... 4
System ............................................................................................................................... 4
About ......................................................................................................................... 4
System User ............................................................................................................... 4
Network ............................................................................................................................. 5
IP Config ..................................................................................................................... 5
UPnp .......................................................................................................................... 5
Wi-Fi........................................................................................................................... 6
DDNS .......................................................................................................................... 6
Alarm Setting ..................................................................................................................... 7
Alarm Setting ............................................................................................................. 7
Email Setting .............................................................................................................. 7
FTP Setting ................................................................................................................. 9
Multi-Camera ................................................................................................................... 11
Multi-Camera ........................................................................................................... 11
Advanced ......................................................................................................................... 12
NTP Setting .............................................................................................................. 12
Firmware Update ..................................................................................................... 13
Recording Path ......................................................................................................... 13
Other Setting ........................................................................................................... 14
Wireless Settings ..................................................................................................................... 14
Port Forwarding of Common Routers ...................................................................................... 15
For 2wireRouter ....................................................................................................... 16
For Actiontec Routers .............................................................................................. 18
For Apple Airport Extreme or Time Capsule ............................................................ 19
For BT BTHomeHub Routers .................................................................................... 21
For D-link Routers .................................................................................................... 23
For FRITZ!! Routers .................................................................................................. 24
ForHuawei Routers .................................................................................................. 24
For Linksys W Series Routers ................................................................................... 25
For Movistar Routers ............................................................................................... 26
For Netgear Routers 1.............................................................................................. 26
For Netgear Routers 2.............................................................................................. 29
For Netgear Routers 3.............................................................................................. 31
For O2/ Thomson routers ........................................................................................ 32
For Sky/Sagmen Routers .......................................................................................... 33
For Speedport Routers 1 .......................................................................................... 35
For Speedport (Deutsch) Routers 2 ......................................................................... 36
For TP-Link Routers 1 ............................................................................................... 39
For TP-Link / Binatone Routers ................................................................................ 40
For Virgin Routers 1 ................................................................................................. 41
2
For Virgin Routers 2 ................................................................................................. 42
For Webtell Routers ................................................................................................. 43
For Zyxel Routers ..................................................................................................... 46
Notice: Certain functions mentioned in this manual may vary according to camera's
model. For example, pan and tilt function are for Pan/Tilt enabled cameras only.
3
Basic Setup
For basic installation, please turn to Operation Guide for Windows Web Browser or
Operation Guide for Mac Web Browser of Quick Start Guide and follow the manual step by
step.
Camera Settings
Click this Settings Button
for camera Settings.
Notice: Certain functions mentioned in this manual may vary according to camera's model.
For example, pan and tilt function are for Pan/Tilt enabled cameras only.
System
About
Basic Device Information & Customer Service Information.
Alias
P2P Serial Number
Device Hardware Version
Device Firmware Version
MAC Address
Wi-Fi Status
Camera’s name
Camera’s P2P serial number
Camera’s hardware version
Camera’s firmware version
LAN MAC address
Wi-Fi Status
System User
Adding and updating user accounts
Defined user contains three different user levels.
Different access is granted to different user levels as specified in the following sheet.
Live
Video
Record
Snapsh
Video
ots
adjustment
Sound
Talkback
PT
operation
Settings
4
Admin
√
√
√
√
√
√
√
√
Operator
√
√
√
√
√
√
√
×
Guest
√
√
√
×
√
√
×
×
Network
IP Config
The Camera’s Basic Network Settings
Obtain IP
address from
DHCP server
IP Address
Net Mask
Default Gateway
DNS Server
Web Port
Enable or disable obtaining IP address from DHCP server automatically. If
it is enabled, IP address and other items cannot be changed manually.
Camera’s local network IP address, which is used to view the camera in
the same local area network.
Specify a unique IP address for your network camera.
Specify the mask for the subnet the network camera is located on
Specify the IP address of the default gateway (router) used for connecting
devices attached to different networks and network segments
DNS (Domain Name Service) provides the translation of host names to IP
addresses of your network
Camera’s communications port which is set to send video and audio data
UPnp
Universal Plug and Play (UPnP) is an architecture for peer-to-peer network connectivity and
it will connect to the IP camera from Internet more seamlessly
Notice:
As UPnP is also easily affected by router or firewall, sometimes it may show failed status. If
this happens, please forward the camera’s port on your router manually. Whether UPnP
5
succeeds or not, it will not affect the camera’s remote access.
Wi-Fi
Configuring WI-FI connection
Connection Status Check and change wireless network status
SSID
All the nearby wireless signals visible to the camera
Wi-Fi Password
The password or key of wireless network
For Set-up procedure please refer to Wireless Setup
DDNS
Configuring the camera’s DDNS for remote view
Built-in DDNS
Configuration
Third-party DDNS
Configuration
This IP Camera has been set with free default built-in DDNS. You can
enable or disable it. If the DDNS status is “successful”, you can view the
camera from Internet after you forward the camera’s port through your
router.
This camera supports third-party DDNS providers.
Tips:
1. What is DDNS?
DDNS (Dynamic DNS) is a service that maps Internet domain names to IP addresses. Thus we
do not need to know the changing IP address in order to view the camera through the
relevant DDNS server.
6
Alarm Setting
Alarm Setting
Enable Alarm
Sensitivity
Warning Tone
Email Alert
Upload Snapshots
to FTP Server
Back to Preset
Upload Interval
(Seconds)
Schedule
Enable or disable the motion detection alarm
The sensitivity of the motion detection alarm.
It will get warning tone in Internet Explorer live video page
Sending alarm pictures to the specified email when the camera detects
the movements
Sending alarm pictures to FTP server set in advance when the camera
detects movement.
Moves camera to a preset position once the camera detects moving
objects (this is only available for Pan/Tilt IP camera).
Upload interval for uploading snapshots to FTP server
Specified motion detection period with 15 minutes a unit and one
week per cycle.
Email Setting
Once the motion detection alarm is enabled, camera will send snapshots to sender email box
itself when it detects the moving objects.
7
Sender([email protected])
SMTP Server
SMTP Port
Transport Layer Security
Need Authentication
SMTP Password
Email address for sending the alarm email
Sending emails provider ‘s SMTP server address
Service port of SMTP server
Encryption protocol of SMTP Server
Need to authenticate sender’s right
Sender email’s login password
E-mail Alarm Configuration
Sender is your own email address. Since common email providers have a better service
experience and the built-in email provider SMTP servers are easier to set up, you are strongly
advised to use Gmail, Yahoo and other common email services as the sender email.
Sender is also the email to accept the email alerts.
SMTP Server: The SMTP (short for Simple Mail Transfer Protocol) works like a post assistant,
handling the sending of emails from the camera to an email server. SMTP Server receives
outgoing mail messages from users to the mail recipients they are intended for.
If your sender email provider is a public server, you can search the IP address of the email
provider’s SMTP server or DDNS from Google.
If your sender email provider is a private one, you can consult with the email provider’s
customer service.
SMTP Port: Service port of SMTP server which you can get with the above procedure
Transport Layer Security: Encryption protocol of SMTP Server and you can also get it from
the above procedure
SMTP Password: The password you use to login to the SMTP server which is also the sender
email password
Go back to alarm settings and enable E-Mail Alert to finfish the whole e-mail alert settings.
8
Notice:
1. Please try again if it shows “Can not connect to SMTP server!”
2. Please check the basic network settings of the camera if it failed the test.
3. There might be some delay for motion detection alarm since it is related to the network
condition and the service quality of the sender email’s provider. Thus it is beyond the control
of IP camera.
4. If you still can not receive any email alert after getting the test email, please check your
spam box and add your sender email address in the trust list of the recipient email once your
find it in spam.
Tips:
The email alert is sent via sender email’s provider server which is an SMTP server. Once the
camera signs in to the SMTP server, the email alert will be delivered to the recipient email
after getting SMTP server’s authentication. Therefore, the sender email, recipient email and
the SMTP server are all required.
FTP Setting
FTP, short for File Transfer Protocol, is used to transfer files between computers on a network.
You can upload camera’s alarm snapshots to your FTP storage. Thus, there is no need to keep
the computer on when the motion detection alarm is triggered.
9
FTP Server
FTP Port (default 21)
FTP User
FTP Password
FTP Upload Folder
FTP server’s address
FTP server’s port
FTP server’s username
FTP server’s password
The upload folder of FTP
FTP Alarm Configuration
FTP Server: FTP server’s IP address and DNS which could be required from FTP server
provider.
FTP Port: Communication port of FTP server and the default port is 21.
FTP User: Username for you to sign in FTP server which could be required from FTP server
provider.
FTP Password: Password for you to login FTP server which could be required from FTP server
provider.
Then click Save and Test. Once it says “Succeed” that means the camera has set FTP settings
successfully.
Go back to alarm settings and enable Upload Snapshots to FTP Server to finfish the whole
FTP alert settings.
10
Notice:
1. Please check the basic network settings of the camera if failed in test.
2. FTP server is offered by FTP provider. We do not provide FTP service. Web Hosting
usually supports FTP.
3. Please make sure the camera is authorized to upload alarm pictures. For detailed
information, please consult with the FTP server provider.
Multi-Camera
Multi-Camera
Local Search
IP Address: Port
Port
Username
All MJPEG IP camera in your local network
Camera’s IP address or you can fill in DDNS instead.
Camera’s port
Camera’s username
11
Password
Camera’s password
If you want to view multiple cameras from Internet by DDNS, you could add the camera with
DDNS.
Notice:
This configuration is only available for IE browser.
Advanced
NTP Setting
Camera’s time setting
Current Time
Time Zone
NTP Server
Automatic Calibration
Time Interval(by hour)
Daylight saving time
Camera’s time and you can click Sync With PC to match it to your
computer’s time
Time zone of the place that the camera is located
Time server of the network which is connected with the camera
To get current time from time server automatically by an interval
time.
Add the correct time such as 60 or 30 if your are under daylight
saving time.
12
Tips:
1.
Since the camera has no built in battery, the time saved in its memory may be lost when
the camera reboots and reset to default.
2. What is NTP server?
NTP server is a server computer that reads the actual time from a reference clock and
distributes this information to its clients using network. Your camera will get the exact time
through an NTP sever by offering the time zone of its location.
Firmware Update
Update the device to the latest firmware version which can be found on our official website.
Restore to factory
default
Reboot
Update Device
Firmware
Restore the camera’s settings to factory default
Reboot the camera
Update camera’s firmware
Notice:
1. Please choose the appropriate firmware package based on your camera model.
2. Please ensure the camera is hard wired to your router via an ethernet cable.
3. Firmware updating… Please do not disconnect power supply or network connection while
updating!
4. The entire update process takes about 1 minute. The camera will reboot once update
complete
5. Please conduct firmware upgrade under professional guidance.
Recording Path
Recording is only available for IE browser.
13
Recording Path
Alarm Recording Path
Camera’s destination folder to record to
Camera’s destination folder to record to when the camera is
alarming
Notice:
If it does not work, please run IE as administrator. Right click IE browser and pick Run as
Administrator
Other Setting
On Screen Display
Power indicator LED
Pan/Tilt speed
Go preset position on
booting
Show camera’s information on video
Control camera’s front green LED
Set up camera’s Pan/Tilt speed
Enable or disable go preset position on booting
Tips:
What are preset positions?
Preset positions are IP camera's memorized P/T positions. Once you set a preset position,
you do not need to pan the camera to your preferred position. You simply press the preset
button that corresponds to the preset you want to see and the camera will move to that
position automatically.
Wireless Settings
1.
Go to Wi-Fi setting page.
2.
Click
Rescan in Wireless Network and pick your preferred WI-FI SSID. Fill
in the wireless network password. Click Save and wait for camera reboot.
14
3. After reboot, if Connection Status shows the SSID that means the camera has connected
to the wireless network successfully.
Tips:
For security concern, please set your Wi-Fi network as WEP encryption or OPEN.
Port Forwarding of Common Routers
Before you set up port forwarding manually, please check 2 things before you do it.
1. Make sure you know the router’s brand, access URL, username and password. If you do
not know them, please get help from the provider of the router, such as your ISP.
2. Find your camera’s IP address and port. You can find them in your search tool.
15
The IP and port of the camera is very important for port forwarding.
For 2wireRouter
1. Open a web browser like Internet Explorer, Chrome, Firefox & etc. Enter the internal IP
address of your router in the address bar of your browser. The default URL is
http://192.168.1.1
2. Click the Firewall Settings button, and then click Add a new user-defined application
3.
Add a new user-defined application.
16
Application Name: It is just a name whatever you want for port forwarding,
Protocol: TCP
Port for range: port of the camera
Protocol timeout: 86400
Click Add.
4. Sign the application for the IP Camera
17
Select Computer
Select the IP camera in the list. You could choose the IP address or input the camera’s IP
address; it depends on the router’s model.
Select allow individual application
Select User-defined
Find your application you just added.
Click Add
For Actiontec Routers
1. Open a web browser like Internet Explorer or Chrome. Enter the internal IP address of
your router in the address bar of your browser. For theses routers, in general, it is
http://192.168.0.1
2. Click Advanced Port Forwarding
18
IP Port Range: The camera’s port.
Protocol: TCP
IP Address: The camera’s IP address.
Click Apply
For Apple Airport Extreme or Time Capsule
1. Go to your finder and type in Airport in the search bar and find your Airport Utility
program.
2. Find the Advanced Tab at the top and select it
3. Choose the Port Mapping option.
19
Add a service for IP camera.
Service: Choose a service
Public UDP Ports: the camera’s port
Public TCP ports: the camera’s port
Private IP Address: the camera’s IP address
Private UDP ports: the camera’s port
Private TCP ports: the camera’s port
Tips:
Be sure to click on the Update button after making these changes to upload them to your
Airport.
20
For BT BTHomeHub Routers
1. Open a web browser like Internet Explorer, Chrome, Firefox & etc. Enter the internal IP
address of your router in the address bar of your browser. For BT routers, in general, it is
http://192.168.1.254
2. Click Advanced Settings and Continue to Advanced Settings
3.
Click Supported Applications and Add new game or application
21
Game/Application name: It is just a name whatever you want for port forwarding,
Protocol: Any or TCP
Port Range: The port of the camera
4. Click Configuration; Select the application you just added in Game or Application List.
Select User Defended IP Address in the Device List.
Enter the camera’s IP address into Device IP Address.
22
For D-link Routers
1. Open a web browser like Internet Explorer or Chrome. Enter the internal IP address of
your router in the address bar of your browser. For D-link routers, in general, it is
http://192.168.0.1
2. Click Advanced - Virtual Server
Name: It is just a name whatever you want for port forwarding,
Public: the camera’s port
Private: the camera’s port
Protocol: TCP
Schedule: Always
23
Inbound Filter: Allow All
Click Save Settings
For FRITZ!! Routers
1. Open a web browser like Internet Explorer or Chrome. Enter the internal IP address of
your router in the address bar of your browser to login your camera. By default the IP
address should be set to http://192.168.178.1
2. Click the Internet link and then click Portfreigabe. In the portfreigabe, click Neue
Portfreigabe.
3.
Do port forwarding
Select Andere Anwendungen from the Portfreigabe aktiv fur drop down box.
Bezeichnung: A name, whatever you want
Protokoll: TCP
von Port: The camera’s port
bis Port:The camera’s port
an Computer: manuelle Eingabe der IP-Adresse
an IP-Adresse: The camera’s IP address
an Port: The camera’s port
ForHuawei Routers
1.
Enter the internal IP address of your router in the address bar of web browser. For these
24
routers, in general, it is http://192.168.1.1
2. Click Advanced - NAT, and click Port Mapping
Name: Whatever you want, it is just a name, e.g. TENVIS IP Camera
Public: the camera’s http port, e.g. 81
Private: the camera’s http port, e.g. 81
Protocol: TCP
Schedule: Always
Inbound Filter: Allow All
Click Save Settings
For Linksys W Series Routers
1. Enter the internal IP address of your router in the address bar of web browser. For these
Series routers, in general, it is http://192.168.1.1
2. Click Application & Gaming and click Single Port Forwarding
Application Game: It is just a name whatever you want for port forwarding,
External Port: the camera’s port
25
Internal Port: the camera’s port
Protocol: TCP
To IP address: the camera’s IP address
Enabled: Enable
For Movistar Routers
1. Enter the internal IP address of your router in the address bar of web browser. For these
routers, in general, it is http://192.168.1.1
2. Click Firewall - Port Forwarding
Comment: It is just a name whatever you want for port forwarding,
Public Port: the camera’s port
Local Port: the camera’s port
Remote IP Address: N/A
Local IP Address: the camera’s IP address
Click Add
For Netgear Routers 1
1. Enter the internal IP address of your router in the address bar of web browser. For these
routers, in general, it is http://192.168.1.254
2. Click Port Forwarding/Port Triggering or Port Forwarding. Select Port Forwarding and
select Add Custom Service
26
Or
27
3.
Do port forwarding
Or
28
Service Name: It is just a name whatever you want for port forwarding,
Starting Port: port of the camera
Ending Port: port of the camera
Service IP Address: IP of the camera
For Netgear Routers 2
1. Enter the internal IP address of your router in the address bar of your browser. For these
routers, in general, it is http://192.168.1.254
2. Click the Services link and Click Add Custom Service button.
3.
Add an IP camera service
29
Name: Whatever you want
Type: TCP
Start Port: The camera’s port
End Port: The camera’s port
4.
Click the Firewall Rules link; and then click the Inbound Services Add button.
5.
Add the user-defined IP Service in Inbound Services.
Service: Select the service you added in Service settings
30
Action: Allow always
Send to LAN Server: The IP of the IP Camera
Wan User: Any
Log: Always or None
For Netgear Routers 3
1. Enter the internal IP address of your router in the address bar of web browser. For these
routers, in general, it is http://192.168.1.254
2. Click the Port Forwarding / Port Triggering link and Click Add Custom Service button.
3.
Add a customer service for the camera
Name: It is just a name, whatever you want for port forwarding,
31
Type: TCP
Start Port: The camera’s port
End Port: The camera’s port
Server IP Address: The camera’s IP address
For O2/ Thomson routers
1. Open http://192.168.1.254 in a web browser. If you are prompted for a login, the
username is "Administrator" and the password is the serial number of your router (printed
on its underside, excluding the bit in brackets).
2. Click Toolbox > Game & Application Sharing > Create a new game or application.
3. Enter the name of your application, e.g. IP Camera, click "Manual Entry of Port Maps",
and then click Next.
4. Select the protocol of your application from the drop down list under Protocol option.
Enter port number of your camera in the two text boxes under Port Range option, and then
click Add. Repeat this step for all the ports you need to forward.
32
5.
Click Assign a game or application to a local network device.
6. Select your newly created application in "Game or Application", e.g. “IP Camera” select
your device in Device or select User Define and input the camera’s IP address, e.g.
“192.168.1.239”, then click Add.
For Sky/Sagmen Routers
1. Enter the internal IP address of your router in the address bar of web browser. For
Sky/Sagmen routers, in general, it is http://192.168.0.1
2. Click SECURITY - SERVICE, and click ADD CUSTOM SERVICE
3.
Add a Custom Service
33
Name: It is just a name whatever you want for port forwarding,
Start Port: the camera’s port
Finish Port: the camera’s port1
Type: TCP
Click APPLY
4. Click SECURITY - FIREWALL RULES - INBOUND SERVICE, add the service to the camera
Service: Select the service you just added.
Action: ALLOW always
Send to LAN Server: The camera’s IP address
WAN Users: Any
Log: Never
34
Click APPLY
For Speedport Routers 1
1.
Login your router. Click Netzwerk and NAT & Portregeln.
2.
Click Neue Regel anlegen
3.
Set port forwarding.
35
Bezeichnung: A name for port forwarding
IP-Adresse: The camera’s IP address
Protokoll: TCP
Ports: The camera’s port
Ports: The camera’s port
4.
Then the camera has been forwarded to Internet.
For Speedport (Deutsch) Routers 2
1. Enter the internal IP address of your router in the address bar of web browser. For these
routers, in general, it is http://192.168.1.1
2. Click Netzwert - Nat & Portregeln, and click ADD CUSTOM SERVICE
36
3.
Click PCs ubernehmen & freigeben
4.
Find your IP camera here and Add PC-Name to the camera
5.
Click SECURITY - FIREWALLRULES, add the service to the camera
37
6.
Select Neue Regel definieren
7.
Set port forwarding
38
Bezeichnung: It is just a name whatever you want for port forwarding
Gultig fur PC: Select the camera you just added
TCP: The camera’s port
For TP-Link Routers 1
1. Enter the internal IP address of your router in the address bar of your browser. For
TP-link routers, in general, it is http://192.168.1.1
2. Click Forwarding - Virtual Servers
3.
Set port forwarding
39
Service Port: the camera’s port
Internal Port: the camera’s port
IP Address: the camera’s IP address
Protocol: ALL or TCP
Status: Enabled
Click Save
For TP-Link / Binatone Routers
1. Open a web browser like Internet Explorer or Chrome. Enter the internal IP address of
your router in the address bar of your browser. For these routers, in general, it is
http://192.168.1.1
2. Click Advanced Setup - Virtual Servers
3.
Set port forwarding
40
Application: A name for port forwarding, e.g. TENVIS
Protocol: ALL or TCP
Start Port Number: the camera’s http port, e.g. 81
End Port Number: the camera’s http port, e.g. 81
Local IP Address: the camera’s IP address, e.g.192.168.1.239
Click Save
For Virgin Routers 1
1. Enter the internal IP address of your router in the address bar of web browser. For these
routers, in general, it is http://192.168.0.1 or http://192.168.0.254
2. Click Advanced - Port Forwarding
41
Name: A name whatever you want for port forwarding
Start Port: the camera’s port
End Port: the camera’s port
Local IP Address: the camera’s IP address
Click Add
For Virgin Routers 2
1. Enter the internal IP address of your router in the address bar of web browser. For these
routers, in general, it is http://192.168.0.1
2. Click Advanced Settings
3.
Select Port Forwarding
4.
Set Port Forwarding
42
Name: A name whatever you want for port forwarding
Start Port: the camera’s port
End Port: the camera’s port
Protocol: TCP
IP Address: the camera’s IP address
Click Add Rule
For Webtell Routers
1. Enter the internal IP address of your router in the address bar of web browser. For these
routers, in general, it is http://192.168.200.1
2. Click Security - Service - Port Forwarding
3.
Click new custom service
43
4.
Add a new custom service
Service Name: A name whatever you want for port forwarding
Select the service you just added.
5. And click static NAT
44
6.
Enter the IP address of the camera, click Enable.
45
For Zyxel Routers
1. Enter the internal IP address of your router in the address bar of web browser. For these
routers, in general, it is http://192.168.1.254
2. Click Network - NAT, and click Port Forwarding
3.
Add a new rule
Service Name: It is just a name whatever you want for port forwarding
Start Port: the camera’s port
End Port: the camera’s port
IP Address: The camera’s IP address
Click Apply
46