1
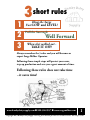
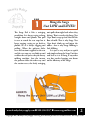
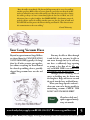
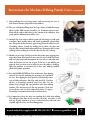
Instruction Manual
Surge Bucket Milker
Inside:
■ Milking Procedures .......................Page 1-7
■ Washing Instructions ....................Page 8
■ Replacement parts.........................Page 9
■ Maintenance .................................Page 10-12
■ Dairy Supplies ..............................Page 13
Copyright 2013 Hamby Dairy Supply
You may print manual for own non-commercial use, but not for resale.
HAMBY DAIRY SUPPLY
2402 SW Water St. Maysville, MO. 64469
1-800-306-8937 ● www.hambydairysupply.com
THE
MAGIC
OF
TUG AND
HERE ARE SOME
IMPORTANT WORDS
ON THE OPERATION
AND SERVICING OF
YOUR SURGE MILKER
READ THEM CAREFULLY
PULL
This is your
SURGE INSTRUCTION BOOK
Please Study it - Follow its Directions...and SAVE it!
Copyright 2013 Hamby Dairy Supply: You may print manual for own non-commercial use, but not for resale.
1
2
3
3
short rules
Hang the Surge
Unit LOW and LEVEL!
Pull the Surcingle
Well Forward
When she’s milked out -
TAKE IT OFF!
Always remember the 3 rules and you will become an
expert Surge Milker Operator.
Following those simple steps will protect your cows,
step up production and save you a great amount of time.
Following these rules does not take time
...it saves time!
www.hambydairysupply.com ● 800-306-8937 ● www.surgemilker.com
1
Copyright 2013 Hamby Dairy Supply: You may print manual for own non-commercial use, but not for resale.
RULE
1
Hang the Surge
Unit LOW and LEVEL!
The Surge Pail is like a swinging
pendulum. It is always trying to hang
straight down and plumb. You pull
it over to attach the teat cups but it
keeps tugging, trying to get back to
plumb...so...it is always tugging and
pulling. When the pulsator slides
over and suction is applied to the teat
and the teat cups try to climb up and
swallow the teat just as they do on any
milking machine, but...the instant
the pulsator slides the other way and
the suction eases, the freely swinging
unit pulls them right back where they
belong. That is exactly why Surge Teat
Cups don’t creep up and shut off the
flow of milk. That is why Surge Teat
Cups don’t climb up and injure the
udder - that is why Surge Milking is
Safe Milking.
It is just as easy and just as quick
and simple to hang the Surge Unit low
and level as it is to hang it any other
way but careless hanging cuts down
on the efficiency of the Surge.
www.hambydairysupply.com ● 800-306-8937 ● www.surgemilker.com
2
Copyright 2013 Hamby Dairy Supply: You may print manual for own non-commercial use, but not for resale.
RULE
2
Pull the Surcingle
Well Forward
Not all cows are built the same way
- they have various kinds of teats and
udders. On some teats the teat cups
have very little hold - on others they
anchor themselves to the teat with a
firm grip.
For those reasons you can pull
the surcingle all the way up to the
shoulders on some cows and on others
you can’t get it so far forward.
It will pay you well to learn your
cows and you can do it in a couple of
milkings. Put on as much forward pull
as you can and not have the teat cups
pulled off the teats. Before a teat cup
falls off it will usually begin to suck air
around the top of the teat and squawk
or squeal. When you hear that noise
you have gone a little too far and had
better ease up a little bit.
Placing the surcingle well forward
or tightening the spring increases the
TUG AND PULL of the Surge and
increases the speed and the safety of
your milking operation. Naturally, a
flushy heifer does not need as much
TUG & PULL as some old matron far
along in lactation.
www.hambydairysupply.com ● 800-306-8937 ● www.surgemilker.com
3
Copyright 2013 Hamby Dairy Supply: You may print manual for own non-commercial use, but not for resale.
RULE
3
Note!
When she’s milked out
- TAKE IT OFF!
While a properly hung Surge
Milker can probably stay on a dry teat
longer and do less harm than other
machines, it is still bad practice, even
for a Surge.
Any milking machine should be
removed just as soon as the cow is
milked out.
Leaving the machine on too long
does not reduce the stripping and
it does not save any time. On the
contrary it teaches a cow to be a slow
milker whether she wants to become
one or not.
You gain nothing and you lose
much by trying to operate too many
units - you gain no time and you lose
both time and milk when you try to do
other things while you are milking.
Your cows can be taught to milk out
faster - they can be taught to help you
get through the job of milking sooner
and to give more milk while they are
doing it.
The very first step toward faster
milking is to take the machine off each
cow as soon as she is milked out.
Thousands of hours were wasted this
morning, and thousands more will be
wasted against tonight by people who
did not take the Surge off each cow as
soon as she was milked out.
You don’t need to make that
mistake.
www.hambydairysupply.com ● 800-306-8937 ● www.surgemilker.com
4
Copyright 2013 Hamby Dairy Supply: You may print manual for own non-commercial use, but not for resale.
“Rinse the milker immediately. The first and all important rule is: never let a milking
machine get dirty. Milk is clean as it comes from the cow. It does not dirty the milker
unless it is allowed to stay in the milker and dry on. Thus the first step in never letting
the milker get dirty is to rinse it immediately after the last cow is milked, not 15 or
20 minutes later or after breakfast, but IMMEDIATELY...Sterilization cannot be
perfectly effective unless the milking machine parts are first free from all milk and
dirt. Old milk and dirt protect the bacteria during sterilization. These bacteria cause
the contamination at the next milking.”
Cornell University
Your Long Vacuum Hose
Beyond any question more Surge Milkers
are slowed down by CLOGGED LONG
VACUUM HOSES (typically 8 ft. long)
than by all other reasons put together.
Just about everything has been blamed
for slowed up milking when a partially
clogged long vacuum hose was the real
villain.
You may be able to blow through
it and feel the air, you may be able to
run water through and yet it still may
not have a sufficiently large opening
to permit a free flow of air. The one
way to MAKE SURE is to scrub it out
occasionally with the long brush.
Through careless handling, bits of
straw, or bedding may be drawn into
the long hose. Bugs and insects can and
do crawl into the hose and build nests.
When your Surge Speed is reduced...
when you seem to be having trouble in
maintaining vacuum...CHECK THE
LONG VACUUM HOSE FIRST.
Note!
Clean hose daily and
replace approximately
every six months.
www.hambydairysupply.com ● 800-306-8937 ● www.surgemilker.com
5
Copyright 2013 Hamby Dairy Supply: You may print manual for own non-commercial use, but not for resale.
Instructions for Machine Milking Family Cows
Cows like consistency. Milk at the same time each day.
Follow the same routine each milking.
1. Wash your hands. Dirty hands spread disease.
2. Wear Nitrile Milking Gloves to reduce the spread of mastitis causing germs
from your hands. The small cracks and crevices in human hands harbor a lot
of bacteria including contagious Staph Aureus.
3. Sanitize your milking machine with a chlorinated sanitizing solution just
before you milk.
4. Entrance. Bring the Cow into a calm, stress free milking environment. Stress,
such as loud noise, inhibits milk let down.
5. Warm hands first and then fore strip. Hand milk 1 or 2 squirts from each teat
onto the black screen of a strip cup. Look for clots, clumps, blood, or signs of
abnormal milk. Fore stripping promotes milk letdown & faster milkout.
6. Teat Prep & Sanitation. The purpose of this step is to reduce the amount of
bacteria on teat skin and promote milk let down.
-Teat Wipes: Wipe and massage each teat for 15 seconds. Use one wipe per
cow or one per teat if they are visibly dirty. Teats will dry in a few seconds due
to the alcohol in the wipes.
-Pre Dipping: Predip with Teat Kote 10/111. Wait 30 seconds, then dry off
with a paper or cloth towel. Use one clean towel per cow. Do not reuse the
towl as this may spread diseases from one cow to the next.
7. The goal is to milk clean, dry teats. Wet udders are a good conduit for bad
bacteria and mastitis (udder infection). Wet udders may drip down to the top
of the liner, and if the liner slips it will suck in the dirty water. Limit water
use on the udder.
8. Apply the milker within one minute of the beginning of teat preparation.
This maximizes the animals natural milk letdown (oxytocin), speeds up milk
flow, and reduces the machine on time. Let the vacuum pull the milker onto
the teat.
DO NOT force the teat into the liner. It only needs to go in about 1/2 inch.
www.hambydairysupply.com ● 800-306-8937 ● www.surgemilker.com
6
Copyright 2013 Hamby Dairy Supply: You may print manual for own non-commercial use, but not for resale.
Instructions for Machine Milking Family Cows continued
9. Adjust milking unit so it hangs square with out twisting the teats. A
little forward tension will provide faster milkout.
10. The cow is finished milking when the large volume of milk flow drops
off to a trickle. Milk out time should be 5 to 10 minutes on most cows.
Pinch off the rubber milk tubes on the bottom of the inflations, then
gently pull the inflation down off the teats.
11. Animals that were hard to milk by hand will take longer to milk with
a machine. Most healthy udders will shrink significantly when milked
out...Except for the first few days (post calving) when the udder has a lot
of swelling (edema). Usually the swelling leaves within a few days and
then the udder should shrink when milked out. Dynamint udder cream
will help reduce swelling if used in the first few days after calving.
12. Should you post strip? No! Research has shown that post stripping may
cause more harm than benefit. It may train the cow to hold back some
milk and your hands will contaminate the teat end at a vulnerable time
when the Keratin teat end seal is open. If the cow is not milking out
properly, then you may need to adjust the way the milker is hanging,
adjust the pulsator, or vacuum level, or have your milking machine
checked for proper operation.
13. Post dip IMMEDIATELY for Teat disinfection. Post dipping
sanitizes the teat skin including the opening at the bottom of
the teat. Post dipping has been proven to dramatically reduce
cases of udder infections. Post Dip with AstroTek. Teat Kote
10/111, or DermaSept protocol tested teat dips. Use the
Hamby Dairy Supply dip cup provided with your milking
machine. This non-return style dip cup provides a fresh dose
of teat dip for each teat. For temperatures below 25 degrees,
DermaSept is recommended because it will not freeze.
14. It is important to keep the dairy cow standing for a while after milking.
This will give some time for the wax-like seal of the teat orifice to seal
back up. A good solution is to have a rack of fresh hay and fresh water
available right after they exit the milking parlor.
www.hambydairysupply.com ● 800-306-8937 ● www.surgemilker.com
7
Copyright 2013 Hamby Dairy Supply: You may print manual for own non-commercial use, but not for resale.
Here’s how to wash your Surge Bucket
Note!
Instructions to wash claw milking units are very
different than the following instructions, which
are used in washing your surge bucket!
IMMEDIATELY upon removal of
machine from the last cow, snap it all apart
and throw the inflations and pail lid gasket
into clean, WARM water. This takes less time, is
better and more thorough than any attempt to
suck water through your surge bucket.
1
With the patented Surge Shell the inflation
never goes back in exactly the same way
and you prolong the life of the inflation by
removing it from the shell. This is the ONLY way
to make sure the inflation is properly cleaned.
3
2
Remove the pulsator
and put the pail lids
into the same water.
As soon as possible, scrub all the rubbers
with the proper brush, plenty of hot water,
and a reliable washing powder. NEVER
USE SOAP. Rinsing is all right as far as it goes, but
thorough brushing MAKES SURE. Scrub each
inflation to remove all milk fat...scrub the pail
lid and run the brush through each nipple...scrub
the pail, taking special care with the inside tip. If
you rinse immediately and scrub thoroughly, no
milkstone will ever form.
4
www.hambydairysupply.com ● 800-306-8937 ● www.surgemilker.com
8
Copyright 2013 Hamby Dairy Supply: You may print manual for own non-commercial use, but not for resale.
Surge Bucket Milker Repair Parts
Replacement Parts Kit - Cow
Includes choice of Surge cow inflations, air tubes,
original thick lid gasket, and vacuum hose
501-10175K
Note!
Retro Kit for Milking 2 goats or sheep at a time
Includes 3/8 silicone milk hose. 1/4 ID pulsator tubing, 4
semi-automatic goat milking claws. 4 3/8 shutoffs for milk
hose. 4 silicone goat inflations. 4 clear plastic goat shells.
Please specify full size goat, mini goat, or sheep
when ordering.
Make sure lip on
gasket is facing down
towards bucket when
assembling.
Rebuilt Pulsator (when available)
501-105C Rebuilt and tested “C style”
501-105S Rebuilt and tested “S style”
Rebuild Service
Rebuild service for your vacuum pulsator - includes parts kit.
501-10310 and labor 501-109
Pusator Repair Parts
Rebuild Kit - includes instructions, 4 leathers, expanders,
housing gaskets, adjusting screw gasket, rubber cap for check
valve, O-ring for “C” model pulsators, brush for cleaning the
small ports inside the pulsator
501-10310- Pulsator Rebuild Kit
501-10335 O-ring for under pulsator
501-10508B pack of 20 leathers
Surge Bucket Milker for cows, Complete.
Reconditioned and Tested
Reconditioned with new ITP Pulsator
New Replacement Pulsator; Kit includes L80
Long Life Interpulse Pulsator w/4 outlets, mounting
adaptor and O-ring. Adjustable Speed. ... 1081-159K
View pictures, print instructions, and read the
fascinating 80 year history of the Surge Bucket
Milker at www.surgemilker.com
Replacement Interpuls
Mounting Adaptor ................................ 1081-178
Surge Check Valve ..................................7750-0010-250
Pulsator Oil............................................1010-244
Lid Gasket thin generic ..........................1120-293
Lid Gasket Original Surge-thick
and long life
96” Surcingle with Triangle....................1114-075
Surcingle Spring .....................................501-10556
Vacuum Hose 8 foot HD clear plastic ....1090-002V
Vacuum stall cock with lever ..................1060-251
Vacuum Regulator Brass for 1/3
to 1.5 hp pumps
Short Air Tubes (4)
Original Surge Long Life ........................7750-2902-451
Air tubes for ITP pulsator ......................1090-205
Inflations
7750-2902-094 ..................................Uses Surge C Shell
7750-2902-052 ..................................Uses Surge C Shell
7750-2902-063 ..................................Uses Vac Saver Shell
Maes 282
Medium bore for C shell ......................Uses Surge C Shell
Maes 221
Narrow bore for vac saver shell ............Uses Vac Saver Shell
0/398 .................................................Jet Flo Shell
501-10117C1
www.hambydairysupply.com ● 800-306-8937 ● www.surgemilker.com
9
Copyright 2013 Hamby Dairy Supply: You may print manual for own non-commercial use, but not for resale.
Flushing Instructions for Conde Vapor Oil Pumps
- Start up & Maintenance
It may be necessary to flush your Conde Vapor Oil Pump to remove any gum
or varnish buildup inside the pump that cause the vanes to stick in their slots.
This is a simple maintenance operation that should be the first step.
1. Remove the oil tube at the oil reservoir.
2. Be sure the exhaust is directed away from the motor or engine.
3. Use Kerosene or fuel oil for the flushing process. While the
pump is running under vacuum, simply insert the oil tube
into the kerosene and allow the pump to draw the fluid in.
Alternately, let air into the tube with the kerosense. It can take
up to a gallon of kerosene to clean the pump. NEVER USE
GASOLINE OR OTHER HIGHLY FLAMABLE LIQUIDS
TO FLUSH OUT PUMP.
4. After flushing, in the same manner draw in about 5 ounces of
oil to complete the process.
www.hambydairysupply.com ● 800-306-8937 ● www.surgemilker.com
10
Copyright 2013 Hamby Dairy Supply: You may print manual for own non-commercial use, but not for resale.
Conde Vapor Oil Vacuum Pumps - Start up & Maintenance
Use a high detergency 10w-40 oil for all Conde Vapor Oil Vacuum Pumps.
Synthetic oil, like Mobil 1, is recommended by Conde. This includes the LWVS
portable, HD portable, or Model 6 stationary pump sold by Hamby Dairy Supply.
When starting a new vapor oil pump, fill oil reservoir above the fittings in which
the oil wicks are inserted. This will give the pump extra oil for the first two hours of
operation. When refilling, fill to just below oil wicks.
Capacities:
Note!
Description
LWVS
HD
#6 Stationary
Pump Model
Conde Model 2
Conde Model 3
Conde Model 6
Oil Tank Capacity
1 quart oil
1 quart oil
2 quarts oil
By looking in sight glass, you’ll know when you need
oil, because it will be low. It’s best if the oil level inside
the sight glass should be 1/2 to 3/4 full.
The sight glass is on the side
of the oil reservoir
Adding oil to the oil reservoir.
www.hambydairysupply.com ● 800-306-8937 ● www.surgemilker.com
11
Copyright 2013 Hamby Dairy Supply: You may print manual for own non-commercial use, but not for resale.
L-80 Pulsator Instructions
Rate Adjustment
The L-80 pulsator is adjustable. Using the Allen key supplied, turn
the speed governor gently CLOCKWISE to DECREASE speed,
ANTI-CLOCKWISE to INCREASE speed to obtain the rate you require. (See Fig.1)
Ensure that the main slide is clean before making any adjustment.
Note!
Maintenance
•
DO NOT LUBRICATE THE MOVING PARTS
•
Clean the filter at least once per month by means of compressed air.
Replace the filter every 6 months. Recommendations are approximate
and must be adopted to the real necessities. (Fig.2)
•
EVERY 2 MONTHS carefully clean the working parts and the pulsator body
using tepid water and a mild detergent. Use a soft not-metallic brush to loosen
any stubborn dirt. Rinse all parts in clean water and dry.
•
Follow the instructions in the diagrams (Fig. 3-4-5-6) for dismantling
and assembly procedures.
•
Under very damp and dusty conditions the above maintenance should be
carried out at least once a month.
•
WHENEVER MILK HAS BEEN SUCKED INTO THE PULSATOR
(eg from a split liner) the pulsator must be immediately washed good and dry.
•
It is recommended that the pulsator rate and the milking ratio be checked by
means of a pulsator tester at least once a year. This should be carried out by an
authorized service center or by a milking machine service technician.
•
Whenever a general overhaul of the pulsator is necessary, contact your local dealer.
Do not
overtighten!
www.hambydairysupply.com ● 800-306-8937 ● www.surgemilker.com
12
Copyright 2013 Hamby Dairy Supply: You may print manual for own non-commercial use, but not for resale.
Order List for our most popular Dairy Supplies
Nitrile Milking
Gloves
Nitrile Milking Gloves with aloe ..................................... Small ................... 1169-990
Nitrile Milking Gloves with aloe ..................................... Med .................... 1169-991
Nitrile Milking Gloves with aloe ..................................... Large ................... 1169-992
Nitrile Milking Gloves with aloe ..................................... XLg ..................... 1169-993
Nitrile Milking Gloves plain............................................ Small .................... 407-TA576
Nitrile Milking Gloves plain............................................ Med ...................... 407-TA586
Nitrile Milking Gloves plain............................................ Large .................... 407-TA596
Nitrile Milking Gloves plain............................................ XLg ...................... 407-TA597
Strip Cup with
black screen
Strip Cup with black screen .......................................................................... 1180-030
CMT Kit...................................................................................................... 1180-025
CMT Concentrate Refill .............................................................................. 1180-026
CMT Kit
Milk Check Teat Wipes ...................................................bucket of 700 .......1041-070
Milk Check Teat Wipes ...................................................refills 4 x 700 .......1041-071
Sanisure Cloth Diary Towel ............................................each .....................1041-067E
Milk Check
Teat Wipes
DermaSept
Teat Dip
Hamby Dairy Supply Side Dipper Teat Dip Cup .......................................HDC
Teat Kote 10/111 Pre or Post dip Iodine Teat Dip ...................1 gallon .....7751-0241-434G
Teat Kote 10/111 Pre or Post dip Iodine Teat Dip ...................5 gallon .....7751-0041-435
DermaSept Sanitizing Teat Conditioner / Winter Teat Dip .....1 gallon .....7751-0240-340
Dynamint Udder Cream w/ peppermint oil, eucalyptus oil & tea tree oil .......1180-020
Kendall Udder Cream .....................................................28 oz. ...................1180-002
........................................................................................4.5 pound pail......1180-003
Dynamint
Udder Cream
www.hambydairysupply.com ● 800-306-8937 ● www.surgemilker.com
13
Copyright 2013 Hamby Dairy Supply: You may print manual for own non-commercial use, but not for resale.
3 piece Hanger Kit
for Surge Bucket Milker
A Hamby Dairy Supply exclusive
reproduction of the original Surge hangers!
Product Details:
■ Hanger Kit for Surge Bucket
(SKU: 1088 - $39.95)
■ All stainless steel!
■ Allows your Surge Bucket, lid
and vacuum hose to completely
drip dry by hanging upside
down after washing.
■ Items available individually at
hambydairysupply.com.
■ See image at right for correct
use of the hangers.
■ This item is a Hamby Dairy
Supply exclusive reproduction
of the original Surge hangers.
Order Online 24 hours a day! We do not have a printed catalog.
Order by phone: 1-800-306-8937 ● International order: 816-449-1314 ● Fax: 816-449-1311
Pay by: MasterCard, Visa, Discover, PayPal, check or money order
HAMBY DAIRY SUPPLY
1-800-306-8937 ● www.hambydairysupply.com