1
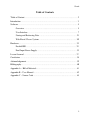
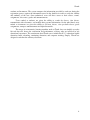
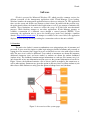
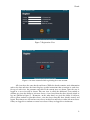
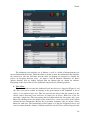
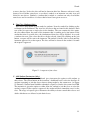
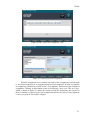
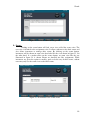
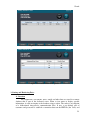
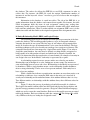
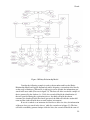
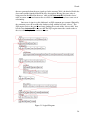
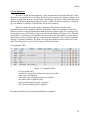
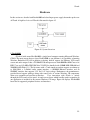
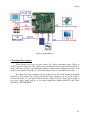
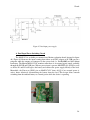
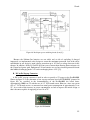
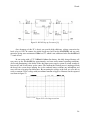
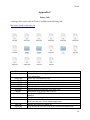
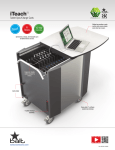
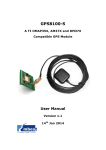
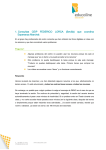
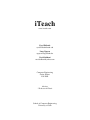
iTeach
www.iteachs.com
Eyad Fallatah
[email protected]
Long Nguyen
[email protected]
Navid Sobhani
[email protected]
Computer Engineering
Senior Project
Fall 2010
Advisor
Professor Al Davis
School of Computer Engineering
University of Utah
iTeach
Table of Contents
Table of Content …………………………………………………………....…….. 2
Introduction ………………………………………………………………….…… 3
Software…………………………………………………………………………… 5
Overview …………………………....……………………………...……… 5
User Interface ……………………………………………………………… 7
Storing and Retrieving Data ……………………………………………… 21
Web-Based Classes System………………………………………………. 30
Hardware …………………………………………………………..……………. 32
Devkit8000 …………..………………………………………..…………. 32
Dual Input Power Supply ………………………………...………………. 33
Lesson Learned …………………………………………………………………. 37
Conclusion ………………………………………………………………………. 38
Acknowledgement ………………………………………………………………. 39
Bibliography ……………………………………………………….……………. 40
Appendix A – Bill of Materials …………………………………………………. 41
Appendix B – User Manual …………………………………..…………………. 42
Appendix C – Source Code ……………………………………..………………. 45
2
iTeach
Introduction
As the world continues to move forward, we are constantly attempting to keep pace with
all the latest technology advancements and essential job skills for our careers. We are also
constrained with full time employment and family commitments while aiming to maintain some
semblance of a social life. Those with busy schedules might find it quite challenging to succeed
in a college setting. To meet the needs of those who desire to continue their learning, distance
education provides the answers to their professional and personal commitments. Computer
technologies are used to deliver education to students who are not physically present in a
traditional classroom.
In an effort to create an even better educational experience, we combined the concept of
mobility with the existing concept of distance education. The outcome is a mobile device called
iTeach that can be carried everywhere and used from anywhere to access learning materials. It
can be used while sitting on a sofa, lying on the bed, or waiting for a bus. In fact, iTeach is
equipped with a rechargeable battery that can last up to two hours as well as with networking
technologies such as Ethernet and WiFi in order to stay connected to the Internet.
Figure 1: iTeach
Specifically designed to serve members of all types of educational institutions, iTeach is
a portable interactive learning device that simplifies the process of learning remotely. The device
is controlled by a multi-touch display, powered by Windows CE, and managed by a custom
application. The user-friendly interface of iTeach displays class information and options to users
with respect to their rules and authority.
After turning the switch, iTeach will attempt to connect to a pre-defined server that has
all the classes’ information. Users are expected to either sign up for new accounts or log in using
their existing accounts. Personal information such as school identification number is needed in
order to sign up for an account. In an effort to maintain rules, the system divides the users into
3
iTeach
students and instructors. The system compares the information provided by each user during the
registration process against the information stored in the database in order to verify the identity
and authority of the user. Once authorized, users will have access to their classes, exams,
assignments, class notes, grades and announcements.
Users ranked as students are given the ability to search for classes, join classes,
communicate with classmates, and modify their personal information. On the other hand, users
ranked as instructors are given the ability to add new classes, view pre-built classes, grade
assignments, compose announcements and upload materials.
The usage of an interactive learning machine such as iTeach does not simplify everyday
life task but also boosts the satisfaction and performance of those who are involved in any
educational experience. The constituents that iTeach serves include Pre-K -12 education, higher
education, home schooling, continuing education, and corporate training. Simply, iTeach was
designed to redefine the ordinary classroom.
4
iTeach
Software
iTeach is powered by Microsoft Windows CE, which provides common services for
efficient execution of the management application called iTeach Manager. Upon loading,
Windows launches the management application browser that was written in C#. The application
takes over the screen and disables any attempts to shut it down. In parallel with the previous step,
the application disallows the launch of other applications as well as any attempts to minimize the
window. These limitations are meant to restrict the usage of iTeach from non-educational
purposes. While blocking attempts to run other applications, iTeach Manager attempts to
establish a connection to a dedicated server through a secured protocol (HTTPS). Upon
connecting, the application tries to access the landing page (main view) through a common
domain (https://server.iteachs.com). If attempts to connect to the server failed, the application
displays an error message and keeps waiting for a connection socket to become available.
1- Overview:
The main view (index) is meant to authenticate users using unique pairs of username and
password. It gives users the option to either login using pre-defined username and password or
signup for a new account. Once logged in, users are directed to a new view with respect to their
rank. The new view is called a dashboard. Users ranked as instructors are shown the instructor
dashboard (instructor view) and users ranked as students are shown the student dashboard
(student view). The dashboard contains unique information to each user. For instance user A is
only shown his or her own information and can never see the personal information of user B. As
Figure 2 shows, the dashboard contains a list of classes joined or taught by the current user as
well as other options. Instructors are given the option to add new classes or allow students to join
their classes while Students are only given the option to lookup classes and join them.
Figure 2: An overview of the system pages
5
iTeach
The dashboard of the instructor is designed to list classes that they are currently being
taught, classes that are inactive or under construction, and classes that have been taught during
previous semesters. Likewise, the dashboard of the student is designed to give students the
ability to access their current classes, see but not access classes that awaiting to be given access
to, or access classes from previous semesters.
Once the user requests to view a certain class, a new view will be shown. The new view
is called the class view. Each class has its own unique information that gets shown. For instance,
the view of a history class shows only the assignments, exams, grades, emails and notes that are
related to this class. The class view has sub-views that organize the content of each class. These
sub-views have different purposes depending on the rank of the user. The assignments view, for
example, keeps track of all assignments related to this class. Instructors use the assignments view
to create new assignments while students use this view to submit their assignments. Similarly,
students use the grade view to see their grades, while instructors use their view to assign grades
to each assignment or assessment.
Some sub-views are designed to have the same functionality for both types of users. For
instance, both an instructor and student can use the email view to send messages to other users
enrolled in the same class. The email view is a vital tool for users to communicate with each
other.
Figure 3: Dashboard
6
iTeach
2- User Interface:
The user interface was programmed in PHP, which is a server side language that can
connect to databases. PHP uses the information provided by the user to collect data from the
database, make certain modifications to it and then display it on the screen. The interface is
enhanced with HTML components, CSS and JavaScript. HTML components are used to draw
the tables and set the text fields while CSS is used to colorize the views and display images.
JavaScript, on the other hand, is used to verify the user inputs, handle error messages and show
alert boxes.
Figure 4: Main View
The main view gives the user the opportunity to login using pre-defined username and password,
register for a new account and request assistance with login problems. Once the user clicks on
the designated option, the JavaScript code updates the PHP file and loads the next view. While
some views such as Help (shown in figure 6) are only informative, views like Login (shown in
figure 5) are expected to collect information from the user, inquire the database and display new
information on the screen.
7
iTeach
Figure 5: Login View
Figure 6: Help View
The registration view collects information from the user and passes it to the PHP files. In order to
register, a user must supply a desired username, a desired password, and his/her identification
number. The user is expected to know his or her Identification number in advance, which is used
to determine his/ her rank (Student or Instructor). If verified, the username and password are
linked to the given identification number and the user will be automatically logged in. Otherwise,
an error message will be shown.
8
iTeach
Figure 7: Registration View
Figure 8: An error occurred while registering for a new account
All views have the same header and footer. While the header contains static information
such as the date and time, the footer displays specific instructions that are unique to each view.
On top of each view, the username and rank of the current user are shown. Once the user is
logged in, a new view will be shown. This new view is called the dashboard. Users ranked as
students are given the ability to join new classes, view classed that they have already joined or
log out (Shown in figure 9). Instructors, on the other hand, are given the ability to add new
classes, allow students to join their classes, view the classes that they have already created, and
logout. First-time users will not have any classes in their lists and have to either join new classes
if they are logged in as students or create new classes if they are logged in as instructors.
9
iTeach
Figure 9: Student Dashboard
Figure10: Instructor Dashboard
The dashboard view includes sets of buttons as well as a block of information that are
located underneath the header. While the block is meant to show the information that identifies
the current user (the user full name and the rank), the buttons are designed to simplify the
process of navigating between views. As figures 9 and 10 illustrate, instructors are shown
options (buttons) that are slightly different than the buttons that are shown for students.
Depending on the rank of the user, the dashboard can provide the following options:
A. View Class:
This is the default view that the dashboard loads once the user is logged in (Figures 9 and
10). This view can be reached by clicking on the green button on the dashboard. A list of
classes is also shown in this view. This list represents the classes that the current user has
already joined. First-time users will have an empty list of classes. Each row of the list
represents a single class. The row contains the class abbreviation, the class name, and a view
button. By clicking on the view button of the desired class, a new view will be loaded which
contains the class information. Besides the view button, instructors only are shown a delete
button for each class. The functionality of this button is to drop the designated classes and
erase its content from the database. Students enrolled in a deleted class will no longer be able
10
iTeach
to access the class. In fact, the class will not be shown in their lists. Because each user is only
shown a list of his/her own classes, a user that is ranked as an instructor can only view and
delete his own classes. Similarly, a student that is ranked as a student can only view his/her
own classes and is not able to see classes that he hasn’t been given access to.
B. Join Class (Students Only):
This view is only shown to users ranked as students. It can be reached by clicking on the
red button on the dashboard. The view lists all classes that are found in the database. Each
row of the list represents a single class in the database. The row contains the class name,
the class abbreviation, the name of the instructor that is teaching and a join button. If the
student has joined a specific class, the join button of that class will be disabled. As a result
a student can never join a class that he or she has already joined. By clicking on the join
button, a request will be sent to the instructor. The student is kindly asked to wait until the
instructor approves his or her request. The class will not be shown in the student’s list until
the request is approved.
Figure 11: A request to join a class
C. Add Student (Instructors Only):
Instead of joining a class, the dashboard gives instructors the option to add students to
their classes. The yellow button on the instructor’s dashboard loads a sub-view that lists all
students requesting to join the classes that are being taught by the current user. As Figure
12 illustrates, Student Anna Smith has submitted a request to join the class named ece2300.
The instructor is given the option to either allow the student to join the class or reject the
student’s request. If the request is approved, the student will have immediate access to the
class. The usage of requests gives instructors the ability to better control their classes and
decide which users are allowed to join their classes.
11
iTeach
Figure 12: The Add Student View
D. Add Class (Instructors Only):
As figure 13 shows, the red button on the instructor’s dashboard is completely different
than the red button on the student’s dashboard. By clicking on the red button, an instructor
is given the ability to add a new class. An instructor is asked to supply the class name and
abbreviation in order to create the class. Once created, the class will be shown in the
instructor’s list of classes as well as the list of classes available to join on the student’s
dashboard.
Figure 13: The Add Student View
E. Sign Out:
The cyan button is designed to allow students and instructors to sign out. By signing out,
the session is destroyed, all pending actions are terminated and the user is redirected to the
main view, which is shown in figure 4. A user will have to login again in order to access
his or her classes.
12
iTeach
User can simply access their classes from the dashboard by clicking on the view button.
The view button loads a completely different view that shows all information related to the
designated class. The new view is called the class view. As figure 14 illustrates, the class view
redefines the block of information and the buttons that are located underneath the header.
Besides the user full name and rank, the information block now displays the class name. The two
buttons offered by this view allow the user to either sign out from the system or go back to the
list of classes (the dashboard). A student that wants to go from the current CS3810 view to the
Math 1100 view will have to click on the black button on top, which loads the dashboard
illustrated in figures 9 and 10.
Figure 14 also shows how the class view redefines the footer. Instead of showing
instructions, the footer now shows a series of buttons. Each button loads a sub-view in the grey
block located on the middle of the screen. These buttons are the same for students and
instructors. By default, the class view loads a view that is called the information view. It is the
same view that the button “information” in the footer loads.
Figure 14: Class View (Student’s View)
The class view lists 6 different button in the footer:
A. Information:
This button loads the class information. While the enrolled student is only able to
read this information, the instructor of the class can read and modify this information. As
Figure 15 shows, an instructor has the ability to modify at any given time the information
that is shown in the information view. The white box in the figure is a textbox that does
not only allow plain text but also HTML codes. By clicking on the save button, the
instructor can save all changes and modifications to the class information
13
iTeach
Figure 15: Class Information (Instructor’s View)
B. Notes:
This button leads to the loading of a new view called the notes view. The notes
view lists all PDF files and PowerPoint Slides that are related to this class. The user is
expected to click on the show button in order to read the material. Figure 17 shows the
content of “Note #1” which is composed in a PDF file. In order to upload these materials,
the instructor has to use his or her personal computer to access iTeach website
(http://www.iteachs.com). The website provides a web-based management system that
acts like a drop box. Files that are uploaded through the web-based system are
automatically shown on iTeach. More information about the web-based management
system is provided in page 30. In order to prevent long waiting time, iTeach converts the
content of the file on the fly from PDF or PPT to JPG and show the result of the
conversion as an image. iTeach divides the content of each file into chunks and loads
each chunk separately. Such technique allows the user to read the content of the file while
the file is still being loaded.
Figure 16: The Notes View
14
iTeach
Figure 17: Displaying a class note
C. Assignments:
The assignments button leads to the loading of a new sub-view called the
assignments view. The new sub-view allows students to submit their assignments and
also allows instructors to manage their assignments. By clicking on the assignments
button, instructors are shown an exam view that looks like the view shown in figure 18.
On the other hand, if a student clicks on the assignments button, an assignment view like
the one illustrated in figure 19 is shown.
Figure 18: An instructor view of the assignments
15
iTeach
Figure19: A student view of the assignment
While instructors are given the option to modify, grade or delete any given
assignments. Users that are ranked as students may only use the assignment view to do
their assignment. As figure 18 illustrates, an instructor may also add a new assignment by
clicking on the button located underneath the information block, which brings up a
different view. Figure 20 shows a picture of the view that gets loaded. The new view
allows the student to determine when this new assignment is going to be available and
when it is due. Also, it allows the instructor to assign a name and a grade for this
assignment. The big white textbox is meant for the assignment instructions.
An instructor can also grade a specific assignment by clicking on the grade button
located next to the designated assignment (See figure 18). Clicking on the grade
assignment leads to the loading of a new view that allows the instructor to assign a
numeric grade to each submission (See figure 21). The new view lists the student name,
student submission and a field in which the instructor assign the grade. The view also
shows the assignment instructions on the left side of the screen as well as the maximum
grade that can be earned. Furthermore, clicking on the delete button leads in the
assignments list will delete the designated assignments and all submission related to it.
16
iTeach
Figure 20: The “add a new assignment” view
Figure 21: Grading a specific assignment
From the assignments view a student can do his or her assignments. A check mark
is only shown right next to an assignment that has been completed. In order to complete
an assignment, a student has to click on the “do assignment” button next to the designated
assignment. Clicking on that button results in displaying a new view. The new view,
which is shown in figure 22, allows the student to read the instructions and respond to
them. A student is expected to do each assignment before the due dates. If an assignment
is missed, a grade of zero will be assigned.
17
iTeach
Figure 22: A view to submit an assignment
D. Exams:
Clicking on the exam button will load a new view called the exams view. The
new view is identical to the assignments view. It allows students to take their exams and
also allows instructors to manage their exams. By clicking on the exams button,
instructors will be shown an exam view that looks like the view shown in figure 23. On
the other hand, if a student clicks on the exams button, an exam view like the one
illustrated in figure 24 is shown. Exams are handled just like assignments. While
instructors are given the option to modify, grade or delete any of their exams, student
users may only use the exam view to take their exams.
Figure 23: An instructor view of the exams
18
iTeach
Figure 24: A student view of the exams
E. Communicate:
The communicate button loads a communication view that shows the inbox of the
current user. The inbox is large container of all email messages received from other users
that belong to the same class. The current user can also use the “Send New Email” button
(Shown in figure 25) in order to be able to send emails to other users. Clicking on the
“Send New Email” button results in loading the view shown in figure 27.
Figure 25: Communication View
19
iTeach
Figure 26: Reading an email
Figure 27: A view to send an email
F. Grades:
Students can click on the grades button to view their own grades. The view shows
the maximum grade and the earned grade of each assignment (Figure 29). Instructors, on
the other hand, can see the overall performance of all students once they click on the
grades button (Figure 28).
20
iTeach
Figure 28: An instructor view of the grades
Figure 29: A student view of the grades
3- Storing and Retrieving Data:
A. Overview
All assignments, assessments, notes, emails and other data are stored in a remote
database that is part of the dedicated server. When a view wants to display specific
information, it sends an inquiry to the database using a socket. The socket is an endpoint
of a bidirectional inter-process communication flow. It uses a pre-defined pair of
username and password to establish a connection between the PHP file (the View) and
21
iTeach
the database. The socket also allows the PHP file to send SQL statements in order to
collect data. For instance, the PHP file sends the unique identification number of
instructor A and the keyword “classes” in order to get a list of classes that are taught by
this instructor.
Information in the database is sorted into tables. The job of the PHP file is to
gather information from the database and connect them together. For instance, the table
called Assignments holds the name of each assignment, starting time, ending time,
maximum possible grade, and assignment description. Another table called submissions
holds students submissions. When a student submits an assignment, PHP saves it in the
submissions table and then link it to the original assignment in the Assignments table.
B. Entity-Relationship Model (ERM) and Logical Design
The following figure shows an abstract and conceptual representation of the datapath in the database. This modeling method produces a type of conceptual schema or
semantic data model of our system. The first stage of our software design required this
model. It describes the type of information that is to be stored in the database. The data
modeling technique was used to describe any ontology for a certain area of interest. The
conceptual data model was later mapped to a logical data model (Figure 31) in order to
design the actual database. An entity may be defined as a thing which is recognized as
being capable of an independent existence and which can be uniquely identified. An
entity is an abstraction from the complexities of some domain. An example of an entity in
our design is the user. In the Model, each entity is represented by a square.
A relationship captures how two or more entities are related to one another.
Relationships can be thought of as verbs, linking two or more nouns. For instance an
owns relationship between a user and a class. Relationships in the Model are represented
by rhombuses. While a single rhombus means a weak relationship, double rhombuses
mean a strong relationship. Circles are used to represent attributes. Each entity has to
have at least one attribute.
While a double line indicates a participation constraint, an arrow from entity set to
relationship set indicates a key constraint. Each entity in the entity set is involved in
exactly one relationship and an underlined name of an attribute indicates that it is a key.
Two different entities or relationships with this attribute always have different values for
this attribute.
Figure 31 shows the process of producing a detailed data model of a database.
This logical data model contains all the needed logical and physical design choices and
physical storage parameters needed to generate a design in a Data Definition Language,
which was used to create the actual database. Each row in the model represents an actual
table in the database. Each row within any table has a unique id. This unique id is called
a key. PHP uses the keys to lookup the designated record.
22
iTeach
Figure: 30 Entity-Relationship Model
Consider the following example in order to better understand how the EntityRelationship Model and logical diagram help while designing a system that relies heavily
on the usage of databases. When user A signs up for a new account, the information gets
stored in the users table (First row in figure 31). The first cell of the row holds a unique id
that is generated by the database (i.e. 3984), the second cell holds the identification id
that was provided during the registration process, the third cell holds the chosen
username, the fourth cell holds the chosen password, the fifth cell holds the student full
name and the sixth cell holds the user rank (student or instructor).
If user A is ranked as an instructor and decides to add a new class, the information
of the new class gets stored in the classes’ table (the second row in figure 31). The first
cell holds a randomly generated unique id for the class, the second cell holds the same id
23
iTeach
that was generated when the user signed up for the account (3984), the third cell holds the
class name and the fourth cell holds the class description. Because the same value is
being stored in the id field in the users’ table and the instructorID field in the classes’
table, an arrow was drawn between the two fields to indicate that they have some sort of
relationship.
Once user A signs in to his dashboard, an SQL statement gets executed. Basically,
the statement passes the user id to the database along with the keyword “classes”. The
SQL engine receives the user id and starts looking for records in the “classes table” that
has the same instructorID as the user id. The SQL engine returns the search results to
the view which displays the results to the user.
Figure 31: Logical Diagram
24
iTeach
C. Data Dictionary:
In order to design the actual database, a data dictionary has to be made. Basically, a data
dictionary is an organized list of all tables and fields used to construct the database. Figures 32 to
42 show all tables that shape the actual database. Each figure represents a single table and clearly
illustrates the different fields that belong to the table. A field has to have certain type, collection
type, an attribute, a validator, a default value and an extra statement.
Figrure 32 shows the content of the assignments table, which is meant to hold
information about each assignment added by an instructor. When an assignment is added, the
database generates a unique identification number for that assignment and save it in the id field.
As the figure shows, the id field is designed to hold integers that has 255 digits or less. The field
does not have a collection or any attributes and can never be null. The figure also states that the
id field does not have a default value and is automatically incremented. As a result, assignments
will have sequential id numbers. The figure also states that different actions can be done to this
field. The id field can be sorted, edited, removed, hidden and shown.
I. Assignments Table:
Figure 32: Assignment Table
-
id: is the primary key
classID: is a foreign key of id located in the classes table
name: name of assignment
start: when is the assignment going to be available
end: when is the assignment is due
grade: maximum grade for this assignment
desc: short description of the assignment
II. Submission Table (when student submit his/her assignment):
25
iTeach
Figure 33: Submission Table
-
id: is the primary key
assignmentID: is a foreign key of id located in the assignments table
studentID: is a foreign key of id located in the students table
date: date of submission
content: students submission
attachment: URL(s) to the file(s) on server that student upload
comment: any feedback from the instructor
grade: grade for this submission
III. Classes Table:
Figure 34: Classes Table
-
id: is the primary key
instructorID: is a foreign key of id located in the users table
name: name of class
desc: short description of the class (We’re assuming that this is an online class and no
location or timing needed)
IV. Exams Table:
26
iTeach
Figure 35: Exams Table
-
id: is the primary key
classID: is a foreign key of id located in the classes table
name: name of exam
start: when is the exam going to be available
end: when the exam is due
grade: maximum grade for the exam
desc: any instructions of information related to the exam
V. Questions Table:
Figure 36: Questions Table
-
id: is the primary key
examID: is a foreign key of id located in the exams table
question: the content of the question
answer: the right answer (Not exposed to students)
IV. Answers Table:
27
iTeach
Figure 37: Answers Table
-
id: is the primary key
studentID: is a foreign key of id located in the users table
examID: is a foreign key of id located in the exams table
answer: student’s answer
grade for this answer
IIV. Notes Table (class notes posted by the instructor):
Figure 38: Notes Table
-
id: is the primary key
classID: is a foreign key of id located in the classes table
name: name of note
content: textual content
IIV. Users Table (includes instructors and students):
Figure 39: Users Table
28
iTeach
-
id: is the primary key
uid: campus id (uID)
username: username needed to login
password: password needed to login
fullname: the name that will be displayed in the form (First-name initial last-name)
rank: is an integer between 0 and 1 (0 = student, 1= instructor). By default, the value
will be 0 for security reasons.
X. Weblink (Links to other websites that instructors provide to student):
Figure 40: WebLink Table
-
id: is the primary key
classID: is a foreign key of id located in the classes table
name: name of link
desc: description of the link
link: the actual URL to the link
XI. Email Table
Figure 41: Email Table
-
id: is the primary key
from: is a foreign key of id located in the users table (sender’s ID)
to: is a foreign key of id located in the users table (receiver’s ID)
date: the sending date
subject: the title of the email
29
iTeach
-
content: textual content of the email
attachment: URL(s) to the file(s) on server that sender upload
XII. Permission
Figure 42: Permissions Table
-
classID: is a foreign key of id located in the classes table
studentID: is a foreign key of id located in the users table
4- Web-Based Classes Manager:
In order to upload class notes, Instructors have to use the web-based management system
that can be accessed through the following link http://www.iteachs.com. An instructor uses his or
her personal computer to upload Slides and PDF files. While file uploading is restricted to
instructors only, students can still access the web-based system to update their login information
and reset their passwords.
Once an instructor is logged in, a list of his or her classes will be shown. The instructor
then chooses the class note file that will be uploaded from his or her computer, assigns a name to
this new material and selects the proper class from the menu. By clicking on the upload button,
the web-based system saves the file in a secure location in the server and injects a reference to it
in the database. The file becomes immediately available and ready to be viewed. Meanwhile, a
student may navigate to this particular class and click on the notes button (Figure17) to see all
uploaded materials. The uploaded class note file should appear on top of the list. The student can
read its content by clicking on the view button that is associated with this class note.
Figure 43
30
iTeach
Figure 44
31
iTeach
Hardware
In this section we describe both Devkit8000 and a dual input power supply that make up the core
of iTeach. A high level view of iTeach is illustrated in figure 45.
Figure 45: System Overview
1. Devkit8000
iTeach is built around DevKit8000, a single board computer running Microsoft Windows
CE 6.0. The main reason that we chose DevKit8000 as our platform is its capability of running
Windows Embedded CE 6.0 in addition to having built-in support for Ethernet, LCD touch
screen and audio output. It has a TI OMAP3530 microprocessor with 600MHz ARM Cortex-A8
RISC Core and 412-MHz TMS320C64x+™ DSP Core bundled with 256MB DDR SDRAM and
256MB NAND Flash ([1]). The kit comes with a 7-inch touch screen that supports resolution up
to 2048*2048, a 2-channel audio output interface, a 10/100M Ethernet interface and an
SD/MMC interface that supports 3.3V and 1.8V logic voltage. Furthermore, the manufacturerprovided board support packages along with source code of various Windows CE components
allow us to customize our special user interface.
User interaction with iTeach is strictly
through the LCD touch screen panel. A touch screen driver which handles touch recognition in
our application is included in our custom Windows CE image. Figure 46 displays Devkit8000
board and its supported peripheral devices and interfaces
32
iTeach
Figure 46: Devkit8000 ([1])
2. Dual Input Power Supply
iTeach accepts two types of power sources: DC power and battery power. When an
AC/DC adapter is plugged in, this source powers up the main board and the LCD touch screen.
At the same time, it charges the Lithium-Ion battery, which remains temporarily inactive. If an
adapter is not available, the single 3.7 Volt Li-Ion battery will act as the main power source.
The output end of the switching circuit is connected to a DC-to-DC booster from which
the board receives power. This booster provides the board a current of 1A at 5 Volts, which is
converted from the 3.7 Volts gained from the battery. Figure 47 below shows the schematic of
our power supply which consists of two main components: Maxim MAX1874 and Texas
Instruments (TI) PTN04050C.
33
iTeach
Figure 47: Dual input power supply
A. Dual Input Power Switching Circuit
The MAX1874 is available pre-mounted on a Maxim evaluation board (pictured in figure
48). Figure 49 illustrates the inputs coming from either an AC/DC adapter or an USB port on a
computer while the outputs are connected to the system load (i.e. DevKit8000) and the Lithium
Ion battery. The Maxim MAX1874 IC monitors when there is an external power supply available
through the DCOK and UOK pins. When a power input is present, MOSFETs Q1 and Q2 as well
as diodes D1 and D2 will bypass the battery and connect the power supply directly to the load.
Meanwhile, the Power-on (PON) pin on MAX1874 IC shuts off Q3 if an external power is
active; hence effectively disconnecting the battery from the load. This design allows smooth
switching from the onboard battery to external power while the device is operating.
Figure 48: MAX1874
34
iTeach
Figure 49: Dual input power switching circuit (from [2])
Because the Lithium Ion batteries are not stable and at risk of exploding if charged
improperly, we implemented safety designs to ensure the maximum protection. One of the safety
mechanisms in our design is input voltage protection up to 18V due to voltage detectors in the
charger. In addition, diodes D1 and D2 prevent reverse current from flowing between inputs via
the system load power path. Furthermore, Li-ion batteries we use have internal protection circuit
that inhibits discharging under 2.5V and overcharging above 4.2V ([5]).
B. DC-to-Dc Step-up Converter
A DC-to-DC step-up converter is used in order to provide a 5V power to the DevKit8000.
Shown in figure 51 is the schematic of our step-up converter based on PTN04050C (pictured in
figure 50). As specified in the documentations of the DevKit8000, the board draws
approximately 500mA at 5V with the use of 4.3” LCD touch screen. However, since our system
uses a 7” LCD touch screen, we measured an actual power consumption of approximately 1A at
5V. As a result of this increase in power consumption, we had to improve the initial design so
that it becomes capable of supplying at least 1A at 5V.
Figure 50: PTN04050C
35
iTeach
Figure 51: DC-DC Step-up Converter ([3])
One advantage of this IC is that it can provide high efficiency voltage conversion for
loads of up to 12W. In contrast, the initial design was based on the MAXIM608 and was only
meant for giving out a maximum of 500mA at 5V, which is not sufficient for the Devkit8000 and
7” touch screen.
In our testing with a 3.7V 2400mAh Lithium Ion battery, this fully charged battery cell
can power up the Devkit8000 for approximately one hour under normal operating conditions.
Also worth mentioning is the ability of the dual input power supply system to switch seamlessly
between AC and Li-ion battery power source. The moment the external power is unplugged from
the board, the system keeps running due to the onboard battery without any interruption and
users will not even notice any differences. By measuring the voltage at the load, we were able to
verify a constant 5V DC voltage with just minimal amount of ripple as illustrated in the captured
waveform in figure 52.
Figure 52: Load voltage waveform
36
iTeach
Lessons Learned
This project has provided a wonderful plethora of lessons for us thus far. These lessons
have definitely made us better engineers and better team players. We had to obtain more
knowledge and practice new techniques in order to accomplish our achievements. The following
are among important lessons that we learned while working on the iTeach project:
A. Software Engineering
While developing a sophisticated system that consists of nearly 6,000 lines of code,
we learned that there is no or negligible participation of software engineering in webbased systems engineering. No or very inadequate trade off studies are meant to reduce
the risk of high-risk, and in our case, the high-risk of software requirements. Moreover,
we learned that there is no modeling and simulation of the system architecture to verify
that the architecture will support system requirements for security, performance, safety,
reliability, and fault tolerance. Perhaps the most valuable lesson that we learned while
working on the software side of this project is that there is no systematic and rigorous
approach to making requirements consistent and that the evolutionary design of system
architecture greatly increases the risk of excessive rework.
B. Risk Management
While developing our dual input power supply, we had the chance to learn that we
needed an effective risk management plan. The fact that we had limited experience
developing a custom power supply forced us to seek for information from all possible
places. Eventually, we were able to come up with a solution that perfectly satisfied our
requirements.
C. Planning & Tracking
This project gave us the opportunity to learn that the visibility of cost and schedule
status of the hardware and software development is important but is often neglected.
During first several months, our solution of developing iTeach was divided into hardware
and software part and each member was responsible for only one. Therefore, weekly
meetings had to be arranged in order to keep all team members updated on different
aspects of our project. During each meeting, all members reported the progress that they
made in one week and how their contribution affected the overall progress.
37
iTeach
Conclusion
The primary goal of this document is to describe how a team of three hard-working
students was able to create a portable interactive device that simplifies the process of distance
learning. The outcome of nearly one year of engineering is an astonishing touch screen device
that puts learning materials at the fingertips of those who are involved in distance education. This
project is a combination of brilliant software developing and robust hardware engineering.
iTeach is comprised of a 7-inch multi-touch screen, a single board computer and a dual input
power supply. The device runs on Windows CE and is managed by a custom application that
makes use of remote databases for storing and retrieving information.
iTeach solves a problem that we constantly face. It provides the answer to the
professional and personal commitments of those who are constantly attempting to have full time
employment, learn new concepts and maintain some semblance of a social life. Those
individuals can use iTeach to have access to their classes at any time of the day and are no longer
obligated to spend the mornings on campus. iTeach is also a green product that contributes
greatly to the protection of our environment. Because students who are using iTeach have an
electronic version of their course material, they are less likely to purchase the printed one.
iTeach is not just an answer of an everyday problem but also a tool to redefine the
classroom, as we know it. Additionally, it makes the expanding payroll of educational
institutions unnecessary. iTeach is an asynchronous technology that is a mode of online delivery
where participants access course materials on their own schedule. Participants are not required to
be present at the same time. The use of Internet to deliver course materials makes it possible to
reach underserved populations who cannot attend a school that offers the educational services
they desire. iTeach can turn production of content into a reusable and durable learning tool that
does not require as much infrastructure.
38
iTeach
Acknowledgements
This project would not have been possible without the support of Professor Al Davis. The
team members wish to express their gratitude to their professor, who was abundantly helpful and
offered invaluable assistance, support and guidance.
39
iTeach
Bibliography
[1] DevKit8000 product website. http://www.embedinfo.com/english/product/devkit8000.asp
[2] Maxim MAX1874 specifications. http://www.maximic.com/quick_view2.cfm/qv_pk/4005
[3] Texas Instruments PTN04050C specifications.
http://focus.ti.com/docs/prod/folders/print/ptn04050c.html
[4] Maxim MAX608 specifications. http://www.maximic.com/quick_view2.cfm/qv_pk/1252/t/al
[5] Tenergy 3.7V Lithium Ion battery specifications.
http://www.batteryjunction.com/2600pcb-18650.html
40
iTeach
Appendix A
Bill of Materials
Product
Manufacturer
Cost
Quantity
Total
Devkit8000 (including 7”
LCD touch screen and Wifi
module)
Embest Info & Tech
$343
1
$343
Texas Instruments
$0
1
$0
Maxim Integrated Products
$75
1
$75
Digikey.com
$4
2
$8
100 µF OSCON capacitors
Toshiba
$9
1
$9
2.2 µF and 0.1 µF ceramic
capacitors
ECE Stockroom
University of Utah
$5
1
$5
Tenergy 3.7 Volts Lithium
Ion Batteries
BatteryJunction.com
$26
2
$52
Center positive connector
cable
Purchased at RA-Elco
$3
1
$3
SSL Certificate
GoDaddy.com
$99
1
$99
Monthly Leased Dedicated
Server
GoDaddy.com
$14.99
12
$179.88
PTN04050C
MAXIM1874 Evaluation
Board
4.3 µH inductors
$773.88
Vendors’ Websites:
Texas Instruments: www.ti.com
Embest: www.embedinfo.com/English/index.asp
Maxim: www.maxim-ic.com
Digikey: www.digikey.com
41
iTeach
Appendix B
User-Manual
If you are a student, first you need to register in order to use iTeach.
If you are a teacher, your account is already created in the database.
How to register as a student:
To create an account, follow these steps:
1) Go to www.iteachs.com
2) Click Software Demo
3) Click on Register
4) Enter the following information and then click on Next
1) A username that has a length of between 4 and 16 characters
2) A password that has a length of between 4 and 16 characters
3) The ID number that your school gave you
4) Your Social Security number
How to log in:
If you already have an account with iTeach, take the following steps:
1) Go to www.iteachs.com
2) Click Software Demo
3) Click on Login
4) Enter your username and password
5) Click on Login
How to add a class:
In order to add a class, you want to join the class and you need to get
approved by the teacher who is teaching that class, so, perform the following
steps:
1) Login
2) Once you are logged in, click on Join Class
3) Click JOIN for every classes you would like from the list that is available on
the page
How to view your classes:
In order for you to see a class, two things need to happen. The first thing is that
you need to join the class and the second is that once you join the class, the teacher needs
to approve you. If the previous conditions are met, then perform the followings steps to
view your classes:
1) Login
2) Once you are logged in, click on View.
How to see your grades:
Once you can see the content of the class, click on Grades at the bottom of the
page to see your grade.
How to see your assignments:
Once you can view the content of the class, click on Assignments at the bottom of
the page to see the list of assignments you have.
How to do your assignment:
42
iTeach
Once you can see your assignment, click on Do Assignment at the right side of
the specific homework.
How to know if homework is submitted or not:
The assignments that are submitted have a checkmark at their left side. They also
have the “Do Assignment” button next to them.
How to email other people:
1) Click on Communicate
2) Click on Send New Email
3) Select the receiver and write a subject
4) Once you have written the content of your email, just click Send
How to see the list of exams you have taken or need to take:
To see the list, click on Exams
How to take the exam:
Once you can see the list of exams you need to take, just click on Take Exam at
the right side of the exam you want to take.
How to know if you have taken the exam:
If you have taken the test there will be a checkmark to the left of the exam but if
you have not, there will be an X. The “Take Exam” button will also not be available on
the screen.
How to see class notes and lectures:
Once you can see the content of the class, just click on Notes and you can view
the list of the notes that is available for you. To see them, just click on Show.
How to see the class syllabus:
Once you are logged in, click on View for the class you want to see and you will
be forwarded to your class. Its first page shows the class syllabus. But if you are under
another section of the class page, click on Information and you will be forwarded to the
syllabus.
The following information shows exactly how teachers can use iTeach:
How to log in:
The login process is exactly the same as the student’s login
How to create a class:
Once you are logged in, perform the following steps:
1) Click on Add Class
2) Insert Class Abbreviation, Class Name and click on Next
How to delete a class:
Click on Delete on the right side of the name of the class you would like to delete
How to view your classes:
Once you are logged in, the first thing you will see is the list of classes you are
teaching, so, just click on View. If you are under another section of iTeach, just click on
View Class.
How to accept students from your classes:
1) Click on Add Student
2) Click on Accept on the right of the student you want to approve
How to reject students into your classes:
1) Click on Add Student
2) Click on reject on the right of the student you want to reject
43
iTeach
How to send an email:
The process is exactly the same as how students send emails to each other.
How to make an exam:
Once you are logged in, perform the following steps:
1) Click on Exams
2) Click on ADD A NEW EXAM
3) Insert your exam, title, start and end date
4) Click on ADD
How to give a grade:
Once you are logged in, perform the following steps:
1) Click on Exams
2) Click on Grade on the right side of exam
3) Insert Grade next to each student name
4) Click on SAVE ALL GRADES
How to create a new Assignment:
Once you are logged in, perform the following steps:
1) Click on Assignments
2) Click on ADD A NEW ASSIGNMENT
3) Insert instruction, title, start and end time
4) Click on ADD
How to modify the Assignment:
Once you are logged in, perform the following steps:
1) Click on Assignments
2) Click on Modify next to the assignment you want to modify
How to modify the Exam:
Once you are logged in, perform the following steps:
1) Click on Exams
2) Click on Modify next to the exam you want to modify.
How to modify the class syllabus:
Once you are logged in, do the following steps:
1) Click on view Class
2) Click on View on the right side of the specific class.
3) The front page is the syllabus so just modify what you want
4) Click on Save Changes
If you are on the other side of iTeach, click on Information and then follow the steps from 3.
44
iTeach
Appendix C
Source Code
A package of the source code of iTeach is available on the following link:
http://www.iteachs.com/source.zip
File Name
class.php
email1.php
email2.php
email3.php
email4.php
email5.php
help.php
images
includes
index.php
js
login.php
logout.php
Description
Loads the class view, display the six button on the footer and shows the
class information.
Shows the communication view.
Display the replay form for the communication view.
Display the actual email in the communication view.
Deletes a given email and reload the communication view.
Send the email once the communication for is submitted.
Display the help information at the main view.
A collection of all images that are used.
A collection of PHP classes that initiate the session and connect to the
database
Loads the main view
A collection of JavaScript functions that validates each form is used and
make sure that users do not submit empty forms.
Handles the process of signing in.
Logs the current users out, destroy the session and terminate any
45
iTeach
register.php
show.php
view.php
pending transaction.
Handel the process of signing up for a new account.
Manages all views and making sure that the user follows a certain chain
of views.
Communicate with the database and provide required information to
views.
46