1
User Manual
Legal information
United Navigation GmbH
Marco-Polo-Str.1
73760 Ostfildern
United Navigation GmbH reserves the right to amend the details and data provided in this
manual even without any prior notice being given. No part of these documents may be
reproduced or transferred without the explicit written permission of United Navigation GmbH,
irrespective of how or by what means this is done.
All trademarks mentioned in this manual belong exclusively to the respective owners and
may therefore not be used for commercial or other purposes.
As despite all efforts being made errors can never be completely ruled out, no liability is
accepted for the accuracy of the content in this manual. We are grateful to receive
notification about errors at any time.
All illustrations similar to actual product.
© 2013 United Navigation GmbH, Ostfildern.
All rights reserved.
Last revised: June 2013
FMI-10587
Contents
1
Safety instructions and maintenance ....................................................................................... 3
Safety instructions ................................................................................................................... 3
Disposal ................................................................................................................................... 3
Introduction ................................................................................................................................. 5
Device description ...................................................................................................................... 6
3.1
Device...................................................................................................................................... 6
3.2
Bracket..................................................................................................................................... 7
3.3
Sensors.................................................................................................................................... 9
3.4
Speed/cadence sensor (optional)............................................................................................ 9
3.5
Magnets ................................................................................................................................. 10
3.6
Heart rate sensor (optional)................................................................................................... 12
Main Screens ............................................................................................................................. 13
4.1
Navigation view...................................................................................................................... 13
4.2
Trip computer......................................................................................................................... 16
4.3
Manoeuvre view..................................................................................................................... 16
Main menu.................................................................................................................................. 17
Destination entry ....................................................................................................................... 17
6.1
Address.................................................................................................................................. 17
6.2
Home ..................................................................................................................................... 18
6.3
Points of interest.................................................................................................................... 18
6.3.1
Detailed view of a POI ................................................................................................... 19
6.4
Previous destinations ............................................................................................................ 19
6.5
Position on map ..................................................................................................................... 20
6.6
Waypoints .............................................................................................................................. 20
6.7
Coordinates ........................................................................................................................... 21
6.8
Arrange menu ........................................................................................................................ 21
6.9
Calculated route .................................................................................................................... 22
Training history ......................................................................................................................... 24
7.1
Detailed view of a training unit............................................................................................... 24
7.2
Edit training unit ..................................................................................................................... 25
7.3
Start training unit ................................................................................................................... 25
7.3.1
Convert track to route .................................................................................................... 25
7.3.2
Start track directly .......................................................................................................... 25
7.3.3
Set track start point........................................................................................................ 26
My time trial ............................................................................................................................... 27
8.1
Against my timed route.......................................................................................................... 27
8.2
Against my training session................................................................................................... 27
8.3
Against transferred route ....................................................................................................... 28
8.4
Starting a time trial................................................................................................................. 28
Tour manager ............................................................................................................................ 29
9.1
Create new tour ..................................................................................................................... 29
9.2
Plan circuit (optional) ............................................................................................................. 29
9.3
Select saved tour................................................................................................................... 30
9.3.1
Detailed view of a tour ................................................................................................... 31
9.3.2
Edit tour ......................................................................................................................... 31
Settings ...................................................................................................................................... 32
10.1
Navigation settings ............................................................................................................ 32
10.1.1
Route options ........................................................................................................... 32
10.1.2
Speed profile ............................................................................................................ 33
10.1.3
Ask about route options............................................................................................. 33
10.2
Presentation of the map .................................................................................................... 34
10.2.1
Map perspective ........................................................................................................ 34
10.2.2
Raster maps (optional) .............................................................................................. 34
10.2.3
In direction of movement / map orientated north ..................................................... 34
10.2.4
Position on street ....................................................................................................... 34
10.2.5
City names on basic map .......................................................................................... 34
10.2.6
Auto zoom.................................................................................................................. 34
10.2.7
Points of interest on map........................................................................................... 34
10.2.8
Track recording.......................................................................................................... 35
1.1
1.2
2
3
4
5
6
7
8
9
10
11
12
13
14
15
16
17
18
19
20
21
10.2.9
Set map colours......................................................................................................... 35
10.3
Profiles / Sensors .............................................................................................................. 36
10.3.1
Edit user profile......................................................................................................... 36
10.3.2
Change bike profile.................................................................................................... 36
10.3.3
Edit bike profile .......................................................................................................... 36
10.3.4
Map priority ................................................................................................................ 37
10.3.5
Fitness sensors.......................................................................................................... 38
10.4
System / General............................................................................................................... 40
10.4.1
Battery ....................................................................................................................... 40
10.4.2
GPS Info .................................................................................................................... 40
10.4.3
Brightness.................................................................................................................. 40
10.4.4
Beeps......................................................................................................................... 40
10.4.5
Calibrate compass ..................................................................................................... 40
10.4.6
Calibrate barometer ................................................................................................... 41
10.4.7
Set position format..................................................................................................... 41
10.4.8
Screen auto-off .......................................................................................................... 41
10.4.9
Set home ................................................................................................................... 42
10.4.10
Default settings .......................................................................................................... 42
10.4.11
Time........................................................................................................................... 42
10.4.12
Language................................................................................................................... 42
10.4.13
Screen ....................................................................................................................... 42
10.4.14
Info about................................................................................................................... 43
10.4.15
Arrange menu ............................................................................................................ 43
Active route................................................................................................................................ 44
Transferred tracks..................................................................................................................... 45
Extras ......................................................................................................................................... 46
13.1
Remember position ........................................................................................................... 46
13.2
Waypoint manager ............................................................................................................ 46
13.2.1
Choose waypoint ....................................................................................................... 46
13.2.2
Create waypoint......................................................................................................... 46
13.2.3
Delete created waypoints .......................................................................................... 47
13.3
GPX manager .................................................................................................................... 47
13.4
Help ................................................................................................................................... 47
Falk Navi-Manager..................................................................................................................... 48
14.1
Introduction to the Falk Navi-Manager .............................................................................. 48
14.2
Import of GPX files ............................................................................................................ 48
14.3
Transfer of content ............................................................................................................ 51
14.4
Compiling your own tour on the PC................................................................................... 51
14.5
Software............................................................................................................................. 52
14.6
Training Manager .............................................................................................................. 52
14.6.1
Training Unit .............................................................................................................. 52
14.6.2
Training Statistics ...................................................................................................... 53
14.6.3
Save Training Units ................................................................................................... 54
14.6.4
Transferred Tracks .................................................................................................... 54
14.7
Import of POIs.................................................................................................................... 55
14.8
Falk Online Community "123POI.com".............................................................................. 57
14.8.1
Use "Favourite lists" from the Community ................................................................. 57
14.8.2
Upload new and amended ratings............................................................................. 57
Tips and tricks ........................................................................................................................... 58
Troubleshooting ........................................................................................................................ 59
Technical data ........................................................................................................................... 60
Change of battery...................................................................................................................... 61
Service & support...................................................................................................................... 62
Glossary ..................................................................................................................................... 63
Licence terms and conditions ................................................................................................. 65
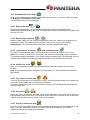
1 Safety instructions and maintenance
1.1
Safety instructions
The device may only be stored at temperatures of from -20°C - 70°C and be operated at
temperatures of from -10°C – 60°C.
Keep your device away from extreme temperatures. The device should only be operated and
stored in an atmospheric humidity of from 0% to 90%.
Do not expose your device to sudden great fluctuations in temperature. This could result in
condensation collecting in the device, which could damage it. If any condensation forms, wait
until the device has completely dried out.
The device is waterproof in accordance with the IPX4 standard. This means that the device
is protected against splash water.
Please note: In order to ensure that the device is protected against the ingress of
water, make sure that the rubber cover for the USB port on the bottom of the device is
completely closed.
You must not place, store or leave your product in or next to heat sources, at places which
have high temperatures or a high level of solar radiation, in a microwave oven or pressurised
container, and you must also not expose it to any temperatures of over 60ºC (140ºF).
Use only Falk original accessories or Falk-approved adapters. The use of other components
may result in malfunctions and/or serious damage.
Caution:
• This navigation device for outdoor use is merely an orientation and navigation aid
which cannot be a substitute for making a sensible assessment of the situation you
are in. Please in any event note the particular characteristics of the terrain and the
routes you are using. Do not follow any routes or suggested routes which would entail
a dangerous or illegal form of riding or would place you in a dangerous situation.
• The road traffic regulations must be complied with at all times, for example when
cycling, and have priority over the routes of the navigation device.
• Never operate the navigation device while riding and do not allow yourself to be
distracted by the device while riding.
• Please note that United Navigation GmbH does not accept any liability for any
damage caused by the device/bracket becoming detached from the bicycle.
• The map data which is used may include inaccurate or incomplete data. You should
therefore check the calculated route to see if it makes sense and choose your own
alternative route if necessary.
• The navigation device is NOT suitable for use as a vehicle navigation system!
1.2
Disposal
DISPOSAL OF USED ELECTRICAL AND ELECTRONIC DEVICES (TO BE
APPLIED IN THE COUNTRIES OF THE EUROPEAN UNION AND OTHER
EUROPEAN COUNTRIES WITH A SEPARATE COLLECTION SYSTEM FOR
THESE DEVICES)
The symbol on the product or its packaging indicates that this product cannot be treated as
normal household waste, but must instead be handed in at a collection point for recycling
electrical and electronic devices. Your contribution to correctly disposing of this product helps
to protect the environment and the health of your fellow human beings. The environment and
health are endangered by incorrect disposal. Material recycling helps to reduce the
consumption of raw materials. You can obtain further information about recycling this product
from your local authority, the municipal waste disposal companies or the shop in which you
purchased the product.
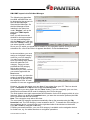
Falk PANTERA User Manual
3
–
WEEE Reg. No. DE 19715620
Aircraft and hospitals
The use of electronic devices is prohibited in most aircraft, in many hospitals and at lots of
other places. The device must not be used in such environments. Always switch your device
off wherever appropriate requests are made for you to do so.
CE certificates and RoHs
This device complies with the Directives of R&TTE 1999/5/EC and the Directive 2002/95/EC
OF THE EUROPEAN PARLIAMENT AND COUNCIL dated 27 January 2003 on the
restriction of the use of certain hazardous substances in electrical and electronic equipment
(ROHS). The link to the certificates can be called up here:
http://www.falk-outdoor.com/de/service/zertifikate.html.
Falk PANTERA User Manual
4
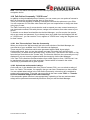
2 Introduction
This manual describes the functions of the Falk PANTERA products.
Functions which do not apply to versions of products because they are not included in the
standard scope of supply for the product are marked "optional".
The chapters are based around the menu structure of the application. This means you
quickly know where you need to look to find an explanation of a particular function.
The Glossary explains important terminology to you.
The Tips and tricks help you to do what you want and quickly get to grips with your device.
If you have any problems using the device or something seems not to be working, the
Troubleshooting section may be able to help. If this still does not provide you with a
solution, please contact our Service & support team.
The following elements are used in this manual to make it easier to understand:
Note: Information worth knowing
Tip: Practical application aids
Caution: Warning notice to prevent any undesired effects
Important terms are marked in bold in the text.
All illustrations similar to actual product.
Falk PANTERA User Manual
5
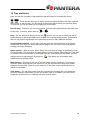
3 Device description
3.1
Device
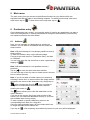
Power Button: Switches the device on. When you press the power button during use, you
have the following options:
Switch off: Switches the device off completely.
Stand-by: Switches to stand-by mode.
Screen off: The screen is switched off, ongoing navigations or track recordings remain active.
This is done to save power.
Keylock on/off: Activates or deactivates the keylock. The keylock prevents unwanted entries
being made via the screen. To deactivate the keylock, press the power button again and then
"Keylock".
takes you back to the application.
Note: If the device stops responding and can no longer be operated, press the power button
for approx. 3 seconds. The device will then restart.
Start/Stop Button: Starts or pauses the recording of a training session or a timed route (see
Chap. 8.1). If you press it long while recording, the recording will end.
Touch Screen: Displays the map and the menu. To make entries or select functions, use
your finger to tap on the appropriate point on the screen.
Falk PANTERA User Manual
6
USB Connector: Connector for charging up the battery via the adapter or for connecting the
device to a PC via the USB cable.
The connector is located beneath a rubberised cover. Pull this up to connect a cable.
Note: The rubberised cover also provides protection against the ingress of water. Make sure
that it is always completely closed when using the device.
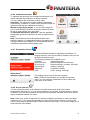
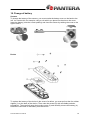
3.2
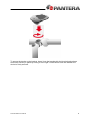
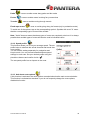
Bracket
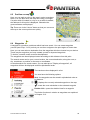
To attach the bracket to the bicycle, you must plug the cable ties which are also supplied in
the manner shown in the drawing through the slots in the bracket which are provided for this
purpose and then pull them tight around the handlebar or stem. Please first attach the
bracket to the bicycle before you fix the device on it. The cable ties can also be opened again
if you pull the small nipple on the fastener upwards.
Falk PANTERA User Manual
7
To secure the device on the bracket, insert it into the bracket with the bicycle bracket base
and lock it securely in place by turning it to the right. Check before each ride whether the
device is firmly secured.
Falk PANTERA User Manual
8
3.3
Sensors
Your Falk PANTERA is designed for ANT+™ fitness sensors to be coupled on. The optional
combined speed and cadence sensor wirelessly transmits the current speed and the
cadence to the device. The optional heart rate sensor in a chest strap wirelessly transmits
the current heart rate to the device.
This product is ANT+™ certified. Visit www.thisisant.com/directory for a list of compatible products and apps.
3.4
Speed/cadence sensor (optional)
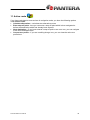
To attach the combined cadence and speed sensor, you must secure it to the frame of your
bicycle with the cable ties as shown. Make sure that you secure the sensors pointing
downwards and with the correct side facing the wheel as shown in the drawing.
Falk PANTERA User Manual
9
3.5
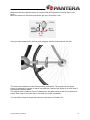
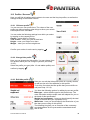
Magnets
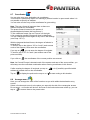
You must secure the magnet for the speed sensor (S sensor) to a spoke. Assemble it as
shown here and screw it tight onto a spoke so that it runs past the sensor when the wheel
rotates.
Make sure that the speed sensor (S sensor) and the magnet are no more than 5 mm apart.
Move the sensor on the frame so that the gap is no more than 5 mm.
Please be aware that the S sensor may only be fitted to the frame facing downwards in order
to avoid any damage to the spokes.
You must secure the magnet for the cadence sensor (C sensor) to the pedal crank using the
cable tie so that it runs past the sensor when you move the pedal crank arm.
Frame
Magnet
max. 5 mm
Pedal
crank
Falk PANTERA User Manual
10
Make sure that the cadence sensor (C sensor) and the magnet are no more than 5 mm
apart.
Move the sensor on the frame so that the gap is no more than 5 mm.
Once you have attached the sensors and magnets, the bicycle should look like this:
The sensors are attached to the frame pointing downwards. The magnet for the speed
sensor is attached to a spoke so that it runs past the S sensor with a gap of no more than 5
mm when the wheel rotates.
The magnet for the cadence sensor is attached to the pedal crank so that it runs past the C
sensor with a gap of no more than 5 mm when the crank is pedalled.
You can find out how to couple the sensors to the device in Chapter 3.3.
Falk PANTERA User Manual
11
3.6
Heart rate sensor (optional)
The heart rate sensor is worn on a chest strap against the body and transmits the current
pulse to the device wirelessly.
Attach the sensor to the chest strap using the press studs.
To use the chest strap, you should moisten the sensor contact area on the back of the chest
strap slightly and then adjust the strap so that it fits you comfortably. The strap should rest on
your body below the chest area.
You can find out how to couple the heart rate sensor to the device in Chapter 3.6.
Falk PANTERA User Manual
12
4 Main Screens
4.1
Navigation view
Distance to destination: shows how far away your destination still is. You can choose what
information you want to be displayed here. In the same way, you can edit the “Current
speed” box.
Profile: shows which profile you are currently using.
Active sensors: The symbols tell you which sensors are currently coupled up.
The symbols are white when an active connection exists and grey when no connection
currently exist.
- Heart rate sensor
- Speed sensor
- Cadence sensor
Recording: When recording of a training session or timed route is taking place, a
corresponding symbol is displayed.
- recording of a training session taking place
- recording of a timed route taking place
Tip: If no connection exists with the heart rate sensor, moisten the sensor contact area on
the back of the chest strap again.
If there is no connection with the combined sensor, check the gap between the sensors and
magnets.
Falk PANTERA User Manual
13
Map: Shows the map extract with your current position. However, you can also move the
map with your finger. Tap on the Zoom-Button
Using the arrow button
to your current position.
to move the map or to zoom in and out.
, which then appears at the bottom, you can return the map back
Next Manoeuvre:
In the manoeuvre box you are shown, via an arrow, the next turn-off direction, other roads
which lead off and the distance to your next manoeuvre. If you are on a roundabout, the
other roads which lead off are also shown in addition to your turn-off arrow.
Relevant crossroads and junctions located before you get to your next turn-off point are also
shown. If there are several crossroads leading off prior to your next manoeuvre, numbers at
the side indicate how many crossroads you still need to pass.
Distance to next manoeuvre:
Shows you how far the next manoeuvre is away.
Next-but-one manoeuvre:
If you need to perform several manoeuvres in quick succession, the next-but-one manoeuvre
is shown in the form of a directional arrow at the right of the Manoeuvre box. This means you
can always see where you are heading in good time.
Main Menu The main menu button takes you to the menu guidance screen.
Current Position: Your current position is marked by a red arrow on the map.
Zoom Button: Tap on the zoom button
the scale of the map. If you tap on
and then on the plus or minus symbol to adjust
, you can see your route from the bird view.
GPS Signal: Indicates the status of the GPS reception.
GPS signal is not sufficiently strong to allow positioning. Signals are being received from
fewer than 3 satellites.
GPS signal is sufficiently strong to allow positioning. Signals are being received from 3
satellites.
A high-quality GPS signal is being received that allows your elevation to be determined.
Signals are being received from at least 4 satellites.
Compass: Indicates the current compass direction. If the compass arrow is shown in red,
the compass needs to be recalibrated.
You can calibrate the compass on the settings menu under "Settings > System / General >
Calibrate compass".
Battery: The battery symbol shows you the status of the battery.
Battery has at least 70% of capacity remaining
Battery has between 15 and 70% of capacity remaining
Battery has less than 15% of capacity remaining
Device connected to power source
Falk PANTERA User Manual
14
Click on map
If you tap on the Zoom Button and then on a point on the map, the point is marked with a pin
and the address or position is displayed. If you then tap on "Actions", you can for example
navigate to the marked point or save the point as a waypoint.
Clickable POIs
With just one click on a POI icon on the map, you can easily
display all the information you need to know about the POIs
which are shown, remember the position, start a radius
search or select the POI for route calculation.
Select a POI icon on the map about which you would like to
know more information.
If you tap on the name of the POI, you will be shown the
detailed view for this POI.
An Actions button appears below the name.
Tap on this. The actions mentioned above are now available
to you.
Tap on Close in the info box or on the red arrow at the
bottom edge of the screen to switch back to the map view.
Falk PANTERA User Manual
15
4.2
Trip computer
To the right of the map view is the trip computer which
shows you lots of measured values. It has a second page
which you can call up by swiping up or down on the screen.
You can configure the values in the trip computer yourself
by tapping on a field and then choosing from the list which
value should be displayed in this field.
Tip: You get the average values, such as average speed,
by recording a training unit.
4.3
Manoeuvre view
To the left of the map view is the manoeuvre screen with
the altitude profile. It displays the next manoeuvre to you in
the middle. As on the map, here too there are configurable
displays of route information or training figures at the top
edge of the screen.
If on the manoeuvre screen you swipe further to the left, you
return to the trip computer (and vice versa).
Via the
button you can view the altitude profile in detail.
Falk PANTERA User Manual
16
5 Main menu
The main menu gives you access to the different functions on your device which are
explained one after the other in the following chapters. To switch from the map view to the
main menu, tap on
. To then return to the map view, tap on
.
6 Destination entry
On the destination entry screen, you have the option of entering any destination you want in
order to be navigated to it. Various possibilities for doing this are available to you and they
are explained one after the other below.
6.1
Address
Here you can navigate to a destination by entering an
address. You can enter a full address with the street and
street number.
Note: With the basemap it is not always possible to enter a
street number.
To enter an address, carry out the following steps:
First tap in the main menu on "Destination entry" and then
on "Address".
You can now enter the city name first or enter a postcode by
tapping on
.
Note: With the basemap it is not possible to enter a
postcode.
Tap on
to enter the street and street number.
You can also tap on the city name or street name in the text
box to confirm the entry.
Note: If you do not wish to further restrict your search by
selecting a street and / or street number and simply want to
navigate to the centre of the destination city, simply tap on
after selecting the city with
. If you just want to
navigate to a street without a street number, tap after
entering the street on
.
The
button allows you to view the destination on the
map in advance.
If you tap on the country flag in the upper section of the
screen, you can select the destination country (if you have
also installed other country maps).
To enter umlauts or special characters, press on the
corresponding basic letter for a long time.
Once you have entered a letter, all of the letters which are
no longer possible will be blanked out.
If you tap on
, a list containing all possible city names for your entry will be displayed.
Falk PANTERA User Manual
17
6.2
Home
The Home function takes you back home without any bother at any time.
When you first start the device, you will be asked to enter your home address.
After you have entered your address once, it is saved and you can navigate there at any time
by tapping on "Home" once. The route from your current position to your home is calculated
immediately.
You can change the saved address in the settings menu at any time.
6.3
Points of interest
Your Falk PANTERA contains countless points of interest such as restaurants, viewing
points, natural monuments, places to stay, places to visit and lots more.
If you select "Points of interest" on the destination entry screen, a list containing all
categories appears. You can select individual categories by tapping on them or select all
categories at once by tapping on "All" (top right).
Tap on
(or on
if you want to search for a name of a category).
Next you must specify a search centre for your search. The POIs will then be displayed
sorted according to their distance from this point.
The search centre can be a waypoint, your current location, the current destination, along the
route, a city, an address, a position on the map or coordinates.
The results are then displayed in a list.
You then have the following options:
Sort – here you can sort the POIs according to various
criteria
– displays the selected POI on the map
– starts the route calculation to the selected POI
Double click – opens the detailed view for a POI
– allows you to search for a POI by entering text
- shows you special Premium POIs around the
search centre. If these exist, they always appear at the
beginning of the list.
Falk PANTERA User Manual
18
6.3.1
Detailed view of a POI
In the detailed view you will find all of the available
information about a POI.
At the top you can switch between the Info, Map, Picture
(optional) and Options screens by tapping on the tabs.
Info shows you the address, the distance and a descriptive
text.
"Map"shows you the POI on the map view.
Via "Picture" you can view a picture of the selected POI if
one exists.
In the Options you also have the following possibilities:
Search for POI around POI - Searches for another POI
around the current one (if for example you would like to find
a restaurant near to the hostel where you are staying).
Enter rating - Possibility of rating the POI. The rating is then
displayed at the top in the detailed view.
Save POI as waypoint - Adds the POI to your own
waypoints.
You can use the two arrows at the bottom to scroll to the
next or previous POI from the list.
starts the route calculation to this POI.
switches back to the list of POIs.
6.4
Previous destinations
This function allows you to select the previous destinations that you entered very easily.
The previous forty destinations are automatically saved.
Falk PANTERA User Manual
19
6.5
Position on map
Here you can mark a point on the map in order to navigate
there. You can also move the map here using your finger.
If a point which is located in a city or on a street is marked,
the address for this point is displayed. Otherwise the
geocoordinates are displayed.
Tip: Zoom out via the "minus" button so that you can move
the map to the correct point more quickly.
6.6
Waypoints
A waypoint is a position or address which has been saved. You can create waypoints
yourself (see Chap. 13.2.2) so that you can then navigate to the point again at a later date.
Here you can now select a destination from the waypoints which are located on your device.
These may be waypoints you have created yourself or imported waypoints.
To do this, a search centre must first be stipulated.
The waypoints are then displayed sorted according to their distance from this point.
The search centre can be your current location, the current destination, along the route, a
city, an address, a position on the map or coordinates.
As an alternative to a search centre, you can also tap on "Display all waypoints"; all
waypoints will then be displayed sorted in alphabetical order.
The results are then displayed in a list.
You now have the following options:
Sort - the waypoints can be sorted in alphabetical order or
by distance.
- displays the currently selected waypoint on the map
- starts the route calculation to the selected waypoint
Double click - opens the detailed view for a waypoint
The further functions in relation to waypoints are explained
in Chapter 13.2.
Falk PANTERA User Manual
20
6.7
Coordinates
You can also enter your destination via coordinates.
This function is particularly helpful for reaching a precise location in open terrain where it is
not possible to specify an address.
You can also use the entry of the coordinates for geocaching.
Note: The entry format is important here as there are
different formats for coordinates.
The preset format is based on the pattern of
degrees/decimal minutes (dd°mm.mmmm´).
To set a different format, tap on "Format" on the right.
A list containing possible formats will then be displayed.
You can change the format again at any time in the settings
(see Chap. 10.4.7).
With the degrees/decimal format, the degree of latitude is
entered first.
To do this, tap on the right on "N" for "north" (north means
north of the equator). Now enter the coordinates.
If you tap on
, you can enter the degree of longitude.
To do this, tap on "E" for "east" (east means east of the
prime meridian).
If you click on
, the coordinates of the current position are entered.
Note: As Central Europe is situated north of the equator and east of the zero meridian, you
will always use the north/east combination when entering coordinates in this format.
If after entering the degree of longitude you tap on
address is located close to the coordinates.
Tap on
6.8
to display the point on the map or on
, it is (if possible) specified which
to start routing to this location.
Arrange menu
Here you can change the order of the functions as you wish within the destination entry
screen.
Select a function and move it to the place you want with the aid of the rectangular arrows.
Do not worry - no function will be lost. And even if the functions become mixed up, you can
tap on
to restore them to the preset order.
Falk PANTERA User Manual
21
6.9
Calculated route
Once you have entered a destination, the route options are then enquired about. If a route
has then been calculated, you have the option of calling up different information about the
route or calculating alternative routes.
- calculates two alternative routes (see 3.13.1).
- displays the altitude profile for the calculated route.
If you have already calculated alternative routes, here you
can view and compare the altitude profiles for all routes (see
3.13.1).
- here you can set the route options again if
necessary.
- displays the route information with a description for the
route in a list. In the route description, each road that the
route runs along is shown in the form of a list. At the end of
each line, the distance travelled along this road is specified.
You can mark a line and click on
this section on the map.
at the bottom to view
Note: The route description is only available in navigation, not in bearing mode (linear line).
You can start routing via
.
Note: The alternatives are also calculated by taking account of the route options entered
previously.
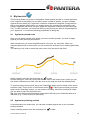
Alternative routes and altitude profiles
If after calculating a route you have calculated alternative
routes, they are shown in different colours on the map.
You can then select an alternative via the boxes at the
bottom which are also marked in the relevant colour.
You can then view the different information for the selected
alternative.
Falk PANTERA User Manual
22
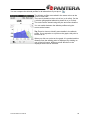
You can compare the altitude profiles for all alternatives if you tap on
.
The altitude profiles are marked in the same colour as the
route in each case.
The route is plotted on the x axis in km (or in miles). On the
y axis the geographical altitude is plotted in m (or in feet).
The scale can be altered using the plus and minus buttons.
You can switch between the altitude profiles using the
arrows at the bottom.
Tip: Zoom in closer to identify more details in the altitude
profile. If you tap twice on a point on the graph, this point is
zoomed in on.
When you click on a point on the graph, it is marked and the
distance from the starting point is displayed. By clicking on
one of the info boxes, different values which are to be
displayed there can be selected.
Falk PANTERA User Manual
23
7 Training history
In the Training history you find your recorded training units.
You can record the route that you are riding or walking along. This recording will help you to
be able to retrace the route you have ridden or walked precisely at a later date. After it has
been recorded, the route can be displayed on the map under training history and the altitude
profile can be viewed. Further information such as the starting and end position, distance and
the height gain or loss can then likewise be displayed.
To start a recording, press the "Start/Stop" button on the outside of the device. You can then
select whether you want to record a training session or a timed route (see Chap. 8). Tap on
the training session "Record" button. A message confirms the start of recording.
Note: It is recommended that you calibrate the barometer manually before you start the
recording (see Chap. 10.4.6).
The recording can be interrupted at any time if, for example, you take a break. To do this, tap
on the "Start/Stop" button again and then on the Pause button.
To continue, tap on the "Start/Stop" button and then again on the Pause button.
To end the recording, tap on the "Start/Stop" button for a long time or first on the "Start/Stop"
button and then on the Stop button.
You will then be asked to specify the name for the track. In the line for the name, initially the
date and the time of the recording are displayed. The track can be saved under this
designation. Or you can delete the name line with
track. You can also cancel the recording if you tap on
and enter your own name for the
.
Note: It is advisable to enter a recognisable name for tracks so that you can find them more
easily at a later date if several tracks are saved on the device.
7.1
Detailed view of a training unit
To select an existing training unit, tap in the list on the unit
you want and then on
.
Info - displays all the information about the training unit. The
displayed information also depend on whether sensors were
connected.
Map - displays the track on the map. You can zoom in and
out and move the map. If you click on "Position", you can
show or hide your current position on the map.
Altitude profile - displays the altitude profile for the unit.
starts the track navigation.
If you want to edit the training unit further, tap on
Chap. 4.2).
Falk PANTERA User Manual
(see
24
7.2
Edit training unit
To edit a training unit, tap in the detailed view (see Chap. 7.2) on
.
The following options are availble to you:
Reverse training unit
Edit name
– Switches the direction of travel. This also allows you to find
your way back to the starting point of a training.
– Here you can change the name of the training unit.
– Deletes the training unit from the device.
Delete training unit
7.3
Start training unit
When you start a track, you have the possibility of deciding whether you want to start the
track directly or would like to convert the track into a route in order to obtain turn-off
instructions.
7.3.1
Convert track to route
The Convert track to route function calculates a route which
is as similar as possible to the original training unit.
In addition, in contrast to standard track navigation, you then
get instructions via beeps which guide you with turn-off
instructions. In addition, you are shown the arrival time and
the real distance.
Note: If road segments do not exist in the map material or
sections of road are avoided by the route options which are
set, the alternative route will make an appropriate detour.
The calculated alternative route is compared with the
original track so that you have the option to decide for
yourself which version of the route you would like to use.
7.3.2
Start track directly
"Start track directly" starts the training unit without any changes. You are given directional
instructions on the map view, but no beeps relating to turns or distances. Select "Start track
directly" and tap on
.
You can now decide whether, taking account of your current position, you would like to be
guided to the starting point of the track or to the nearest point on the track.
Falk PANTERA User Manual
25
7.3.3
Set track start point
If you have selected Convert route to track, initially the
route is calculated and displayed on the map.
By clicking on "Route" or "Track" you can switch back and
forth between the track and the route on the map view.
The chequered flag shows the end point of the track.
To start routing using the alternative route, select "Route"
. To retain the original track and start the
and tap on
track guidance without any turn-off instructions, select
"Track" and tap on
.
You can now decide whether, taking account of your current
position, you would like to be guided to the starting point of
the track or to the nearest point on the track (see picture on
the right).
Falk PANTERA User Manual
26
8 My time trial
This function allows you to race in competition mode against yourself or a virtual opponent.
Over a specific route (which you can either record yourself or import), you then compete
against the time which your "opponent" needed to complete this segment. During the time
trial, a view appears which shows you exactly where you currently are compared to your
fictitious opponent and shows you on a graph how far ahead or behind you are (see Chap.
8.4). To start a time trial, you must first select on which route you want to compete against
your "opponent". You have the following possibilities for doing this:
8.1
Against my timed route
Here you can select a timed route which you have recorded yourself. You then compete
against your own previous performance.
With a timed route you record a specific section of a route, e.g. an incline. When you
compete against such a timed route, you can monitor the success of your training particularly
well.
The training unit is used to record the entire route, from the start to the finish.
to start.
Select a timed route from the list and tap on
Double-clicking on a list entry opens the detailed view for the timed route in which you can
see all the information you need, view the route on the map and view the altitude profile.
To record a timed route yourself, tap on the "Start/Stop" button on the outside of the device
. If during the recording you press
and then under "Timed route" on the Record button
again on the "Start/Stop" button, you can end the recording. When the recording is ended,
you can enter a name for the timed route.
Tip: Give your timed routes descriptive names which will help you to find them faster at a
later date (e.g. "Forest route up to mountain").
8.2
Against my training session
As an alternative to a timed route, you can also compete against one of your recorded
training sessions.
Select a training session from the list and tap on
Falk PANTERA User Manual
to start.
27
Double-clicking on a list entry opens the detailed view for the training session.
To record a training session yourself, tap on the "Start/Stop" button on the outside of the
device and then under "Training session" on the Record button . If during the recording
you press again on the "Start/Stop" button, you can pause or end the recording. When the
recording is ended, you can enter a name for the training session .
You can also find all training sessions under Training history (see Chap. 7).
8.3
Against transferred route
Here you can compete against a route which you have transferred to your device. To do this,
the route must contain data on the times which have been recorded.
Select a route from the list and tap on
to start.
Double-clicking on a list entry opens the detailed view for the route.
The way you can transfer routes to your device is explained to you in Chapter 14 on the Falk
Navi-Manager.
8.4
Starting a time trial
Once you have selected a segment, the time trial can begin!
First of all you can select whether the chosen segment should be converted into a route or
be started directly. If it is converted into a route, you receive turnoff instructions.
You are then initially guided to the starting point. A message warns you 200 m before the
start of the time trial. At the starting point, another message is issued to indicate the start.
On the time trial view, you can track exactly where you are
currently placed compared to your fictitious component.
The altitude profile shows the course of the route with the
inclines. The red arrow shows your current position; your
"opponent" is indicated by a white arrow.
Your deficit or lead is also displayed as a distance and time
figure. If you are ahead, the values have a green
background, and they have a red background if you are
behind.
At the end of the time trial, the time you have achieved is
displayed and also whether you have beaten your
opponent's time.
Your recorded times are saved. If you compete several
times against a specific timed segment, all of your times are
recorded and displayed in the detailed view for the
particular time trial. If you have beaten your opponent's time, your new best time is adopted.
Falk PANTERA User Manual
28
9 Tour manager
Tours are routes which contain several destinations one after the other. You can compile
your own tours on the device. You can use all sorts of destinations to do this.
9.1
Create new tour
Tap in the main menu on Tour manager.
Via "Plan tour" you can compile a tour for yourself.
The preset starting point is your current location.
To change this, simply click on the "Start" button. You then
have several options for entering a starting point (e.g.
address, previous destinations etc.)
You can then also enter the destination point in the same
way.
When you tap on
on the map.
, the route is calculated and displayed
In addition to the functions for the calculated route from the
normal destination entry, you can also simulate the
calculated route here (not where there are several stations).
The route is run through virtually here. You will see on the map how the route proceeds and
when and how turns are made. To do this, tap after calculation on
.
For routes with several stations, you can add destinations to the tour by tapping on the "Add
further destinations" button and then "+ Add station".
All kinds of destinations can be used as stations. The different kinds of destinations are
entered in the same way as with normal destination entry.
Once you have entered all destinations, tap on
. You will then be asked to save the
route under a name which you are free to choose. When you confirm the name, the tour is
created. You can start the routing by tapping on
again. You can choose whether the
route calculation should start from your current position or the first station.
9.2
Plan circuit (optional)
Tap in the tour planner on "Plan circuit". Here you can start
a circuit from a stipulated starting address. Here too, the
you can
preset starting point is your current location. Via
enter another starting point.
After the starting point has been entered, you can either
specify the distance you want or the length of time around
the circuit. The Falk Navigator then calculates a circuit which
reflects the route options that have been set and takes you
back to your starting point.
Falk PANTERA User Manual
29
9.3
Select saved tour
If you have already created tours, you can call up a tour via Select saved tour.
First select whether the tours should be displayed sorted around your current location or an
address. Or you can simply have all tours displayed. They are then listed in alphabetical
order.
Select the tour you want from the list and tap on
The detailed view of the tour is then displayed.
Via
.
you can change the settings for the tour.
If you tap on
, you start the routing. You can select whether the route calculation should
start from your current position or the first station.
Falk PANTERA User Manual
30
9.3.1 Detailed view of a tour
You will find all of the information you need about a tour in the detailed view.
First select a tour and tap on
.
You can switch between three views using the tabs at the
top:
Info: Shows the starting point and destination point, as well
as the route length and the number of stops.
Map: Shows the tour on the map.
Stations: Displays a list of the individual stations.
In the station list you can also deselect certain destinations
on the tour if you do not want to navigate to them. To do
.
this, tap at the end of the line for the station on
means that the station will be ignored.
means that the station will be navigated to.
means that the station has already been visited (on the
current tour)
When you tap on
, the tour is started.
To make further settings in relation to the tour, tap on
9.3.2
(see under Chap. 9.3.2).
Edit tour
To edit a tour, first select a tour and then tap on
Now tap on
.
.
The following setting options are then available to you:
Edit stations
– Here it is possible to add further
stations, change the sequence of the stations and delete
stations again.
Set direction of travel
– Here you can reverse the tour.
The stations will then be navigated to in reverse order.
Edit name
– Here you can edit the name of the tour.
Delete tour
– Here the selected tour can be deleted.
Falk PANTERA User Manual
31
10 Settings
The settings for your device are divided up into four categories.
The navigation settings relate to the routing, the map settings comprise all functions of the
map, the profile / sensor settings relate to the set-up and all settings of the profiles and
sensors, and the system / general settings relate to the device or the application as a whole.
10.1 Navigation settings
Here you can make various settings relating to the routing. To do this, click in the menu on
Settings > Navigation Settings.
The following options can be changed:
10.1.1 Route options
The route options allow you to define your own individual route ("My route").
The route options include two settings: the route optimisation and the type of routes. These
settings are run through as standard after each route calculation.
With the route optimisation, you have various options for adapting the route:
Flat
- the route preferably runs over flat sections.
Mountainous
- the route preferably runs over hilly sections.
Short / neutral
inclines.
- calculates the shortest route to the destination, regardless of
Linear distance
(bearing navigation).
– plots a straight line from your current location to the destination
Note: The selected route optimisation also has an impact on the length of the route. For
example, if you choose "flat", sections of the route with an incline that is too steep will be
avoided, which can result in a longer route.
With the types of routes, you have the following options:
Cycle paths
- uses or avoids cycle paths (only in bicycle mode)
Hiking trails
- uses or avoids hiking trails (hiking trails can be preferred in pedestrian
mode)
Steep gradient
Road traffic
Turns
– uses or avoids gradients of over 8% (only in bicycle
mode)
– uses or avoids roads (only in bicycle mode)
– allows or reduces turnoffs on the calculated route
Falk PANTERA User Manual
32
Paths
Ferries
Tunnels
- uses or avoids routes along paths and dirt tracks
- uses or avoids routes involving ferry connections
- uses or avoids routing through tunnels
Fixed rope routes
- uses or avoids going along via ferrata (only in pedestrian mode)
To avoid one of the options, tap on the corresponding symbol. Symbols with a red "X" mean
that the corresponding type of route will be avoided.
Note: "Avoid" does not mean that these types of routes are completely ruled out. It is always
possible that avoided types of routes will also be used in individual cases.
10.1.2 Speed profile
This function allows you to set your average speed. The set
profile helps to calculate the arrival time and total travel time
more exactly.
You can set this setting separately for pedestrian and
bicycle mode. You can choose between different speed
settings in each case. Set your desired profile using the
plus/minus buttons and confirm it with
.
The set speed profile has an impact on the route.
10.1.3 Ask about route options
If this function is activated, the route options are asked about before each route calculation.
This function is activated as standard. If you do not frequently change the route options,
disable this function.
Falk PANTERA User Manual
33
10.2 Presentation of the map
Here you can make various settings which affect the map view. To do this, click in the menu
on Settings > Presentation of the map.
The following options can be changed:
10.2.1 Map perspective
/
With the map perspective you can switch between the two-dimensional and threedimensional representation of the map. The respective setting is indicated by the symbol and
the text 2D or 3D.
10.2.2 Raster maps (optional)
/
With the raster maps you can view landscapes and cities from a bird's-eye perspective via
topographic maps. The raster map thus makes it easy for you to get your bearings.
Requirement: You have activated the 2D map view and installed raster maps.
10.2.3 In direction of movement
/ map orientated north
The map can be orientated either in the direction of movement or always to the north.
Note: If you select "In direction of movement", the positional arrow always points upwards.
This setting facilitates orientation. If you select "Map orientated north", the positional arrow is
located in the middle of the map and rotates according to the direction of movement.
10.2.4 Position on street
/
Here you can stipulate whether your current position should be mapped onto the route
network.
Note: For geocaching and for navigation on open terrain, it is essential that you switch off
this function.
10.2.5 City names on basic map
/
If you do not have maps for a continent or country, this function still allows you to display the
city names on the basic map to allow better orientation.
If you then subsequently go on to purchase more maps, you can deactivate the labelling on
the basic map here.
10.2.6 Auto zoom
/
When auto zoom is activated, the scale of the map is adjusted on the basis of your speed (at
high speed the map zooms out). If you switch off the auto zoom, you can set the scale of the
map on the map view screen yourself. This is then retained.
10.2.7 Points of interest on map
Here you can choose which points of interest should be displayed with small symbols on the
map. To do this, select the categories you want. All points of interest in the chosen
categories will then be displayed on the map.
Falk PANTERA User Manual
34
10.2.8 Track recording
/
For the recording of a training unit, you can set here whether the route covered should be
shown on the map view.
Note: This setting only relates to the map view during recording. With a saved track, the
route covered can always be displayed on the map at a later date.
10.2.9 Set map colours
Here you can select from various map colours which colour appeals to you more.
Using the arrows at the bottom, you can switch back and forth between the different colour
options available.
Select your colour options and confirm your selection with
Falk PANTERA User Manual
.
35
10.3 Profiles / Sensors
Here you will find all settings which relate to the user and the bicycle profiles, as well as the
settings relating to the fitness sensors.
10.3.1 Edit user profile
You can set your user profile here. The values of the user
profile are required among other things to allow your calorie
consumption to be calculated.
You can make the following settings here which you select
by tapping on the respective line:
Gender – select Male or Female
Year of birth – enter your year of birth here
Height – enter your height in cm here
Weight – enter your current weight here
Confirm your entries in each case by tapping
.
10.3.2 Change bike profile
Here you can change the bike profile. You can choose from
four profiles which you can configure yourself (see Chap.
10.3.3).
Select the profile you want (bike 1-3 and walker profile) and
confirm by tapping
.
10.3.3 Edit bike profile
Here you can edit the bike profile which is currently chosen,
as well as view all of the statistics for this profile.
To do this, first select the bike profile that you would like to
edit (see Chap. 10.3.2).
You have the following options for editing the current profile:
Bike type – select the bike type for this profile here. The
route calculation and the maps used are adapted for you on
the basis of this specification.
Weight incl. equipment – here you should specify the total
weight of the bike and your equipment in kg.
Wheel size – here you should specify the wheel size of your
bike that you are using for this profile.
The following list gives you an overview of the customary
type designations for the tyres and the associated wheel
size in mm.
Falk PANTERA User Manual
36
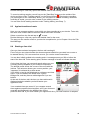
The type designation can generally be read off the tyre.
47‐305 47‐406 37‐540 47‐507 23‐571 40‐559 44‐559 47‐559 50‐559 54‐559 57‐559 37‐590 37‐584 20‐571 32‐630 28‐630 40‐622 47‐622 40‐635 37‐622 18‐622 20‐622 23‐622 25‐622 28‐622 32‐622 37‐622 40‐622 16x1.75x2 20x1.75x2 24x1 3/8A 24x1.75x2 26x1 26x1.5 26x1.6 26x1.75x2 26x1.9 26x2.00 26x2 125 26x1 3/8 26x1 3/8x11/2 26x3/4 27x1 1/4 27x1 1/4 28x1.5 28x1.75 28x1 1/2 28x1 3/8x1 5/8 700x1 BC 700x200 700x23C 700x25C 700x2BC 700x32C 700x35C 700x4DC 1272
1590
1946
1907
1973
2026
2051
2070
2089
2114
2133
2105
2086
1954
2199
2174
2224
2268
2265
2205
2102
2114
2133
2146
2149
2174
2205
2224
Map priority – here you can stipulate which map type is preferred for this profile. You will
find detailed information about the map priority in the following chapter (10.3.4).
Name – here you can change the name for the profile.
Full statistics – here you will find the overall distance covered and the total ascent which
have already been accomplished with this profile. You can also correct these details by
tapping on
.
10.3.4 Map priority
Only one country map at a time can ever be used for a country. If you have installed several
country maps for a country on your device (e.g. Basic Map Plus Germany and Premium
Outdoor Partial Map Germany), you can set the priority of the map to be used. This will then
be used both for the map display and in the address entry. To do this, proceed as follows:
Tap in the country selection list on the map which is currently inactive (grey background) for
a country.
The prompt for the map priority then appears. You then have the following options:
Falk PANTERA User Manual
37
- Premium Outdoor Map: Stipulates that (if present) the Premium Outdoor Map will always
be used (recommended setting if you are travelling in an area for which you have a Premium
Outdoor Map [e.g. southern Germany if you have the Trans-Alpine Premium Outdoor Map]).
- Premium Road Map: Stipulates that the Premium Road Map will be preferred. This setting
is recommended if you are travelling for example with a road bike and want to use paved
roads that are also available for car traffic.
- Prefer Basic Map Plus (OSM) before Premium Partial Map (e.g. southern Germany):
Stipulates that preference will be given to the Basic Maps even if a Premium Outdoor Map is
available for part of the country.
This setting is recommended if you have installed the Trans-Alpine Premium Outdoor Map
and want to calculate a route which is no longer fully within the area covered by the partial
map (e.g. southern Germany). In this case, the Basic Map Plus (OSM) will be used for the
corresponding country, if available.
Example: You are planning a tour involving several stops from Frankfurt to Florence. You
have installed the Trans-Alpine Premium Outdoor Map and the Basic Maps Plus (OSM) for
Germany, Austria and Italy. With the setting described above, you can now follow a route
from Frankfurt on the Basic Map Plus Germany as far as the Austrian border. As the TransAlpine Premium Outdoor Map also covers the whole of Austria, you will be routed all the way
through Austria on this map. In Italy, you will then be routed on the Basic Map Plus Italy as
the destination (Florence) is no longer covered by the Trans-Alpine Premium Outdoor Map.
- Basic map Plus (OSM): Stipulates that the Basic Map will always be used even if a
Premium Outdoor Map is available for this country or part of this country.
Weitere Informationen zu den verschiedenen Kartentypen findest du im Glossar.
10.3.5 Fitness sensors
Your Falk PANTERA is designed for coupling several ANT+™ fitness sensors. You can
couple a heart rate sensor, a speed sensor and a cadence sensor to the device which will
provide you with up-to-date and accurate figures at all times while you are on the move.
How you attach the sensors is explained to you in the device description right at the start of
the manual.
When you first call up the Fitness sensors function, you are guided through the process of
coupling up the individual sensors. Follow the instructions provided on the device.
If the coupling has already been carried out, here you can view a list of the sensors and their
respective status.
Falk PANTERA User Manual
38
Heart rate monitor
Once you have coupled up a heart rate sensor, here you see the ID of the sensor as well as
the status. You can use the Search for sensor button here to search again for a sensor.
Tip: If it is not possible to establish a connection to the heart rate sensor, moisten the sensor
contact area on the back of the chest strap again.
Speed sensor
Once you have coupled up a speed sensor, here you see the ID of the sensor as well as the
status. You can use the Search for sensor button here to search again for a sensor.
Cadence sensor
Once you have coupled up a cadence sensor, here you see the ID of the sensor as well as
the status. You can use the Search for sensor button here to search again for a sensor.
Tip: If it is not possible to establish a connection to the combined sensor, check the gap
between the sensors and magnets.
You can display the measured values of the sensors at any time (e.g. in the info fields of the
map view).
Falk PANTERA User Manual
39
10.4 System / General
Here you can make various settings which affect the device. To do this, click on the menu on
Settings > System / General.
The following options can be changed:
10.4.1 Battery
The battery option allows you to check the remaining capacity of the batteries.
When connected to a power source, “Charging” is displayed here.
10.4.2 GPS Info
GPS Info indicates the GPS reception signal strength at the current location. Adequate GPS
reception is essential for any navigation.
An info page with information about the existing GPS connection and your current position as
button takes you back to the settings
well as the altitude and speed is displayed. The
menu.
The colouring provides you with information about the GPS status at a quick glance:
Red: GPS signal is not sufficiently strong to allow positioning. Signals are being received
from fewer than 3 satellites.
Yellow: GPS signal is sufficiently strong to allow positioning, but not sufficiently strong to
allow the current elevation to be determined. Signals are being received from 3 satellites.
Green: A high-quality GPS signal is being received that allows your elevation to be
determined. Signals are being received from at least 4 satellites.
10.4.3 Brightness
Here you can set the brightness of the screen.
The brightness settings have a great influence on the power consumption of your navigation
device. To save power in battery mode, turn down the brightness level.
In addition, you can select whether the screen should automatically be dimmed when the
battery is weak in order to save power.
Confirm your setting by tapping on
.
10.4.4 Beeps
The beeping noise output warns you with a beep when you are approaching a turn-off or
when you deviate from the calculated route.
10.4.5 Calibrate compass
To guarantee precise orientation of the compass, you should recalibrate the compass at
regular intervals. To do this, tap on "Calibrate compass" and follow the instructions on the
device.
Note: You should only ever calibrate the compass outdoors. Make sure when calibrating it
that no metallic objects are located in the vicinity of the device and that no magnetic or
electro-magnetic sources of disturbance (e.g. high-voltage power lines, antennae) are
present.
Falk PANTERA User Manual
40
10.4.6 Calibrate barometer
To optimise the accuracy of the height measurement, you
should calibrate the barometer at regular intervals.
You can calibrate the barometer in three ways:
Automatic - the barometer is then calibrated completely
automatically. (However, to obtain more accurate results it is
recommended that you calibrate it manually.)
Manual by specifying height - if you know the height of
your current position, enter this and place the device down
to rest on a flat surface for a short time.
To standard atmospheric pressure - then the standard
atmospheric pressure at sea level is used to determine the
height.
Note: The barometer should be calibrated after each
change of battery. In changeable weather and where there
are large differences in height, it is recommended that you
calibrate the barometer several times a day.
10.4.7 Set position format
There are different formats for specifying coordinates. To
support the entry of the most common formats, here you can
select the format you want.
The following formats are available to you:
dd.ddddd°
(decimal degrees)
dd°mm.mmmm`
(decimal degrees and minutes)
dd°mm`ss.ss"
(decimal degrees, minutes, seconds)
Gauß-Krüger
(easting, northing)
Swiss grid
(longitude, latitude)
UTM
(zone, easting, northing)
This setting is then used in the entire system.
Note: UTM and Gauß-Krüger are formats from printed
maps. You can read the coordinates off such maps and
enter them in the device.
10.4.8 Screen auto-off
You can use this function to set whether and after what period of time the screen
automatically switches off. You can choose between 15 seconds, 30 seconds and 1 minute.
In addition, you can select whether the keylock should also be activated at the same time so
that no accidental entries are made.
Note: While your screen is switched off, existing navigation operations or track recordings
continue to run. If you press the hardware key (when the keylock is active) or click on the
screen, the screen is activated again. Beeps continue to be output. This function helps you to
extend the life of the battery.
Falk PANTERA User Manual
41
10.4.9 Set home
The Set home option allows you to change your home address which you entered when you
first started the device.
Tap on Set home.
You can enter your home address via the on-screen keypad.
Confirm your entry with
.
The display automatically switches back to the settings menu.
The address which is entered can be overwritten at any time by entering a new address.
10.4.10
Default settings
If you tap on Default settings, you can reset the settings of the Falk Navigator to the factory
settings; the navigation device is automatically restarted when you do this. You then have the
option via the start wizard of making new settings.
10.4.11
Time
The Time option allows you to set the time zone and the
time format.
Note: The current date and the current time are received
with the GPS signal and are thus always set to the nearest
second.
To set the time zone in which you are situated, tap on the
left or right arrow in the top section of the screen.
An automatic switchover between winter and summer time
is preset. If you would prefer to set the summer time
manually, select On. If Off is activated, winter time is
displayed.
Confirm the settings with
saving the settings via the
or exit the display without
button.
10.4.12
Language
Tap on Language to select the language in which you want to be guided through the menus
in the Falk Navigator. The language is always specified in the respective national language.
Confirm your selection with
.
10.4.13
Screen
If the screen no longer reacts to being tapped on without any errors, it needs to be
recalibrated. To do so, you need a stylus (optional) or another blunt object. To avoid
damaging the display, never tap it with any pointed object.
Choose the Screen option and start calibration by confirming the following display screen
. If you do not want to carry out the calibration, exit the display by tapping on
.
with
Tap and hold the stylus for a short while on the cross. Repeat the process for each position
at which the cross is located.
The calibration process is complete as soon as there is no longer any cross displayed. Tap
on the screen again to return to the menu.
Falk PANTERA User Manual
42
10.4.14
Info about
You can use the Info about option to display system information, in particular about the
version of the navigation software used, about the map material and map data used. The
button gives you an overview of the software functions available to you for a limited
period of time.
To exit the display, tap on
.
button to display information about copyrights for the software used. Here
Tap on the
you will also find country-specific copyright notices.
10.4.15
Arrange menu
Here you can change the order of the functions within the settings menu as you wish.
Select a function and move it to the position you want with the aid of the rectangular arrows.
Do not worry - no function will be lost. And even if the functions become mixed up, you can
tap on
to restore them to the preset order.
Falk PANTERA User Manual
43
11 Active route
If you have calculated a route and are in navigation mode, you have the following options
under Active route:
Calculate alternatives – calculates two alternative routes
Enter stop-off point - here you can enter a stop-off point which is then navigated to
before the destination which has already been entered.
Next destination – if you have entered a stop-off point or are on a tour, you can navigate
to the next destination here.
Current tour profile – if you are travelling along a tour, you can view the entire tour
profile here.
Falk PANTERA User Manual
44
12 Transferred tracks
Under "Transferred tracks" you will find all tracks that you have transferred to your device.
Here you can also delete imported tracks from your device again.
.
You can search for the name of a track by tapping on
When you select a track and tap on
Tapping on
, you are shown the detailed view for the track.
again starts the routing.
When you start a saved track, you have the possibility of deciding whether you want to start
the track directly or want to convert it into a route in order to receive turn-off instructions in
the form of a beep. In addition, you can select whether you want to travel to the starting point
of the track or to the point on the track nearest to your current position.
To edit a transferred track, tap in the detailed view on
.
The following possibilities are available to you:
Reverse track
Edit name
Delete track
– Changes the direction of travel of the route.
– Here you can change the name of the track.
– Deletes the track from the device.
Falk PANTERA User Manual
45
13 Extras
Here you find further functions, which will be explained to you in the following chapters.
13.1 Remember position
To remember a position so that you can find your way back there at a later date, use the
"Remember position" function. This saves the current position as a waypoint. You then have
the option of specifying a name for the location.
The date and the time is first displayed as the name as standard.
You can change the name by pressing the back button for a long time and entering another
name.
You save the position with
.
If you want to save a point which is not your current location, you can do this via the waypoint
manager.
13.2 Waypoint manager
Here it is possible to select, create and delete waypoints.
13.2.1 Choose waypoint
If you want to navigate to a waypoint, tap on "Choose
waypoint". Then specify the search centre you want. The
waypoints will then be displayed, sorted by their distance
from this centre.
Alternatively, you can tap on "Show all waypoints". All
waypoints will then be displayed sorted in alphabetical
order.
Once you have selected a waypoint from the list, you can
display the waypoint on the map by clicking on
navigate there directly by clicking on
detailed view with a double-click.
,
or call up the
The detailed view offers similar possibilities to the detailed
view for a point of interest.
13.2.2 Create waypoint
You have various possible options for creating a waypoint.
You can:
Use your current position, enter an address, select a position on the map, use one of
your previous destinations, enter coordinates or select a point of interest.
Entry then takes place in the same way as when entering a destination (see Chap. 6.6).
Falk PANTERA User Manual
46
Once the destination has been defined, you are asked to enter a name for the new waypoint.
In the row for the name, initially the address or the geocoordinates of the waypoint are
automatically displayed. However, it is advisable to assign an appropriate name to each
waypoint, particularly if several waypoints have already been created.
You can change the name by pressing the back button for a long time and entering another
name.
Confirm the name with
and the waypoint is then saved.
13.2.3 Delete created waypoints
To delete a waypoint that you have created yourself, tap on "Delete created waypoints".
One or several waypoints can then be marked from the complete list and deleted by clicking
on
.
Note: Imported waypoints can be deleted by deleting the corresponding GPX file in the GPX
manager (see Chap. 13.3).
13.3 GPX manager
The GPX manager contains all of the GPX files that are located on your device.
These can be either tracks that you have recorded yourself or imported GPX files.
Here you can also delete imported GPX files from the device.
Note: The imported files may contain tracks, tours and waypoints.
They are also displayed in each case in the track manager and waypoint manager.
Caution: When you delete a GPX file, all of the elements contained (tracks, tours and/or
waypoints) are deleted.
Tip: If you want to delete a GPX file, but would like to keep a waypoint from it, simply save
the waypoint under a different name before you delete the GPX file.
13.4 Help
Help takes you to the online help containing brief operating instructions for your navigation
symbol, you can tap on it and you will be
system. On each screen on which you see the
guided directly to the chapter in the Help section which deals with the corresponding topic.
This allows you to find an explanation about the respective function quickly in lots of different
contexts.
In addition, in the Help section you can select "Demonstrate functions" to get a
demonstration of certain functions.
Falk PANTERA User Manual
47
14 Falk Navi-Manager
In this chapter you are given a brief introduction to the Falk Navi-Manager.
The following explanations relate to version 2.8 of the Navi-Manager. If you are now using a
newer version, you will find information about this in the program help section. You can
access help via the ? in the menu bar of the Navi-Manager program interface. There you will
also find detailed information about the functions which are outlined below, as well as about
other functions.
With the Falk Navi-Manager you are able to transfer country maps, speakers, POIs and GPX
files to your device or from the device to your PC.
In addition, you can transfer individually compiled content from the Falk Online Community to
the device via the Navi-Manager.
As the memory capacity on your navigation device is limited, the Falk Navi-Manager also
offers you the possibility of managing your data by for example only saving the data which is
currently required on your navigation device and downloading other data onto a memory card
or your PC.
The Falk Navi-Manager provides you with the following further functions:
Import of GPX files
Setting up, activating and changing the theft protection
POI import from, for example, Google Earth
Installation of software updates
Installation of the maps
Creation of a device back-up (optional)
14.1 Introduction to the Falk Navi-Manager
You must first install the Falk Navi-Manager on your PC. To do this, you must first download
the program from the internet.
You will find the Navi-Manager on www.falk-navigation.de under "Service > Navi-Manager".
After download is complete, double-click on the file "setup.exe" and then follow the
instructions given by the installation wizard.
Now connect your navigation device to your PC via the USB cable.
To start the Falk Navi-Manager, click on the Windows Start menu: Start/Programs/Falk/NaviManager or if necessary on the Navi-Manager icon which was placed on your desktop when
installation took place. The Falk Navi-Manager then opens up.
14.2 Import of GPX files
GPX is the most common file format for saving tracks, geocaches and waypoints. There are
numerous portals and providers on the internet that offer tracks to download. If they are in
GPX format, they can easily be transferred to your device and utilised. To transfer GPX files
from a portal to your device, you must first save them on your PC.
Then choose "GPX Manager" at the top in the Falk Navi-Manager.
The GPX manager shows all GPX files on the PC or on the device in a list.
Falk PANTERA User Manual
48
You then have the following possible options:
Back up to PC – The selected GPX file from one of the two windows can be saved to a
freely selectable directory on the PC.
Delete – Deletes the selected GPX file from the device.
Import – Imports a GPX file from a PC to your device. To be able to manage the GPX files,
the files to be imported must first be imported to the Navi-Manager.
Update – Updates the content of the windows if, for example, you have imported a GPX file
again.
You can display your waypoints, tracks and geocaches on the map.
Altitude and speed profiles and the time required for the tracks can be called up.
Transfer and save GPX files to the PC
To save imported GPX files and GPX files you have created yourself to the computer,
proceed as follows:
1. Select the file you want and use the "Save" button.
2. Once you have acknowledged the notice about the intended storage location with
"OK", two entries will appear in your list. There is an entry for the GPX file on your
navigation device and an entry for the GPX file on your computer.
3. To find the file you want again on your PC, mark the file and, by clicking the right
mouse button, call up the menu item "Show folder". The folder in which the GPX file
has been saved is automatically opened.
Falk PANTERA User Manual
49
Import GPX files from your PC to the navigation device
To import downloaded GPX files to your navigation device, please perform the following
steps:
1. Select the button "Import".
2. Search for the file you want on your PC, select it and use the button "Open".
3. The file has now been imported to the GPX manager and can now be saved on the
navigation device.
4. Mark the file you want and choose "Copy PC > Flash" in the bar on the right.
The GPX file is now saved on your navigation device and can be used.
Delete GPX files from the navigation device
To delete recorded or imported GPX files from your navigation device, please perform the
following steps:
1. Select the file you want and use the "Delete from Flash" button in the function bar on the
right.
2. Confirm the notice with "Yes" to remove the file.
Edit GPX files
To edit the name or the description of tracks or waypoints, proceed as follows:
1. Select the element you want and use the button "Edit".
2. A window will open up in which you can change the name and description as you wish.
GPX files on the map view
In the GPX manager, you can display waypoints, tracks and geocaches that you have
created yourself. The map can be moved using the arrows and the hand icon. The zoom
level of the map can be changed with "+" and "-". Viewing options such as satellite and map
are located at the top right-hand edge of the map view screen.
In the bottom section of the GPX manager, you can display the altitude and speed profiles,
length, time and description of tracks and waypoints. If no information exists in relation to
this, the detailed view remains empty at this point.
If no actually required time exists, the anticipated required time is calculated based on the
average speeds for cyclists and pedestrians which exist in the navigation device.
Falk PANTERA User Manual
50
14.3 Transfer of content
All of the available data is summarised in various categories. In the top section of the screen
interface, the categories Country maps, POIs, My favourite lists, Speakers, Software and
Raster maps (optional) are presented in the form of tabs.
When you click on the tab you have selected, all of the data in this category is presented in
list form in the overview.
Thanks to row headings and corresponding icons, you can tell from the overview where the
individual data for the various categories is saved. The data may be stored
in the internal memory of the navigation device,
on the SD card,
on the PC,
on CD/DVD or
on an internet server.
Important: An active internet connection must exist to enable downloading from the internet.
Copying or deleting:
The selected data is copied from the PC to the SD card.
The selected data is copied from the PC to the internal memory of your device.
The selected data is deleted from the internal memory.
The selected data is deleted from the SD card.
The selected data is deleted from your PC.
Please note that the memory capacity of the internal memory is limited. The capacity
utilisation of the internal memory is displayed on the bar at the bottom of the screen.
14.4 Compiling your own tour on the PC
The Falk Navi-Manager offers the possibility, via the online route planner from Falk, of
planning your journeys from the comfort of your own PC. You have the option of transferring
the tours planned in this way to the device and navigating with them there.
Vital prerequisities for using this function are an active internet connection and connection of
the navigation device by USB cable to the PC.
Initially proceed in the manner described in the introduction.
In the opened Falk Navi-Manager, you will find the Service item in the menu bar. Select the
subitem Falk Route Planner
You will get directly to the webpages of Falk. There you have the option to plan a route with
the route planner. First enter your starting address followed by your destination and then
click on Plan route.
In the top menu bar of the Navi-Manager, the Transfer tour button is activated after the
route has been calculated. Select this to transfer the tour to your device. An input box will
appear into which you can enter a name for your tour. This name will then be used as the
tour name on the navigation device.
You can find the tours transferred to the navigation device in the main menu under the menu
item Tour planner.
Select the tour by tapping on it and then choose
. You can now travel along the tour that
has been compiled.
Note: The routes which are planned here only travel along the road network.
Falk PANTERA User Manual
51
14.5 Software
Under the Software tab you are shown software updates which are compatible with your
device. In addition, you are shown additional products that allow you to expand your device
to include particular functions. If you click on "Buy", you are automatically directed to the
Falk Online Shop where you can get further information about the additional products and
buy them.
14.6 Training Manager
To open the Training Manager, use the following buttons or menu options:
1. Training Manager"" button
2. Training Manager"" menu option
The Training Manager has the following functions available:
•
Training Units
The training units recorded with your device are being displayed.
•
Training Statistics
The training units recorded with your device are currently being statistically analyzed.
•
Compare Training Units - Tracks
Aufgezeichnete Trainingseinheiten und auf Ihr Gerät übertragene Strecken können
verglichen werden.
•
Save Training Units
In order to analyze them, you first have to save your recorded training units and your
transferred tracks on your computer.
•
Transferred Tracks
The tracks transferred to your device are being displayed.
14.6.1 Training Unit
Used to display all the details concerning the training units recorded with your Falk Outdoor
navigation device.
Selecting a training unit
In order to select a training unit that is being recorded, follow the steps below:
1. Select the file you want from the list of training units being displayed.
2. If the list of training units is too long, you can filter it by moving your mouse over a
column label of your choice and then selecting a value that should be used for
filtering.
3. After this, the list will only show training units that match the filter value (i.e., these will
be the only training units available for selection).
4. To confirm your selection, simply click on the "Show details" button.
Falk PANTERA User Manual
52
Training unit view
Detailed information:
The left side will show all available details concerning the training unit that is being recorded
and that you selected. If no values are shown, this unit has not been recorded. This may
occur with transferred tracks, for example.
Map view:
1.
2.
3.
4.
5.
The map view has the following features available:
View of the training unit being recorded in the form of a line on the map view.
You can move the map with the arrows or with the hand icon.
You can change the level of zoom with "+" and "-".
View options, such as "Satellite" and "Street map," are found on the upper right
edge of the map view.
6. When you click on a waypoint, a layer with details concerning the waypoint will be
displayed.
Profile display:
The following profiles are available on the lower pane in the Details view:
1.
2.
3.
4.
Speed profile
Elevation profile
Heart rate profile
Cadence profile
14.6.2 Training Statistics
Your device carries out statistical analyses of the training units being recorded. This will
provide you, for example, with an overview of the number of training units, total distance,
duration, calories consumed, and the number of climbs and descents during a specific period
of time.
Total statistics:
• Total kilometers: In contrast to your actual training statistics, your total statistics not
only total the values of the training units being recorded. Instead, they show the
grand total of kilometers you've ridden.Values that you enter manually into the
device will also be added to this total.
• Elevation gain: In contrast to your training unit statistics, your total statistics not only
total the values of the training units being recorded. Instead, they show the grand
elevation gain total. Values that you enter manually into the device will also be
added to this total.
Training statistics:
Your "training statistics" will only include the training units that have been recorded with your
device. You can use the filters to filter these training units by bicycle profile or by year. If you
do this, the statistics will only take into account the training units that meet the filter
conditions.
You can use the "Week," "Month," and "Year" buttons to select the period for which you want
a report. Training units that have been recorded with your device will be statistically
Falk PANTERA User Manual
53
analyzed. This way, you can get, for example, an overview of the number of training units,
total distance, duration, calories consumed, and the number of climbs and descents during a
specific period of time.
14.6.3 Save Training Units
In order to be able to analyze your recorded training units and transferred tracks, you will
have to save them once on your computer. Whenever new training units that have not yet
been saved on your computer are detected on your device, a prompt will immediately appear
asking you to save your data.
If you interrupt the saving operation, you will be asked to save the newly found training units
and tracks the next time you start the Training Manager.
14.6.4 Transferred Tracks
This function can be used to analyze tracks that have been transferred to your device using
the GPX Manager. The actual values shown will depend on the data in the transferred tracks.
Selecting a transferred track
In order to select a transferred track follow the steps below:
1. Select the file you want from the list of transferred tracks being displayed.
2. If the list of transferred tracks is too long, you can filter it by moving your mouse
over a column label of your choice and then selecting a value that should be used
for filtering.
3. After this, the list will only show tracks that match the filter value (i.e., these will be
the only training units available for selection).
4. To confirm your selection, simply click on the "Show details" button.
Training unit view
Detailed data:
The left side will show all available details concerning the tracks you transferred. If no values
are shown, no values are available in the data.
Map view:
1.
2.
3.
4.
5.
The map view has the following features available:
View of the training unit being recorded in the form of a line on the map view.
You can move the map with the arrows or with the hand icon.
You can change the level of zoom with "+" and "-".
View options, such as "Satellite" and "Street map," are found on the upper right
edge of the map view.
6. When you click on a waypoint, a layer with details concerning the waypoint will be
displayed.
Falk PANTERA User Manual
54
14.7 Import of POIs
On Falk.de, Google Earth and lots of other websites a large number of points of interest
(POIs) are available for you to download. If these POIs exist in a KML or KMZ format, you
can transfer them to your navigation device via the KML import plugin of the Navi-Manager.
Visit the corresponding website from which you want to download the KML files, e.g.
www.falk.de.
KML files from falk.de
On www.falk.de. you enter on the entry menu (top left) an address within whose
surroundings you would like to search for POIs. On the right next to this entry area, you can
select a theme for the search, e.g. restaurant, cinema etc.
To complete your entries, you confirm them with the button "display". Below the entry area
you will see a dropdown list of POIs. In addition, you will see a map display with the POIs
marked on it.
To select the POI which you want to transfer to your navigation device, click directly on the
map on the corresponding POI or select is by clicking on it from the dropdown list. After a
POI has been selected, an info window for the POI appears.
Now select the Tool button. A list will open up. Now select Save and For my Falk Navi.
The POI is saved as a KML file on your PC.
KMZ/KML files from Google Earth
You will also find lots of interesting POIs on Google Earth. The following section describes
how you can incorporate several POIs as a new POI category.
Note: Falk has no influence over functions of Google Earth which are described in the
instructions. There may therefore be changes to the sequence which is described.
Start the program Google Earth.
Enter a city and a subject theme in the search box at the top left (e.g. "Stuttgart" and
"„Museums").
Selection of the POIs which are to be adopted:
You can adopt blocks of POIs by using the umbrella term (e.g. "Museums (1 – 10)") by
clicking on the right mouse button and then selecting the menu item "Save under "My
Places"".
You can adopt individual POIs by clicking on the right mouse button and then selecting the
menu item "Save under "My Places"".
The selected POIs are displayed under "My Places".
Further POIs, including those from other cities, can now also be added to "My Places" in the
manner described above.
Click on the "My Places" item with the right mouse button and select the menu item "Save
As". The file can now be saved on the PC as a KMZ file.
Falk PANTERA User Manual
55
KML/KMZ import in the Falk Navi-Manager
The following text describes
how KML and KMZ files can
be imported to the sat nav via
the Falk Navi-Manager.
Start the Navi-Manager. On
the Navi-Manager screen
interface in the menu bar
under "Plugins", call up the
menu item "KML Import
Plugin".
Here you will then see the
window for the import wizard.
You can acknowledge this
with the Next button. With the
aid of the "Select" button, you
can select the KML or KMZ
file on your PC which you would like to transfer to your navigation device. Once you have
selected a file, a list of the POIs in it appears beneath it. Press the Next button.
In the next window, you must
assign an individual category
name for your POI category.
You also have the option
here of providing more details
about the particular POI
category. Once you have
provided the POI category
with a name and the
information you want, confirm
your entries again with the
Next button.
In the next step, you have the
option of selecting an icon to
be displayed on the map with
the respective POIs. A small
selection of icons are suggested for you.
However, you can also select your own icon (if one exists) from your PC. This icon should
have a resolution of 72 dpi and the image size 16x16 pixels.
Finally, confirm your entry again with the "Next" button. If you do not specify your own icon,
the default icon shown will be used for displaying the POI on the map.
The final window once again summarises the information for the POI category which is to be
imported. When you press the Complete button, you start the conversion process (the KML
file is converted into the Falk format).
Note: The conversion may take a little time.
The converted POI category appears automatically after a few seconds under the "My
favourites" tab. The POI category is now located on the PC. To transfer the POI category to
the navigation device, you must click on the right-hand side of the window on the button
Copy PC > Flash or Copy PC > SD card.
Following successful transfer, your own POI category is available on the navigation device
for further use, e.g. for radius searches or navigation operations.
Falk PANTERA User Manual
56
Note: The POIs which are imported via the KML import plugin cannot be rated on the
navigation device.
14.8 Falk Online Community "123POI.com"
In addition to the preinstalled points of interest, you can create your own points of interest in
the Falk Community and then transfer them to your device.
There you have the possibility of adding a descriptive text and also pictures to your POIs.
You can comment on POIs from other users with your own experiences or simply rate them
using up to 5 stars.
The Falk Community can of course also be used to expand your own content because you
can download countless POIs with pictures, ratings and comments from other users to your
device.
To be able to use these functionalities via the Navi-Manager, you first require free access
with a user name and password. If you already have log-in data from the websites "falk.de"
or "123POI.com", you can use this. If not, register at "123POI.com" using the "Register now
for free!" button.
14.8.1 Use "Favourite lists" from the Community
When you click on the "My favourites" tab in the main window of the Navi-Manager, an
overview list of your available "own" POI collections is displayed.
These may be POI collections which were generated with the KML import plugin.
On the other hand, here you are also shown your own "Favourite lists" which exist at
"123POI.com" (to create a new favourite list at "123POI.com", click there in the menu on "My
favourite lists" and then on the "Create" tab). The favourite lists from the community are only
displayed if you are currently registered with the community via the Navi-Manager.
Your "own" POI collections mentioned above from a KML import or from "123POI.com" can
be transferred to the sat nav in the usual way. Content which is located in the online
community is presented with a globe symbol.
14.8.2 Upload new and amended ratings
On the sat nav, in the detailed view for a point of interest (POI), you can submit a rating of
from 1 to 5 stars. This means, for example, that you can rate a restaurant you have visited.
You can upload these ratings in the Falk Online Community, where they are combined to
produce an overall rating. To do this, you must click in the menu under "Edit" on "Transfer
new and amended ratings to the Falk Community".
If the automatic update function is set appropriately, uploading of the new and amended
ratings will be performed automatically each time that you start the Navi-Manager.
Falk PANTERA User Manual
57
15 Tips and tricks
Here you will find a number of tips and tricks that will help you to handle the device.
– These buttons allow you in many contexts to switch between the input view and
the list view. In the list view, you will see all of the entries which match your previous input.
This means you can find what you are looking for even faster.
Back to map – Wherever you are on the menu, you can easily switch back to the map view
at any time. To do this, press down on
or
.
symbol, you can tap on it and you will be
Help – On any screen on which you see the
guided directly to the Help chapter which relates to the corresponding theme. This ensures
that you can find an explanation of the particular function in many different contexts.
Scrolling and browsing – In list views, you can move the continuous text up and down
directly with your finger. In menus with several pages, you can scroll to the next page by
swiping your finger sideways.
Route options – With the route option "Easy" the route may be longer as gradients of over
4% are avoided. The avoidance of certain types of routes (tunnels, hiking trails etc.) also has
an influence on the route which is calculated. After the route has been calculated, you can
change the route options again if you tap on
difference these settings make.
. This allows you to compare what
Map zooming – Zooming in and out of the map helps in many situations. If you want to
move the map a large amount, first zoom out. You can then move the map over greater
distances more quickly. Zoom in on the map (e.g. in the view of the calculated route) to
identify more details.
Save power – You can save power and thus increase the operating life if you switch the
device to stand-by mode when you are not actually using it. In addition, you can set the
brightness of the screen to a relatively low level to save power.
Falk PANTERA User Manual
58
16 Troubleshooting
Problem
Possible cause
Solution
Connect the device to a suitable power
source or replace the batteries.
Navigation device does
not start up
No GPS reception / GPS
reception is interrupted
Device no longer
responds to entries
Battery capacity too low
GPS reception may be interfered with in
forests, when you are surrounded by tall
buildings, where there is heavy cloud
cover etc.
Occasionally, overloading may result in
the device no longer responding
Reposition the navigation device if
necessary. At least 4 satellites are
required for navigation. This information
can be retrieved on the device under
"Settings > "System / General" > "GPS
Info".
Carry out a hard reset by holding down
the power button for around 3 seconds.
The device then switches off entirely.
The compass should be regularly
calibrated
Recalibrate the compass
There are sources of interference in the
immediate vicinity
Make sure that there are no sources of
interference such as magnets or highvoltage power lines close by.
Compass does not align
itself correctly
Barometer values are
not correct
If the device is not being used for a
prolonged period, please switch it off
entirely. Press the power button and tap
on "Switch off".
The barometer should be regularly
calibrated
When there are breaks in the weather or
you experience great gains or losses of
altitude, you should calibrate the
barometer several times a day.
The destination you are
searching for cannot be
entered
The corresponding country map may not
be available
Please check whether the corresponding
detailed map is included with the product
or is already preinstalled. Please use the
Navi-Manager for any possible
installation that may be required.
The track includes
jumps in altitude
The barometer was not calibrated prior
to the start of the track recording.
It is recommended that you calibrate the
barometer manually, by entering an
altitude, in particular before recording a
track.
Falk PANTERA User Manual
59
17 Technical data
Screen
Display
Resolution
Dimensions
Internal memory
GPS
Flash memory
RAM memory
Chip
Sensors
Input / output
Barometer, compass
Input
Screen interface, on-screen keypad
USB
USB 2.0 (Micro USB)
Waterproof rating
Operating temperature
Storage
Atmospheric humidity
Integrated 1840 mAh LI-Ion battery,
rechargeable
IPX 4
-10~+60°C
-20~+70°C
0~90% atmospheric humidity
Battery
Environmental conditions
Falk PANTERA User Manual
7.1 cm diagonal (3”) , transflective
240 × 320 pixels
ca. 6,2 x 10,8 x 1,7 cm
8 GB
128 MB
SiRF Star IV
60
18 Change of battery
Sensors
To change the battery of the sensors, you must untwist the battery cover on the back to the
left. You can do this, for example, using a coin which you place into the slot on the cover.
Insert the battery (note the correct polarity) and close the sensor by twisting the cover to the
right to shut it.
Device
To replace the battery of the device in the event of a defect, you must pull out the four rubber
nipples (1) on the back of the device. Then undo the screws (2) with a suitable precision
screwdriver. Then carefully open the housing cover (3) and carefully remove the battery (4).
Detach the connector of the battery from the device.
Falk PANTERA User Manual
61
19 Service & support
To provide optimum support to customers, Falk has set up a service centre which handles all
warranty claims and repairs.
If you have any questions about the guarantee and warranty, please feel free to contact the
technical hotline:
+49 1805 – 003233
(€ 0.14 / min. from a German landline, mobile phone prices may vary, max. € 0.42 / min.)
In the event of a technical defect within the guarantee period, you can also register the
device for a free repair on the following website:
http://www.falk-outdoor.com/en/service-en/guarantee-processing.html
Scope and duration of the warranty
United Navigation GmbH guarantees, for a period of 24 months (battery: 6 months) from the
purchase date, that at the point in time of the transfer of risk the product is free of any
material defects and defects of title in accordance with Sections 434, 435 of the German Civil
Code. If a product which is supplied has evident material or manufacturing defects, which
also include damage caused during transportation, the defect must be complained about
immediately.
In other respects, the statutory regulations pursuant to Sections 434 ff., 475 para. 1 of the
German Civil Code apply.
Proof of purchase is required to make a claim under the guarantee.
The gurantee does not cover defects which have been caused by improper maintenance,
unauthorised attempts to open, repair and/or modify the product or its parts, inappropriate
installation, use of software added by the customer, viruses, causes outside of the scope of
the intended uses which are envisaged, accidents, fire, lightning, power cuts and/or natural
disasters as well as similar causes. This guarantee shall further lapse in the event of any
attempted or completed alteration or repair to the product by unauthorised people, removal
or alteration of the device's serial number.
Falk PANTERA User Manual
62
20 Glossary
Barometer: A barometer is a measuring device used to measure atmospheric pressure. The
barometer is used to calculate the current height and is shown on the trip computer.
Menu button: The menu button is the lower button on the left-hand side of the device. When
you press the menu button, you can control the volume and brightness levels. However, you
can also select another function which is to be controlled using the menu button.
Button: Buttons which are shown on the screen. These many be menu items or command
buttons (
etc.). Buttons can be operated by tapping on them.
GPS: The Global Positioning System is a satellite-based system for global positioning. Your
location can be pinpointed using the conventional GPS satellite system to within 20 metres at
any time – provided that a GPS signal is being received.
GPX file: The most common file format for saving tracks or waypoints is the GPX format.
The files are saved in the GPX manager. However, the tracks or waypoints they contain are
also displayed in the track manager or waypoint manager.
Note: To delete imported waypoints, the corresponding GPX file must be deleted.
Compass: A compass is a measuring instrument for determining the cardinal direction. The
compass icon on the navigation view screen shows you the north bearing. If you display the
compass in a large-scale view via the rapid access menu, the entire map is orientated in the
direction you are looking.
Favourite lists: A compilation of several points of interest is a favourite list. You can create
your own points of interest via the Falk Online Community. You can then also compile the
points of interest to create favourite lists or use favourite lists and points of interest from other
users.
Circuit: In the case of a circuit, the starting point and end point are identical. Either a route
length or your preferred travel time can be entered. An appropriate route is calculated
automatically from these details.
Point of interest: A point of interest (POI) is an address or position of special interest such
as restaurants, interesting sights, museums and many more besides.
The points of interest on your device are divided up into various categories to make it easier
to search for specific destinations. Additional points of interest can be transferred to the
device via the Falk Online Community (see Chap. 14.8.1).
Coordinates: Positions can be determined precisely with the aid of coordinates. This makes
sense particularly on open terrain away from roads. Coordinates are normally specified with
degrees of latitude and longitude.
Tour: Tours are the linking together of waypoints, favourite locations or other destinations in
a defined sequence. However, the route between the individual waypoints is not precisely
defined, as as the case with tracks.
Track: A track is a route which is precisely defined (with the aid of coordinates placed close
to one another which are connected to form a line). This can be displayed on the map so that
you can travel along it. Tracks can also be recorded with the device. In track navigation, no
turn-offs are displayed or spoken announcements issued.
Falk PANTERA User Manual
63
Trip computer: The trip computer is the ingenious information and statistics hub in your Falk
PANTERA. Data relating to the current route but also barometer figures (atmospheric
pressure, altitude) as well as astronomical figures (sunrise and sunset, lunar phase) can be
called up.
Waypoint: A waypoint is a geoposition saved as a pair of coordinates (geographical latitude
and longitude) in open terrain. A waypoint can be any point in the countryside, e.g. a branch
on a path, a hut, or any desired POI (picturesque point in the countryside, viewing point or
interesting sight). Each waypoint can be selected as a destination.
Basic Map Plus
The Basic Map Plus is an OpenCycleMap/OpenStreetMap prepared specifically for the
products of Falk Outdoor.
It is a simplified outdoor map but still fully routable. The map shows a more or less
comprehensive network of routes and in some places also cycle paths and footpaths
(depending on the data provided by OpenCycleMap/OpenStreetMap).
In contrast to the Premium Outdoor Map, this map is not quality-tested but rather is based on
the information provided by a free community on the internet. For this reason, there is no
road classification and there may be limitations in the quality of routes. The coverage of the
network of routes is less than that of a quality-tested Falk Premium Outdoor Map. The map
shows a simpler representation of the surface area and contains fewer points of interest.
However, the familiar design of the Falk Premium Outdoor Map has been kept in order to
make it simple to embrace the world of outdoor navigation of Falk Outdoor.
Basic Maps Plus are offered for a large number of European countries. Others will follow and
can be downloaded and transferred to the device via the Falk Navi-Manager. It is also
possible to navigate by moving from a Premium Outdoor Map to a Basic Map Plus.
Premium Outdoor Map (optional)
The quality-tested Falk Premium Outdoor Maps offer a maximum level of information for
outdoor use. The maps are developed in collaboration with outdoor specialists (e.g.
KOMPASS cycling and hiking maps) and offer comprehensively standard/uniform coverage.
In addition to the road network for a country, these maps contain a huge range of cycle
paths, footpaths, hiking trails and forest trails. In some cases, this outdoor route network,
which is fully integrated into the map, is just as extensive as the road network for the country
in question.
All maps undergo extensive quality testing before they are used on the navigation devices.
Outdoor maps from Falk therefore know (almost) all routes to the destination - on foot or by
bike. They are also fully routable. Starting from your chosen location, a suitable route to your
destination is therefore automatically determined which is then output with the aid of acoustic
and visual commands.
The presentation of the map remains sharp and clear on every zoom level.
Falk PANTERA User Manual
64
21 Licence terms and conditions
Licence terms and conditions for the Falk Navigator and Navi-Manager
§1
Object of the contract
1. The Licensor is United Navigation GmbH, Marco-Polo-Zentrum, 73760 Ostfildern –
hereinafter referred to as the "Licensor". In accordance with § 6, the Licensor grants the
Licensee, for the duration of the contract, a single (non-exclusive) right which is restricted
in accordance with the terms and conditions below to use the enclosed software program
which is stored on a data carrier in machine-readable form (object code) - hereinafter
referred to as the "software" – including the data which is contained and the
accompanying material. Accompanying material in this context is taken to mean the
program description and the instructions for use.
2. An acquisition of rights to the software which goes beyond this is not associated with this
granting of usage rights. The Licensor shall retain in particular all of the distribution,
exhibition, presentation, performance and publication rights to the software. The same
applies to the editing and reproduction rights, unless anything to the contrary is expressly
agreed below.
§2
Scope of the usage rights
1. The granting of the licence entitles the Licensee to install and run the software and to use
the data at one workstation (stand-alone application). Furthermore, the Licensee may use
the installation program provided by the software to install the software on a portable
Windows CE device (stand-alone application) which is sold by the Licensor. Use of the
software and the data on a network or a system comprising multiple workstations shall
only be permitted if the Licensee has purchased a special licence for every workstation at
which the software and data may be used. The software and data may not be used by
employing remote data transmission.
2. The granting of the licence only permits private use of the software; commercial use is
prohibited.
3. The usage right is confined to the object code of the software program. The Licensee has
no entitlement to a copy of the source code. The Licensee is prohibited – unless it is for
the purpose of establishing interoperability pursuant to § 69e of the German Copyright
Act – from reengineering (reverse engineering), reassembling, translating or editing, or
amending in some other way the object code of the software. In particular, the software
and data and the results achieved by using them may not be used to create a dedicated
product for the Licensee.
4. Any type of reproduction of the accompanying material, data carriers, software and data,
in particular copying to data carriers, and the provision of it for remote data transfer
and/or transmission by remote data transfer is prohibited. Exceptions to this are the oneoff installation of the software from the data carriers which are supplied with it to the hard
disk, the inevitable non-permanent copies made as a result of the use pursuant to § 2
paragraph 1, and the downloading or printing out of data from the application which is
running exclusively for personal use. "One-off installation" shall also be authorised if the
software has been deleted beforehand irreversibly and in full from the computer on which
it was installed and it is only then subsequently reinstalled on the same computer or on a
different computer.
5. Another exception to the prohibition on reproduction is the creation of a back-up copy,
where this is necessary to safeguard future use of the software exclusively for personal
use as assumed by the contract. This copy must be explicitly identified as a back-up copy
and may only be used as such. It must remain in the possession of and be kept safe by
the Licensee.
Falk PANTERA User Manual
65
Transferring
1. The Licensee is prohibited from hiring out the software, data and/or the accompanying
material to third parties as part of commercial activities.
2. The Licensee is prohibited from making the software, data and/or the accompanying
material accessible to third parties as part of commercial or non-commercial activities,
circulating it and/or passing it on to the public.
3. However, the Licensee shall be entitled to transfer the original data carriers including the
software, data and the accompanying material if
a) it has deleted the installed software and all possible pools of data which may have been
saved and any back-up copies which may have been made,
b) the third party pledges in writing to the Licensors directly that it will abide by these licence
terms and conditions,
c) this written declaration of consent is sent to the Licensor and
d) the Licensee has handed over the software, data and the accompanying material in full to
the recipient without retaining any copies whatsoever.
§4
Warranty
1. The Licensee must report obvious defects within an appropriate set period of time and in
writing with a precise description of the defect. Defects must be reported – at the option
of the Licensee – exclusively to one of the Licensors mentioned above. Reports of
obvious defects which are delayed or unsubstantiated shall release the Licensor from its
obligations to provide a service to correct the defects. However, in the event that the
Licensor becomes involved with unsubstantiated reports of defects which are raised
through gross negligence or deliberately, it shall be entitled to invoice the Licensee for
the costs associated with this. In the event that the Licensee is a trader, it must, above
and beyond its obligation arising from sentence 1, examine the items delivered and
services provided by the Licensors immediately and report any defects which are found
immediately in writing and with as precise a description of the defect as possible.
2. The Licensor guarantees that the program functions can be executed without any errors
in accordance with the program specifications and contract documents. Errors which only
result in a negligible reduction in the usability of the software shall not entitle the Licensee
to reduce the amount paid for the granting of the usage rights to the object of the contract
or to withdraw from the contract.
3. Outside of the claims under the warranty, the Licensee has no claim against the Licensor
for updates to the software and/or data.
4. The Licensor shall fulfil its warranty obligations in the event of material defects by
providing a subsequent service, specifically at its option by correcting the defect or
supplying a replacement product. A subsequent service may be performed in particular
by a new version of the program being handed over or by the Licensor indicating possible
ways of preventing the effects of the defect. A new version of the program must be
accepted by the customer if this results in an acceptable level of adjustment for it. If the
subsequent service provided fails to work, if the Licensor is late in providing it, refuses to
do so or if the subsequent service is unacceptable to the Licensee in an individual
instance, the Licensee shall be entitled, at its option, to withdraw from the contract or to
demand a reduction in price. Claims for compensation are governed by § 5.
5. If exceptionally the Licensor has promised or demonstrated characteristic features of the
software, the data, the accompanying material or the data carriers expressly or in
demonstrating the characteristic feature in its own advertising or has fraudulently failed to
disclose defects in these items, paragraphs 2 and 4 above shall not apply. In this case, §
5 paragraph 1 a) shall apply accordingly.
6. A warranty on the part of the Licensor shall not exist in cases of functional impairments
which result from the hardware and software environment provided by the Licensee,
incorrect operation, incorrect, improper commissioning, use and/or treatment of the
subject of the contract by the Licensee, external defective data or other reasons which
Falk PANTERA User Manual
66
stem from the Licensee’s area of risk, as well as from improper maintenance, alterations
and/or inappropriate repairs made by the Licensee or third parties and also from natural
wear and tear, provided that the Licensee is not able to demonstrate that the defect is
independent of this.
§5
Liability
1. The Licensor shall pay compensation or refund wasted expenditure, no matter what the
legal ground for this is, only to the following extent:
a) if the Licensor, its legal representatives or vicarious agents have acted with specific intent
and if a guarantee has been provided in full in respect of the agreed quality;
b) if the Licensor, its legal representatives or vicarious agents have acted with gross
negligence, to the level of the predictable loss which is typical for the contract and should
be prevented by the duty to exercise due care;
c) in other cases only when a substantial contractual obligation is breached and when there
is a delay, specifically for reimbursement of the typical and predictable loss.
2. Statutory liability in the event of culpable loss of life, physical injury or damage to health
and in accordance with the German Product Liability Act shall remain unaffected.
3. The Licensor shall be at liberty to claim contributory negligence.
4. If any data is lost, the Licensor shall only be liable for losses which would have occurred
even if the Licensee had backed up its data properly.
§6
Term of the contract
1. The contract shall run for an indefinite period of time.
2. The Licensor is entitled to withdraw permission to use the software for a good reason at
any time. A good reason shall be deemed to exist in particular if the Licensee fails to
comply with the restrictions on use stipulated in § 2 or breaches the terms and conditions
for passing on the software laid out in § 3 and does not stop this behaviour immediately
even after receiving a written warning with a threat of withdrawal.
3. If permission to use the software is withdrawn, the Licensee must destroy the original
data carriers and any copies which exist and delete any data and software which is
stored completely and irreversibly. It must provide the Licensor with a written assurance
that the items have been completely destroyed and deleted.
§7
Statute of limitations
The Licensee’s claims on account of defects shall become statute-barred within a year. If the
objects of the contract are new moveable assets and the Licensee is a consumer, all
claims shall only become statute-barred after 24 months. The statutory regulations shall
apply to instances of premeditated or fraudulent behaviour, if there is personal injury or in
the case of claims under the German Product Liability Act. The start of the period of
limitation shall be governed by the statutory regulations.
§8
Final provisions
The agreement reached here shall be governed by the law of the Federal Republic of
Germany to the exclusion of the UN Convention on Contracts for the International Sale of
Goods. The place of performance for all obligations arising there from shall be Esslingen
(Germany). The parties agree that Esslingen (Germany) shall be the place of jurisdiction for
all disputes arising from this licence agreement if the Licensee is a trader or is of equal
standing to a trader or if its registered office or branch office is abroad.
End User Terms
The data (“Data”) is provided for your personal, internal use only and not for resale. It is
Falk PANTERA User Manual
67
protected by copyright, and is subject to the following terms and conditions which are agreed
to by you, on the one hand, and United Navigation GmbH and its licensors (including their
licensors and suppliers) on the other hand.
© 2012 NAVTEQ
[Austria © Bundesamt für Eich- und Vermessungswesen; Croatia, Cyprus, Estonia, Latvia,
Lithuania, Moldova, Poland, Slovenia and Ukraine © EuroGeographics; France Source:
Géoroute® IGN France & BD Carto® IGN France; Germany Die Grundlagendaten wurden
mit Genehmigung der zuständigen Behörden entnommen.; Great Britain © Based upon
Crown Copyright material.; Greece Copyright Geomatics Ltd.; Hungary Copyright ©2003;
Top-Map Ltd.; Italy La Banca Dati Italiana è stata prodotta usando quale riferimento anche
cartografia numerica ed al tratto prodotta e fornita dalla Regione Toscana.; Norway
Copyright © 2000; Norwegian Mapping Authority; Portugal Source: IgeoE – Portugal; Spain
Información geográfica propiedad del CNIG.; Sweden Based upon electronic data ©
National Land Survey Sweden.; Switzerland Topografische Grundlage: © Bundesamt für
Landestopographie]
All rights reserved.
Terms and Conditions
Personal Use Only. You agree to use this Data together with Falk Navigator for the solely
personal, non-commercial purposes for which you were licensed, and not for service bureau,
time-sharing or other similar purposes. Accordingly, but subject to the restrictions set forth in
the following paragraphs, you may copy this Data only as necessary for your personal use to
(i) view it, and (ii) save it, provided that you do not remove any copyright notices that appear
and do not modify the Data in any way. You agree not to otherwise reproduce, copy, modify,
decompile, disassemble or reverse engineer any portion of this Data, and may not transfer or
distribute it in any form, for any purpose, except to the extent permitted by mandatory laws.
Multi-disc sets may only be transferred or sold as a complete set as provided by United
Navigation and not as a subset thereof.
Restrictions. Except where you have been specifically licensed to do so by United
Navigation, and without limiting the preceding paragraph, you may not (a) use this Data with
any products, systems, or applications installed or otherwise connected to or in
communication with vehicles, capable of vehicle navigation, positioning, dispatch, real time
route guidance, fleet management or similar applications; or (b) with or in communication
with any positioning devices or any mobile or wireless-connected electronic or computer
devices, including without limitation cellular phones, palmtop and handheld computers,
pagers, and personal digital assistants or PDAs.
Warning. The Data may contain inaccurate or incomplete information due to the passage of
time, changing circumstances, sources used and the nature of collecting comprehensive
geographic data, any of which may lead to incorrect results.
No Warranty. This Data is provided to you “as is,” and you agree to use it at your own risk.
United Navigation GmbH and its licensors (and their licensors and suppliers) make no
guarantees, representations or warranties of any kind, express or implied, arising by law or
otherwise, including but not limited to, content, quality, accuracy, completeness,
effectiveness, reliability, fitness for a particular purpose, usefulness, use or results to be
obtained from this Data, or that the Data or server will be uninterrupted or error-free.
Disclaimer of Warranty: UNITED NAVIGATION GMBH AND ITS LICENSORS (INCLUDING
THEIR LICENSORS AND SUPPLIERS) DISCLAIM ANY WARRANTIES, EXPRESS OR
IMPLIED, OF QUALITY, PERFORMANCE, MERCHANTABILITY, FITNESS FOR A
PARTICULAR PURPOSE OR NON-INFRINGEMENT.
Some States, Territories and
Countries do not allow certain warranty exclusions, so to that extent the above exclusion may
not apply to you.
Falk PANTERA User Manual
68
Disclaimer of Liability: UNITED NAVIGATION GMBH AND ITS LICENSORS (INCLUDING
THEIR LICENSORS AND SUPPLIERS) SHALL NOT BE LIABLE TO YOU: IN RESPECT OF
ANY CLAIM, DEMAND OR ACTION, IRRESPECTIVE OF THE NATURE OF THE CAUSE
OF THE CLAIM, DEMAND OR ACTION ALLEGING ANY LOSS, INJURY OR DAMAGES,
DIRECT OR INDIRECT, WHICH MAY RESULT FROM THE USE OR POSSESSION OF
THE INFORMATION; OR FOR ANY LOSS OF PROFIT, REVENUE, CONTRACTS OR
SAVINGS, OR ANY OTHER DIRECT, INDIRECT, INCIDENTAL, SPECIAL OR
CONSEQUENTIAL DAMAGES ARISING OUT OF YOUR USE OF OR INABILITY TO USE
THIS INFORMATION, ANY DEFECT IN THE INFORMATION, OR THE BREACH OF
THESE TERMS OR CONDITIONS, WHETHER IN AN ACTION IN CONTRACT OR TORT
OR BASED ON A WARRANTY, EVEN IF UNITED NAVIGATION GMBH OR ITS
LICENSORS HAVE BEEN ADVISED OF THE POSSIBILITY OF SUCH DAMAGES. Some
States, Territories and Countries do not allow certain liability exclusions or damages
limitations, so to that extent the above may not apply to you.
Export Control. You agree not to export from anywhere any part of the Data provided to you
or any direct product thereof except in compliance with, and with all licenses and approvals
required under, applicable export laws, rules and regulations.
Entire Agreement. These terms and conditions constitute the entire agreement between
United Navigation GmbH (and its licensors, including their licensors and suppliers) and you
pertaining to the subject matter hereof, and supersedes in their entirety any and all written or
oral agreements previously existing between us with respect to such subject matter.
Governing Law. The above terms and conditions shall be governed by the laws of The
Netherlands, without giving effect to (i) its conflict of laws provisions, or (ii) the United Nations
Convention for Contracts for the International Sale of Goods, which is explicitly excluded.
You agree to submit to the jurisdiction of The Netherlands for any and all disputes, claims
and actions arising from or in connection with the Data provided to you hereunder.
Government End Users. If the Data is being acquired by or on behalf of the United States
government or any other entity seeking or applying rights similar to those customarily
claimed by the United States government, the Data is a “commercial item” as that term is
defined at 48 C.F.R. (“FAR”) 2.101, is licensed in accordance with the End-User Terms
under which this Data was provided, and each copy of the Data delivered or otherwise
furnished shall be marked and embedded as appropriate with the following “Notice of Use,”
and shall be treated in accordance with such Notice:
Notice of use USE
Contractor (Manufacturer/ Supplier) Name: NAVTEQ
Contractor (Manufacturer/Supplier) Address: 222 Merchandise Mart Plaza, Suite 900,
Chicago, Illinois 60654
This Data is a commercial item as defined in FAR 2.101 and is subject to the End-User
Terms under which this Data was provided.
© 2012 NAVTEQ – All rights reserved.
Wenn der zuständige Beamte, eine Bundesagentur oder sonstige Bundesbeamte den
vertraglich vereinbarten Hinweistext ablehnen, so sind der zuständige Beamte, die
Bundesagentur oder die sonstigen jeweiligen Bundesbeamten, bevor Sie weitere oder
alternative Rechte an den Daten einfordern, verpflichtet, NAVTEQ darüber in Kenntnis zu
setzen.
Provisions for end customers
The data ("data") is provided exclusively for internal use by the end customer and not for
onward sale. It is protected by copyright and is the subject of the following General Terms
and Conditions which were agreed to firstly by the end customer and secondly by United
GmbH and its licensors.
Falk PANTERA User Manual
69
© 20102 LOGIBALL GmbH, NAVTEQ NV, surveying agencies of the states and the German
Federal Agency for Cartography and Geodesy (map of Germany), KOMPASS Karten GmbH
(Austria and Italy). All rights reserved.
GENERAL TERMS AND CONDITIONS
For internal use only. You agree to utilise this data together with a navigation solution from
United Navigation GmbH only for internal corporate/administrative, non-commercial purposes
for which you have received the licence, but not for a service company, for timesharing or for
other similar purposes. Accordingly, but subject to the restrictions that are outlined in the
following paragraphs, you may copy this data if it is necessary for your internal use (i) to view
it and (ii) to save it, provided that you do not delete any copyright notice which appears and
you do not alter the data in any way. You agree not to reproduce, copy, amend, separate,
take apart or reverse-engineer any part of the data in any other way, and not to transfer or
disseminate it in any form and for any purpose, apart from to the extent that mandatory laws
permit.
Restrictions. If you do not have a special licence from United Navigation GmbH to do so, and
without restricting the previous paragraph, you may not utilise this data with all products,
systems or applications which are installed or connected in some other way or in connection
with vehicles which are capable of vehicle navigation, positioning, processing, real-time
routing, fleet management or similar applications or (b) with or in connection with all
positioning devices or all mobile or wireless electronic or computer devices, including and
without restriction to mobile phones, palmtops and handhelds, pagers and electronic
organizers or PDAs.
No guarantee. This data is provided to you "as it is", and you agree to use it at your own risk.
United Navigation GmbH and its licensors (and their licensors and suppliers) do not grant
any explicit or implicit guarantees, assurances or warranties arising from the law or some
other source. Included within this, but not restricted thereto, are content, quality, accuracy,
completeness, effectiveness, reliability, suitability for a particular purpose, usefulness,
benefits or results produced from this data, or the fact that the data or servers do not
terminate or work without any errors.
Warranty disclaimer: UNITED NAVIGATION GMBH AND ITS LICENSORS (INCLUDING
THEIR LICENSORS AND SUPPLIERS) EXCLUDE ANY EXPLICIT OR IMPLICIT
WARRANTY IN RESPECT OF QUALITY, PERFORMANCE, MARKETABILITY, SERVICE
FOR A PARTICULAR PURPOSE OR EXEMPTION FROM PROPERTY RIGHT
VIOLATIONS.
Liability disclaimer: UNITED NAVIGATION GMBH AND ITS LICENSORS (INCLUDING
THEIR LICENSORS AND SUPPLIERS) SHALL NOT BE LIABLE IN RESPECT OF ANY
DEMAND, CLAIM OR ACTION, REGARDLESS OF THE NATURE OF THE DIRECT OR
INDIRECT LOSS, HARM OR DAMAGE ASSERTED IN THE DEMAND, CLAIM OR ACTION
WHICH CAN ARISE AS A RESULT OF THE USE OR POSSESSION OF INFORMATION;
OR FOR ANY LOSS OF PROFIT, INCOME, ORDERS OR SAVINGS, OR FOR ANY OTHER
DIRECT, INDIRECT, ACCIDENTAL, PARTICULAR OR CONSEQUENTIAL DAMAGE
WHICH ARISES AS A RESULT OF THE USE OR UNSUITABILITY FOR USE OF THIS
INFORMATION, FOR ANY DEFECT IN THE INFORMATION, OR FOR BREACHES OF
THESE GENERAL TERMS AND CONDITIONS, EITHER BY AN ACTION IN HARMONY OR
IN CONTRAST OR ON THE BASIS OF A WARRANTY, EVEN IF UNITED NAVIGATION
GMBH AND ITS LICENSORS HAVE BEEN NOTIFIED ABOUT THE POSSIBILITY OF
SUCH DAMAGE.
Responsibility disclaimer: References to other products, services, processes, hypertext links
to third parties or other data through the use of trade names, trademarks, names of
manufacturers and suppliers or other parties shall not necessarily constitute or imply any
endorsement, support or recommendation by United Navigation GmbH or its licensors.
Product and service information is the sole responsibility of the individual dealer. The name
and logo of NAVTEQ, LOGIBALL, KOMPASS Karten GmbH, BKG, trademarks and logos of
NAVTEQ and NAVTEQ ON BOARD, LOGIBALL, KOMPASS Karten GmbH, BKG and other
trademarks and trade names which are the property of Navteq, LOGIBALL, KOMPASS
Karten GmbH, BKG may not be used for commercial purposes without the prior written
Falk PANTERA User Manual
70
permission of the respective owners.
Export control. You agree not to export any part of the data provided to you and other direct
products therefrom from whatever location, apart from in compliance with, and in accordance
with all the necessary licences and permits, the applicable export laws, regulations and
provisions.
Compensation You agree to compensate United Navigation GmbH and its licensors
(including their licensors, suppliers, authorised agents, subsidiaries or affiliated companies
and their employees, managers, workers, shareholders or agents or representatives of them)
for, protect against and indemnify against any form of liability, loss, injury (including injuries
which result in death), claim, action, costs, expenditure or demands of any kind and nature,
including, but not limited to, legal costs which arise as a result of or in connection with any
use or any possession of data by you.
Overall agreement These General Terms and Conditions form the overall agreement
between United Navigation GmbH (and its licensors, including their licensors and suppliers)
and you relating to the subject matter thereof, and in their entirety they replace without
exception all written or verbal agreements which had been concluded between us in relation
to this subject matter.
Applicable law. The abovementioned General Terms and Conditions are subject to the legal
regulations of Germany without any influence on (i) their impairment of legal provisions or (ii)
the United Nations Convention for Contracts for the International Sale of Goods, which is
explicitly excluded. You agree without exception to pass on all disputes, demands and claims
arising as a result of or in connection with the data provided to you under this agreement to
the jurisdiction of the court in Stuttgart.
Falk PANTERA User Manual
71