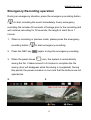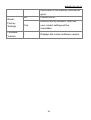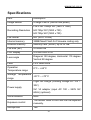
1
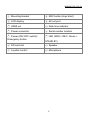
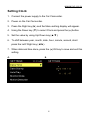
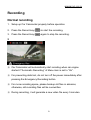
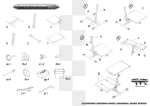
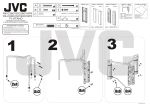
HOLUX GVR-2100 G1
GVR-2100 G1
User Manual
Version: V1.1
HOLUX GVR-2100 G1
Welcome:
Thank you kindly for purchasing this fine product.
Much investment in time and effort has gone into its
development, and it is our hope that it will give you many
years of trouble-free service.
Important Notice
1.
Do not drop, puncture or disassemble the device; otherwise the
warranty will be voided.
2.
Avoid all contact with water, and dry hands before using.
3.
Use the device with care. Avoid pressing hard on the device
body.
4.
For your own safety, avoid using the device when there is a
storm or lightning.
5.
Use only the accessories supplied by the manufacturer.
6.
Keep the device out of the reach of infants.
7.
When you get off the car, do not leave the device on the
dashboard that is subject to direct sunlight.
8.
For your own safety, do not operate the controls of the product
while driving. This product is intended to be used as a car
Camcorder aid only.
i
HOLUX GVR-2100 G1
FCC Compliance Statement
This device complies with Part 15 of the FCC Rules. Operation is
subjected to the following two conditions: (1) this device may not cause
harmful interference, and (2) this device must accept any interference
received, including interference that may cause undesired operation.
This equipment has been tested and found to comply with limits for a
Class B digital device, pursuant to Part 15 of the FCC rules. These limits
are designed to provide reasonable protection against harmful
interference in residential installations. This equipment generates, uses,
and can radiate radio frequency energy, and if not installed and used in
accordance with the instructions, may cause harmful interference to
radio communications. However, there is no guarantee that interference
will not occur in a particular installation. If this equipment does cause
interference to radio or television equipment reception, which can be
determined by turning the equipment off and on, the user is encouraged
to try to correct the interference by one or more of the following
measures: -Reorient or relocate the receiving antenna. -Move the
equipment away from the receiver. -Plug the equipment into an outlet on
a circuit different from that to which the receiver is connected.
- Consult the dealer or an experienced radio/ television technician for
ii
HOLUX GVR-2100 G1
additional suggestions.
You are cautioned that any change or modifications to the equipment
not expressly approved by the party responsible for compliance could
void Your authority to operate such equipment.
If the time arises to throw away your product, please recycle all the
components possible.
Batteries and rechargeable batteries are not to be disposed in your
domestic waste! Please recycle them at your local recycling point.
Together we can help to protect the environment.
Copyright Information
No part of this manual, including the products and software described in
it, may be reproduced, transmitted, transcribed, stored in a retrieval
system, or translated into any language in any form or by any mean,
without the express written permission of HOLUX Technology, Inc.
Copyright, All Rights Reserved.
iii
HOLUX GVR-2100 G1
Table of Contents
Product Overview.................................................................................. 1
Package Content ................................................................................... 3
Operation ............................................................................................... 4
Installation ............................................................................................ 4
Installation suggestions........................................................................ 5
Setting Clock ........................................................................................ 6
Using the memory card........................................................................ 7
Recording............................................................................................... 9
Normal recording.................................................................................. 9
Emergency Recording ....................................................................... 10
Emergency Recording operation ........................................................11
Playback............................................................................................... 12
Playback on a TV ............................................................................... 12
Playback on built-in LCD.................................................................... 13
Playback on a PC............................................................................... 14
Deleting .............................................................................................. 15
Menu Operation................................................................................... 16
Enter Menu mode............................................................................... 16
Specifications ...................................................................................... 21
iv
HOLUX GVR-2100 G1
Product Overview
1
HOLUX GVR-2100 G1
1 Mounting bracket
○
8 REC button (stop/ start)
○
2 LCD display
○
9 AV-out port
○
3 HDMI out
○
10 Date time indicator
○
4 Power connector
○
11 Serial number location
○
5 Power (ON/ OFF switch)/
○
12 LED (RED = REC; Green =
○
Emergency button
STAND BY)
6 SD card slot
○
13 Speaker
○
7 Joystick control
○
14 Microphone
○
2
HOLUX GVR-2100 G1
Package Content
Car Recorder
Cigar Car Charger
Bracket
Quick Guide
AC adapter (optional)
HDMI cable (optional)
AV cable (optional)
※ All parts shown in the illustration can be purchased separately from
local distributor.
3
HOLUX GVR-2100 G1
Operation
Installation
1. Use Cigar Car Charger and connect USB terminal to the Car
Camcorder power connector.
2. Adjust the car recorder angle before placing it on the vehicle.
3. Sliding from right to left into the bracket until you hear a click.
※ To ensure proper startup operation, please use the supplied Cigar
Car Charger or Power Adapter (optional).
4
HOLUX GVR-2100 G1
Installation suggestions
1. Be sure to place the device in an appropriate place, so as not to
obstruct the driver's view or deployment of air bags.
2. Use the Top 1/5 of the windshield.
3. Be sure the interior rear view mirror/ viewing area mirror does not
block the camera.
Recommended installed location
5
HOLUX GVR-2100 G1
Setting Clock
1. Connect the power supply to the Car Camcorder.
2. Power on the Car Camcorder.
3. Press the Right key (►) and the Menu setting display will appear.
4. Using the Down key (▼) to select Clock and press the (●) button.
5. Set the value by using Up/ Down key (▲/▼).
6. To shift between year, month, date, hour, minute, second, short
press the Left/ Right key (◄/►).
7. When date and time done, press the (●) OK key to save and exit this
setting.
4.
6.
6
HOLUX GVR-2100 G1
Using the memory card
1. Gently push the card as indicated (golden-fingers facing downwards)
until the card reaches the end of the slot.
2. To remove the card, push the card to release it and then pull it out
gently.
3. Video Storage Capacity as below (Note: The actual value of
capacity may vary (up to ± 30%) depending on the color saturation
and complexity of your subject and surroundings.)
Memory Size
8GB
16GB
32GB
100
200
400
720p/ 60fps
140
280
560
720p/ 30fps
180
360
720
Resolution
1080p/ 30fps
Unit: minutes
※ We strongly recommend you that the memory card is strictly for the
car Camcorder use only. (Recommended specification: 4GB SDHC
Class 6 or above.)
※ Make sure the memory card is not in write protection
7
HOLUX GVR-2100 G1
※ Must format the memory card before use by Car Camcorder or PC/
NB.
※ Never remove the memory card during the recording process, fatal
memory card damage could result.
※ Certain types of memory cards may not be recognized, take out the
card and inset again or just change to another card if this occurs.
※ Be sure to backup your data before overwriting the memory card.
8
HOLUX GVR-2100 G1
Recording
Normal recording
1. Setup up Car Camcorder properly before operation.
2. Press the Record key (
) to start the recording.
3. Press the Record key (
) again to stop the recording.
2
※ Car Camcorder will automatically start recoding when car engine
started if “Automatic Recording” of Menu item is set to “On”.
※ For preventing data lost, do not turn off the power immediately after
pressing the Emergency Recording button.
※ For more recording space, please backup old files in advance;
otherwise, old recording files will be overwritten.
※ During recording, it will generate a new video file every 5 minutes.
9
HOLUX GVR-2100 G1
Emergency Recording
As emergency happens, press the emergency recording button (
) to
start recording the event immediately. (The default settings is one
minutes of total record time before and after event occurs) The system
provides 15 storage units.
Emergency
recording
Recording
file saving
30 seconds 30 seconds
Circling
Recording
Recording
Time frame
0
1
2
3
4
5
Power On/ Off
10
HOLUX GVR-2100 G1
Emergency Recording operation
During an emergency situation, press the emergency recording button
(
) to start recording the event immediately. Every emergency
recording file includes 30 seconds of footage prior to the recording and
will continue recording for 30 seconds; the length of each file is 1
minute.
1. When in recording or preview mode, please press the emergency
recording button (
) to start emergency recording.
2. Press the REC key (
3. When the panel shows (
) again to stop the emergency recording.
) icon, the system is automatically
saving the file. It takes around 3-4 minutes to complete the file
saving (Icon will disappear while file saving is completed). During
this period, the power remains on, but note that the buttons are not
operational.
2.
3.
11
HOLUX GVR-2100 G1
Playback
Playback on a TV
1. To play on a TV, connect the drive recorder to the HDTV, TV
(optional) or HDMI (optional) signal line on the TV.
2. The Recorded images will be displayed on the TV as thumbnails.
3. Select the normal recording file you wanted by right (►) or left key
(◄) and then press the OK key (●) to start displaying.
4. The Car Camcorder will play the all the movies continuously from
the chosen thumbnail image to the last one.
1.
3.
12
HOLUX GVR-2100 G1
Playback on built-in LCD
1. Press the OK key (●) during recording or preview mode to enter
playback mode.
2. Select the normal recording file you wanted by right (►) or left key
(◄) and then press the OK key (●) to start displaying.
3. Emergency and normal file switch: press the up key (▲).(
file;
emergency file)
13
normal
HOLUX GVR-2100 G1
Playback on a PC
1. Remove your memory card from the Car Camcorder and inset it into
a Memory card slot on your PC or a card adapter connected to your
PC.
2. Use your PC playback software for the H.264 avi file type. For
example: Media Player Classic, Quick Time, Splash Lite, VLC Media
Player, etc.
3. Depending on your PC's effectiveness, video card characteristics,
memory size or Memory card transfer speed, your images may not
play smooth and/ or sound may cut in and out.
4. If you rename a file in your PC, it will not be recognized by Car
Camcorder
14
HOLUX GVR-2100 G1
File Delete
Item
Option
Description
Delete One
----
Delete current file
Delete All
Yes/ No
Delete all files stored in the memory
The current file can be locked. Select
“Yes” to lock the file, and choose
“No” to unlock the file.
Lock
Yes/ No
Delete function can not delete the
locked file.
Format function can delete all locked
and unlocked file.
Cancel
----
Return to Playback Mode
15
HOLUX GVR-2100 G1
Menu Operation
Enter Menu mode
1. Press the Right key (►) during recording or preview mode to enter
Menu mode.
2. Using the Down key (▼) or Up key (▲) to select Menu item and
press the OK key (●) to confirm.
3. Press the Rec key (
) to save and exit this setting.
16
HOLUX GVR-2100 G1
Item
Option
1080p30fps
Resolution
720p60fps
720p30fps
On
Description
Set the video resolution to 1080p
(1920 x 1080), 30fps.
Set the video resolution to 720p (1280
x 720), 60fps.
Set the video resolution to 720p (1280
x 720), 30fps.
Car Camcorder will start to recording
Automatic
when starting the car.
Recording
Disable the Automatic Recording
Off
Off
function
Turns off the audio recording function.
Recording
Audio
EV
On
Executes audio recording while
recording video.
-
-2/ -1/ 0/ 1/ 2
Off
Cancel action.
High
Sensitivity
Bump Auto
Record
Mid
Sensitivity
Selects automatic collision event
recording according to different
sensitivity levels.
Low
Sensitivity
Date/ Time
-
To set up date and time.
17
HOLUX GVR-2100 G1
Off
Date Stamp
On
Off
Auto Play
On
Off
Turn off the Date Stamp function.
Print a date and time mark on the
video.
Turn off continuous playback.
Indicates turning on continuous
playback at playback mode.
Turn off Monitor Mode.
Monitor Mode would switch the
recording speed to 1fps when the
recoding scene stays the same for 53
sec. after recording begins. If the
scene changes, recording speed
Monitor
Mode
On
would revert to 30fps and save this
recording as a new file.
When this function is selected, the
movement detection and emergency
recording functions are not
operational.
Off
Turn off Motion Detection.
Motion Detection would switch to
power saver mode and stop recording
Motion
Detection
On
when the recoding scene stays the
same for 53 sec. after recording
begins. If the scene changes,
recording would be restarted and save
18
HOLUX GVR-2100 G1
this recording as a new file. When this
function is selected, the Monitor Mode
and emergency recording functions
are not operational.
Off
Default value
If there is no activity for 10 seconds,
10 sec.
LCD Off
the screen will automatically turn off
and go into the sleep mode. It will
recover again if any button is pressed.
If there is no activity for 2 minutes, the
2 min.
screen will automatically turn off and
go into the sleep mode. It will recover
again if any button is pressed.
Off indicates muting the playback
Volume
Control
video.
Off ~ 100%
100% indicates increasing volume of
the playback video to max.
Language
NTSC
TV System
Select the OSD language used for Car
Camcorder.
This option is suitable for America,
Taiwan, Japan and Korea areas.
This option is suitable for Germany,
PAL
England, Italy, Netherland, China, and
Hong Kong areas.
Format SD
Cancel
Cancel action.
Card
Confirm
Format the memory card. Note that all
19
HOLUX GVR-2100 G1
files stored in the memory card will be
gone.
Reset
Factory
Settings
Firmware
Version
No
Cancel action.
Restore factory defaults. Note that
Yes
your current settings will be
overridden.
-
Displays the current software version.
20
HOLUX GVR-2100 G1
Specifications
Item
Description
Image sensor
5 Mega CMOS (2592x1944 pixels)
FULL HD 1080p/ 30f (1920 X 1080)
Recording Resolution
HD 720p/ 30f (1280 x 720)
HD 720p/ 60f (1280 x 720)
File format
AVI (AVC/ H.264)
Internal memory
32MB Nand Flash for Firmware coding only
External memory
Memory card (SDHC) up to 32 GB
File size (ea.)
5 minute file
LCD display
2.4 inch color LCD
Lens angle
Lens
Operation
Temperature range
Storage Temperature
range
Diagonal 120 degree; Horizontal 110 degree
Vertical 80 degree
F2.0 fixed focus
0°C ~ +65°C
-20°C ~ +70°C
Cigar car charge (Working voltage DC 10V ~
Power supply
30V)
5V/ 1A adaptor (input AC 100 ~ 240V 50/
60Hz) (optional)
White balance
Exposure control
Microphone
Auto
The default value is zero and can be adjusted
manually.
Yes
21
HOLUX GVR-2100 G1
Date/ Time (RTC)
Yes
Circling Recording
Yes
Automatic Recording
Yes
Emergency Recording
Yes
Monitor Mode
Yes
Motion Detection
Yes
The screen will
automatically
Yes
turn off
The image flips
Time Stamp keeping
time
Yes
At least 7.5 days
Green: power on
LED indicator
Red: REC in process
Red flashing: SD card not inserted/
recognized; can’t recording
Interface
USB 2.0; HDMI/ AV output; SD slot
Dimensions
101 x 66.5 x 23.7 mm (L x W x H)
Weight
Approx 100 grams
Note: Specifications are subject to change without notice.
22