1
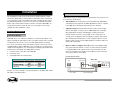
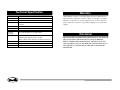
Operation
VMD-19M works with a video camera, a VCR and optionally an electronic security
system. VMD-19M detects a moving object in the video signal received from the
video camera.
VMD-19M is designed specifically to detect walking of people and movement of
larger objects under controlled lighting conditions and for indoor use. However the
sensitivity of VMD-19M to detect motion is adjustable. Therefore it can be made
insensitive to the motion of small pets.
The VMD-19M can learn the remote control codes from the remote controller unit
of most VCRs. When the VMD-19M detects a motion the red light will flash
momentarily and the VMD-19M will put the VCR into RECORD mode. At the same
time alarm output relay contacts will close momentarily. After 30 seconds of nonmotion, the VMD-19M will PAUSE the VCR. If there is no motion for a further 2.5
minutes then the VMD-19 will STOP the VCR. If motion is detected while the
VCR is paused, the VMD-19M will put the VCR back into RECORD mode and
close the alarm output relay contacts momentarily.
If the video signal from the camera is lost, the alarm output relay contacts will
close. When the video signal is restored, the relay contacts will open.
The VMD-19M also controls the VCR when triggered by an external device such
as a door/window sensor or a PIR motion sensor or an electronic security system.
Aerial
Camera
IR Transmitter
TV
AC Plug
Pack
VMD19-M
VCR
Version 1.3
RF
RF
Audio Video
Audio
Out
Video
In
7.5-24 Video
4 3 2 1 VDC Out In
RCA Lead
Remote
Out In
Installation
This installation procedure assumes that you have already installed a security
camera at a suitable indoor location and have a VCR with a remote controller unit
for recording video events. The installation procedure is divided into two sections.
The “Advanced Installation” section is for users who are technically minded and
want to explore all the advanced options or want to connect the VMD-19M to an
existing electronic alarm system. All other users can skip this section and go
straight to the “Basic Installation” section.
Connection to a Security System
VMD-19M has a 4 pin screw terminal block for interfacing to control systems such
as an electronic security system.
•
Arm and Disarm- A security system can arm and disarm the VMD-19M by
controlling the power supplied to the VMD-19M. When the power is supplied
to the VMD-19 it is automatically armed otherwise it is disarmed.
•
Trigger Recording- Most VCRs take around 4 seconds to start recording
after an alarm trigger. For faster response VMD-19M provides a Normally
Open (NO) input for pre-alarm external trigger recording. Connect the
terminals marked “3” and “4” to relay contacts of the security system. A
security system can trigger the VCR recording by closing the relay contacts
thus shortening the terminal number “3” and “4” together. After 30 seconds
that the contacts remain open, the VMD-19 will pause and after a further 2.5
minutes will stop the VCR.
•
Motion or Video Loss Output- VMD-19M provides a Normally Open (NO)
relay contact output at terminals “1” and “2” for motion detection and video
loss signalling. When video signal is lost the relay contacts will close and
remain closed until the video signal is restored. When a motion is detected
relay contacts will close momentarily.
Advanced Installation
Sensitivity Setting
VMD-19M can be set to 4 different sensitivities for motion detection. When set at
highest sensitivity (4) small changes in the scene will be detected. Lower sensitivity
is suitable where the camera is not of a very high quality and has some image
noise. If you do not want to detect small object movements such as pets, a lower
sensitivity might be suitable. VMD-19M is set to sensitivity level 3 at factory and is
suitable for most applications. You can change the sensitivity using the DIP switch
provided on the circuit board of the VMD-19M as following:
1- Undo the screws on the sides of the VMD-19M.
2- Remove the cover.
3- Set the DIP Switch based on this table:
Sensitivity
1 (lowest)
2
3 (factory setting)
4 (highest)
Tab Switch 1
ON
ON
OFF
OFF
Tab Switch 2
ON
OFF
ON
OFF
Security System Panel
Input
Relay Output
VMD-19M
7.5-24 Video
4 3 2 1 VDC Out In
To trigger close the relay contacts
Example: To set the sensitivity to 2 set the Tab Switch 1 to the ON position and the
Tab Switch 2 to the OFF position.
Close = Motion
Motion Output Signal
Remote
Out In
Basic Installation
Please read all the following steps before starting the installation process.
1- Connect the video cable from the video camera to the “Video In” at the back of
the VMD-19M.
2- Connect one end of the RCA video cable supplied in the packaging to the
“Video Out” at the back of the VMD-19M and the other end to the AV video
input of the VCR.
3- Connect the IR transmitter cable to the “Remote Out” of the VMD-19M and
place the transmitter in front the remote control sensor of the VCR. It is
important that the signals from the transmitter can reach the sensor of the
VCR otherwise the VMD-19 can not control the VCR. Test the suitability of the
location by trying to control the VCR with its own remote controller unit at the
same location that you have placed the IR transmitter.
4- Have the remote controller of the VCR ready. Put a blank video tape in the
VCR, turn the VCR on, and set its input channel to AV channel or Line In (if
unsure refer to your VCR user guide).
5- Ensuring the correct polarity (- and + connection on the power supply),
connect a plug pack power supply delivering a voltage between 7.5VDC and
24VDC to the 7.5-24VDC connector on the back of the VDM19-M. Minimum
current of 100mA is required.
6- The red light on the VMD-19M should now be on.
7- Wait for a few seconds until the red light starts flashing.
8- Hold the VCR remote controller unit about 30cm away from the back of the
VMD-19M and point towards the “Remote In” of the VMD-19M.
9- Press and hold the RECORD button on the VCR remote controller until the red
light stops flashing for a couple of seconds.
10- Wait until the red light starts flashing again.
11- Press and hold the PAUSE button on the VCR remote controller until the red
light stops flashing for a couple of seconds.
12- Wait until the red light starts flashing again.
13- Press and hold the STOP button on the VCR remote controller until the red
light stops flashing for a couple of seconds.
14- Wait until the red light starts flashing again.
15- Press and hold the ON/OFF or POWER button on the VCR remote controller
until the red light stops flashing.
VMD-19M will now transmit the RECORD signal. Check to ensure that the VCR is
now recording. If the VCR is recording stop it. In this case the VMD-19M has learnt
the codes and can control your VCR. If the VCR is not recording you have to
repeat steps 5 to 15 again.
If you have done all the installation steps, the VMD-19M should now be ready to
detect motions in video signals from the camera and activate the VCR recording.
Troubleshooting
Problem
Solution
When power
supply is
connected, red
light does not
turn on.
•
Motion is not
detected.
•
•
False motion is
detected.
•
•
•
•
•
•
VMD-19M does
not operate the
VCR.
Image from the
camera is not
recorded.
•
•
•
•
•
Ensure mains power is connected and switched on at
the wall socket.
Ensure the polarity of plug pack is correct.
If VMD-19M is connected to a security system ensure
that VMD-19M is armed by the security system.
Ensure that the camera is on.
Check that the camera video lead is connected to the
“Video In”.
Change to a higher sensitivity.
Change to a lower sensitivity.
Scene contains a window to outside or moving
background objects such as trees or cars.
Camera might be generating large video noise.
Change to a better quality camera.
Ensure that the IR Transmitter is placed in front of the
remote control sensor of the VCR.
Ensure that the VCR is turned on and has a tape
inside it, and test its operation with its own remote
controller.
Repeat the IR code learning procedure.
Ensure that the “Video Out” from the VMD-19M is
connected to the AV Video input of the VCR.
Ensure that the VCR is set to the AV channel.
Technical Specification
Video Format
Video Input
NTSC, PAL, EIA, CCIR and SECAM video standards
75Ω 1Vpp composite video via RCA connector
Video Output
IR Input
Passive loop through from Video Input
950nm Infra-red signal from a standard appliance remote
controller
IR output
same as IR Input
Power Supply
7.5VDC to 24VDC at 100mA minimum
Indicator
Red LED
Sensitivity
Adjustment
Via 2 way dip switch, for size and contrast
Controls
Available on screw terminals:
External Trigger input to activate recording
Motion output or video signal loss via relay contact closure
Enclosure case
Metal powder coated in silver
Dimensions
104mm x 52mm x 25mm
Weight
Approx. 200gr
Warranty
VMD-19M has a warranty of 12 months against defects in workmanship and
materials after the original date of purchase. In the event of failure, the supplier
will replace or repair it at its option providing there is no evidence of customer
misuse or alteration. Customer is responsible for shipping costs to and from the
supplier.
Disclaimer
MANUFACTURER, DISTRIBUTORS AND DEALERS OF THE VMD-19M
MAY NOT BE HELD LIABLE FOR INJURY, LOSS OR DAMAGE,
DIRECT, INDIRECT OR CONSEQUENTIAL, ARISING OUT OF THE
USE, OR INABILITY TO USE THE VMD-19M. THIS INCLUDES, BUT IS
NOT LIMITED TO, THE FAILURE OF VMD-19M TO PERFORM AS
ADVERTISED.