1
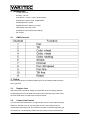
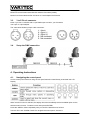
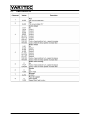
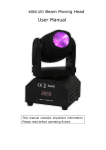
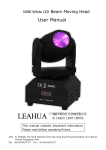
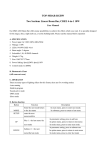
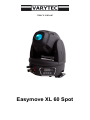
User’s manual
Easymove XL 60 Spot
Table of content
1.
Safety instructions........................................................................................................................... 3
2.
Introduction ..................................................................................................................................... 4
2.1.
3.
4.
5.
DMX channels ........................................................................................................................ 4
Setup............................................................................................................................................... 4
3.1.
Replace fuse .......................................................................................................................... 4
3.2.
Connect the fixtures ............................................................................................................... 4
3.3.
3 to 5 Pin xlr converter ........................................................................................................... 5
3.4.
Setup the DMX connection .................................................................................................... 5
Operating Instructions..................................................................................................................... 5
4.1.
Navigating the control panel .................................................................................................. 5
4.2.
Menu Map .............................................................................................................................. 6
4.3.
User configuration .................................................................................................................. 6
Technical Data ................................................................................................................................ 7
5.1.
DMX channel list .................................................................................................................... 8
2/9
1. Safety instructions
FOR SAFE AND EFFICIENT OPERATION
Be careful with heat and extreme temperatureAvoid exposing it
to direct rays of the sun or near a heating appliance.
Not put it in a temperature bellow 41°F /5°C, or exceeding 95°F /35°C.
Keep away from humidity, water and dust
Do not place the set in a location with high humidity or lots of dust.
Containers with water should not be placed on the set.
Keep away from sources of hum and noise
Such as transformer motor, tuner, TV set and amplifier.
To avoid placing on un-stable location
Select a level and stable location to avoid vibration.
Do not use chemicals or volatile liquids for cleaning
Use a clean dry cloth to wipe off the dust, or a wet soft cloth for stubborn dirt.
If out of work, contact sales agency immediately
Any troubles arose, remove the power plug soon, and contact with an engineer for repairing,
do not open the cabinet by yourself, it might result a
danger of electric shock.
Take care with the power cable
Never pull the power cable to remove the plug from the receptacle, be sure
to hold the plug. When not using the player for an extended period of time
be sure to disconnect the plug from the receptacle.
3/9
2. Introduction
-
11 DMX Channels
-
Pan 630°, Tilt 270°
-
Colorwheel: 7 colours + open, rainbow effect
-
Gobowheel: 6 gobos+open, wheelrotation
-
Variable electronic strobo
-
Variable electronic dimmer (0-100%)
-
LED Display menu with invert
-
Possibility to set manufacturers settings
-
Fan cooled
2.1.
DMX channels
3. Setup
Disconnect the power cord before replacing a fuse and always replace with the
same type fuse.
3.1.
Replace fuse
With a flat head screwdriver wedge the fuse holde out of its housing. Remove
the damaged fuse from its holder and replace with exact same type fuse. Insert
the fuse holder back in its place and reconnect power.
3.2.
Connect the fixtures
You will need a serial data link to run light shouw of one or more fixtures using a
DMX-512 controller or to run synchronized on two or more fixtures set to a
master/slave operating mode. The combined number of channels required by all
the fixtures on a serial data link determines the number of fixtures the data link
4/9
can support.
Maximum recommended serial data link distance:500 meters(1640ft).
Maximim recommended number of fixtures on a serial dqta link:32 fixtures.
3.3.
3 to 5 Pin xlr converter
Note! If you use a controller with a 5 pin DMX output connetor. you will need to
use a 5pin to 3 pins adapter
The chart below details a proper cable conversion:
3.4.
Setup the DMX connection
4. Operating Instructions
4.1.
Navigating the control panel
Access control panel functions using the four panel buttons located directly underneath the LCD
Display.
When a menu function is selected, the display will show immediately the first available option for the
selected menu function. To select a menu item,press<ENTER>.
Press the <MENU> button repeatedly until you reach the desired menu function.
Use the <UP> and <DOWN> buttons to navigate the menu options. Press the
5/9
<ENTER> button to select the menu function currently displayed, or to enable a menu option. To
return to the previous option or menu without changing the value, press the <MENU> button.
No alterative worth that return re-option or menu , press(MENU)button
4.2.
Menu Map
RPON
set up the dmx address A001 – A512
AU01
fast speed movement
AU02
slow automatic movement
SNOF
Sound to Light OFF
SNON
Sound to Light ON
RPOF
TILT and Pan are non inverted
RPON
invert PAN
RTON
invert Tilt
RTOF
invert the display
RDOF
non invert the display
DFON
default settings
Note ! the factory settings are DMX address A001 and every function is non inverted.
4.3.
User configuration
Setup automatic moving mode(self-motion move)
.Press the MENU until it shows AU01
.Use the UP/DOWN buttons to set to AU01 or AU02 , Press ENTER to confirm.
Sound to light moving mode(sound control)
.Press the Mode button until it shows SNOF .
.Use the UP/DOWN buttons to set to SNON, press ENTER to confirm.
Master/slave mode(auto-running、sound control)
This mode will allow you to link up 32 units together without a controller.
Use standard DMX cables to daisy chain your fixtures together via the DMX
connector on the rear of the units. Proper performance it may be necessary to
use a terminator at the last fixture. Choose a unit to be the Master. Select NAFA/NASL OR NStS (see
below for readout)depending upon which master mode your require. The master
unit must be the first unit in line. Finally ,chain the units together using DMX cable.
To set the pan to inversion
Press the MENU until it shows RPOF.
Use the UP/DOWN buttons until it shows RPON, press ENTER to confirm.
6/9
To set the tilt to inversion
Press the MENU until it shows RTOF
Use the UP/DOWN buttons until it shows RTON, press ENTER to confirm.
Display inversion
Press the MENU until it shows RDOF.
Use the UP/DOWN buttons until it shows RTON, press ENTER to confirm.
Default setting
Press the MENU until it shows DFON.
press ENTER to confirm
DMX mode
This mode allows the unit to be controlled by any universal DMX controller.
The default mode for the fixture is DMX.
5. Technical Data
Voltage
230V 50Hz
Fuse
5A,Ф5×20mm,
Lamp resource
White LED , life is 50,000 hours
Pan
630°,16bit fine
Tilt
270°,16bit fine
Max temperature
104°F(40°C)
Date input/output
3pin XLR-connector
Size
260 ×260×350mm(L×W×H)
N.W
7.0kg
7/9
5.1.
DMX channel list
8/9
Importeur:
B & K Braun GmbH
Industriestraße 1
D-76307 Karlsbad
www.bkbraun.com
[email protected]
9/9