1
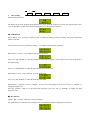
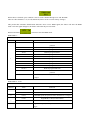
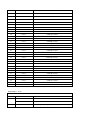
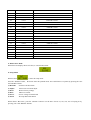
TOP-MBAR-RGBW
Two Sections Linear Beam Bar, CREE 4-in-1 10W
User Manual
Our DMX LED Beam Bar offers many possibilities to achieve the effects which you want. It is specially designed
for the stages, disco, night clubs etc, even the building halls. Please read the manual before operation
A. SPECIFICATION
1. Power input: AC 100V-240V, 60Hz/50Hz
2. Wattage: 110W
3. LEDs: 8*10W CREE 4-in-1
4. Beam angle: 3 degrees
5. Selectable 1,36, 40 DMX channels
6. Weight: 8.7 kg
7. Size: 1065*95*177mm
8. Power linking: 9pcs@240V, 4pcs@110V
9. Control mode: LCD0802
B. Photometric Chart
(will come out soon)
C. OPERATION
There are many types of lighting effects for this fixture, there are five working modes:
·Auto running
·Build-in program
·Sound-active mode
·DMX mode
·Slave mode
D. Button function
Button
Function
Description
MODE
Enter the next mode/return
to the last menu
In main menu, press to enter next mode;
In submenu, press to return to last menu
SETUP
UP
enter the next
menu/confirm
Plus 1:the last menu/ the
next mode
DOWN
Subtract 1:the next
menu/the last mode
In parameter setting, press to add one
In option menu, press to return to last menu
In mode menu, press to enter next mode
In parameter setting, press to subtract one
In option menu, press to return to next menu
In mode menu, press to enter last mode
E. LCD Menu struture chart
01
Speed
e-Auto
Freq.
20
01
20
LED
Red
e-Manul
Freq.
01
20
Black
AUTO
m-Auto
BAR
01
16
L-BAR
0
180
m-Manul
R-BAR.
SHOW
SOUND
0
180
Show1
Show2
001
031
MENUS
001
Address
DMX
512
1--Ch
Channel
36-Ch
40--Ch
5s
SLAVE
10s
BL
20s
30s
On
SETTINGS
L-Moto
000
Y/N?
OK
R-Moto
000
Y/N?
OK
Reset
Y/N?
OK
Moto
000
Power
18V
Adjust
about
Model
Main
Drive
Update
1. Auto running
When the display shows:
The light will run as the program which had been set. Press “SETUP” button to enter into the optional menu. Press
“UP” and DOWN” to choose the optional which need to set the parameter as below :
1) LED function
When choose “led”, and press “SETUP” enter to LED auto running parameter setting. The option with black
marks is selected.
You could choose e-Auto(LED auto running )or e-Manul (manual adjust the LED)
When choose “e-Auto”, press “SETUP” button enter the menu
Press “UP” and “DOWN” to select the parameter. When choose “Speed”, press setup to choose the speed menu of
the auto running.
Press “UP” and “DOWN” to adjust the auto running speed from 01-20
When choose “Freq.”, press “SETUP” to set the flash speed.
Press “UP” and “DOWN” to adjust the flash speed 00-20Hz
When choose “e-Manul”, press the “SETUP” to choose the LED single color, press the “UP” or “DOWN” to
change the single color.
Press the “SETUP” again to set the LED flash frequency, press the “UP” or “DOWN” to change the flash
frequency value.
2) Bar function
Choose “Bar”, press the “SETUP” to set the parameter.
You could choose m-Auto (bar auto running mode) and m-Manul (manual to adjust the bar position).
When you choose “m-Auto”, press “SETUP” to set the bar speed 01-16
When you choose “m-Manul”, the bar stops rotating. Press “SETUP” to set the Bar lock position
Choose “L-BAR”, press “SETUP” to set the left bar position through “UP” and “DOWN” When it is 90 °, the bar
is in the horizontal position. The same method to set the right bar.
2. Build-in program
When display shows this menu, it enter to the build-in program
Press “SETUP” to enter the build-in programs. There are 10 programs inside. Press “UP” and “DOWN” to choose
the built-in program from Show1 –Show10(the built-in program is pre-set and can not be reset)
3. Sound-active Mode
When display shows this menu, enter the sound-active mode.
Press “SETUP” enters the menu of adjust the sound sensitivity. Press “UP” and “DOWN” to adjust the sensitive
value from 0-31
4. DMX Mode
When display shows this menu, enter the DMX mode.
Press “SETUP” enter the main menu. Press the “UP” or “DOWN” to choose the option.
When choose “Address”, press the “SETUP” enter the address menu, set the DMX address 1-512 through “UP”
and “DOWN”.
When choose “Channel”,press “SETUP” enter to set the channel through “UP” and “DOWN”.
There are three channels: 1-ch, 36-ch, and 40-ch (choose 36-ch to restore factory settings)
This product has automatic identification functions. Once receive DMX signal, the fixture will enter the DMX
mode. Once the signal disappear, the fixture will return the previous mode.
When LCD shows
, it means it enter the DMX mode.
DMX Mode 1:
1-ch
Channel
Number
Function
0--19
LED close, electronic machine return to the horizontal
position
20-29
Built-in program Show1
30-39
Built-in program Show2
40-49
Built-in program Show3
50-59
Built-in program Show4
60-69
Built-in program Show5
70-79
Built-in program Show6
80-89
Built-in program Show7
90-99
Built-in program Show8
100-109
Built-in program Show9
110-119
Built-in program Show10
120-139
LED close, electronic machine return to the horizontal
position
140-255
Sound active, the sensitivity will be higher when the value
is larger.
1
DMX Mode 2: 36-ch
36-ch
Channel
Value
Function
1
0--180
Left BAR 0-180°(90° horizontal)
180-255
Left BAR 180°
0-255
Left BAR speed, the speed is faster when the No. is larger.
0-180
Right BAR 0-180°(90° horizontal)
3
180-255
Right BAR 180°
4
0-255
Right BAR speed, the speed is faster when the No. is
larger.
2
5
0-255
LED1 R 0-100%
6
0-255
LED1 G0-100%
7
0-255
LED1 B 0-100%
8
0-255
LED1 W 0-100%
9
0-255
LED2 R 0-100%
10
0-255
LED2 G 0-100%
11
0-255
LED2 B 0-100%
12
0-255
LED2 W 0-100%
13
0-255
LED3 R 0-100%
14
0-255
LED3 G 0-100%
15
0-255
LED3 B 0-100%
16
0-255
LED3 W 0-100%
17
0-255
LED4 R 0-100%
18
0-255
LED4 G 0-100%
19
0-255
LED4 B 0-100%
20
0-255
LED4 W 0-100%
21
0-255
LED5 R 0-100%
22
0-255
LED5 G 0-100%
23
0-255
LED5 B 0-100%
24
0-255
LED5 W 0-100%
25
0-255
LED6 R 0-100%
26
0-255
LED6 G 0-100%
27
0-255
LED6 B 0-100%
28
0-255
LED6 W 0-100%
29
0-255
LED7 R 0-100%
30
0-255
LED7 G 0-100%
31
0-255
LED7 B 0-100%
32
0-255
LED7 W 0-100%
33
0-255
LED8 R 0-100%
34
0-255
LED8 G 0-100%
35
0-255
LED8 B 0-100%
36
0-255
LED8 W 0-100%
DMX Mode 3: 40-ch
40channel mode
Channel
Value
Function
1
0--180
Left BAR 0-180°(90°horizontal)
180-255
Left BAR 180°
0-255
Left BAR speed, the speed is faster when the No. is larger.
2
0-180
Right BAR 0-180°(90°horizontal)
3
180-255
Right BAR 180°
4
0-255
Right BAR speed, the speed is faster when the No. is
larger.
5
0-255
Master dimming
0-9
No function
10-19
LED auto running, motor position controlled by
CH1-CH4
20-29
Built-in program Show1
30-39
Built-in program Show2
40-49
Built-in program Show3
50-59
Built-in program Show4
60-69
Built-in program Show5
70-79
Built-in program Show6
80-89
Built-in program Show7
90-99
Built-in program Show8
100-109
Built-in program Show9
110-119
Built-in program Show10
120-139
No function
140-255
Sound active, the sensitivity will be higher when the value
is larger.
6
7
0-255
0-14
8
15-255
Led speed(only for the LED auto running mode)
LED no strobe
LED strobe,it will be faster with larger value (It has no
use under built-in program mode)
9
0-255
LED1 R 0-100%
10
0-255
LED1 G0-100%
11
0-255
LED1 B 0-100%
12
0-255
LED1 W 0-100%
13
0-255
LED2 R 0-100%
14
0-255
LED2 G 0-100%
15
0-255
LED2 B 0-100%
16
0-255
LED2 W 0-100%
17
0-255
LED3 R 0-100%
18
0-255
LED3 G 0-100%
19
0-255
LED3 B 0-100%
20
0-255
LED3 W 0-100%
21
0-255
LED4 R 0-100%
22
0-255
LED4 G 0-100%
23
0-255
LED4 B 0-100%
24
0-255
LED4 W 0-100%
25
0-255
LED5 R 0-100%
26
0-255
LED5 G 0-100%
27
0-255
LED5 B 0-100%
28
0-255
LED5 W 0-100%
29
0-255
LED6 R 0-100%
30
0-255
LED6 G 0-100%
31
0-255
LED6 B 0-100%
32
0-255
LED6 W 0-100%
33
0-255
LED7 R 0-100%
34
0-255
LED7 G 0-100%
35
0-255
LED7 B 0-100%
36
0-255
LED7 W 0-100%
37
0-255
LED8 R 0-100%
38
0-255
LED8 G 0-100%
39
0-255
LED8 B 0-100%
40
0-255
LED8 W 0-100%
5. Master/slave Mode
When the LCD displays shows as below, it enter the M/S mode.
F. Setup Menu
When it shows
, it enter the setup mode.
Press the “SETUP” button, the fixture enter the optional menu. You could choose six options by pressing the “UP”
and “DOWN” button.
1) BL Time
Set the LCD closed time
2) Adjust
motor reset correction adjust
3) Reset
Restore factory settings
4) Moto
Motor reset mode
5) Power
Service voltage of main board
6) About
About product information
When choose “BL Time”, press the “SETUP” button to set the time. Choose 5s, 10s, 20s, 30s or keeping on by
pressing “UP” and “DOWN” buttons.
As the above picture, if you choose 10s. After you restore factory settings, the time will keep 10s.
Choose the “Adjust”, press the “SETUP” to set the position of electronic motor. When it shows 90°but the bar is
not in horizontal position, you could adjust it through this function. It will be ok when the bar is horizontal position
when it is 90°.
When display shows above picture, choose the electronic motor need to be adjusted. Now it chooses the right motor.
Press the “SETUP” to enter the adjust mode.
After testing the origin, press the “UP” or “DOWN” to check the bars are parallel or not.
When the bars are in parallel position, press “SETUP” and the electronic motor will adjust the reset data, the LCD
will show as below:
When it shows
, the adjustment is finished.
When the electronic motor could not be reset, the LCD shows no reset as follow picture.
Choose “L-Moto” to adjust the left motor and use the same method above.
Choose “Reset”, press the “SETUP” button to enter the restore factory setting. At this time, the display will show a
prompt menu as below to confirm if restore factory setting.
Press “SETUP” to confirm yes, the LCD shows follow process and restore factory settings, the fixture will restar.
Press “MODE” to confirm No, then it will return to last menu.
Choose “MOTO”, press the “SETUP” button to check the motor restore mode, it is normal when it shows “000”,
others are not normal.
Choose “POWER”, press “SETUP” button to check the main board’s voltage, 17-20V will be normal. When turn
on the fixture, if the voltage is higher than 20V, the program would not work and LCD shows “Power high”; if the
voltage is lower than 17V, the program would work but the LCD shows “Power low”, the motor would be
abnormal.
Choose “About”, press the “SETUP” button to enter the product information. Press the “UP” or “DOWN” button to
scan the information which include the product model number, product version, motor drive, product update date.
G. Restore factory setting
Operate in the setup menu, please refer to the operation
Press “MODE”, “SETUP” at the same time, then power on. When the LCD prompts the process as below, release
the button and restore factory settings.