1
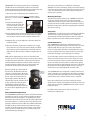
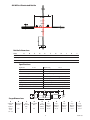
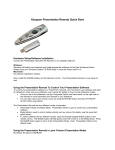
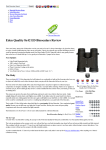
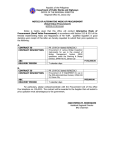
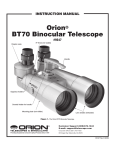
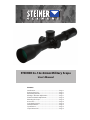
STEINER 3x-12x-56mm Military Scope
User’s Manual
Contents
Introduction ................................................................................Page 1
Eyepiece Focusing ....................................................................Page 1
Parallax Adjustment .................................................................Page 1
Windage / Elevation Adjustment ........................................Page 1
Illuminated Reticle Adjustment ...........................................Page 2
Mounting the Scope ................................................................Page 2
Accessories ..................................................................................Page 2
Care & Maintenance .................................................................Page 2
G2 Mil Dot Reticle .....................................................................Page 3
Specifications .............................................................................Page 3
Scope Dimensions ....................................................................Page 3
Elevation Adjustment Knob
Parallax/Focus Adjustment
Rotary Illumination Dial
Eyepiece Focus Ring
Windage Adjustment Knob
Power Ring
Introduction
STEINER is one of the largest manufacturers of high-quality
optics in the world. STEINER products represent the highest
level of precision and technology. They are field-tested and
combat proven and designed to withstand the toughest
conditions and rigors of daily use in the field.
When the scope is set
parallax-free for the
distance you are viewing, you should be able
to move your eye sideto-side or up and down
without seeing the reticle
move appreciably in
relation to the target.
This STEINER Military Riflescope will deliver precision accuracy
and performance at short and long ranges in the field or on
the range. It is ideally suited for tactical, military and law
enforcement operations.
This manual outlines the basic operation and maintenance of
the scope.
Parallax
Adjust
Knob
Windage / Elevation Adjustment
The windage and elevation knobs are designed for precise
adjustment. The dials are calibrated so that 1 click = 0.1 mRAD.
Eyepiece Focusing
The eyepiece can be focused so that the reticle appears sharp
and black to your eyes. Adjusting the focus is quick and easy
to do. Just follow this procedure.
The windage knob, located on the right side of the tube, is
calibrated for up to 5 mils of adjustment left and right.
Adjustments are indicated by detents and audible clicks.
Hard stops at both
ends of the
adjustment range
Rotation
prevent shooters
Indicator
from getting lost
on the dial.
1. Point the scope at the sky or a plain wall and take a quick
glance through the scope. If the reticle appears sharp and
black, no further adjustment is necessary.
2. If not, use quick glances through the scope while rotating
the focus ring until the reticle pattern is sharp and clear.
For shooting at
extreme distances,
the elevation
knob offers up to
19.5 mils and two
full revolutions of adjustment. The first revolution or 100 clicks
are indicated by white scale on the knob. On the second
revolution (101 to 195), a small elevation Rotation Indicator
pops out at the base of the turret to remind the shooter to
use the second scale indicated by grey numbers on the dial.
NOTE: Do not look through the eyepiece as you turn the
focus ring. Your eyes will adjust to the out-of-focus condition.
Parallax/Focus Adjustment
Parallax is the apparent movement of the reticle in relation
to the target when the eye is not directly in line behind the
center of the scope. Images from different distances focus in
front of or behind the scope’s reticle. Parallax is more noticeable with higher magnification scopes and scopes with a
larger objective lens.
This riflescope is shipped from the factory with the optical
center set below center. Without tapered bases the initial
sight-in or bore-sighting will likely produce an initial point of
impact considerably high. Because of the Zero Stop feature, as
shipped from the factory the scope has no immediate capability
for downward point of impact adjustment.
To use the parallax/focus adjustment, rotate the knob on
the left side of the adjustment turret until the numeral
corresponding to the known target distance lines up with
the reference mark. If the distance is unknown, rotate the
adjustment knob until the target image is sharply focused.
1
STEINER offers this riflescope with a choice of windage/
elevation knobs that offer both Clockwise and Counterclockwise adjustment. Use the following procedure whenever
you need downward point of impact adjustment:
The reticle is powered by a 3-volt lithium cell battery
#CR2450. To install a new battery, simply unscrew the battery
cap on the rotary switch and install the new battery flat side
(+) up. It is advisable to remove the battery for long term
storage (over a month).
1) Turn the elevation adjustment knob clockwise to “0”.
(Steps 2-5 below are for scopes with clockwise windage/elevation
adjustment. For counter-clockwise knobs, just reverse the indicated
direction.)
Mounting the Scope
This riflescope requires 34mm rings. STEINER recommends
using high-quality, solid steel rings and bases. Quality
components ensure that your scope will remain safely and
securely mounted, and will provide the maximum accuracy.
Read the manufacturer’s directions regarding the installation
of mounts and rings.
2) Use the hex wrench supplied
with the scope to loosen the
set screws on the elevation
adjustment knob located just
under the top of the knob.
Accessories
STEINER offers a range of accessories including anti-reflective
devices for this scope. The objective lens is designed to
accommodate standard anti-reflective devices, sunshades,
filters and other accessories that fit a 63mm objective.
3) Pull up slightly on the adjustment knob to the second white
hash mark on the turret. Turn the knob clockwise slightly
more than the number of mils needed to achieve zero.
4) Retighten the set screws. Adjust the elevation down the
required amount.
Care & Maintenance
This STEINER Military riflescope is fully waterproof and
fogproof. To protect the objective and ocular lenses, it comes
equipped with flip-up scope caps. In the event that the
lenses are subjected to dust, dirt or mud, follow these steps
to clean and protect the lens surface. Failure to remove grit
before final cleaning is sure to damage lens coatings.
5) Once the elevation adjustment is complete, once again
loosen the two set screws and reset the knob to “0”. With
the screws loose, push down firmly on the knob until it is
fully seated on the turret base and then retighten the set
screws.
NOTE: When retightening set screws on elevation knob,
maintain pressure on the top of cap to ensure proper seating
of adjustment dial. If the knob is removed, it is possible to
rotate the Rotation Indicator actuator, which controls the
elevation rotation indicator pin, to a position which will
prevent full rotation of the knob when reinstalled.
If the knob locks up in the middle of
the two turns, the Rotation Indicator
actuator is out of position. When this
occurs, return the knob to zero, loosen
the set screws and remove the cap
exposing the actuator. Rotate the
actuator fully counter-clockwise until
it stops against the adjacent plate.
The Rotation Indicator pin will be
retracted. Reinstall the knob and turn
it to zero before retightening the set
screws.
Coarse dirt/debris must be removed from the lens surface.
The most convenient way to clean a lens surface is to use a
Lens Pen. Position the scope so particles will fall away from
the lens, and then use the Lens Pen or soft brush to gently
whisk away the debris, while blowing on the lens to dislodge
the particles. For heavy dirt, like dried mud, use a spray of
clean water or lens cleaning fluid to remove the dirt.
Your STEINER riflescope will provide a reliable performance
given reasonable care and treatment. All moving assemblies
are permanently lubricated. Only occasional cleaning of the
outside of the scope and the exterior lenses is required.
Rotation
Indicator
Actuator
Never disassemble your scope. Disassembly by anyone
other than our factory will void the warranty. If you have any
other problems with the STEINER riflescope, return it to the
factory for repair.
For further information, please visit our web site at
www.steiner-military.com.
Illuminated Reticle Adjustment
The STEINER Military Riflescope features an illuminated reticle
that makes it easier to see the reticle in low light conditions.
The intensity of the illumination is controlled by the rotary
illumination switch located on the left side of the adjustment
turret. The switch has 11 intensity levels and a “battery saver”
position in between each level that turns off the illumination.
The “Off” positions at the minimum and maximum ranges
turn the circuit off completely and should be use when the
scope is not in use. Each level also has a detent to prevent
unintended changes during use.
2
G2 Mil Dot Illuminated Reticle
Reticle Subtensions:
Units
A
B
C
D
E
F
G
H
J
K
L
mRad
10
0.5
0.5
0.2
0.06
.5
1
0.06
0.06
5
2
in/100 yd.
36
1.8
1.8
0.72
.22
1.8
3.6
.22
.22
18
7.2
cm/100 m
100
5.0
5.0
2
0.6
5
10
0.6
0.6
50
20
Specifications:
Magnification
3x - 12x
Diopter Setting
+2 to -3
Objective Size
56mm
Reticle
G2 Mil-Dot
Tube Diameter
34mm
Elevation Adjustment Knob
Resettable to “0” w/wrench
Field of View @100 (m/y)
10.4 - 2.80 / 11.3 – 3.06
Windage/Elevation Adjustment
1 cm (0.10 mRAD)
Eye Relief (mm/in.)
96 - 77 / 3.7 - 3.0
Elevation Range @ 100 m
Exit Pupil (mm/in.)
16.4 – 4.5 / 0.64 – 0.17
Windage Range @ 100 m
195 cm (19.5 mils)
+_ 48cm (4.8 mils)
Twilight Factor
13.79– 26.25
Parallax /Focus Adjust. Knob
Turret Mounted, Rotary
Length (mm/in.)
395 / 15.5
Parallax /Focus Adjustment
50 m to Infinity
Weight (grams/oz.) with caps
1,030 / 36.3
Operating Temperature
-25° / +63°C
Battery
CR2450
Illumination
Rotary Digital Control
Scope Dimensions:
A
Optimum Eye
Relief
High-Low
(mm/in.)
96-77
3.77 – 3.03
B
Objective End
Dia. (mm)
63.7
C
Clear
Objective Dia.
(mm)
56
D
Ocular End Dia.
(mm)
42.6
E
Scope
Dimension
(mm/in.)
395 / 15.5
F
Scope
Dimension
(mm/in.)
117 / 4.6
3
G
Scope
Dimension
(mm/in.)
48 / 1.8
H
Scope
Dimension
(mm/in.)
91 / 3.5
I
Scope
Dimension
(mm/in.)
94 / 3.7
J
Scope
Dimension
(mm/in.)
184 / 7.2
INSTR-1089