1
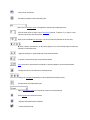
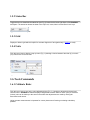
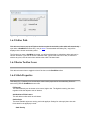
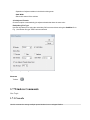
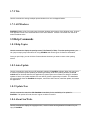
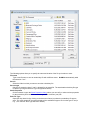
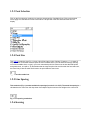
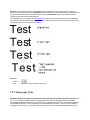
SEWWRITE USER MANUAL V1.3.1 DECEMBER 11, 2014 S & S COMPUTING Oak Ridge, TN 37830 Table of Contents 1. SewWrite ...................................................................................................................................... 4 1.1 Introduction ............................................................................................................................ 4 1.1.1 Getting Started................................................................................................................. 4 1.1.2 Contacting Us .................................................................................................................. 5 1.1.3 FAQ ................................................................................................................................. 5 1.1.4 Purchase SewWrite ......................................................................................................... 6 1.2 Menus ..................................................................................................................................... 6 1.2.1 File Menu ........................................................................................................................ 6 1.2.2 Edit Menu ........................................................................................................................ 7 1.2.3 View Menu ...................................................................................................................... 7 1.2.4 Tools Menu ..................................................................................................................... 7 1.2.5 Window Menu ................................................................................................................. 7 1.2.6 Help Menu ....................................................................................................................... 8 1.3 File Commands ...................................................................................................................... 8 1.3.1 New ................................................................................................................................. 8 1.3.2 Open ................................................................................................................................ 8 1.3.3 Close ................................................................................................................................ 9 1.3.4 Save ................................................................................................................................. 9 1.3.5 Save As ............................................................................................................................ 9 1.4 Edit Commands .................................................................................................................... 10 1.4.1 Undo .............................................................................................................................. 10 1.4.2 Cut ................................................................................................................................. 10 1.4.3 Copy .............................................................................................................................. 10 1.4.4 Paste .............................................................................................................................. 10 1.4.5 Select All ....................................................................................................................... 11 1.5 View Commands .................................................................................................................. 11 1.5.1 Toolbar .......................................................................................................................... 11 1.5.2 Status Bar ...................................................................................................................... 13 1.5.3 Grid................................................................................................................................ 13 1.5.4 Units .............................................................................................................................. 13 1.6 Tools Commands.................................................................................................................. 13 1.6.1 Calibrate Ruler .............................................................................................................. 13 1.6.2 Editor Path ..................................................................................................................... 14 1.6.3 Resize Toolbar Icons ..................................................................................................... 14 1.6.4 Stitch Properties ............................................................................................................ 14 1.7 Windows Commands ........................................................................................................... 15 1.7.1 Cascade.......................................................................................................................... 15 1.7.2 Tile ................................................................................................................................ 16 1.7.3 All Windows ................................................................................................................. 16 1.8 Help Commands ................................................................................................................... 16 1.8.1 Help Topics ................................................................................................................... 16 1.8.2 Auto-Update .................................................................................................................. 16 1.8.3 Update Now................................................................................................................... 16 1.8.4 About SewWrite ............................................................................................................ 16 1.8.5 Change (History) Log.................................................................................................... 17 1.8.6 Context Help ................................................................................................................. 17 1.9 Utilities ................................................................................................................................. 17 1.9.1 File Open Dialog ........................................................................................................... 17 1.9.2 File Save As Dialog....................................................................................................... 17 1.9.3 Font Selection ................................................................................................................ 19 1.9.4 Font Size ........................................................................................................................ 19 1.9.5 Line Spacing .................................................................................................................. 19 1.9.6 Kerning .......................................................................................................................... 19 1.9.7 Monogram Styles .......................................................................................................... 20 1.9.8 Paragraph Alignment..................................................................................................... 21 1.9.9 Paste Image Template ................................................................................................... 22 1.9.10 Symbol Dialog............................................................................................................. 23 1.10 Character Properties ........................................................................................................... 23 1.10.1 Bold ............................................................................................................................. 23 1.10.2 Bullets.......................................................................................................................... 24 1.10.3 Color ............................................................................................................................ 24 1.10.4 Decrease Letter Size .................................................................................................... 24 1.10.5 Increase Letter Size ..................................................................................................... 24 1.10.6 Italic ............................................................................................................................. 24 1.10.7 Outline ......................................................................................................................... 24 1.10.8 Para Center .................................................................................................................. 24 1.10.9 Para Left ...................................................................................................................... 24 1.10.10 Para Right .................................................................................................................. 25 1.10.11 Subscript .................................................................................................................... 25 1.10.12 Superscript ................................................................................................................. 25 1.10.13 Underline ................................................................................................................... 25 1. SewWrite 1.1 Introduction 1.1.1 Getting Started Welcome to SewWrite, an application designed to allow you to create quality lettering for your embroidery projects. The SewWrite workspace is set up to look like a modern word processor. Letters are entered there from the keyboard and modified by applying various available font styles (such as bold, italic or underline) and monogram styles. Font styles can be applied to letters before they are entered by clicking the appropriate font toolbar buttons, or afterwards by selecting the letters and then clicking the desired styles(s). In contrast, monogram styles are applied to existing letters by first selecting them and then choosing the monogram style from drop-down combo list. Finally, you can set (and store) the properties for the embroidery stitches written by SewWrite (such as fill and satin density) by clicking the Stitch Properties item on the Tools Menu. Once the letters have been arranged in the workspace, they can be saved by clicking the File/Save As menu item. The "Save As" dialog opens, allowing you to choose a name for the workspace file which - like an ordinary document - will be saved so it can retrieved later for further editing in SewWrite. It has an extension ".swr" which identifies it uniquely as a SewWrite file. If the document file is deleted, the user will not be able to edit the file in SewWrite. In addition to the document file, an embroidery file will be saved with the same name as the document file, but with a Melco ".exp" file type extension. A color file (with extension .inf) is also saved. You may open the embroidery file in an editor (such as SewWhat-Pro) to change it to the format needed by your embroidery machine. You can also edit the file, merge it with other designs, etc. It is possible to set the path to your favorite embroidery editor so that the embroidery file written by SewWrite will be automatically opened in that editor. There is a button at the bottom of the "Save As" dialog to change or verify the settings for the embroidery stitches. Basic Letter Entry and Editing Capabilities Letters are entered from the keyboard (as in any word processor). A caret (vertical blinking line) appears to the right of the last entered letter and indicates the position where the next typed letter will be entered. The arrow keys or a left-mouse click can be used to move the caret around in the SewWrite workspace. Many editing operations in SewWrite may be applied to multiple consecutive letters by first selecting them. Letter selection can be done from the keyboard by first holding down the SHIFT key and using the arrow keys (or HOME/END keys) to select one or more letters. This action is identical to what most word processors implement. Selection can also be performed by dragging a selection rectangle around letters with the left mouse button held down. Toolbar functionality The functions of the various toolbar buttons at the top of the SewWrite workspace are described here. Font Name – by clicking the up/down arrow all of the available fonts are shown and a selection can be made from those available. Additional fonts will be added in the future. Font Size – the font size is shown in points. As an example, the 32 point size yields a font which is approximately ½ inch (from the top of the ascender to the bottom of the descender of that font); 72 points is approximately 1 inch. The font size can be changed for a selected letter, word or line of a data by highlighting those objects. Line Spacing –is the amount of space between the first line of text and the second, third, etc. The line spacing can be adjusted by typing your text and selecting a line spacing number. The line spacing can also be changed after the information has been typed by highlighting all of the data and changing the line spacing number. Subscript & Superscript - will allow a letter or number to be typed slightly above or below the actual line of data. Subscript will move the letter/number below and Superscript will move it above. This is done by highlighting the letter/number and selecting your choice. The location can be adjusted by using the Kerning option (see explanation below). Remember to turn the button off when finished. Grow and Shrink Font – Grow Font increases the size of a letter, word or phrase and Shrink Font will reduce the size. Highlight the area you want increased or shrunk and click the applicable button. Remember to turn the button off when finished. Kerning – there are left, right, up and down buttons to make adjustments in the location of a highlighted letter, word or phrase. This is done by highlighting your letter, word or phrase and clicking the applicable button until you get your selected item in the location of your choice. Monogram – provides the user with numerous monogram styles. You must highlight your selection first and then select the monogram style you want. Symbols – provides Math (Greek) and ‘other’ symbols such as the cent sign, registration, etc. 1.1.2 Contacting Us To obtain contact support for this product, please write to the following email address: [email protected] 1.1.3 FAQ How To . . . Purchase SewWrite 1.1.4 Purchase SewWrite You may purchase SewWrite from the S & S website: http://www.sandscomputing.com or any of our reseller websites. Scroll down to the SewWrite product listing and click the Add-to-Cart button there to purchase the license. If you want to order a CD, use the down-arrow on the Add-to-Cart button to select the CD version of the software. To update to the latest version of the software, use the INSTALL link (to the right of the Add-to-Cart button) for either the 32 and 64-bit version of the product (depending on your Operating System). There is a 14 day DEMO period during which you may use the software (with no restrictions). After that, you can either uninstall the software or purchase a license (Add-to-Cart). After purchasing the license, the registration information will be emailed to you and you can register the DEMO to make it a licensed copy. You DO NOT have to uninstall the DEMO if you want to keep the software, but only register it after receiving the license information. 1.2 Menus 1.2.1 File Menu File menu commands The File menu offers the following commands: New Open Creates a new blank document file. Opens an existing document file. Close Save Closes the presently active document file. Saves an open document file, using the same file name, and stores the embroidery stitches in a Melco (.exp) file. Saves an open document file (and the associated embroidery file) to a specified file name. Options for selecting embroidery properties are presented. Save As 1.2.2 Edit Menu Edit menu commands The Edit menu offers the following commands: Undo allows deletions and application of monogram styles to be undone Cut Copy Paste deletes selected text copies selected text to the clipboard paste clipboard text at cursor Select All selects all text in the document 1.2.3 View Menu The View menu offers the following commands: Toolbar Status bar Displays (checked) or hides (unchecked) the main toolbar. Displays or hides the status bar. Grid Units Displays or hides grid to enable accurate alignment with kerning. Displays a pop-up to choose units for the ruler in American (inch) or metric (cm). 1.2.4 Tools Menu Tools menu commands The Tools menu offers the following commands: Calibrate Ruler Stitch Properties Editor Path Opens dialog to calibrate the on-screen ruler(s) Opens dialog to set and save embroidery properties Select an embroidery editor to automatically open when the "swr" document is saved. 1.2.5 Window Menu The Window menu offers the following commands, which enable you to arrange multiple views of multiple documents in the application window: Cascade Tile All Windows Arranges windows in an overlapped fashion. Arranges windows in non-overlapped tiles. Goes to specified window. 1.2.6 Help Menu The Help menu offers the following commands: Help Topics List help topics Auto-Update Update Now Toggles on/off the auto-update feature Checks website for available update About SewWrite Change (History) Log Display program information, version number, copyright Display history of changes to SewWrite 1.3 File Commands 1.3.1 New Use this command to create a new document in SewWrite. You can open an existing document with the Open command. Shortcuts Toolbar: Keys: CTRL+N 1.3.2 Open Use this command to open an existing SewWrite document file in a new window. You can open multiple documents at once. Use the Window menu to switch among the multiple open documents. When you use this command, SewWrite displays the File Open Dialog so you can select the pattern file(s) to open. Alternatively, you can open an existing document by selecting it from the most recently used (MRU) file list in the File menu, if it was recently opened. You can create new blank pattern files with the file New command. Shortcuts Toolbar: Keys: CTRL+O 1.3.3 Close Use this command to close all windows containing the active document. SewWrite suggests that you save changes to your document before you close it. If you close a document without saving, you lose all changes made since the last time you saved it. Before closing an untitled document, SewWrite displays the File Save As dialog and suggests that you name and save the document. You can also close a document by using the Close icon on the document's window, as shown below: Shortcuts Keys: CTRL+F4 closes a document window ALT+F4 closes the SewWrite window or dialog box 1.3.4 Save Use this command to save the active document using its current name and directory. When you save a document for the first time, SewWrite displays the File Save As Dialog so you can name your document (and the associated embroidery file). If you want to change the name and directory of an existing document before you save it, choose the file Save As command. Shortcuts Toolbar: Keys: CTRL+S 1.3.5 Save As Use this command to save and name the active document and its associated embroidery file. SewWrite displays the File Save As Dialog box so you can name your pattern file. To save a document file with its existing name and directory, use the Save command. 1.4 Edit Commands 1.4.1 Undo Use this menu item/toolbar key to undo certain changes to the SewWrite workspace. Shortcuts Toolbar: Keys: CTRL+Z 1.4.2 Cut Use this menu item/toolbar key to delete (cut) the selected text from the SewWrite workspace. Shortcuts Toolbar: Keys: CTRL+X 1.4.3 Copy Use this menu item/toolbar key to copy the selected text to the Clipboard (for pasting) from the SewWrite workspace. Shortcuts Toolbar: Keys: CTRL+C 1.4.4 Paste Use this menu item/toolbar key to paste the previously selected text to the SewWrite workspace. Shortcuts Toolbar: Keys: CTRL+V 1.4.5 Select All Use this edit menu item to select all the letters for copying or other editing. Shortcuts Keys: CTRL+A 1.5 View Commands 1.5.1 Toolbar Use this command to display and hide the main toolbar, which includes buttons for some of the most common commands in SewWhat-Pro, such as File Open. A check mark appears next to the menu item when the toolbar is displayed. Fig 1. The main SewWrite toolbar (split in half) The functions of individual toolbar buttons and boxes shown in Fig. 1 are described below: Click To Open a new document. Open an existing document. SewWrite displays the Open dialog box, in which you can locate and open the desired file. Save the active document and its associated embroidery file with its current name. If you have not named the document, SewWrite displays the Save As dialog box. Cut (delete) selected letters from the document and stores them in the clipboard for possible undo. Copy the selected letters to the clipboard. Insert (paste) the letters stored in the clipboard into the active window. Undo certain operations. Set stitch properties for the embroidery file. Open a list of available fonts to be applied to selected and subsequent text. Click the down arrow to open a list of font sizes (in points, 72 points=1"), or type in a size (which must be less than 400 points) Open a list of available line spacings, in 0.25 increments as fractions of the font size. B (bold), I (italic), U (underline), or O (outline) apply one or more of these styles to either the selected or subsequent text. Apply the subscript or superscript style to the selected letters. Increase or decrease the size of the selected letters. Kern (increase or decrease the horizontal or vertical separation of) the selected letters. Change the color of the selected or subsequent text. Change the paragraph indentation for the selected and subsequent text. Create bullets (not implemented yet). Apply a monogram style from drop-down combo list to selected text. Enter symbol text into the document. Displays information about SewWrite. Context sensitive help. 1.5.2 Status Bar Toggle this item to show/hide the status bar (see Fig.1) located at the lower right frame of the SewWrite workspace. The status bar shows the state of the Cap Lock, Insert, Num Lock and Scroll Lock keys. Fig. 1 SewWrite status bar pane 1.5.3 Grid Displays or hides a grid which is helpful for accurate alignment of text (particularly if kerning is used). 1.5.4 Units Click this menu item to display a pop-up menu (Fig. 1) allowing a choice between American (in) or metric (cm) units for the on-screen ruler. Fig 1. Units menu item. 1.6 Tools Commands 1.6.1 Calibrate Ruler Click this menu item to pop-up the ruler calibration dialog (Fig. 1). Use this to adjust the horizontal and vertical rulers in SewWrite so that the displayed lengths are accurate. Either a metric (mm) or American (inches) ruler can be held up to the screen rulers while the adjustments are made by clicking the associated scroll arrows. Using accurate measurements is important for correct placement of lettering on existing embroidery patterns. Fig. 1 Dialog for calibrating rulers displayed in SewWrite. 1.6.2 Editor Path Click this menu item to pop-up an Explorer window to select the embroidery editor which will automatically open when a SewWrite document file (*.swr) is saved. The associated embroidery file (*.exp) will be displayed in the chosen embroidery editor. The first time you save a SewWrite document, you will be advised that an embroidery editor path can be chosen. After that, if you wish to choose a different editor, just click this menu item. Also, to cancel the editor at any time, click the menu item and leave the editor File Name blank. 1.6.3 Resize Toolbar Icons Click this tools menu item to toggle the size of the icons on the SewWrite toolbar. 1.6.4 Stitch Properties This dialog (Fig. 1) allows you to set and store various stitch properties for the embroidery file that is saved along with the SewWrite document file. Fill Density The satin fill density can be chosen to be normal, high or low. The higher the setting, the closer together will be the adjacent rows of stitches. Add Outline to Filled Letters This will add an outline stitch to solid letters. Outline Style The three available styles are running, satin and applique. Settings for satin style (there is a satin finish stitch for the applique) include: Satin Density Separation of adjacent stitches in the direction being sewn. Satin Width Side-to-side extend of the stitches. Join Adjacent Threads Check this option to automatically join adjacent threads that have the same color. Emb(roidery) File Type Use this drop-down list to select the embroidery file format used when saving the SewWrite file. In Fig. 1, the Brother file type "PES" has been selected. Fig. 1 Stitch Properties Dialog Shortcuts Toolbar: 1.7 Windows Commands New Topic. 1.7.1 Cascade Use this command to arrange multiple opened windows in an overlapped fashion. 1.7.2 Tile Use this command to arrange multiple opened windows in a non-overlapped fashion. 1.7.3 All Windows SewWrite displays a list of currently open document windows at the bottom of the Window menu. A check mark appears in front of the document name of the active window. Choose a document from this list to make its window active. 1.8 Help Commands 1.8.1 Help Topics Use this command to display the opening screen ("Get Started") of Help. From the opening screen, you can jump to step-by-step instructions for using SewWrite and various types of reference information. Once you open Help, you can click the Contents button whenever you want to return to the opening screen. 1.8.2 Auto-Update Use this command to toggle (turn on/off) automatic updating of SewWrite software. When this menu item is checked (unchecked), auto-updating is allowed (prevented). With auto-updating allowed, the S & S website will be checked whenever the application is opened (but not more than once daily) for available updates. If there is an update available, the user will be given the opportunity to install it. The installation will automatically close the SewWrite workspace, remove the older version, install the update, and restart the application. 1.8.3 Update Now Use this command to search the S & S website immediately for the availability of an update for SewWrite. If an update is found, the user is given a choice to install it. 1.8.4 About SewWrite Use this command to display the copyright notice, version number and registration information for your copy of SewWrite. 1.8.5 Change (History) Log Use this command to display the history of changes made to SewWrite. 1.8.6 Context Help Use this command to obtain context-sensitive help for toolbar and menu items. When you (single left) click this toolbar button, the cursor changes to a "?" icon. Then click on the item for which you want help, and the help manual will open to an appropriate topic. Shortcuts Toolbar: 1.9 Utilities 1.9.1 File Open Dialog This dialog allows you to open an existing (previously-saved) SewWrite document file (with the extension "*.swr") for further editing. 1.9.2 File Save As Dialog This dialog (see Fig. 1) allows you to choose the name of the SewWrite document (and embroidery) file to be saved, as well as the folder to save the file in. Fig 1. SewWrite File Save As dialog. The following options allow you to specify the name and location of the file you're about to save: File name Type a new filename to save an embroidery file with a different name. SewWrite automatically adds the extension ".swr" . Save in Select the folder in which you want to store the embroidery file. Save as type Only the file extension (type) "*.swr" is allowed for the saved file. The associated embroidery file type is chosen by using the Emb File Type list (explained below). Stitch Properties Click this button to open the Stitch Properties dialog, where you can verify or select various properties for the embroidery file that will be saved along with the document (.swr) file. Emb File Type Open this drop-down list (by clicking on the down scroll arrow) to select the embroidery file type to save. The scroll arrows can be used to display all the available file types. Click on the type to use (in Fig. 1, the Janome "PES" type has been chosen). 1.9.3 Font Selection Click on the font selection combo box to open the drop-down list of available fonts. Click on the desired font to apply it to selected text or text to be entered. The preview of the font shows how the font will display. 1.9.4 Font Size This toolbar combo box (see Fig. 1) gives a list of font sizes in units of points (72 points = 1"), in steps of 36 points. Click on the down-arrow to open the list of available sizes. You can either choose (by clicking) one of the available sizes, or type in your own customized point size. Sizes must be less than 400 points and greater than, or equal to, 36. Remember that the large the point size and the wider the font letters are, the more likely is that the satin fill will need to be split inside the sewn area. Fig 1. Font size combo box. 1.9.5 Line Spacing This combo box (Fig. 1) contains available line-spacings (in units of 1/4 = 0.25). The actual line spacing is calculated as the value from this drop-down list multiplied by the maximum font height on the current line. Fig 1. Line-spacing combo box. 1.9.6 Kerning Kerning is the process of adjusting the spacing between characters in a proportional font, usually to achieve a visually pleasing result. In SewWrite, both horizontal and vertical adjustments of selected letters can be achieved with either the toolbar kerning arrows (see Shortcuts below) or by holding down the Control key and using the keyboard arrows. If the INSERT key is on (check in the status pane), then the horizontal kerning increases (or decreases) the separation equally between ALL selected letters (instead of shifting all the selected letters as a block). The different types of kerning are shown below: Shortcuts Toolbar: Keys: CTRL+Arrow Keys or INSERT+Arrow Keys 1.9.7 Monogram Styles Monogram styles can be applied to selected text by choosing from the scrollable drop-down list shown in Fig. 1. You must first select the letters to be monogrammed, either by drawing a selection rectangle around them by holding down the left-mouse button or by pressing the SHIFT-key and using the keyboard arrow/HOME/END keys. (This is the same as any standard word processor). Then click on the desired monogram style (in Fig. 1, the "Up slant" style was chosen) and the letters will be displayed in this style. Normally, you would choose only 3 letters for most monogram styles. However, the arching styles and the other "path" styles - Polygon, Diamond, or Bezier - work well with more than 3 letters. These path styles open an editing window (see Fig. 2) which allows you to interactively create the path (or in the case of the Diamond style, the outline) for the letters. In Fig. 2 shows the "Arch-Up" editor. The radius of the arch can be increased or decreased by left-clicking the red ball and dragging away or towards the center ("+") point, and the starting point can be moved by rotating the ball in a circle around the center point. When editing is finished, click outside the edit box OR press the ESC key to return to the SewWrite workspace and the style will be applied to the letters there. Once the editing box is closed for these styles, further manual editing is possible or you can Undo the style before applying it again. A useful tool for sizing and placing the lettering for the arching, Bezier, and Polygon tools is the Paste Image Template tool. Fig 1. Monogram styles drop-down combo list. Fig 2. The "Arch-Up" editing tool. 1.9.8 Paragraph Alignment The three paragraph alignment styles (see Fig. 1) can be chosen either before text is entered or afterwards by selecting the text to be aligned. Note that in SewWrite there is no explicit page size for alignment. Instead, the page width is computed based on the widest line of text. For example, if two lines of text are entered that are exactly the same length, then all three options will display the text the same in SewWrite. However, if two or more lines have different lengths, then the centering options will display differently (see Fig. 2 below). Fig 1. Paragraph alignment (left align by default). Fig 2. Demonstration of how SewWrite applies paragraph styles. 1.9.9 Paste Image Template The Paste Image button (see Fig. 1) appears in certain monogram style views (arching, polygon, Bezier curve). Clicking this button will paste the contents of the clipboard into the view. The clipboard image acts as a template for arranging and sizing the lettering in SewWrite. For example, the clipboard image can be an embroidery pattern to which lettering will be added. Fig. 1 The easiest way to obtain this image is by using the Windows "Snipping" tool (available in VISTA and later operating systems) to make a snapshot of the pattern that is opened in your embroidery editor. In Fig. 2, an embroidery pattern has been pasted from the SewWhat-Pro (c) editor into the Arch-Up monogram style view in SewWrite. The image (and lettering) are scaled to fit this workspace with the relative size of each kept proportional. Note how the image acts as a template for arranging the arch. When the arched text is saved (note that upon leaving the monogram-style edit space, the template will disappear), and subsequently merged with the pattern, it will look exactly as shown in Fig. 2. Fig. 2 1.9.10 Symbol Dialog Use this dialog to enter math (Greek) symbols or other special symbols (see Fig. 1). Select the character set from the drop-down list and then click on the individual characters to enter them into the SewWrite workspace. Fig. 1 The symbol character dialog 1.10 Character Properties New Topic. 1.10.1 Bold Click this toolbar button to toggle (change) the bold state of either selected or subsequently typed letters. 1.10.2 Bullets Click this toolbar button to add bullets to a list or outline. 1.10.3 Color Click this toolbar button to toggle (change) the color of either selected or subsequently typed letters. 1.10.4 Decrease Letter Size Click this toolbar button to decrease the font size a little for either selected or subsequently typed letters. 1.10.5 Increase Letter Size Click this toolbar button to increase the font size a little for either selected or subsequently typed letters. 1.10.6 Italic Click this toolbar button to toggle (change) the italic state of either selected or subsequently typed letters. 1.10.7 Outline Click this toolbar button to render the selected or subsequently typed text as outlines. 1.10.8 Para Center Click this toolbar button to center the selected or subsequently typed lines of text. 1.10.9 Para Left Click this toolbar button to left-align the selected or subsequently typed lines of text. 1.10.10 Para Right Click this toolbar button to right-align the selected or subsequently typed lines of text. 1.10.11 Subscript Click this toolbar button to subscript the selected or subsequently typed lines of text. 1.10.12 Superscript Click this toolbar button to superscript the selected or subsequently typed lines of text. 1.10.13 Underline Click this toolbar button to toggle (add or remove) underlining of either selected or subsequently typed letters.