1
SEWICONZ USER MANUAL
V1.8.2
DECEMBER 11, 2014
S & S COMPUTING
Oak Ridge, TN 37830
Table of Contents
1. Introduction .................................................................................................................................. 2
1.1 Getting Started........................................................................................................................ 2
1.2 FAQ (Frequently Asked Questions) ....................................................................................... 6
1.3 Contacting Us ......................................................................................................................... 8
1.4 Purchase SewIconz ................................................................................................................. 8
2. Control Buttons ............................................................................................................................ 8
2.1 Adjust Thumbnail Size (XP) .................................................................................................. 8
2.2 Always Show Icons (VISTA and W7-W8) ............................................................................ 8
2.3 Clear All Selections ................................................................................................................ 9
2.4 Clear Icon Cache .................................................................................................................... 9
2.5 Color Order ............................................................................................................................ 9
2.6 Disable SewIconz ................................................................................................................. 10
2.7 Display File Icon Overlay .................................................................................................... 10
2.8 Fabric Color.......................................................................................................................... 10
2.9 File Association .................................................................................................................... 10
2.10 Open Preview Pane ............................................................................................................ 11
2.11 Select All ............................................................................................................................ 14
2.12 Select Units ........................................................................................................................ 14
2.13 Show Icons in Zip Files ...................................................................................................... 14
2.14 Show Texture in Preview Pane .......................................................................................... 15
2.15 Update SewIconz................................................................................................................ 15
1. Introduction
1.1 Getting Started
SewIconz© is Windows software that displays icons (pictures) for various embroidery, quilt and graphics
files when those files are viewed using MS Windows Explorer©. For embroidery and quilt files, those icons
depict the pattern of the stitches encoded in those files. Thus, users can scroll through Windows folders
(and zipped folders, too) and actually see the contents of embroidery files, without having to open the files.
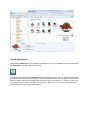
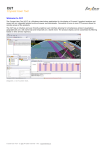
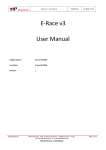
Figure 1a shows a folder containing embroidery files when viewed in Windows Explorer. Only a default
"blank sheet" icon is displayed for all the files, and the Preview Pane (on the right) is empty (No preview
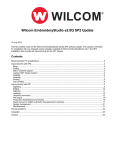
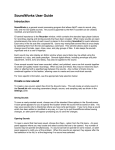
available). Figure 1b shows the same folder when SewIconz has been installed and activated (see
activation details below). Now the contents of each embroidery file are displayed as a thumbnail image,
depicting how the patterns look if they were sewn out. Also, the file "Dino2.pes" in the upper right has
been clicked to display the magnified textured image in the preview pane.
Figure 1a Windows Explorer showing blank icons for embroidery files, when SewIconz is not activated.
Figure 1b Same Explorer window, with SewIconz activated.
Activating SewIconz
After installing SewIconz on your computer, there will be an icon on your desktop which looks like this (for
64-bit SewIconz, the label will be SewIconz64):
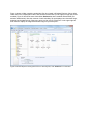
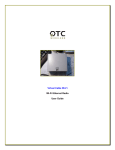
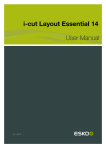
Double-click this icon to open the SewIconz settings dialog shown below in Fig. 2. This dialog allows you
to select the embroidery file types to show as icons in Windows Explorer. Various display criteria can also
be set from there. Note in the top right corner next to the "Close" (X) button is a "?" button. You can click
on that at any time to convert your cursor to a floating "?". Move your cursor over any of the buttons or
lists and left-click to pop-up help about that item.
Figure 2. The SewIconz settings dialog
A brief outline of the steps needed to activate and customize SewIconz for your computer is given below:
Select File Types To Display as Icons
Select - by left-clicking - file types (extensions) in any of the three lists (embroidery, quilting,
graphics) shown in Fig. 1. Selected items will appear in blue and will be displayed in Explorer as
icons. All the embroidery types can be selected (or deselected) at once by pressing the "Select All
Emb Types" (or "Clear All Selections") button.
Set Explorer Display Criteria
If you want to display icons for files stored inside zipped files, check the "Show Icons in Zip Files"
box. (This will only work if you have a license issued after Jan 1, 2010.)
For XP, the only option available (undimmed) is to select the Icon Thumbnail Size.
For VISTA/W7/W8, several display options are available:
1. Open Preview Pane
2. Show Texture (in Preview Pane only)
3. Always show icons, never thumbnails
4. Display an icon overlay on thumbnails
Set File Association
Click the "File Assoc" button to set the file associations for the selected embroidery file types.
Miscellaneous (Optional) Settings
Select units for popup information. You may choose either American or metric units of
measurement
Select the fabric color (default is white) which allows you to pick a background color for the icons
and thumbnails.
Select the color order for file types (like exp or dst) which do not include an internal palette
Accept Settings
After choosing the file types to iconize, and selecting the various display settings, click the "OK" button to
accept these settings (or if you don't want to accept them, click "Cancel" and make your settings choices
at a later time).
At any time after your initial use of the settings dialog, you may change your settings by double-clicking
the SewIconz desktop icon and repeating the steps outlined above.
1.2 FAQ (Frequently Asked Questions)
Frequently Asked Questions
Q Does SewIconz work with VISTA and Windows 7/8? I installed SewIconz on my Windows 7/8
computer and the icons don't display - what is wrong?
A Yes, SewIconz works on computers running VISTA and Windows 7/8. You must be sure to install the
correct bit version - either 32- or 64-bit - corresponding to your computer's operating system (OS). If you
are not seeing icons after installing SewIconz, it is likely due to having installed the 32-bit version on a 64bit system. Simply install the 64-bit version (downloaded from the SewIconz64 link). NOTE: if you have
legacy 32-bit embroidery programs installed, then you should keep the 32-bit version of SewIconz
installed in addition to the 64-bit version. This will allow you to see icons in the File/Open dialogs of the 32bit applications.
Q How do I determine if my computer operating system (OS) is 32-bit or 64-bit?
A The easiest way on VISTA or Windows 7/8 systems is to press the Windows key (the one with the
"wavy flag" logo) and the Pause key simultaneously. An information sheet will appear which displays
System Information, including the bit-size of your OS. Alternatively, you can try to install the 64-bit version
of SewIconz. If it installs, you must have a 64-bit OS! If the 64-bit version fails to install, you must use the
32-bit installer.
Q After installing SewIconz and selecting the file types to iconize (by double-clicking the SewIconz
desktop icon), only the icons for small views display properly. The medium and large (Tiles, thumbnails)
views show up as black boxes or with "weird" icons in them. What is wrong?
A This occurs because there are several settings in Windows that may block the display of large icons
(thumbnails). To fix this, open the SewIconz desktop application. Make sure the item "Always show icons,
never thumbnails" is unchecked. Click the "Clear Icon Cache" button. Now see if your large icons display
correctly. (You should close and then reopen Windows Explorer.)
If icons are still not appearing, then one more setting has to be adjusted. Go to Start->Control Panel>System & Maintenance->System->Performance Information & Tools. (This assumes you are using
Control Panel Home View. In Classic View, click Performance Information.) Now click the "Adjust Visual
Effects" link. On the "Visual Effects" tab, make sure the check box "Show thumbnails instead of icons" is
checked. One of the two option "Let Windows Choose What's Best for my Computer", or "Custom", needs
to be selected to be able to make this change.
Q After setting a file association ("Open With" in Explorer) for an embroidery file type, the icons no longer
display for that file type and only the application icon overlays show. How do I recover the SewIconz
(pattern) icons?
A Follow the steps below:
1. Double-click the SewIconz desktop icon and press the "File Assoc" button.
2. Follow the instructions to set the file association.
3. Click the "OK" button.
The SewIconz (pattern) icons should display correctly now, and your file associations will work, too.
Q Will SewIconz display icons in the VISTA/WIN7 Details and/or Preview Panes?
A Yes. You can show/hide the Explorer Preview Pane by checking the "Open Preview Pane" button on
the SewIconz dialog. The Preview Pane is now fully supported by SewIconz for both regular and zipped
files. It is recommended to use this pane, rather than the Details Pane, for viewing enhanced (textured)
thumbnails of individual files.
To open the Details Pane, click (in Windows Explorer) Organize->Layout->Details Pane.
Q When do I need to activate (double-click) the SewIconz desktop icon?
A You only need to do that whenever you wish to initially select (after installing SewIconz) or change the
choice of file types that should appear as icons, or if you want to change the units displayed for the pattern
properties (which display when you hover your cursor over the pattern file icon). Otherwise, the desktop
icon for SewIconz can be ignored and just serves as a reminder that SewIconz is on your computer and
handling the display of embroidery (quilting and some other image) icons and thumbnails.
Q How do I purchase SewIconz?
A Purchase and upgrade information is available here.
1.3 Contacting Us
You may contact support at the following email address:
[email protected]
1.4 Purchase SewIconz
You may purchase SewIconz from the Shop-Online webpage of the S & S website:
http://sandscomputing.com
There is a 7 day DEMO period during which you may run the software (with no restrictions). After that, you
can either uninstall the software or purchase from the "Add-to-Cart" button to the left of the download
links. After you purchase the license, the registration information will be emailed to you and you can
register the DEMO to make it a licensed copy. Note: you DO NOT have to uninstall the DEMO if you want
to keep the software, but only register it after purchasing the license.
If you purchased SewIconz prior to Jan 1, 2010, then your license can be upgrades (for $10) to enable
the Zip-viewer feature.
2. Control Buttons
2.1 Adjust Thumbnail Size (XP)
Thumbnail sizes are continuously variable in VISTA and W7 and may be adjusted from the View menu in
Windows Explorer.
In XP, use this control to select the thumbnail size relative to the default value (100%).
2.2 Always Show Icons (VISTA and W7-W8)
Check this box if you want to show icons for all image sizes, rather than thumbnails for the larger (medium
and above) sizes and icons for the smaller sizes.
The main difference is that thumbnails display with a decorative border and can show an icon overlay
indicating the application that is currently selected to open the file when it is double-clicked in Windows
Explorer.
It is recommended to leave this item unchecked. To force this option (either on or off) without having to
reboot, it is advisable to go to Start->Control Panel->(Appearance and Personalization)->Folder Options
and click the "View" tab there. Under "Advanced Settings", uncheck (or check) the box "Always show
icons, never thumbnails". See the figure below where the item is marked with the blue arrow.
2.3 Clear All Selections
Press this button to clear all the selected embroidery files in the embroidery list.
2.4 Clear Icon Cache
Press this button to clear the icon and thumbnail caches This may be necessary if the Windows caching
system has corrupted any icons. Another situation where clearing the cache is essential is when you
change the "Always show icons" display setting.
On VISTA and W7, sometimes the thumbnail cache can not be immediately cleared (a message will
inform you of this). In that case, you should try again to clear the cache after doing a system reboot.
2.5 Color Order
This advanced option allows you set the color order for various embroidery files - like Tajima dst or Melco
exp - which do not contain an internal color palette. By default, the colors are ordered consecutively
according to the Brother (PES) palette.
2.6 Disable SewIconz
Press this button to disable SewIconz without actually uninstalling it. If you want to completely uninstall
SewIconz from your system, then right-click the SewIconz desktop icon, click on "Delete", and follow the
link to the control panel uninstall list and remove SewIconz from that list.
2.7 Display File Icon Overlay
Check this option if you want to display the file "open with" icon as an overlay in the lower right corner of
the Explorer pane where icons are shown. This overlay only appears for thumbnails (medium size and
above), so you must leave the "Always show icons, never thumbnails" option unchecked.
2.8 Fabric Color
Click on this option to set a background (simulated fabric) color on which to draw the embroidery patterns.
This is useful, for example, for white lace patterns which need a different background color from the
default (white) to be visible.
2.9 File Association
Once you have selected the file types you want to associate with a particular embroidery (or graphics)
editor, the "File Assoc" button on the SewIconz dialog will become enabled.
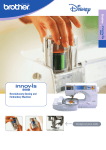
Click the "File Assoc" button to pop-up the Explorer pane shown below. It will automatically open to the
"Program Files" directory where most application files are stored. Navigate to the appropriate folder to find
the embroidery editor executable file for opening (by double-clicking them) the selected embroidery file
types.
In the example shown here, the SewWhat-Pro executable file (with extension "exe") has been selected to
be the editor associated with the selected embroidery file types. Click on the "Open" button to apply the
association. This will return control to the main SewIconz dialog.
You may now select different file types to associate with a different editor by repeating this process as
often as required.
NOTE: If your computer OS is 64-bit, you may have to navigate to the "Program Files(x86)" folder to find a
legacy 32-bit editor.
The "Program Files" folder for setting file associations in SewIconz.
2.10 Open Preview Pane
Check this option to open the Windows Explorer Preview Pane. SewIconz automatically enables the
"show preview handlers in preview panes" option in Windows so that previews will display if appropriate
software (like SewIconz) is installed. (If this option is not enabled from the Tools->Folder Options->View
Advanced Settings list, then no previews will be displayed.)
The Preview pane allows you to see an enlarged preview of the selected (highlighted) embroidery, image,
or document file in the middle Windows Explorer window, without having to actually open it. It can be
resized by dragging the separator bar between the middle and preview pane. Useful statistics about the
pattern (size, thread count, etc) will also appear. Previewing also works for files in zipped archives - even
for files in zipped folders! If the "Show Texture" option is also checked, then a textured (3D) view of the
embroidery file will appear in the preview pane. (NOTE: texturing will only be applied to embroidery files
with readable stitch data. Some embroidery files - like *.gen - are proprietary formats and only provide a
bitmap which cannot be textured.)
Note: VISTA does not have the same ease of use as W7. You can use the instructions below to manually
toggle the Preview Pane. In VISTA, SewIconz only enables/disables preview panes for Documents and
Zip Folder types (in W7, ALL folder types are enabled). If other folder types - such as Picture folders,
Video folders - require a visible preview pane, then follow the instructions below to enable it for those
special folder types.
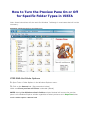
How to Turn the Preview Pane On or Off
for Specific Folder Types in VISTA
Note: these instructions will also work for Windows 7 although in most cases that will not be
necessary.
EXAMPLE: Windows Explorer Preview Pane
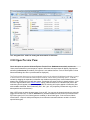
STEP ONE: Set Folder Options
1. Open Tools->Folder Options in the Windows Explorer menu.
2. Click on the General tab. (See screenshot below)
Make sure Show preview and filters is selected (dotted)
NOTE: Having Use Windows classic folders selected instead will remove the preview
pane in the Windows Explorer window regardless of what you have set in Step Two below.
Tools->Folder Option->General Tab
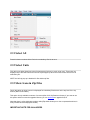
STEP 2: Toggling the Preview Pane from Windows Explorer
1. Open a Windows Explorer window. (A short-cut for this is to press the Windows key + "E"
keyboard combination.)
2. Click on Organize, then click Layout. (See screenshot below)
3. To Turn On the Preview Pane Click on Preview Pane to highlight the icon.
4. To Turn Off the Preview Pane Click on Preview Pane to unhighlight the icon.
Organize->Layout/Preview Pane option
2.11 Select All
Press this button to select all the files in the embroidery files list at once.
2.12 Select Units
Click this to use either American units of measurement (inches) or metric units (mm). These units are
displayed in the Preview Pane and in the Info-tip that pops-up when the mouse cursor hovers over an
embroidery file.
NOTE: the info-tip pop-up is disabled for files inside zip files.
2.13 Show Icons in Zip Files
Check this option to allow icons to be displayed for embroidery files that are at the top level of the zip
archive (NOT inside folders).
This option is only available to owners of a recent (after 01/01/10) SewIconz license. If you want to use
this option and do not own the upgraded license, you can purchase an upgrade for $10.
Note that there is a free third-party product called jZip which allows you to view compressed archives in
many formats other than zip (such as rar).
IMPORTANT NOTE FOR 64-bit USERS
Currently, jZip is only available in 32-bit format. You can still install and use it on a 64-bit computer, but
you must install both the 32-bit and the 64-bit versions of SewIconz to view embroidery files inside
compressed archives.
2.14 Show Texture in Preview Pane
Check this option to display thumbnails in the Preview Pane that are textured (3D).
2.15 Update SewIconz
Click the “Update” button to search the S & S Computing website for recent versions of SewIconz. If an
update is available, you will have the opportunity to download and install it.