1
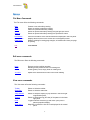
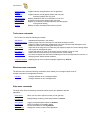
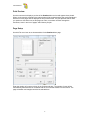
SEWCAT USER MANUAL V3.9.2 FEBRUARY 18, 2013 S & S COMPUTING Oak Ridge, TN 37830 SewCat Manual Table of Contents Introduction ........................................................................................................... 1 Getting Started .................................................................................................. 1 Frequently Asked Questions (FAQ)................................................................... 3 Contact Us ........................................................................................................ 3 Menus ................................................................................................................... 4 File Menu Commands ....................................................................................... 4 Edit menu commands ........................................................................................ 4 View menu commands ...................................................................................... 4 Tools menu commands ..................................................................................... 5 Windows menu commands ............................................................................... 5 Help menu commands ...................................................................................... 5 File Commands ..................................................................................................... 6 New ................................................................................................................... 6 Open ................................................................................................................. 6 Close ................................................................................................................. 6 Save .................................................................................................................. 7 Save As ............................................................................................................. 7 Print Album ........................................................................................................ 7 Print Preview ..................................................................................................... 8 Page Setup ....................................................................................................... 8 Exit .................................................................................................................... 9 Edit commands ................................................................................................... 10 Undo................................................................................................................ 10 Delete .............................................................................................................. 10 Insert ............................................................................................................... 10 Virtual Catalog Drive Editor ............................................................................. 11 View commands.................................................................................................. 12 Toolbar ............................................................................................................ 12 Status Bar ....................................................................................................... 12 Jump Stitches .................................................................................................. 12 Texture ............................................................................................................ 12 SewCat Manual Units ................................................................................................................ 12 Zoom Icons...................................................................................................... 12 Virtual Catalog-Explorer .................................................................................. 13 Thumbnails ...................................................................................................... 13 File Information................................................................................................ 13 Large Catalog Folders ..................................................................................... 14 Uncatalogued Files.......................................................................................... 14 Zip Files ........................................................................................................... 14 Windows commands ........................................................................................... 15 Cascade .......................................................................................................... 15 Tile .................................................................................................................. 15 Tools commands................................................................................................. 16 Alphabetize ..................................................................................................... 16 Background Color............................................................................................ 16 File Filter ......................................................................................................... 16 Hover Delay..................................................................................................... 16 Icon Layout ...................................................................................................... 17 Import Folders ................................................................................................. 17 Search Criteria ................................................................................................ 17 Language Support ........................................................................................... 17 Help commands .................................................................................................. 18 Help Topics ..................................................................................................... 18 Help Manual .................................................................................................... 18 Context Help.................................................................................................... 18 Auto-Update .................................................................................................... 18 Update Now..................................................................................................... 18 About SewCat ................................................................................................. 18 Change (History) Log ...................................................................................... 19 Toolbars .............................................................................................................. 20 Main ................................................................................................................ 20 Status Bar ....................................................................................................... 21 Miscellaneous topics ........................................................................................... 22 Displaying Files in the Central View Panel ...................................................... 22 Rename Files (or Folders) in the Catalog ........................................................ 22 SewCat Manual Move Files into the Catalog ............................................................................. 23 Interacting with other Embroidery Programs ................................................... 23 Add a Prefix or Suffix to a group of selected files ............................................ 24 Add Keywords ................................................................................................. 24 Find location on disk of a file in the VC ........................................................... 25 SewCat Manual Introduction Getting Started SewCat© is software that allows you to organize your embroidery files into catalogs. These catalogs can be either virtual folders (which are stored temporarily in computer memory and later saved to disk as a very small database file) or actual directory folders on your hard drive or removable media. SewCat allows you to easily view the stitch patterns encoded in your embroidery files, making it easy to sort and optionally rename files in meaningful ways. SewCat gives you the choice of using virtual or real catalogs, depending on your preferences. The virtual cataloging that SewCat performs leaves your original embroidery files intact in their original locations on the Hard Drive, CD or Removal Drive. This is in contrast to the Explorer cataloging option which reorganizes files and folders on your hard drive. There are advantages to each form of cataloging. Virtual Catalog In creating virtual catalogs (VC), any mistakes - such as inadvertent file or folder deletions - do not permanently affect the original embroidery files (which are never moved or deleted). If you do mistakenly delete file(s) or folder(s) in the virtual catalog, they can be restored from the special Recycle Bin folder in the VC. When a virtual catalog is saved to a hard drive, it takes up very little space. This allows you to create numerous different catalogs containing the same files, while occupying (almost) no additional disk space. However, a disadvantage of the virtual catalog (compared with a real, or physical catalog) is that only links to the cataloged files are saved. Thus, if you change the location of files on your hard drive, or remove the external media (CD or floppy) containing the cataloged files, those files will no longer be viewable when you reopen the saved catalog file. Explorer Catalog In the Windows Explorer (or real, physical) catalog mode, the catalog folders are created on your hard drive and the files you move around (either by copying or moving them with your mouse) are actually saved on the hard drive. Thus, although they will occupy additional space on the hard drive, there are no virtual links, so you will always be able to view the explorer-style catalog folder contents from Windows Explorer. Starting a SewCat Session To begin a new SewCat catalog, use the directory folder list appearing in the left panel of the SewCat workspace to navigate through your directories and locate embroidery files to be displayed for cataloging. Storing Files in Virtual Catalog Folders The catalog appears in the panel on the right of the SewCat workspace. It initially contains a few example folders to demonstrate what a catalog might look like. You can delete these folders, or rename them to something more suited to your application (see the discussion below on manipulating folders for more details). Use the mouse to select files from the center panel (by left-clicking on the file icons). Once selected, drag and drop the icon(s) into the catalog directory tree. Multiple files can be selected by holding 1 SewCat Manual down the Ctrl or Shift key during selection. An icon will appear with a thickened border when it is selected. After it is dropped into the catalog, a box with a check mark will appear below the icon to indicate it has been inserted into the catalog. This behavior is modeled after the folder selection logic of Windows Explorer®. Note that you can clear the selection status of all files by clicking on any blank area in the middle pane. Manipulating Virtual Catalog Folders To create a new folder in the catalog, first click on the catalog folder that will be the parent of the inserted folder. (The new child folder will go below its parent.) Then press the Insert key. This works for both top-level folders and subdirectories. New folders can also be added to the Virtual Catalog by clicking on the Import Folders item on the Tools menu. This latter method will allow you to insert empty folders into the virtual catalog, based on the folders that are selected in the directory view. This is an effective way to populate your Virtual Catalog tree. To delete a folder (and all its contents) or a file from the catalog, first select the folder or file (by clicking it) and then press the Delete key. If a file or folder is deleted by mistake, then click the Undo toolbar button (or press Ctrl-Z) to recover it. Files and folders in the catalog can also be moved to another branch of the catalog (dragged and dropped) or copied (hold down the Ctrl key during the mouse drag to copy the selected items to a new location). An existing catalog folder or file may be renamed by first clicking on the appropriate icon to select (highlight) it. Next, click the label (the text next to the icon) to initiate text-editing mode. (This is important: simply clicking the file or folder will not put you into editing mode! You must click the text label, too.) Once in editing mode a box will appear around the text to be edited, which should now be highlighted and blinking. After you complete the text editing, press either Return to accept your changes, or Escape to recover the original text. This will exit text-editing mode. To view an enlarged image of any cataloged file, along with some pattern details (stitches, colors, size), click on the file icon or label in the catalog. Selecting the Save As item from the File menu will allow you choose a name and location for saving the catalog to a small SewCat catalog file (*scc extension). This file stores the information required to restore your virtual catalog in the future. It contains only the names and locations of the embroidery files in your catalog and the associated embroidery files on disk. It does not store any stitch data. Opening a Catalog File Another way to begin a SewCat session is by opening an existing embroidery catalog file saved from a previous editing session. The last catalog that was edited will automatically load the next time SewCat is opened. Interaction of SewCat With Other Applications You can also drag and drop files from the center panel or directly from the catalog into other applications, such as an embroidery editor (for example, SewWhat-Pro) or Windows Explorer. Printing Albums To print an album of the file icons appearing in the center panel, select Print Album from the File menu. 2 SewCat Manual Creating a Permanent Catalog: organizing embroidery folders on your hard drive There may be situations when you want to create permanent catalogs directly on your hard drive (in contrast to producing the virtual catalogs described above). SewCat allows you to do this by toggling the Catalog/Explorer item on the View menu. Frequently Asked Questions (FAQ) How To ... Alphabetize Files (existing or new) in the Virtual Catalog (VC) Add a prefix or suffix to selected files in VC Add a keyword to a single VC file Add keywords to multiple selected files in VC Display an Explorer catalog Display Files for Cataloging Find the location in the VC of a disk file Find the location on disk of a file in the VC Move Files into a Catalog Rename Files or Folders Open a previously-saved catalog Save the present (working) catalog Delete a folder or file(s) from a catalog Insert a new folder into a catalog Show File Details for mid-panel icons Set search criteria (keywords or pattern-based) Interact with an Embroidery Editor Menus File menu Edit menu View menu Tools menu Windows menu Help menu Contact Us If you have any questions about the SewCat program, or any suggestions for improvements or additional features you would like to see added, please contact us at [email protected] 3 SewCat Manual Menus File Menu Commands The File menu offers the following commands: New Open Close Save Save As Creates a new embroidery catalog. Opens an existing embroidery catalog. Closes an opened embroidery catalog. Saves an opened embroidery catalog using the previous name. Saves an opened embroidery catalog to a specified file name. Print Album Print Preview Page Setup Prints an icon album of the selected directories displayed in the icon panel. Displays the document on the screen as it would appear printed. Displays a dialog for setting page margins, orientations and icons per page for printing. Exit Exits SewCat. Edit menu commands The Edit menu offers the following commands: Undo Delete Insert Reverse previous editing operation Deletes (prunes) folders or files from catalog tree. Inserts (grafts) a new, empty folder on catalog tree. VC Drive Update drive associations for files in the Virtual Catalog View menu commands The View menu offers the following commands: Toolbar Status Bar Shows or hides the toolbar. Shows or hides the status bar. Jump Stitches Shows or hides the display of jump stitches in the lower right magnification panel. Shows or hides texturing (3D view) of the pattern in the lower right panel. Toggles between American (in) and metric (mm) units in pattern properties display. Magnifies or shrinks the size of icons displayed in the central panel. Texture Units Zoom Icons 4 SewCat Manual Virtual CatalogExplorer Thumbnails File Information Large Folders Uncatalogued Files Zip files Toggles between catalog/Explorer view in right panel. Toggles between normal (display folders and files) and thumbnail (display files only) view Displays detailed file and color information in icon view. Increases the size of the catalog folder tree items. Displays (if unchecked) or hides embroidery files that appear in the present catalog Displays or hides embroidery files stored in zip files. Tools menu commands The Tools menu offers the following commands: Alphabetize Background Color File Filter Hover Delay Icon Layout Import Folders Search Criteria Language Support Alphabetizes files/folder in the catalog. Displays popup menu for choosing icon and panel background colors. Displays a dialog for selecting combinations of file type extensions that will appear in the middle icon panel when searching the directory tree. Adjust the hover delay time for customizing the drag/drop response over the catalog folders. Also choose an AutoExpand option. Choose the spacing of icons on the screen and the number of icons in a row. Import folder tree from directory view (left panel) into virtual catalog. Set criteria to display files with names containing at least on the keywords in the search, or satisfying certain pattern-based measures. Displays pop-up menu to select languages supported by SewCat. Windows menu commands The Window menu offers the following commands, which enable you to arrange multiple views of multiple documents in the application window: Cascade Tile Arranges windows in an overlapped fashion. Arranges windows in non-overlapped tiles. Help menu commands The Help menu offers the following commands, which provide you assistance with this application: Help Topics Offers you an index to topics on which you can get help. Help Manual Displays dialog containing online help manual for SewCat. Auto-Update Update Now Order Info About SewCat Toggle (on/off) autoupdate feature for SewCat Check immediately for available update. Provide information for ordering SewCat. Displays the version number of this application. 5 SewCat Manual File Commands New Use this command to create a new Catalog in SewCat. A new catalog is automatically opened when you first start a new SewCat session. You can open an existing document with the File Open command. Shortcuts Toolbar: Keys: CTRL+N Open Use this command to open an existing catalog in a new workspace. Select the desired catalog from a list of previously-stored SewCat files. Note that the catalog files you create with SewCat represent virtual directories. That is, they are stored in small catalog files and appear in the SewCat catalog panel, but they do not actually modify the contents of your disk directories. Thus, deleting files and folders in the catalog tree has no impact whatsoever on the embroidery files you have stored on disk. This makes the virtual cataloging system a very safe and user-friendly way of organizing your embroidery files. You can create new Catalogs with the New command. Shortcuts Toolbar: Keys: CTRL+O Close Use this command to close all windows containing the active document. SewCat suggests that you save changes to your document before you close it. If you close a document without saving, you lose all changes made since the last time you saved it. Before closing an untitled document, SewCat displays the Save As dialog box and suggests that you name and save the document. You can also close a document by using the Close icon on the SewCat catalog document's window, as shown below: 6 SewCat Manual Shortcuts Keys: CTRL+F4 closes a document window ALT+F4 closes the SewCat window or dialog box Save Use this command to save the active document to its current name and directory. When you save a document for the first time, SewCat displays the Save As dialog box so you can name your document. If you want to change the name and directory of an existing document before you save it, choose the Save As command. Shortcuts Toolbar: Keys: CTRL+S Save As Use this command to save and name the active Catalog. SewCat displays the Save As dialog box so you can name your catalog. SewCat catalog files are given the extension "scc" (SewCat Catalog). These files may be double-clicked on your desktop to automatically open SewCat. To save a catalog with its existing name and directory, use the Save command. Print Album Use this command to print an album of SewCat icons based on the icons displayed in the center panel. The album icons can be either associated with the directory (left) panel or the virtual catalog (right) panel, depending on in which directory tree the last check-boxes were selected. If there are no files open for viewing, then a summary of the Getting Started topic can be printed by selecting Print Manual instead. This command presents a Print dialog box, where you may specify the range of pages to be printed, the number of copies, the destination printer, and other printer setup options. Shortcuts Toolbar: Keys: CTRL+P 7 SewCat Manual Print Preview Use this command to display a preview of the SewCat album as it would appear when printed. When you choose this command, the main window will be replaced with a print preview window in which one or two pages will be displayed in their printed format. The print preview toolbar offers you options to view either one or two pages at a time; move back and forth through the document; zoom in and out of pages; and initiate a print job. Page Setup Use this File menu item to set characteristics for the SewCat album page. Enter the number of icons per column in the Columns edit box. The number of rows will be automatically determined to be consistent with the icon size that results from this choice. The page orientation and margins can also be selected here. 8 SewCat Manual Exit Use this command to end your SewCat session. You can also use the Close command on the application Control menu. SewCat prompts you to save documents with unsaved changes. Shortcuts Mouse: Keys: Double-click the application's Control menu button. ALT+F4 9 SewCat Manual Edit commands Undo Use this command (or press the Ctrl-Z key sequence) to undo the previous deletion operation in the Virtual Catalog (VC). Alternatively, you may drag/drop files and folders from the (Virtual Catalog) Recycle Bin back into the main part of the VC. Files and folders in the VC Recycle Bin will be deleted (from the Virtual Catalog, not from the hard drive) when the current session of SewCat is closed. A message will pop-up to warn you of their impending deletion. Undo is also implemented in Explorer mode. Since deleted files and folders are stored in the system Recycle Bin, you may also go there at any time to restore them (even after SewCat has closed) as an alternative to Undo. Shortcuts Toolbar: Keys: Ctrl-Z Delete Use this command (or press the Delete key) to remove the currently selected folder or file(s) from the catalog. This command is unavailable if there is no item currently selected. Note that any files or folders deleted from the Virtual Catalog (VC) will appear in the special Recycle Bin folder at the bottom of the VC. That way, any files inadvertently deleted can be restored by dragging them from the Recycle Bin to any other file in the VC. Files and folders in the Recycle Bin are not saved with the other VC files and folders (they are permanently deleted from the VC, but the original files on the Hard Drive or other external media are unaffected). Likewise, in Explorer mode, deleted files and folders are stored in the system Recycle Bin and can be restored from there in the case of an unintentional deletion. Shortcuts Toolbar: Keys: Delete Insert Use this menu command (or press the Insert key) to insert a new folder into the catalog tree below the currently selected catalog folder. Shortcuts Toolbar: Keys: Insert 10 SewCat Manual Virtual Catalog Drive Editor If you have moved your folders to a different drive (with a different drive letter or path), then you can modify the Virtual Catalog (VC) by using the VC Drive editor available on the Edit menu. Click this to open a dialog box where you may select (with the left mouse button) and edit the drives. You may also edit path names - up to four levels deep - that will appear on the new drive. 11 SewCat Manual View commands Toolbar Use this command to display and hide the Toolbar, which includes buttons for some of the most common commands in SewCat, such as File Open. A check mark appears next to the menu item when the Toolbar is displayed. See Toolbar for help on using the toolbar. Status Bar Use this command to display and hide the Status Bar, which describes the action to be executed by the selected menu item or depressed toolbar button, and keyboard latch state. A check mark appears next to the menu item when the Status Bar is displayed. See Status Bar for help on using the status bar. Jump Stitches Use this View menu item to toggle on/off jump stitches in the magnified display of the pattern file in the lower right (catalog) panel. Texture Use this View menu item to toggle on/off a textured display of the selected pattern file in the lower right viewing panel. Texturing is automatically off in the middle icon view in order to implement fast scrolling. At present, SewCat does not print textured icons (but this may change in the future). Units Use this View menu item to toggle between American units (inches) or metric units (mm) for the length properties of displayed patterns. Zoom Icons Click this View menu item to change the viewable size of the file icons appearing in the central panel. Click the "+" glass to magnify the image, and the "-" glass decrease the image size. 12 SewCat Manual Shortcuts Toolbar: Virtual Catalog-Explorer Click the Virtual Catalog-Explorer item (on the View menu) to toggle the right panel (catalog) view between the Virtual Catalog and the Windows Explorer view. In the Virtual Catalog View, the right panel displays the user-defined virtual catalog tree structure. This structure is called virtual because it does not alter the location of any of the files stored on your drive. In contrast, in the Explorer view the right panel displays the directory tree of your actual physical media attached to your computer (hard drives, floppy drives, CDs, USB media, etc.). Now, any changes you make in this tree will be permanently stored on your drive. This mode of operation is exactly the same as what you would do using the actual Windows Explorer. However, only embroidery files are shown in the SewCat Explorer view, simplifying the file management activity. You may drag/drop files from the center icon panel into this Explorer panel, or within the Explorer panel. Helpful hint: Hold down the Ctrl key to copy (not move) files from one place to another in either the Virtual Catalog or Explorer Catalog. An explorer-style directory tree will appear in the right panel overwriting the virtual catalog (which is stored temporarily in memory - be sure to save it before exiting SewCat). All the embroidery files stored on your various drives (floppies, hard drives, CD's, USB media) can now be viewed in the Windows Explorer-like right panel. You may drag/drop files from the center icon panel into this Explorer panel. Now the files you add will be permanently stored on the physical media (hard, floppy or Zip disk) you drop them onto. In contrast to virtual catalogs - which do not modify your disk contents - moving files and deleting folders in the Explorer panel will change the files and directories on your drive(s). The result is exactly the same as using Windows Explorer to rearrange your files and folders. The user should be aware of this important difference between the SewCat Virtual Catalog and Windows Explorer functionality. Thumbnails Click the Thumbnails item (on the View menu) to toggle the middle-pane view between normal (display both folders and file icons) and thumbnail (display only file icons) view. This is useful for printing out a catalog of your files. File Information Click this View menu item to pop-up a menu for toggling (showing or hiding) the display of certain file properties in the central icon panel. Check the File Details item to display the number of stitches and colors, together with the pattern size. Check the Color Stops item to display the color stops (up to 36 of them) corresponding to the thread in the pattern. 13 SewCat Manual Whatever is checked here will appear both in the icon panel and in the print preview and print album screens. Large Catalog Folders Click this View menu item to toggle the size of the folder icons displayed in the Virtual Catalog. Uncatalogued Files Use this View menu item to show (if unchecked) or hide icons for embroidery files that appear are catalogued in the current Virtual Catalog. If this item is unchecked, the icons for previously catalogued files will appear in the center-pane with a green check-mark. If checked, the icons for catalogued files will be hidden. Checking this item may be useful to print a catalog comprised of only newer files that were added to your system since the catalog was original made. It is also useful for adding these newer files to an existing catalog. Zip Files Use this View menu item to show or hide the display of embroidery files that are compressed in zip files. SewCat will scroll faster when compressed files are not viewed. 14 SewCat Manual Windows commands Cascade Use this command to arrange multiple opened windows in an overlapped fashion. Tile Use this command to arrange multiple opened windows in a non-overlapped fashion. 15 SewCat Manual Tools commands Alphabetize Select this Tools menu item to toggle on/off the automatic alphabetizing of files dropped into the SewCat catalog trees. When this feature is on, the next file(s) dropped into a folder will automatically alphabetize all the files in that folder. Also, checking this item at any time will automatically alphabetize the entire Virtual Catalog. Background Color Use this Tools menu option to open a pop-up dialog for selecting icon and panel background colors. File Filter Use this Tools menu item to open a dialog with a list of allowable embroidery file extensions. Choose All Files if you want to show all embroidery file type in the middle icon panel. If you wish to show only several of the allowable file types, select those extensions by using the Arrow keys (Up or Down) and pressing the Enter key to select them. Hold down either the Shift or the Ctrl key to make multiple selections. The file types not selected will be masked out (filtered). Note: The catalog files will be automatically refreshed to reflect the filter changes when you click the "OK" button. Shortcuts Toolbar: Keys: Hover Delay Use this tools menu option to open a dialog for entering the hover delay time. This is the time delay between when you drag a file (icon) over an unopened folder and when the folder will automatically open (expand) in response to the dragging operation. To avoid opening folders inadvertently as you drag files over them, it is advisable to make this delay time greater than about ½ second (enter 0.5 or larger). You may also select from two AutoExpand options. This determines when (or if) an unopened folder will automatically open. The two choices are: 1. Folder expands if you either drop a file on it or the hover timeout period (set above) is exceeded. 2. Folder expands only if the hover timeout period si exceeded. 16 SewCat Manual This latter option is useful if you are moving a lot of files and do not care to view the contents of a folder at this time. Icon Layout Use this tools menu option to open a dialog for entering the number of icon columns (icons per row) appearing on the screen. Import Folders Use this Tools menu item to add new folders to the Virtual Catalog by importing existing directory folders from the left panel (directory) tree. After checking the folders in the left panel that you wish to import, click this menu item and the selected folder tree will appear as empty folders in the Virtual catalog below (as children of) the presently active (selected) folder in the Virtual catalog. Search Criteria Use this tools menu option to open a dialog for setting certain criteria used to search for files. You can enter keyword(s) used to find files in selected folders with at least one keyword in their title. Also, you can select various pattern-based measures, such as a range of pattern sizes, stitches, or colors. Only those files simultaneously matching the keyword(s) and pattern criteria will be displayed in the Icon View Panel. A keyword-restricted search can be performed both for the directory folders in the left-pane, as well as the Virtual Catalog folders in the right pane, depending on which folders are checked. In addition, keywords for individual files in the Virtual Catalog may be added to the search list. See Add Keywords for more information. Note: The catalog files will be automatically refreshed to reflect the keyword changes when you click the "OK" button. Shortcut Toolbar: Language Support Use this tools menu option to pop-up a menu for selecting the language to use for the user interface in SewCat. 17 SewCat Manual Help commands Help Topics Use this Help menu item to open the SewCat help manual to the Getting Started topic. Help Manual Use this Help menu item to pop-up a floating dialog displaying a summary of the SewCat user manual. This dialog may be moved and resized and can be visible even viewing directory file icons in the middle icon panel. Context Help Use the Context Help command to obtain help on some portion of SewCat. When you choose the Toolbar's Context Help button, the mouse pointer will change to an arrow and question mark. Then click somewhere in the SewCat window, such as another Toolbar button. The Help topic will be shown for the item you clicked. Shortcut Toolbar: Keys: SHIFT+F1 Auto-Update Use this toggle command to allow (prevent) automatic updating of SewCat software. When this menu item is checked (unchecked), auto-updating is allowed (prevented). With auto-updating allowed, the S & S website will be checked whenever the application is opened (but not more than once daily) for available updates. If there is an update available, the user will be given the opportunity to install it. The installation will automatically close the SewCat workspace, remove the older version, install the update, and restart the application. Update Now Use this command to search the S & S website for the availability of an update for SewCat. If an update is found, the user is given a choice to install it. About SewCat Use this command to display the copyright notice, registration and version number of your copy of SewCat. 18 SewCat Manual Change (History) Log Use this command to display the history of changes made to SewCat. 19 SewCat Manual Toolbars Main The toolbar is displayed across the top of the application window, below the menu bar. The toolbar provides quick mouse access to many tools used in SewCat, To hide or display the Toolbar, choose Toolbar from the View menu (ALT, V, T). Click To Open a new document. Open an existing document. SewCat displays the Open dialog box, in which you can locate and open the desired file. Save the active document or template with its current name. If you have not named the document, SewCat displays the Save As dialog box. Print the active document. Reverse the last file or folder deletion. Cut (delete) the selected folders or files. Insert a folder at the current selection point in the Virtual Catalog. Add a mask (or filter) to the file search, allowing only specified file types to appear in the middle icon-view pane. Set search criteria based on file names, keywords stored in the Virtual Catalog, or pattern-based measures. Zoom-in (magnify) the size of the icons displayed in the middle pane. 20 SewCat Manual Zoom-out (reduce) the size of the icons displayed in the middle pane. Context-sensitive help. Click this and move cursor to toolbar item or menu item for which help is required, and click on that item. Open help manual. Status Bar The status bar is displayed at the bottom of the SewCat window. To display or hide the status bar, use the Status Bar command in the View menu. The left area of the status bar describes actions of menu items as you use the arrow keys to navigate through menus. This area similarly shows messages that describe the actions of toolbar buttons as you depress them, before releasing them. If after viewing the description of the toolbar button command you wish not to execute the command, then release the mouse button while the pointer is off the toolbar button. The remaining areas of the status bar indicate information about the status of the catalog (left pane), is described below: Indicator 2nd Pane Description Full path name of the (original) file store in the catalog 3rd Pane Number of embroidery files selected (checked) in the left-pane tree Last Pane Number of embroidery files in the present catalog 21 SewCat Manual Miscellaneous topics Displaying Files in the Central View Panel File icons may be displayed in the central (view) panel by selecting folders containing embroidery files from either the directory tree in the left (directory) panel or the virtual catalog in the right panel. In either directory tree, use the left mouse button to click the "+" appearing to the left of any unexpanded directory. This will expand the directory to show any subdirectories. The embroidery file icons may be displayed by clicking the checkbox next to each directory. If you click the box without expanding the directory, all the files in that directory and its subdirectories will appear (as icons) in the center file-icon panel. Clicking again on the check box will remove the associated icons from the icon panel. Also, clicking the "-" next to an expanded directory will collapse it. When you have checked the box of a directory containing embroidery files, images (icons) of the patterns contained in those files will appear in the center (viewing) panel. The file name is shown above each icon. An asterisk after the file name indicates it is contained in a Zip archive. To show more details about the files, click the File Details item in the View menu. The displayed size of the icons (zoom) can be changed by selecting the Zoom Icons item in the Tools menu or clicking the “+” or “-” button on the toolbar. If necessary, a vertical scroll bar will automatically appear on the right of the center panel, as well as a horizontal scroll bar at the bottom of the panel. Click the scroll bar button to activate scrolling in the central panel. Dragging the scroll bar, or using the Page Up, Page Down, Home or End keys, will allow you to view all the icons in the opened folder. You can filter the files that are displayed in several ways. In the Tools menu, the File Filter item will allow you to select only certain embroidery file types (extensions) to be displayed. The Search Criteria item allows you to use certain file properties to limit the icon display. For VC icons, keywords can also be used to determine which icons are shown. The View menu item Uncatalogued Files will allow you to limit the display of files to only those that are not in the present catalog. Rename Files (or Folders) in the Catalog To move files from the central panel into the catalog tree (the right-most panel), you must first select the file icons by clicking them with the left mouse button. A selection rectangle will be drawn around the icons you select. Hold down the Ctrl or Shift keys to select multiple icons for moving. Double-clicking a selected icon, or clicking the left button anywhere outside the selection box around the icon, will clear the selection box of all previously selected icons. To clear a single icon, hold down the Ctrl key before clicking again. This selection behavior is similar to Windows Explorer. Once the icon(s) have been selected, hold down the left mouse button (while the mouse cursor is over one of the selected icons) and drag the icon(s) into the catalog (right) panel. Drop the icon(s) over the catalog folder where you want the associated files to appear. Be aware that when you are working in Catalog View mode, moving files into the catalog tree does NOT actually move files on your hard drive. Rather, a database of file names is created that links the names in the catalog tree to the files on the hard drive. This virtual catalog takes up almost no additional disk space and maintains the integrity of your directory structures. Moving, deleting or inserting files into the catalog tree has no effect whatever on the files stored on your hard drive. However, should you remove or move files on your hard drive after creating a virtual catalog, this will cause the catalog links to be unresolved the next time the catalog is opened (that is, the moved files will no longer be found). 22 SewCat Manual In Explorer View mode (which should only be used once you have gained some experience with the SewCat system), files are actually moved around on your hard drive. No catalog need be saved in this case (indeed, you will not be allowed to use the Save options), since the tree structure is being permanently recorded on your hard drive. Note that now, deleting files and folders is a permanent action, just as though you were working in Windows Explorer. Move Files into the Catalog To move files from the central panel into the catalog tree (the right-most panel), you must first select the file icons by clicking them with the left mouse button. A selection rectangle will be drawn around the icons you select. Hold down the Ctrl or Shift keys to select multiple icons for moving. Double-clicking a selected icon, or clicking the left button anywhere outside the selection box around the icon, will clear the selection box of all previously selected icons. To clear a single icon, hold down the Ctrl key before clicking again. This selection behavior is similar to Windows Explorer. Once the icon(s) have been selected, hold down the left mouse button (while the mouse cursor is over one of the selected icons) and drag the icon(s) into the catalog (right) panel. Drop the icon(s) over the catalog folder where you want the associated files to appear. Be aware that when you are working in Catalog View mode, moving files into the catalog tree does NOT actually move files on your hard drive. Rather, a database of file names is created that links the names in the catalog tree to the files on the hard drive. This virtual catalog takes up almost no additional disk space and maintains the integrity of your directory structures. Moving, deleting or inserting files into the catalog tree has no effect whatever on the files stored on your hard drive. However, should you remove or move files on your hard drive after creating a virtual catalog, this will cause the catalog links to be unresolved the next time the catalog is opened (that is, the moved files will no longer be found). In Explorer View mode (which should only be used once you have gained some experience with the SewCat system), files are actually moved around on your hard drive. No catalog need be saved in this case (indeed, you will not be allowed to use the Save options), since the tree structure is being permanently recorded on your hard drive. Note that now, deleting files and folders is a permanent action, just as though you were working in Windows Explorer. Interacting with other Embroidery Programs SewCat will allow you to graphically select specific files to open with an embroidery editor. For example, suppose your embroidery editor is SewWhat-Pro. By opening both SewWhat-Pro and SewCat side-by-side (they will need to be resized so both are visible on the desktop - use the restore button at the top right of the application to resize it), you can drag a file from either the Virtual Catalog (right panel) or the center panel in the SewCat workspace and drop it into the SewWhat-Pro workspace. If the SewWhat-Pro workspace is empty, this will automatically open a new editing pane with the dropped file appearing in it. If there already is a file in the SewWhat-Pro editing pane, then the dropped file(s) will be merged with the existing file. This may be used, for example, as an easy way to combine alphabetical characters (such as monograms) with pictorial sewing patterns. 23 SewCat Manual Add a Prefix or Suffix to a group of selected files The dialog below will "pop-up" to allow you to modify a group of selected files in the Virtual Catalog (VC). This will allow you to enter Keywords (or Prefices and/or Suffices to the VC file names) for all the selected files at once. There are two ways to access this dialog: LEFT-CLICK on the first file in the VC group and then - with the SHIFT (or CTRL) key held down - RIGHT-CLICK on the last file in the group you want to modify. Select the folders containing the files to be modified in the VC so the files appear as icons in the mid-pane. Then (SHIFT+/CTRL+) LEFT-CLICK the files in the mid-pane to be modified. Holding down the SHIFT or CTRL key, RIGHT-CLICK the last file in the group of selected icons in the mid-pane. The first item in the dialog allows you to add keywords to the selected files. There are situations when you might want to add a prefix or suffix to a group of files in the Virtual Catalog. For example, you may want to identify the files by the initial of the digitizer by adding "_abc" to the file name. To do that, . The dialog box shown below will appear as a pop-up. For this example, enter in the suffix box the desired characters (_abc) and press OK. This suffix will be added to the files you selected in the Virtual Catalog (before the file-type extension). Add Keywords Use the dialog shown below to add keywords to individual catalog items. The dialog appears as a pop-up when a file in the Virtual Catalog is right-clicked. It allows you to enter or modify keywords for the selected file that will be added to the search keys when a keyword search is performed. 24 SewCat Manual Keywords can also be added to multiple selected files at once. Find location in the VC of a file on disk Double click the file icon displayed in the Virtual Catalog (VC) right-panel to find the source location of that file on your Hard Drive or CD (or other media). An icon of the file pattern will appear in the lower right pane, and the original source path will appear in the Status Bar. Find location on disk of a file in the VC Right click the file icon displayed in the mid-panel to find the location(s) of that file in the Virtual Catalog (VC). A list of paths will pop-up showing where the file can be found in the VC. Note that only files with check marks below them are in the VC. You can click on an entry in the list to automatically open the VC to the folder containing the file. 25