1
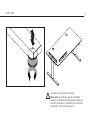
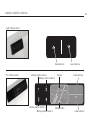
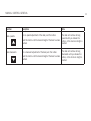
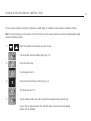
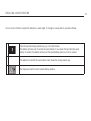
EN SAFETY AND OPERATING INSTRUCTIONS NOTE Please read all instructions carefully before operating the system. Keep instruction manualfor further reference. This document is alternative available on the official Bene - homepage. (www.bene.com) https://bene.com/de/produkte-raumkonzepte/bueromoebel/lift-desk-pure/ LIFT DESK PURE CONTENTS 2 EN Product overview................................................................3 Safety instructions..............................................................4 Sitting correctly..................................................................8 FIRST START-UP Levelling............................................................................9 Manual control general......................................................10 Manual reset....................................................................12 FEATURES Storing a position (Manual control ”Light“).........................13 Storing a position (Manual control ”Pro“)...........................14 Recalling a saved position.................................................15 Information regarding the push-push function.....................16 Enable and disable keylock...............................................17 SOLUTION Click codes......................................................................18 Possible problems............................................................19 Error messages on the display (only at Manual control switch ”Pro“).................................20 Technical data..................................................................22 CE Certificate of Comformance..........................................23 Cleaning instructions. Certificates......................................24 Notes..............................................................................25 PRODUCT OVERVIEW 3 Lift Desk Pure with cable tray Lift Desk Pure with CPU - holder Lift Desk Pure with cable duct Lift Desk Pure with Third working level 3L / 3T SAFETY INSTRUCTIONS Please observe the safety instructions! Improper operation of the system may result in personal injury and cause damage to objects! 1. Unplug the power cord in case of smoke, smell or unusual noise. 2. Make sure no objects or parts of the body get caught when operating the motor. 3. The piece of furniture must not be adjusted in height if other people are located directly in its vicinity. 4. Do not place any objects or parts of the body between fixed or movable parts. 5. Height adjustment is only possible in jog mode. If an obstacle is encountered or if there is a functional fault, stop the adjustment immediately. 4 6. Make sure adjacent objects are placed at a minimum distance of 25 mm to prevent them from being squeezed or sheared! 7. Ensure that the safety distances are 25 mm for movable parts (this also applies for organisational elements which are fitted above or underneath the furniture, mounted to adjoining walls or building parts such as open windows). 8. The protection against uncontrolled move ment does not prevent objects being trapped! For physical reasons, „soft“ obstacles are not easily recognised and evaluated, if at all! 9. In case of hitting an obstacle, slight damage (scratching, pressure marks, etc.) to such obstacles may result (table is lifted at nominal speed)! SAFETY INSTRUCTIONS 10.Do not change or modify the control mechanism or the operating device. 11.Never open the enclosure of the control unit or power supply. Unauthorised opening of the enclosure or improper repairs may endanger the user and voids all warranty claims. 12.Only professionals authorised by the manufacturer may do maintenance or repair. 13.Do not operate devices in explosive environments. 14.This furniture is admitted only for the commercial office area and management in interiors. 15.This appliance must not be used by any person (including children) with limited physical, sensorial or mental abilities or failing experience and/or knowledge unless 5 they are supervised by a person responsible for their safety or received instructions about how to use the appli- ance. Children should be supervised in order to make sure that they do not play with the appliance. 16.The manufacturer assumes no liability for damage resulting from improper use. 17.Connection plug boards must be fixed properly for easy plugging and unplugging. Plugs and connection plug boards must be located in such a way that no fluids come into contact with electrical equipment when the office furniture is used properly. 18.The power cable must be secured in the strain relief. Interconnecting cables may be run loosely. All lines and cables must be run in such a manner as to avoid mechanical damage (i.e., shearing, abrasion...). SAFETY INSTRUCTIONS 6 19.Furniture with flexible or height-adjustable components require special care. Cables must be sufficiently long to allow height adjustments without damaging the cables and wiring (i.e., stretching, crushing, ...). 22.The operation of the control mechanism and the power supply unit requires a minimum of 5°C and a maximum temperature of 40°C. 20.If the power cord of this equipment is damaged, it must be replaced by the manufacturer, their customer service, or a similarly qualified person so as to avoid any risk. 23.For the above reasons do not install the control unit: - above or in front of heat sources (e.g. radiators), - at places exposed to direct sunlight, - in small, unventilated or humid rooms, - near easily flammable materials, or - near high-frequency devices (e.g. transmitters, radiation equipment, or similar devices) 21.Do not spill liquids into the control unit or power supply unit, as this could cause electrical shock or short circuits. SAFETY INSTRUCTIONS Warning: In the event of a fault it is possible that the table top moves a bit during every attempt whilst operating before the safety switch off kicks in. Please take care to avoid the possible danger of crushing. Warning: During all reset procedures the collision protection is not active. Please take care to avoid possible danger of crushing. Please note: If the product is visibly damaged it must not be installed or used further! 7 24.After 2 minutes of continuous operation the system automatically shuts itself off and cannot be used for an additional 18 minutes. This keeps the motor from overheating. 25.Do not exceed maximum load of 75 kg. SITTING CORRECTLY 8 200% > 600 mm 140% 20° 100% 90-100° Sitting with a hunched back doubles the burden (200%) on the vertebral disks compared to standing up (100%). 90-100° Occupational health experts have issued standards and recommendations for preventing harmful habits and their negative health impact at the office workplace. These standards and recommendations are based on findings relating to an incorrect and tense sitting posture which limits performance and produces long-term physical damage over time. Source: Wilkhahn 650-1250mm > 100 mm LEVELLING 9 The desk must be reset after levelling! Please note: The protection against uncontrolled movement is deactivated during resetting. Make sure there are no objects or impediments under the table! (specifically in the area of the column) MANUAL CONTROL GENERAL 10 ”Light” Manual control Raise table top ”Pro” Manual control Memory position button 1 Memory position button 2 Memory position button 3 Memory position button 4 Display Memory button Lower table top Raise table top Lower table top MANUAL CONTROL GENERAL 11 Function Description Note Desk upwards For an upward adjustment of the desk push this button. The desk will continue driving upwards until you release the button, or the maximum height is reached. Push this button until the desired height of the desk has been reached. Desk downwards For a downward adjustment of the desk push this button. Push this button until the desired height of the desk has been reached. The desk will continue driving downwards until you release the button, or the minimum height is reached. MANUAL RESET 12 When the desk is used for the first time a reset must be done before you can operate the product. The reset causes all of the columns to be brought to the same level. This ensures that the table top is positioned parallel with the ground. The controller also saves the connected components in the standard configuration, such as columns or a sensor, if there is one attached. After the reset, changes to the configuration are detected and considered to be errors. The system will not operate until the configuration stored in its memory has been re-established. When the actual desktop position no longer corresponds to the height displayed or you wish to use a configured control unit on another identical electric height-adjustable desk, you have to reset the lowest desktop position to the minimum height. 1. Press the desktop down key. Keep pressing it until the desktop has reached the lowest position (programmed desktop position). 2. Press the desktop down key again and keep pressing it. After about 5 seconds, the desktop will slowly move further down until it reaches the absolutely lowest desktop position possible. 3. Release the desktop down key. The electric height-adjustable desk can now be used again normally. Danger: Intelligent system protection (ISP) is not enabled during all resets and limit position calibration. Please note that there is a potential risk of pinching in this case. STORING A POSITION (MANUAL CONTROL ”LIGHT“) These 2 features can be used to limit the movement area of the desktop (e.g. if a container is placed underneath the desktop). A container stop position can be defined in the lower half of the movement area, a shelf stop position in the upper half. If a container stop position is set, this position will be the lower limit position. If a shelf stop position is set, this position will be the new upper limit position. To store a container stop / shelf stop position, go on as shown below: 1. or Move the desktop to the position where the container stop/ shelf stop position shall be stored. Do so by pressing the desktop down or desktop up key until you reach the desired position. Note: A container stop position can only be stored in the lower half of the movement area and a shelf stop in the upper half. Press for 10 seconds. The SMART will click twice when the container stop position is stored. 2. Note: These steps have to be done for a container stop and a shelf stop position separately! To deactivate the container stop/ shelf stop position go on as shown below: 1. 2. or Move the desktop to any position in the lower half to deactivate the container stop. / Move the desktop to any position in the upper half to deactivate the shelf stop. Do so by pressing the desktop down or desktop up key until you reach the desired position. Press for 10 seconds. The SMART will click once when the container stop position is deactivated. Note: These steps have to be done for a container stop and a shelf stop position separately! 13 STORING A POSITION (MANUAL CONTROL ”PRO“) You can use this function to adjust the desktop to a saved height. To change to a saved position, proceed as follows: Note: If you are switching on the control unit for the first time, all the saved positions are set to the lowest desktop height (minimum desktop position). 1. Adjust the desktop to the position you want to save. The display will show the desktop height (e.g. 74). 2. Press the memory key. The display will read S –. 3. Press the required memory position key (e.g. 2). The display will read S 2. 4. The set desktop position will now be saved tot he selected memory position key. You will hear an audible double click and after about 2 seconds the saved desktop position will be displayed. 14 RECALLING A SAVED POSITION You can use this function to adjust the desktop to a saved height. To change to a saved position, proceed as follows: 1. Press the required memory position key (e.g. 2) and hold it down. The desktop will move until it reaches the saved position. If you release the key before the saved position is reached, the desktop will stop and the saved desktop position will not be reached. 2. The desktop has reached the saved position. Now release the memory position key. The display will read the current (saved) desktop position. 15 INFORMATION REGARDING THE PUSH-PUSH FUNCTION The ”Pro“ manual control is equipped with a push-push function which is used to move out the user interface panel automatically. Note: To extend the control panel you have to press it while it is retracted. Afterwards you have to release it. The control panel will extend automatically (push-push function). Do not pull while the control panel is retracted. The control panel can get damaged. Figure 1: left: Press the user interface panel so that it extends automatically; right: lift the user interface panel to a horizontalposition and push it into the holder to retract the user interface panel Note: The connection cable has to form a loop of at least 10 cm to ensure that the push-push function works properly. Figure 2: The cable loop (highlighted white) shall be at least 10 cm long to ensure that the push-push function works properly. Note: Depending on the ambient temperature the user interface panel may take varying time to move out (it may take longer if it is cooler). 16 ENABLE AND DISABLE KEYLOCK 17 The keylock can be enabled and disabled by swiping the screen. After enabling the keylock a key will be shown on the display. Figure 3: The key indicates that the keylock is enabled Figure 4: Activating and deactivating the keylock can be done by swiping left or right underneath the display Note: The direction of movement is not relevant (see Figure 4) Note: You have to swipe the screen gently without pressing a button while swiping. Note: The display must be active during activation or deactivation of the keylock (e.g. showing the current height). To activate the display, press one key shortly (e.g. desktop up button). Menu function By pressing the memory position key 1 and 2 and the desk upwards key at the same time for more approx. 5 seconds you will enter the menu. After you release the keys, the display will show S and a number, e.g. S 5. To select a menu option you have to press the Memory key. Note: The available menu options depend on the parameters of the control unit. For more information about menus please read the user manual of the control unit. CLICK CODES 18 When the control unit is switched on the SMART uses its relays to inform the user acoustically about the system state and the reason why the control unit was switched off before. The table below shows which number of clicks corresponds to certain information. NUMBER OF CLICKS STATE INFORMATION 2x Normal operation: No problems detected. 1x Emergency operation: The system is in Safe-State, movement is not possible. Check LED indication and/or error codes on the display of the handswitch. 3x - 6x Last shutdown incomplete / forced reset: Check LED indication and/or error codes on the display of the handswitch. POSSIBLE PROBLEMS 19 Display does not work (buttons work) Possible cause Remedy Cable is defective Replace the handswitch. Display is defective Replace the handswitch. Microcontroller is defective Replace the handswitch. Handswitch is defective Replace the handswitch. Buttons do not work (display works) Possible cause Remedy Cable is defective Replace the handswitch. Handswitch is defective Replace the handswitch. Buttons are pressed during installation Disconnect and re-connect the handswitch to the control unit without touching the user interface. Handswitch does not work (neither display nor buttons) Possible cause Cable is not plugged in Cable is not plugged in as intended Remedy Plug the plug in the intended jack marked with HS. Bad pin contact Plug off the handswitch an plug it in as intended. Cable is defective Replace the handswitch. ERROR MESSAGES ON THE DISPLAY (ONLY AT MANUAL CONTROL SWITCH ”PRO“) Display DESCRIPTION Motor controller overheated Internal error channel 1 Internal error channel 2 Defect Channel 1 Defekt Kanal 2 SOLUTION • Wait until the motor controller has cooled off and the “hot” message on the display has disappeared. This can take up to 18 minutes (on-time monitoring: 2 min. continuous operation, 18 min. pause). The controller is ready for use again after this. • Turn off the motor control. • Contact customer service. • Unplug the control unit. • Fix the external short circuit or plug in the correct motor to the motor socket that shows the error. • Start the control unit again. Overcurrent Motor M1 Overcurrent Motor M2 Overcurrent Motor Group 1 Collision protection • Remove jammed objects from the driving area. • Desk might be overloaded Remove load from desk. • Contact customer service. Overcurrent Control Unit Plug detection in Motor socket M1 Plug detection in Motor socket M2 Actuator changed • Plug in the correct motor to the motor socket that shows the error. • Reset all motors. 20 ERROR MESSAGES ON THE DISPLAY (ONLY AT MANUAL CONTROL SWITCH ”PRO“) Synchronization lost motor group 1 • Remove load from desktop. • Reset all motors. If error occurs after reset again, contact customer service. High voltage • Unplug the power cord and contact the customer service. Motor configuration changed • See chapter „Storing a position“. Internal error • Make a manual reset. • Unplug the power cord and plug it in again after a few seconds. • If this error occurs frequently, unplug the power cord and contact the customer service. Note: The PowerFail detection identifies mains power breakdowns and saves all relevant data before the voltage falls below a critical threshold. In some exceptional cases, this storage is not possible and the error E81 is shown on the handswitch display (if available) and the SMART clicks three times. To rectify this error, a manual reset is necessary (see chapter „manual reset“). Note: If the mains power breaks down or is disconnected from the control unit during movement of the drives, a manual reset might be necessary. 21 TECHNICAL DATA 22 Handschalter LIGHT Handschalter PRO Supply voltage...................................................5VDC ± 10% Supply voltage...................................................5VDC ± 10% Power consumption (Average)���������������������������������������� 0mA Power consumption (Average)....................................... 60mA Dimensioning of switching current������������������������������� 50mA Power consumption in standby (Average)��������������������� 1,3mA Lifetime (Cycles of operation)..................................... 10.000 Lifetime (Cycles of operation)..................................... 10.000 Ambient temperature in operation���������������������������� 0 - 30°C Ambient temperature in operation���������������������������� 0 - 30°C Humidity (In operation).............................................5 - 85% Humidity (In operation).............................................5 - 85% (not condensing) (not condensing) Storage and transport temperature.................-40°C bis +60°C Storage and transport temperature.................-40°C bis +60°C Humidity (at storage).................................................. 5-90% Humidity (at storage).................................................. 5-90% (not condensing) (not condensing) Weight......................................................... 70g (incl. cable) Cable length............................................. 2200 mm ±40 mm Dimension (L, B, H) [mm].......................... 150 x 155,6 x 14,8 Tolerances to DIN ISO 2768-1 c Control Input power supply................................. 230 V, 50 Hz, 2,5 A Max. on-time........................................ 2 min on, 18 min offProtection class...................................................................I Noise.......................................................................<50 dB Upward lift speed.................................................... 35 mm/s Weight.................................................. 197g (incl. cable) CE CERTIFICATE OF COMFORMANCE 23 CLEANING INSTRUCTIONS. CERTIFICATES Gentle and proper cleaning of furniture surfaces and partition walls is especially important in retaining their optimum condition for as long as possible. We generally recommend cleaning with a moist, fluff-free cloth, moistened with pure water without the addition of any cleaning agents; furniture polishes or similar. If cleaning with a damp cloth proves not to be adequate, careful use of a mild plastics cleaner without abrasive additive is admissible on melamine surfaces. Wood polishes must not be used on open-pored lacquered veneer surfaces (oak, walnut, ash and bamboo). 24 alcohol or softeners. The same applies for scratching cleaning agents with abrasive additives. Glass and material surfaces are to be cleaned in accordance with manufacturer’s instructions. Please contact Bene for information and documentation on this matter. Bene can not assume any liability for damage to surfaces caused as a result of improper cleaning. Roland Gruber (Head of QSE Management) Bernhardt Kronnerwetter (Director Production) This settles into the open pores, closes them and gives the surface a greasy, glossy appearance after a while. The desired semi-gloss and open-pored veneer appearance is ruined. Furniture polishes available off-the-shelf can be used for closed-pore lacquered surfaces (cherry, beech and maple). They fill the finest of scratches in the lacquer and cover them up relatively well.An enhanced glossy appearance of the surface is difficult to prevent. Never use polishes containing silicon, caustic cleaning agents with ammonia additives, DISPOSAL Instructions for the disposal of Bene products can be found in the sustainability report at: http://www.bene.com NOTES 25 ................................................................................................................... ................................................................................................................... ................................................................................................................... ................................................................................................................... ................................................................................................................... ................................................................................................................... ................................................................................................................... ................................................................................................................... ................................................................................................................... ................................................................................................................... ................................................................................................................... ................................................................................................................... ................................................................................................................... ................................................................................................................... ................................................................................................................... ................................................................................................................... ................................................................................................................... ................................................................................................................... ................................................................................................................... ................................................................................................................... ................................................................................................................... ................................................................................................................... ................................................................................................................... ................................................................................................................... ................................................................................................................... ................................................................................................................... ................................................................................................................... ................................................................................................................... ................................................................................................................... ................................................................................................................... ................................................................................................................... ................................................................................................................... ................................................................................................................... ................................................................................................................... NOTES 26 ................................................................................................................... ................................................................................................................... ................................................................................................................... ................................................................................................................... ................................................................................................................... ................................................................................................................... ................................................................................................................... ................................................................................................................... ................................................................................................................... ................................................................................................................... ................................................................................................................... ................................................................................................................... ................................................................................................................... ................................................................................................................... ................................................................................................................... ................................................................................................................... ................................................................................................................... ................................................................................................................... ................................................................................................................... ................................................................................................................... ................................................................................................................... ................................................................................................................... ................................................................................................................... ................................................................................................................... ................................................................................................................... ................................................................................................................... ................................................................................................................... ................................................................................................................... ................................................................................................................... ................................................................................................................... ................................................................................................................... ................................................................................................................... ................................................................................................................... ................................................................................................................... NOTES 27 ................................................................................................................... ................................................................................................................... ................................................................................................................... ................................................................................................................... ................................................................................................................... ................................................................................................................... ................................................................................................................... ................................................................................................................... ................................................................................................................... ................................................................................................................... ................................................................................................................... ................................................................................................................... ................................................................................................................... ................................................................................................................... ................................................................................................................... ................................................................................................................... ................................................................................................................... ................................................................................................................... ................................................................................................................... ................................................................................................................... ................................................................................................................... ................................................................................................................... ................................................................................................................... ................................................................................................................... ................................................................................................................... ................................................................................................................... ................................................................................................................... ................................................................................................................... ................................................................................................................... ................................................................................................................... ................................................................................................................... ................................................................................................................... ................................................................................................................... ................................................................................................................... BENE WORKS SUSTAINABLY Bene plays a leading role in responsible environmental management. It is practiced throughout all company divisions - from product development, procurement, production and logistics to product recycling. Bene considers ecology to be a central element of its responsible and sustainable corporate strategy. Bene sees the legal regulations as minimum requirements and strives for better and more sustainable environmental protection throughout the group. The Bene principle in environmental policy is: Avoidance - Minimisation - Recycling - Disposal. LIFT DESK PURE/WP_MB240_SB_EN/102015/PM