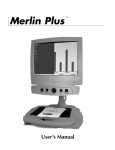
1
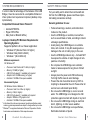
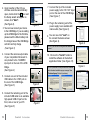
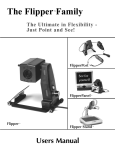
Users Manual
Congratulations on your purchase of the USB
Bridge from Enhanced Vision. The USB Bridge is
a very useful accessory to be used in conjunction
with your Enhanced Vision product(s). When used
along with the Acrobat™, Flipper™ or Max™, the
USB Bridge provides an all-in-one solution, bringing
both computer connectivity and portability for these
devices.
The USB Bridge serves as a central hub for
connecting your Enhanced Vision product to your
laptop or desktop PC using a standard, USB cable.
Featuring a built-in computer interface and included
software, the USB Bridge allows you to use your
PC while simultaneously viewing magnified, camera
based images on a single display. Built-in software
controls allow you to dynamically re-size the camera’s
display window on your desktop to either full or “splitscreen” modes to best suit your particular viewing
needs. The still-image snapshot feature allows you
to capture magnified, camera-based images on your
PC for later recall, making the USB Bridge an ideal
solution for students and working professionals.
Last but not least, the USB Bridge supplies power
to your Enhanced Vision product via the included
Lithium battery, providing two or more hours of
portable use on a single charge. The built in battery
charger (and included power supply) completes the
package, offering a convenient and fully integrated
“on-the-go” solution for people with low vision.
FCC COmpliance notice
This device complies with Part 15 of the FCC Rules. Operation
is subject to the following two conditions: (1) This device may
not cause harmful interference, and (2) this device must accept
any interference received, including interference that may cause
undesired operation.
This equipment has been tested and found to comply
with the limits for a Class B digital device, pursuant to Part
15 of the FCC Rules. These limits are designed to provide
reasonable protection against harmful interference in a
residential installation. This equipment generates, uses, and
can radiate radio frequency energy and, if not installed and
used in accordance with the instructions, may cause harmful
interference to radio communications. However, there is
no guarantee that interference will not occur in a particular
installation. If this equipment does cause harmful interference
to radio or television reception, which can be determined by
turning the equipment off and on, the user is encouraged to
try to correct the interference by one or more of the following
measures:
– Reorient or relocate the receiving antenna.
– Increase the separation between the equipment and receiver.
– Connect the equipment into an outlet on a circuit different
from that to which the receiver is connected.
– Consult the dealer or an experienced radio/TV technician for
help.
Unauthorized changes or modification to this system can void
the user’s authority to operate this equipment.
If your Low Vision device has an option to connect to a TV,
it must be used with shielded interface cables in order to
meet FCC emissions limits for Class B digital devices. It is the
responsibility of the user to use the shielded interface cables
supplied with the equipment.
FCC Compliance Notice
Chapter 1: Before you Begin
5
Chapter 2: System Requirements
6
Chapter 3: Safety Precautions
Chapter 4: Package Contents & Controls
7-8
9-10
Chapter 5: Installation
11-14
Chapter 6: Using the USB Bridge
15-20
Chapter 7: Charging & Using the Battery
21-22
Chapter 8: Tips for using the USB Bridge
23-24
Chapter 9: Troubleshooting
25
Chapter 10: Specifications
26-27
Chapter 11: Warranty Information
28-29
Chapter 12: Other EV Products
30-32
Chapter 13: Contact Information
32
Before you begin
IMPORTANT! It is highly recommended that you
install the included software before making the
hardware connections to your PC.
Do not connect the included USB cable or the
hardware interface to your PC until after the
software installation has completed. Failure to follow
these instructions may cause your PC to “freeze” or
cause the USB Bridge and software to incorrectly
function. Should you need assistance installing the
included software, please seek the assistance of a
trained computer specialist or contact our technical
support department.
(800) 440-9476 (US Office, toll-free)
(714) 465-3400 (outside the US)
[email protected]
Prior to using this system, please carefully read and
follow the instructions provided within this manual.
A thorough understanding of all functions will allow
you to fully benefit from the flexibility and great
features of this product.
If you have general questions about the use of this
product, please contact the eyecare professional or
the supplier from whom you have acquired the unit.
Should you require technical assistance, please
contact our technical support department.
4
Chapter 1 Before you Begin
5
System requirements
In order to take full advantage of the features of the USB
Bridge, it must be connected to a compatible Enhanced
Vision product and a personal computer (desktop or laptop/notebook).
Compatible Enhanced Vision Products*:
• Acrobat NTSC/PAL
• Flipper NTSC/PAL
• Max (Color or Black & White)
Laptop or Desktop PC Minimum Requirements:
Operating Systems:
Supported platforms for our Viewer application:
• Windows XP (Service Pack 2 or higher)
• Windows Vista (32-bit & 64-bit)
• Windows 7 (32-bit & 64-bit)
Minimum requirements
OS: Windows XP
•
•
•
•
•
Processor: Intel Pentium M 1.5 GHz (or higher)
Memory: 512 MB (or higher)
USB 2.0 (high-speed): 1 available port required
Graphics card: 32 MB memory (or higher)
Hard disk: 100 MB of free space available
Recomended System
OS: Windows Vista or Windows 7:
•
•
•
•
•
Processor: Intel Core 2 Duo (or higher)
Memory: 2 GB (or higher)
USB 2.0 (high-speed): 1 available port required
Graphics: NVidia or ATI graphics card
Hard disk: 100 MB of free space available
* In the interest of continuous improvement, product specifications and/or
minimum system requirements are subject to change without prior notice.
**Windows® is a registered trademark of Microsoft Corporation. All other
brand names are trademarks of their respective owners.
6
Chapter 2 System Requirements
Safety Precautions
For your safety and to obtain the most benefit and
life from the USB Bridge, please read these important safety precautions carefully.
General guidelines for use:
• Follow all warnings, cautions, and instructions
marked on the product.
• Use the USB Bridge on a stable, level surface
such as a solid desk or table, according to intended design specifications.
• Avoid placing the USB Bridge on an unstable
table, cart or stand. It may fall causing serious
damage to the unit or bodily injury to the user.
• Use the USB Bridge indoors only – it should NOT
be exposed to extreme or rapid changes in temperature or humidity.
• Do not place the USB Bridge near a radiator,
heater or areas exposed to long hours of direct
sunlight.
• Always place the power and USB cords away
from high traffic areas to avoid damage.
• Prevent the risk of electrical shock by NOT attempting to disassemble the unit. Please refer all
service to an authorized repair facility.
• Do not use the USB Bridge in, near or around
water. The USB Bridge is not designed to offer
protection against contact with liquids of any kind.
• Do not use the USB Bridge during an electrical
storm, lightning, or other severe weather.
• Do not use the USB Bridge near open flames,
flammable materials or liquids.
Chapter 3 Safety Precautions
7
Transportation:
• This product is intended to be used as a portable
device. Please use care when connecting/disconnecting cables and accessories.
• Use caution if you are repositioning the USB
Bridge a short distance across a desk or table.
Make sure you do not pull on any power cords or
connector cables which could cause damage to
the cables or input connections.
Care & Maintenance:
• Always turn the power OFF on the USB Bridge
when the system is not in use.
• To prolong battery life, remove the battery from
the USB Bridge if the system is not being used for
one week or more.
• If needed, clean the surface of the USB Bridge
with a soft damp cloth or an electrostatic dusting
wipe. DO NOT use liquid cleaners on the plastic
surfaces. No additional methods of sterilization or
cleaning are recommended or required.
8
PAckage contents & controls
All required accessories for operation are included
inside your USB Bridge package. The USB Bridge
includes the following items:
1) USB Bridge
2) Power Supply
3) USB Cable (Type “A” to “A”)*
4) Lithium Battery (7.2V, 2200mAh)
5) CD-ROM Software (Viewer Application & Driver)
Please take a moment to familiarize yourself
with the location of the USB Bridge controls and
connection ports:
6) Power Indicator LED
7) Power ON/OFF Button
8) Battery Charge Indicator LED
9) Battery Charger Base
Susceptibility to Interference:
10) Power Connection Port (12V DC)
There may be temporary performance degradation
of the USB Bridge when subjected to a strong magnetic and/or radio-frequency field, electrostatic discharge or transient electrical noise. An electrostatic
discharge (caused by static electricity) may cause
image distortion. If this happens, switch the unit off
and try moving the unit to a different location.
11) Camera Connection Port
Chapter 3 Safety Precautions
12) USB Connection Port (Type “A”)*
*Please note: Your USB Bridge package includes a specially
designed USB cable (Type “A” to “A”) for making the appropriate USB connections. Using an aftermarket or different style of USB
cable (i.e. type “A” to “B”) may not be compatible with this device
and/or your PC without using a USB port adaptor, available from
most major electronics and computer retailers.
Chapter 4 Package Contents & Controls
9
Software installation
1
IMPORTANT! It is highly recommended that you
install the included software before making the
hardware connections to your PC.
7
9
8
6
2
3
Do not connect the included USB cable or the
hardware interface to your PC until after the
software installation has completed. Failure to follow
these instructions may cause your PC to “freeze” or
cause the USB Bridge and software to incorrectly
function. Should you need assistance installing the
included software, please seek the assistance of a
trained computer specialist or contact our technical
support department.
(800) 440-9476 (US Office, toll-free)
(714) 465-3400 (outside the US)
[email protected]
4
5
Use the following procedure to install the software for
the USB Bridge:
11
10
NOTE: Installing the software may require that you
have administrator privileges on your PC.
12
1. Start up your PC as normal.
Load the included CD-ROM
containing the Viewer Application software and USB drivers
into the CD-ROM drive of your
PC (See Figure 1).
Figure 1
10
Chapter 4 Package Contents & Controls
Chapter 5 Installation
11
7. Connect the tip of the included
power supply to the “DC 12V” input
port on the rear of the USB Bridge.
(See Figure 7)
2. Upon Insertion of the CD you
will have a window automatically
open, double click the
icon and
the Setup wizard will appear on
screen, click “Next”.
(See Figure 2).
3.You can now connect your device
to the USB Bridge. If you are setting
up the USB Bridge for the first time,
please insert the lithium battery into
the charger base of the USB Bridge
so that it can fully charge
(See Figure 3)
4. Connect the camera output cable
of your compatible Enhanced Vision product to the “CAMERA”
input port on the rear of the USB
Bridge.
(See Figure 4)
5. Connect one end of the included
USB cable to the “USB” port on
the rear of the USB Bridge.
(See Figure 5)
6. Connect the remaining end of the
included USB cable to an available
high-speed USB 2.0 port on the
front, side or rear of your PC.
(See Figure 6)
12
Chapter 5 Installation
8. Plug in the remaining end of the
power supply to an available AC/
mains outlet (See Figure 8).
Figure 2
9. You can now click “next” on
the connect the device screen.
(See Figure 9).
Figure 3
Figure 7
Figure 8
NOTE: If you are an XP user ignore the hardware
wizard.
10. Click on the “Install” button to
install the software to the default
application folder. (See Figure 10).
Figure 4
NOTE: If you are an XP user you will have a Software
and a Hardware Installation pop up message. Press
“Continue Anyway” for both. (see below)
Figure 9
Figure 5
Figure 10
Figure 6
Chapter 5 Installation
13
11.The software will start installing.
This should take aprox. 1 min.
(See Figure 11). At completion
of the installation the Viewer
application will automatically
open and you will have a black,
full screen window.
12.Press the POWER button on
the front of the USB Bridge.
When the power is turned on,
the green “POWER” indicator
will illuminate and your image
should appear on screen. (See
Figure 12)
13.To Start the viewer application
in the future, See next page for
instructions.
Using the usb bridge
Figure 11
Figure 12
1. Start the viewer application by double-clicking on
the “EV” icon, located on
your Windows desktop
(See Figure 1).
2. The viewer software will
open a black, full screen
window. You may now
connect your Acrobat,
Flipper, or Max Enhanced
Vision product to your
USB Bridge and to your
PC (See figure 2).
3. Press the POWER button
on the front of the USB
Bridge. When the power
is turned on, the green
“POWER” indicator will
illuminate (See Figure 3).
Figure 1
Figure 2
Figure 3
4. The camera image should
appear on your PC
screen.
14
Chapter 5 Installation
Once the camera image appears on your PC,
adjust the zoom and color mode settings on your
camera as desired. Refer to the manual included
with your Enhanced Vision product for more
information on adjusting these settings.
Chapter 6 Using the USB Bridge
15
4. Press the [F8] function key on your PC keyboard
to toggle the position of the on-screen camera
window. Each press of the [F8] key will rotate the
camera window position clockwise (left, top, right
or bottom, or full screen). After cycling through all
five camera window positions, pressing the [F8]
key a sixth time will exit the camera viewing window, returning you to your full screen PC desktop. Pressing [F8] again will repeat all six screen
rotation cycles in sequence (See Figure 4).
Adjusting the Video Window Divider:
Once you’ve chosen the position of the on-screen
camera image, use the following procedure to adjust
the width/height of the video window divider, relative
to your PC display:
• If the on-screen
camera image
is positioned to
the left or right of
your display, hold
down the [SHIFT]
button while pressing either the left or right arrow
keys on your PC keyboard to increase or decrease
the width of the video divider window. This adjustment is useful when viewing magnified documents
side-by-side with your PC display.
• If the on-screen
camera image is
positioned to the
top or bottom of
your display, hold
down the [SHIFT]
button while pressing either the up or down arrow
keys on your PC keyboard to increase or decrease
the height of the video divider window. This adjustment is useful when viewing magnified documents
above and below your PC display.
Figure 4
16
Chapter 6 Using the USB Bridge
Chapter 6 Using the USB Bridge
17
Capturing a Still Image:
Viewing a Stored Image:
The Viewer application allows you to capture a still
photo (or “snapshot”) of the camera image. This is
especially useful in school or work settings, where
it may be desirable to magnify and store text that is
located on an distant object (i.e. chalkboard or dry
erase board) and later recall the image (homework
assignments, etc.). Use the following procedure to
use the Image Capture feature:
1) Press the [F6] function key on your PC keyboard.
to open a previously stored image. The standard
“Open” dialog box will appear.
1) Focus on either a near or distant object. The object
viewed on the display will be captured as shown.
2) Press the [F5] function key on your PC keyboard.
to capture the still image. It will be followed by the
standard “Save As” dialog box.
3) Select the directory in which you wish to store
the file. If desired give the snapshot a descriptive
file name. If no filename is entered, the default
timestamp filename will be used. The image will be
saved as a standard .jpg file (Windows* jpeg).
2) Choose the directory in which the stored file is
located and select “Open” to view the image.
Using Third-party Screen Magnification Software:
The USB Bridge viewer application can be used in
conjunction with the following magnification software
products:
▶▶ Dolphin SuperNova Version 11.5 or higher
▶▶ AISquared ZoomText Version 9.18 or higher
▶▶ Issist iZoom Version 3.2 or higher
While the USB Bridge Viewer application is running
you may open up your third-party magnification software at any time to simultaneously run the software
and the viewer application. Refer to the manual of
your magnification software for detailed instructions
on its usage.
Upgrading Your Software
In the interest of continuous product improvement,
updates to the Viewer software will be made
available on the Enhanced Vision website at:
http://www.enhancedvision.com/usb-bridge-update.
For assistance in locating and downloading updates,
call the toll free support number, 1-800-440-9476.
18
Chapter 6 Using the USB Bridge
Chapter 6 Using the USB Bridge
19
Using the Hot Keys:
From factory default, the following functions are
assigned (using “Hot Keys”) to remotely control the
viewer application options of the USB Bridge.
Hot Key:
Function:
[F8] Video Window Position
[SHIFT] + [←] Video Window Divider (Left)
[SHIFT] + [→] Video Window Divider (Right)
[SHIFT] + [↑] Video Window Divider (Up)
[SHIFT] + [↓] Video Window Divider (Down)
[F5] Image Capture
[F6] Image View
[F7] Hides and Restores Viewer
[M] Changes Color Mode
[Ctrl+Alt+G] This will activate the viewer to allow
keyboard shortcuts. These keyboard
controls will only function when the
Viewer application is the active window, designated by the keyboard
icon in the upper left corner of the
screen. If the keyboard icon is not
present, press Ctrl+Alt+G to active
the application before using any
other keyboard controls.
20
Chapter 6 Using the USB Bridge
Charging & using the battery
Special Notes regarding Power Options:
• The AC adaptor included with the USB Bridge can supply
power to your compatible Enhanced Vision product. This
is the preferred method of powering the unit when using
the system near an AC (mains) wall outlet or when using
the system at home.
• Alternately, the lithium battery included with the USB
Bridge can be used to supply power to your compatible
Enhanced Vision product. This method of powering the
unit is designed for using the system away from an AC
wall outlet or when using the system in a portable setting
(school or office). In order to take full advantage of the
portable features of this device, it will be necessary to fully
charge the battery prior to using the system. Please follow
the procedure described on the next page.
• Once the battery has fully charged (about 2 hours), the
lithium battery can power your Enhanced Vision product
for 2 hours or more. Actual usage times may vary depending on the specific type of device connected and the
total battery life remaining. See pages 22-23 for more
details.
• When using the system with AC power, it is recommended to leave the battery attached to the USB charging station. Doing so will ensure that a continual charge is maintained upon the battery, allowing you to use the system in
a portable setting whenever desired. It is not possible to
overcharge the battery. It is recommended to remove the
battery from the charging station only when storing/transporting the system or when not using the system for one
week or more.
Chapter 7 Charging & Using the Battery
21
Tips for using the usb bridge
Charging the battery:
1) Insert the lithium battery into
the charger base of the USB
Bridge so that it can fully
charge. Do not use extreme
force when inserting the battery, as it will only fit securely
in one direction (See Figure
1).
2) Connect the tip of the
included power supply to the
“DC 12V” input port on the
rear of the USB Bridge
(See Figure 2).
3) Plug in the remaining end
of the power supply to an
available AC/mains outlet.
(See Figure 3).
4) Press the POWER button
on the front of the USB
Bridge. When the battery is
charging, the red “CHARGE”
indicator illuminate.
(See Figure 4).
General Tips
Figure 1
Figure 2
Using Acrobat NTSC/PAL
with the USB Bridge
Figure 3
Figure 4
5) When the “CHARGE” indicator begins to blink,
the battery has fully charged. Resume normal
USB Bridge operation as described on page 14.
22
• Use caution when attaching the output of your
Enhanced Vision product to the CAMERA input
of the USB Bridge. The specially designed
connector will only fit in one direction. Once
attached, it should not be removed under normal
circumstances.
• Do not disconnect the USB cable from your PC or
the USB Bridge while the software application is
running. This may cause your system to become
unstable. Always exit the software application
before disconnecting the USB cable.
Chapter 7 Charging & Using the Battery
• The Acrobat (long or
short arm version) is
compatible with the USB
Bridge.
• Using a new, fully charged lithium battery, the USB
Bridge will supply portable power to your Acrobat
NTSC/PAL for approximately 2 hours*
• Be sure to use the Acrobat with sufficient ambient
lighting. Because this device projects a magnified,
camera-based image, adequate lighting will
ensure that the best picture quality is obtained.
*Estimated times only. Actual usage times will vary
based on the life cycle remaining on the battery.
Chapter 8 Tips for using the USB Bridge
23
Using Flipper NTSC/PAL with the USB Bridge
• The Flipper is compatible with the USB Bridge
• Using a new, fully
charged lithium battery,
the USB Bridge will
supply portable power
to your Flipper for
approximately 3 hours*
• When using the Flipper
(reading mode), activate
the reading lamp switch to provide improved
image quality
Using Max with the USB Bridge
• The Max is compatible
with the USB Bridge.
• Using a new, fully
charged lithium battery,
the USB Bridge
will supply portable
power to your Max for
approximately 4 hours*
• Only color versions of the Max camera will
display color images when shown on the PC
display
*Estimated times only. Actual usage times will vary
based on the life cycle remaining on the battery.
24
Chapter 8 Tips for using the USB Bridge
Troubleshooting
• No camera image appears on screen
•Does you computer meet the minimum system
requirements? (page 6)
•Is the software for the USB Bridge installed
correctly? (pages 11-12)
•Is your Enhanced Vision product correctly
attached to the USB Bridge? (pages 13-14)
•Is the included USB 2.0 cable attached to the
USB Bridge and your PC? (pages 13-14)
•Check for power - is the Power LED on the USB
Bridge illuminated? (page 15)
• Video image is jagged and/or slow moving
•Does you computer meet the minimum system
requirements? (page 6)
•Be sure you are connected to a high-speed USB
2.0 port on your PC. (page 6)
• Camera images appear as Black & White only
•Is your Enhanced Vision product (Max) designed
to display color modes? (page 24)
•Use the Mode button on your Enhanced Vision
product to cycle through Color, Black & White or
Enhanced modes. Refer to the manual included
with your Enhanced Vision product for details.
• The battery will not power the camera
•Can you use AC power to power the camera?
(pages 13-14)
•Does the battery need to be charged? (page 22)
•Does the battery need to be replaced? (page 27)
Chapter 9 Troubleshooting
25
Specifications
Dimensions & Weight:
• Dimensions: ~ 4.75”W x 4”D x 1.25”H
• Weight: ~ 8 oz. (with battery)
Minimum Hardware Requirements:
Minimum requirements
OS: Windows XP
•
•
•
•
•
Processor: Intel Pentium M 1.5 GHz (or higher)
Memory: 512 MB (or higher)
USB 2.0 (high-speed): 1 available port required
Graphics card: 32 MB memory (or higher)
Hard disk: 100 MB of free space available
Features:
• 4 Split screen positions + full screen + silent
operation 3rd party magnification software
• Very little CPU resources used
• Variable size split screen
• Simple interface: operates exclusively with hotkeys
• Snapshot function (saves in JPG format)
• Snapshot viewer function
• Excellent color reproduction
• Automatic monitor Aspect Ratio detection (based
on computer’s selected resolution)
Recomended System
Effective resolution and refresh rate:
OS: Windows Vista or Windows 7:
• 640x480 pixels @ 30 frames/sec
•
•
•
•
•
Processor: Intel Core 2 Duo (or higher)
Memory: 2 GB (or higher)
USB 2.0 (high-speed): 1 available port required
Graphics: NVidia or ATI graphics card
Hard disk: 100 MB of free space available
Optional Hardware:
• Universal 12V 2A+ DC Power Supply
• Extra 16Wh EV battery (ACC-0038-00)
Compatibility:
• Compatible with ACROBAT, FLIPPER and MAX in
NTSC or PAL versions.
• Split screen capability with AISquared Zoomtext
9.18 or higher, Dolphin SuperNova Version 11.5 or
higher, or Issist iZoom 3.2 or higher
* In the interest of continuous improvement, product
specifications and/or minimum system requirements are
subject to change without prior notice.
26
Chapter 10 Specifications
* In the interest of continuous improvement, product
specifications and/or minimum system requirements are
subject to change without prior notice.
Chapter 10 Specifications
27
Warranty information
Enhanced Vision USB Bridge Warranty Policy
Enhanced Vision products are designed to give
you the highest quality image, convenient features,
ease of use and reliable service. The USB Bridge
has been inspected and tested prior to shipping.
Enhanced Vision warrants the USB Bridge against
defects in material and workmanship under normal
use for two years from the date of original purchase.
Enhanced Vision, at its option, will at no charge
either repair the product or replace it during the
warranty period. There are no other expressed or
implied warranties accompanying this product.
This warranty policy does not cover:
a) Defects or damage from misuse, use in other
than normal and customary manner, accident or
neglect;
b) Defects or damage from improper operation,
maintenance, installation, adjustment, alterations
or modification;
c) Defects or damage from spills of food or liquid;
d) All plastic surfaces and all other externally
exposed parts that are scratched or damaged due
to normal use;
e) Damage due to operation of the USB Bridge with
equipment not supplied or designed by Enhanced
Vision.
28
Chapter 11 Warranty Information
• You must provide proof of purchase, bearing the
date of purchase, in order to receive warranty
service.
• Anyone using this product does so knowingly
assuming certain risks, due to the need to utilize
vision enhancement devices.
Service Process
In the event that technical support or repair service
is needed, please contact your local Enhanced
Vision representative or the Enhanced Vision
warranty service center. If warranty service is
required, please contact Enhanced Vision at (800)
440-9476 Monday through Friday, between 8 a.m.
and 5 p.m. Pacific Standard Time (PST) to request
a return authorization number.
Warranty repairs will not be accepted without a
valid return authorization number.
You may wish to keep the original product
packaging in case warranty service is required.
The manufacturer cannot provide packaging
for warranty repairs.
NOTE: Please completely fill out and send in the
enclosed warranty registration card.
Chapter 11 Warranty Information
29
other enhanced vision products
Pebble – Compact, Ultra-Portable
Magnification!
The Pebble is a handheld electronic video
magnifier that you can take anywhere.
Weighing less than 8 ounces, Pebble features
a uniquely-designed folding handle and
includes both near-viewing and table reading
modes. Small enough to fit in your pocket or
purse, the Pebble is the ideal companion to
provide magnification, on the go. Featuring a
built-in 3 .5” or 4.3” LCD screen, the Pebble's
Freeze-Frame feature allows you to capture
any still image and adjust magnification. Up to
28 different viewing modes allow you to
choose alternate color combinations based on
your personal preference. Pebble can be powered using standard rechargeable batteries
(included)
Magnification: 2X – 10X
Acrobat LCD
With your choice of a built-in 19” or 22”
LCD, the Acrobat is a 3-in-1 video magnifier
ideal for near, distance and self viewing. By
rotating the camera, you can read, write,
groom, and magnify images at any distance.
The Acrobat LCD offers a complete system
for those at work, school or home
.
Magnification: 2X – 65X (19” LCD)
Magnification: 2X – 75X (22” LCD)
Flipper – The Ultimate in Flexibility!
Read, write, get more out of life! Our innovative
camera design lets you magnify in almost any
position with images in full color. Available in
Color and Black & White Display Modes.
Magnification: 1X – 50X* (with optional stand)
*maximum limit depends upon display size
Merlin LCD – Easy to use!
Merlin LCD is a video magnifier
that pivots and swivels to the most
comfortable viewing position. This
product includes all the same features
as the Merlin but with a sleek ergonomic
design. Available in 17”, 19” or 22” LCD
versions. Magnification: 2.4X – 77X
30
Chapter 12 Other Enhanced Vision Products
Max - Powerful Magnifier
A powerful, low-cost magnifier for reading.
Connects to any TV in seconds. Available in
either Color or Black & White versions.
Magnification: 16X – 28X*
*Maximum limit depends upon display size
Chapter 12 Other Enhanced Vision Products
31
Contact Information
Notes
Amigo – Your Portable Friend!
Amigo is a truly portable desktop magnifier
and is the lightest weight it its class. Optimal
viewing is achieved with a tilting 6.5 inch
viewing screen. Amigo is battery operated
and can be taken anywhere.
Magnification: 3.5X – 14X (digital)
______________________________________________
______________________________________________
______________________________________________
______________________________________________
Accessories
Lithium Battery (ACC-0038-00)
Additional batteries are available for your Enhanced Vision
products (USB Bridge, Amigo and Jordy)
______________________________________________
______________________________________________
Carrying Cases
Convenient cases for storage and transport of all Enhanced Vision products.
______________________________________________
Power Supplies
Spare power supplies for your Enhanced Vision products.
______________________________________________
______________________________________________
______________________________________________
Contact information:
(US Office) Phone: (714)465-3400 Fax: (714)374-1821
(UK Office) Phone: +44 (0)115 9442317 Fax: +44 (0)115 9440720
(DE Office) Phone: +49 (0)6691 911588 Fax: +49 (0)6691 807958
www.enhancedvision.com
Technical Support:
Main Toll Free (800) 440-9476 ext. 3
Local Phone: (714) 465-3400 ext. 3
E-mail: [email protected]
32
Chapter 13 Contact Information
______________________________________________
______________________________________________
______________________________________________
______________________________________________
______________________________________________
Notes
33
______________________________________________
______________________________________________
______________________________________________
______________________________________________
______________________________________________
______________________________________________
______________________________________________
______________________________________________
______________________________________________
______________________________________________
______________________________________________
______________________________________________
______________________________________________
______________________________________________
______________________________________________
______________________________________________
______________________________________________
______________________________________________
______________________________________________
______________________________________________
______________________________________________
______________________________________________
______________________________________________
______________________________________________
______________________________________________
______________________________________________
______________________________________________
______________________________________________
______________________________________________
______________________________________________
34
Notes
Notes
35
The USB Bridge is an accessory designed to operate in conjunction with Enhanced Vision products.
The products manufactured by Enhanced Vision
enlarge and enhance images to improve the lives
of people who have low vision. The extent to which
Enhanced Vision products can improve the ability
to see images and text depends on a person’s individual condition and level of visual impairment. Enhanced Vision products are not designed to restore
vision, correct eye conditions or halt degenerative
vision loss. An eye care professional can best determine the suitability of Enhanced Vision products
for a patient’s specific condition. For more information, please visit www.enhancedvision.com.
www.enhancedvision.com
(800) 440-9476 (US Office, toll-free)
+44 (0)115 9442317 (UK Office)
Part # MAN-0850-01
December, 2010
Copyright © 2008 by Enhanced Vision. All rights reserved.
Product specifications subject to change without prior notice.