1
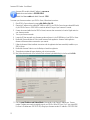
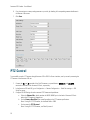
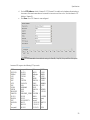
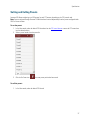
ANNEXXUS Ax516
USER GUIDE
Rev. 1.01
Rev. 150705
©2013 i3 International Inc.
The contents of this user manual are protected under copyright and computer program laws.
i
Annexxus 516 Encoder - User Manual
Table of Contents
Introduction ............................................................................................................................................................. 4
Installation............................................................................................................................................................... 5
Warnings and Operation Notes.............................................................................................................................. 5
Power Supply ................................................................................................................................................. 5
Installation Requirements and Recommendations.................................................................................................... 5
Unpacking ........................................................................................................................................................... 6
Hard Disk Installation / Replacement...................................................................................................................... 7
Front Panel ......................................................................................................................................................... 9
Rear Panel ........................................................................................................................................................ 10
Installation Instructions ...................................................................................................................................... 10
Connecting Encoder to the SRX-Pro Server ............................................................................................................... 11
Encoder Connection Options ............................................................................................................................... 11
Hardware/Software Requirements ...................................................................................................................... 11
Assigning IP Address to your Annexxus Encoder ................................................................................................... 11
Accessing via Web Browser ................................................................................................................................ 13
Adding your IP Encoder to your SRX-Pro Server ................................................................................................... 15
Accessing Encoder Settings ..................................................................................................................................... 19
Configuring Video Settings ...................................................................................................................................... 23
PTZ Control ........................................................................................................................................................... 24
Live View PTZ Control ........................................................................................................................................ 26
PTZ Control via SRX-Pro Server .......................................................................................................................... 26
Setting and Calling Presets ................................................................................................................................. 27
Call PTZ Preset on Alarm .................................................................................................................................... 28
Specifications......................................................................................................................................................... 29
ii
Annexxus 516 User Guide
Copyright © 2014 i3 International Inc.
Rev. 150705
All rights reserved. No part of this manual may be reproduced or transmitted in any form or by any means, electronic or
mechanical, including photocopying, recording, or by any information storage or retrieval system, without the prior written
permission of the copyright owner and the publisher. i3 reserves the right to change the contents of this manual without
notice.
Disclaimer
Annexxus 516 User Guide is provided as is, without warranty of any kind, expressed or implied, including but not limited
to performance, merchantability, or fitness for any particular purpose. Neither i3 International Inc. nor its dealers or
distributors shall be liable to any person or entity with respect to any liability, loss, or damage, caused or alleged to have
been caused directly or indirectly by this information.
Furthermore i3 International Inc. reserves the right to revise this publication, and to make changes to the content at any
time, without notice.
FCC
This device complies with part 15 of the FCC Rules. Operation is subject to the following two conditions: (1) This device
may not cause harmful interference, and (2) this device must accept any interference received, including interference that
may cause undesired operation.
Address:
i3 International Inc. • 780 Birchmount Road, Unit 16 • Scarborough • Ontario • Canada M1K 5H4
Tech Support: 1.877.877.7241 / [email protected]
Web Site: www.i3international.com
3
Annexxus 516 Encoder - User Manual
Introduction
Thank you for purchasing i3 Annexxus 516 IP video encoder device.
Annexxus network video encoders allow to encode analog video into high quality digital video for use and storage on a
hard disk (some models only) or to be transmitted via local area network and stored on your SRX-Pro Server. The benefits
of this technology allow for increased flexibility within the surveillance network.
Annexxus 516 model features 16 BNC video inputs and 16 audio inputs. Optional SATA interface supports up to 4TB of
hard drive storage for on-site redundancy recording, offering an effective and affordable data back-up solution in an NVR
environment.
With video being locally stored on the Ax516, storage loss can be avoided during network interruptions. Additionally,
Ax516 encoder can be used as an IP Network video appliance for transmitting video over the LAN to i3 Digital Video
Management Software (DVMS) software. The Ax516 storage capabilities enable it to function as a conventional standalone DVR as well as a high-quality video streaming encoder. Dual-streaming provides two independent streams per video
input, allowing viewing and recording at two different quality levels to save disk space and bandwidth.
The Ax516 encoder transmits full-motion video at 30 fps (NTSC) or 25 fps (PAL) per channel at the maximum resolution of
960H (960×480 [NTSC]; 960×576 [PAL]). For high-performance, multi-channel surveillance over IP data networks, the
Ax516 is a unique multi-channel encoder that can cost effectively aid the transition from analog video to IP video at the
best possible cost with little worries of video storage lost.
4
Connecting Encoder to the SRX-Pro Server
Installation
Warnings and Operation Notes
Installation and servicing must be performed only by qualified and experienced technicians to conform to all local codes
and to maintain your warranty.
WARNING! The use of CSA certified/ UL Listed Class 2 power adapter is required to ensure compliance.
WARNING! To reduce the risk of fire or electric shock, do not expose the product to rain or moisture.
When installing your Annexxus encoder, be sure to avoid:
•
•
•
•
•
•
•
•
•
excessive heat, such as direct sunlight or heating appliances
moisture and humidity
environments without adequate ventilation
contaminants such as dust and smoke
strong magnetic fields
sources of powerful electromagnetic radiation such as radios or TV transmitters
areas with mechanical vibrations
temperatures below -10° Celsius or 14° Fahrenheit and above 55° Celsius or 131° Fahrenheit.
environments with humidity levels in excess of 90%
Power Supply
Ensure the supplied voltage meets the power consumption requirements of this camera before powering the camera on.
Incorrect voltage may cause irreparable damage to the unit and will effectively void the device warranty.
Installation Requirements and Recommendations
1. Use provided brackets for rack mount installations.
2. Ensure ample room for audio and video cables.
3. When installing cables, ensure that the bend radius of the cables is no less than five times
its diameter.
4. Connect both the alarm and RS-485 cables.
5. Allow at least 2 cm (~0.75in) of space between rack mounted devices.
6. Ensure the Encoder is grounded.
7. Environmental temperature must remain within the range of -10ºC ~ 55ºC, 14ºF ~
131ºF.
8. Environmental humidity must remain within the range of 10% ~ 90%.
5
Annexxus 516 Encoder - User Manual
Unpacking
Check that the items received match those listed on the order form and packing slip. In addition to this manual, the
packing box includes:
1 x Annexxus 516 encoder
1x Power cord
1x 12VDC power adapter
4x HDD Screws
1x HDD Power Cable
1x HDD SATA Cable
1x CD (Manual, IP Finder
2x Mounting Brackets
4x Mounting Screws
If any parts are missing or damaged, contact the dealer you purchased the encoder from.
6
Connecting Encoder to the SRX-Pro Server
Hard Disk Installation / Replacement
WARNING! Use only hard disk drives from the i3-approved list.
If you have purchased your Annexxus 516 without a hard disk drive (HDD) or if you need to replace the HDD in your
Annexxus 516 unit, please refer to the following instructions on how to install an i3-approved drive. The installation and
removal of the hard disk must be performed by a qualified and experienced technicians to conform to all local codes and to
maintain your warranty.
Before installing a hard disk drive (HDD) for Annexxus 516, ensure that the power is disconnected from the device. Use
only an i3-approved HDD.
Step 1.
Ground yourself. This will remove any static electrical charge your body might be carrying.
Step 2.
Using a Phillips screwdriver, remove the screws on both sides and on the rear panel of Annexxus 516. Remove the cover
from the chassis.
Step 3.
Place the i3-approved HDD into the hard drive slot of the chassis, face up.
Step 4.
Securely attach the HDD to the bottom of the chassis with the four screws provided.
7
Annexxus 516 Encoder - User Manual
Step 5.
Remove the HDD power cable from the accessories box. Plug one end of the cable into the power port on the HDD and
the other end - into the circuit board, as shown in the image below.
Step 6
Remove the SATA cable from the accessories box. Plug one end of the SATA cable into the SATA port on the HDD and the
other end - into the circuit board, as shown in the image below.
8
Connecting Encoder to the SRX-Pro Server
Step 7
Replace the chassis cover and re-tighten the screws on both sides and on the rear panel of the chassis.
Front Panel
Indicator
1 POWER
2 STATUS
3 Tx/Rx
Description
LED is red when power is ON
LED is red when data is being read from or written to the HDD.
Applies only to models with the installed HDD.
1. LED of OFF when Annexxus 516 is not connected to the
network
2. LED blinks green when the data is being transmitted /
received;
3. LED blinks at higher frequency when the large amounts of
data are being transmitted/received.
9
Annexxus 516 Encoder - User Manual
Rear Panel
Indicator
1 VIDEO IN
Description
BNC connectors for analog video inputs (1-16)
3.5mm two-way audio interface; connect to active pick-up, microphone,
etc.
3.5mm audio output interface; connect to audio output device, such as a
3 AUDIO OUT
speaker, etc.
Line input interface for audio input. Audio Port number corresponds and is
4 AUDIO IN
hard-linked with the Video Port number. Make sure to connect audio inputs
to the corresponding video channels.
2 LINE IN
5 LAN
10M/100/1000Mbps adaptive Ethernet interface
6 RESET
Restore Annexxus 516 unit to factory default settings by pressing the
RESET pin hole button for 15 seconds after the power is turned OFF
7 RS-485
RS-485 serial interface is provided for Pan/Tilt/Zoom support for PTZ
cameras.
8 ALARM IN
Relay alarm input (up to 16 sensors)
9 ALARM OUT Relay alarm output (up to 4 controls)
10 DC12V
12V DC power supply
11 GND
Grounding
Installation Instructions
1.
2.
3.
4.
Connect up to 16 analog cameras to the BNC VIDEO IN ports on the back of the Annexxus 516 unit
Connect the microphone or other two-way audio device to the LINE IN 3.5mm port, if using
Connect the speakers, or other audio output device to the AUDIO OUT 3.5mm port, if using
Connect up to 16 audio inputs to the AUDIO IN ports, if using. Audio Port number corresponds and is hard-linked
with the Video Port number. Make sure to connect audio inputs to the corresponding video channels.
5. Connect a network cable to the LAN port on the back of the Annexxus 516 unit, plug in the other end of the
cable to SRX-Pro Server for a direct/cross-over connection or plug into the Gigabit switch if using on the network
or connecting multiple Annexxus 516 units.
10
Connecting Encoder to the SRX-Pro Server
6.
7.
8.
9.
10.
11.
Connect PTZ control cables from PTZ cameras to RS-485 port on the back of the Annexxus 516 unit, if using.
Connect up to 16 sensor inputs to ALARM IN ports, if using.
Connect up to 4 control relay outputs to ALARM OUT ports, if using.
Connect the 12VDC power adapter to your Annexxus 516 unit.
Connect the power cable to the 12VDC power adapter.
Lastly, plug in the power cable into the power source. The use of UPS (Uninterrupted Power Supply) is highly
recommended to extend the life of your unit. Annexxus 516 unit will power on automatically.
Connecting Encoder to the SRX-Pro Server
Encoder Connection Options
Hardware/Software Requirements
The following requirements must be met to achieve a successful network connection with the Annexxus 516 encoder.
SRX-Pro Server:
•
•
•
•
•
•
•
i3 SRX-Pro Version 3.0 or higher
Latest GiPi adapter is installed. GiPi adapters can be downloaded from i3 FTP website. (Please contact i3 Technical Support
for more information.)
Windows XP, XPe, 7 Pro or 7e
Internet Explorer v6.0 and above, Firefox v3.5 and above, Chrome v8 and above, Safari v5.0.2 and above
Note: If you are using Internet Explorer v.10 or v.11, you must first add the Annexxus 516 IP address to the browser's
Compatibility View Settings.
CPU: Intel Pentium Core 2 or higher
Memory: 1GB or more
VGA card--supporting Direct X 9.0 or above
Assigning IP Address to your Annexxus Encoder
11
Annexxus 516 Encoder - User Manual
Annexxus 516 encoder's default IP address is 192.0.0.16
Default subnet mask address is 255.255.255.0.
Default User Name: admin and default Password: 1234
To connect your Annexxus encoder to your SRX-Pro Server, follow these instructions:
1. Close SRX-Pro Server software by pressing Alt+Shift+Ctrl+F4.
2. Change the IP address on the onboard NIC (LAN) (or on NIC1 if your SRX-Pro Server has two onboard NIC cards)
of your SRX-Pro Server to 192.0.0.XXX to match the default IP range of your Annexxus IP encoder.
3. Connect the network cable from the SRX-Pro Server (crossover direct connection) or from the Gigabit switch to
your Annexxus encoder.
4. Turn on your Annexxus encoder.
5. Locate the CD that came with your Annexxus encoder and insert it in the CD-ROM drive of your SRX-Pro Server.
6. Double-click “AnnexxusFinder.exe” file to install Annexxus Finder application. Annexxus Finder application
discovers all Annexxus devices connected to your network.
7. Follow the Annexxus Finder installation instructions until the application has been successfully installed on your
SRX-Pro Server.
8. Double-click Annexxus Finder icon on the Desktop to launch the application.
9. The application window will appear displaying a list of active encoders.
10. Next, select desired encoder in the Annexxus Finder software by double-clicking it in the list and click Edit.
11. Enter the new IP address and Subnet Mask of the encoder in the Change IP Address area. The new
encoder IP address must match the original range of your SRX-Pro LAN or NIC1 card. E.g. If your original SRXPro Server’s IP address was 192.138.10.122, change your Annexxus encoder's IP address to 192.138.10.XXX.
12
Connecting Encoder to the SRX-Pro Server
Remember: Annexxus encoders cannot share an IP address, each encoder requires its own unique IP address.
12. Enter the default encoder password: 1234 in the Input Password field and click Save.
13. Wait a few moments as the new IP address is being applied to your Annexxus device. Wait for the following
message to be displayed. Click OK to close it.
14. Now that the new IP address has been successfully assigned to your encoder, make sure you can connect to it
through the web browser (instructions below).
Accessing via Web Browser
Annexxus 516 encoder can be accessed through Web Browser for live viewing or setup configuration. The following web
browser versions are supported: Internet Explorer v6.0 and above, Firefox v3.5 and above, Chrome v8 and above, Safari
v5.0.2 and above.
Note: If you are using Internet Explorer v.10 or v.11, you must first add the Annexxus 516 IP address to the browser's
Compatibility View Settings.
To access the Annexxus 516 through your web browser,
1. Open web browser window and enter the encoder's IP address. Annexxus 516 default IP address is:
http://192.0.0.16
13
Annexxus 516 Encoder - User Manual
2. In the login window, enter the encoder User Name and Password. Annexxus 516 default User Name is admin
and default Password: 1234.
3. If accessing for the first time, download and install browser plug-in.
4. Annexxus 516 Live View window will be displayed in your browser window.
5. Annexxus encoder interface will be displayed in the Internet Explorer window. Click the Play All icon
display all connected analog cameras.
14
to
Connecting Encoder to the SRX-Pro Server
6. If you do not see the camera images on the screen, call i3 International tech support for help.
Adding your IP Encoder to your SRX-Pro Server
Make sure that the latest version of GiPi updater is installed on your SRX-Pro Server.
You can download the most recent GiPi installer package from our website: from
http://www.i3international.com/index.php/en/support/downloads-2
1. Once the latest GiPi updater has been installed, restart i3 SRX-Pro Server software.
15
Annexxus 516 Encoder - User Manual
2. Log In and go to the Setup -> IP Camera tab.
.
3. Click the Search button
4. Locate ANNEXXUS 516 in the list and click the Select button.
5. In the Select IP Camera window, enter Annexxus 516 User Name and Password. The default User
Name/Password is admin/1234.
16
Connecting Encoder to the SRX-Pro Server
6. Then, click the Add button.
7. Enter the encoder's IP Address and select ANNEXXUS from the drop-down list, then click the Search
button.
8. The encoder will be added to the list.
9. Note that all 16 inputs will be added. Delete the inputs that do not have analog camera connected.
Next, assign the cameras to the SRX-Pro video channels (see image below). You may change resolution and
frame rate for the connected cameras in the IP Camera tab menu or you may choose to configure them through
17
Annexxus 516 Encoder - User Manual
the encoder's advanced settings.
10. In order to be able to use SRX-Pro Server/Remote on-screen PTZ controls and PTZ control panel to control analog
PTZ cameras connected to Annexxus 516, select i3 GiPI in PTZ drop-down menu for each PTZ analog camera
connected to Annexxus 516 (see image below).
Note: The analog PTZ cameras must first be correctly configured in Annexxus 516 setup.
11. Your Annexxus encoder is now connected to SRX-Pro Server and ready to record.
18
Accessing Encoder Settings
To make changes to the Encoder settings, or to view / download video recorded to the encoder's hard drive, you must
access the encoder's Web GUI.
This can be done either through SRX-Pro Server setup, Annexxus Finder application, which can be installed from the
software CD included with Annexxus 516 accessories, or directly from an Internet Explorer browser window.
To access the encoder's Web GUI through SRX-Pro Server, open the IP Camera setup tab, then select ANNEXXUS 516
device in the list and click the Advanced Setup button.
To access the encoder's Web GUI through Annexxus Finder, launch Annexxus Finder application. Then, select your
desired Annexxus 516 encoder in the Annexxus Finder software by double-clicking it in the list and click Advanced
Setup.
19
Annexxus 516 Encoder - User Manual
To access the encoder's Web GUI through your web browser, open web browser window and enter the encoder's IP
address.
Note: Annexxus 516 default IP address is: http://192.0.0.16
A new Internet Browser window will be opened with the Annexxus 516 login screen.
20
Specifications
1. In the login window, enter the encoder User Name and Password. Annexxus 516 default User Name is admin
and default Password: 1234.
2. If accessing for the first time, download and install browser plug-in.
3. Annexxus encoder interface will be displayed in the Internet Explorer window. Click on the Configuration tab
to access the encoder's advanced settings.
21
Annexxus 516 Encoder - User Manual
Note: If you are using Internet Explorer v.10 or v.11, you must first add the Annexxus 516 IP address to the browser's
Compatibility View Settings.
To add an IP address to Internet Explorer's compatibility view settings,
a. Open a Browser window
b. Click on Tools -> Compatibility View Settings
c. Enter the Annexxus 516 IP address in the Add this website: field and click Add.
22
Specifications
Configuring Video Settings
Annexxus 516 Video Settings allow configuring main and sub-stream settings, resolution, video quality, frame rate, and
video encoding for each individual analog camera connected to the encoder.
While settings such as resolution and frame rate can be configured via SRX-Pro Server -> IP Camera setup page, main/sub
stream settings and encoding can only be configured through Web GUI. SRX-Pro Server relies on the Main/Sub Stream
settings as configured on Annexxus 516 Web GUI.
Note: Video settings configured on Annexxus 516 also affects the video feeds recorded by SRX-Pro Server.
To access Annexxus 516 Video Settings,
1. Open the encoder's Web GUI.
2. Go to Configuration -> Camera Settings -> Video Settings menu
3. Select the analog camera in the Channel No. drop-down menu
4. In the Video Settings setup, configure the Main Stream settings.
a. Select Main Stream under the Stream Type drop-down menu
b. Set the Resolution, Video Quality, Frame Rate and Video Encoding from corresponding drop-down
menus.
5. Next, configure the Sub Stream settings.
a. Select Sub Stream under the Stream Type drop-down menu
b. Set the Resolution, Video Quality, Frame Rate and Video Encoding from corresponding drop-down
menus.
23
Annexxus 516 Encoder - User Manual
6. Copy the settings to as many analog cameras as you wish, by checking off corresponding camera checkboxes in
the bottom of the screen
7. Click Save.
PTZ Control
To successfully control a PTZ camera through Annexxus 516 or SRX-Pro Server interface, start by correctly connecting the
PTZ camera to the Annexxus 516 unit.
1. Connect the R+ and R- terminals of the Pan/Tilt camera or a speed dome to RS-485 D+ and RS-485 Dterminals on the back of the Annexxus 516 unit, respectively.
2. In the Annexxus 516 web GUI, go to Configuration -> Remote Configuration -> Serial Port settings -> 485
Serial Port setup.
3. Configure RS-485 Settings for each connected PTZ Camera and speed dome.
a. Select the Channel No., which matches the VIDEO IN BNC port in the back of Annexxus 516 unit
where the PTZ camera is plugged into.
b. Set the Camera Baud Rate (port speed) according to the PTZ camera specifications.
Note: If using i3's PTZ730 camera, set the Baud Rate to 2400
c. Set the camera's PTZ Protocol
Note: If using i3's PTZ730 camera, use Pelco-D protocol
24
Specifications
d. Set the PTZ Address, which is Camera ID. PTZ Camera ID is usually set by hardware dip-switches on
the camera. See camera manufacturer's manual for instructions on how to set / find the camera's PTZ
Address / Camera ID.
e. Click Save. Your PTZ Camera is now configured.
Note: It is recommended to leave default settings for Data Bit, Stop Bit, Parity and Flow Ctrl options.
Annexxus 516 supports the following PTZ protocols:
1602PROTOCOL
3609hd
A-01
AB-D
AB-P
ACES
ADV
ALSON
ANTEN
BBV-RS422
BEWATORPELCO-D
DRAGON
DSCP
HIKVISION
HY
Honeywell
IntegrativeP
PLD
KALATEL
RM110
KC3360S
RedApple
KTD-348
SAE
Kony
SHINEI
LC-D2104
SONY-EVILG MULTIX
D100/P
LILIN
SONY-EVIMAOWANG
D30/31
NAIJIE
SONY-EVINITRO
D70
PANASONIC_CS850 SPD-2200
PELCO-D
SUNELL
PELCO-P
Samsung
PELCO-RS422TY Siemens
PHILIPS
TC-PELCO-D
PHILIPS-3
TC-PELCO-P
PIH-1016
TCL-PELCO-
TIANDYPELCO-D
TIANDYPELCO-P
TIANMINPELCO-D
TIANMINPELCO-P
TLHHX2000
TL-PELCOP
TL-V1200
Tiandy
VC2000PTC-C
VCL
VICON
25
Annexxus 516 Encoder - User Manual
INFINOVA
Infinovadcp001a
D
TCL-PELCOP
TECHWIN
VIDO B-01
VIDO B-02
YAAN-1
YAAN-2
YF-06
YOULI
Live View PTZ Control
To control your PTZ camera from Annexxus 516 web GUI, open the encoder's interface via the Web Browser.
Start the Live Video and select the PTZ camera you would like to control on the screen.
Follow the instructions in the diagram below to control the PTZ camera in live view mode.
PTZ Control via SRX-Pro Server
In order to be able to use SRX-Pro Server/Remote on-screen PTZ controls and PTZ control panel to control analog PTZ
cameras connected to Annexxus 516, the cameras must first be correctly configured in Annexxus 516 setup.
Once PTZ cameras are configured in Annexxus 516 setup and Annexxus 516 is successfully connected to SRX-Pro Server,
make sure to select i3 GiPI in PTZ drop-down menu for each PTZ analog camera connected to Annexxus 516, see image
below.
26
Specifications
Setting and Calling Presets
Annexxus 516 allows configuring up to 256 presets for each PTZ camera, depending on the PTZ protocol used.
Note: Presets configured through Annexxus 516 Web interface function independently from the presets configured inside
SRX-Pro Server software.
To set the preset:
1. In Live View mode, select the desired PTZ channel and use the PTZ control buttons to move the PTZ camera lens
into the desired position.
2. Select a preset number from the preset list.
3. Click the Set Preset icon
. Your new preset position has been saved.
To call the preset:
1. In Live View mode, select the desired PTZ channel
27
Annexxus 516 Encoder - User Manual
2. Select a preset number from the preset list.
3. Click the Call Preset icon
. Your selected PTZ camera will move into the saved preset position.
Call PTZ Preset on Alarm
Annexxus 516 allows the PTZ Camera's preset to be recalled automatically in response to a triggered alarm input.
Note: When configured, this feature will also affect the video feed recorded by SRX-Pro Server.
To link the Alarm Input to the PTZ camera's preset,
1. In Live View mode, set the PTZ camera preset.
2. Configure the selected Alarm Input in Configuration -> Alarm Settings -> Alarm Input setup.
3. Go to Configuration -> Remote Configuration -> Alarm Settings -> Alarm Input -> Linkage Method setup.
4. In the PTZ Linking drop-down menu, select PTZ Linking video channel.
5. Check off Enable checkbox next to the Preset No. drop-down menu.
6. Select configured preset in the Preset No. drop-down menu.
7. Click Save.
28
Specifications
Specifications
Features
Video Compression
Recording resolution
Frame rate
h.264 / MPEG4 / MJPEG
960H / 4CIF / 2CIF / CIF
960H: 960×480 (NTSC); 960×576 (PAL)
30 fps (NTSC)/ 25 fps (PAL) on h.264/MPEG4 encoding;
15 fps on MJPEG encoding
Video input
16CH (BNC)
Screen division
1,4,9,16 via IE v 6.0 and above, Firefox v3.5 and above, Chrome
v8 and above, Safari v5.0.2 and above
Audio In/Out
16 Line in (2.0 Vp-p, 1 kΩ) / 1 Line out (3.5mm interface
(Linear, 600 Ω)), CODEC:G.711
Alarm In/Out
16 In / 4 relays
Storage
1 HDD (SATA), up to 4TB
PTZ control
RS-485
System control
Via Web Connection
Remote SW
Web viewer
Search type
Search by time, search by event
System
Time synchronization
Auto Time Sync. via NTP Server
User authority
Supports multi-user levels
System reliability
Auto-Recovery after power Failure
Firmware upgrade
Via Web Connection
Configuration export &
Via Web Connection
import
Recording quality
6 Levels (Lowest/Lower/Low/Medium/Higher/Highest)
Recording schedule
By hour, by day of the week, by alarm, by motion
Pre-recording
Max. 30 sec
Post-recording
Max. 10 min
File format
i3 encrypted and AVI file via SRX-Pro Server
MPEG4, h.264, MJPEG for local on-site recording
Network
Network
10M/100M/1000Mbps adaptive Ethernet interface.
29
Annexxus 516 Encoder - User Manual
Protocols
IPv4/v6, HTTP, HTTPS, FTP, SMTP, Bonjour, UPnP,
SNMPv1/v2c/v3(MIB-II), DNS, NTP, RTSP, RTP/RTCP, TCP,
UDP, IGMP, ICMP, DHCP, ARP, SOCKSv4/v5, OnVIF
E-mail notification
Event/exception notification emails to selected user
System configuration
Full configuration setup via network/web connection
Two-Way audio
Via Web Connection. 1-ch, 3.5mm interface (2.0 Vp-p, 1 kΩ)
Physical Environment and Qualifications
Weight
4 Kg (8.81 lb)
Power
12V DC
Operating temperature -10°C ~ +55°C (14° F ~ 131° F)
Operating humidity
10% ~ 90%
Dimensions (W × D ×
440 × 274 x 45 mm (17.3” x 10.8” x 1.8”)
H)
Certifications
FCC
Warranty
Standard warranty
30
3 year parts, 1 year labor