1
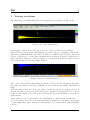
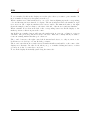
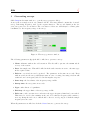
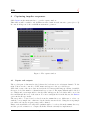
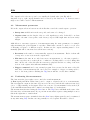
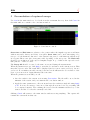
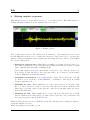
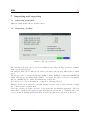
Aliki - 0.1.0
User Manual
Fons Adriaensen
[email protected]
ζ
Aliki
Contents
1 Introduction
3
1.1
Installation . . . . . . . . . . . . . . . . . . . . . . . . . . . . . . . . . . . . . . .
3
1.2
Running Aliki . . . . . . . . . . . . . . . . . . . . . . . . . . . . . . . . . . . . . .
3
1.3
The Aliki file format . . . . . . . . . . . . . . . . . . . . . . . . . . . . . . . . . .
4
1.4
The session directory . . . . . . . . . . . . . . . . . . . . . . . . . . . . . . . . . .
4
2 Viewing waveforms
6
3 Generating sweeps
8
4 Capturing impulse responses
9
4.1
Inputs and outputs . . . . . . . . . . . . . . . . . . . . . . . . . . . . . . . . . . .
9
4.2
Measurement parameters . . . . . . . . . . . . . . . . . . . . . . . . . . . . . . .
10
4.3
Performing the measurments . . . . . . . . . . . . . . . . . . . . . . . . . . . . .
10
5 Deconvolution of captured sweeps
11
6 Editing impulse responses
12
7 Importing and exporting
14
7.1
Importing sound files . . . . . . . . . . . . . . . . . . . . . . . . . . . . . . . . . .
14
7.2
Exporting .ald files . . . . . . . . . . . . . . . . . . . . . . . . . . . . . . . . . . .
14
c Fons Adriaensen
2
ζ
Aliki
1
Introduction
This is the user manual for the 0.1.0 (beta) release of Aliki.
Compared to the previous 0.0.3 release this one should has very few changes, mainly small
bugfixes.
1.1
Installation
Compiling and installing Aliki should be simple enough. Unpack the source tarball, cd to it,
then make and as root make install. The default install directory is /usr/bin. To change this,
just edit the PREFIX variable in the Makefile.
Alike depends on a number of shared libraries. These are:
• libclthreads version 2.4.0 or later,
• libclalsadrv version 2.0.0 or later,
• libclxclient version 3.6.1 or later,
• libsndfile, any recent version.
• libfftw3f, any recent version.
The first three are available from the same place as the Aliki sources.
It may be worth the effort to compile the fftw3f library locally using optimisation options (e.g.
enabling SSE) adapted to your platform. Binary versions installed by most distributions are not
optimised for any platform.
1.2
Running Aliki
Running aliki -h will show the command line options:
Aliki-0.1.0
(C) Fons Adriaensen
<[email protected]>
-h
-J
-A
-d <device>
-r <rate>
-p <period>
-n <nfrags>
-E <prefix>
Display this text
Use JACK
Use ALSA, with options:
Alsa device [hw:0.0]
Sample frequency [48000]
Period size [1024]
Number of fragments [2]
Prefix for audio process, e.g. sudo
Without either -J or -A only the file processing functions are available.
Most of this will be clear enough, but the -E option may need some comments.
c Fons Adriaensen
3
ζ
Aliki
The audio interface part of Aliki is a separate executable (aliki-rt) which is started by the main
program if an audio interface is requested on the the command line (-A or -J). The two parts
communicate via shared memory. The main reason for this separation is to avoid JACK locking
all the memory blocks used by the processing code. These could be quite large, there is no need
to lock them, and doing so could easily deplete physical memory on some systems.
It is preferable to run aliki-rt with real-time and memory locking privileges. How this is done
depends on your system. On some (recent) systems nothing special is required if the user is a
member of the audio group. On others, aliki-rt needs to be started with a prefix command such
as sudo or rlimits. The -E option allows to specify such a prefix.
Aliki does not depend on low latency (latency can be compensated for later), so you may use
larger period sizes than would be required for interactive audio work.
Note that it is possible to run Aliki without any audio interface at all, for example to process
previously captured files.
1.3
The Aliki file format
Aliki uses its own file format with the filename extension .ald. The same file format will be
used by some other applications (in development) that use impulse responses.
An .ald file is a multi-channel, multi-section audio file using single precision floating point as
the sample format. Apart from the audio signals some other information is stored. For example,
special formats such as Ambisonics B-format or MS stereo can be identified and treated correctly,
even if they have the same number of channels as some other formats. An .ald file can also
contain a time reference (indicating which sample corresponds to zero time), and use fractional
sample rates. Future versions of Aliki and other software may add more metadata.
The format has changed compared to the 0.0.1 release (and will change again in the future), but
Aliki releases will always read the older formats at least up to version 1.0.0.
All files used by Aliki can be exported to raw PCM, WAV or WAVEX format for external use,
see the section on exorting. Future versions will also allow conversion of external files to the
.ald format.
1.4
The session directory
The current version of Aliki does not have a real ’session’ concept, but it does depend on a
particular directory structure. A session directory should contain at least the following subdirectories:
• sweep: sweep and equalisation files.
• capture: recorded room responses.
• impresp: raw impulse responses.
• edited: modified impulse responses.
It is absolutely essential for the current version (which lacks decent error reporting) that the
session directory is set correctly. Failing to do so may lead to mysterious failures. A new session
directory can be initialised from the file window (see below).
c Fons Adriaensen
4
ζ
Aliki
The default session when aliki is started will be the current directory. To set the session directory,
click Session in the main window. A filer window (see fig.1) will open for the current directory.
To create a new session directory, navigate to the place where you want it. If necessary use the
New dir function to create the directory. Then click Select to create the required subdirectories.
To select an existing session directory, navigate to it (so you see the required subdirs), then click
Select.
Once the session is set, you can use the Session button in the filer window to return to it at any
time.
Figure 1: The filer window
c Fons Adriaensen
5
ζ
Aliki
2
Viewing waveforms
The main window normally displays the waveform(s) in the currently loaded file, if any.
Figure 2: Top of the main window
At the right top (fig.2) and bottom (fig.3) are some controls for this waveform display.
The Lin and Log buttons in the right margin select either a linear or logarithmic vertical scale.
If the file is a multichannel file, there will be a number of channel selection buttons. The labels
depend on the file type - in the figure an Ambisonics B-format file is shown. L-click selects a
single channel, R-click adds or removes a channel to or from the current selection. These buttons
are not shown if the file only has a single channel.
Figure 3: Bottom of the main window
The + and - buttons in the right margin modify the vertical scale. For the linear format they
just change the scale factor. For the logarithmic one they modify the lower limit of the displayed
range.
If the file has more than one section, there will be left and righ arrow buttons in the left bottom
margin, selecting resp. the previous and next section. Again these buttons will be not be shown
if there is only a single section. The index of the current section and the number of sections are
always shown.
At the right are a set of buttons that control the markers, zooming and the vertical scale.
Up to two markers can be put on the waveform display. A marker is a vertical line corresponding
to a particular sample offset. It is used for various purposes, for example when editing an impulse
response.
c Fons Adriaensen
6
ζ
Aliki
To set a marker, R-click in the display area at the place where you want to put a marker. To
move a marker, L-drag it by the square near the top.
When a marker is set, this is indicated by one of two buttons lighting up in the corresponding
color and showing an arrow instead of a square. The arrow indicates where the marker is: up if
it is on screen, left or right if a marker is set but not visible. The numerical value to the right
shows the sample position, relative to the start of the file, of the most recently used marker.
When a marker is set, then an L-click on the corresponding button scrolls the display to the
marker position so that it is put at the centre.
An R-click on a marker button will erase the marker if it is on-sceen, or bring it on-screen
otherwise. The previous position is lost in both cases. This can be handy when you want to
re-use an existing marker that has gone off-screen.
The + and - buttons to the right control the horizontal scale factor, i.e. they zoom in or out.
L-click moves one level up or down, R-click goes faster.
The zoom focus is the most recently referenced marker if still set and visible, or the centre of the
display area otherwise. In other words, when you go to a marker clicking its button, or when
you move it, it also becomes the zoom focus.
To scroll the display horizontally, just L-drag the time scale.
c Fons Adriaensen
7
ζ
Aliki
3
Generating sweeps
Click Sweep in the main window to open the sweep generator dialog.
A sweep file is a single-section, two-channel .ald file. The first channel contains the ’forward’
sweep, with rising frequency, used by the capture function. The second channel is the ’inverse’ sweep used for deconvolution. The convolution of these two will always be a Dirac pulse
bandlimited to the frequency range of the sweep.
Figure 4: The sweep generator window
The following parameters (fig.4) should be filled in to generate a sweep:
• Name: filename without the .ald extension. The file will be put into the sweep subdirectory of the session.
• Rate: the sample rate. This will be filled in if the audio interface is active, otherwise type
in the required value.
• Fade in: a soft fade-in can be speficied. The parameter is the time in seconds. Even
without a fade-in, the sweep will always start at a zero-crossing, but using a fade-in will
result in lower low-frequency sidelobes in the impulse response.
• Start freq: the lower limit of the frequency range, in Hz.
• Sweep time: the sweep time in seconds.
• Type: either linear or logarithmic.
• End freq: the upper limit of the sweep range, in Hz.
• Fade out: a fade-out time in seconds after the upper frequency limit has been reached.
This is used to avoid a discontinuity at the end. Note that the frequency will continue to
move up during the fade-out, so this should be short to avoid going above half the sample
frequency in some cases.
When all parameters are filled in, click the Create button to generate the sweep.
c Fons Adriaensen
8
ζ
Aliki
4
Capturing impulse responses
Click Capture in the main window to open the capture window.
This window will be available only if Aliki was started with an audio interface option (-A or -J).
It controls all aspects of the actual IR measurement operation.
Figure 5: The capture window
4.1
Inputs and outputs
The top left part of this window (fig.5) shows the level meters for each input channel. To the
right of these are the controls to set file names and types for the recorded sweeps.
An L-click on any of the arrow buttons besides the level meters will bring up a menu of available
file types. Select the number of channels and type you need. The input channels will be labeled
accordingly and a text input field for the file name will appear. Recorded files will be stored in
the capture subdirectory of the session. To remove an input file from the list, use the Remove
option in the file type menu.
The sweep file to be used can be selected from the sweep directory. Make sure to select one
with the correct sample rate - this is not checked in the current release. Using the wrong sample
rate will work, but the frequency range will be shifted.
Future versions will allow a loudspeaker equalisation file to be selected from the sweep directory,
and also provide a function to compute such files. This is currently not implemented.
c Fons Adriaensen
9
ζ
Aliki
The output level for the sweep can be set, usually the default value (-20 dB) will do.
Any mix of up to eight output channels can be selected by the buttons 1. . . 8. In most cases a
single source will be used for IR measurment.
4.2
Measurement parameters
Below the output selection buttons are the fields that control the actual capture operation.
• Sweep time is filled in from the sweep file, and can not be changed.
• Capture time sets the length of the recorded signals in seconds. It should be at least
equal to the sum of sweep time, audio latency, expected IR length time and some safety
margin.
Aliki allows to automate sequences of measurements using the same paramters, for example
when measuring the polar diagram of a speaker. This feature can also be used to record a set
of IR using a sequence of different sources. In this case the output switching must be done
manually (this will be automated as well in later versions).
• Iterations is the nunber of automatically sequenced measurments. Each of them will
correspond to a new section in the capture files.
• Idle time is the time in seconds between two measurements, i.e. the time required to
rotate a speaker, move a microphone, or whatever. Nothing will be recorded during this
time. At the end of the idle time the next sweep playback and the recording of the next
section of the capture files will start simultaneously.
• Trigger command can be any external program. It is executed at the start of the idle
time after each measurement and can be used for example to trigger a rotating table to
move to the next position. Clicking the Trig button will also execute this command.
4.3
Performing the measurments
The buttons in the lower right corner control the actual measurment.
A Test signal (an FM modulated sine) can be output to adjust levels before a measurement.
The test signal is output at the same level as set for the sweep and should result in a sane level
(-15 to -5 dB) returning on the inputs. There’s no reason to try an maximise levels, as the S/N
of the final IR measurement will be much better than that of your hardware.
The measurement is started using the Start button. The Trig button will flash at the start of the
idle time after each measurement. If you perform an automatic sequence using multiple sources
this is the right time to switch them.
The measurement sequence is finished when the Start button lights again. It can be terminated
at any time using Stop. In that case any partially recorded capture files will be deleted.
c Fons Adriaensen
10
ζ
Aliki
5
Deconvolution of captured sweeps
Use Load in the main window to load a file from the capture directory, then click Convol in
the main window to switch to the convolution window.
Figure 6: Convolution controls
Start time and End time are relative to the position where the impulse response would start
without any audio latency and delay. A negative Start time can be used when using a log
sweep to see the harmonic distortion of the system being tested - each harmonic will show up
as a separte IR at some place in negative time depending on the sweep rate. The End time
should be set in function of the expected impulse length. A good value is the expected reverb
time plus two or three seconds.
The Sweep file should of course be the same one as used during the measurement.
When all parameters are set, click Apply to start the deconvolution on the current section. This
may take a few seconds. The result will be displayed (and you can zoom in, scroll etc.) but not
yet stored. For a multi-section file, moving between sections will start the deconvolution of the
next or previous section. Again this may take some time.
When the parameters seem OK, you can
• Save the result for the current section using Save section. The file will be stored in the
impresp of the session, and you remain in the convolution window.
• Apply the same parameters to all sections and save the result in a single file using Apply
to all. It is not necessary to have moved through all sections before as everything will
be recomputed anyway. The resulting file is stored in the impresp subdirectory of the
session, and also becomes the currently loaded file.
Clicking Cancel will return to the main window without storing anything. The capture file
remains the current file in that case.
c Fons Adriaensen
11
ζ
Aliki
6
Editing impulse responses
This function is used to prepare IR for use in e.g. a convolution reverb. Enter this window by
clicking Edit with an IR file from the impresp directory loaded.
Figure 7: Editing controls
Four operations are provided. All of them are non-destructive — the results are saved to a new
file and Aliki will not allow you to overwrite the current one. They can be also be repeated any
number of times (restarting from the original data each time) and can be undone by R-clicking
the corresponding button.
• Setting the reference time. This will not normally be necessary, but is provided to be
used while preparing files for another application which needs this. It can also be useful
just to align the time axis while examining an IR.
Put a single marker at the place that should correspond to ’zero’ time (zoom in to set
it precisely). L-click Time Ref to move the time axis so it becomes zero at the marker
position. Aliki files retain this information.
• Amplitude normalisation. Put a single marker on the direct sound peak of the IR
(zoom in to set it precisely). L-click Normalise to normalise to unit energy in a small
region around this point.
• Trimming the start. This normally used to remove any debris before the start of the
IR, or to remove the direct sound or even some early reflections. Put two markers at the
times where you want a raised cosine fade-in to start and reach unity gain respectively,
then L-click Trim start.
• Trimming the end. This normally used to remove the noise tail at the end of an IR.
Put two markers at the times where you want a raised cosine fade-out to start and reach
zero gain respectively, then L-click Trim end.
When moving between sections of a multi-section file the currently active settings are apllied to
each newly displayed section.
When the parameters seem OK, you can
c Fons Adriaensen
12
ζ
Aliki
• Save the result for the current section using Save section. The file will be stored in the
edited of the session, and you remain in the edit window.
• Apply the same parameters to all sections and save the result in a single file using Apply
to all. It is not necessary to have moved through all sections before as everything will be
recomputed anyway. The resulting file is stored in the edited subdirectory of the session,
and also becomes the currently loaded file.
Clicking Cancel will return to the main window without storing anything.
c Fons Adriaensen
13
ζ
Aliki
7
7.1
Importing and exporting
Importing sound files
This is not implemented in the current version.
7.2
Exporting .ald files
Figure 8: The export window
The currently loaded file can be exported in different ways. The following options are available
in the export dialog (fig.8).
The sample format can be either 16-bit, 24-bit or floating point (32-bit). This applies to all file
types.
The file type can be a raw headerless file (.pcm), or WAV, WAVEX or Amisonics WAVEX (all
.wav). The first two are always single channel — a separate file will be created for each channel.
The two WAVEX types combine all channels into a single file.
You can choose to export all channels, or only those currently selected.
Finally you can export either the currently displayed section only, or all sections into a single
file, or all sections to separate files.
Select the options you require, and type a base name into the filename input field. The base
name will be extended if necessary by parts indicating the section and / or channel, and by the
correct extension. Finally click Export. Exported files are placed into the session directory.
c Fons Adriaensen
14