1
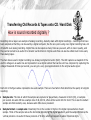
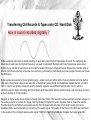
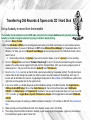
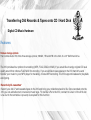
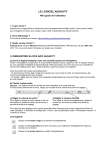
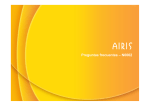
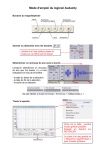
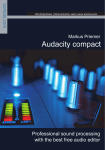
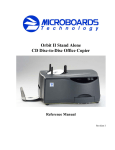
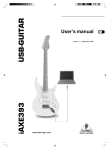
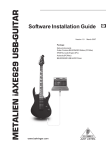
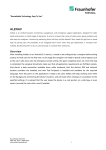
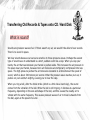
Transferring Old Records & Tapes onto CD / Hard Disk
What is sound?
Sounds are pressure waves of air. If there wasn't any air, we wouldn't be able to hear sounds.
There's no sound in space.
We hear sounds because our ears are sensitive to these pressure waves. Perhaps the easiest
type of sound wave to understand is a short, sudden event like a clap. When you clap your
hands, the air that was between your hands is pushed aside. This increases the air pressure in
the space near your hands, because more air molecules are temporarily compressed into less
space. The high pressure pushes the air molecules outwards in all directions at the speed of
sound, which is about 340 meters per second. When the pressure wave reaches your ear, it
pushes on your eardrum slightly, causing you to hear the clap.
When you ring a bell, after the initial strike (which is a little like a hand clap), the sound
comes from the vibration of the bell. While the bell is still ringing, it vibrates at a particular
frequency, depending on the size and shape of the bell, and this causes the nearby air to
vibrate with the same frequency. This causes pressure waves of air to travel outwards from
the bell, again at the speed of sound.
!
!
Transferring Old Records & Tapes onto CD / Hard Disk
How is sound recorded?
A microphone consists of a small membrane that is free to vibrate, along with a
mechanism that translates movements of the membrane into electrical signals.
(The exact electrical mechanism varies depending on the type of microphone.)
So acoustical waves are translated into electrical waves by the microphone.
Typically, higher pressure corresponds to higher voltage, and vice versa.
A tape recorder translates the waveform yet again - this time from an electrical
signal on a wire, to a magnetic signal on a tape. When you play a tape, the
process gets performed in reverse, with the magnetic signal transforming into
an electrical signal, and the electrical signal causing a speaker to vibrate,
usually using an electromagnet.
Transferring Old Records & Tapes onto CD / Hard Disk
How is sound recorded digitally ?
Recording onto a tape is an example of analog recording. Audacity deals with digital recordings - recordings that have
been sampled so that they can be used by a digital computer, like the one you're using now. Digital recording has a lot
of benefits over analog recording. Digital files can be copied as many times as you want, with no loss in quality, and
they can be burned to an audio CD or shared via the Internet. Digital audio files can also be edited much more easily
than analog tapes.
The main device used in digital recording is a Analog-to-Digital Converter (ADC). The ADC captures a snapshot of the
electric voltage on an audio line and represents it as a digital number that can be sent to a computer. By capturing the
voltage thousands of times per second, you can get a very good approximation to the original audio signal:
!
!
!
Each dot in the figure above represents one audio sample. There are two factors that determine the quality of a digital
recording:
•
Sample rate: The rate at which the samples are captured or played back, measured in Hertz (Hz), or samples
per second. An audio CD has a sample rate of 44,100 Hz, often written as 44 KHz for short. This is also the default
sample rate that Audacity uses, because audio CDs are so prevalent.
•
Sample format or sample size: Essentially this is the number of digits in the digital representation of each
sample. Think of the sample rate as the horizontal precision of the digital waveform, and the sample format as the
vertical precision. An audio CD has a precision of 16 bits, which corresponds to about 5 decimal digits.
Transferring Old Records & Tapes onto CD / Hard Disk
How is sound recorded digitally ?
Higher sampling rates allow a digital recording to accurately record higher frequencies of sound. The sampling rate
should be at least twice the highest frequency you want to represent. Humans can't hear frequencies above about
20,000 Hz, so 44,100 Hz was chosen as the rate for audio CDs to just include all human frequencies. Sample rates of
96 and 192 KHz are starting to become more common, particularly in DVD-Audio, but many people honestly can't hear
the difference.
Higher sample sizes allow for more dynamic range - louder louds and softer softs. If you are familiar with the decibel
(dB) scale, the dynamic range on an audio CD is theoretically about 90 dB, but realistically signals that are -24 dB or
more in volume are greatly reduced in quality. Audacity supports two additional sample sizes: 24-bit, which is
commonly used in digital recording, and 32-bit float, which has almost infinite dynamic range, and only takes up twice
as much storage as 16-bit samples.
Playback of digital audio uses a Digital-to-Analog Converter (DAC). This takes the sample and sets a certain voltage on
the analog outputs to recreate the signal, that the Analog-to-Digital Converter originally took to create the sample.
The DAC does this as faithfully as possible and the first CD players did only that, which didn't sound good at all.
Nowadays DACs use Oversampling to smooth out the audio signal. The quality of the filters in the DAC also contribute
to the quality of the recreated analog audio signal. The filter is part of a multitude of stages that make up a DAC.
Transferring Old Records & Tapes onto CD / Hard Disk
How does audio get digitized on your computer?
Your computer has a soundcard - it could be a separate card, like a SoundBlaster,
or it could be built-in to your computer. Either way, your soundcard comes with an
Analog-to-Digital Converter (ADC) for recording, and a Digital-to-Analog Converter
(DAC) for playing audio. Your operating system (Windows, Mac OS X, Linux, etc.)
talks to the sound card to actually handle the recording and playback, and Audacity
talks to your operating system so that you can capture sounds to a file, edit them,
and mix multiple tracks while playing.
Transferring Old Records & Tapes onto CD / Hard Disk
Standard file formats for PCM audio
There are two main types of audio files on a computer:
•
PCM stands for Pulse Code Modulation. This is just a fancy name for the technique described
above, where each number in the digital audio file represents exactly one sample in the
waveform. Common examples of PCM files are WAV files, AIFF files, and
Sound Designer II files. Audacity supports WAV, AIFF, and many other PCM files.
•
The other type is compressed files. Earlier formats used logarithmic encodings to squeeze
more dynamic range out of fewer bits for each sample, like the u-law or a-law encoding in
the Sun AU format. Modern compressed audio files use sophisticated psychoacoustics
algorithms to represent the essential frequencies of the audio signal in far less space.
Examples include MP3 (MPEG I, layer 3), Ogg Vorbis, and WMA (Windows Media Audio).
Audacity supports MP3 and Ogg Vorbis, but not the proprietary WMA format or the MPEG4
format (AAC) used by Apple's iTunes.
Transferring Old Records & Tapes onto CD / Hard Disk
Audacity Software
Audacity® is free, open source, cross-platform software for recording and editing sounds.!
!
Audacity is available for Windows®, Mac®, GNU/Linux® and other operating systems.!
About Audacity!
Audacity is a free, easy-to-use, multi-track audio editor and recorder for Windows, Mac OS X, GNU/Linux and other operating
systems. The interface is translated into many languages. You can use Audacity to:!
!
!
!
!
!
!
•!
•!
•!
•!
•!
•!
Record live audio.!
Record computer playback on any Windows Vista or later machine.!
Convert tapes and records into digital recordings or CDs.!
Edit WAV, AIFF, FLAC, MP2, MP3 or Ogg Vorbis sound files.!
Cut, copy, splice or mix sounds together.!
Change the speed or pitch of a recording.!
Transferring Old Records & Tapes onto CD / Hard Disk
Audacity Software
Recording!
Audacity can record live audio through a microphone or mixer, or digitize recordings from cassette tapes, records or minidiscs.
With some sound cards, and on any Windows Vista, Windows 7 or Windows 8 machine, Audacity can also capture streaming
audio.!
! •!
! •!
! •!
! •!
!
!
!
!
•!
•!
•!
•!
! •!
! •!
Device Toolbar manages multiple input and output devices.!
Level meters can monitor volume levels before, during and after recording. Clipping can be displayed in the waveform or
in a label track.!
Record from microphone, line input, USB/Firewire devices and others.!
Record computer playback on Windows Vista and later by choosing "Windows WASAPI" host in Device Toolbar then a
"loopback" input.!
Timer Record and Sound Activated Recording features.!
Dub over existing tracks to create multi-track recordings.!
Record at very low latencies on supported devices on Linux by using Audacity with JACK.!
Record at sample rates up to 192,000 Hz (subject to appropriate hardware and host selection). Up to 384,000 Hz is
supported for appropriate high-resolution devices on Mac OS X and Linux.!
Record at 24-bit depth on Windows (using Windows WASAPI host), Mac OS X or Linux (using ALSA or JACK host).!
Record multiple channels at once (subject to appropriate hardware).
Transferring Old Records & Tapes onto CD / Hard Disk
Audacity Software
Import and Export!
Import sound files, edit them, and combine them with other files or new recordings. Export your recordings in many different
file formats, including multiple files at once.!
! •!
! •!
!
!
!
!
!
!
•!
•!
•!
•!
•!
•!
Import and export WAV, AIFF, AU, FLAC and Ogg Vorbis files.!
Fast "On-Demand" import of WAV or AIFF files (letting you start work with the files almost immediately) if read directly
from source.!
Import and export all formats supported by libsndfile such as GSM 6.10, 32-bit and 64-bit float WAV and U/A-Law.!
Import MPEG audio (including MP2 and MP3 files) using libmad.!
Import raw (headerless) audio files using the "Import Raw" command.!
Create WAV or AIFF files suitable for burning to audio CD.!
Export MP3 files with the optional LAME encoder library.!
Import and export AC3, M4A/M4R (AAC) and WMA with the optional FFmpeg library (this also supports import of audio
from video files).
Transferring Old Records & Tapes onto CD / Hard Disk
Audacity Software
Sound Quality!
! •!
! •!
! •!
Supports 16-bit, 24-bit and 32-bit (floating point) samples (the latter preserves samples in excess of full scale).!
Sample rates and formats are converted using high-quality resampling and dithering.!
Tracks with different sample rates or formats are converted automatically in real time.!
Editing!
!
!
!
!
!
!
!
•!
•!
•!
•!
•!
•!
•!
Easy editing with Cut, Copy, Paste and Delete.!
Unlimited sequential Undo (and Redo) to go back any number of steps.!
Edit and mix large numbers of tracks.!
Multiple clips are allowed per track.!
Label tracks with selectable Sync-Lock Tracks feature for keeping tracks and labels synchronized.!
Draw Tool to alter individual sample points.!
Envelope Tool to fade the volume up or down smoothly.!
Effects!
!
!
!
!
!
!
•!
•!
•!
•!
•!
•!
Change the pitch without altering the tempo (or vice-versa).!
Remove static, hiss, hum or other constant background noises.!
Alter frequencies with Equalization, Bass and Treble, High/Low Pass and Notch Filter effects.!
Adjust volume with Compressor, Amplify, Normalize, Fade In/Fade Out and Adjustable Fade effects.!
Remove Vocals from suitable stereo tracks.!
Create voice-overs for podcasts or DJ sets using Auto Duck effect.
Transferring Old Records & Tapes onto CD / Hard Disk
Audacity Software
!
Recording with Audacity
!
Audacity running on Windows
Transferring Old Records & Tapes onto CD / Hard Disk
Set up Audacity to record from the turntable!
The turntable must be switched on and its USB cable connected to the computer before launching Audacity, because
Audacity is not able to recognise a device if you plug it in while it's already running.!
! 1.! Go to the Device Toolbar!
!
1.!Select the USB Audio CODEC as the recording device and select your inbuilt sound device or sound card by name as
the playback device. If you are on Windows, do NOT choose Microsoft SoundMapper for the playback device. On
Windows 7 or Vista, you can try Microsoft SoundMapper as the recording device if the "USB Audio Codec" choice
doesn't record.!
!
2.! Set recording channels to 2 (stereo) if you want to record in stereo, or set to 1 (mono) for mono recording.!
! 2.! Go to the Transport Menu and check "Software Playthrough" to be "on" to hear the turntable through the computer
speakers; this setting can be toggled on/off easily from the Transport Menu. (Or if you are using a legacy version of
Audacity prior to 1.3.8, you can do this from the Audio I/O tab of Preferences)!
! 3.! Go to the Mixer Toolbar and turn up the left-hand output volume slider (by the speaker symbol). The right-hand input
volume slider (by the microphone symbol) can often be used to vary the loudness of the recording, but it may not
function with all turntables. If it does not, try adjusting the input level on the turntable or in the Windows system mixer
(right-click over the speaker icon by the system clock).!
! 4.! If you are on a Mac, you should always set up the turntable by clicking on the Mac hard disk, then Applications >
Utilities > Audio-MIDI Setup. Click on the Audio Devices tab, then on the left-hand side, select USB Audio
CODEC in the Default Input and Properties for dropdowns. You can vary the input level here, too. If you are on OS
X 10.1 or earlier, go to Apple Menu > System Preferences > Sound, click the Input button and select USB Audio
CODEC.
An alternative procedure for setting up a USB input device in Audacity 1.3.12 and later on Mac OS X is documented
here.!
! 5.! Make sure that your Project Rate bottom left of the Audacity screen is set to 44 100 Hz.!
! 6.! Then simply press the red Record button in Audacity to start recording from the turntable - ignore any instructions in
the manufacturer's guide to select "stereo mix",.
Transferring Old Records & Tapes onto CD / Hard Disk
Saving recordings as MP3
How do I download and install the LAME MP3 encoder?!
Because of software patents, we cannot distribute MP3 encoding software ourselves. Follow these instructions to use the free
LAME encoder to export MP3 files with Audacity.!
Windows!
! 1.! Go to the external LAME download page.!
! 2.! Under "For Audacity on Windows", left-click the link "Lame v3.99.3 for Windows.exe" and save the file anywhere on
your computer. Do not right-click the link to the .exe file.!
! 3.! Double-click "Lame v3.99.3 for Windows.exe" to launch it (you can safely ignore any warnings that the "publisher
could not be verified").!
! 4.! Follow the "Setup" instructions to install LAME for Audacity. Do not change the offered destination location of "C:
\Program Files\Lame for Audacity".!
! 5.! The first time you use the "Export as MP3" command, Audacity will ask for the location of "lame_enc.dll". Navigate to
"C:\Program Files\Lame for Audacity", select "lame_enc.dll", then click "Open" and "OK".!
! 6.! If you prefer the Zip option for the LAME download, save the zip file to anywhere on your computer, extract
"lame_enc.dll" to any location, then show Audacity where to find it as in Step 5 above.!
Transferring Old Records & Tapes onto CD / Hard Disk
Getting Started!
.!
Learn how to:!
! ▪! import and play an existing audio file!
! ▪! record your voice, guitar, standard turntable or tape deck!
! ▪! record with a USB device (USB turntable, USB tape deck or USB sound card)!
! ▪! edit sounds, including applying effects!
! ▪! save or open an Audacity project!
! ▪! export to an MP3 or other audio file!
! ▪! burn to a CD!
Transferring Old Records & Tapes onto CD / Hard Disk
Record!
!
!
!
To record: Set the recording (input) device, monitor then adjust the input level, then press the red Record button.!
Correct adjustment of level before recording is essential to avoid noise or distortion.!
! 1.! Set the Recording Device either in the Devices section of Preferences or in Device Toolbar!
! 2.! Click in the right-hand section of Meter Toolbar to start monitoring as in the following image:
! 3.! Singing or playing the loudest part of what you are recording, adjust the input level using the right-hand slider on Mixer Toolbar: so that the moving Meter Toolbar bars do not get too close to the right-hand edge of the meter!
! 4.! Optionally, turn on Transport > Software Playthough (on/off) (so it has a check mark) to hear what the recording will sound like!
! 5.! Press the red Record button to record for real.
Transferring Old Records & Tapes onto CD / Hard Disk
USB Recording!
!
!
This is a very basic guide to recording with USB devices. More detailed information can be found at Recording with USB
turntables or USB cassette decks.!
! ▪! Connect the USB cable of the turntable, or tapedeck, to the computer, then launch Audacity. If Audacity was already
running when you connected the cable, restart Audacity or choose Transport > Rescan Audio Devices.!
! ▪! Use the Device Toolbar to set the input (recording) and output (playback) devices and set the channels to "2(stereo)
Input Channels":!
!
! !
In this example on Windows 7, the output is set to the named speakers of the built-in computer sound device, the input
is set to the USB turntable (usually called or including the phrase "USB Audio CODEC") and recording channels are set
to stereo. Windows Vista/7 calls most USB external devices "microphones", but Windows XP and earlier do not. Some
higher-end USB recording interfaces may appear as their explicit manufacturer's name.
Transferring Old Records & Tapes onto CD / Hard Disk
Saving!
!
!
!
! ▪!
! ▪!
To return later to your unfinished work in Audacity with all tracks and edits as you left them, Save an Audacity project.!
To play your current work in other media programs or send it to others, you need to Export an audio file such as WAV or
MP3.!
Save!
There are two main commands for saving projects:!
! ▪! File > Save Project saves an .aup project file and a _data folder containing the actual audio.!
! ▪! File > Save Project As... is for saving an empty project. It also lets you save an existing Project with a new name.!
This saves or updates the .aup file and _data folder. Saving a project lets you save unfinished work and re-open it later in
Audacity exactly as it was and (with the exception of the undo history), with all edits and recorded/imported tracks preserved. As
with saving any type of file, certain characters cannot be used in the name of the .aup file if they are reserved for the operating
system; see our information on forbidden characters.!
When saving an Audacity project it is normally easiest to use the File > Save Project command, which has a default shortcut of
CTRL + S (or COMMAND + S on Mac). If you save a project again having made further changes to it, "Save Project" then
updates the .aup file and _data folder silently without bothering you with prompts.!
If the project does not have any unsaved changes (for example, if the project is empty or you just saved it), "Save Project" will be
grayed out. In that case, use File > Save Project As... instead. "Save Project As" is the safe and recommended way to make a
copy of a project with a new name or in a different location. This could serve either as a single backup copy of the project, or as
one of several incremental copies of the project in the state it had at a particular date and time.
Transferring Old Records & Tapes onto CD / Hard Disk
Export!
!
!
!
To hear your work in other media programs, export it to an audio file.!
Audacity as shipped can export to a number of common audio formats including WAV, AIFF, Ogg Vorbis, FLAC and MP2.!
To export as MP3, the optional Lame MP3 encoder must be installed.!
You can install the optional FFmpeg library to export to many more audio formats including AC3, AMR(NB), M4A, MP4 and WMA.!
! ▪!
To export, choose File > Export... then choose the file format you want to export to in the "Save as type" drop-down. To burn a
CD for standalone CD players, choose WAV or AIFF.!
! ▪! Use File > Export Selection... to export only a selected area of audio.!
! ▪! Use File > Export Multiple... to export multiple files at the same time, either one for each audio track, or one for each labeled
area in a single track.!
!
▪! Tracks > Add Label at Selection lets you split the tracks from an album for multiple export as separate files.!
See File Export Dialog for more help with exporting.!
Export Formats!
There are a number of audio formats that Audacity, as shipped, can export to; others can be added with additional software.!
! ▪!
! ▪!
As shipped available exports include WAV, AIFF, Ogg Vorbis, FLAC and MP2.!
To export as MP3, the optional Lame MP3 encoder must be installed.
Transferring Old Records & Tapes onto CD / Hard Disk
Audacity
BurnCD!
!
!
!
To burn your work to an audio CD for standalone CD players, first export it as WAV or AIFF.!
The exported WAV or AIFF file should be:!
! ▪! stereo!
! ▪! 44100 Hz (set at Project Rate at bottom left of the project window)!
! ▪! 16-bit (chosen using the "Save as type" menu in the File Export Dialog ).!
These are Audacity's default settings, so normally you will not need to change these before exporting.!
Burn the exported file to an "audio CD" - not a "data CD" or "MP3 CD" - with a CD burning program like iTunes or Windows Media
Player.!
For more help, see Burning music files to a CD.!
Transferring Old Records & Tapes onto CD / Hard Disk
Other Useful Digital Music Software
As a follow up to some of the questions asked, here are some tools to supplement music file management. (You may
find that Windows Media Player already does what you need.)
!
They are all free software.
!
1. If you want to RIP a CD to your harddisk then try one of these. They will automatically insert the CD metadata, by
sending a sample to a free database of music. If possible this data will be entered into your digital music files.
!
Foobar2000 - http://www.foobar2000.org/ - great for Windows, has most functions.
RipperX - http://sourceforge.net/projects/ripperx/ - my favourite simple audio ripper - Linux only.
Handbrake - http://handbrake.fr/ - audio and video ripper that runs on all platforms, but more complex.
!
2. If you ripped your music offline or your track data was not found, you may need to add or edit the data afterwards.
!
EasyTag - https://wiki.gnome.org/Apps/EasyTAG/ This uses FreeDB, Musicbrainz and GnuDB to look up Artists, Titles
and Albums and enter this info into the music file metadata.
MusicBrainz - http://musicbrainz.org/doc/MusicBrainz_Picard - MusicBrainz own tool.
MP3Tag - http://www.mp3tag.de/en/ - lays everything out in a spreadsheet, so you can change large numbers of fields
simultaneously.
Transferring Old Records & Tapes onto CD / Hard Disk
Digital CD Music Hardware
There are a few companies which are offering a CD Storage and Music Streamer
I use one called Cocktail Audio X10.
!
Details
can be found here: http://sygnifi.co.uk/products/cocktail-audio-x10
CD Storage up to 2TB
Music streamer
Internet Radio* Optional Wi-Fi Dongle required
!
High speed front loading CD drive
Built-in high quality 60W amplifier
Stand-alone or connect to an existing system
!
Easy set-up with the 3.5” TFT colour LCD Screen
Connect the X10 to your home network and the
internet via Wi-Fi or Ethernet
!
Control with remote control, Web UI or UPnP smartphone apps
High resolution recording WAV / FLAC Support for internet streaming services
!
Includes: Cocktail Audio X10 Black / White + your choice of storage AC/DC Mains Power Adapter, Remote Control + 2 AA Batteries User Manual, USB cable for PC connection
Transferring Old Records & Tapes onto CD / Hard Disk
Digital CD Music Hardware
Features:
!
Various storage options
The Cocktail Audio X10 offers three storage options; 500GB, 1TB and 2TB in the form of a 3.5” SATA hard drive.
!
The X10 provides four options for encoding: (MP3, FLAC,OGG or WAV). If you would like to enjoy original CD level
quality sound then choose FLAC/WAV for encoding. If you would like to save space on the X10 hard drive and
transfer your music to your MP3 player for travelling, choose MP3 encoding. The X10 supports lossless for playback
and ripping.
Record vinyl & cassettes*
Record your old LP and cassette tapes to the X10 and bring your collections back to life. Once recorded onto the
X10 you can add album art covers and music tags. *To transfer LPs to the X10, connect to Line In of the X10 and
Line-Out to the turntable. A pre-amp is required for this function