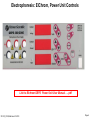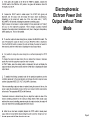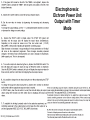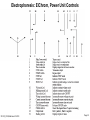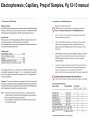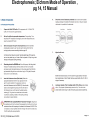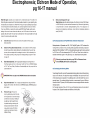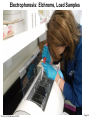
1
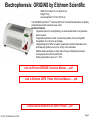
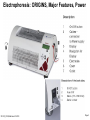
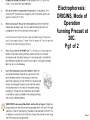
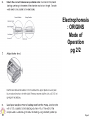
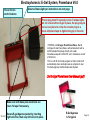
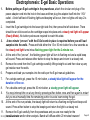
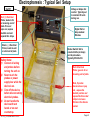
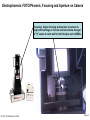
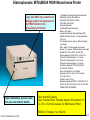
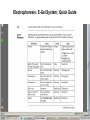
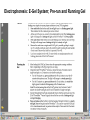
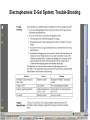
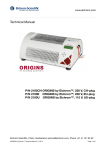
E-Gel Powerbase FOTO/Phoresis Fotodyne wThermal Printer E-Gel Agarose 1.2% typical ElectroPhoresis Detect Pictures to Jump to that Instrument Elchrom Origins Link to Power Supply and standard cell Electrophoresis SOP Cambrex FlashGel (ref) Electroblotter @BRDG Prepared by: Bob Morrison Transilluminator STLCC_CPLS;Morrison 4/1/2013 FVCC, Instrumentation Specialist Original Sep 2008, Rev Apr 2012 Page 1 Electrophoresis: ORIGINS by Elchrom Scientific Width 55 cm Depth 41 cm Height 22 cm Weight 18 kg Gel compartment D 10.8 x W 27.8 cm The ORIGINS by ElchromTM comprises THE most cost-effective alternative to capillary electrophoresis: better results for lower costs! Technical Features: Integrated system for cooling/heating: no external water bath nor temperature probe required Integrated temperature control: constant temperature of the running buffer independent of running time and voltage Integrated pump for buffer circulation: guarantees constant temperature and eliminates pH gradients even in the vicinity of the electrodes Parallel double-electrodes on either side of the gel compartment provide a homogeneous and uniform electric field. Working temperature range: 4°C - 55°C Link to Elchrom ORIGINS Technical Manual …. pdf Link to Elchrom GEPS Power Unit User Manual …. pdf Link to Elchrom Starter Kits for 2100U (110volt) …. pdf STLCC_CPLS;Morrison 4/1/2013 Page 2 Electrophoresis: ORIGINS, Major Features, Power STLCC_CPLS;Morrison 4/1/2013 Page 3 Electrophoresis: ORIGINS, Mode of Operation Running Precast at 20C. Pg1 of 2 STLCC_CPLS;Morrison 4/1/2013 Page 4 Electrophoresis : ORIGINS Mode of Operation pg 2/2 STLCC_CPLS;Morrison 4/1/2013 Page 5 Electrophoresis: ElChrom, Power Unit Controls Link to Elchrom GEPS Power Unit User Manual …. pdf STLCC_CPLS;Morrison 4/1/2013 Page 6 Electrophoresis: ElChrom, Power Unit Controls STLCC_CPLS;Morrison 4/1/2013 Page 7 Electrophoresis: Elchrom Power Unit Output without Timer Mode STLCC_CPLS;Morrison 4/1/2013 Page 8 Electrophoresis: Elchrom Power Unit Output with Timer Mode STLCC_CPLS;Morrison 4/1/2013 Page 9 Electrophoresis: ElChrom, Power Unit Controls STLCC_CPLS;Morrison 4/1/2013 Page 10 Electrophoresis; Elchrom, Prep of Precast Gels pg 10-11 of manual STLCC_CPLS;Morrison 4/1/2013 Page 11 Electrophoresis; Capillary, Prep of Samples, Pg 12-13 manual STLCC_CPLS;Morrison 4/1/2013 Page 12 Electrophoresis; Elchrom Mode of Operation , pg 14, 15 Manual STLCC_CPLS;Morrison 4/1/2013 Page 13 Electrophoresis; Elchrom Mode of Operation, pg 16-17 manual STLCC_CPLS;Morrison 4/1/2013 Page 14 Electrophoresis: Elchrome, Load Samples STLCC_CPLS;Morrison 4/1/2013 Page 15 Electrophoresis: ElChrom, Short Manual, GMS gels at 9C. Pg 1/2 STLCC_CPLS;Morrison 4/1/2013 Page 16 Electrophoresis: ElChrom, Short Manual, GMS gels at 9C. Pg 2/2 STLCC_CPLS;Morrison 4/1/2013 Page 17 Electrophoresis: Elchrom Gels, Distributor Jan2012 Sent: Monday, December 17, 2012 10:05 AM To: Taylor, Angela M.; BioLynx Sales; BioLynx Quotations Cc: Boedeker, Elizabeth D.; Hill, Jennifer S.; Barban, JoAnn L.; Norris, Richard J.; Morrison, Robert G.; Staerk, Becky K.; Gaetane Denechaud Subject: RE: Biolynx Inc - Set Up As New Vendor - W9 Needed Good morning Angi, MJS BioLynx Inc is now the Distributor of Elchrom products in the United States. We appreciate you contacting us. Our Accounting Dept. will be sending an email with the information required to set up an account to purchase from us. Please note the email address will be “@chromspec.com”, Chromatographic Specialties Inc. is our sister company. Our quotation dept., [email protected] will be happy to send you pricing when you are ready to proceed, please include the Elchrom part number if available. In addition, our sales dept., [email protected] will process your orders and send confirmation via email. Our team would be pleased to provide you with any information you require. For more information regarding MJS BioLynx Inc., visit our website at www.biolynx.ca I am a contact within the office to answer any questions you may have. Sincerely, Gaëtane Denechaud Gaëtane Denechaud Customer Service Coordinator - Coordinatrice du Service à la Clientèle MJS BioLynx Inc. www.biolynx.ca 1-613-498-2126 ext. 327 Toll Free in Canada - Sans Frais au Canada 1-888-593-5969 [email protected] STLCC_CPLS;Morrison 4/1/2013 Page 18 Electrophoresis: E-Gel System, Powerbase V4.0 15 and 30 min control buttons Observe Status light per instructions on next page Power plug must fit securely in slot. If status lights do not show with an E-gel in place, the plug may be loose. Use pliers to crimp the circular plug to a more elliptical shape to tighten the grip in the slot. ETHROG or Invitrogen E-Gel Power Base , Ver 4 Invitrogen E-Gel Power Base, self-contained unit with a AC/DC adaptor that plugs directly into a wall Powerbase outputs 8.8-9.0VDC and maintains a current of 38-42 mA 15 min. and 30 min timed program so that it will shut off automatically when electrophoresis is complete. E-Gel Pre-Cast Agarose Gel Electrophoresis System Link to Egel Powerbase User Manual (pdf) Make sure both base pole electrodes are clean. Scrape if necessary. Secure E-gel Agarose packet by inserting right side first, then snap left side into place. STLCC_CPLS;Morrison 4/1/2013 E-Gel Agarose 1.2% typical Page 19 Electrophoresis: E-gel Basic Operations 1. Before putting an E-gel cartridge in the powerbase, attach the circular end plug of the power adapter cord into the hole in the base and then plug the adapter itself into the 110V outlet. A brief self-test of flashing lights and beeping will occur, then no lights until step 2 is completed. 2. Insert the E-gel cartridge into the base right side first, then press the left side down. There should be an click sound as the cartridge snaps into place and a steady red light will appear (Ready Mode). No button pushes are required to reach this state. 3. A two minute “pre-run” with the E-Gel comb in place is required before you will load samples into the wells. Press and hold either the 15 or 30 min button for a few seconds as the steady red light turns into a flashing green light for the 2-minute run. 4. At the end of the “pre-run”, the flashing green light will turn to flashing red and a rapid beep will sound. Press and release either button to stop the beeps and return to a steady red. 5. Remove the comb from the E-gel cartridge carefully lifting straight out and then clear up any gel residue near the wells. 6. Prepare and load your samples into the wells per the E-gel manual guidelines. 7. For a single-comb gel, press the 15 min button, a steady blue light will appear for the duration of the run. 8. For a double-comb gel, press the 30 min button, a steady green light will appear. 9. You may interrupt the run at any time by pressing either button once and then again to restart but you must manually time the remaining portion to avoid overrunning the gel. 10. At the end of the run periods, the steady light will return to a flashing red light and beeps will sound. Press either button to stop the beeping and return the light to a steady red. 11. Remove the E-gel carefully from the powerbase and you are now ready for the Page 20 transilluminator STLCC_CPLS;Morrison 4/1/2013 and/or other analysis. Bands will diffuse within 20 minutes however! Electrophoresis: E-Gel Rig, BRDG, Ethrog Biotechnologies Purchase through Fisher Scientific: S11191ND Ethrog Biotechnologies No.:65-0017 A base and power supply together in one piece. Lighted display indicates when the two-minute pre-run is complete and when to load samples. See details Includes: Power cord and manual Required Accessories: Double-comb or single-comb E-Gels STLCC_CPLS;Morrison 4/1/2013 Page 21 Electrophoresis : Typical Gel Setup On/Off Red ( +) Electrical Probe; leads to far or receiving end of plate. If lose or pops out, expose metallic end and expand thin strips. Black ( – ) Electrical Probe; leads to well or start end of plate Safety Notes: 1) Connect all wiring and probes before turning the unit on. 2) Never touch the probes or power supply box while the device is on. 3) Turn off the device before disconnecting electrical probes. 4) Do not handle the device with wet hands or on wet countertop. STLCC_CPLS;Morrison 4/1/2013 Voltage or Amps dial control. Typically set to maintain 95 volts during run. Digital Volt or Amp readout Window Rocker Switch: Set to constant Volts (or Amps) per lab procedure. Typically 95 Volts DC. Red + Electrical Probe; goes to far or receiving end of plate. Note, if probes become lose or pop out , expose the metallic portion and expand the thin metal strips to increase friction in the female socket. Page 22 Electrophoresis; Typical Instructions and Guidelines 1. Place the cover on the electrophoresis unit, making sure to have the negative (black) electrode at the well end of the gel. 2. Insert the electrode cords into the proper inputs of the power supply. Set the power supply on ‘low’ and turn it on. Set the voltage at 90-95 volts. Check to make sure bubbles are forming in the buffer on the platinum wire electrodes along the ends of the gel box. Watch the gel closely for 2 – 5 minutes to make sure that the dye is migrating in the correct direction. 3. If you hear an audible alarm or any of small red lights (Fuse or >500mA) come on during the run, turn off the unit immediately and unplug. The audible alarm and overcurrent lights indicate potential breakdown of the gel mixture or higher than normal temperatures in the gel. For further information on Voltage, Current, and Resistance, see the following slides. 4. If the Gel Rig Electrode/probes pop out or become lose during the run. Turn off and unplug the Power Supply and remove each electrode. Inspect each electrode probe end by exposing the metallic portion. Use a sharp tool to “spring” the thin strips on the metallic probe ends to create a better grip in the power supply female sockets. 5. Allow the tracking dye to migrate 4-5 centimeters from the wells so that the molecular weight marker fragments separate sufficiently. 6. Turn off the power supply, unplug it, and disconnect the electrodes from it. Then remove the lid from the gel box. STLCC_CPLS;Morrison 4/1/2013 Page 23 Electrophoresis: Horizontal, Mini, Owl-Series, 400ML Mini-Gel System 400 ML Size 16 x 9.5 x 8 (65/16 x 33/4 x 35/32) 8 x 7 (35/32 x 23/4) Thermo Sci # B1A VWR # 27372-226 Mini-Gel systems have a small footprint and can run 5–34 samples (for 400 and 600mL systems) or 8–48 samples (for 800mL systems) on one gel. The buffer chamber features lane visualization strips, which are silkscreened on the platform to provide a clear view of sample wells. Lane markers and fluorescent rulers provide accurate fragment size determination of DNA when compared to known standards. Durable acrylic construction and research-quality components give the buffer chamber a long life. Platinum electrodes and gold-plated banana plugs are corrosion-protected, and electrode placement ensures a uniform electric field. Leak-resistant, gasketed ultraviolet transmission trays allow tape-free casting in the buffer chamber. The trays have two comb positions and allow DNA bands to be viewed on a transilluminator without removing the gel. Optional multiload UVT trays have 12 slots for multiple sample-running, and allow samples to be loaded directly from a 96-well plate into an agarose gel. This design is based on the fixed spacing required to accommodate multichannel pipets (at least eight channels) and 96-well plates. Heavy-duty, one-piece combs eliminate the need for comb assembly. The SuperSafe* safety lid eliminates the risk of accidental shock. System is supplied with a 0.91m (3') safety power cord, attached. STLCC_CPLS;Morrison 4/1/2013 Page 24 Electorphoresis: Agarose Gel Guidelines, Edvotek Kit Hotlink to Edvotek Guidelines for Gel Electrophoresis …. Pdf (24 pgs) STLCC_CPLS;Morrison 4/1/2013 Page 25 Electrophoresis: Phase-Lock Gel (PLG), Eppendorf Manual Hotlink to Eppendorf Phase-Lock Gel manual …. Pdf (24 pgs) STLCC_CPLS;Morrison 4/1/2013 Page 26 Electrophoresis: FOTO/Phoresis Operation 8.6 x 10.8 cm viewing surface UV Blocking Cover with interlocking safety switch and indicator light Perfect positioning of mini-gels for photodocumentation Notched acrylic viewing frame for holding standard Petri plate Two 9-watt, 300 nm bulbs Cooling fan Replacement Bulbs: 300 nm, 9 watt, 5-7/8" pin-to-pin (E11-2122) On/Off Interlock STLCC_CPLS;Morrison 4/1/2013 Page 27 Electrophoresis: Transilluminator-UVP-LM26 Transilluminator; UV; Benchtop; LM-26; 2UV; Single Intensity; 100-115V, 8w, Midrange; Wavelength 302/365nm, E-Ballast; Purple Base; Stainless Steel Filter Assembly; 21 x 26cm filter surface; w/UV blocking cover; 9.5D x 13.25W x 4.75&Pr Includes: UVG 5000 hour long-life filter and hinged UV blocking cover with adjustable height On/Off UV Blocking cover lid, detachable for cleaning Analog dial, set at 302 or 365nm Gel Cutter Tool: UVP85 0002 01 Ultra Violet Products No.:85-0002-01 STLCC_CPLS;Morrison 4/1/2013 Page 28 Electrophoresis: UV Transilluminator, BRDG, VWR# MINI UV TRANSILLUM TM-10 115V, 21476-040 Supplier UVP Transilluminator, Benchtop Model M-10E, 6W. Single intensity for detection of nucleic acids in all gel documentation applications. UVG* filter decreases solarization. UV blocking cover included. Wavelength: 302nm UV. Filter size: 10x10cm. 11.4Hx26Wx18.4Dcm. 115V, 60Hz. ETL, ETLc certified. On/Off UV Blocking cover lid, detachable for cleaning STLCC_CPLS;Morrison 4/1/2013 Analog dial, set at 302 or 365nm Page 29 Electrophoresis: FOTO/Phoresis Minivisionary System Simple, Inexpensive Thermal Prints—No Computer Needed MiniVisionary Workstations are designed to simply and rapidly document electrophoresis gels in both research and educational laboratories. Camera, Hood, and Filters - Receives power and commands from Minivisionary Controller - Sends video signal to Thermal Printer for copies These stand-alone CCD-based imaging systems allow the acquisition of very low light fluorescent gels. Inexpensive thermal prints can be produced for about 1/10 the price of conventional film with the touch of a button. Fotodyne* FOTO/Analyst* MiniVisionary FD62310 System Photodocumentation, FOTO/Analyst MiniVisionary Hood Mount System; CCD camera; Hood; Controller; Ethidium bromide/coomassie; blue/methylene blue filters; Thermal printer; Cable; Support frame; 120V 60Hz Minivisionary Controller -set # copies, then use this PRINT button - Automatically sends commands to the Thermal Printer Thermal Printer -Gets commands from controller (PC or Minivisionary) - Has options for brightness and multiple copies Link to Fotodyne Brochure on Minivisionary .. pdf STLCC_CPLS;Morrison 4/1/2013 Page 30 Electrophoresis: FOTO/Phoresis, Focusing and Aperture on Camera Focusing: Adjust focusing and aperture on camera to align with markings on the dial as shown below. A target of “8” seems to work well for the Fotodyne unit at BRDG. STLCC_CPLS;Morrison 4/1/2013 Page 31 Electrophoresis: MITSUBISHI P93W Monochrome Printer Copy: Use ONLY if you want to set Multiple copies from each press of the PRINT button on the Minivisionary Controller. Paper replacement, press to open door, see next slide for details. Print Method Thermal printing on thermal paper Dot Density 325 dpi (12.8 dots/mm) Resolution (NTSC)1280 x 500 dots (PAL)1280 x 600 normal Greyscale 256 levels Interface BNC (input and output) Memory 10 Frames 6 image sizes Normal, Side (landscape), MultiNormal, Multi-Side, Square (1:1) and expanded (x 0.5 to 2.0) Print Capacity Normal - Approx. 260 prints (paper save mode) Side - Approx. 150 prints (paper save mode) Square (1:1) - Approx. 195 prints (paper save mode) Normal Size 3.3 Sec. NTSC, 3.9 Sec. PAL Side (landsacpe) 8.4 Sec. NTSC, 8.4 Sec. PAL Picture Size (Normal) Approx. 3 x 4 inches Picture Size (Side) Approx. 4 x 5.2 inches Picture Size (Square) Approx. 4 x 4 inches Dual Power Supply AC 100-120V, 50/60 Hz AC 220-240V, 50/60 Hz Power Consumption 1.5 to 0.8 amps Dimensions (W x D x H) 6 x 9.8 x 3.5 inches 152 x 249 x 89 mm Weight 6.16 lbs. (2.8 kg) Regulatory Approvals UL2601-1; CAN.CSA C22.2 No.601-1(C-UL), FCC-Class A, TUV GS, TUV GM; CE Mark (EMC; 89/336/EEC) Fisher Scientific Catalog: Paper, Thermal Printer, Fotodyne; Approx. 260 prints/roll; 3 x 4 in. (7.6 x 10.2cm); Accessory for MiniVisionary Printer FD602012 Fotodyne No. :60-2012 STLCC_CPLS;Morrison 4/1/2013 Page 32 Electrophoresis: Thermal Printer Paper Replacement 1) Press to open printer door 2) Locate KP65HMce thermal paper in the cabinet above printer. Open foil and place in carousel with end at top of the roll 3) Insert new paper roll with shiny face on outside, whiter flat face on inside of roll 4) Extend paper 2cm outside of cut edge 5) Close door and resume printing STLCC_CPLS;Morrison 4/1/2013 Page 33 Electrophoresis: PhotoDoc-It System MIDSCI Cat #: 97-0274-04 PhotoDoc-It System, w/M-20V Transilluminator, 20x20cm, Variable Intensity STLCC_CPLS;Morrison 4/1/2013 DigiCam 60: Color digital camera 10.0 megapixels SD memory card (16 MB minimum) Power cord included (batteries not required) Darkroom: UV blocking viewer window Lightweight and compact Handles for easy transport of the hood Fits on top of the transilluminator Emission Filters EtBr Red 570-640nm Transilluminator The system is designed for use with UVP's Benchtop UV Transilluminators Select from 302nm UV or 2UV model with 302nm and 365nm Filter sizes: 20x20cm or 21x26cm M-20V and M-26V feature variable intensity settings Color Printer 300 x 300 resolution 4x6 in. prints USB connectivity 108 prints included Dimensions: 7 x 5 x 2.5 in. (178 x 127 x 64 mm) Combination Lock: 3 digit resettable combination 2 ft. cable Dimensions: 17H x 13.25W x 9.5D in. (432 x 337 x 241mm) Page 34 Electroblotter: Semi-Dry, Ellard HEB 2020 RELATED INFORMATION: VWR Catalog Website Owl Series Semi-Dry Electroblotters, Thermo Scientific Supplier: Thermo Scientific Rapidly transfer proteins or nucleic acid molecules from polyacrylamide or agarose gels to membranes. Reduce Southern, Northern, and Western blotting times to less than one hour. Solid plate platinum/titanium and stainless steel electrodes are highly conductive and allow transfers at low voltages without external cooling systems. Plate electrodes provide a uniform electric field for efficient, even transfers. The HEB 2020 accepts gels up to 20 cm x 20 cm. Completely enclosed lid and drip retaining base. For safety power leads must be disconnected to open unit. Color coded lid, base and leads prevents reversal of polarity. Solid construction of 3/16 inch red and 1/4 inch black acrylic, 3/8 inch laminated base with 1/4 inch thick graphite plates. Advantages of Horizontal Semi-Dry Electro-Blotter Transfer time, one hour at constant 0.8mA/square cm at room temperature. Increases capacity to six gels. Reduces Buffer Requirements to only 200 ml. No cooling required. Standard power supplies can be used. Safety Cover. STLCC_CPLS;Morrison 4/1/2013 Lid and attached power cord are safety-interlocked to prevent electric shock. Lid is designed to ensure proper orientation of electric field. Minimal buffer is needed for accurate transfers; the amount contained within the blotting filter paper is sufficient. Easy-to-turn knobs allow uniform pressure to be applied across the entire blotting stack for even transfers. Use electroblotter 27372-374 for mini- to full-size gels. Unit is designed specifically for the transfer from polyacrylamide or agarose gels to membranes. Electroblotter 27372-376 is ideal for the transfer of nucleic acids from sequencing gels to nylon membranes. Page 35 Electrophoresis: Cambrex FlashGel System Not in Service at present at FV The FlashGel™ System is the fastest way to separate DNA and the only way to watch DNA migration as it happens. This revolutionary new tool separates DNA in 2–7 minutes. Monitor gel runs right at the bench, without UV light. The highly sensitive system allows a 5X reduction in DNA amount saving both time and money. Get results in 5 minutes or less Watch DNA migrate at your bench, in real time without UV light Enjoy outstanding resolution and exquisite sensitivity The FlashGel™ System consists of enclosed, disposable, precast agarose gel cassettes and a combination of electrophoresis and transilluminator unit. FlashGel™ Cassettes contain precast, prestained agarose gels and buffer – no need for gel preparation, buffer addition or gel staining. The FlashGel™ Dock is an electrophoresis apparatus with a built-in transilluminator that provides both separation and detection. FlashGel™ Starter Kit includes: FlashGel Dock 9 FlashGel Cassettes 1 ml FlashGel Loading Dye 150 μl FlashGel DNA Marker See Brochure for details. STLCC_CPLS;Morrison 4/1/2013 Page 36 Electrophoresis: E-Gel System; Quick Guide STLCC_CPLS;Morrison 4/1/2013 Page 37 Electrophoresis: E-Gel System STLCC_CPLS;Morrison 4/1/2013 Page 38 Electrophoresis: E-Gel System; Basic Operations and Interrupt STLCC_CPLS;Morrison 4/1/2013 Page 39 Electrophoresis: E-Gel System; Pre-run and Running Gel STLCC_CPLS;Morrison 4/1/2013 Page 40 Electrophoresis: E-Gel System; Trouble-Shooting STLCC_CPLS;Morrison 4/1/2013 Page 41 Electrophoresis: E-Gel, BRDG, FlashGel/Lonza Lonza# DNA Starter Kit 57026 VWR# 95015-612 FlashGel systems consist of enclosed, disposable, precast agarose gel cassettes and a combination electrophoresis and transilluminator unit. FlashGel DNA system separates DNA in 2–7 minutes with outstanding resolution and allows monitoring of gel runs right at the bench without UV light. The highly sensitive system also allows 5–20 times the reduction in DNA levels, saving both time and money. FlashGel RNA system is a fast and sensitive tool for analysis of sample integrity and optimized for the unique requirements of RNA. Recommended for verification and analysis of total RNA, quick checks of native RNA, and checking RNA degradation and mRNA purity. The system provides results in 30 minutes or less while avoiding use of hazardous reagents and contaminating RNases. RNA fragments are analyzed on the FlashGel system using the same fast and simple procedure used for DNA. Separation is complete in less than eight minutes and RNA samples are ready for imaging within 10–20 minutes. FlashGel system for RNA is 5–20 times more sensitive than ethidium bromide gels and RNA <10ng per band are clearly detected, conserving precious RNA samples. FlashGel system for DNA recovery eliminates agarose gel preparation and delivers highly efficient recovery, free from inhibitors and UVinduced damage, in a simple 5–10 minute protocol. Go from sample loading to recovery in just five minutes. Recover samples directly from the cassette without band excision or purification. Visualize sample recovery without UV light and recover at 80–100% efficiency. FlashGel Dock is an electrophoresis apparatus with a built-in transilluminator that provides visualization of both DNA and RNA cassettes. The FlashGel camera captures gel images from the FlashGel system right at the benchtop with complete gel run and image capture in just five minutes. FlashGel cassettes contain precast, prestained agarose gels and buffer with no need for gel preparation, buffer addition, or gel staining. STLCC_CPLS;Morrison 4/1/2013 Ordering Information: DNA starter kit includes the FlashGel Dock; nine DNA cassettes with precast, prestained agarose gels (1.2% agarose) and buffer, in 12+1 well, single tier format; loading dye; and DNA marker (100bp–4kb). RNA starter kit includes nine RNase-free RNA cassettes that fully enclose the gel (1.2%), stain, and running buffer in 12+1 single tier format; formaldehyde sample buffer; RNA marker; and molecular biology water. Page 42 Electrophoresis: Power-Voltage-Current-Resistance What are the relations between Voltage, Current, Power and Resistance? Power (W) = Voltage (V) x Current (A) Resistance (Ω) = Voltage (V) / Current (A) How does a power supply react after pressing RUN? The internal generator will start building up the high voltage at the output terminals while voltage and current are constantly measured and power calculated. When one of the pre-set parameters is exceeded, the generator stops and will keep that parameter constant. How important is the resistance of an electrophoresis unit? The resistance of an electrophoresis unit depends on its size, gel thickness, amount of buffer, buffer conductivity and temperature. This resistance will normally decrease in time due to a slowly increasing temperature. Electrophoresis units which have a resistance below the minimum load resistance of a power supply will trigger an alarm and/or cause fuses to blow ! Read the output voltage and current during a run to measure the resistance and use above formula to calculate the value. How to keep a constant voltage during a run? Program the desired voltage and a higher current and power then the maximum expected values: Current > Voltage / Resistance Power > Voltage x Current How to keep a constant current during a run? Program the desired current and a higher voltage and power then the maximum expected values: Voltage > Current x Resistance Power > Voltage x Current How to keep a constant power during a run? Program the desired power and a higher voltage and current then the maximum expected values: Voltage > Current x Resistance Current > Voltage / Resistance STLCC_CPLS;Morrison 4/1/2013 Page 43