1
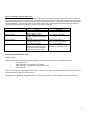
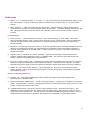
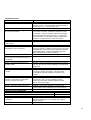
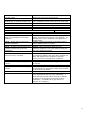
Galileo Bioscience User’s Manual Semi-Dry Electroblotters 91-1010-SD & 91-2020-SD WARNING THESE UNITS ARE CAPABLE OF DELIVERING POTENTIALLY LETHAL VOLTAGE WHEN CONNECTED TO A POWER SUPPLY AND ARE TO BE OPERATED ONLY BY QUALIFIED TECHNICALLY TRAINED PERSONNEL. PLEASE READ THE ENTIRE OPERATOR’S MANUAL THOROUGHLY BEFORE OPERATING THIS UNIT. Please check that the unit has been received complete and undamaged following shipment. Any Faults or losses must be notified to Galileo immediately, Galileo cannot accept responsibility for Goods returned without prior notification REFER TO PACKING LIST AND CHECK THAT ALL COMPONENTS AND ACCESSORIES WERE RECEIVED SAFETY PRECAUTIONS Please, read the User Manual carefully before using the Semi-Dry Electro-Blotting Unit. This manual contains important operating and safety information. Our electrophoresis units are designed to perform flawlessly for years in the most demanding laboratories. Please take the time to read the manual to ensure that you understand the safety and operating instructions to ensure the successful use of the unit. Alterations could cause serious injury to the user or the system. Only use the Galileo Semi-Dry Blotter with a ground-isolated external DC power supply. The power supply should be equipped with No Load or Open Circuit protection. Operating limits for the Galileo Semi-Dry Blotter are: Maximum Voltage Limit: 50 Volts DC Operating Temperature: 4-40˚C ∆ The Galileo Semi-Dry Blotter is designed to be operated with the lid in place. If the lid is removed, the electrical connection will be broken. Do not attempt to use the blotter without the lid in place. ∆ Always disconnect the unit from the power supply to avoid the risk of personal shock. Isolate the power supply from the main power source FIRST then disconnected the power cords. ∆ Running Conditions should not exceed the maximum operating voltage or current. ∆ Always disconnect the unit from the power supply when you want to move the unit or add running buffer. ∆ Use this apparatus only for its intended purpose as described in this manual. Do not use this product if the power cords are damaged or if any of its surfaces are cracked. Gemini Scientific, Inc, DBA Galileo Bioscience is not responsible for any injury or damage caused by operating this blotter in a manner not specified in this manual. 1 WARRANTY Gemini Scientific, Inc., DBA Galileo Bioscience guarantees that the Semi-Dry Electro-blotting System you have received has been thoroughly tested and meets its published specification. This warranty is valid for 36 months, only if the product and functions have been used according to the user manual. No liability is accepted for loss or damage arising from incorrect use. Gemini’s liability is limited to the repair or replacement of the unit or refund of the purchase price, at their option. Gemini Scientific is not liable for any consequential damages. Gemini Scientific reserves the right to alter the specifications of all Electrophoresis Systems without prior notice. This will enable us to implement developments as soon as they arise. If there has been shipping damage or incorrect items received please contact Gemini Scientific immediately. Please do not return any goods without receiving a Return Authorization. 2 Introduction The Galileo Insight™ Semi-Dry Electro-Blotter enables rapid and highly efficient transfer nucleic acid or protein fragments from polyacrylamide or agarose to blotting membranes such as nitrocellulose, nylon or PVDF membranes. Electroblotting of gels is more efficient than capillary methods – often taking less than an hour – and is suitable for “Southern”, northern or western blotting. Insight™ semi-dry electroblotter’s solid plate platinized titanium and stainless steel electrodes are highly conductive and allow transfer at low voltages without external cooling systems. The systems use large flat electrodes and consume significantly less transfer buffer without a loss in transfer efficiency or signal strength. Once proteins (nucleic acids) in a sample aliquot have been separated on a slab gel, the resulting bands may be transferred to a solid support membrane. The primary reason for this type of blot is one of localization and secondarily, concentration of discrete protein bands. Although many have used alternative cross linking agents such as DATD (N, N”dihydroxyethylene-bis Acrylamide) to allow for the accessibility of gel bound proteins, this still represents an impediment to radio enumeration due to the quenching by the gel matrix itself. The most common solid support membrane is nitrocellulose. A second type of membrane is PVDF (Polyvinylidene difloride), which is generally used when a transferred protein is to be sequenced, additionally; it has a 2x binding capacity. Also used for nucleic acid capture are Nylon membranes. In either case, the proteins are transferred from the gel to the matrix in an electric field perpendicular to the gel (initial running direction). Tris based buffers are employed in the transfer. Methanol and SDS are modifiers often used in protein transfer buffer. These components however are antithetical in their effects both in terms of movement and absorption. Methanol restricts protein movement from the gel but is often required to support the ionic nature of protein to nitrocellulose binding. SDS aids in protein elution, but can also inhibit binding of small molecular weight proteins (Mozdzanowski, J., High yield electroblotting, Electrophoresis, 1992, Vol 13., p.59-64). 3 Using Semi-Dry Electro-Blotter Units A. SAFETY PRECAUTIONS ∆ READ all instructions before using the unit ∆ Always turn off power supply FIRST then disconnect the power cords. Always have electrophoresis unit disconnected from their power supply before removing the safety cover. DO NOT operate electrophoresis units in metal trays. ∆ ∆ ∆ Acrylamide is a volatile, cumulative neurotoxin and suspected carcinogen. Wear effective protective clothing and follow recommended handling and disposal procedures. Polymerized gels contain some unpolymerized monomer. Handle with gloves only. DO NOT move the unit when it is running B. General Care & Cleaning WARNING !! Acrylic is not resistant to aromatic or halogenated hydrocarbons, ketones or esters. Organic solvents cause acrylic to “craze” or crack. Do not use ethanol or other organic solvents to clean your unit. Do not autoclave, bake or microwave your unit. ∆ ∆ ∆ Before using, clean and dry unit with DISTILLED WATER ONLY; dry parts with clean tissues or air dry.. Do not use abrasive creams or cleaning brushes on the electrodes A thorough rinse with Distilled Water is all that is generally required to clean the unit after use. A mild detergent may also be used. Acrylic can also be exposed to a mild bleach solution (10:1). Different Kinds of Blotting Western Blotting: a blotting method for proteins that uses specific antibodies attached to a particular protein to help identify it. It is often performed after SDS-PAGE or some other form of polyacrylamide gel electrophoresis. “Southern” Blotting: a method sometimes called hybridization because a radioactive probe is “hybridized” or attached to specific pieces of DNA. Northern Blotting: similar to Southern but the molecules involved are RNA Both Southern and northern blotting generally requires the DNA or RNA to first be separated out on an agarose gel. 4 Setting Up Power Supply: Blotting requires a power supply than can operate at 10 V. If an inappropriate power supply is used, the power supply may blow a fuse, shut itself off, display a no load or short load message or even have a short circuit. It is very important to be sure that the power supply you will be using will work with this device. Blotting Buffer: The most commonly used buffer for protein blotting from polyacrylamide gels is Towbin buffer. Small amount of buffer may be needed for equilibrating the gel and membrane prior to blotting. The buffer should be cooled to 4°C. Filter Paper: Whatman 3MM or equivalent is recommended. Large sheets or rolls of can be cut to size and used. Blotting Membrane: ● Nitrocellulose for western or Southern blotting ● PVDF (polyvinylidene difluoride) for western blotting ● Nylon for Southern or northern blotting See the following table for more details on each membrane. Membrane Properties Applications Pore size Reprobing Nitrocellulose Most widely used membrane for western blotting. Good binding capacity Proteins bind to the membrane due to hydrophobic interactions Protein binding capacity: 80 µg/cm² Higher binding capacity than nitrocellulose Strong hydrophobic character and solvent resistant Physically stronger than nitrocellulose Compatible with commonly used protein stains and immunodetection methods Protein binding capacity: 50-150 µg/cm² Microporous membrane modified with strongly basic charged groups Ideal for binding negatively charged biomolecules such as DNA and RNA Low background for enhanced resolution Membrane is formed around a non-woven polyester fiber matrix which confers high tensile strength, toughness, and flexibility Western transfer Amino acid analysis Solid phase assay systems 0.2 µm 0.45 µm No Protein Sequencing Western transfer Amino acid Analysis Solid phase assay systems 0.2 µm 0.45 µm Yes Southern and northern transfers Solid phase immobilization Dry chemistry test strips Enzyme immobilization Gene probe assays 0.45 µm Yes PVDF Nylon 5 RECIPES FOR BUFFERS 1X Tris-Borate EDTA Buffer (TBE) 1X or 0.5X TBE is used for agarose gel electrophoresis and semi-dry electroblotting of nucleic acids. Final 1X Composition: 89mM Tris Base 89mM Boric Acid 2mM Disodium EDTA pH 8.3 1X Towbin Buffer 1X Tris-glycine buffer (Towbin buffer minus the methanol) is used for agarose and polyacrylamide gel electrophoresis of nucleic acids. Towbin buffer (containing 20% methanol) is a commonly used buffer for semi-dry transfers. 0.025M Tris Base 0.192M Glycine 20% MeOH pH 8.3 1X Tris-Acetate EDTA Buffer (TAE) 1X TAE is used for agarose and polyacrylamide gel electrophoresis and semi-dry electroblotting of nucleic acids. Final 1X Composition: 0.04M Tris Acetate 0.001M Disodium EDTA pH 8.0 1X Tris-Glycine-SDS Buffer (TGS) 1X TGS Buffer is used for denaturing polyacrylamide gel electrophoresis of proteins. Final 1X Composition: 0.025M Tris Base 0.192M Glycine 0.1% SDS pH 8.3 1X Three Buffer System for Semi-Dry Electroblotting This buffer is used with the Galileo Semi-dry Electroblotters Final 1X Composition: Anode 1 Buffer: 0.3M Tris Base, 20% MeOH, pH 10.4 Anode 2 Buffer: 0.025M Tris base, 20% MeOH, pH 10.4 Cathode Buffer: 0.025M Tris Base, 0.04M Caproic Acid, 20% MeOH, pH 9.4 50X NAQ Northern Transfer Buffer (8) For transfer of RNA from agarose gels. With its high buffering capacity and low ionic strength, this buffer is more efficient than TAE, TBE, or MOPS for agarose gels. 0.2M morpholinopropanesulfonic acid (MOPS) 50mM sodium acetate 5mM EDTA pH 7.0 6 50X NAQ “Southern” Transfer Transfer of DNA from agarose gels 1M ethanolamine-glycine buffer pH 11 10X NAQ Transfer Buffer 0.8M Tris 1.18M borate 24mM EDTA pH 8.3 CAPS Buffer PH 11 This buffer can be used to improve transfer of some proteins, 10mm CAPS (3-[cyclohexylamino]-1-10% methanol propanesulfuric acid adjust to pH 11 with sodium hydroxide. 7 DNA/RNA: If these gels were not run in 1XTBE, they should be equilibrated for 10 minutes in this buffer. Protein Gels: After electrophoresis, wearing gloves, remove the gel assembly from the apparatus and place it under cold, running water until the surfaces of both the glass plates are cool. This facilitates handling of the gel and prevents the gel from “curling”. Place the gel assembly, with the notched or shorter plate facing up, flat on paper towels on the lab bench and remove any excess liquid. Remove one side spacer and insert a long metal spatula between the glass plates where the spacer had been. Use care not to insert the blade close to the notches. Gently rock the spatula, forcing separation of the plate from the gel. The gel will normally remain affixed to the bottom (non-notched) plate. Remove the top (notched) plate by slowly lifting it from the side with the inserted spatula and gradually increasing the angle until the plate is completely separated from the gel. If the gel sticks to the top plate in an isolated spot, a stream of water from a squirt bottle can be sprayed at the spot of separation. Once the plates are separated, remove the second side spacer along with any extraneous bits of acrylamide around the gel. If excess water was utilized to aid in the separation of the gel from the glass, use a paper towel to absorb the excess liquid. Using a dry piece of dry blotting paper gently roll it onto the gel beginning at one end and working slowly towards the other end. Care should be taken to prevent air bubbles from forming between the paper and the gel. Beginning at one end of the gel, slowly lift and peel back the paper from the glass with the gel attached. As before, a stream of water from a squirt bottle may be used to aid separation of the gel from the glass plate. 8 Assembly of Transfer Stack Place the gel in blotting buffer and agitate gently. Mark the membrane, to indicate the side to which the samples will be on. This is important in the event that any successive probe is negative, and to indicate sample orientation. Wet the membrane according to its manufacturers’ recommendations, followed by a quick equilibration in transfer buffer. Cut six (6) pieces of Extra Thick blotting paper and a piece of blotting membrane to the exact size of the gel to be blotted. It is often helpful to have all the filter paper and membrane sitting in transfer buffer as you start to build the blotting sandwich. Lay three (3) pieces of thoroughly soaked filter paper on the bottom (anode) electrode plate of the blotting unit. Make sure that the pieces are lined up squarely. Using a roller and only gentle pressure remove any air bubbles from between the papers. Add a few ml of buffer to the papers and place the thoroughly soaked blotting membrane on top of the filters papers. Add a few ml of buffer to the membrane - remove the gel from the blotting buffer and place on top of the blotting membrane. Be careful not to introduce any air bubbles. Finally, place three (3) thoroughly soaked filter papers on top of the gel. Use a roller to gently remove any air bubbles from the stack. Holding the stack, drain off all excess buffer from the plate. Wipe away any droplets around the edges of the stack. Running the Blot Place the lid on the unit and loosely tighten down the lid with the supplied black knobs. The weight of the lid is usually enough, and the tightening is not required. Note: Do not tighten for gels thicker than 1.5mm, or when using more than six (6) filter pads total. If the screws are used, tip the unit on an angle, to drain off any excess buffer that may have been squeezed out. The buffer will remain safely in the moat around the electrode plate. Attach the power leads (red to red and black to black) to an appropriate power supply. The black lead has a acrylic shroud that will stop it from attaching to the red anode. 9 Transfer Settings Blotting takes place at a given migration rate for a specified time. The units are mA times hrs. If you need to slow the transfer down, to say coincide with the setting up of a probe, simply decrease the current (mA) to match the added time you require. (mA)(hr) Std Setting = (mA)(hr) New Setting alternatively, you can increase the current to decrease the time. This assumes that you have determined an initial mAh value that works well for the molecules you are interested in. A current to use for a 45 minute time period is based on the area (cm*cm) of your gel. The range is 0.8 to 2 mA per square centimeter of gel.. For example: the area of a 10 x 10 cm gel would be 100 cm², the current range would be 80 mA (0.8mAcm x 100cm²) to 200 mA (2mAcm x 100cm²) Blots may also be run at a constant voltage. Some power supplies have difficulty sustaining steady voltages at these low voltage settings. If you find that voltages are fluctuating, or that the power supply shuts itself off when set on constant voltage, use constant current settings instead. Read your power supply’s instructions to ensure that the power supply will work at a voltage lower than 20V. These voltages often occur in semi-dry electroblotting. Contact the manufacturer regarding the unit’s performance under high current, low voltage conditions if you have any questions. 10 Factors That Affect Transfer Efficiency: While general conditions can be described which will result in successful transfer of most molecules, it should be noted that optimal transfer conditions will vary based on the characteristics of the molecule you are working with. Some factors that affect transfer rate and efficiency include molecule size, charge, gel thickness and percentage, and hydrophobicity. The reference list at the end of the manual provides useful information that can help you choose optimal conditions for efficient transfer of a specific molecule. Membrane Transfer Buffer Power Settings Running Time RUNNING CONDITIONS Protein Nitrocellulose .45 or 0.2u, PVDF 0.45u or 0.2u Towbin Buffer, 3 Buffer System, Bjerrum and SchaferNielsen Constant current 0.8-3mA per cm² gel surface area 10-14 Volts maximum 30 minutes to 2 hours Needs to be experimentally determined (large molecules need longer transfer time) DNA/RNA Nylon 0.5X – 1XTBE, TAE, NAQ Constant Current 0.53mA/cm² gel surface area 10-14 Volts maximum 30 minutes to 2 hours, generally in the lower range TECHNICAL INFORMATIONAL TIPS Transfer Times Transfer times • • • • must be determined experimentally. This is because transfer time is dependent upon: Percentage of gel Type and amount of cross linking in the gel Type of protein: cytoplasmic, membrane, nuclear Size of protein There is no formula for determining transfer time. There are too many variables involved to give specific transfer conditions that will work for every protocol. The guidelines of 2mA/cm² of gel for 1 hour are just a starting point – exact conditions must be determined 11 12 References 1. Bjerrun, O. J. and Schafer-Nielsen, C. in: Dunn, J.J. (ed.) Electrophoresis ’86 VCH Weinheim 1986, pp. 315327. These authors compare results using different transfer buffers (Towbin buffer vs. the three buffer system). 2. Khyse-Anderson, J., 1984. Electroblotting of multiple gels. A simple apparatus without buffer tank for rapid transfer of proteins from polyacrylamide gels to nitrocellulose. J. Biochem, Biophys. Methods 10: 203209. This paper describes a semi-dry blotter with a 3 Buffer system that is effective for the transfer of proteins. Protein Blotting 3. Castora, Frank J., “Western Blotting of Proteins”, Clinical Biotechnology 1: 43-49 (1989). This review article on Western Blotting gives a good overview of factors such as transfer buffers, types of membranes, and post-membrane stains. This was written for standard tank blotting, but much of it is applicable to semi-dry blotting. 4. Eckerskorn, Chrisoph and Lottspeich, Friedrich, “Structural Characterization of blotting membranes and the influence of membrane parameters for electroblotting and subsequent amino acid sequence analysis of proteins”, Electrophoresis 14: 831-838, 1993. A useful reference if you plan to do protein sequencing of transferred samples. 5. Legendre, Nancy “Immobilon-P Transfer membrane: Applications and Utility in Protein Biochemical Analysis”, BioTechniques supplement to Vol. 9: 788-805 (1990). This reference deals specifically with transfer conditions using Immobilon-P type membranes. 6. Tovey, E.R. and B.A. Baldo, 1987. Comparison of semi-dry and conventional tank buffer electro-transfer of proteins from polyacrylamide gels to nitrocellulose membranes. Electrophoresis 8: 384-387. This paper discusses quantitative yields of proteins of different molecular weights using different transfer conditions. 7. Dunbar, B.S., Ed. 1994. Protein Blotting: A Practical Approach. IRL Press at Oxford University Press, Oxford, England. A great guide to blotting techniques, including visualization, immunological techniques, and sequence analysis. Nucleic Acid Blotting References 8. Trnovsky, Jan, “Semi-Dry Electroblotting of DNA and RNA from Agarose and Polyacrylamide Gels”, Biotechniques 13: 800-804 (1992). 9. Blotting, Hybridization & Detection: “An S & S Laboratory Manual”, a publication of Schleicher and Schuell, (1995). This publication, written by a leading manufacturer of blotting membranes, gives protocols for the transfer of both proteins and nucleic acids. 10. “Hybond Blotting Guide: The direct route to excellent blotting results”, Amersham Life Science. This publication gives very helpful hints and tips for producing good Western, Northern and “Southern” blots along with a useful reference list. Also included is a very useful troubleshooting guide for nucleic acid and protein blots with pictures of the problems, descriptions of the symptoms, and proposed solutions. 13 TROUBLESHOOTING PROBLEM: Transfer Efficiency is Poor Cause: Current is too Low Solution: Semi-Dry Transfer should be performed at constant current. Current density should be between 0.5 and 3mA/cm² of stack surface area. Cause: Power Supply is inappropriate for Semi-Dry Transfer Solution: Many power supplies will shut off or blow a fuse when run at the conditions required for semidry transfer. Semi-dry transfer requires low voltage (often less than 10V) and high current. Check with the manufacturer of the power supply to determine whether it is appropriate for semi-dry transfer. Cause: Transfer performed for too short a time Solution: Increase the amount of time for transfer Cause: Transfer sandwich was assembled in the wrong order Solution: The Insight™ Semi-Dry Electroblotter is configured with the cathode on the top and the anode on the bottom. This means that a downward transfer is being performed. Follow instructions carefully when assembling the transfer sandwich. Cause: The pH of the transfer buffer is too close to the isoelectric point of the protein Solution: Try a more acidic or basic transfer buffer Cause: Too much methanol in the transfer buffer Solution: Reducing methanol can help elute proteins from the gel, but can reduce binding to nitrocellulose membranes. Cause: High percentage gels restrict transfer Solution: Higher percentage acrylamide or crosslinker can restrict elution of proteins. Use the lowest percentage acrylamide possible to separate your proteins. Cause: Puddles of buffer were present on the anode, allowing the current to bypass the stack Solution: Always clean the lower plate before placing the lid on the unit. Do not squeeze the stack excessively as this also creates puddles that the current can pass through. Cause: The filter paper was too dry Solution: Filter paper should be saturated with transfer buffer before adding them to the sandwich NITROCELLULOSE MEMBRANES PROBLEM: Insufficient binding of proteins to the membrane Cause: Over transfer through the membrane Solution: Use 0.2 micron pore size nitrocellulose instead of 0.45 micron, or use PVDF with a higher binding capacity 14 Cause: Not enough methanol in the transfer buffer Solution: Nitrocellulose binds proteins best when 20% methanol is used in the transfer buffer Cause: Low MW proteins are not binding well or are being washed away Solution: Use glutaraldehyde to crosslink the proteins to the membrane and use Tween-20 in the wash steps. Cause: SDS is preventing binding Solution: Eliminate SDS in the transfer buffer PVDF PROBLEM: Smeared or swirled transfer and missing bands Cause: Membrane was dried out before it was added to the transfer sandwich Cause: Alcohol was not used to prewet the membrane Solution: Membrane should be completely gray and slightly translucent when added to the sandwich. If it has dried out re-wet in methanol and equilibrate in transfer buffer Solution: PVDF is hydrophobic and requires a short soak in methanol prior to transfer Cause: Air spaces are interfering with contact between the gel and the membrane Solution: Roll a test tube or pipet over the membrane (make sure it is clean) before putting the rest of the sandwich together Cause: Electrophoretic conditions were incorrect or not ideal Solution: Running conditions, sample preparation, percentage acrylamide, and many other variables can affect the migration and resolution of proteins. Please review your electrophoretic conditions Cause: Transferring at too high a current Solution: Please refer to the Running Conditions in the manual Cause: Membrane was not thoroughly wetted Solution: Always pre-wet the membrane according to the manufacturer’s instructions. White spots indicate dry areas of the membrane. Cause: Too much Current Solution: Running at constant voltage can cause power fluctuations that will cause overheating. A buffer that has not been made correctly or that has too high an ionic strength can also burn a gel by overheating. A cracked and dry gel often is an indicator of overheating 15 The following is a chemical compatibility chart for the care of an acrylic device. Although acrylic is compatible with most solvents and solutions found in a biochemical laboratory, some solvents can cause damage. This list does not include all possible chemical incompatibilities and safe compounds. Acrylic products should be cleaned with warm water, a mild detergent, and can be exposed to a mild bleach solution (10:1). RNAse removal products are also safe for acrylic. Chemical Code Chemical Code Chemical Code Acetic Acid (5%) S Ethyl Alcohol (50%) A Naptha S Acetic Acid (Glacial) D Ethyl Alcohol (95%) U Nitric Acid (10%) S Acetic Anhydride A Ethylene Dichloride D Nitric Acid (40%) A Acetone D Ethylene Glycol S Nitric Acid concentrate U Ammonia S 2-Ethylhexyl Sebacate S Oleic Acid S Ammonium Chloride (saturated) S Formaldehyde (40%) S Olive Oil S Ammonium Hydroxide (10%) S S Phenol 5% solution U Ammonium Hydroxide concentrate S Gasoline, regular, leaded Glycerine Heptane (commercial grade) S Soap Solution (Ivory) S Aniline D Hexane S Sodium Carbonate (2%) S Benzene D Hydrochloric Acid (10%) S Sodium Carbonate (20%) S Butyl Acetate D Hydrochloric Acid concentrate S Sodium Chloride (10%) S Calcium Chloride (saturated) S Hydrofluoric Acod (40%) U Sodium Hydrochlorite (5%) S Carbon Tetrachloride U Hydrogen peroxide (28% solution) U Sodium Hydroxide (1%) S Chloroform D Hydrogen peroxide (3% solution) S Sodium Hydroxide (10%) S Chromic Acid (40%) U Hydroxide (10%) S Sodium Hydroxide (60%) S Citric Acid (10%) S Isooctane S Sulfuric Acid (3%) S Cottonseed Oil (edible) S Isopropyl Alcohol (100%) A Sulfuric Acid (30%) S Detergent Solution (Heavy Duty) S Kerosene (no. 2 fuel oil) S Sulfuric Acid concentrate U Diesel Oil S Lacquer Thinner D Toluene D Diethyl Ether U Methyl Alcohol (100%) U Trichloroethylene D Dimethyl Formamide U Methyl Alcohol (50%) A Turpentine S Dioctyl Phthalate A Methyl Ethyl Ketone U Water (distilled) S Ethyl Acetate D Methylene Chloride D Xylene D Mineral Oil (white) S CODES: S SAFE (No effect, except some possible staining) A ATTACKED (Slight attack by, or absorption of the liquid) Slight crazing, but acrylic has retained most of its strength Any Damage is mostly visual, not structural U UNSATISFACTORY (Softened, swollen, slowly dissolved) D DISSOLVED (In seven days of less) 16