1
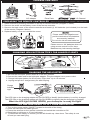
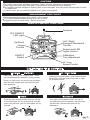
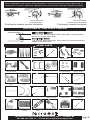
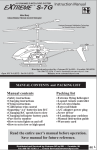
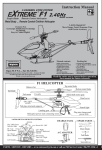
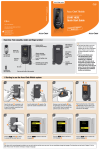
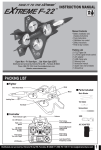
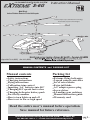
3.5-CHANNELS WITH GYRO SYSTEM
S-6G
TM
Instruction Manual
Metal Body
Indoor/Outdoor Remote Control Helicopter
Features Gyroscopic Stabilization Technology
for Smooth, Easy-to-Control Flight!
Open M-F 9-6 (EST) Sat 10-3 (EST)
MANUAL CONTENTS and PACKING LIST
Manual contents
Safety instructions
Charging instructions
Flying instructions
Calibration trim control
Inputting ‘AA’ batteries into R/C
Changing R/C speeds fast to slow
Changing helicopter battery pack
Part list by number
How to turn lights on and off
How to set to low or high speed
Packing list
Extreme flying helicopter
2-speed remote controller
Set of extra blades
Extra tail blade
A/C adapter power plug
Screw driver
4-Landing gear cushions
Manual instruction guide
Warranty card
Read the entire user’s manual before operation.
Save manual for future reference.
Distributed and Serviced by: Extreme RC by RSI ... Ferndale, MI
Tel: 586-757-1336 x 1 ... E-mail: [email protected]
-pg 1-
PACKAGE CONTENTS
ON/OFF
Remote Control
A/C Adapter
Extra Parts
PREPARING THE REMOTE CONTROLLER
EXTREME S-6G 3.5-Channel
TM
FRESH ALKALINE BATTERIES STRONGLY RECOMMENDED
1. Install antenna by screwing clockwise in the top of remote controller (Diagram 1 below).
2. Remove the screw on the battery cover of the remote controller.
3. Remove the back cover of the remote controller and install (4) ‘AA’ batteries (not included) into the back
of the remote (Diagram 2 below).
4. Replace battery cover and reinstall the screw.
Please ensure the negative and
positive terminals of the batteries
are correctly installed.
Do not mix old and new batteries.
ON/OFF
Diagram 1
Diagram 2
Please remove ‘AA’ batteries when not
using remote control for 60+ days.
Batteries may leak causing damage.
CHANGING HELICOPTER BATTERY FOR LONGER FLIGHTS
Carefully Unplug and
Pull Out the Battery
Replace with Fully Charged Battery
Plug Wire Back into Port-Located in the Back of the Helicopter Body
CHARGING THE HELICOPTER
1.Be sure the helicopter power switch is in the OFF position.
2.Connect the cable end to the helicopter adapter. Plug the adapter into a power outlet.
3. Charge helicopter battery for 90 minutes, Flight time: Up to 10 minutes.
4. Unplug and put A/C charger away for safe keeping.
Charge
Indicator
Light
Be careful not to over-charge the battery pack.
This could lead to shorting the life of the battery.
The LED light on the charging adapter will GLOW RED to identify that the battery is not fully charged
The LED light on the charging adapter will GLOW GREEN to identify that the charging is complete.
When the LED light GLOWS GREEN, your helicopter is ready for flight!
YOU ARE NOW READY TO FLY YOUR HELICOPTER
1. Turn on the power switch (ON/OFF located on the side of the body).
2. Place the helicopter on stable ground.
3. Extend the antenna on the remote controller and switch the controller to ON.
4. Stand back a minimum or 8’ from helicopter.
5. To deactivate the safety on remote, pull the left throttle up - then down. The safety is now
off and you can start flying.
-pg 2-
CAUTION
Do not fly near homes, buildings, structures, water, vehicles, telephone or electrical wires.
Keep flying helicopter away from pets, young children, the elderly and the disabled.
Do not place stickers weights or anything else on the helicopter, this may cause the helicopter to crash
or malfunction.
To avoid injury, do not touch the blades or any other moving parts.
ENVIRONMENT FOR FLIGHT
Recommended flying area: 20’L x 20’W x 15’H indoors.
Fly in good weather without strong wind, rain or snow.
Suggest flying in an open area - without structures.
REMOTE CONTROL FUNCTIONS
Antenna
R/C ON/OFF
LED Light
Left / Right
Forward / Backward
Throttle
Up/Down
Hover
Throttle
ON/OFF
Search and LED
Lights Control
Calibration
Trim Adjustment
ON/OFF
Switch
Hi / Low
Speed Control
CALIBRATION TRIM CONTROL
Hovering ... Up/Down
Left / Right turns
Learn how to hover (fly in place) first – once
you’ve mastered this operation, flying is easy.
While hovering helicopter, push (right) throttle
stick left for counter-clock wise turns or right
for clockwise turns.
Once you can hover, try moving up and down
with the (left) throttle stick. Move the throttle
stick gradually.
ON/OFF
ON/OFF
Forward
Backward
Push the right control throttle stick up, the top
of the helicopter will tilt downwards, the tail
motor will activate, and the helicopter will fly
forward.
Pull right control throttle down, the top of
the helicopter will tilt upwards, the tail motor
will activate, and the helicopter will fly
backward.
ON/OFF
ON/OFF
-pg 3-
Note: Calibration trim control: If the helicopter is turning excessively to the right or left, or
turning out of control, adjust the calibration trim control knob using the instructions below
Turn trim control
knob counter-clockwise
Turn trim control
knob clockwise
If helicopter rotates counter-clockwise
If helicopter rotates clockwise
LIGHTS AND HI / LOW SPEED CONTROL
Lights ON/OFF button
This will turn off helicopter LED night lights, saving battery
power for longer flight time.
Acceleration button
This is a two speed helicopter. Slow speed for beginners and fast
speed for professionals.
SPARE PARTS
#1 Head cover
#2 Main blades
#3 Tail and top fin
with connectors
#4 Balance bar
#5 Balance bar
connection set
#6 Blade clip set
#7 Body support
connect brackets
#8 Tail blade
#9 Landing gear
#10 Main gear set
#11 Shaft bearings
and gear bearings
#12 Top shaft ball
bearing housing
#13 Outer metal
body
#14 Inner metal
body
#19 Center pipe
#20 Main motors set
#21 Tail motor
#22 PCP board with
ON/OFF switch
#23 Landing gear
cushions set
#24 Main motor
housing set
#25 Li-Poly battery
#26 Battery case
housing
#27 Under carriage
board
#28 A/C adapter
#29 Remote control
#30 Antenna
#15 Main rotor shaft #16 Tail motor shaft #17 Tail support bars
#18 Tail pipe with
LED lights
Distributed and Serviced by: Extreme RC by RSI ... Ferndale, MI
Tel: 586-757-1336 x 1 ... E-mail: [email protected]
-pg 4-