1
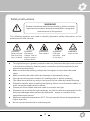
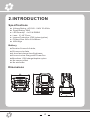
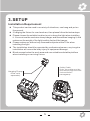
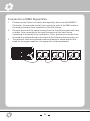
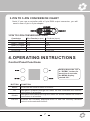
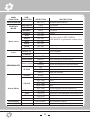
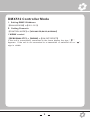
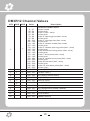
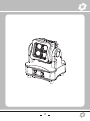
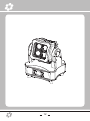
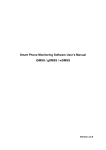
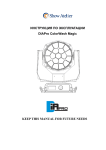
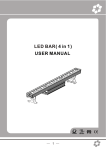
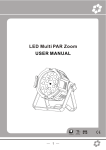
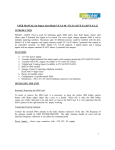
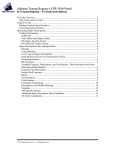
DIAPro LED Battery Wash Beam IP65
USER MANUAL
1
1.BEFORE YOU BEGIN
What is included
ò
1 x Fixture
ò
1 x Power cable with plug
ò
1 x User Manual
Unpacking Instructions
Immediately upon receiving a fixture, carefully unpack the carton; check the
contents to ensure that all parts are present, and have been received in good
condition. Notify the shipper immediately and retain packing material for
inspection if any parts appear damaged from shipping or the carton itself shows
signs of mishandling. Save the carton and all packing materials. In the event that
a fixture must be returned to the factory, it is important that the fixture be returned
in the original factory box and packing.
AC POWER
This fixture has an auto-switching switch-mode power supply that can
accommodate a wide range of input voltages. The only thing necessary to do
before powering on the unit is to make sure the line voltage you are applying is
within the range of accepted voltages. This fixture will accommodate between
100V and 240V AC 50-60 Hz. Each light is connected end to end by the power
socket “POWER IN” and “POWER OUT” on the light, or use the waterproof power
cord. Please ensure the head and the tail tightening when connect the lights, to
prevent the power leakage occurred by water seepage to the plug.
Help preserve the environment! Ensure that this product is
recycled at the end of its life. Your supplier can give details
of local arrangements for the disposal of products.
2
Safety Instructions
WARNING!
!
Please read these instructions carefully, which includes
important information about the installation, usage and
maintenance of this product..
The following symbols are used to identify important safety information on the
product and in this manual:
!
DANGER!
Safety hazard.
Risk of severe
injury or death
DANGER!
Hazardous
Voltage. Risk of
lethal or severe
electric shock.
WARNING!
Fire hazard
WARNING!
LED light
emission. Risk
of eye injury.
WARNING!
Refer to user
This light belongs to grade I protection device, therefore the light must connect
=
to the earth excellently. And the power connection must be operated by the
professional technician.
=
Make sure that the working voltage will not higher or lower than the rated
value.
=
Make sure that the cable didn't be damage or lacerated by sharp.
=
The light must be power off when it's standing idle or before clearing.
=
The cable must with plug, and you must pull out the cable by handle the plug.
=
Please be careful when installing the lighting. Never touch the bared cable, or
it will cause the deadly electric shock.
=
Please use the suitable and safe cable to connect the light.
=
Please never remodel the light randomly, we will not take the guarantee for the
faulty and damage which caused by dismantle、repair or remodel of the
nonprofessional person.
=
Maximum ambient temperature 40°C. Do not operate fixture at temperatures
higher than this.
=
Never connect the device to a dimmer pack.
3
2.INTRODUCTION
Specifications
Voltage Rating: AC100V~240V 50-60Hz
l
l
Power Rating: 50W
l
LED Quantity: 4 x10 W RGBW
l
Lens: 8°-40° Ζοοm
l
Ingress Protection: IP65 /indoor(option)
l
Product Size: 240x191x286 mm
l
N/W:6Kgs
Battery
l
Duration 9 hours full white,
l
20 hours color fade
l
4-hour fast charge from flight case,
l
8 hours in slow charge with PowerCon
l
More than 1,000 charge/deplete cycles
l
No memory effect
l
No acid leaks
Dimensions
4
3.SETUP
Installation Requirement
l
This product can be used in a variety of situations, can hang and put on
the ground.
l
If hanging the fixture for over head use, then please follow the below steps.
l
Please choose the suitable location to put or hang the light when installing
it. You must use the exclusive clamp hanger and screw when hanging it, and
make sure the weight of the light is within limits of the hanger.
l
Please make sure without any flammable objects within 0.5m when
installing the light.
l
The installation should be operated by professional person; any irregular
installation will cause the body injury or equipment damage.
l
Block access below the work area and use suitable and stable platform
when installing or servicing fixture.
Safety Cable
Note: the cable must be
secured through the heat
sink ventilation
passageway.
Hanging Clamp
Note: sold
separately
5
Connection of DMX Signal Wire
1
2
3
Please use the fixture controller wire specially when use the DMX512
Controller. Connect the (male) 3 pin connector side of the DMX cable to
the output (female) 3 pin connector of the first fixture.
Connect the end of the cable coming from the first fixture which will have
a (male) 3 pin connector to the input connector of the next fixture
consisting of a (female) 3 pin connector. Then, proceed to connect from
the output as stated above to the input of the following fixture and so on.
This product can be connected numerous lamps in series without the
need for the signal amplifier; the signal will not be weakened.
DMX IN
DMXOUT
6
DMX IN
DMXOUT
DMX IN
DMXOUT
3-PIN TO 5-PIN CONVERSION CHART
Note! If you use a controller with a 5 pin DMX output connector, you will
need to use a 5 pin to 3 pin adapter.
3 PIN TO 5 PIN CONVERSION CHART
Conductor
Ground/Shield
Data ( - ) signal
Data ( + ) signal
Do not use
Do not use
3 Pin Female(output)
Pin 1
Pin2
Pin 3
5 Pin Male (Input)
Pin 1
Pin2
Pin 3
Do not use
Do not use
4.OPERATING INSTRUCTIONS
Control Panel Functions
Holding down the “UP”
or “DOWN” button for
more than 3 seconds,
the MENU display
rotated 180°
BUTTON
MODE
FUNCTION
Exits from the current menu or function
UP
Navigates upwards through the menu list and increases the numeric
value when in a function
DOWN
Navigates downwards through the menu list and decreases the numeric
value when in a function
ENTER
Enables the currently displayed menu or sets the currently selected
value in to the selected function
7
MAIN
FUNCTION
SUBFUNCTION
001~512
DMX ADDRESS
CONTROL
MODE
Static color
Auto
Set DMX start address
ADVANCED
12CH
12 Channls
BASIS
05CH
5 Channls
NORMAL
08CH
Dimmer
00~100
Red
00~100
Green
00~100
Blue
00~100
White
00~100
8 Channls
Dimmer
User can combine RED, GREEN,
BLUE,WHITE to generate a custom color
zoom
zoom
00~100
Strobe
SP(0-20)
Custom program
Tempreture
ON/OFF
Color Calib
ON/OFF
Dimmer Speed
PERSONALITY
W-DMX
Temperature display on/off
Color calibration mode on/off
Fast
Fast dimming with unrestricted speed
Smooth
Smooth dimming with restricted speed
ON
Turn on the Wireless
OFF
Turn off the Wireless
Reset the Wireless
RESET
SCENE
Scene
0~255
R(0~100)
COLOR
0~20Hz)Select strobe frequency
Auto program
Auto(1~8)
Custom
red
G(0~100)
green
B(0~100)
blue
W(0~100)
white
S(0~100)
(0~20Hz)Select strobe frequency
Fade
F(0~255)
Time
T(0~255)
step time(XXX s)
transition time of last step to current step(XXX s)
Zoom
Z(0~255)
Wide → narrow
Use
OFF/ON
Scene Editor
Information
INSTRUCTION
SELECTION
RESTORED
Factory RST
CPU firmware version
Return all settings to factory defaults
8
DMX512 Controller Mode
1、Setting DMX512 Address
【DMX ADDRESS】[
【001--512】
2、Setting Channels
【CONTROL MODE】[
【ADVANCED,BASIS,NORMAL】
3. WDMX control
【PERSONALITY】[
【WDMX】[
【ON/OFF/RESET】
If the unit is successfully connected in the home display the sign“
”.
Appears. If the unit is not connected to a transmitter or switched off no“
sign is visible
9
”.
DMX512 Channel Values
ADV
BAS
NOR
Value
Description
Electronic shutter effect
Shutter closed
Shutter open
Strobe 1 (fast --slow)
Shutter open
Strobe 2: opening pulse (fast--slow)
Shutter open
Strobe 3: closing pulse (fast--slow)
Shutter open
Strobe 4: random strobe (fast--slow)
Shutter open
Strobe 5: random opening pulse (fast -- slow)
Shutter open
Strobe 6:random closing pulse (fast-- slow)
Shutter open
Strobe 7: burst pulse (fast--slow)
Shutter open
Strobe 8: random burst pulse (fast--slow)
Shutter open
Strobe 9:sine wave (fast --slow)
Shutter open
Strobe 10: sine wave pulse(fast --slow)
Shutter open
Dimmer (0-100%)
1、
1、
0 - 19
20 - 24
25 - 64
65 - 69
70 - 84
85 - 89
90 - 104
105 - 109
110 - 124
125 - 129
130 - 144
145 - 149
150 - 164
165 - 169
170 - 184
185 - 189
190 - 204
205 - 209
210 - 224
225 - 229
230 - 244
245 - 255
2、
2、
000 - 255
3、
1、
3、
4、
000 - 255
ZOOM(0-100%)
000 - 255
Color wheel rotation effect
2、
4、
000 - 255
Red(0-100%)
6、
3、
5、
000 - 255
Green(0-100%)
7、
4、
6、
000 - 255
Blue(0-100%)
8、
5、
7、
000 - 255
White(0-100%)
5、
9、
10、
8、
000 - 255
Color temperature(2500K-10000K)
000 - 255
AUTO(0-10)
11、
000 - 255
AUTO SPEED
12、
000 - 255
DIMMER SPEED
10
11
12