1
Wireless Camera
User Manual
Please read carefully before using this product.
ffie@ m&ffim
ffiEwlmifrris
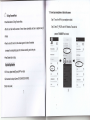
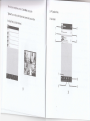
Shutter Bufton
Gettinsr:$ariEo
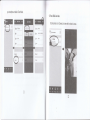
1. Chaeing the Unit
'
Before first use, charge the battery fully by either adapter or Pc usB if you want to use the camera in
Photo or Video mode.
Photo Mode
Video Mode
Direct Mode
Cloud Mode
Driving Recorder Mode
Tripod Mount
.
ln Direct, Cloud and Driving Recorder modes, the camera need work with power supply by either
adapter or PC USB.
2. lnsert Micro SD Card
'"f;'
wil| beep constantly.
,vote lf the Micro SD card is full or damaged, the camera
3. Modes Navigation
Press and holci Power/Mode bufton about
3
seconds
to turn on the camera' Then press the
Direct Mode
. Before using Direct mode, please download [Sycloud] APP from Google Play orApple Store.
. Press Mode button to Direct Mode.
. Connect camera and mobile directly for local live view, managing alarm events, pictures, photos and
Power/ModebuttontoswitchPhoto,Video,DirectandDrivingRecordermodes.
camera setup-
Thecamerawillshutdownautomaticallywithoutanyoperationin60seconds.
6)
r"r"
pnoto
('.!-r Cloud Mode
. To connect
came6 to Cloud server via Access Point (AP) or mobile Hotspot for lnternet live video and
. Press Mode button to Photo Mode'
monitoring.
.
Press Shutter button to take.
LB
snootVideo
.
By setting up an lnternet connection in Direct Mode, the Cloud
Mode
indicator will light red
automatically.
. Press Mode button to Video Mode.
Ivore For Direct and cloud Modes, please refer to Sycloud Application of this manual.
. Press Shutter button to take and again to stop'
6
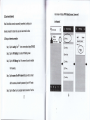
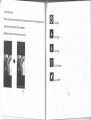
1.1 Connect your smartphone or tablet to the camera
(+--
-.r) Driving Recorder Mode
Step 1. Turn on the Wi-Fi of your smartphone or tablet.
.
Press Mode button to Driving Recorder Mode.
.
After the icon flash red,the camera will record video automatically and save a segment every 3
minutes.
. When the micro SD card is full, the earliest segment of video will be deleted
to release the corresponding space for continuous recording, and so the cycle'
Step 2. Select "SY_IPCAM" under Wi-Fi Networks. Then enter the
q;I
i1I
ii:llri1:
password "0123456789" and connect
&,
..
r,,1{',
. Press Shutter button to stop.
l:1 *
svctoiiii&pliri6$on
.
For flrst use, please install [Sycloud] APP on mobile.
. Each camera has unique Camera lD (WCM-XXXXXX-XXXXX).
@"..,,--.,4
i:10. .
::Y::,Y."..,,,
5Yn3
l.Direct mode (Local)
7
.n
*
?
+
*@"
tu itt$ r*i:r|
?
Step 3. Launch the lsycloud] APP on your smartphone or tablet' The
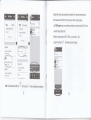
1.2 Add new camera
Step 1. Tap the 'Add new camera" icon to enter "Add Camera" screen.
welcome screen will display as below.
Step 2. Tap the "Search" bar for Search Result.
(You can also tap the "Did" bar to manually enter the lD of the
camera or tap the "Scan lD" bar to scan the lD code.)
Step 3. Tap the lD of camera to return "Add Camera" screen. Then the
lD will display on the screen. The default password is empty.
Step 4. Tap the "Done" icon to complete add camera.
,Vote
,.
Follow the above steps, you can add more cameras.
2. Because the name of the camera Wi-Fi signal is the same, that is
SY_IPCAM, you can only connect ONE camera at the same time using
9
l0
your smartphone or tablet in Direct Mode
'1.3
View LOCAL live video
Tap the camera icon in Camera List to view the live video of camera.
m
T
I
2.Cloud mode (lnternet)
main screen will display "WiFi Setting Success, Camera
I
When Direct Mode connection successfully completed, by setting up an
be Restarted".
I
lnternet connection for cloud mode, you can view remote live video.
il
2.1 Set up an lnternet connection
Step 1. Tap the "setting" icon
*
when camera status display ON LINE.
Step 2. Tap the 'Wifi Setting" bar to enter Wifi Sefting screen.
1
I @
I
Step 3. Tap the "Wifi Manager" bar. The camera will scan for available
l')
I
i
Wi-Fi networks.
Step 4. Tap the name of the Wi-Fi network that you wish to connect
with the camera, and enter the password of your Wi-Fi router.
aterr sartns
I
-- il
Mat
&t $r $entr
lt*rlxxlxl:xl,*,1|}l1t:
i Q Tiileserry
laaial.ii]liriill,liii$11&llilliilliiallliii*:lrii:,
I
.l1r
Step 5. Tap the "Done" icon to complete lnternet connection. Then the
13
wind
tttt
.
:-
tr
'
,
'1"
t:i:iiili;:iliilllllliiliiilllrliitilltlllt:iilli;iii::
,,tt:iiiilgli::,i:ilirautiltili::,l|,llillil:
t4
l
will
indicates the Internet setup successfully completed. This may need several seconds.
2. lf ihe camera cannot find the Wi-Fi network you wish to connect to,please
,:iffiid
*i, &J. {rt{. BlWl
tap "Wifi Manager" again or more times and make sure the camera and the Wi-Fi router
:
are within range of each other.
:i
l
I
:
l:l:',
*
it
ll tM
3. When the camera status is NOT ON LINE, you cannot set up. Then
you tap the "setting" icon
r.'
, the following prompt will appear.
p1 !r.s
.. :r:it r. i!q.ar.{}
i *i,riri.;r tri
g.t
lrtrr. 3:
,l 1a11
t
.1:j::i:::i
/Vote ,.Only when both the WiFi
icon
and Cloud icon
l5
:i..
sn th6 526s13 light red constantly, il
t6
2"2 View REMOTE tive video
After lnternet setup completion, you
can view the live video ofthe camera.
Step 1. MAKE SURE your smartphone
or tablet can link to the tnternetvia
a 3G/4G
mobile network or a Wi_Fi router,
which is different
connected with.
tt31ll1"
"rr"ra
from the one your camera
/Vote ,. The speed of video transmission from the camera highly depends on
the speed of the connection you are using.
2. The lnternet speed either from your Wi-Fi netlvork or 3G/4G mobile
network has high impact on the performance of the product. The faster
icon in camera List to view the
tive video of camera
and more stable the connection speed, the faster you can see the
video from the camera.
3. After tnternet setup completion, if your smartphone or tablet links to
the lnternet via a 3G/4G mobile network or a Wi-Fi router, which is
the same with the one your camera connected with, you can also view
the live video, and then this video is from LocalArea Network (LAN)
4. Due to the higher screen resolution, your tablet can support Quad
18
l
3.
APP Operation Menu
3.1 Main screen
1
3
***q-1;
5
19
video of camera'
Tap the camera icon, which status is on line to view the live
1.
APP name: Sycloud
6. Setting
Long tap the icon to enter the euad View in Cloud Mode on tablet.
2. Edit
on line'
Tap the icon to enter setting screen when camera status display
7. Alarm Event
Tap the icon to delete camera or change camera,s name or password.
3. Add new camera
Tap the icon to view cameras'alarm logs'
8. Pictures folder
Tap the icon to add new camera in Oirect UoOe. please refer to
,.2.
4. Refresh
Tap the icon to view all of the taken photos'
9. Videos folder
Tap the icon to reconnect and refresh the status of cameras in camera
list.
5. Camera list
Tap the icon lo view recorded videos or remote videos'
10. About information
Display the added cameras and show the status and ID of each camera.
2t
Tap the icon to get information about the APP'
22
3.2 Video playing menu
when you enter the rive video screen, either rocar or
remote, tap the screen, the video praying menu
wi,
appear and tap the screen again, the menu disappear.
/Vole.'Slide the menu bar on the boltom for more
menus.
g
Iu
E
E
E
Quit playing
Mirror image
lnvert image
Turn for full screen
Audio ON/OFF
24
ril
E
E
E
r
Snapshot
El
Resetdefautts
3.3 Setting menu
Video record (Tap the icon to start recording and again to stop)
On main screen, taP the icon
&
ON LINE'
to enter setting menu screen when camera status display
Watch mode, select speed or quality priority
+ffi
Brightness adjustment
l
Contrasl adjustment
25
t
1. Wifi Setting
5. SD Setting
into the camera' such
Tap the bar to get the information of SD card inserted
Please refer to 2.1 of this manual.
record coverage'
as total capacity, remaining capacity. You can also select
2. User Setting
set record time or format SD Card.
Tap the bar to set the user and password forAdministrator
or Operator.
3. Alarm Setting
.
6. Time Setting
Tap the bar.to set mobile phone time calibration'
Tap the bar to enable/disable Motion Detection.
. A motion detection event
can trigger Mail Notification.
Reeet-'il&!S-!tttiie
or a
.When the camera crashed or forced shutdown, please press the reset button using a small obiect
. Motion Detection Sensibility
can be set.
4. Mail Setting
pin.
When Motion Detection enabled, tap the bar to set mail
sender and receiver
.
button and Shutter button at the
lf you forget the camera password, please press both the Power
to factory default, then the LED plate will
same time about 3 seconds in Direct or Cloud mode to reset
for Mail Notification.
27
28
flash 3 tim€s and cameta beep once. And in this way, you can only rcset the camera name, passwod
and mail setting to factory default.
29