1
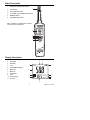
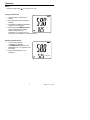
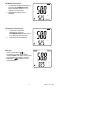
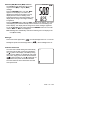
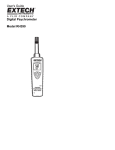
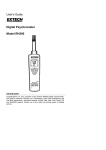
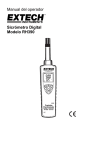
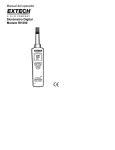
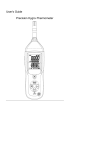
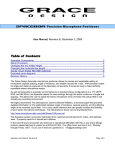
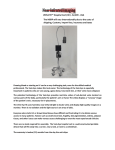
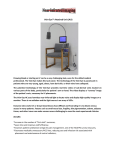
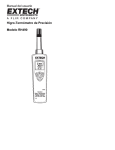
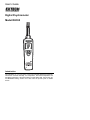
User's Guide
Digital Psychrometer
Model RH390
MAX
MIN
°F•°C•WBT
Dew Point
Introduction
Congratulations on your purchase of the Extech RH390 Digital Psychrometer.
This device measures Humidity, Air Temperature, Dew Point temperature and
Wet Bulb temperature. Advanced features include Data Hold, Auto Power Off,
and MAX/MIN reading. Careful use of this meter will provide years of reliable
service.
Specifications
Function
Range and Resolution
Humidity
±2%RH (20% to 90%)
±3%RH (10% to 20% and 90 to 95%)
±4%RH typical at 1% and 99%
0.0 to 100.0%RH
o
-4.0 to 158.0 F
(-20 to 70oC)
Temperature
Accuracy
o
o
±1.8 F (±1 C)
-22.0 to – 3.9oF
and 158.1 to 199.0oF
o
(-30.0 to -19.9 C
and 70.1 to 100.0oC)
±2.7oF (±1.5oC)
Display
Response Time:
Sensor Type
Dual LCD
<30 seconds (90% of final value in moving air)
Humidity: Precision capacitance sensor
Temperature: Thermistor
Wet Bulb
32 to 176°F (0 to 80°C) (calculated from RH and Air
temperature measurements)
Dew Point
-22 to 199°F (-30 to 100°C) (calculated from RH and Air
temperature measurements)
Operating Conditions 32 to 122oF (0 to 50oC); < 80% RH non-condensing
o
o
Storage Conditions -40 to 185 F (-40 to 85 C); <99% RH non-condensing
Power Supply
9 Volt battery
Battery Life
Approx. 24 hours
Dimensions / Weight 7.8 x 1.7 x 1.3” (200 x 45 x 33mm); 7 oz. (200g)
Warranty
EXTECH INSTRUMENTS CORPORATION warrants this instrument to be free
of defects in parts and workmanship for one year from date of shipment (a six
month limited warranty applies to sensors and cables). If it should become
necessary to return the instrument for service during or beyond the warranty
period, contact the Customer Service Department at (781) 890-7440 ext. 210 for
authorization or visit our website www.extech.com for contact information. A
Return Authorization (RA) number must be issued before any product is returned
to Extech. The sender is responsible for shipping charges, freight, insurance and
proper packaging to prevent damage in transit. This warranty does not apply to
defects resulting from action of the user such as misuse, improper wiring,
operation outside of specification, improper maintenance or repair, or
unauthorized modification. Extech specifically disclaims any implied warranties
or merchantability or fitness for a specific purpose and will not be liable for any
direct, indirect, incidental or consequential damages. Extech's total liability is
limited to repair or replacement of the product. The warranty set forth above is
inclusive and no other warranty, whether written or oral, is expressed or implied.
2
RH390 V2.0 03/05
Meter Description
1.
Humidity & Temperature Sensor
2.
LCD Display
3.
Power ON/OFF button
4.
°F/°C/WBT (wet bulb)/Dew Point button
5.
MIN/MAX button
6.
HOLD/Backlight button
1
Note: The battery compartment is located
on the rear of the instrument
2
3
6
5
4
Display Description
Relative Humidity %
Dew Point
3. Wet Bulb
4. °C/°F
5. Temp/WB/DP Display
6. Maximum
7. Minimum
8. Low Battery
9. Hold
10. RH% Display
11. Auto Off
6
1.
7
2.
9
1
MAX MIN
10
°C °F
Dewpoint
WetBulb
8
11
4
2
3
5
3
RH390 V2.0 03/05
Operation
Power
Press the power button(
) to turn power on or off.
Taking measurements
1. Hold the probe in the area to be
tested.
2. Allow adequate time for readings to
stabilize.
3. The Relative Humidity measurement
appears in the top display.
4. Pressing the °F/°C/WBT/Dew Point
button toggles the lower display
between Temperature (°F),
Temperature (°C), Dew Point (°C),
Dew Point (°F), Wet Bulb (°C) and Wet Bulb (°F).
°C °F
Dew Point measurements
1. To select the Dew Point
measurement, press the
°F/°C/WBT/Dew Point button until
DEWPOINT (°F or °C) appears in the
lower right.
2. Dew Point temperature is now
displayed.
4
°C °F
Dewpoint
RH390 V2.0 03/05
Wet Bulb measurements
1. To select the Wet Bulb measurement,
press the °°F/°C/WBT/Dew Point
button until WET BULB (°F or °C)
appears in the lower right.
2. Wet Bulb temperature is now
displayed.
°C °F
WetBulb
Temperature measurements
1.
2.
To select the temperature
measurement, press the
°F/°C/WBT/Dew Point button until °C
or °F appears in the lower right.
Temperature is now displayed.
°C °F
WetBulb
Data Hold
Press the hold button (
)
momentarily to freeze the displayed
readings.”HOLD” will appear on the upper
left-hand side of the display. Press the
hold button (
) again to return to
normal operation.
MAX MIN
°C °F
WetBulb
5
RH390 V2.0 03/05
Minimum (MIN) Maximum (MAX) Function
MAX MIN
The MIN/MAX mode allows the user to view
only the lowest (MIN) or highest (MAX)
readings.
Press the MAX/MIN button once and “MAX”
appears on the display. The LCD is now
displaying the maximum humidity in the top
display and the maximum reading of the
°C °F
selected parameter in the bottom display. The
display will not change until a higher reading
is registered.
Press the MAX/MIN button again and “MIN” appears on the display. The LCD is
now displaying the minimum humidity and the minimum second reading in the
bottom display. The display will not change until a lower reading is registered.
To exit the MIN/MAX mode, press and hold the MIN/MAX button for 2 seconds
until the “MAX” or “MIN” icon disappears.
Note: Readings are automatically reset when switching from one display to the
next (MAX to MIN).
Backlight
Press and hold the light button (
) until the backlight comes on. To turn the
backlight off press and hold the light button (
Automatic Power OFF
The meter has a default setting that automatically
shuts the meter off after 10 minutes (indicated by
the
symbol on the display. This battery saving
feature can be disabled. To disable the auto power
off function, simply press and hold the hold button
(
) while powering on. The
symbol will not
appear when auto power off has been disabled.
The meter will revert to the default auto-off mode
when powered off.
6
) until to backlight turns off.
MAX MIN
°C °F
RH390 V2.0 03/05
Maintenance
Cleaning and storage
1. The meter should be cleaned with a damp cloth and mild detergent when
necessary. Do not use solvents or abrasives.
2. Store the meter in an area with moderate temperature and humidity (refer to
the operating and storage range in the specifications chart earlier in this
manual).
Battery Replacement
When the battery power falls low, the battery symbol will appear on the LCD.
Replace the 9 Volt battery by removing the Philips head screw holding the rear
battery compartment cover to access the battery compartment. Ensure that the
compartment cover is securely fastened when finished.
Calibration and Repair Services
Extech offers repair and calibration services for the products we sell. Extech
also provides NIST certification for most products. Call the Customer Service
Department for information on calibration services available for this product.
Extech recommends that annual calibrations be performed to verify meter
performance and accuracy.
Support line (781) 890-7440
Technical support: Extension 200; E-mail: [email protected]
Repair & Returns: Extension 210; E-mail: [email protected]
Product specifications subject to change without notice
For the latest version of this User’s Guide, Software updates, and other
up-to-the-minute product information, visit our website: www.extech.com
Copyright © 2005 Extech Instruments Corporation
All rights reserved including the right of reproduction in whole or in part in any form.
7
RH390 V2.0 03/05