1
Legacy Conversion
Guide
LexisNexis® Bridger Insight® XG 4.5
In This Guide
• Legacy Conversion Overview, page 3
• Product Conversion, page 8
• Deny List and Accept List Importing, page 15
• Data Conversion and Testing, page 20
Legacy Conversion Guide |
Confidential and Proprietary
FIN025—6 April 2015
1
LexisNexis® Risk Solutions shall not be liable for technical or editorial errors or omissions contained herein. The information in this publication is subject to change without notice and is provided WITHOUT WARRANTY OF ANY KIND. THE ENTIRE RISK ARISING OUT OF THE USE OF THIS INFORMATION REMAINS WITH RECIPIENT. IN NO EVENT SHALL LEXISNEXIS RISK SOLUTIONS FL INC. BE LIABLE FOR ANY DIRECT, CONSEQUENTIAL, INCIDENTAL, SPECIAL, PUNITIVE, OR OTHER DAMAGES WHATSOEVER (INCLUDING, WITHOUT LIMITATION, DAMAGES FOR LOSS OF BUSINESS PROFITS, BUSINESS INTERRUPTION, OR LOSS OF BUSINESS INFORMATION), EVEN IF LEXISNEXIS RISK SOLUTIONS, HAS BEEN ADVISED OF THE POSSIBILITY OF SUCH DAMAGES.
The limited warranties for these products and services are exclusively set forth in the license agreement or other agreements accompanying such products or services. Nothing herein should be construed as constituting a further or additional warranty.
Due to the nature of the origin of public record information, the public records and commercially available data sources used in reports may contain errors. Source data is sometimes reported or entered inaccurately, processed poorly or incorrectly, and is generally not free from defect. This product or service aggregates and reports data, as provided by the public records and commercially available data sources, and is not the source of the data, nor is it a comprehensive compilation of the data. Before relying on any data, it should be independently verif ied.
The LexisNexis® Bridger Insight® XG, LexisNexis® FraudPoint® Score, LexisNexis® InstantID®, LexisNexis® InstantID® International, LexisNexis® News, LexisNexis® Anti‐Money Laundering Solutions, Lexis® Diligence, and LexisNexis® Red Flags Rule Report services are not provided by "consumer reporting agencies," as that term is def ined in the Fair Credit Reporting Act (15 U.S.C. § 1681, et seq.) ("FCRA") and do not constitute "consumer reports," as that term is def ined in the FCRA. Accordingly, the Bridger Insight XG, FraudPoint Score, InstantID, InstantID International, LexisNexis News, Anti‐
Money Laundering Solutions, Lexis Diligence, and Red Flags Rule Report services may not be used in whole or in part as a factor in determining eligibility for credit, insurance, employment or another purpose in connection with which a consumer report may be used under the FCRA.
Lexis, LexisNexis, and the Knowledge Burst logo are registered trademarks of Reed Elsevier Properties Inc., used under license. Bridger Insight is a registered trademark of LexisNexis Risk Solutions Inc. FraudPoint and InstantID are registered trademarks of LexisNexis Risk Solutions. WorldCompliance is a registered trademark of World Compliance, Inc. Other products and services may be trademarks or registered trademarks of their respective companies.
©2015 LexisNexis Risk Solutions. All rights reserved.
Legacy Conversion Guide |
Confidential and Proprietary
FIN025—6 April 2015
2
Legacy Conversion Overview
LexisNexis® Bridger Insight® XG (XG) incorporates the latest technologies and decision‐making tools with the sophisticated searching you have come to expect from Bridger Insight legacy products.
LexisNexis® offers two means of including legacy data in XG:
• Product Conversion, page 8—Convert results, accept lists, deny lists, and system values using a conversion tool. This process may be ideal for clients who want to move most of their legacy data into XG.
The XG conversion tool requires administrative access to the server or client machine.
• Deny List and Accept List Importing, page 15—Import only accept lists and deny lists into XG. This process may be ideal for clients who only need to access their legacy Accept List or deny lists in XG.
With either of these methods, you can export users from your legacy product and import them into XG.
• Legacy Users to XG, page 18—Export user account information and prepare it for import into XG.
This guide provides instructions on the following product conversions:
• Online to XG Service, page 10
• Client‐hosted Legacy Product to XG Service, page 11
• Client‐Hosted Legacy Product to XG Enterprise, page 13
Convert from Bridger Insight Online 6.0.x to XG Enterprise by contacting Bridger Insight Technical Support at: https://bridgerinsight.custhelp.com.
Legacy Conversion Guide |
Confidential and Proprietary
FIN025—6 April 2015
3
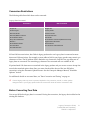
Helpful Terms
XG provides new and improved functionality. The terms used to reference similar functionality may be different from legacy features. The following table shows how legacy product terms correspond to XG terms.
Term Changes
Legacy Products
XG
Check Name tab
Real‐Time search window
data list/watch list status
record status
deny list
custom watchlist
deny list reason
custom watchlist reason
ID Verification status
record status
Report tab
Result Processing menu
search policy
predefined search
Scan Files run
batch run
Scan IDV Files run
batch run
System tab
Administration menu
References to other sections of this document may be active hyperlinks. You can click on the link to take you to the referenced section.
Information and instructions are provided on performing tasks in XG. For errors, troubleshooting, alternative functionality, and the most up‐to‐date product changes, see the Bridger Insight knowledge base available on the Customer Support website at: https://bridgerinsight.custhelp.com
Legacy Conversion Guide |
Confidential and Proprietary
FIN025—6 April 2015
4
You can also access a glossary def ining industry and commonly‐used terms on the Customer Support website at: https://bridgerinsight.custhelp.com/app/answers/detail/a_id/1482/
To learn more about new and updated features in XG, see the release notes at: https://bridgerinsight.custhelp.com/app/answers/detail/a_id/1475/
A Help system is available from within Smart Clients and Browser Clients. Press F1 to view a Help page associated with the window you are viewing.
Conventions
We use the following conventions to relate information.
I n s t r u c t i o n Ste ps
The steps necessary to complete actions in XG are provided in this document. These instructions may include the results of the actions or other information to keep in mind as you complete the steps.
Text you should enter is shown in a different font. For example: Type BridgerInsightXG in the Database f ield.
Right‐click menus are only described in instructions if they are the only means of performing a task.
The following is an example of steps.
Sample Steps
1
Click Print Report .
The Watchlist Report is displayed in a Report Preview window.
2
Click P r i n t .
Notes and Wa rnings
This is a note icon. It precedes helpful information.
Legacy Conversion Guide |
Confidential and Proprietary
FIN025—6 April 2015
5
i
This is a warning icon. It precedes information to help prevent you from negatively affecting your XG
system or processes.
W i n d o w El emen ts
The following table lists common interface objects and how those objects are referred to in the text.
Window Elements
Item
Description
Window
Window names are capitalized: the Search Client window.
Buttons and Tabs
Clickable buttons and tabs are mentioned by name in a bold font, such as: Search
(a button) or Automatic Updates (a tab). A toolbar button may also be displayed with a description of the icon in parentheses, for example: Click (Delete).
Fields
Field names are capitalized: the Password field.
Window Elements
Unnamed window elements are described using brackets: <Field name>.
Documentation Suggestions
Your suggestions for document improvement are welcome. Send comments or suggestions via email to: [email protected]
Or mail comments or suggestions to:
Technical Publications
LexisNexis®
1819 S. 22nd Avenue
Bozeman, MT 59718
USA
Legacy Conversion Guide |
Confidential and Proprietary
FIN025—6 April 2015
6
Support and Resources
Support and resources are available to XG clients who have purchased the product. Support and resources are not available to trial users.
Te c h n i c a l S u p p o rt
Standard technical support is included at no additional cost with the XG annual fee. Premier Support is available at an additional cost. For more information, contact your sales representative.
To access the knowledge base, Live Chat, Ask a Question, and other support services, you must f irst register for a free Customer Support account at: https://bridgerinsight.custhelp.com
Your XG product code, provided to you by LexisNexis, is required to create an account.
For support hours,visit: https://bridgerinsight.custhelp.com/app/answers/detail/a_id/476/
Customer Support
The Customer Support website provides access to related documentation, knowledge base articles, eLearning modules, and Web‐based support: https://bridgerinsight.custhelp.com
Using your product code, create a Customer Support account to:
• Search the knowledge base and request notif ications of article updates.
• Submit, track, and update your product questions.
• Set up a prof ile of search defaults and contact information.
• Download software installation and upgrade executables.
• Download manuals, white papers, and training guides.
• Take eLearning courses.
Legacy Conversion Guide |
Confidential and Proprietary
FIN025—6 April 2015
7
Tr aining
Some XG training is offered at no additional cost. These instructor‐led web trainings and eLearning modules are available at the Customer Support website: https://bridgerinsight.custhelp.com/app/answers/detail/a_id/438
Product Conversion
Product conversion allows you to transfer most of your legacy data into XG through one process. Data from the following legacy products can be converted:
• Bridger Insight 6.0.x Client‐hosted Online
• Bridger Insight 6.0.x for Windows
• Bridger Insight Online 6.0.x • Homeland Tracker 5.x
• OFAC Tracker 5.x
• World Tracker 5.x
Except for Bridger Insight Online 6.0.x, these are client‐hosted legacy products.
Converting your legacy product can help you avoid the time required to duplicate the same work in XG.
Legacy Conversion Guide |
Confidential and Proprietary
FIN025—6 April 2015
8
Conversion Restrictions
The following table lists which data can be converted:
Legacy Data Converted
Converted
Accept List
Account Types
Data List Results
Data List/Watch List Status
ID Verification Status
Deny Lists and Reasons
Divisions
ID Verification Results
Scan Files Runs
Scan IDV Files Runs
Not Converted
Bridger IDV
Country Codes
Custom Formats
Demonstration IDV
eFunds IDV
ID Verification or Data List/Watch List Setup
Organization Information
Search Policies
User Accounts and Credentials
XG has f ield size restrictions, but f ields in legacy products do not. Legacy data is truncated to meet these new f ield restrictions. For example, a street address f ield in your legacy product may contain 300 characters of data. The XG address f ield is limited to 255 characters. Only the f irst 255 characters of legacy data are converted. The remaining 45 characters are truncated and not available in XG.
If optional multi‐f ile data sets were searched in the legacy product and you want to convert Accept List records that matched against these lists, you must download the data set f iles into XG before conversion, using the Automatic Updates feature. See the Enterprise Manager Manual, "Watchlist Updates" section.
For additional details on converted data, see "Data Conversion and Testing" on page 20.
i
Convert legacy data only once to prevent duplication. Any searches, results, or other system
changes made in your legacy product after the conversion starts will not be converted to XG.
Before Converting Your Data
You can use XG before legacy data is converted. During the conversion, the legacy data is added to the existing XG database.
Legacy Conversion Guide |
Confidential and Proprietary
FIN025—6 April 2015
9
Prepare for your legacy product conversion:
• Complete all result processing in your legacy product.
• Ensure conversion personnel have appropriate server access permissions.
• Ensure conversion personnel have an active Customer Support account.
These instructions assume all processing is complete in the legacy product before data is converted.
Primary Conversion Contact
While we understand multiple people within your organization may be responsible for different tasks during the conversion, instructions in this guide reference your personnel as a single "primary conversion contact." In steps where the primary conversion contact must communicate with us, please designate the most appropriate person.
If the primary conversion contact does not already have a Customer Support account, they must create one. The primary conversion contact uses this account to communicate with us and to access the knowledge base and other software documentation. You need your XG product code to create a Customer Support account.
Online to XG Service
If you are moving from Bridger Insight Online to XG Service, we perform the conversion. We coordinate the conversion with your organization's primary conversion contact, including:
• Setting the data conversion date. • Setting the legacy product deactivation date.
To complete some of the conversion steps, you may need to consult your legacy Bridger Insight manual.
Convert from Bridger Insight Online to XG Service
1
Bridger Insight Technical Support contacts you to set conversion and deactivation dates.
Legacy Conversion Guide |
Confidential and Proprietary
FIN025—6 April 2015
10
2
In the legacy product, complete the following:
a Merge duplicate Accept List records and index the Accept List.
b Delete FinCEN deny lists. c Index remaining deny lists.
i
Any future searches, results, or other system changes made to your legacy product are not
converted to XG.
3
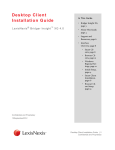
If not already installed, install a Smart Client to access XG Service.
See the Desktop Client Installation Guide.
4
We convert your legacy product on the conversion date.
5
We send you an email indicating the conversion is complete. 6
Test your converted data in XG.
See "Data Conversion and Testing" on page 20.
Back up the data in its original legacy format by exporting your records, Accept List, and/or deny lists from the legacy product before the end of the testing period.
7
We deactivate your legacy product on the deactivation date.
8
If needed, finish setting up XG.
See the Smart Client User Manual, "System Settings" chapter.
Client-hosted Legacy Product to XG Service
If you are moving from a legacy product hosted by your organization to XG Service, we perform the conversion. We coordinate the conversion with your organization's primary conversion contact, including:
• Setting the data conversion date.
• Setting the legacy product deactivation date.
• Transferring your encrypted legacy data to LexisNexis.
To complete some of the conversion steps, you may need to consult your legacy Bridger Insight manual.
Legacy Conversion Guide |
Confidential and Proprietary
FIN025—6 April 2015
11
Conv e rt from L eg acy P r o d u cts t o XG Se rv i c e
1
Bridger Insight Technical Support contacts you to set conversion and deactivation dates.
2
Create a legacy conversion directory:
a Open the legacy product.
b Merge duplicate Accept List records and index the Accept List.
c Delete FinCEN deny lists.
d Index remaining deny lists.
e Copy the entire legacy installation folder, usually named "Bridger", into a separate conversion directory.
i
Any searches, results or other system changes made to your legacy product after the conversion
directory is created will not be converted to XG.
3
Encrypt the conversion directory with 256‐bit AES encryption using WinZip 9.0 or later.
For more information on encrypting the directory using WinZip, refer to the following knowledge base article in Customer Support at:
https://bridgerinsight.custhelp.com/app/answers/detail/a_id/712/
4
Provide Bridger Insight Technical Support the password you created when encrypting the conversion directory.
5
Send the encrypted conversion directory to LexisNexis.
6
If your files require SFTP (secure shell file transfer protocol) transfer, we provide you with SFTP credentials the week of your conversion.
i
We cannot accept unencrypted files.
SFTP credentials are good for three days. For more information on sending data via SFTP, refer to the following knowledge base article in Customer Support at:
https://bridgerinsight.custhelp.com/app/answers/detail/a_id/1252/
7
If not already installed, install a Smart Client to access XG Service.
For multiple legacy installations, contact Bridger Insight Technical Support.
See the Desktop Client Installation Guide.
8
We convert your legacy product on the conversion date.
9
We send you an email notification indicating the conversion is complete. 10 Test your converted data in XG.
Legacy Conversion Guide |
Confidential and Proprietary
FIN025—6 April 2015
12
See "Data Conversion and Testing" on page 20.
To backup your data in its original legacy format, export your records, Accept List, and/or deny lists from the legacy product before the end of the testing period.
11 If needed, finish setting up XG.
See the Smart Client User Manual, "System Settings" chapter.
12 Delete all files from the data files folder (usually named "BridgerDataFiles") in the legacy installation directory to avoid searching against outdated information.
This does not remove the legacy product or the optional Watch List Manager from your system. After testing and archiving, you may want to uninstall these products.
For information on uninstalling your legacy product, refer to the following knowledge base article in Customer Support at:
https://bridgerinsight.custhelp.com/app/answers/detail/a_id/1323/
For information on the Watch List Manager, request the Watch List Manager 2.0 User Manual from the Bridger Insight Technical Support team.
Client-Hosted Legacy Product to XG Enterprise
Through our implementation services, we help clients install XG Enterprise. These services may include legacy data conversions as an optional service. For assistance with your conversion at an additional cost, contact your sales representative.
If not, your organization can perform the conversion using the XG conversion tool. If you have more than one XG application server, run the conversion tool from one location to convert data on multiple servers. Only Enterprise Manager users with system administrator user access level can convert legacy data.
To complete some of the conversion steps, you may need to consult your legacy Bridger Insight manual.
Conv e rt from L eg acy P r o d u cts t o XG En t e rp ri s e
1
Once XG Enterprise is installed, log in to Enterprise Manager and create the necessary XG clients.
See the following in the Enterprise Manager Manual:
Legacy Conversion Guide |
Confidential and Proprietary
FIN025—6 April 2015
13
• "Log in to Enterprise Manager" section
• "Create Bridger Insight XG Clients" instructions
2
Create a legacy conversion directory:
a Stop performing searches in the legacy product.
b Open the legacy product.
c Merge duplicate Accept List records and index the Accept List.
d Delete FinCEN deny lists.
e Index remaining deny lists.
f
Copy the entire legacy installation folder, usually named "Bridger", into a separate conversion directory.
i
Any searches, results or other system changes made to your legacy product after the conversion
directory is created will not be converted to XG.
3
Open the XG conversion tool on the application server.
4
On the Conversion Tool Login window:
a Enter your user ID and password.
b Click Lo gi n .
The user completing these steps must have full access to the product.
5
On the Conversion Tool window:
a Click Browse and locate the legacy conversion directory.
If your directory is on a network drive, enter a UNC path: \\<computer name>\<file name>.
b Select the applicable time zone from the Data Server Time zone field.
The timestamp applied to converted data is based on the selected time zone.
c Enter the client ID that will receive the converted data.
d Click Con ver t .
i
Do not repeat the conversion on legacy data. Repeated conversions create duplicate data in XG.
If you want to create multiple XG clients from a conversion directory, repeat these steps each client.
6
Test the converted data in XG.
See "Data Conversion and Testing" on page 20.
Legacy Conversion Guide |
Confidential and Proprietary
FIN025—6 April 2015
14
7
If needed, finish setting up XG.
See the Smart Client User Manual, "System Settings" chapter.
8
Delete all files from the data files folder (usually named "BridgerDataFiles") in the legacy installation directory to avoid searching against outdated information.
This does not remove the legacy product or the optional Watch List Manager from your system. After testing and archiving, you may want to uninstall these products.
For information on uninstalling your legacy product, refer to the following knowledge base article in Customer Support at:
https://bridgerinsight.custhelp.com/app/answers/detail/a_id/1323/
For information on the Watch List Manager, request the Watch List Manager 2.0 User Manual from the Bridger Insight Technical Support team.
Deny List and Accept List Importing
You can convert only your legacy Accept List or deny lists by exporting the lists from your legacy product and importing them into XG. Before you export and import, consider the following:
• If you are importing both the Accept List and deny lists, import the deny lists f irst.
• If you are using a 5.x product, you must upgrade to Bridger Insight 6.x before you export your Accept List and/or deny lists. For more information on upgrading to Bridger Insight 6.x, contact Bridger Insight Technical Support.
• If you have multiple instances of your legacy product, you can import several legacy accept lists into one XG accept list or several deny lists into one custom watchlist.
Deny List Importing
In XG, deny lists are referred to as custom watchlists. Once you have imported your legacy deny lists, test the custom watchlists in XG. See "Deny List Testing" on page 22.
Legacy Conversion Guide |
Confidential and Proprietary
FIN025—6 April 2015
15
I mport Deny Lists
1
Edit legacy records with Unknown entity types in your legacy product:
a On the Deny List tab, search for Unknown entity type.
b Double‐click the name.
c Select Entity Ty pe and choose either Individual or Business.
d Click OK .
e Repeat for each Unknown entity record.
Repeat these steps for all deny lists to import. For importing instructions, see the Smart Client User Manual.
2
Edit legacy records with Unknown entity types in a Microsoft® Excel file:
a Export the data to an Excel file.
b Change the entity type to Individual or Business.
c Save the file as Text (Tab Delimited).
Repeat these steps for all deny lists to import. For importing instructions, see the Smart Client User Manual.
3
Export a deny list from your legacy product:
a Index the deny list.
b Export the deny list in ASCII format.
For exporting instructions, see the Smart Client User Manual.
4
Import the deny list into XG:
a Log in to XG.
b On the List Maintenance main menu, click C us t om Wat c h li s ts .
c Create a custom watchlist with the exact same name as the legacy deny list.
The name is not case sensitive, but it is sensitive to spacing within the name.
d Select the custom watchlist and click Imp or t .
e In the Input Format field, select B r id ge r In si gh t 6 .x F or m at .
f
Click Browse File and locate your deny list export file.
g Double‐click the file. Legacy Conversion Guide |
Confidential and Proprietary
FIN025—6 April 2015
16
h Click Imp or t .
i
If the list names are not exactly the same, accept lists containing watchlist information from those
deny lists cannot suppress subsequent false positives that match against legacy deny lists.
See the Smart Client User Manual, "Custom Watchlists" chapter.
5
Index the list:
• For lists set to automatically index, click the Maintain Lists table.
• For lists set to manually index, select the list and click I n dex L is t .
6
Test the imported deny list.
See "Deny List Testing" on page 22.
Accept List Importing
XG supports multiple accept lists. You can import your Accept List into the XG default accept list or into another accept list. Once you have imported your legacy Accept List, you should test the accept list in XG. See "Accept List Testing" on page 23.
I mp o r t t h e A c c e p t L i s t
1
Export the Accept List from Bridger Insight 6.x:
a Merge duplicate Accept List records.
b Index the Accept List.
c Export the Accept List in ASCII format.
For exporting instructions, see your legacy product user manual.
2
Import the Accept List into XG:
a Log in to XG.
b On the side menu, click Acce pt Lists .
c If you want to import into a new accept list, create the list. d Select the accept list to import into and click Impo rt .
e In the Input Format field, select B r id ge r In si gh t 6 .x F or m at .
f
Click Browse File and locate your accept list export file.
Legacy Conversion Guide |
Confidential and Proprietary
FIN025—6 April 2015
17
g Double‐click the file. h Click Imp or t .
See the Smart Client User Manual, "Accept Lists" chapter.
3
Index the list:
• For lists set to automatically index, click the Maintain Lists table.
• For lists set to manually index, select the list and click I n dex L is t .
4
Merge duplicate records in the list:
a Select the imported list.
b Click Me rge Du pl i cat e s .
See the Smart Client User Manual, "Accept List Record Merging" section.
5
Test the imported Accept List.
See "Accept List Testing" on page 23.
Legacy Users to XG
Several Bridger Insight 6.x products allow you to export users. XG allows you to import users. Using these features, you can save time by transferring users from your legacy product to XG.
Not all legacy products allow you to export users. For example, 5.x clients may need to upgrade to a 6.x legacy product to complete these steps.
If you have fewer than 20 users, it may be easier to re-enter the users than to perform these steps.
P r e pa r i n g 6 .x U s e rs f o r I m p o r t i n t o X G
1
From Bridger Insight 6.x, open the User Access Rights window.
Path to this window will depend on your 6.x version. 2
Click Ex po rt User Re po rt .
3
To create the export file:
a Click Browse .
Legacy Conversion Guide |
Confidential and Proprietary
FIN025—6 April 2015
18
b Navigate to an appropriate location.
c Name the file.
d Click Sa ve .
4
On the Export User Report window, click Export .
5
Open the file in Excel.
6
Delete the first row.
The row contains the report name and creation date.
7
Move the User Name column, so it is the first column.
The User Name column should be column A.
8
Add and delete columns as necessary to make this column order:
• User Name
• User ID
• Email Addresses
• Roles
• Division
• Division Access
9
You must provide an email address for each user.
10 You may provide a role name.
The Role column must be blank or spelled exactly as roles are in XG.
Users cannot log in to XG without an assigned role.
11 If the Division column is empty, you may provide a division name.
The Division column must be blank or spelled exactly as divisions are in XG. You can add multiple divisions; they must be separated by a pipe character (|).
If you plan to use divisions, they must be created in XG before the import or the import will fail.
12 For the Division Access column:
• In the Division column if there is a division name followed by "(D)", delete the "(D)" and enter "Assigned" in the Division Access column.
Legacy Conversion Guide |
Confidential and Proprietary
FIN025—6 April 2015
19
• If you added a division name for a user, you can enter either "All" or "Assigned" in the Division Access column.
• For users with no division name, enter "All" in the Division Access column.
Use "Assigned" for users who should only access the divisions they belong to.
Use "All" for users who can access all division results.
13 Delete the heading row.
The file imported into XG should have no heading information.
14 Import the file into XG.
See the Smart Client User Manual, "User Import" section.
Data Conversion and Testing
Once your legacy data is converted, review and test the data in XG. The following sections detail different types of converted data and how to test the data in XG. section describes the minimum data testing your organization should perform. You may need to
This
conduct additional data testing to verify that it supports your organization's business processes.
The sections are organized to help you test your data eff iciently. Test the data in the order provided.
Depending on the data converted and your planned use of the product, you may need to complete the following tasks to use the product effectively:
• Assign users to converted divisions.
• Add accept lists and custom watchlists to predef ined searches.
• Import FinCEN custom watchlists.
• Check that the index settings for accept lists and custom watchlists are set as intended.
• For XG Enterprise installations, check conversion and accept list logs.
For more information on using XG, see the Smart Client User Manual or Browser Client User Manual.
Legacy Conversion Guide |
Confidential and Proprietary
FIN025—6 April 2015
20
Conversion Log
XG Enterprise clients have access to a conversion log f ile to help troubleshoot conversion issues. The log f ile may record converted f iles, truncated data, or conversion errors. This log f ile is located in the Logs folder of the XG installation directory on the application server. A conversion log is created for each XG client containing converted legacy data. The default path is: D:\LexisNexis\Bridger Insight XG\Logs\ConversionLog_<ClientID>_<ConversionDate>.txt
The conversion log may contain the following information:
• Batch runs with duplicate run IDs
• Conversion errors
• Converted f iles
• Conversion f iles not in the conversion directory
• Deny list records in which the Unknown entity type was converted to Individual
• Records with invalid information
• Truncated data
• Accept List records not added to the default accept list
Accept List Log
XG Enterprise clients have access to an accept list log f ile, which records reasons accept list records were not converted. This log f ile is located in the Logs folder of the XG installation directory on the application server. An accept list log is created for each XG client containing converted legacy data. The default path is: D:\LexisNexis\Bridger Insight XG\Logs\AcceptListLog_<ClientID>_<ConversionDate>.txt
The accept list log contains the reason why a legacy accept list record was not added to the XG accept list. The following reasons may be listed:
• No matches generated: The entity no longer matches the watchlist in XG due to improved false positive reduction functionality or the absence of a legacy deny list or multi‐f ile watchlist during conversion.
• Matches are different than original match records: The entity matches additional or different watchlist information or the legacy deny list or multi‐f ile watchlist were absence during conversion.
Legacy Conversion Guide |
Confidential and Proprietary
FIN025—6 April 2015
21
• Missing unique identif ier and/or address: The record does not contain a unique identif ier or complete address.
Deny List Testing
The way your existing deny list is handled during the conversion process depends on whether it has a unique name. If a custom watchlist exists in XG with the same name as a legacy deny list, the deny list data is appended to the custom watchlist. If a custom watchlist does not exist in XG, a new list is created for the legacy deny list data during the conversion. If the deny list is empty (has no records), the conversion creates an empty custom watchlist.
you imported the deny list instead of converting it, the records are contained in the custom
Ifwatchlist
you imported into.
Converted custom watchlist records indicate they were created during a legacy conversion with a comment noting the date the conversion occurred.
During the conversion and import processes, not all data is directly converted:
• Legacy products do not have f ield size restrictions. Legacy data is truncated to meet XG f ield restrictions. Truncated data is not available.
• In the State f ield, only abbreviations recognized by the United States Postal Service or full‐text versions of the abbreviation are converted. For example, both "Missouri" and "MO" are acceptable state identif iers and will be converted as is.
• Legacy products do not store the date a record was added to a list. The Date Listed f ield in converted records is blank. Therefore, you cannot query these records in XG using the Date Listed f ield.
• XG does not support the Unknown entity type for custom watchlists. Converted Unknown entity type custom watchlist records will have an Individual entity type.
• XG does not support address information for records with a Vessel entity type. This information is not converted.
Custom watchlists are set to automatically index. If legacy lists were set to manually index, you may need to set the new custom watchlists to manually index as well. See the Smart Client User Manual, "Manually Index Custom Watchlists" instructions.
After the conversion is complete, test custom watchlists to verify that they converted correctly.
Legacy Conversion Guide |
Confidential and Proprietary
FIN025—6 April 2015
22
Test Converted or Impo rte d Custom Watchlis t Records
1
Log in to XG.
2
Create a predefined search only searching the converted custom watchlist. See the Smart Client User Manual, "Setting Up Predefined Searches" instructions.
3
Perform a real‐time search against each converted deny list record using the predefined search. See the Smart Client User Manual, "Perform Real‐Time Searches" instructions.
All searches should generate watchlist results if the deny list converted correctly.
You can now add the custom watchlist to predefined searches.
Accept List Testing
If you converted your Accept List using the conversion tool, the Accept List is appended to the default accept list in XG. If you imported your Accept List the records append to the accept list you imported into.
During the conversion and import processes, XG requires that each accept list record contains either an ID number or an acceptable address. XG only converts records meeting at least one of these requirements. Acceptable addresses must include, at a minimum, information in one of the following data combinations:
• Address and postal code
• Address, city, and state
• Address, city, state, and postal code
• Address, city, and country
• Address (Full address in street 1 and street 2; 4 or more words required), no city, state, or zip
Any other address combinations are considered partial addresses and the record is not converted or imported.
In addition, XG compares the legacy accept list records to watchlists, optional data sets, and custom watchlists using a scoring threshold of 80. The legacy accept list record is not converted if the customer record:
• No longer matches the watchlist.
Legacy Conversion Guide |
Confidential and Proprietary
FIN025—6 April 2015
23
• Now matches a different record in the watchlist.
• Now matches a record in a different watchlist.
XG may determine a customer record is no longer a match because of changes to watchlists, optional data sets, or custom watchlists. The customer record may not match because of false positive reduction improvements in the XG matching algorithm.
When converting and importing legacy data:
• Legacy data is truncated to meet XG f ield restrictions. Legacy products do not have f ield size restrictions. Truncated data is not available. • Entity types were not set for legacy accept list records. Converted accept list records have an Unknown entity type in XG. • Legacy products do not store the date an entity was added to a list. The Date Listed f ield in converted records is blank. Therefore, you cannot query these records in XG using the Date Listed f ield.
• If a drivers license number is not present, drivers license state and date information is not converted. • In the State f ield, only abbreviations recognized by the United States Postal Service or full‐text versions of the abbreviation are converted. For example, both "Missouri" and "MO" are acceptable state identif iers and will be converted as is.
• Watchlist f ile names in the accept list record's match information are converted to the XG watchlist name.
Converted accept list records indicate they were created during a legacy conversion with a comment noting the date the conversion occurred. In addition, the record lists the batch f ile name associated with the record.
Legacy product Accept List indexing settings are not converted. You should verify that the list is set to index, manually or automatically, to meet your needs. If you want this list to manually index, see the Smart Client User Manual, "Manually Index Accept Lists" instructions.
After the conversion is complete, test the default and any additional accept list to verify that legacy accept list records appended correctly.
Test Converted or Impo rte d Accept List Re cord s
1
Log in to XG.
Legacy Conversion Guide |
Confidential and Proprietary
FIN025—6 April 2015
24
2
Export the converted or imported accept list.
See the Smart Client User Manual, "Export Accept Lists" instructions.
3
Create a predefined search with the converted accept list, watchlists, custom watchlists, and optional data sets selected for searching.
See the Smart Client User Manual, "Setting Up Predefined Searches" instructions.
4
Use the exported accept list data to perform a real‐time search against all converted or imported accept list records using the predefined search.
See the Smart Client User Manual, "Perform Real‐Time Searches" instructions.
If a match is reported, compare the accept list record to the result record to determine if the match contains new information or was generated by a new watchlist. If the information is not new, contact Bridger Insight Technical Support at: https://bridgerinsight.custhelp.com
You can now add the accept list to predefined searches.
Account Types
Account types are converted to account types if they do not already exist in XG. In most cases, if the names do not match exactly, the legacy account type converts. However, if the Loans account type exists in your legacy product and the Loan account type exists in XG, the Loans account type is converted to Loan. If the Loan account type does not exist in XG, the Loans account type converts as is.
Verify Acco unt Typ es
1
Access your account types in your legacy product.
2
In XG, click Syste m Se tting s .
3
Click the Sy stem Values tab.
4
Select A c cou n t Ty pe s .
5
Verify that your legacy account types appear in XG.
Data List/Watch List and ID Verification Statuses
Data list and ID Verif ication statuses in legacy products are converted to record statuses, if they do not already exist in XG. While the legacy product had two statuses, XG has one. So, if a data list status is applied to a result record, it is converted to the current record status in XG. If the record does not have Legacy Conversion Guide |
Confidential and Proprietary
FIN025—6 April 2015
25
a data list status, the ID Verif ication status (if one is applied) is set as its current record status. Records without set statuses do not have a record status set in XG.
Ver i f y Sta t u s e s
1
Access your data list statuses in your legacy product.
2
In XG, click Syste m Se tting s .
3
Click the Sy stem Values tab.
4
Select Re cor d Statu ses .
5
Verify that your legacy data list/watch list statuses appear as XG record statuses.
6
Access your ID Verification statuses in your legacy product.
7
Verify that your legacy ID Verification statuses appear as XG record statuses.
Deny Reasons
Some default custom watchlist reasons in XG are the same as the deny reason defaults in legacy products. Deny reasons that do not exist as defaults are created within XG as custom watchlist reasons.
Verify Cust om Watch list Rea sons
1
Access your deny reasons in your legacy product.
2
In XG, click Syste m Se tting s .
3
Click the Sy stem Values tab.
4
Select Cu sto m Wa tc hlists R easo n s .
5
Verify that your legacy deny reasons appear as XG custom watchlist reasons.
Divisions
Divisions in the legacy product are converted to divisions in XG if they do not already exist in the new product. In XG, a description of each division is required so the conversion repeats the division name in the Description f ield. Legacy Conversion Guide |
Confidential and Proprietary
FIN025—6 April 2015
26
Verify Divi sions
1
Access your divisions in your legacy product.
2
In XG, click Use r Acce ss .
3
Click the Division s tab.
4
Verify that your legacy divisions appear as XG divisions.
You can now add users to the divisions. See the Smart Client User Manual, "Divisions" section.
Runs
Scan Files and Scan IDV Files runs are converted to batch runs. During the conversion:
• Legacy products do not record search policy settings used in the search. Therefore, these settings are not available in XG on the Batch Details report or for the batch run's watchlist and due diligence settings.
• If a FilesChecked f ile was not converted or does not contain the run associated with a result record, XG lists the batch f ile as Unknown on the Manage window. • The Records f ield on the Run Results tab of the Manage window states "0 out of 0 Records Processed." For certain runs, the Records f ield may state "1 out of ‐1 records." This is due to inconsistencies in the legacy product.
• If two or more runs have the same system‐def ined run ID (due to a legacy error), the results are combined into one run and are logged in the conversion log f ile.
• Search policies did not exist in 5.x. For 5.x legacy runs, XG lists search policies as an Unknown predef ined search in the Search Name tab. The description indicates that the run was converted from a legacy product.
Verify Runs
1
Access your Scan Files runs in your legacy product.
2
In XG, on the Result Processing main menu, click M an ag e and click the Batch Runs tab.
3
Verify that legacy runs have converted to XG.
Repeat all steps for Scan IDV Files runs.
Legacy Conversion Guide |
Confidential and Proprietary
FIN025—6 April 2015
27
Records
Records generated from legacy searches are converted to result records. During the conversion:
• Legacy products do not have f ield size restrictions. Legacy data is truncated to meet XG f ield restrictions. Truncated data is not available.
• Legacy products do not store the time a record was created. Converted result records show 12:00 p.m. as their creation time.
• Legacy products may not always store the date a record was created. If a search date cannot be determined, the result record will show the date the conversion occurred.
• In the State f ield, only abbreviations recognized by the United States Postal Service or full‐text versions of the abbreviation are converted. For example, both "Missouri" and "MO" are acceptable state identif iers and will be converted as is.
• Documentary identity verif ication information is converted to record details information for each result record.
• In XG, you cannot query converted result records by ID Verif ication errors.
• Legacy records converted to XG are unassigned and have a closed alert state.
• For 5.x legacy records, XG lists search policies as an Unknown predef ined search in the Origin f ield of the Record Details tab.
In XG, the record history for each converted result record contains the following:
• An event detailing the original creation of the record in the legacy product, the user name of the person who created the record, and the date the record was created. Legacy products do not store the time a record was created. Converted records show 12:00 p.m. as their creation time.
• An event detailing the legacy conversion of the record and the date and time the record was converted.
• An event for each record status set for the record in the legacy product detailing who set the status and the date the status was set. Legacy products do not record the time a record status was set. Converted records show record status set at 12:00 p.m.
due diligence searches cannot be performed on converted result records of individuals
Secondary
with unparsed names.
In XG, a Results Summary Report generated from a period with legacy data contains the following:
Legacy Conversion Guide |
Confidential and Proprietary
FIN025—6 April 2015
28
• Demonstration ID Verif ication records in legacy products are not converted but are included in the ID Verif ication Record Summary totals.
• The Batch Search total does not count blank rows in legacy batch f iles.
• Legacy records having a False Positive current status and present on an Accept List are counted in the Closed Alerts total.
• Result records with documentary IDV data are counted twice in Watchlist Record Summary totals.
Legacy OFAC reports are converted to OFAC Report of Blocked Transactions.
Verify Resu lt Records
1
Access your records in your legacy product.
2
Log in to XG.
3
Access converted result records:
a On the side menu, click Qu ery.
b Set the Search results from date fields to span the time period the results were created in the legacy product.
c In the Source area's field, select All Res ults .
d In the Criteria area's Input list, click Rec ord State .
e In the Record Changed By field, enter Conversion. f
Click Su bm it Qu ery.
The converted records display on the Result View window.
4
Verify that all records have converted to XG.
For documentary IDV records, the information is located on the Record Details tab.
F ind Con verted Records that Req uire Proce ssing
1
Log in to XG.
2
Locate converted result records:
a On the side menu, click Qu ery.
b Set the Search results from date fields to span the time period the results were created in the legacy product.
Legacy Conversion Guide |
Confidential and Proprietary
FIN025—6 April 2015
29
c In the Source area's field, select All Res ults .
d In the Criteria area's Input list, click Rec ord Status .
e In the Current Record Status field, select C o n vers io n . f
Click Su bm it Qu ery.
The converted records display on the Result View window.
The Current Record Status field only works if the recommended step of changing statuses to "Conversion" for unprocessed legacy records was performed.
3
To add legacy records to your XG workflow, do one of the following:
• Process the result records.
• Change the alert state to Open and assign the records to a user or role.
See the Smart Client User Manual, "Search Results" chapter.
Legacy Conversion Guide |
Confidential and Proprietary
FIN025—6 April 2015
30