1
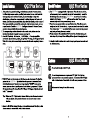
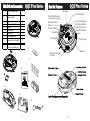
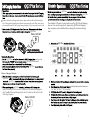
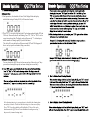
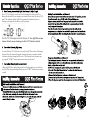
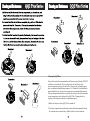
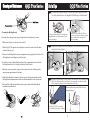
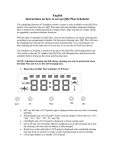
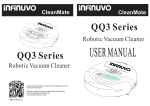
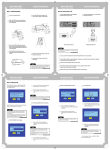
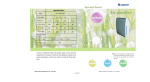
CleanMate
CleanMate
QQ2 Plus Series
Robotic Vacuum Cleaner
USER MANUAL
QQ2 Plus Series
Robotic Vacuum Cleaner
QQ2 Plus Series
QQ2 Plus Series
Sonic Wall Setup
Operations
Useful Tips
QQ2 Plus Series
QQ2 Plus Series
QQ2 Plus
QQ2 Plus
QQ2 Plus
QQ2 Plus
serves
Special Bounce
"S" Shap e
QQ2 Plus
Sp iral
Sp iral
Along Wall
Polygonal Sp iral
Sp iral
Sp iral
QQ2 Plus Series
QQ2 Plus Series
QQ2 Plus Series Main
Unit
1
2
Remote control
1
3
4
5
6
7
8
Filter
Rechargeable battery
Charger
User manual
Hand brush
Self charging base
2
1
1
1
1
1
9
Fragrance (not included)
1
10
Sonic Wall (included for
QQ2 Plus II model only)
1
1
QQ2 Plus Series
Bumper
Sonic Wall Sensor
Control Panel
(for QQ2 Plus II only)
1
Remote Control
Sensor
Power Switch
Dust Bin
Side Light
Time Set Button
Start/Stop Button
Remote Control
Dust Bin Release
Button
Air Vent
2
Battery Charging
Socket
7
3
6
Clean MATE 365
9
QQ2 Plus Series
4
8
10
5
4
Handle
QQ2 Plus Series
QQ2 Plus Series
1.Turn on the power button, the power blue LED will light up.
2.Press the Time Set Button to set the length of operation time. The numerical
panel will display the operation time. When power is first turned on, the
default setting is 40 minutes. The setting parameters are from 10 to 80 minutes
in 10-minute increments.
3.Try to set the operation time by the size of the area to be cleaned in order to
prevent overuse of the battery and shortening its lifespan.
4.When the battery is low, the Low Battery light will blink red.
5.In the following situations, the error light will light up: over charging battery
, overloaded motor, and no traction for more than three consecutive
seconds.
Error Indicator
Operational Time &
MODE Display
Vacuum Motor
Off Indicator
Timer set
S tart/Stop Button
Power On/Off
Ultraviolet On
Indicator
Power On
& Charging
Indicator
Low Battery Indicator
LED and Audible Indicator
Audible Indication
Status
Description
Times up (when the cleanning timer was set)
Long Beep once followed by one Brief Beep
Battery Low, cleanning function off
Long Beep once
Error
Brief Beep three times
Fully charged
Fully charged and start vacuuming again
(when the docking station is set that after
Brief Beep three times and One long Beep
fully charged, QQ-2 Plus will go out to
vacuum again)
LED Indication
Function of each Button:
1.Start Button: Press the Start Button to begin the automatic cleaning of the
room.
2.Stop Button: Press the Stop Button to stop the activity of the unit, and it will
emit a long sound.
3.Timer button: Use this button to set the cleaning time of the QQ2 Plus.
4.Directional Buttons: Forward: when press forward QQ2 Plus will moving
until user press forward button again or stop by obstacle.
Right, left and backward button: use these buttons to manually drive the
unit to the right, left and backward.
5.Mode Button: Press this button to pick a specific cleaning pattern for the
QQ2 Plus. By default the unit cleans in "Automatic" Mode (All 5 cleaning
movements).
Press the "Mode" button once to make the unit clean in"Spiral" mode only.
The timer will display "1" for one minute and then will show the cleaning
time. When the QQ2 Plus comes in contact with any object while
running in this mode, it will automatically stop its movement.
Press the "Mode" button again (Twice)to make the QQ2 Plus clean in
"Special Bounce" mode only. The Timer will display "2" for one minute.
Press the"Mode" button again (Three times) to make the unit run in "Along
Wall" mode only. The Timer will display "3" for one minute.
Press the "Mode" button again (Four times) to make the unit run in "S
Shape" mode only. The timer will display "4" for one minute.
Press the "Mode" button again (5 times) to make the unit run in
"Polygonal Spiral" mode only. The Timer display will show "5"
for one minute.
QQ2 Plus Series
Press the "Mode" button again (6 times) to return to "Automatic"
mode (all 5 cleaning patterns). The Timer display will show "A" for one
minute.
6.UV Button: Allows you to turn On and Off the ultraviolet light as needed.
7.Vacuum Motor Off Button: Press this button to control the On/Off of the
vacuum motor.
8. Home Button: Use this Button to make QQ2 Plus go back to the
charging base.
9. Power Off Button: to power Off QQ2 Plus manually by pressing
power Off Button.
QQ2 Plus Series
Sonic Wall Setup
QQ2 Plus II
The Sonic Wall only works with CleanMates that have the Sonic Wall
Sensor on their bumper (refer to diagram on page 5). It will create an
invisible barrier that the CleanMate will not cross. This way, users can easily
confine the CleanMate to one room or certain area to improve cleaning
efficiency.
Sonic Transmitter
Charging Socket
LED Power
indicator
Power Switch
Sonic Transmitter
Instructions:
1. This CleanMate Sonic Wall is powered by 2 AA batteries. Make sure to
install the included AA rechargeable batteries in correct polarity.
2. To turn on the Sonic Wall, slide the power switch to position "1".
3. For best effect, put the Sonic Wall on the other side of the door (see picture
below) when you want to confine it in certain area. The CleanMate unit will
detect the ultrasonic barrier from the Sonic Wall and not cross the invisible
barrier line.
4. The effective distance of the Sonic Wall barrier is about 10 ft long.
5. To turn off the Sonic Wall, slide the power switch to position "0" to save
battery power.
6. The LED power indicator on Sonic Wall will start blinking when its battery
power is low. User can charge the Sonic Wall battery using the same
CleanMate charger (item No. 5 on page 4) by plugging it into the charging
socket on Sonic Wall.
2
1
When CleanMate detects the ultrasonic signals from
Sonic Wall, it will turn around and head to another
direction.
QQ2 Plus Series
Scheduler Operations
QQ-1
QQ2
Plus
Series
QQ-1
Clean Mate 365
QQ2 Plus
QQ2 Plus
Connect the battery charger to the power input socket on the back of home base
first. Then, place the metal plate of home base against the wall. Don't leave loose
wire around the wall. Finally, plug battery charger to AC power outlet on the wall.
QQ2 Plus
WALL OUTLET
The scheduler LCD panel is located on the top of the QQ2 Plus self-charging
base unit. User needs to plug the AC adapter into QQ2 Plus self-charging
base, and power up the scheduler before setting up the clock and cleaning
times.
QQ2 Plus
QQ2 Plus
and turn it on
The QQ2 Plus should
QQ2 Plus
Battery Charging Methods
QQ2 Plus
QQ2 Plus
QQ2 Plus
matter if the QQ2 Plus is on or off. Make sure to connect the charger to
the CleanMate first and then plug it to the AC outlet on the wall. See the
following diagram.
WALL OUTLET
10
seek day display will be shown as
“Su”,”Mo”,”Tu”,”We”,”Th”,”Fr” and”Sa”.
11
QQ2 Plus Series
Operations
QQ2 Plus Series
Operations
2.1 Once powered on, the scheduler will enter Clock Display Mode and display
initial default setting of Sunday 00:00 (in 24 hours time format)
2.2 Press “SET” to set up the clock time (enter Clock-setting mode and display SET and
CLK icon). Time and week will start blinking. Press “Hr”, “Min” or “Wk” to set the
correct time and week day. The display value will increase by “1” with each press,
and the number will change rapidly if you hold the button.
The clock will be set and display will become steady (SET and CLK disappear) if
there is no key input for one minute (idling or no action).
-
User can schedule the QQ2 Plus unit to clean on any day of the week, up to 7 days
per week (one cleaning time per day and same cleaning time on each day).
After cleaning time is set, you can choose to schedule the cleaning time
on any day in a week. The initial default setting is to clean on everyday.
Press “Wk”, then the scheduler will highlight all 7 days of the week,
which means the QQ2 Plus will start automatic cleaning once a day, 7
days a week (at same cleaning time).
12
13
QQ2 Plus Series
Operations
QQ2 Plus Series
Press “GO” (for about 1 second) on the self-charging base, and you will see
Battery, Brush and GO icons turned on (as shown below) on the left side of LCD
panel. This indicates that the QQ2 Plus vacuum will automatically start a
cleaning cycle right after the battery is fully charged.
Press the “GO” button again to turn this function off. Note: QQ2 Plus vacuum
cleaner will only run one cleaning cycle after “GO” button is selected.
If you hold down “GO” button for 5 seconds, the QQ2 Plus on the self-charging
base will leave the base and begin the cleaning right away, no matter whether
the battery has been charged in full or not. This function works the same way
as you push “START” button on the remote control on Section 7.
When the QQ2 Plus is being charging on the self-charging base, you can direct
the QQ2 Plus to begin cleaning when you press “START” button on your remote
control.
QQ2 Plus Series
Illustration 1
14
Illustration 3
Illustration 2
15
Illustration 4
QQ2 Plus Series
QQ2 Plus Series
battery
QQ2 Plus
QQ2 Plus
CleanMate
QQ2 Plus
QQ2 Plus
QQ2 Plus
QQ2 Plus
QQ2 Plus
QQ2 Plus Series
QQ2 Plus Series
Cleaning the QQ2 Plus
Over time dust and dirt can accumulate in different areas of the unit, DO NOT
use Water to clean the unit. This is an electrical unit, and if any of the
electric components get wet, the unit will no longer work, and could cause a
short circuit and potentially harm someone. Use Canned Air, the Hand Brush
provided with the unit, or a dry cloth to wipe away accumulated dust and dirt.
After operating the machine for a period of time, dust and dirt will accumulate
on the vacuum entry on the bottom of the QQ-2 Plus. Cleaning this area
regularly will help ensure that the unit performs properly.
1.Make sure the power of the QQ-2 Plus is turned off.
2.Turn the unit upside-down, and brush any dust that has accumulated inside
the vacuum entry as shown below. Shake the dust out into a trash can.
QQ2 Plus Series
Useful Tips
QQ2 Plus Series
Clear the area where the QQ-2 Plus is to clean of any items can
be easily knocked over or caught in the Rolling or Side Brushes.
Cleaning the Rolling Brush
Hair and other stringy items can get caught in the rolling brush over time.
In the area where the QQ-2 Plus operates,
it might knock over items such as vases,
glasses, or lamps.
In order to provide the QQ-2 Plus a
space for fast and safe cleaning, please
remove small items from the area
before operating.
1.Make sure the power to the unit is turned off.
2.Turn the QQ-2 Plus upside-down and place it on a flat surface with the back
of the unit facing you.
Adjust the distance between furniture, walls and other objects to
beat least 36 cm (14 in).
36cm
3.Remove the Rolling Brush from its compartment by grasping the left side of the
Rolling Brush, and sliding it toward the right.
4.Lift the free end of the Rolling Brush out of the compartment, then slide the
Rolling Brush to the left, freeing it from the flexible insert.
5.Manually remove any hair, string or other objects from the rolling brush to
ensure proper performance of the unit.
6.With the Rolling Brush removed, loosen any dirt that has accumulated in the
Rolling Brush compartment with a brush, then dump the dirt into a trash can.
7.Re-install the rolling brush following the steps outlined in Rolling Brush
Installation and Removal
Do not let the loose edges of rugs, drapes, table cloths, etc to get caught in the
QQ-2 Plus. Roll under the loose edges of rugs and make sure that any table
cloths, drapes, bedding etc do not hang down to the floor.
Remove plastic bags and leftover longshaped garbage
When the QQ-2 Plus is cleaning
rugs, fold under the edges of the rug.
21
16.5 ~ 18.5 cm/sec
Infrared light with more than 3 meters controlling range,
3V button Lithium battery CR2032
5 types: Spiral, Special Bounce, Along Wall, S shape, Polygonal Spiral
36cm(Diameter)x 9cm (H) or 14inch (diameter) x 3.5 inch (H)
3kg
Remote control
Types of movement
Dimension
Weight
The space beneath some furniture is
just high enough for the QQ-2 Plus to
Use a potted plant to block the QQ-2 Plus
get stuck underneath.
Moving speed of machine
Block areas where the QQ-2 Plus could get stuck by placing
objects in the way so that the QQ-2 Plus does not go into these
areas.
0.3 liter
Turn the Power switch
of the unit to OFF.
Description
Clean the vacuum
entry.
Capacity of dust bin
When something is
Turn the QQ-2 Plus
jammed inside the QQ-2 upside-down, and
Plus, it will emit a beeping remove the objects.
sound.
6000 hours continuously
Fixing jams: Objects can get caught in the Rolling Brush and
prevent it from working properly. Immediately turn the unit off,
clear the object causing the jam, and resume normal use.
Life time of UV ray
QQ2 Plus Series
Output: 20Vdc 1000mA
Input: 100 - 240V 50 - 60 Hz
Ni-MH 14.4V, 2.5Ah Rechargeable, 3.5 hours of charging time
QQ2 Plus Series
Useful Tips
T IM
LE
ER
FO
D
R IG
AR
OP
SP
AL
RT
IR
S TA
65
HT
te 3
TE
CK
RW
BA
ST
Ma
U
TM
FT
GH
an
& LI
UV
S IC
Cle
MU
LE
RW
AR
D
AR
ST
HT
T
IRA
5
SP
36
RIG
TE
OP
CK
ate
ST
MU
BA
FO
FT
HT
nM
& LIG
ER
UV
SIC
TIM
Clea
MU
L
22
Battery
Sensor
Fast adapter/charger
Aim the remote control at the sensors on the front of the QQ-2 Plus.
Anything blocking the signal will affect the performance of the
remote control.
Item
and prevent it from going these places.
23
Troubleshooting
QQ2 Plus Series
This trouble shooting guides cover some CleanMate problems that you might
have.
If problem persists, please contact your local warranty provider or
www.infinuvo.com for further assistance.
The repairs that marked * needs to be done by qualified service personal.
QQ2 Plus Series
Please fill in your warranty card completely and submit it to your local
customer service center.
Infinuvo provides you, as the owner of this Infinuvo product, with the
following Limited Warranty Policy.
One year Product Warranty:
CleanMate is stuck
Remove deris & hairs from brushes and wheels
Infinuvo warrants to the original purchaser of this Infinuvo product that the
product is free from defects in original materials and workmanship for a
period of up to one year from the date of initial purchase. This warranty is
only valid if the product has been properly installed and is used in the way
for which it is intended, and has received only factory-authorized repairs,
servicing or alterations.
Under-warranty products that meet these conditions and that function
improperly will be repaired or replaced, at the discretion of Infinuvo.
Battery power is low
Recharge the CleanMate battery
Six months Battery Warranty:
Malfunction charging base
Replace the charging base
Problem Symptoms
Possible Cause
Both ERROR & LOW BATT
indicators are on
Battery installation problem
ERROR indicator on
LOW BATT indicator on
Can not power on the home
charging base
Home base LCD display
malfunction (scheduler version
only)
Can not dock on the home
charging base
Fall down steps or stairs
Always turning in circles to left
Always turning in circles to right
Always going backwards
Main roller brush stuck
Side brush stuck
Remote control does not work
Battery malfunction
Things to do
Make sure battery has good contact with charging
stripes, and battery lifting band faces up.
Charge battery manually for 2 days (see Page 10)
or replace battery.
CleanMate is lifted off ground over 3
Put the CleanMate back on to the ground.
seconds while running
Malfunction LCD display on home base Replace the LCD on charging base. *
Malfunction charging base
Replace the charging base *
Malfunction sensor on CleanMate unit Repair the CleanMate main unit *
Malfunction cliff sensors
Repair the CleanMate main unit *
Left wheel stuck or malfunction
Clean or replace left wheel
Right wheel stuck or malfunction
Clean or replace right wheel
Bumper protection pads not removed Remove bumper protection pads
Malfunction front bumper sensor
Clean or replace front bumper sensor *
Malfunction control board
Replace control board *
Remove debris & hairs from roller brush. Replace
Too much debris & hairs on brush
the roller brush if necessory
Malfunction brush motor
Replace brush motor *
Remove debris & hairs from side brush. Replace
Too much debris & hairs on brush
the side brush if necessory
Malfunction brush motor
Replace brush motor *
Remote control battery bad
Replace the button battery in the remote control .
Remote control defective
Replace the remote control
Infinuvo warrants to the original purchaser of this Infinuvo product that
the original batteries contained within this product will function for a
period of six months. This warranty is only valid if the product has been
properly installed and is used in the way of which it is intended, and has
received only factory-authorized repairs, servicing, or alterations.
Under-warranty batteries that meet these conditions and that function
improperly will be repaired or replaced, at the discretion of Infinuvo.
These warranties contain the sole express warranty of Infunuvo, which
makes no other warranties, expressed or implied. These warranties are
made in lieu of any implied warranties of merchantability or fitness for a
particular purpose. These warranties give you specific legal rights. You
may also have other rights, which vary from state to state.
WHEN YOU RETURN A CLEANMATE PRODUCT OR BATTERY
UNDER THIS WARRANTY, you must first obtain an RMA number by
calling your local customer service center or www. infinuvo.com
Infinuvo reserves the right to request that you submit a letter describing
the circumstances under which the problem occurred and that you submit
invoice and any other supporting evidence and documentation.