1
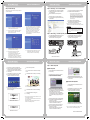
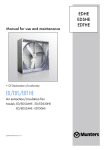
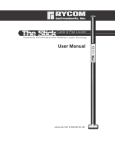
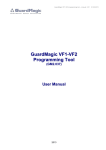
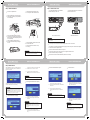
READ ME FIRST
QUICK REFERENCE
Connection & Initial Setup
Step 1. HDD Installation
1
Turn the unit upside down.
2
Open the HDD door case by pressing it
down after unscrewing it (only if there is
screw fastened)
READ ME FIRST
QUICK REFERENCE
Connection & Initial Setup
Step 2. Connection to TV
5
Push the HDD into the bracket and
connect power cable and Data cable
1
Connect EURO SCART in TV and EURO
SCART OUT (TV) in this unit.
1
Connect Audio/Video In of TV and Audio /
Video Out of this unit.
WHITE
RED
YELLOW
3
4
<Euro Scart Verion>
Take out the HDD bracket by pressing
the push point and pulling the handle out
after uncrewing the handle (only if there is
screw fastened)
Push the HDD into the bracket and
assemble it with bracket by fastening 4
screws.
<Standard Version>
NOTE
• For other ways of connecting this unit to TV, please refer to
the User's Manual.
6
Screw the handle of bracket and the unit
and close door case.
7
Screw the Door Case and the unit (if
necessory)
NOTE
• When you disconnect the cables in order to change HDD,
please disconnect them while the holding stick is locked in
order to prevent the connectors from damages.
READ ME FIRST
2
3
Turn on your TV and select the relevant AV input that this unit is connected.
4
5
Switch On the mechanical S/W in the rear panel.
6
Wait for this unit to finish the initialization (about 10-15 seconds)
Connect DC In with the supplied Adapter and plug one end of the power cable into the Adapter
and the other end into power socket.
Press Power button on the front panel or on the supplied remote control
(please insure that battery is installed)
QUICK REFERENCE
Connection & Initial Setup
READ ME FIRST
QUICK REFERENCE
Connection & Initial Setup
Step 3. HDD Format
After initialization of this unit, the following OSD
will appear automatically if HDD is installed first
time for HDD format.
1-1
Press ▲,▼ in order to set the Time Shift
Butter time from 1 hour to 4 hours
1-2
Press ► button and select Next by
pressing Enter or OK button on the front
Key
3
Selection of Multimedia Disc Space
4
Format execution
NOTE
• Selected HDD space for Time Shift buffer can only be used
for Time Shift and can not be used any other purpose.
Select OK by pressing Enter button in the Remote
Control or OK button on the Front Key
2
Recording & Multimedia Disc Capacity
NOTE
• Format will erase all the contents and data in the HDD.
Please format HDD after back up of important contents
and data first.
• The above OSD may not be showed on your TV when it is
connected with HDMI cable. In this case, please try again
with connecting TV through Scart or RCA cable.
1
3-1
Press ▲,▼ in order to select each
capacity of FAT32 and NTFS in Multimedia
disc space.
3-2
Press ► button and select Next by
pressing Enter or OK button on the front
Key
4-1
Press ► button and select Format by
pressing Enter or OK button on the front
Key, Format will start.
4-2
Select OK button by pressing Enter or
OK button on the front Key. Format is
completed.
NOTE
• Please refer to the explanation in File System in Before
you start part in User's Manual.
Time Shift Buffer Disc Capacity
2-1
Press ▲,▼ in order to select each
capacity of Recording and Multimedia
partition.
NOTE
• Recording Partition : the HDD space you can record
the contents from AV input such as Set Top box, VCR,
Camcorder.
• Multimedia Disc Partition : HDD space you can copy AV
files and Photo files. such as ts, tp, avi, mpg, jpg, wma,
ogg and so on
2-2
Press ► button and select Next by
pressing Enter or OK button on the front
Key
NOTE
• Please do not format FAT32 partition into NTFS again
by computer. HMR will consider it as an new HDD if it is
connected again.
* It will not appear if there is no HDD or HDD is
not connected correctly.
READ ME FIRST
QUICK REFERENCE
Connection & Initial Setup
Step 4. Initial Set Up
READ ME FIRST
QUICK REFERENCE
Connection & Initial Setup
Step 5. File Copy - as an external HDD
After finishing HDD format, the following Initial Set
up OSD will appear.
1
Connect HMR to your computer with USB
cable (the shape of each ends is different
as A and B type)
2
After connection, turn the power on
3
Double click the icon 'My computer' in
your computer and you will see the newly
created drive.
4
You can copy the AV contents by computer
to HMR as an external HDD drive
* FAT 32 has the limit of single file size
less than 4GB. If you want to copy the
file of which size is Over the limit, please
copy it to the drive with NTFS partition or
please split the file to the limited size with
utility program (such as MPEGtoHDTV in
accessory CD)
5
Turn power off after finishing the
connection with computer and Turn on
again after connecting with TV
* This unit can also copy the AV files as a Host.
Please refer to the User's Manual File Copy Section.
4-1
Select your language by pressing ▲,▼
buttons and Enter to execute it.
4-2
Set the current date and time by pressing
Number button and ▲,▼ button and
press Enter to execute it
- If you select DHCP IP (Auto), The IP address
will be set according to DHCP in your network
NOTE
• Drive name can be different depending on each computer
• Please connect HMR to USB 2.0 port in order to get the
high speed (Upto 480Mbps) file transfer. HMR shall work
only USB 1.1 speed if it is connected to USB 1.1 port in
your computer
- Select Cancel if you do not have network
available or you do not want to set it up now.
- If you select Fix IP (Manual), Set the LAN
manually according to your network by
pressing Numbers or ▲,▼ button and press
Enter to execute it.
Step 6. Recording - from Set Top Box (Terrestrial or Satellite or Cable )
1
Connect EURO SCART IN/OUT in this unit
and EURO SCART Out in Set Top Box
while this Unit is connecting to TV
1
Connect Audio Video In of this unit and
Audio Video Out of Set Top Box while
this Unit is connecting to TV
WHITE
RED
YELLOW
4-3
4-4
Select OK and press Enter when you are
asked again. Select Cancel and press Enter
if you want to cancel the setting.
Please make sure if the LAN cable
is correctly connected first. It is
recommended to set the network after
connecting LAN cable to this unit.
Select DHCP IP (Auto) or Fix IP (Manual)
according to your IP status by pressing
▲,▼ button and press Enter to execute it
4-5
AV device
Select OK and press Enter when you are
asked again. Select Cancel and press
Enter if you want to cancel the setting.
<Euro Scart Verion>
READ ME FIRST
QUICK REFERENCE
Connection & Initial Setup
<Standard Version>
READ ME FIRST
QUICK REFERENCE
Connection & Initial Setup
Step 7. Basic Playback
2
Turn power on your Set Top Box and
select the TV channel you want to record
with the remote control of Set Top Box.
3
Press Guide button on Remote Control or
on front key
4
Select Video In by pressing ◄,► button
and press Enter button on Remote
Control or OK button on Front Key
6
Go to Scart input status
AV file Playback
7
You can watch the TV channel of Set Top
Box.
1
Press Guide button on Remote Control or
on Front key
8
Press REC button to start your recording.
2
Select Brower by pressing ◄,► button
and press Enter button on Remote
Control or OK button on Front Key
6
Select your required file by pressing ◄,►
button and press Enter button to playback
in full screen
Recorded Title Playback
5
Press Source button to choose the A/V
source you want to record.
Every time this button is pressed, the A/V
source is changed :
9
10
Press PAUSE button if you want to stop
the recording for a short while.
Press REC button to continue recording.
3
Select a type of AV file you want to play
back from Music, Movies and Photo by
pressing ◄,► button Selected type will
be enlarged. Only selected type of AV files
will be shown on the TV screen.
You can change it only in root directory
so that please go to the root directory first
if you want to change it by pressing ▲,▼
button.
4
Select the device where the required files
are located from USB, HDD and NET by
pressing ▲,▼ button.
Press the Enter button on your remote
control or OK button on front key.
11 recording.
Press STOP button to stop your
* You can also record from other AV device such as
VCR, Digital Camcorder.
<Euro Scart Verion>
You can also connect AV device and this unit with
other Input sockets.
Please refer to the User's Manual Connection
section or Recording section.
5
<Standard Version>
Select the directory where the required
files are located in the directory list by
pressing ▲,▼ button.
Press the Enter button on your remote
control or OK button on front key.
1
Press Guide button on Remote Control or
on Front key
2
Select REC List by pressing ◄,► button
and press Enter button on Remote
Control or OK button on Front Key
3
Select the title in Recorded title list by
pressing ▲,▼ button and press Enter
button to make it play back in full screen.
* This unit has the easy edit function also. Please
refer to the User's manual Editing section.
P/N : 63020013900